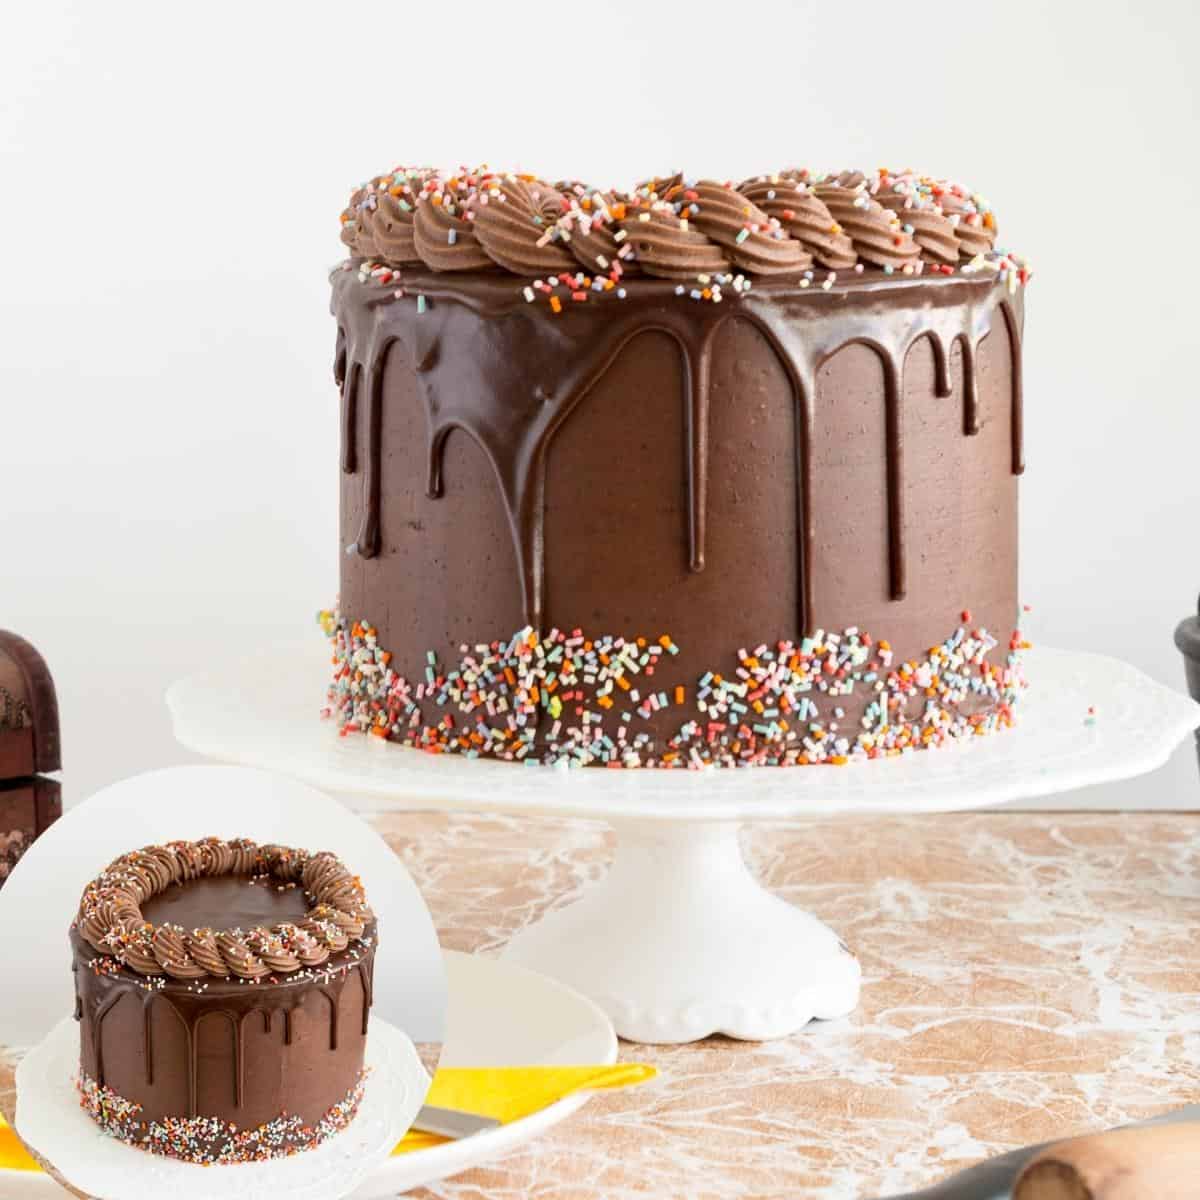
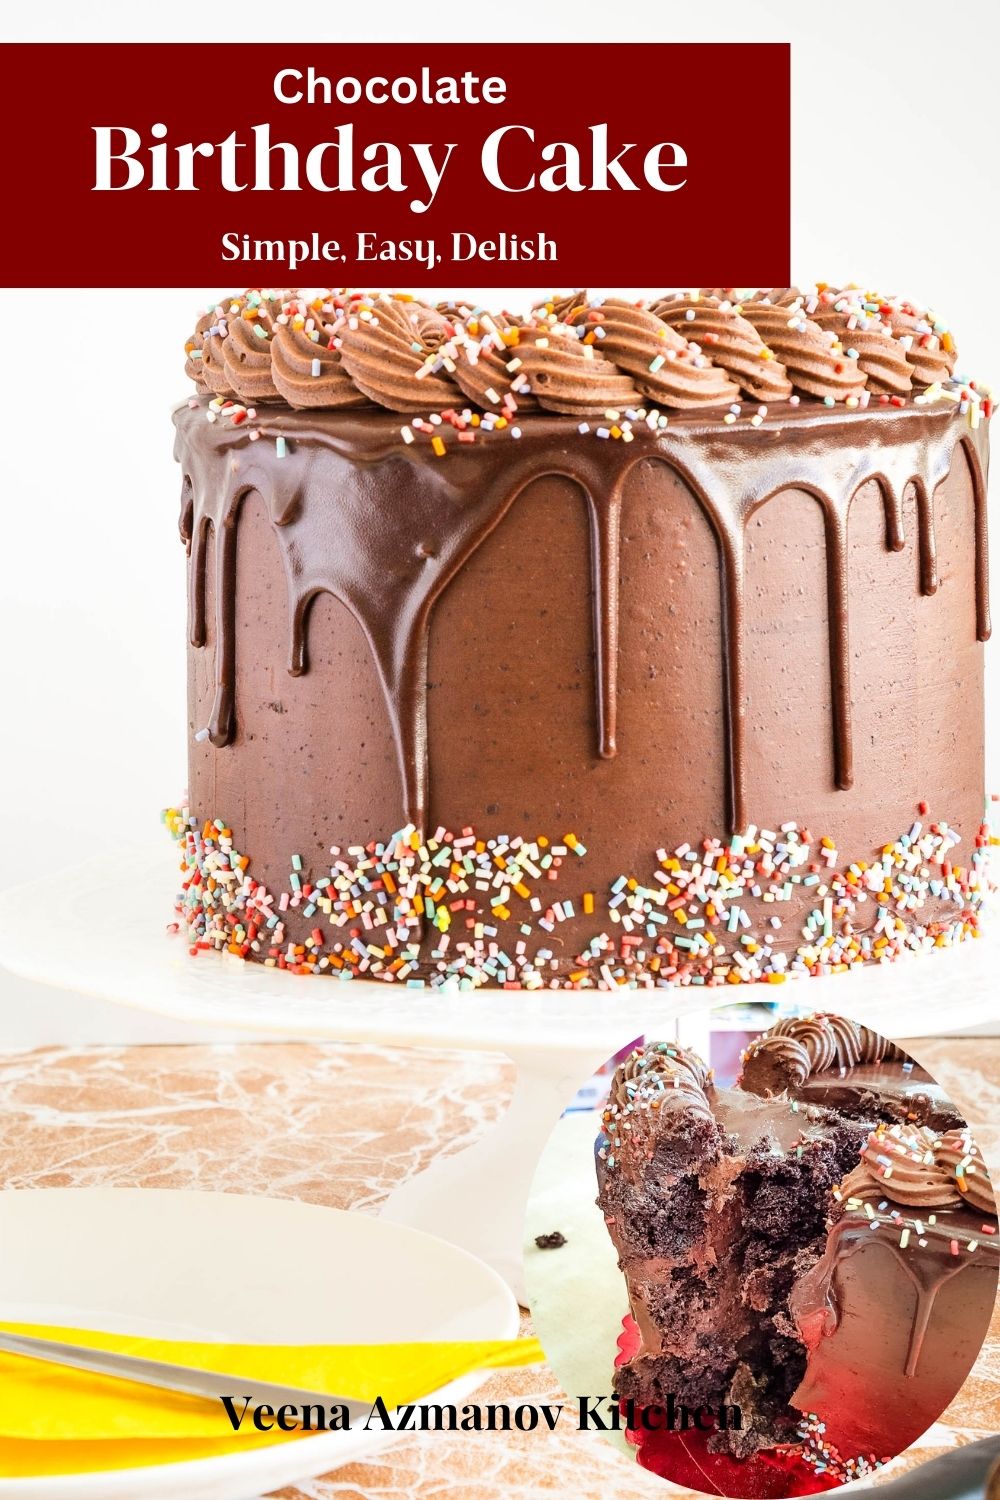
Rich, Moist Chocolate Birthday Cake
 Prep Time 30 minutes Cook Time 35 minutes Total Time 1 hour 45 minutes
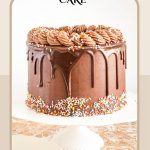

Create memories with this rich and moist chocolate birthday cake! Soft, chocolaty layers are smothered in decadent chocolate frosting for a dessert that’s pure indulgence. You can keep it simple with one easy chocolate frosting or take it up a notch with a glossy ganache finish. Follow our tips for perfect results every time and make your special day even sweeter.
There’s something truly special about baking your own birthday cake—a celebration of your craft and love for baking. Every baker needs at least one trusted vanilla or chocolate cake recipe, the kind that’s perfect for every birthday celebration.
Having run a successful cake business for many years, I’ve learned that despite the endless variety of wonderful cake recipes on my blog, the humble vanilla birthday cake and this rich chocolate birthday cake remain the most requested by clients and loved by all.
These timeless classics never go out of style, serving as a canvas for creativity or standing alone in their simple, delicious glory. Whether you’re celebrating yourself or someone you love, these dependable recipes are the heart of a memorable birthday celebration.
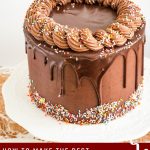
Why is this the best chocolate cake recipe?
- Stays Moist for Days – This oil-based cake with buttermilk has a soft, tender crumb that doesn’t dry out after one day. It slices beautifully and stays fresh.
- Deep, Rich Chocolate Flavor – Bloomed cocoa gives it a bold chocolate taste without being overly sweet.
- Easy or Bakery-Style — You Choose – Use one chocolate frosting for a simple birthday cake, or add the ganache finish for a polished celebration look. Both options work perfectly.

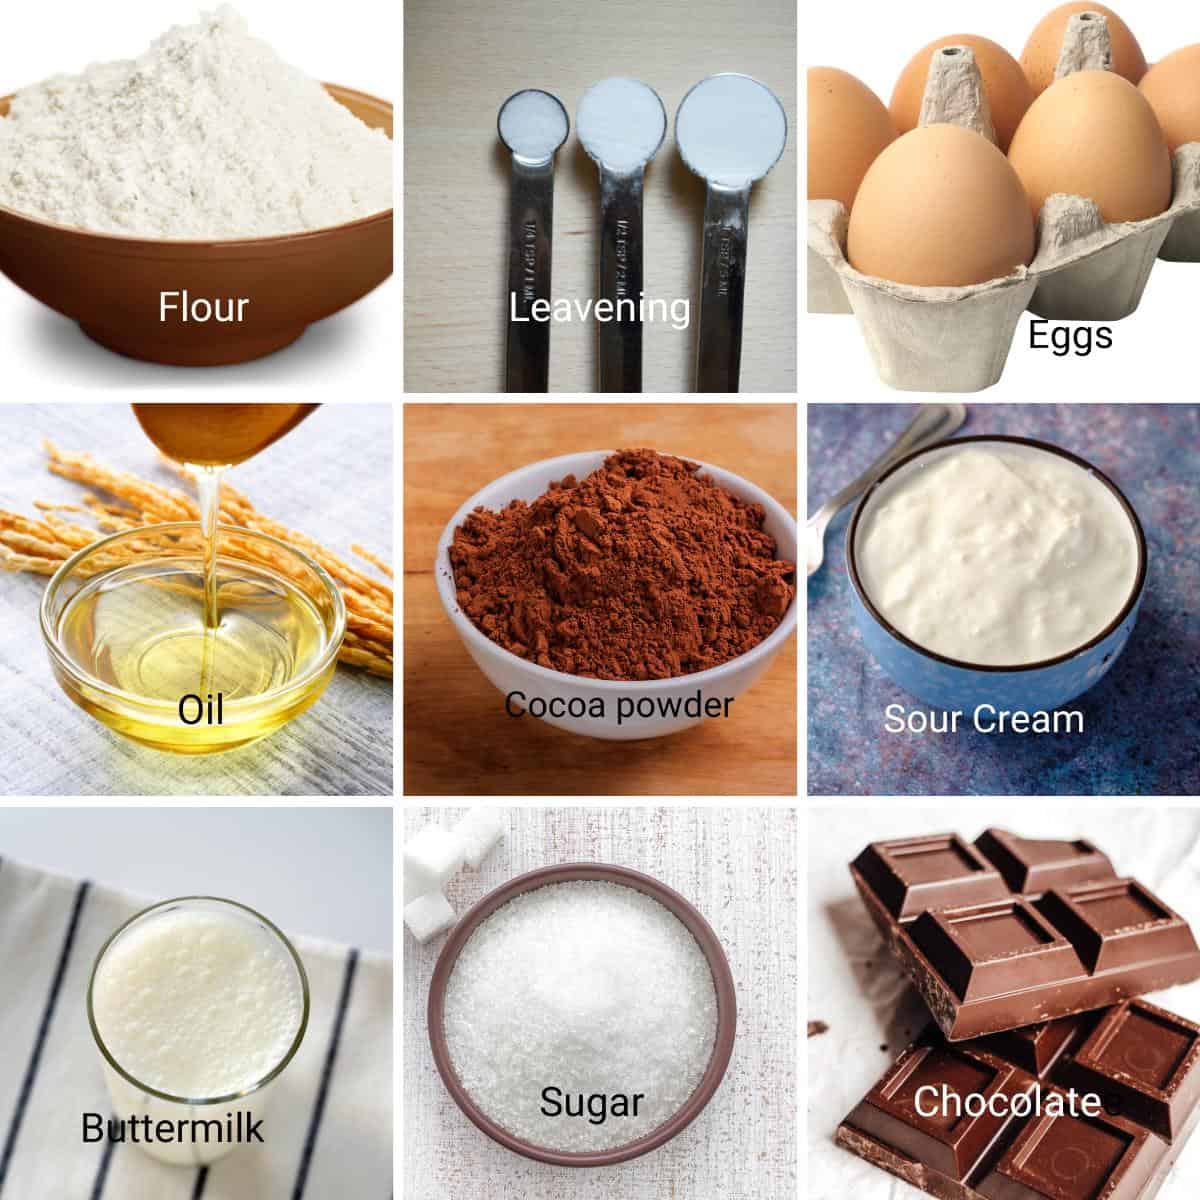
Ingredients for this chocolate birthday cake
- All-purpose flour – When it comes to chocolate cake, I prefer plain all-purpose flour. (read more here). Do not use any self-raising flour as those contain more leavening.
- Cocoa powder – I always use unsweetened Dutch-processed cocoa powder. You can find this in the regular baking aisle. You can also add espresso powder for added flavor.
- Sugars – We are using both white granulated sugar and light brown sugar in this cake. The brown adds that soft texture, while the white gives us a nice, crisp crust.
- Oil – Any cooking oil will work as long as it has no flavor. That way it won’t affect the flavor of the cakes.
- Sour cream – I use homemade sour cream made with 32% fat but store-bought works just as well.
Buttermilk – You can make buttermilk at homemade buttermilk in 5 minutes so there is no need to substitute this. - Vanilla – You can use vanilla extract, bean paste, or sugar.
Step-by-step – BEST Chocolate Birthday cake
Cake Batter
- Oven – Preheat the oven to 325℉/ 165℃ or Gas Mark 3. Grease and line 3 x 8-inch round cake pans (looks tall and proud🤪) or 2 x 9-inch round cake pans (looks big and beautiful) with parchment paper or dust with cocoa powder.

- Dry ingredients – In a large bowl, sift or combine together the flour, baking powder, baking soda, and salt. Set aside
- Cocoa paste – In a medium bowl, combine the hot water with cocoa powder and coffee. Set aside to cool.
Pro tip – Adding hot water to the cocoa powder will deepen the chocolate brown color of the baked cake.
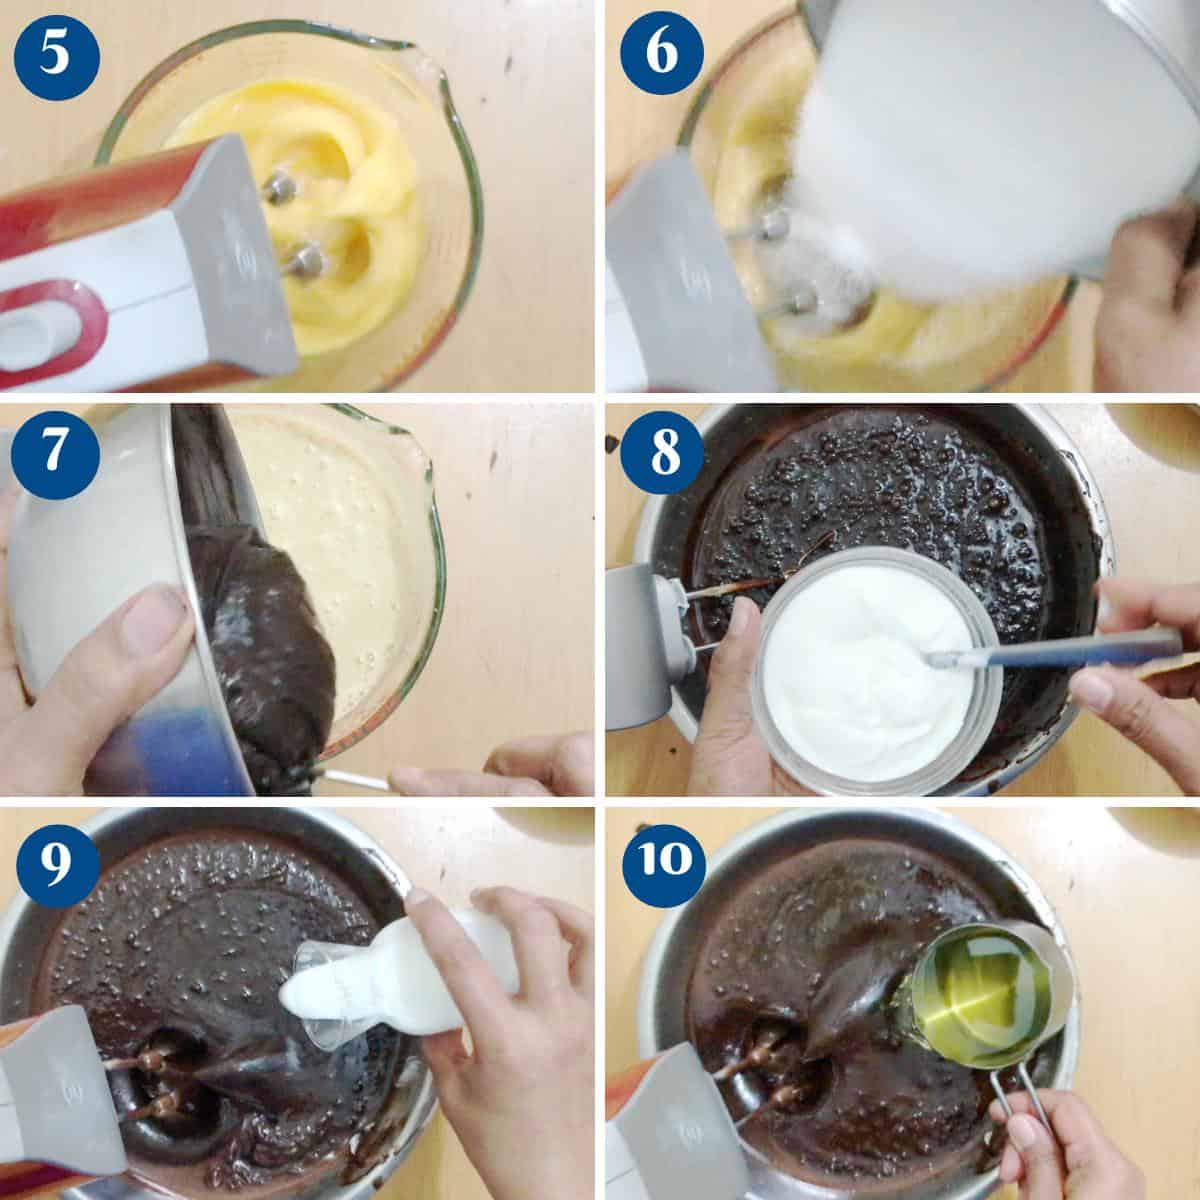
- Wet ingredients – Whip the eggs with both white and brown sugar until light and foamy. Next, add the cocoa paste to the whipped egg mixture, followed by the sour cream, buttermilk, and vanilla extract. Then, gradually add the oil, and do not overmix.
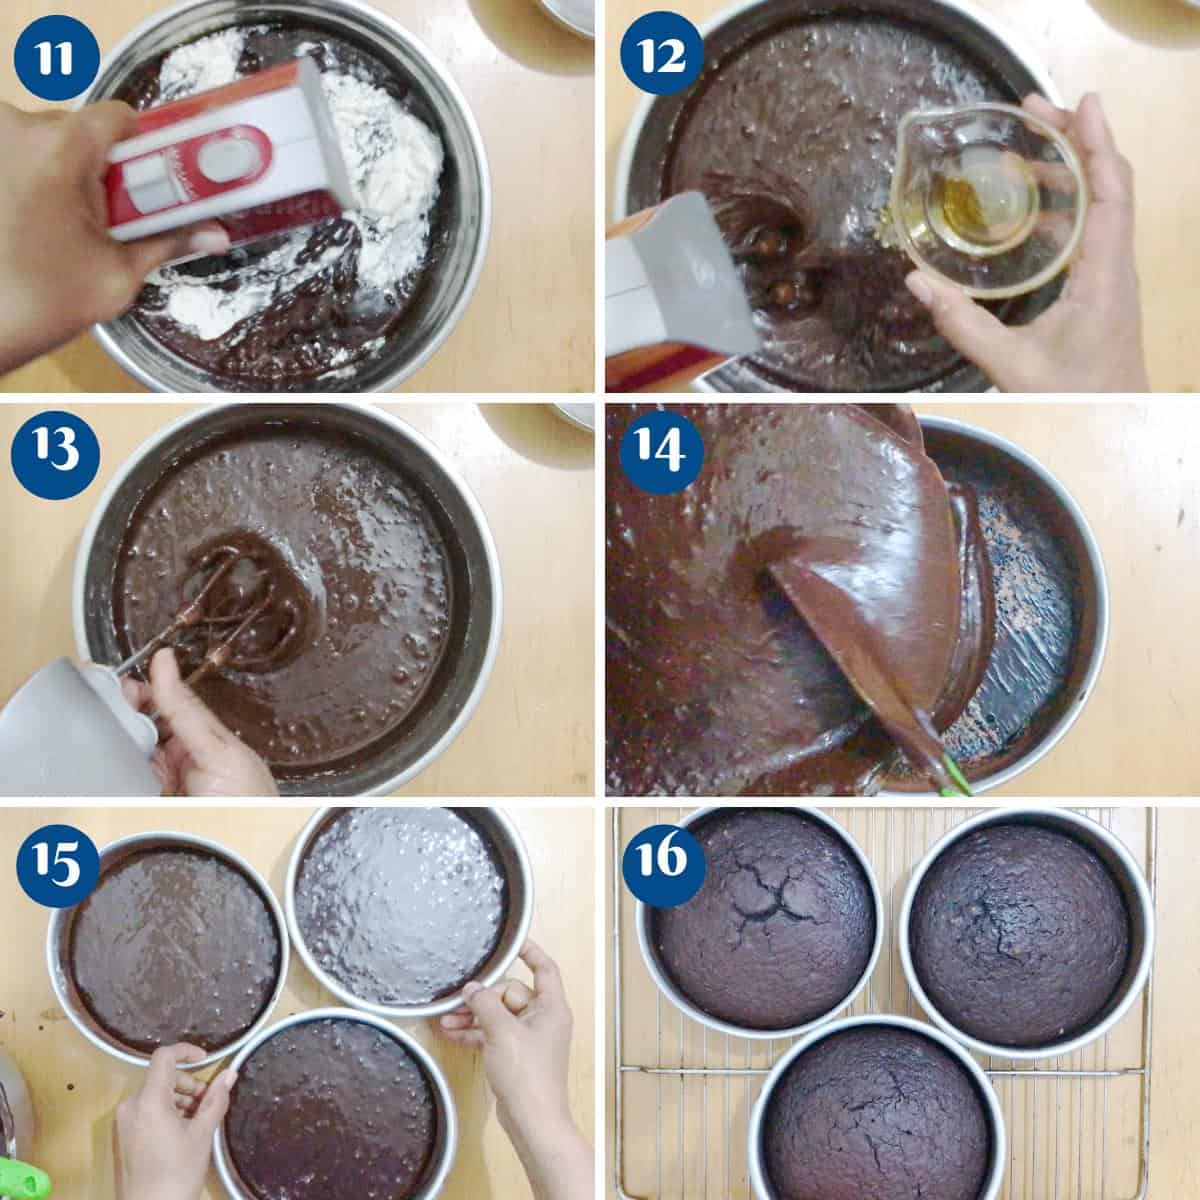
- Wet to dry – Add the flour mixture to the wet ingredients and combine well. But, do not overmix.
- Pans – Divide the batter equally between the prepared cake pans.
- Bake – transfer the pans to preheated oven on the center rack. Bake for about 30 to 35 minutes until a toothpick inserted in the center comes out clean.
- Cool – When baked, cool in the pan for 10 minutes then invert on a cooling rack and cool completely before baking.
Chocolate buttercream frosting for the filling
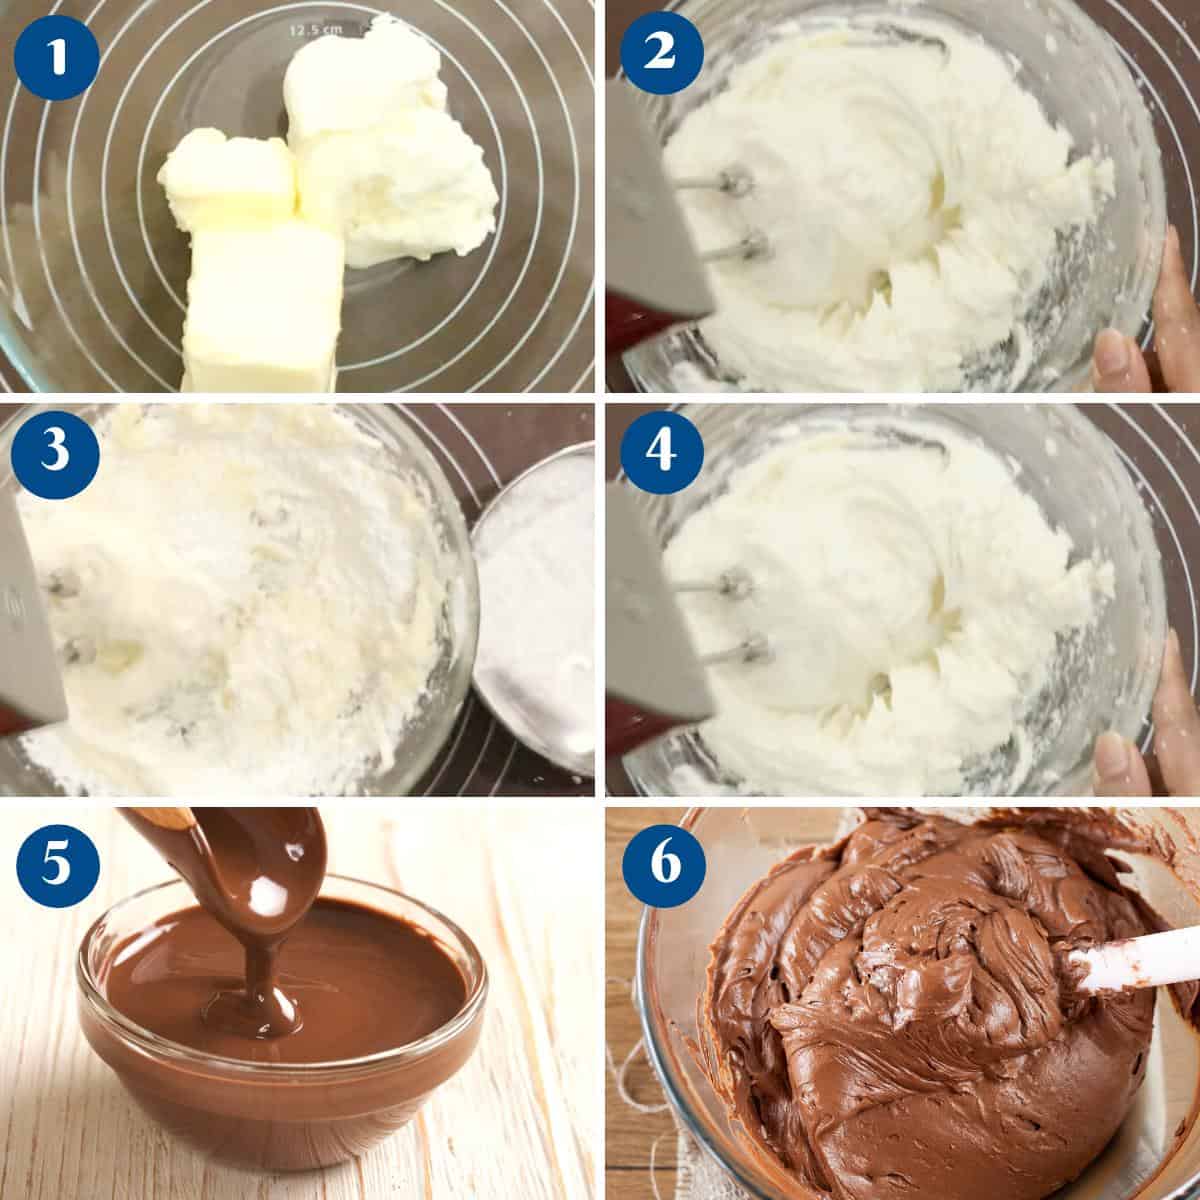
- Chocolate – In the microwave-safe bowl or double boiler melt the chocolate – set aside to cool until barely warm.
- Cream – In the bowl of a stand mixer with the paddle attachment, cream the butter for a minute. Add salt, whipping cream, and vanilla extract – continue to whip for a minute more.
- Sugar – Next, add the powdered sugar (confectioner’s sugar) one cup at a time. Once all the powdered sugar has been incorporated, turn the mixer to medium-high. Mix for 2 to 3 minutes until you have a light and fluffy buttercream that resembles a whipped cream consistency.
- Chocolate buttercream – Now, add the melted and cooled chocolate. Make sure to scrape the bottom and sides to ensure you have a smooth chocolate buttercream with no white streaks.

Chocolate Ganache for the frosting (optional)
- Microwave – In a microwave-safe bowl, add the chopped chocolate and heavy cream. Melt for a minute or two until smooth. Next, add the butter and vanilla extract. Combine well.
Stovetop – Place the cream in a saucepan and bring it to an almost boil. Then, pour the heavy cream over the chopped chocolate into a large bowl. Combine until smooth. Next, add the butter and vanilla extract. Combine well. - Rest – Cover with ganache with plastic wrap making sure to cover the surface of the chocolate to prevent any skin from forming. Leave to set in the fridge for 2 to 3 hours or on the counter for 4 to 6 hours until it’s about peanut butter consistency.
Assemble
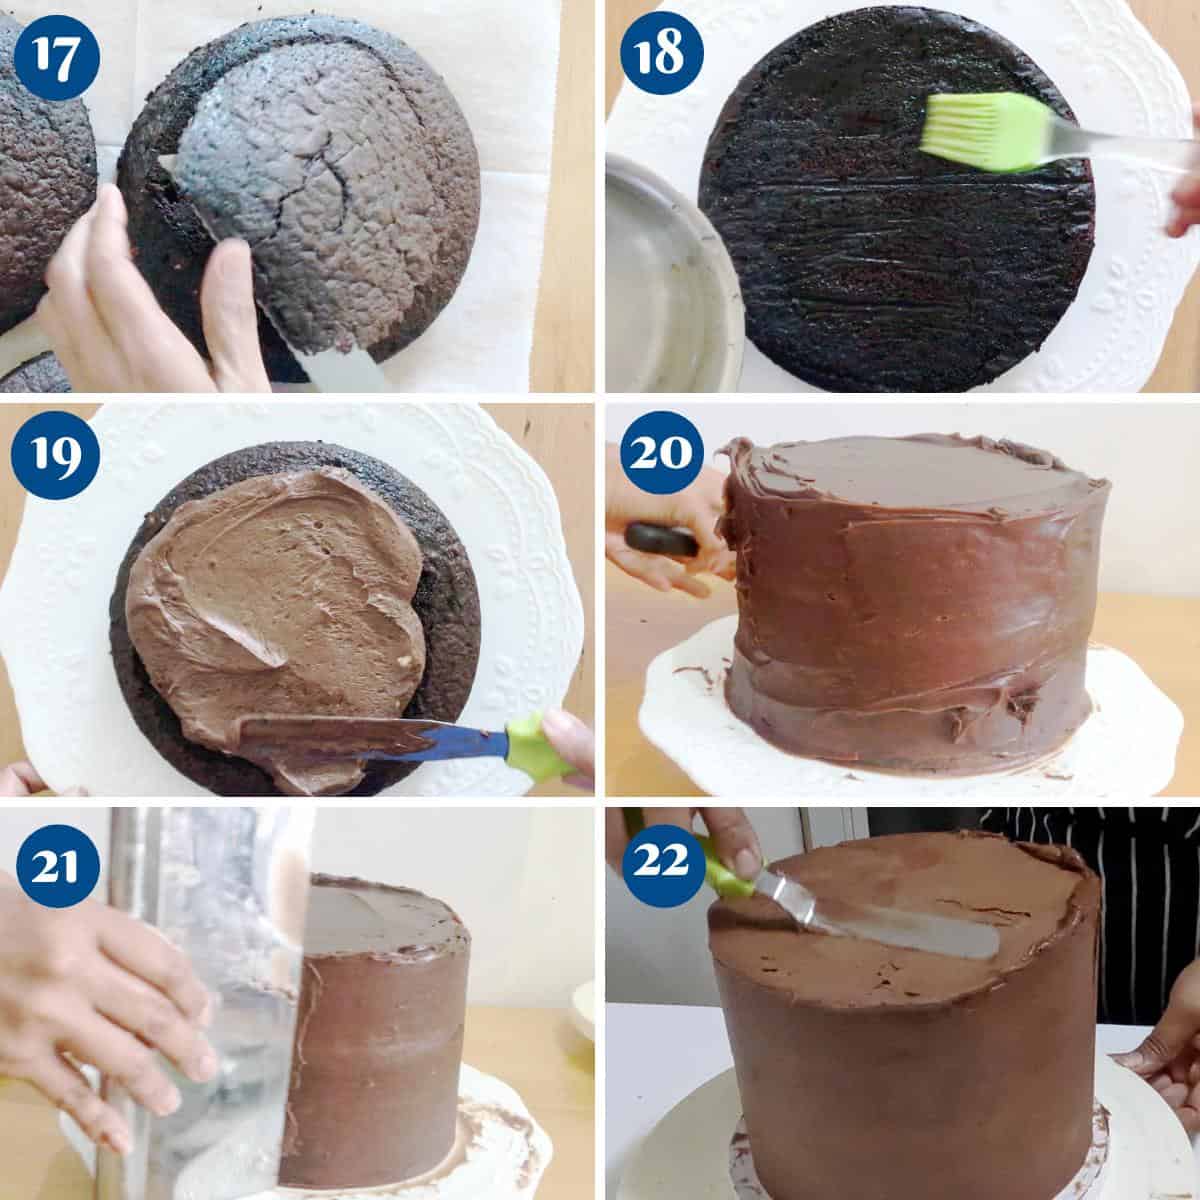
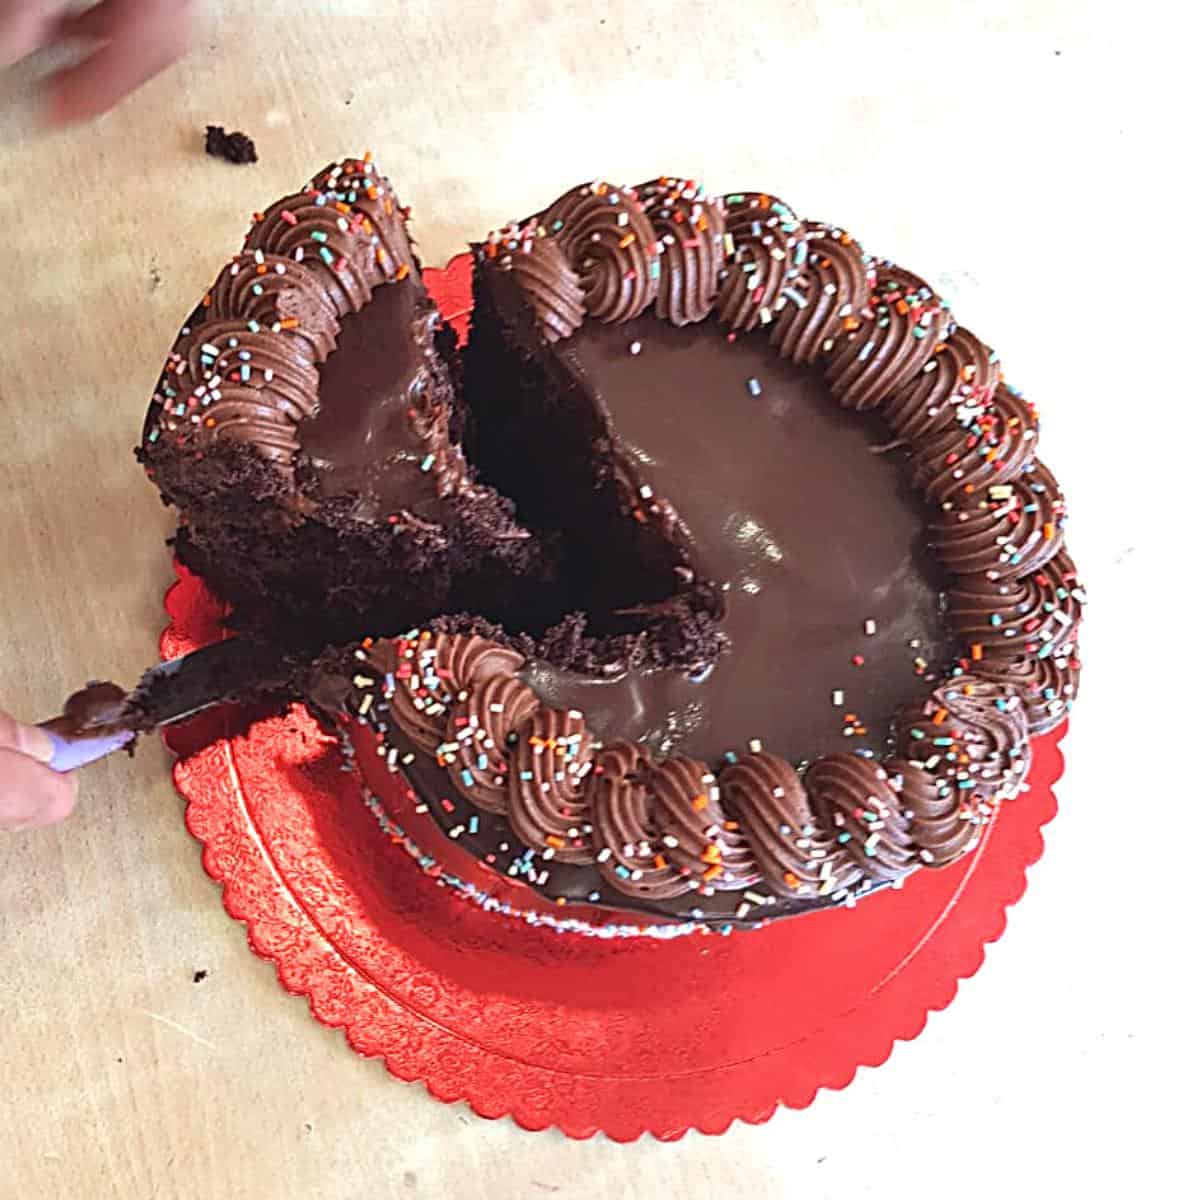
- Level – Once cooled, cut the domes off the cake layers with a serrated bread knife or cake leveler.
- Stack – Place a cake layer on the cake board or cake stand. Top with about a large dollop of buttercream and spread evenly using a spatula. Then, place the second layer followed by more buttercream and then the last layer.

- Chill – Transfer the stacked cake layers to the fridge and chill for 10 minutes so the buttercream holds the layers together.
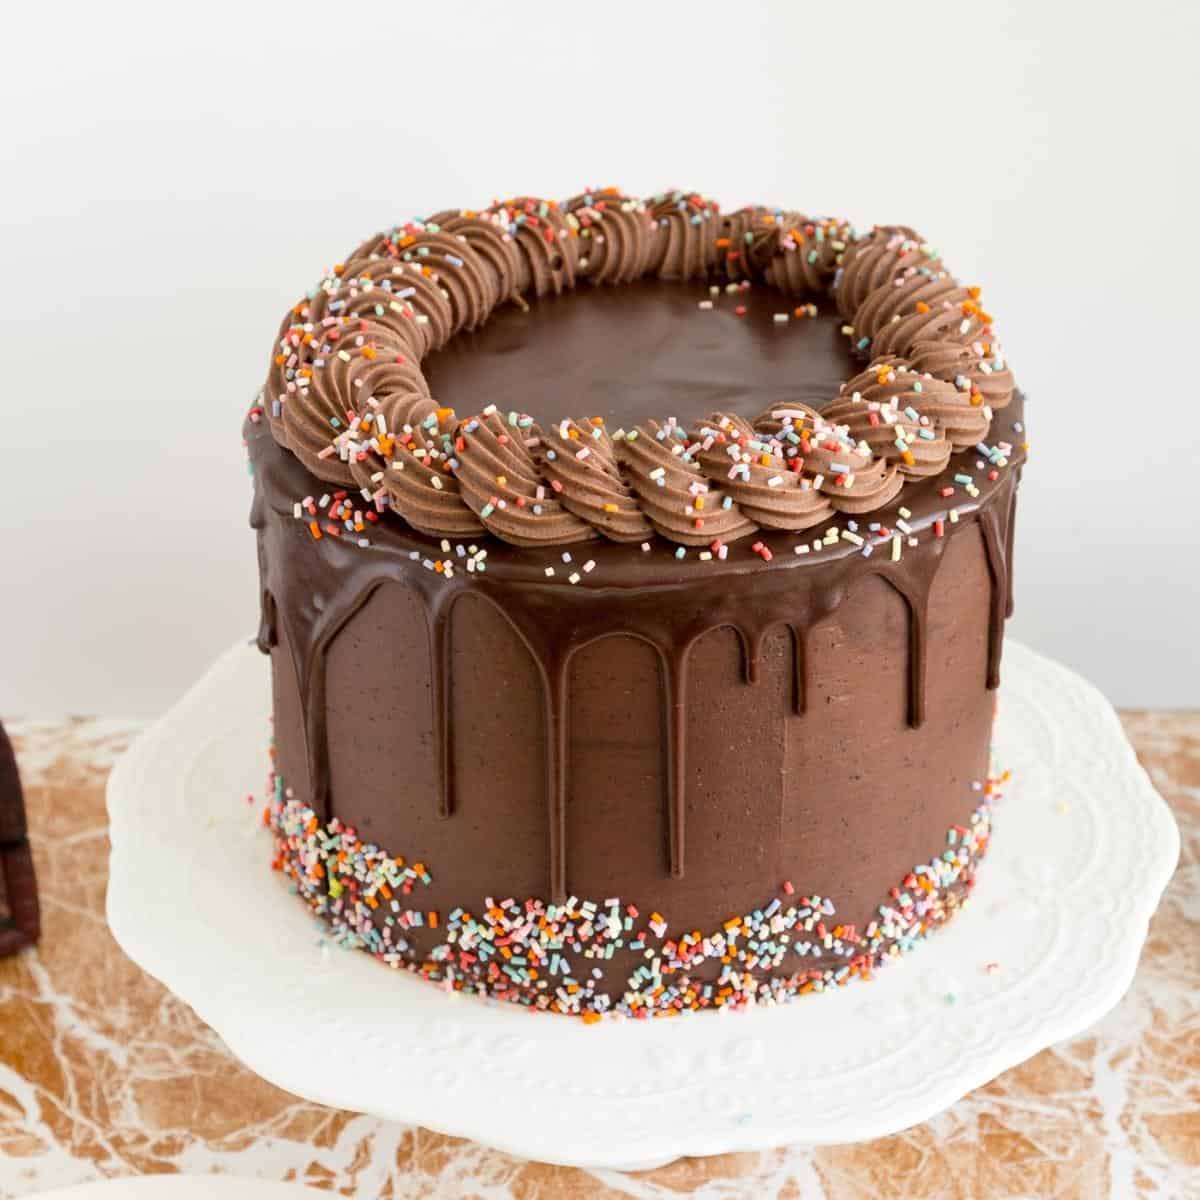
- Frost – Add a large heap of ganache on the top of the cake. Spread evenly with an offset spatula. Add more ganache on the sides with a straight-edge spatula. Then, use a bench scraper to smooth the sides. Place in the fridge while you make the drip.
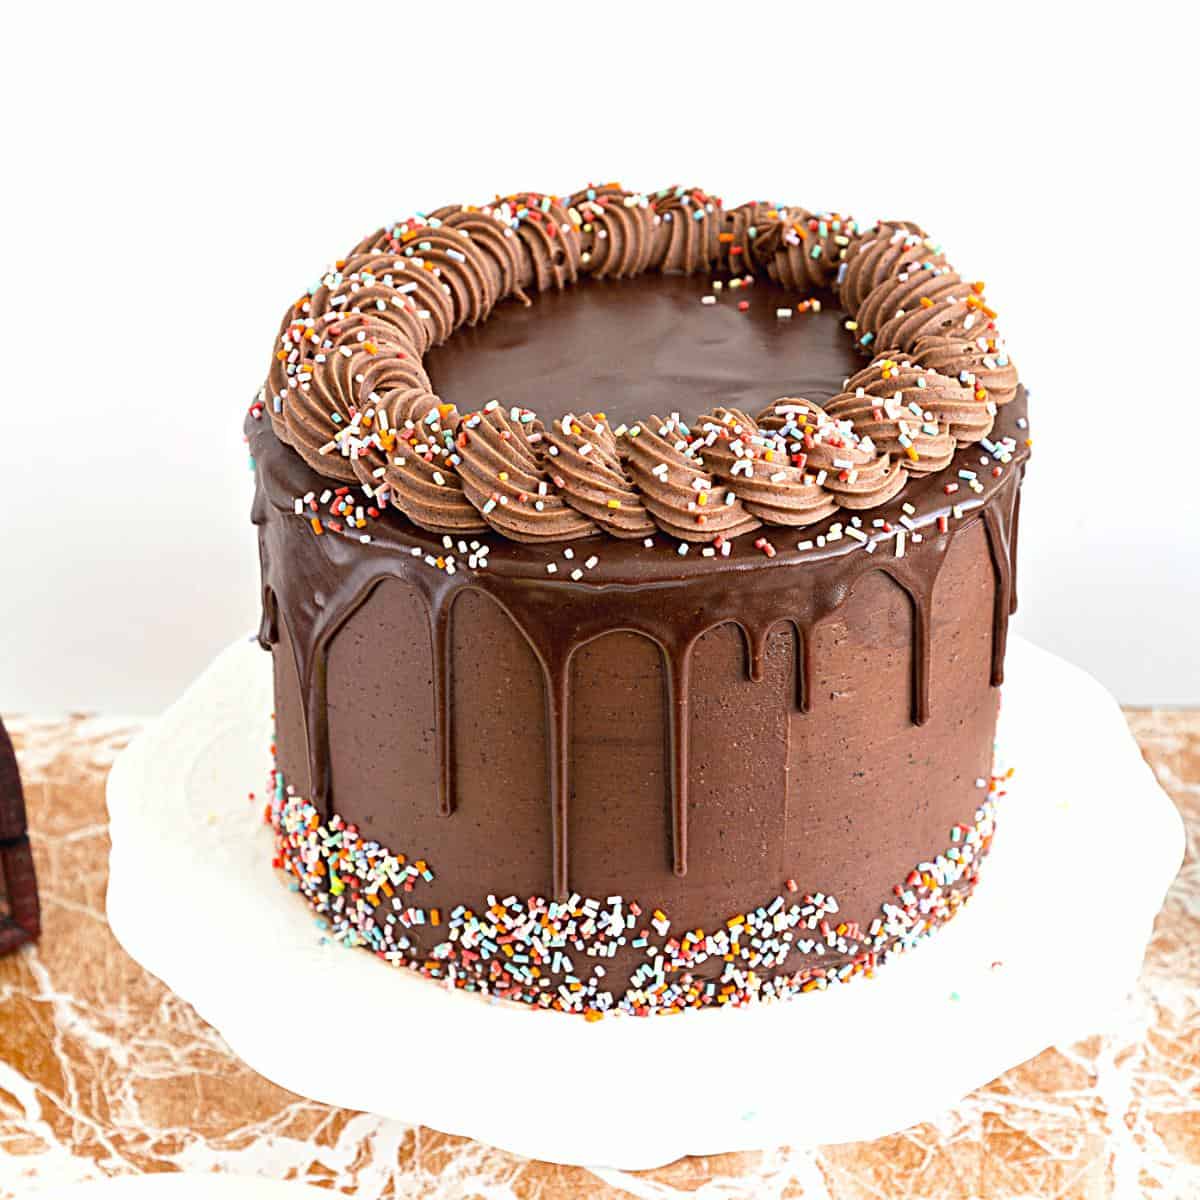
- Drip – Melt about a cup of the leftover ganache in the microwave for 10 seconds until runny and smooth. And let cool until barely warm. Then, place the melted ganache in a piping bag. Make a small hole to control the bag and pour the drip, guiding it as it falls onto the cake. Chill until set (at least 30 minutes or the next piping will slide).
- Pipe – Place the remaining chocolate buttercream in a piping bag with a large star piping tip. And pipe a border. I made circular swirls as shown in the video.
- Sprinkles – Decorate the top and bottom with sprinkles or similar as desired.
How do I Store this chocolate birthday cake
- Once decorated, the cake does not need to be refrigerated.
- It can stay at room temperature for 3 to 4 days or in the fridge for up to a week.
- Once cut, always cover the cut side of the cake with cling/plastic wrap so the cake does not dry out.
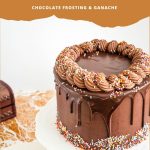
Chocolate Birthday Cake with Chocolate Frosting
Create memories with this rich and moist chocolate birthday cake! Soft, chocolaty layers are smothered in decadent frosting for a dessert that’s pure indulgence. Follow our tips for perfect results every time, making your special day even sweeter.
Video
Ingredients
- 340 g (2¾ cups) All-purpose flour
- 1 ½ tsp Baking powder
- 1 tsp Baking soda
- ½ tsp Salt
- 65 g (¾ cup) Cocoa Powder Dutch-processed
- 240 ml (1 cup) Hot water
- 3 large Eggs room temperature
- 200 g (1 cup) White sugar
- 220 g (1 cup) Light brown sugar
- 113 g (½ cup) Sour cream
- 120 g (½ cup) Buttermilk
- 180 ml (¾ cup) Vegetable oil
- 1 tbsp Vanilla Extract
- 1 tsp Coffee powder optional
- 226 g (1 cup) Soft Butter unsalted, room temperature
- 360 g (3 cups) Powdered sugar confectioners sugar
- 60 ml (4 tbsp) Heavy cream
- 100 g (4 oz) Chocolate dark, semi-sweet – chopped
- ½ tsp Kosher salt
- 1 tsp Vanilla extract
- 350 g (12 oz) Chocolate Semi-sweet or dark – chopped
- 180 ml (¾ cup) Heavy cream 32 – 38% fat
- 1 tbsp Butter room temperature
- 1 tsp Vanilla extract
- 120 ml (½ cup) Sugar syrup (optional by recommended)
- 80 g (½ cup) Sprinkles or similar for decorations
Method
- Oven – Preheat the oven to 325℉/ 165℃ or Gas Mark 3.Grease and line 3 x 8-inch round cake pans or 2 x 9-inch round cake pans with parchment paper and dust with cocoa powder
- Dry ingredients – In a large bowl sift or combine together the flour, baking powder, baking soda, and salt. Set aside340 g All-purpose flour, 1 ½ tsp Baking powder, 1 tsp Baking soda, ½ tsp Salt
- Cocoa paste – In a medium bowl combine the hot water with cocoa powder and coffee. Set aside to cool65 g Cocoa Powder, 240 ml Hot water
- Wet ingredients – Whip the eggs with both white and brown sugar until light and foamy. Next, add the cocoa paste to the whipped egg mixture, followed by the sour cream, buttermilk, and vanilla extract. Then, gradually add the oil, and do not overmix.3 large Eggs, 200 g White sugar, 113 g Sour cream, 120 g Buttermilk, 180 ml Vegetable oil, 1 tbsp Vanilla Extract, 1 tsp Coffee powder, 220 g Light brown sugar
- Wet to dry – Add the flour mixture to the wet ingredients and combine well. But do not overmix.
- Bake – Divide the batter equally between the prepared cake pans. Transfer the pans to preheated oven on the center rack. Bake for about 30 to 35 minutes until a toothpick inserted in the center comes out clean.
- Cool – When baked, cool in the pan for 10 minutes, then invert on a cooling rack and cool completely before baking.
- Melt chocolate – In the microwave-safe bowl or double boiler, melt the chocolate – set aside to cool.100 g Chocolate
- Cream – In the bowl of a stand mixer with the paddle attachment, cream the butter for a minute. Add salt, whipping cream, and vanilla extract, and continue whipping for 1 minute more.226 g Soft Butter, 60 ml Heavy cream, ½ tsp Kosher salt, 1 tsp Vanilla extract
- Sugar – Next, add the powdered sugar one cup at a time. Once all the powdered sugar has been incorporated, turn the mixer up to medium-high. Continue to mix for 2 to 3 minutes more until you have a light and fluffy buttercream that looks similar to a whipped cream consistency.360 g Powdered sugar
- Chocolate buttercream – Now, add the melted and cooled chocolate. Make sure to scrape the bottom and sides to ensure you have a smooth chocolate buttercream with no white streaks.
- Microwave – In a microwave-safe bowl add the chopped chocolate and heavy cream. Melt for a minute or two until smooth. Add the butter and vanilla extract. Combine well. Stovetop – Place the cream in a saucepan and bring it to an almost boil. Pour the heavy cream over the chopped chocolate into a large bowl. Combine until smooth. Add the butter and vanilla extract. Combine well.350 g Chocolate, 180 ml Heavy cream, 1 tbsp Butter, 1 tsp Vanilla extract
- Rest – Cover with ganache with plastic wrap making sure to cover the surface of the chocolate to prevent any skin from forming. Leave to set in the fridge for 2 to 3 hours or on the counter for 4 to 6 hours until it’s about peanut butter consistency.
- Level – Once cooled, cut the domes off the cake layers with a serrated bread knife or cake leveler. Brush each layer with simple syrup on both sides.120 ml Sugar syrup
- Stack – Place a cake layer on the cake board or cake stand. Top with about a large dollop of buttercream and spread evenly using a spatula. Place the second layer followed by more buttercream and then the last layer.
- Chill – Transfer the stacked cake layers to the fridge and chill for 10 minutes so the buttercream holds the layers together.
- Frost – Add a large heap of ganache to the cake. Spread evenly with an offset spatula. Add more ganache on the sides with a straight-edge spatula. Use a bench scraper to smooth the sides. Place in the fridge while you make the drip.
- Drip – Melt about a cup of the leftover ganache in the microwave for 10 seconds until runny and smooth. Let cool until barely warm. Place the melted ganache in a piping bag. Make a small hole so you can control the bag, and gently pour the drip, guiding it as it falls. Chill until set (30 minutes at least or the piping will move)
- Pipe – Place the remaining chocolate buttercream in a piping bag with a large star piping tip. Pipe a border. I made circular swirls as shown in the video.
- Sprinkles – Decorate the top and bottom with sprinkles or similar as desired.80 g Sprinkles
Notes
- Make sure to use room-temperature ingredients.
- Dusting the pans with cocoa powder instead of flour gives a darker rather than white crumb.
- You can measure the batter using a weighing scale to ensure you have even layers. I like to weigh the empty pans first, then ensure they are the same weight as the batter.
- You can also frost this cake with only one frosting. Double the buttercream recipe and continue to frost with buttercream instead of ganache, following the same process.
- You must let the drip cool to a pouring consistency. A hot drip will melt the frosting on the cake
- You can bake this into a 9 x 14 sheet pan – a ‘ Chocolate Sheet Cake’.
- You can also pour the batter into a well-greased and dusted 12-cup bundt pan for a ‘Chocolate Bundt Cake’.
- This recipe can also be baked into 24 beautiful homemade chocolate cupcakes
Equipment you will need


Nutrition
Tried this recipe?
Mention @veenaazmanov_kitchen or tag #veenaazmanovkitchen!Tips for making this birthday cake
- Make sure to use room-temperature ingredients.
- Dusting the pans with cocoa powder instead of flour gives a darker rather than white crumb.
- You can measure the batter using a weighing scale to ensure you have even layers. I like to weigh the empty pans first, then ensure they are the same weight as the batter.
- You can also frost this cake with only one frosting. Double the buttercream recipe and continue to frost with buttercream instead of ganache, following the same process.
- You must let the drip cool to a pouring consistency. A hot drip will melt the frosting on the cake.
more chocolate cake recipes


Frequently asked questions
If properly stored, a chocolate cake will last for 3 to 4 days at room temperature. It can also be kept in the fridge for up to a week.
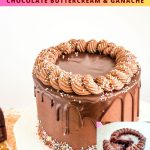
A rich, moist chocolate birthday cake with soft layers that stack beautifully and stay fresh for days. Frost it simply or finish with ganache for a celebration-ready showstopper.
Yes. Simply melt 1/2 cup of chocolate, then add 1 tablespoon of oil, and let it cool to a nice, thick pour. Pour over your cake, then gently direct the drip with a spatula.
Freeze the cake on a tray for an hour or two, then wrap it well in plastic wrap, followed by a sheet of parchment paper and aluminum foil. The foil prevents the smell of other foods in the fridge and into the cak.
Thaw wrapped in the fridge for 24 hours so the condensation will stay on the papers, not the cake.
No, this recipe works best with eggs. Perhaps try my tried and tested eggless chocolate cake or eggless chocolate Fudge cake recipes which are both very popular with my visitors on this blog.
You could replace the all-purpose flour with gluten-free flour and the dairy with coconut, oat milk, or almond milk. You can try my gluten-free chocolate cake.
You know my love for frosting by the variety I have for you on this blog. In fact, there are so many other choices for frosting. Such as:
Swiss or Italian Meringue Buttercream
French or German Buttercream Frosting
Chocolate Buttercream Frosting, Vanilla Buttercream Frosting.
I have over 30 plus frosting recipes on this blog. And I highly recommend checking them out.
more cake recipes
- One Bowl Vanilla Cake (naked cake)
- Tres Leches Cake
- Mini Bundt Cakes
- Checkerboard Cake
- Funfetti Cake Recipe
- Tropical Pina Colada Cake

Don’t lose this recipe! Save it for Later!
📌 Save this Recipe for later on Pinterest so you can easily find it again.
⭐ Add Veena Azmanov Kitchen to your Google Preferred Sources.
It helps Google show you more of our recipes.
📧 Subscribe for new recipes delivered to your inbox.
🎥 Follow us for more recipes


This cake sound & looks amazing. I have one question; is the frosting very sweet? And if so can I lessen the sugar amount without affecting it? Traditional frosting recipes are usually too sweet my family. Thanks so much!
week 2 day 2 done LOVED this cake
hi Veena would this chocolate cake be firm enough to support fondant icing.
Absolutely val – I’ve used it with fondant and ganache many times
hi Veena, I’ve now made the chocolate cake twice for kids birthdays using fondant which had turned out great and all cake was eaten with not a crumb left. another cake for my daughters 40th birthday next month to come. many thanks for all your great recipes.
Thank you so much Val.
Hi
Thanks for the chocolate birthday cake recipe that I would love to try, but when doubling the recipe for a bigger cake it does not change the tin sizes or the baking time. Could you help me on that please.
Thank you
Hey Linda, yes, the recipe card does not change the tin size or baking time. Because these are different for every recipe and cannot be standardized.
If you double this recipe you should be able to make 3 x 10-inch round or 4 x 9-inches round cakes. The baking times will be approximately 55 to 65 minutes or until a skewer inserted in the center comes out clean.
Hi Veena
Can I substitute sugar with jaggery powder in any of your cakes?
I have never used jaggery in these cakes so I am not so sure how it will turn out.
Week 2 Day 5 Done.
This was truly the best chocolate cake I’ve ever tasted or made. Thanks for sharing your recipe!
Happy you enjoyed this cake Casey. Thank you for the lovely feedback.
Hi Veena ,
After mixing the wet and dry ingredients , some recipes say we should add boiling coffee some say add the cooled liquid ( the liquid could be cocoa powder ,water and coffee ) .
Just wanted to know whether it should be hot or cool . If hot what is the science behind it .
Thank you
Sona, adding cocoa to hot water will give the cake a richer deeper color but we need to cool it to room temperature to add it to the batter. That way it does not melt the butter or curdle the eggs in the batter. Hope this makes sense.
Hi
What can i substitute sour cream with?
Also how much sugar can i reduce withoutit affecting the texture?
Karuna. You can use yogurt instead of sour cream. And, you can use 350 grams of sugar instead of 400 grams.