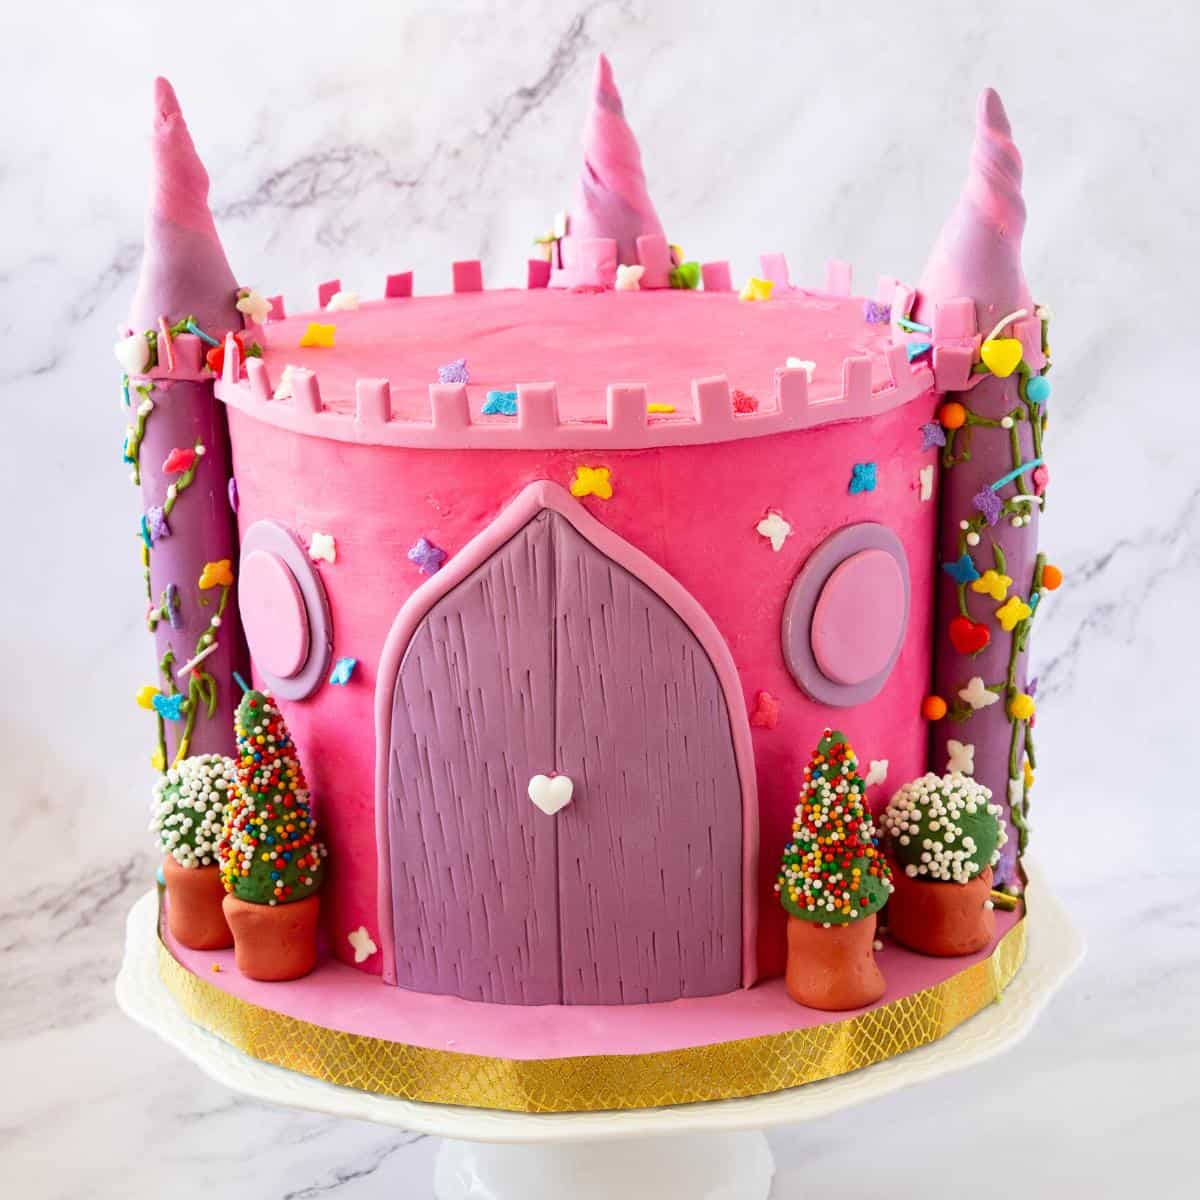
Castle Cake Tutorial
 Prep Time 10 minutes Cook Time 1 hour 30 minutes Total Time 2 hours 40 minutes
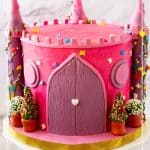
Prepare to be transported to a world of enchantment, where the alchemy of cake baking and decorating unveils the ultimate fairytale dream: the castle cake. Imagine a confectionery masterpiece that towers with grace and delicacy, capturing the essence of a medieval fortress, while tempting your taste buds with its delectable flavors. The castle cake is more than just a dessert; it is a spectacle, a centerpiece that mesmerizes and delights.
But how does one create such a magical creation? Well, it can be as simple or as elaborate as you want it to be. We start by choosing the right cake and frosting. You will learn to wield the spatula like a magician, conjuring intricate designs and enchanting textures. We will also add fairytale touches that will transport your castle cake to a realm of wonder. And we’ll teach you how to adorn it with edible decorations fit for a king or queen.
In a world where dreams come true through the power of baking, we have unlocked the secrets to creating the ultimate fairytale castle cake. From selecting the perfect cake recipe and constructing the castle structure to mastering frosting techniques and adding enchanting touches. We have revealed the key to transforming batter and frosting into a whimsical dream.
Choosing the perfect cake recipe
- When selecting a cake recipe for your castle cake, it’s important to consider the flavor preferences and dietary restrictions of your intended audience. If it’s a children’s party, a classic vanilla cake might be a safe bet, as it appeals to a wide range of tastes. However, if you’re catering to a more adventurous crowd, you could explore options like chocolate, red velvet, or even citrus flavors for a refreshing twist.
- Another factor to keep in mind is the level of difficulty you’re comfortable with. If you’re new to baking or short on time, opt for a straightforward one bowl recipe with simple instructions. On the other hand, if you’re an experienced baker looking to challenge yourself, you might want to try a recipe with more intricate techniques or unusual ingredients.
- Additionally, consider the size and shape of the cake pans you have available. Most cake recipes are designed for standard-sized round or square pans. So, if you’re planning on creating a multi-tiered castle cake, you’ll need to adjust the recipe accordingly or find specialized pans in the shape you desire. Also, keep in mind that larger cakes may require longer baking times. So be sure to allocate enough time for the cake to bake and cool before moving on to the decorating stage.
- Lastly, don’t forget to take into account any dietary restrictions or allergies your guests may have. If you’re aware of specific dietary needs, such as gluten-free or dairy-free, look for recipes that cater to those requirements. There are plenty of delicious and inclusive options available, ensuring that everyone can enjoy a slice of the fairytale magic.
The structure of a castle cake
- Use a pen and paper to draw your imaginary castle. Decide the number of tiers and number of layers in each tier. Then, carefully plan where you are going to place the towers, turrets, doors, windows, and rest of the details.
- Today, I am using a single tier cake for my castle. But if you plan to make more than a single tier you’ll need sturdy materials such as dowels, cardboard, or even plastic straws to support and stabilize your cake’s different tiers. These will serve as the pillars on which your fairytale dream will come to life.
- You may also need to decide the type of frosting you want to you for your structure. For example, a ganache will add more stability to the cake as compared to a cream cheese frosting. Also, a castle cake may need long decorating hours. So a stable frosting is better than having to put the cake into the fridge ever so often. Similarly, if you plan to make a tall castle cake with more tiers, fridge space might need to be taken into consideration.

Decorating with magic: Frosting techniques
- One popular technique is buttercream, which allows you to create delicate details that will add a touch of elegance to your castle cake. Using a piping bag fitted with a small round tip, you can create anything even beautiful roses, daisies, or any other flower you desire. Experiment with different colors to make your castle truly unique. And if you do not like to work with buttercream, you may want to consider using royal icing to create intricate accents on your castle cake. Royal icing can be piped or flooded onto the surface of the cake to create anything from borders to lace-like designs, intricate borders, or even delicate filigree patterns.
- And if you’re feeling adventurous, you can also experiment with fondant decorations. Fondant is a smooth, pliable icing that can be rolled out and used to create three-dimensional shapes, such as turrets, flags, or even a drawbridge for your castle cake. With a little patience and a touch of creativity, fondant can be molded into any shape you can imagine.

Adding fairytale touches
- One of the most popular edible decorations for a castle cake is royal icing. This versatile frosting is the perfect medium for creating intricate details like turrets, windows, and doors. With a steady hand and a piping bag, you can craft a fairy tale castle with the finest architectural details.
- Another delightful option to consider is using edible pearls and jewels. These tiny, shimmering embellishments can be delicately placed on your cake to mimic the beauty of a royal crown. Sprinkle them along the edges of each tier or create a dazzling pattern on the castle walls for a touch of regal opulence.
- And embrace the natural beauty of flowers by incorporating edible blooms into your cake design. Delicate sugar flowers, whether in soft pastels or vibrant hues, can add a touch of elegance and whimsy to your castle creation. Place them strategically around the cake or create a cascading floral arrangement down the sides for a truly enchanting effect.
- For a touch of charm, consider using edible gold or silver leaf to add a magical shimmer to your castle cake. Gently apply the leaf to specific areas of your creation, such as the castle spires or the drawbridge, to create a captivating contrast against the frosting. The glimmering metallic accents will make your cake look like a treasure straight out of a storybook.

Step-by-step instructions: Castle cake recipe and tutorial
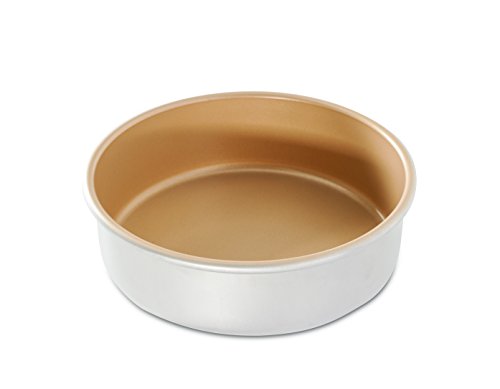
- Oven – Preheat the oven to 325℉/165℃Gas Mark 3. Grease and line 4 x 7-round cake pans or 3 x 8-inch round cake pans with parchment paper.

- Coco mixture – In a bowl, combine the hot coffee or water together. Use a whisk to prevent lumps.
- Dry ingredients – In a large mixing bowl combine the flour, sugar, baking soda, baking soda, and salt.
Pro tip – Use a whisk to ensure everything is well combined. - Wet ingredients – In a larger mixing bowl, combine the oil, melted butter, eggs, and vanilla extract. Then, add the sugar followed by the coffee mixture, and combine well. Set aside.
Pro tip – Sugar melts so it is usually better to consider it as a wet ingredient in baking. Helps it dissolve easily.

- Wet to dry – Pour the wet ingredients into the dry ingredients and combine well to ensure no lumps.
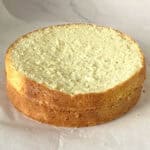
Pro tip – Use a whisk to ensure everything is well combined without any lumps. - Bake – Divide the batter into your prepared baking pans. Bake in a preheated oven for 35 to 40 minutes or until a toothpick inserted in the center comes out clean.

Prepare frosting
- Cream – In the stand mixer with the paddle attachment (or hand mixer), cream butter until light and fluffy. Add salt, whipping cream, and vanilla extract – mix for a minute until well combined.
- Whip – Next, add the powdered sugar, one cup at a time. Once all the powdered sugar has been incorporated, whip for 2 to 3 minutes until light and fluffy.
Pro tip – The heavy cream will whip some volume making the frosting light and airy. - Divide – Divide the frosting into 3 bowls.
- Vanilla – I kept one simple and easy with white vanilla frosting.
- Chocolate – I made one chocolate frosting with melted chocolate.
- Pink – I dyed the remaining frosting with pink gel food coloring.

Assemble
- Level – Cut the domes off the cake layers using a bread knife or cake leveler. Brush each layer with the cooled simple syrup.
Pro tip – Simple syrup is just sugar water that has been boiled and cooled. Used to keep cake layers moist. - Stack – Place a cake layer on the cake board or cake stand. Top with a big dollop of chocolate buttercream – spread evenly using a straight-edge spatula. Place the successive layers, followed by more buttercream. Chill the cake for 15 minutes.
Pro tip – Chilling the cake at this point will ensure the layers don’t move when you frost the outside. - Frost – Spread the white-colored buttercream around and on the top of the cake. Smooth as much as possible. Then, spread the pink frosting and smooth it as much as possible. Use a bench scraper to smooth the sides of the cake and an offset spatula to smooth the top.

Decorate
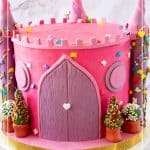
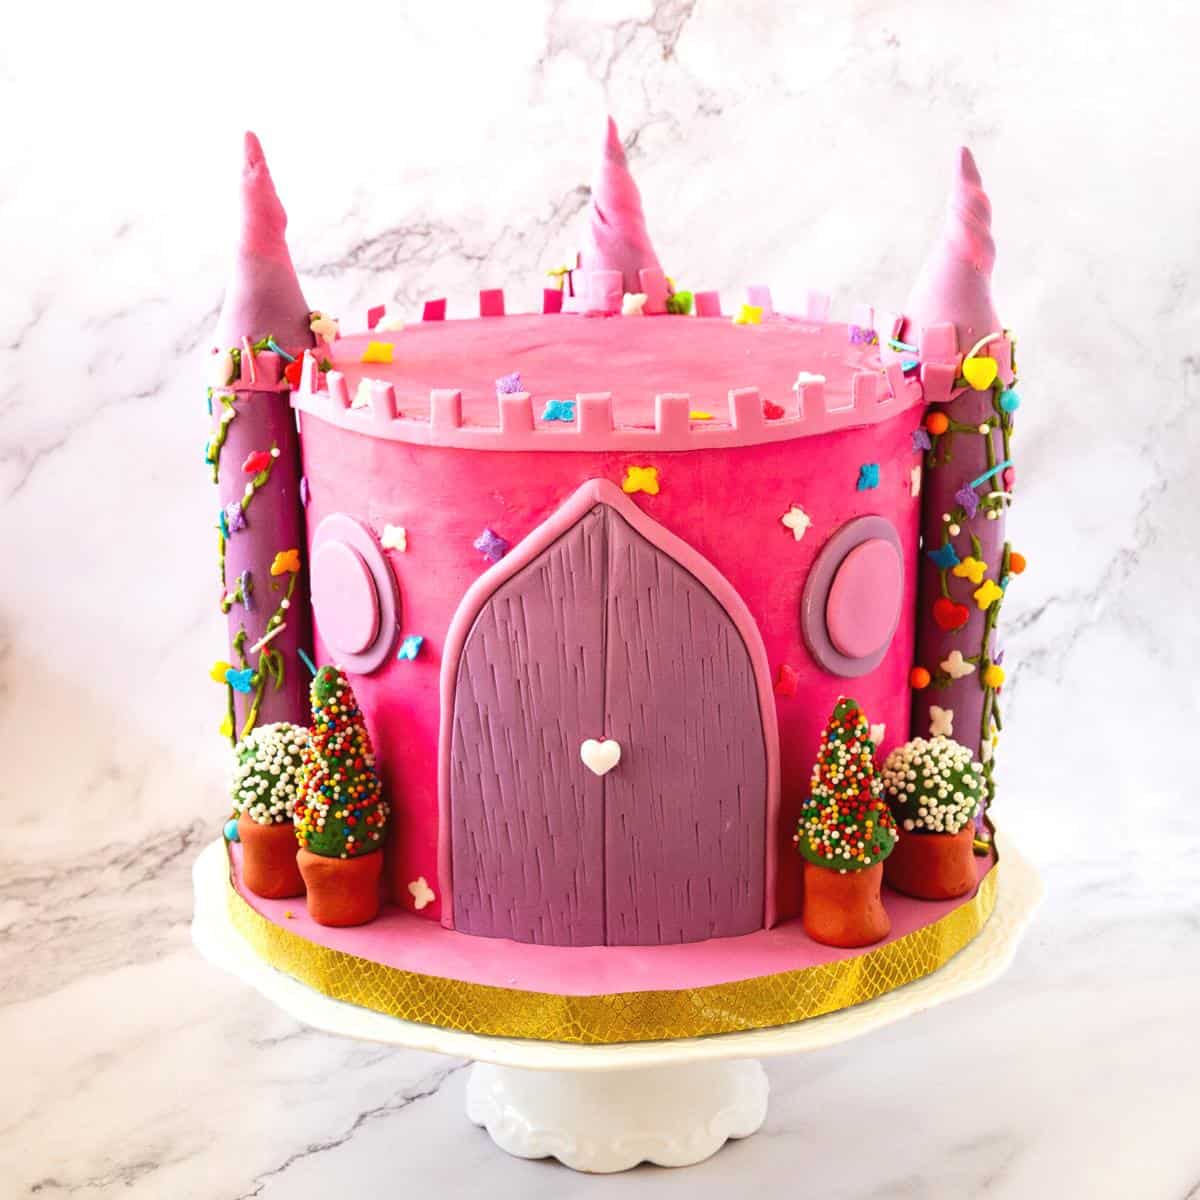
- Towers – Roll a fondant log and divide it into three. Place them on a parchment-lined baking tray and leave to dry for a few minutes. Then, add them to the cake.
- Turrets – Take a golf size ball of pink and purple fondant. Roll into a ball first, then into a cone. Twist the top and place them on the towers.
- Door/windows – Roll 1/4 inch thick fondant and shape a door and windows. I made the door arch in shape and circle windows but be creative and create anything you like. Place them on the cake.
- Cake board – I like rolling thin fondant strips and covering the cake board edges.
- Piping – Place the remaining frosting in a piping bag with a small round piping tip and pipe long trails of frosting along the towers. Decorate them with dragees, mini flowers, edible decorations, etc.
more cake tutorials
- Buttercream Castle Cake with Princess Cupcakes
- Effective communication and Customer Service in Cake Business
- Moist Chocolate Bundt Cake
- Princess Birthday Cake
- How to make a Princess Doll Cake


Frequently asked questions
To ensure the structural integrity of your castle cake, it’s essential to use a sturdy cake recipe that can withstand the weight of the layers above. Consider using a dense cake batter or adding a supportive dowel down the center of the cake to reinforce its stability. Additionally, make sure to properly cool your cakes before assembling to avoid any potential sagging or collapsing.
If your frosting turns out too runny, try adding more powdered sugar gradually until you achieve the desired consistency. On the other hand, if your frosting is too thick, you can add a bit of milk or cream to thin it out. Remember to make these adjustments slowly, as a little can go a long way. Be patient and make sure to test the consistency as you go along.
Achieving a smooth finish on your castle cake can be a challenge, but it’s not impossible. Before adding the final layer of frosting, start by applying a thin crumb coat to seal in any loose crumbs. Once this initial layer sets, add another coat of frosting, using a palette knife or an offset spatula to smooth it out. For an even smoother finish, you can try dipping the spatula in warm water and gently gliding it over the frosting.
While professional cake decorating tools can certainly enhance the final result, they are not essential. You can achieve impressive results with simple household items. For example, instead of a piping bag, you can use a ziplock bag with the corner snipped off to create decorative accents. A butter knife or spoon can also be used to create patterns or texture on the frosting. Don’t be afraid to get creative and experiment with what you have on hand.
Castle Cake Tutorial
This simple and easy recipe makes an irresistible simple moist chocolate cake. All you need are two bowls and a whisk. The light and airy texture of this cake mean you can be served on its own. Try whipped cream for a light dessert or with any of my frostings for a more indulgent affair.
Video
Ingredients
- 1 ¾ cup (215 g) All-purpose flour
- 1 tsp Baking soda
- ½ tsp Baking powder
- 1 cup (85 g) Cocoa powder (Dutch-processed)
- 1 pinch Kosher salt
- ⅓ cup (180 ml) Vegetable oil flavorless
- ⅓ cup (75 g) Melted butter
- 3 large Eggs room temperature
- ½ cup (60 ml) Greek yogurt
- ½ cup (180 ml) Sour cream
- 2 cup (300 g) Brown Sugar
- 2 tsp Vanilla extract
- ¾ cup (180 ml) Boiling water with 2 tsp of coffee
- 1½ lb (450 g) Unsalted butter room temperature
- 8 cups (720 g) Powdered sugar
- ½ cup (120 ml) Whipping cream
- ½ tsp Kosher salt
- 1 tbsp Vanilla extract
- 1 cup (175 g) Chocolate melted, cooled
- ½ cup (120 ml) Sugar Syrup to moisten the cake (optional)
- 1 lb (500 g) Fondant pink, purple, or other.
Method
- Oven – Preheat the oven to 325℉/165℃Gas Mark 3. Grease and line 4 x 7-round cake pans or 3 x 8-inch round cake pans with parchment paper.
- Coco mixture – In a bowl, combine the hot coffee or water together. Use a whisk to prevent lumps.1 cup Cocoa powder, ¾ cup Boiling water
- Dry ingredients – In a large mixing bowl, combine the flour, sugar, baking soda, baking soda, and salt.1 ¾ cup All-purpose flour, 1 tsp Baking soda, ½ tsp Baking powder, 1 pinch Kosher salt, 2 cup Brown Sugar
- Wet ingredients – In a larger mixing bowl, combine the oil, melted butter, eggs, and vanilla extract. Then, add the sugar followed by the coffee mixture, and combine well. Set aside⅓ cup Vegetable oil, 3 large Eggs, ½ cup Greek yogurt, ½ cup Sour cream, 2 tsp Vanilla extract, ⅓ cup Melted butter
- Wet to dry – Pour the wet ingredients into the dry ingredients and combine well to ensure no lumps.
- Bake – Divide the batter into your prepared baking pans. Bake in a preheated oven for 35 to 40 minutes or until a toothpick inserted in the center comes out clean.
- Cream – In the stand mixer with the paddle attachment (or hand mixer), cream butter until light and fluffy. Add salt, whipping cream, and vanilla extract – mix for a minute until well combined.1½ lb Unsalted butter, ½ cup Whipping cream, ½ tsp Kosher salt, 1 tbsp Vanilla extract
- Whip – Next, add the powdered sugar one cup at a time. Once all the powdered sugar has been incorporated, whip for 2 to 3 minutes until light and fluffy.8 cups Powdered sugar
- Divide – Divide the frosting into 3 bowls. – Vanilla – I kept one simple and easy with white vanilla frosting. – Chocolate – I made one chocolate frosting with melted chocolate. – Pink – I dyed the remaining frosting with pink gel food coloring.1 cup Chocolate
- Level – Using a bread knife or cake leveler, cut the domes off the cake layers. Brush each layer with the cooled simple syrup½ cup Sugar Syrup
- Stack – Place a cake layer on the cake board or cake stand. Top with a big dollop of chocolate buttercream – spread evenly using a straight-edge spatula. Place the successive layers, followed by more buttercream. Chill the cake for 15 minutes.
- Frost – Spread the white-colored buttercream around and on the top of the cake. Smooth as much as possible. Then, spread the pink frosting and smooth it as much as possible. Use a bench scraper to smooth the sides of the cake and an offset spatula to smooth the top.
- Towers – Roll a fondant log and divide it into three. Place them on a parchment-lined baking tray and leave to dry for a few minutes. Then, add them to the cake.1 lb Fondant
- Turrets – Take a golf size ball of pink and purple fondant. Roll into a ball first, then into a cone. Twist the top and place them on the towers.
- Door/windows – Roll 1/4 inch thick fondant and shape a door and windows. I made the door arch in shape and circle windows but be creative and create anything you like. Place them on the cake.
- Cake board – I like rolling thin fondant strips and covering the cake board edges.
- Piping – Place the remaining frosting in a piping bag with a small round piping tip and pipe long trails of frosting along the towers. Decorate them with dragees, mini flowers, edible decorations, etc.
Notes
- One of the key aspects of creating a visually stunning castle cake is the structure. Before you even start baking your cake, consider how you will construct the layers to resemble the towers of a castle. Today, I am using a single tier cake but using sturdy dowels or plastic supports can provide the necessary stability, especially if you plan to add multiple tiers to your design. Take the time to carefully stack and secure each layer, ensuring that your castle stands tall and proud.
- When it comes to the actual cake batter, consider using a denser recipe that can hold its shape better and support any additional weight from decorations. A pound cake or a dense sponge cake can be a great starting point. Be sure to properly grease and flour your cake pans to ensure easy removal and minimal breakage.
- After your cake has baked and cooled, it’s time to move on to the frosting. A buttercream frosting is ideal for castle cakes as it allows for easy piping and sculpting. Start with a crumb coat to seal in any loose crumbs before applying the final layer of frosting. Smooth it out as much as possible using an offset spatula or bench scraper for a clean, polished look.
- As you begin to decorate, remember the importance of patience and attention to detail. Start with a plan in mind and sketch out your vision on paper before transferring it to your cake. A combination of spatulas and bench scrapers for frosting and piping bags fitted with different tips can be your best friends for piping. From turrets and windows to doorways and drawbridges, take your time to bring each element to life.
- Consider using pre-made fondant decorations or edible paper cutouts. These can be easily placed on the cake to create instant fairytale charm. Remember to keep the size and scale of your decorations in mind, ensuring they complement the overall design without overwhelming it.
- Lastly, don’t forget to add a touch of magic by incorporating colors that reflect the enchantment of a fairytale. Coordinate your frosting and decorations with a color palette that evokes a sense of whimsy and wonder. Soft pastels or vibrant jewel tones can transform your castle cake into a truly captivating centerpiece.
Equipment you will need


Nutrition
Tried this recipe?
Mention @veenaazmanov_kitchen or tag #veenaazmanovkitchen!more cake tutorials
- Barcelona Soccer Ball Cake
- How to Make a Fire Truck Cake
- Fondant Cheese and Mice Cake Tutorial
- Wine Bottle and Crate Cake Tutorial
- Baby Booties Baby Shoes Cake Toppers


Don’t lose this recipe! Save it for Later!
📌 Save this Recipe for later on Pinterest so you can easily find it again.
⭐ Add Veena Azmanov Kitchen to your Google Preferred Sources.
It helps Google show you more of our recipes.
📧 Subscribe for new recipes delivered to your inbox.
🎥 Follow us for more recipes