Chocolate Fudge Cake
 Prep Time 10 minutes Cook Time 35 minutes Total Time 1 hour 45 minutes
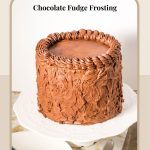
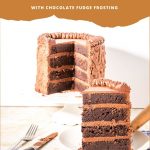
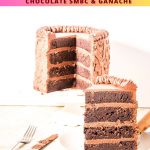
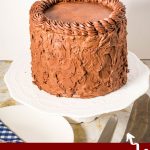

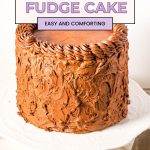
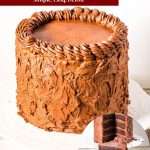
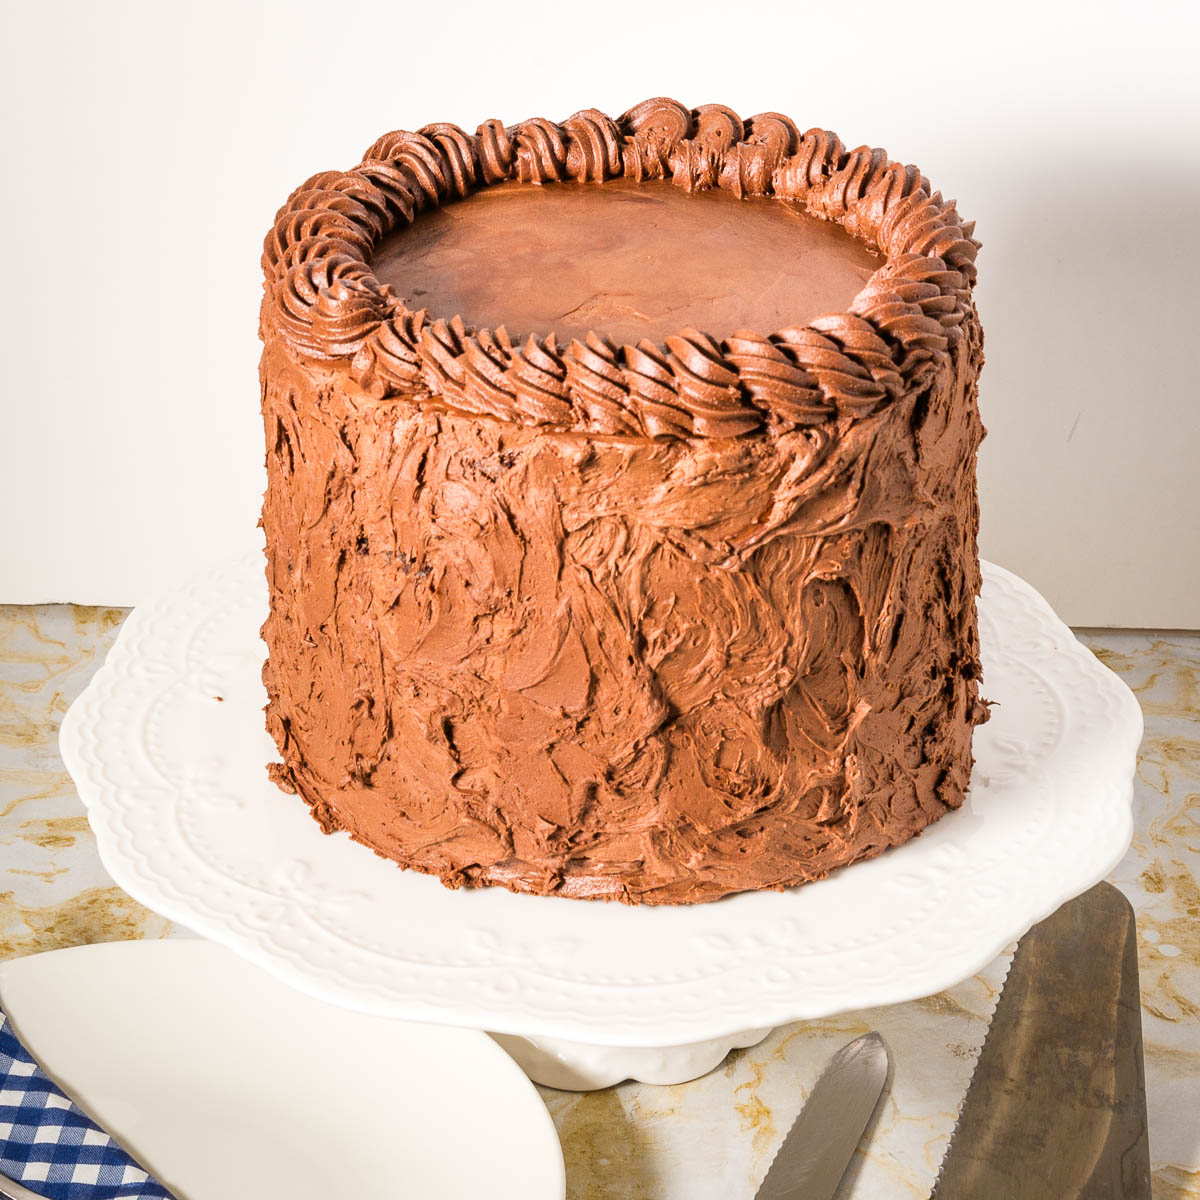
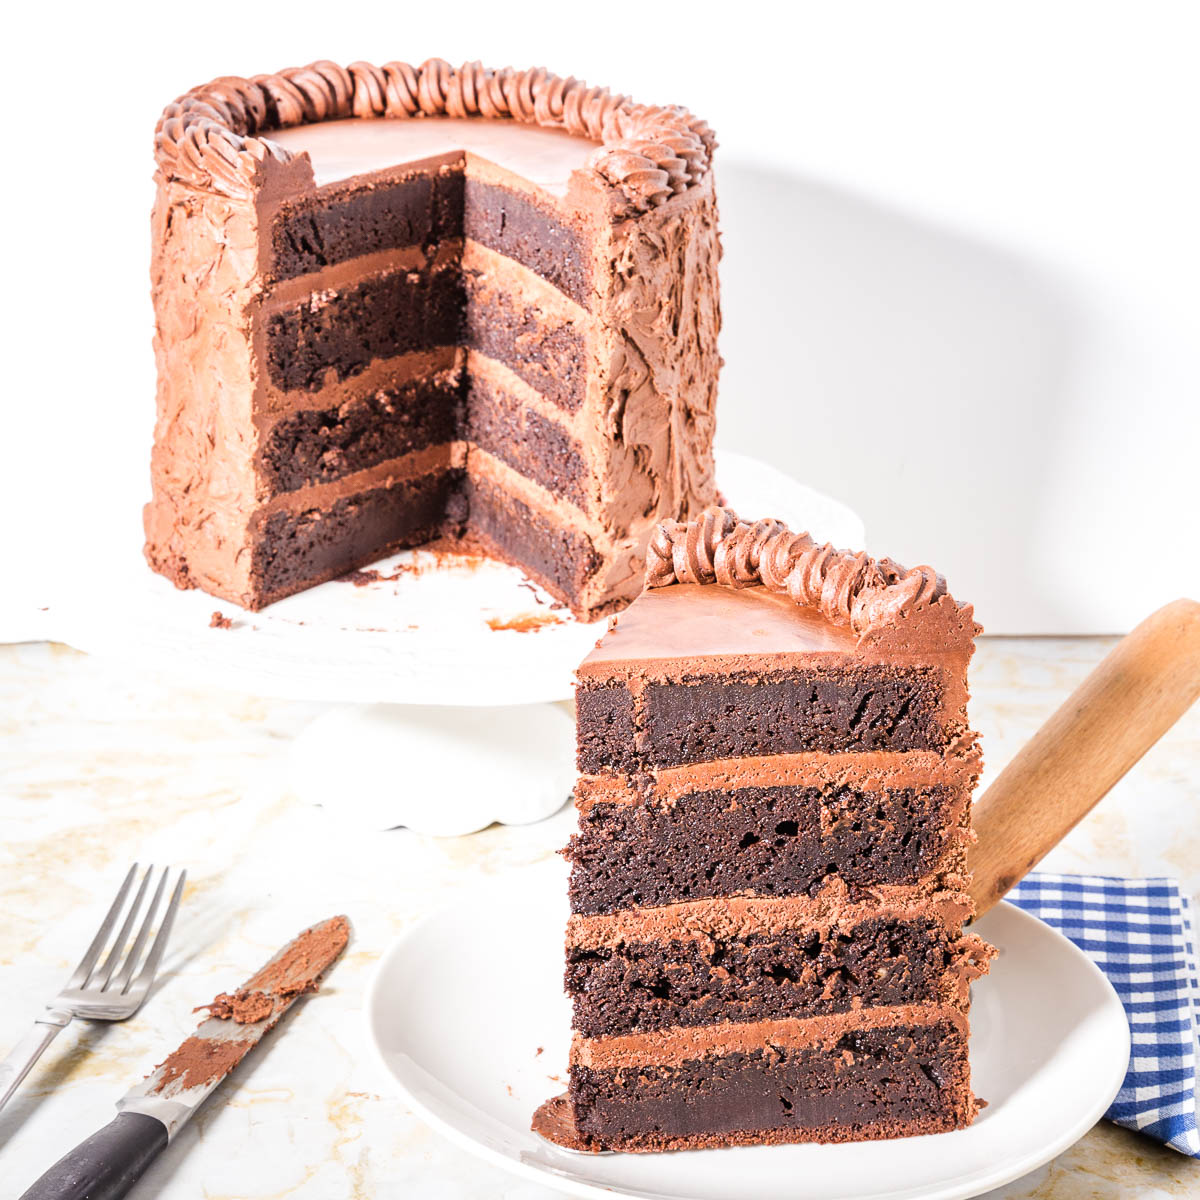
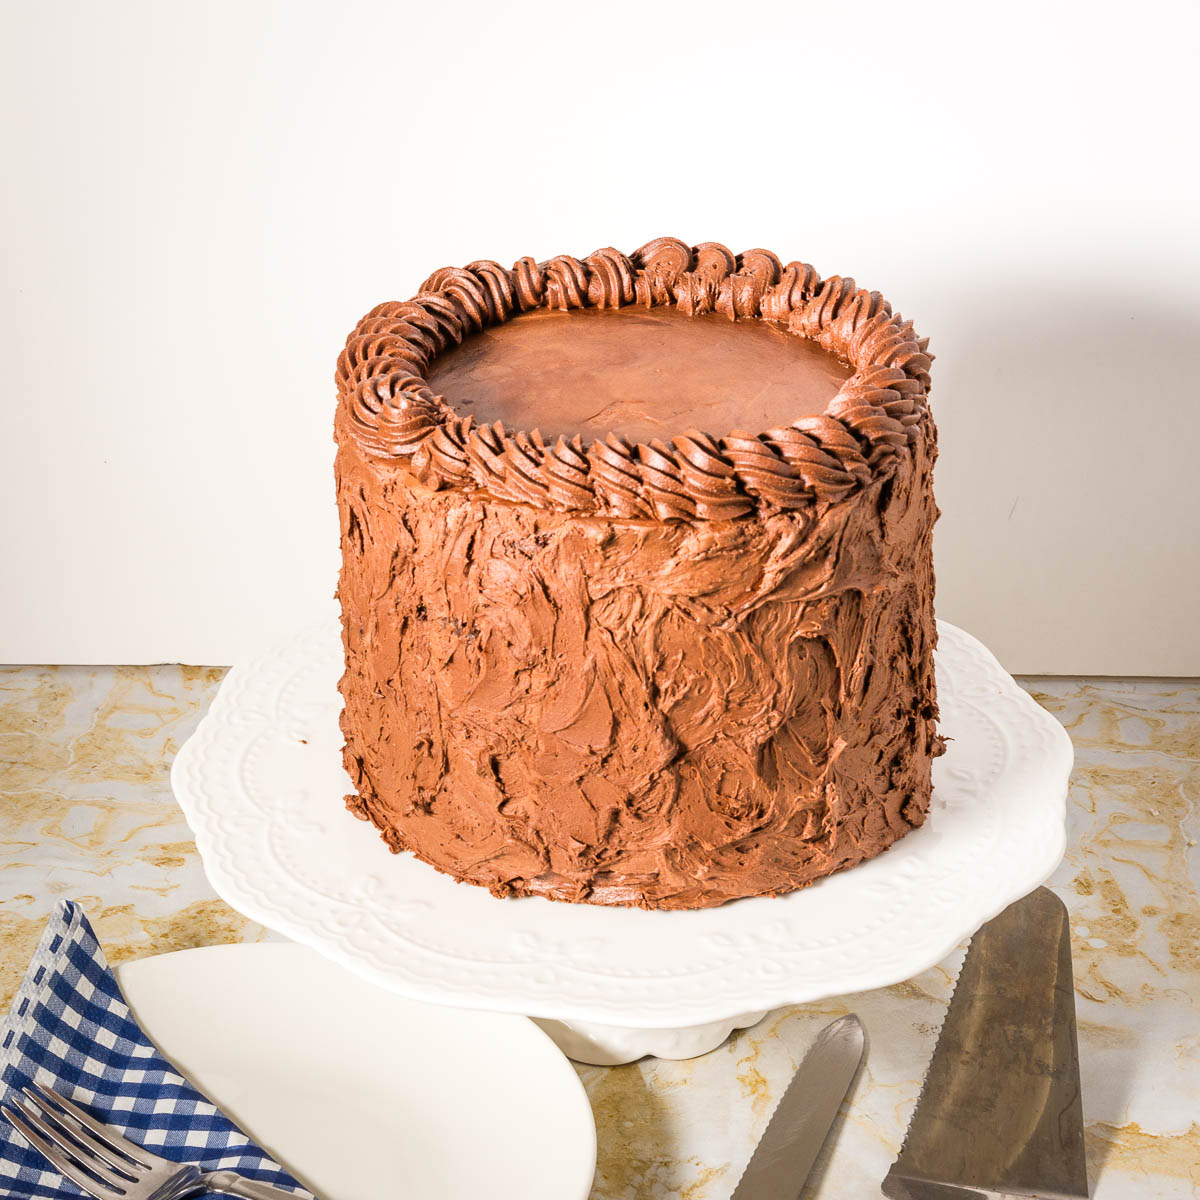
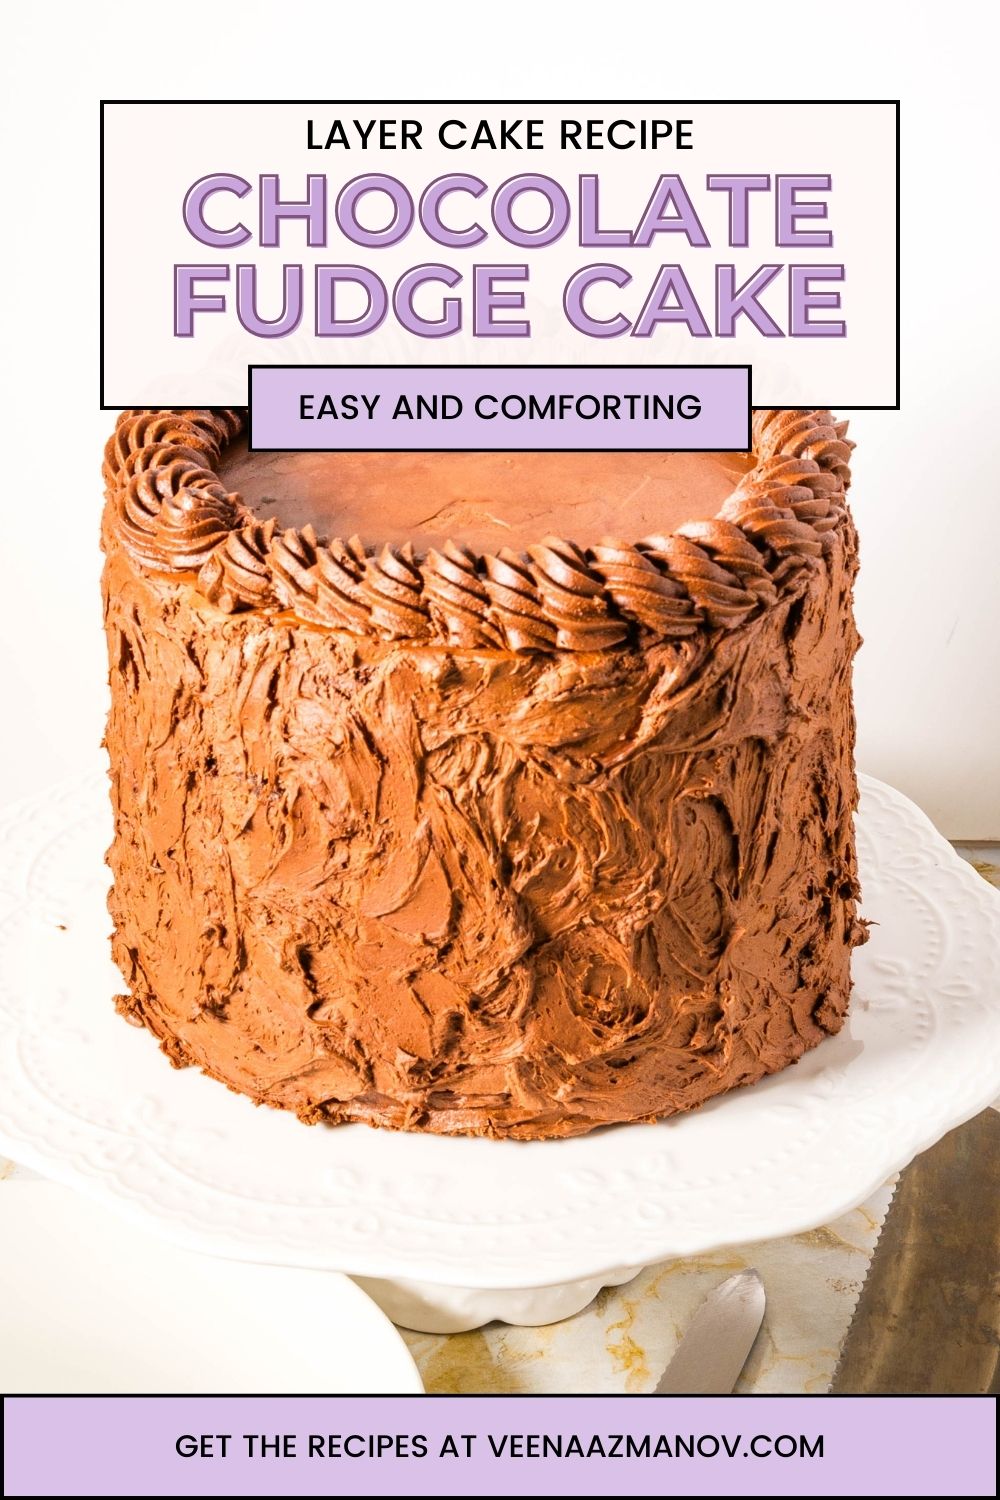
This chocolate fudge cake is everything you love in a chocolate cake: rich, moist layers with a soft, dense crumb and topped with creamy chocolate fudge frosting. Whether it’s for a birthday, celebration, or your next chocolate craving, this cake delivers every time.
This fudge cake holds a special place in my heart. Back when I ran my cake business, this was one of the most requested cakes by my clients—and for good reason!
Its rich, moist chocolate layers and velvety fudge frosting made it a standout at every celebration. It was also one of my personal favorites during cake tastings. Watching clients fall in love with its decadent flavors always reminded me of why I loved baking so much. It’s a true classic that never fails to impress!
Why You’ll Love This Chocolate Fudge Cake
- Rich Chocolate Flavor: Made with real chocolate and cocoa for a deep chocolate taste.
- Moist & Fudgy: Buttermilk, brown sugar, and melted chocolate create a soft, dense crumb.
- Easy to Make: Simple steps using pantry staples, perfect for any skill level.
- Versatile: Pair with ganache, fudge frosting, or whipped cream for any occasion.
- Crowd-Pleaser: Always a hit at birthdays, potlucks, and celebrations.
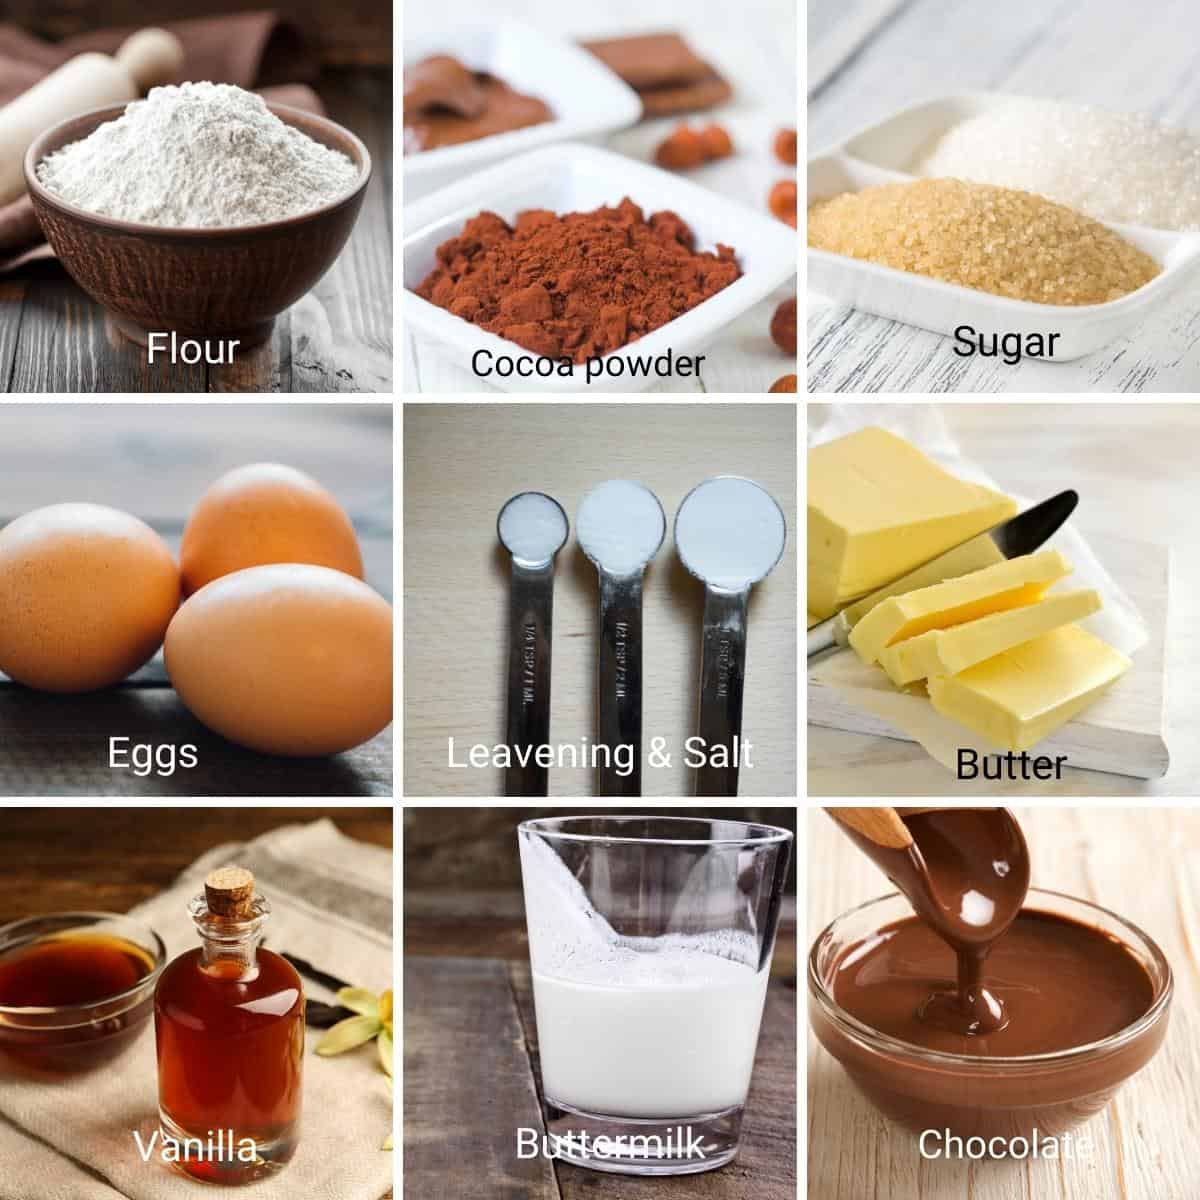
Ingredients and substitutes
- All-Purpose Flour: Use plain flour; if using self-raising, reduce baking powder by half.
- Cocoa Powder: Unsweetened Dutch-processed for rich flavor.
- Butter: Unsalted preferred for control, but salted works (omit added salt).
- Brown Sugar: Adds moisture and deepens flavor.
- Buttermilk: Creates a tender crumb. Make your own with milk + lemon juice if needed.
- Chocolate: Use eating chocolate or couverture for the best results.
- Vanilla Extract: Adds warmth to enhance chocolate notes.
How to Make Chocolate Fudge Cake (Step-by-Step)
- Preheat the oven to 325°F 165°C/ Gas Mark 3. Grease and line 2 x 9-inch or 3 x 7-inch round cake pan with parchment paper.
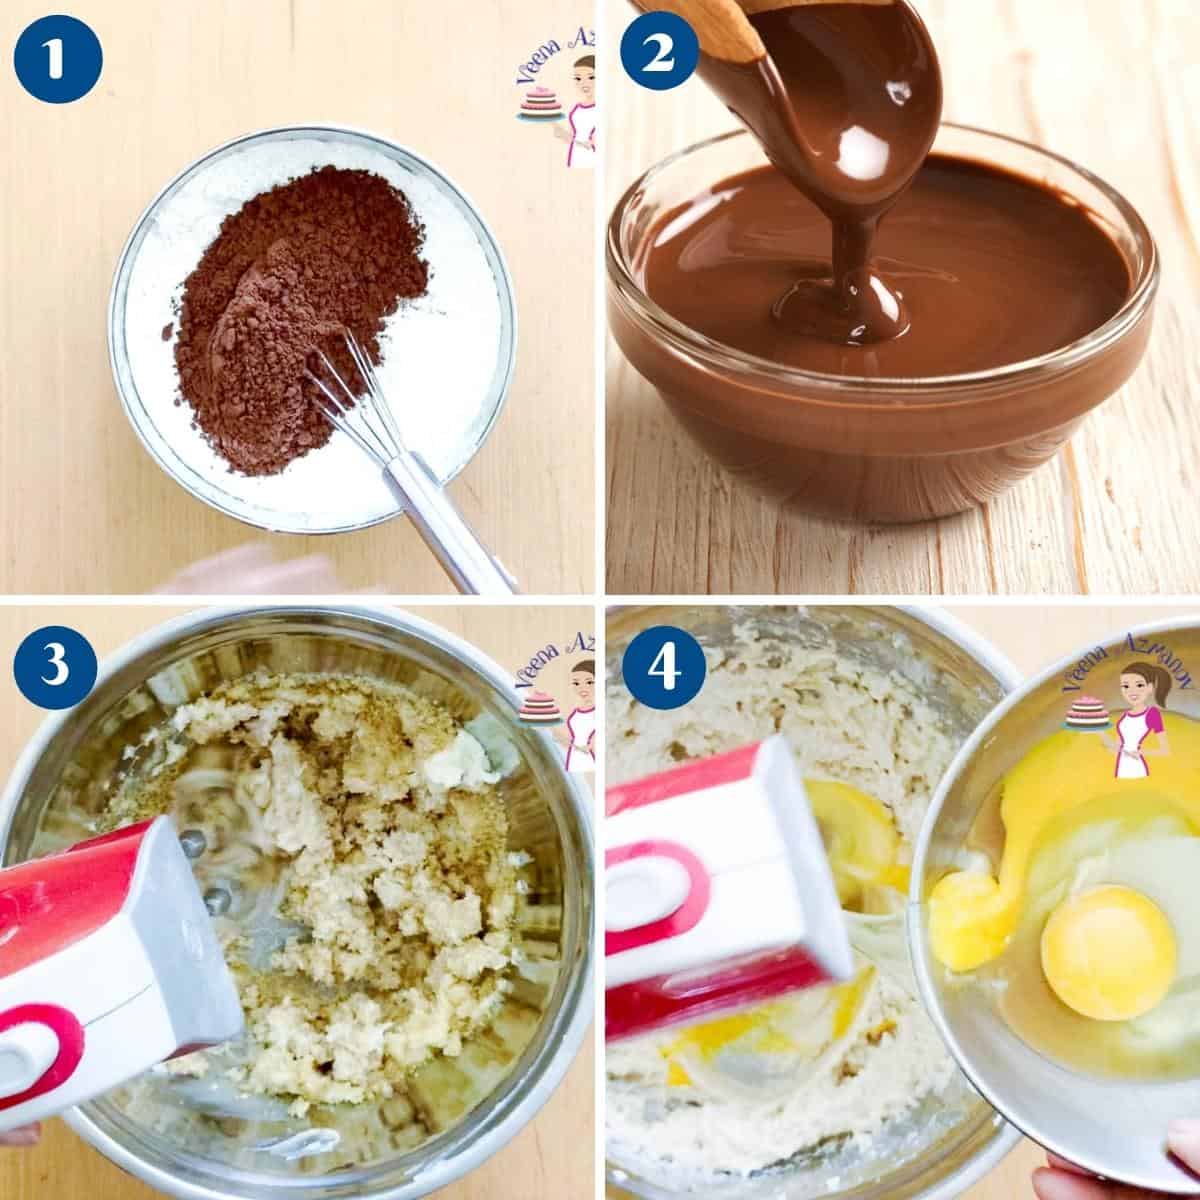
- Dry ingredients – In a bowl, combine flour, baking powder, baking soda, salt, and cocoa powder – and set aside.
- Wet ingredients – In a stand mixer bowl with the paddle attachment, cream butter and sugar until light and fluffy. Next, add the eggs one at a time, ensuring each is well incorporated.

- Dry to wet – Add the flour, mixer, and buttermilk in three batches, then the melted, cooled chocolate, vanilla extract, and brewed hot coffee
- Bake – Divide the batter equally between the prepared baking pans. Then, bake for 30 to 35 minutes or until a skewer inserted in the center comes clean.
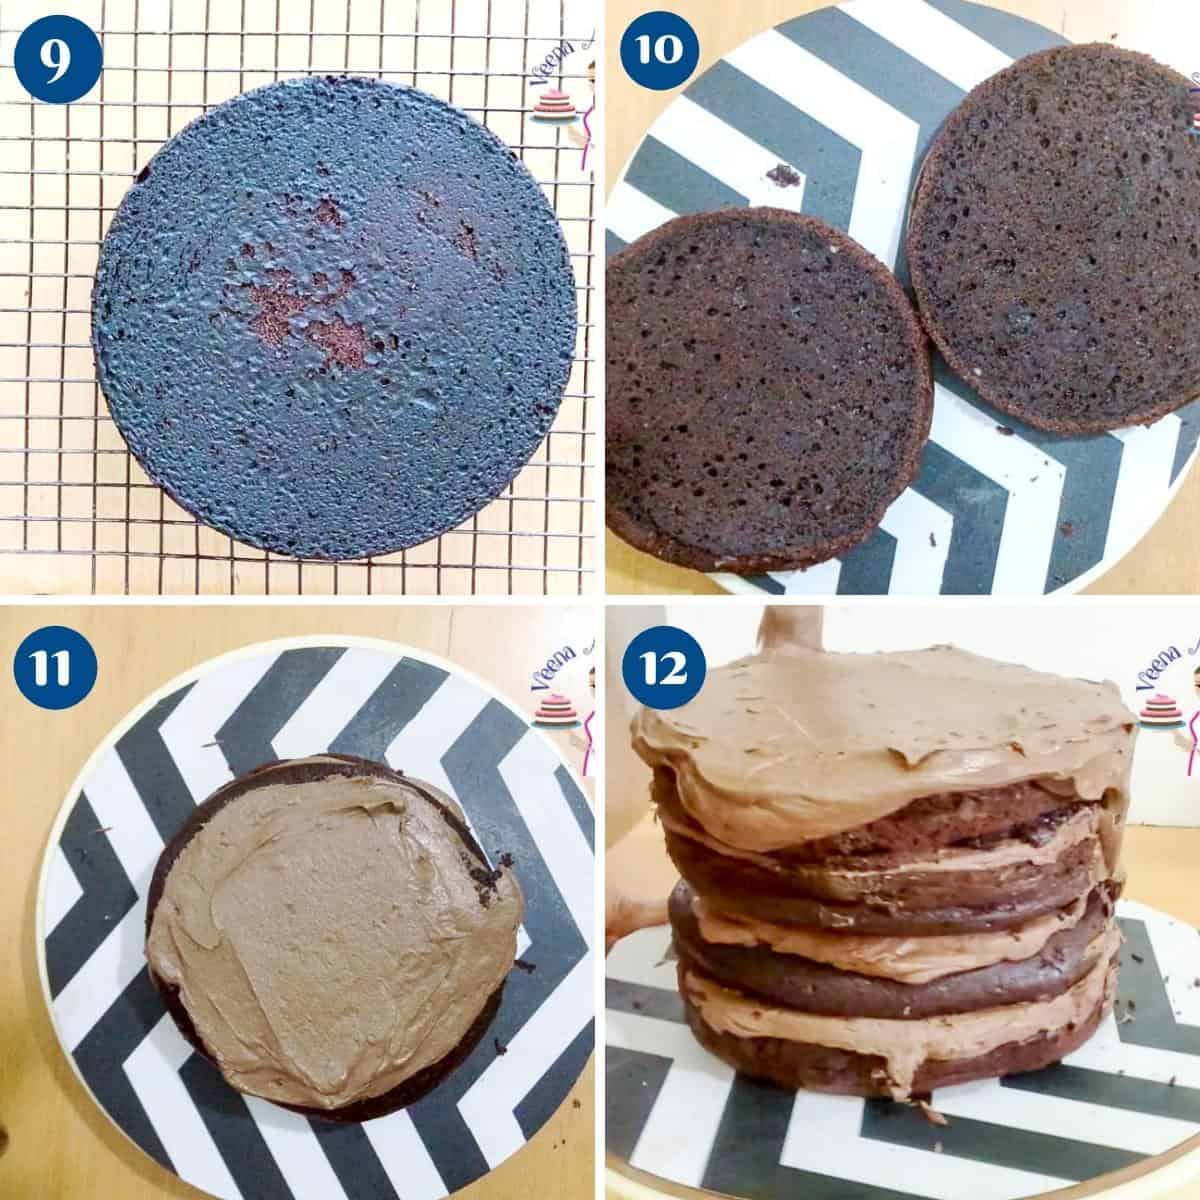
- Cool – Once baked, cool in the baking pan for 5 minutes. Then, invert and cool on a wire rack completely before you decorate.
- Fudge frosting – In the bowl of a stand mixer with the paddle attachment, cream the butter until smooth. Next, add salt, whipping cream, and vanilla extract. Mix for a minute longer until well combined. Then, add the powdered sugar one cup at a time. Continue to mix on medium-high for 2 to 3 minutes. Lastly, add the melted, cooled chocolate.
- Level – Using a bread knife or cake leveler, cut the domes off the cake layers. Then, brush each layer with the cooled simple syrup.
- Stack layer – Place a cake layer on the cake board or cake stand. Top with a big dollop of buttercream – spread evenly using a straight-edge spatula. Then top the second cake layer on top, followed by more buttercream and the last layer.
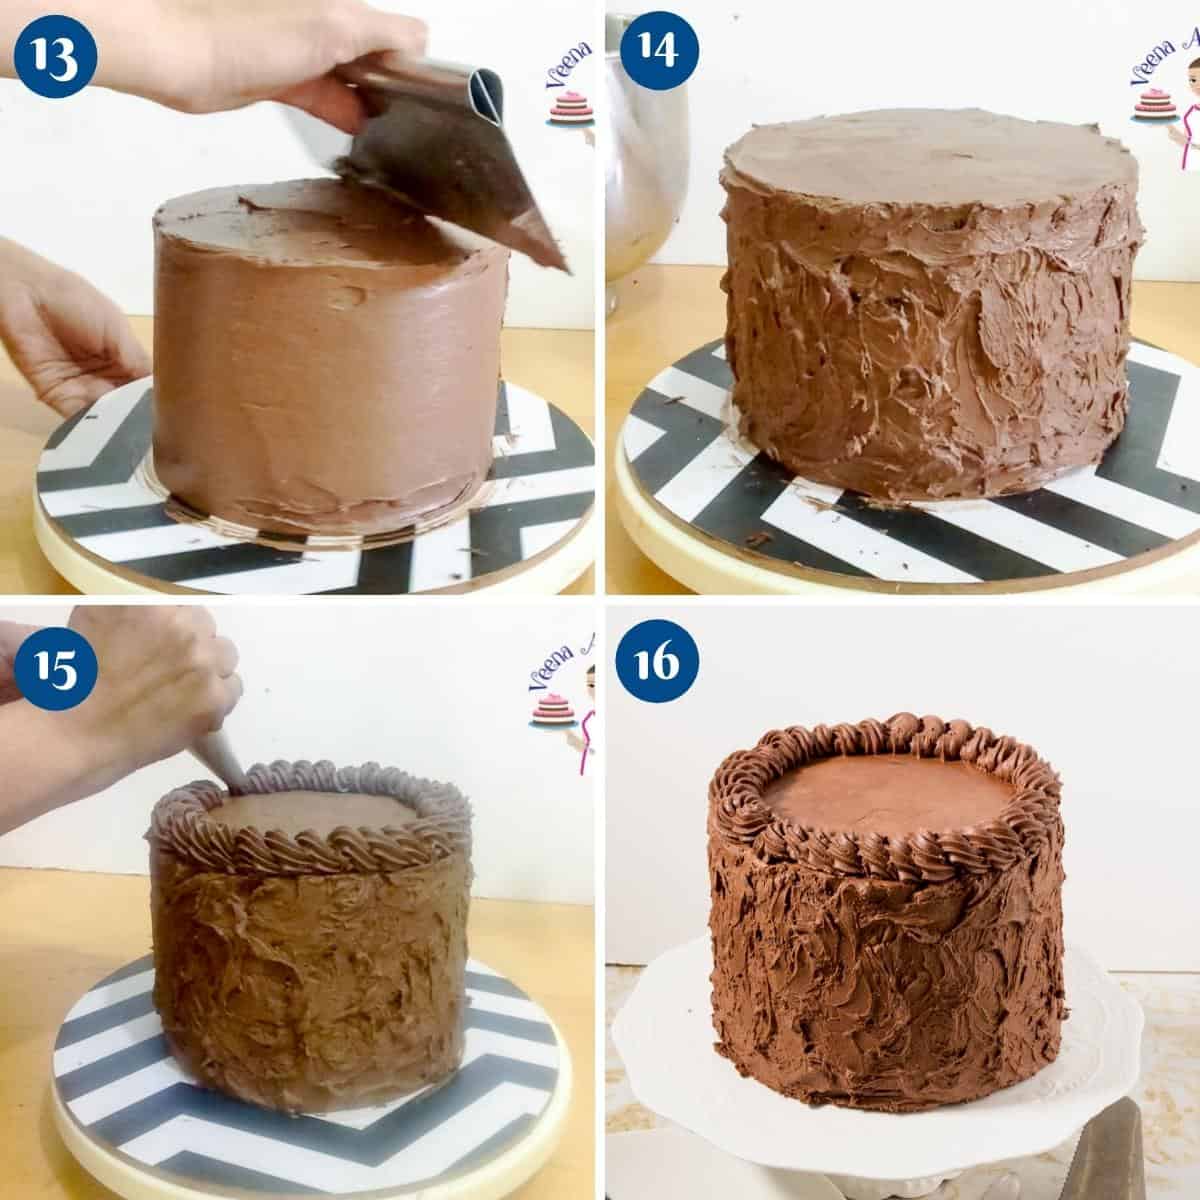
- Crumb coat – Spread a thin layer of frosting on top and around the cake. Then, place the cake in the fridge to chill for 10 to 15 minutes.
- Spread the remaining buttercream around and on top of the cake. Create a rustic buttercream look by simply swirling the tip of the spatula around the cake.
- Place any remaining frosting in a piping bag with a round tip, and pipe small kisses as I have done.
Storage
- Once decorated, the cake does not need to be refrigerated.
- It can stay at room temperature for two days or in the fridge for up to 5 days.
- Once cut, always cover the cut side of the cake with plastic wrap to prevent it from drying out.
Tips for Success
- Use room-temperature ingredients for a smooth batter.
- Also, avoid overmixing to prevent a dense cake.
- Don’t overbake; check for a few moist crumbs on the skewer.
- Use high-quality chocolate for the best flavor.
- Store covered at room temperature for 2 days or in the fridge for 5 days.
- One bowl chocolate cake
- Devil’s food chocolate cake
- Chocolate Fudge Cake or Death by chocolate cake
- Classic, chocolate cake or Chocolate Coffee Cake


Frequently asked questions
Brown sugar, melted chocolate, and buttermilk keep the cake moist and dense.
If properly stored, a chocolate fudge cake will last for 2 to 3 days at room temperature. It can be kept in the fridge for up to 5 or 6 days.
Yes, you can make the chocolate cake ahead of time and freeze it for later use. It’s best to wrap the completely cooled cake layers tightly in plastic wrap and then place them in an airtight container or freezer bag. Properly stored, the cake can be frozen for up to 2 to 3 months. When you’re ready to use the cake, thaw it in the refrigerator overnight and bring it to room temperature before frosting or serving.
Oh, I do have an eggless chocolate Fudge cake recipe for you.
Fudge cake is denser and moister, with a deeper chocolate flavor and a richer crumb.
Moist Chocolate Fudge Cake Recipe
This Chocolate Fudge Cake is a dream come true for chocolate lovers! Moist cake layers frosted with creamy chocolate fudge frosting make it an indulgent treat. Perfect for birthdays, celebrations, or whenever your sweet tooth calls, this cake is easy to make and guaranteed to impress.
Video
Ingredients
- 250 g (2 cups) All-purpose flour
- 60 g (¾ cups) Cocoa powder
- 2 tsp Baking powder
- 1 tsp Baking soda
- ½ tsp Salt
- 226 g (1 cup) Butter unsalted, room temperature
- 100 g (1 cup) White sugar
- 220 g (1 cup) Dark brown sugar
- 3 large Eggs
- 240 g (1 cup) Buttermilk
- 2 tsp Vanilla Extract
- 100 g (4 oz) Chocolate, melted 60 to 70% cocoa
- 60 ml (¼ cup) Coffee brewed (optional)
- 226 g (1 cup) Butter unsalted, room temperature
- 360 g (3 cup) Powdered sugar
- 200 g (7 oz) Chocolate melted, cooled
- 60 g (¼ cup) Whipping cream (38% fat)
- 2 tsp Vanilla extract
- ½ cup (120 ml) Simple syrup
Method
- Preheat the oven to 325°F 165 C/ Gas Mark 3. Grease and line 2 x 8-inch or 3 x 7-inch round cake pan with parchment paper.
- Dry ingredients – In a bowl, combine flour, baking powder, baking soda, salt, and cocoa powder – set aside.60 g Cocoa powder, 250 g All-purpose flour, 2 tsp Baking powder, 1 tsp Baking soda, ½ tsp Salt
- Wet ingredients – In a stand mixer bowl with the paddle attachment, cream butter and sugar until light and fluffy. Add the eggs one at a time, ensuring each is well incorporated. .226 g Butter, 100 g White sugar, 220 g Dark brown sugar, 3 large Eggs, 240 g Buttermilk, 2 tsp Vanilla Extract, 100 g Chocolate, melted, 60 ml Coffee
- Dry to wet – Add the flour mixer and buttermilk in three batches, then the melted, cooled chocolate, vanilla extract, and brewed hot coffee
- Bake – Divide the batter equally between the prepared baking pans. Bake for 30 to 35 minutes or until a skewer inserted in the center comes clean.
- Cool – Once baked, cool in the baking pan for 5 minutes. Invert and cool on a wire rack completely before you decorate
- Fudge frosting – In a bowl of a stand mixer with the paddle attachment, cream the butter until smooth. Add salt, whipping cream, and vanilla extract. Mix for a minute longer until well combined. Then, add the powdered sugar one cup at a time. Continue to mix on medium-high for 2 to 3 minutes. Lastly, add the melted cooled chocolate.226 g Butter, 360 g Powdered sugar, 60 g Whipping cream, 2 tsp Vanilla extract, 200 g Chocolate
- Level – Using a bread knife or cake leveler cut the domes off the cake layers. Brush each layer with the cooled simple syrup.½ cup Simple syrup
- Stack layer – Place a cake layer on the cake board or cake stand. Top with a big dollop of buttercream – spread evenly using a straight-edge spatula. Then top the second cake layer on top followed by more buttercream and the last layer.
- Crumb coat – Spread a thin layer of frosting on top and around the cake. Place the cake in the fridge to chill for 10 to 15 minutes.
- Spread the remaining buttercream around and on top of the cake. Create a rustic buttercream look by simply swirling the tip of the spatula around the cake. Place any remaining frosting in a piping bag and with a round tip and pipe small kisses as I have donePro tip – A straight-edge spatula for the top, an offset spatula, and a bench scraper for the sides work better.
- Place any remaining frosting in a piping bag and with a round tip and pipe small kisses as I have done
Notes
Tips for Success
✅ Use room-temperature ingredients for a smooth batter.✅ Avoid overmixing to prevent a dense cake.
✅ Don’t overbake; check for a few moist crumbs on the skewer.
✅ Use high-quality chocolate for best flavor.
✅ Store covered at room temp for 2 days or in the fridge for 5 days.
Equipment you will need


Nutrition
Tried this recipe?
Mention @veenaazmanov_kitchen or tag #veenaazmanovkitchen!- Chocolate ganache cake or chocolate mud cake
- my Espresso Cake with whipped espresso ganache
- See all chocolate cake recipes or see all layer cakes
- Eggless chocolate Fudge cake recipe


Don’t lose this recipe! Save it for Later!
📌 Save this Recipe for later on Pinterest so you can easily find it again.
⭐ Add Veena Azmanov Kitchen to your Google Preferred Sources.
It helps Google show you more of our recipes.
📧 Subscribe for new recipes delivered to your inbox.
🎥 Follow us for more recipes


Hi Veena can i use light brown sugar for this recipe. Thank you. Carol
Yes, you can. Same quantity.
Hi Veena, is it possible to make this as a loaf cake?
Absolutely! just transfer the dough to a loaf pan and bake until a skewer inserted comes out clean.
Can i make this into a 3 layer 6inch cake with this recipe please x
Rebecca this batch will make 4 x 6-inch cakes and yes, 3 tall layers of 6-inch cake.
I am really amazed at this delicious recipe. I was in wonder when I read that we can freeze it for a month. If it’s possible then my huge problem will be solved because when some guest arrives abruptly, I didn’t get enough time to bake a cake and to serve them.
Caroline, I don’t freeze my cakes because I don’t usually have freezer space but, yes, cakes can be frozen for a month.
You can thaw them in the fridge overnight. Then, let come to room temperature before serving.
Some cakes do better than others when frozen. Thanks
Hi Veena,
Really excited to try this recipe. I just anted to double check something from the tip section. It says to whip the sour cream and buttermilk before putting into the batter but the recipe doesn’t mention sour cream. Is sour cream just a potential alternative to the buttermilk or am I reading something wrong?
Thank you,
Tanya
Ah.. no – just mix the buttermilk so it’s not lumpy. Thanks
Love this cake Week 2 day 3 done