Mermaid Cake Recipe

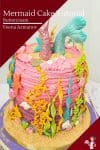
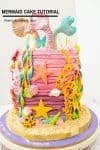

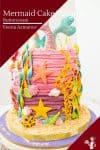
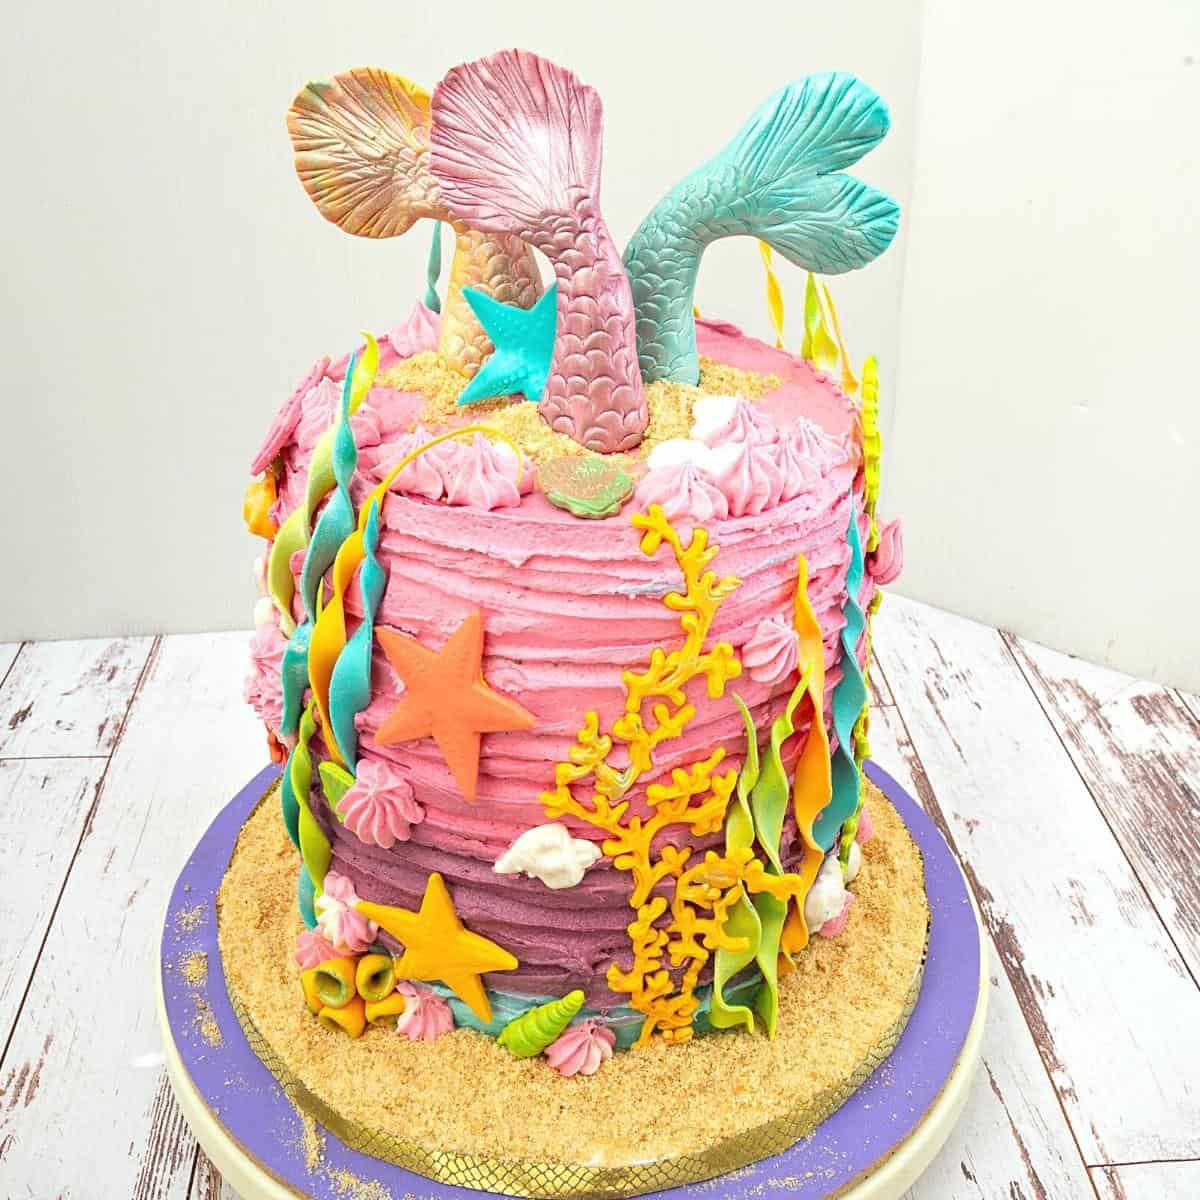
This buttercream mermaid cake is perfect whether it’s a little girl’s birthday party or an adult mermaid party! This tall buttercream cake, with mermaid-tail toppers and fondant accessories, will steal your heart. With my step-by-step and video tutorial, you can make this for your little princess, too.
This year, I made this mermaid birthday cake for my daughter Rhea’s birthday. She loves swimming very much, and we always say she swims like a mermaid. So, of course, she is fascinated with mermaids.
I also made this a double-barreled cake, as you can see. These are two cakes stacked as one. This time, I decided to do a buttercream finish instead of covering the cake in fondant.
I thought it would make a lovely tutorial, so I hope you find it useful. The video is detailed. So, feel free to skip parts that you find not relevant to your project.
Why make a little mermaid cake
- It is a simple and easy cake, but it does need some preparation and time management.
- There are three main components to the cake
- Cake – I have included an oil-based vanilla cake recipe below that is light and airy. And yet, you can also use any of my other layer cake recipes.
- Frosting – It’s summer, so I am using my velvet American buttercream. But any other buttercream icing would work just as well. See my list of 30-plus buttercream recipes here.
- Mermaid cake decorations – I’ve made simple freehand-shaped mermaid tails, which you can do by watching the video. Alternatively, you can also use silicone molds for the tails, shells, and other ocean-themed decorations. These days, you can also find candy shaped like fish, mermaid tails, shells, and other maid-themed candy. Be creative!

Videos
Tie-dye cake recipe
Mermaid cake tutorials
Step-by-step: Mermaid cake Instructions
Cake batter
- Preheat the oven to 165°C/325°F/Gas Mark 3. Grease and line with parchment paper 4 x 7-inch round cake pans (or 3 x 8-inch round cake pans).
- Dry ingredients – Combine flour, baking powder, baking soda, and salt – set aside.
- Eggs – In the bowl of a stand mixer fitted with a whisk attachment, whip the whole eggs on medium speed for 2 minutes. Gradually add the sugar a little at a time and continue to whip until the eggs are light and foamy or the ribbon stage
Pro tip – adding the sugar gradually will prevent the eggs from separating. - Oil – Next, gradually add the oil while whipping continuously.
Pro tip – adding the oil gradually will help the oil emulsify with the eggs, similar to mayonnaise. - Combine – Next, add the flour mixture along with the buttermilk and sour cream in three or four batches. Scraping the sides of the bowl when necessary.
Pro tip – Combine the buttermilk and sour cream; whisk to ensure no lumps, then set aside.
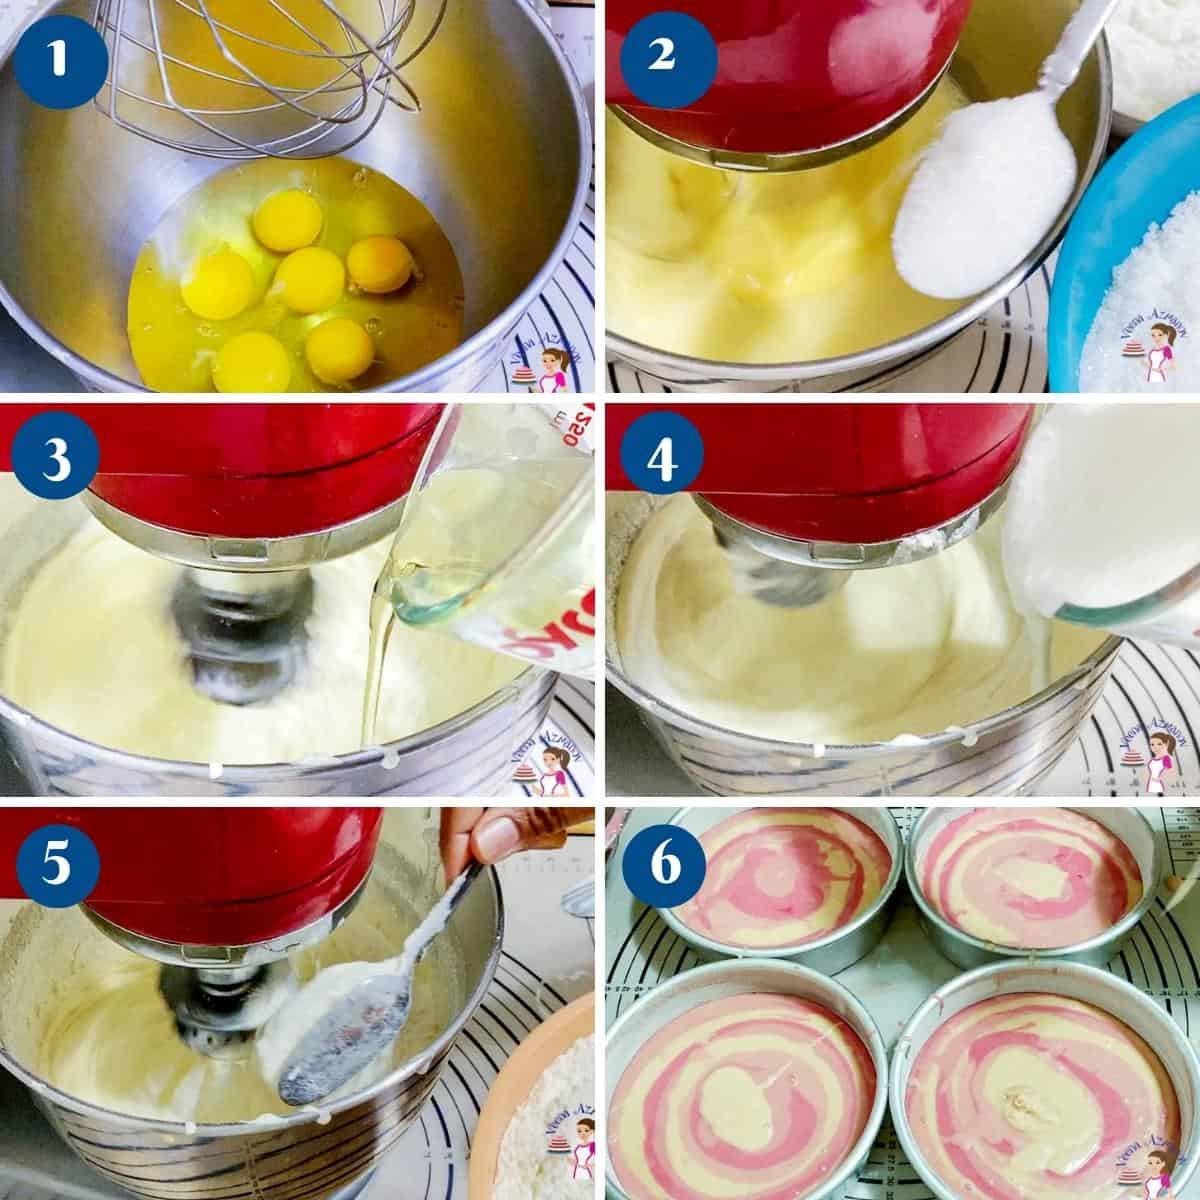
- Pans – Divide this batter between the four baking pans. I used cake strips to ensure I had flat cakes with no domes.
Note – I divided the batter into 4 bowls and colored each in shades of pink (my daughter’s request was pink inside) before I created a tie-dye kinda effect. - Bake – Place the pans on the middle rack and bake for 30 to 35 minutes or until a skewer inserted in the center comes out clean.
Pro tip – Rotate the pans between baking time (after 20 mins), top to bottom racks, and vice versa. - Cool – Once baked, cool in the cake tins on a cooling rack for 10 minutes, then invert cakes from the baking pans and cool completely. When cooled, wrap each cake in plastic wrap and let chill in the fridge for at least 4 hours.
Pro tip – Keeping the cakes in the pan for longer will make them soggy with the steam. Chilling cakes before frosting makes them easier to handle with fewer crumbs and breakage.

Frosting
- Meringue – In the bowl of a stand mixer with the paddle attachment, combine the meringue powder, heavy cream, and approximately two cups of powdered sugar. Whip starting on low speed until you have a thick, light, and sticky mixture.
Pro tip – We make a meringue first; this is what makes this buttercream different from other American buttercream recipes. - Powdered Sugar – Next, gradually start adding the remaining powdered sugar in two batches.
Pro tip – The mixture at the moment will be very dry and crumbly, but continue to combine. - Butter – Once all the butter is in, run the mixer on high for about 3 to 5 minutes more. Whip until you have a light and fluffy, creamy velvety texture very similar to whipped cream.
Pro tip – Do not skip the whipping, as this is what gives us that whipped-cream-like consistency. - Divide – Use 3 cups of buttercream for filling between the layers. The rest can be colored with gel food coloring – I used turquoise, purple, fuchsia, and pink. Place the colored buttercream in piping bags without tips.
Stacking the cake
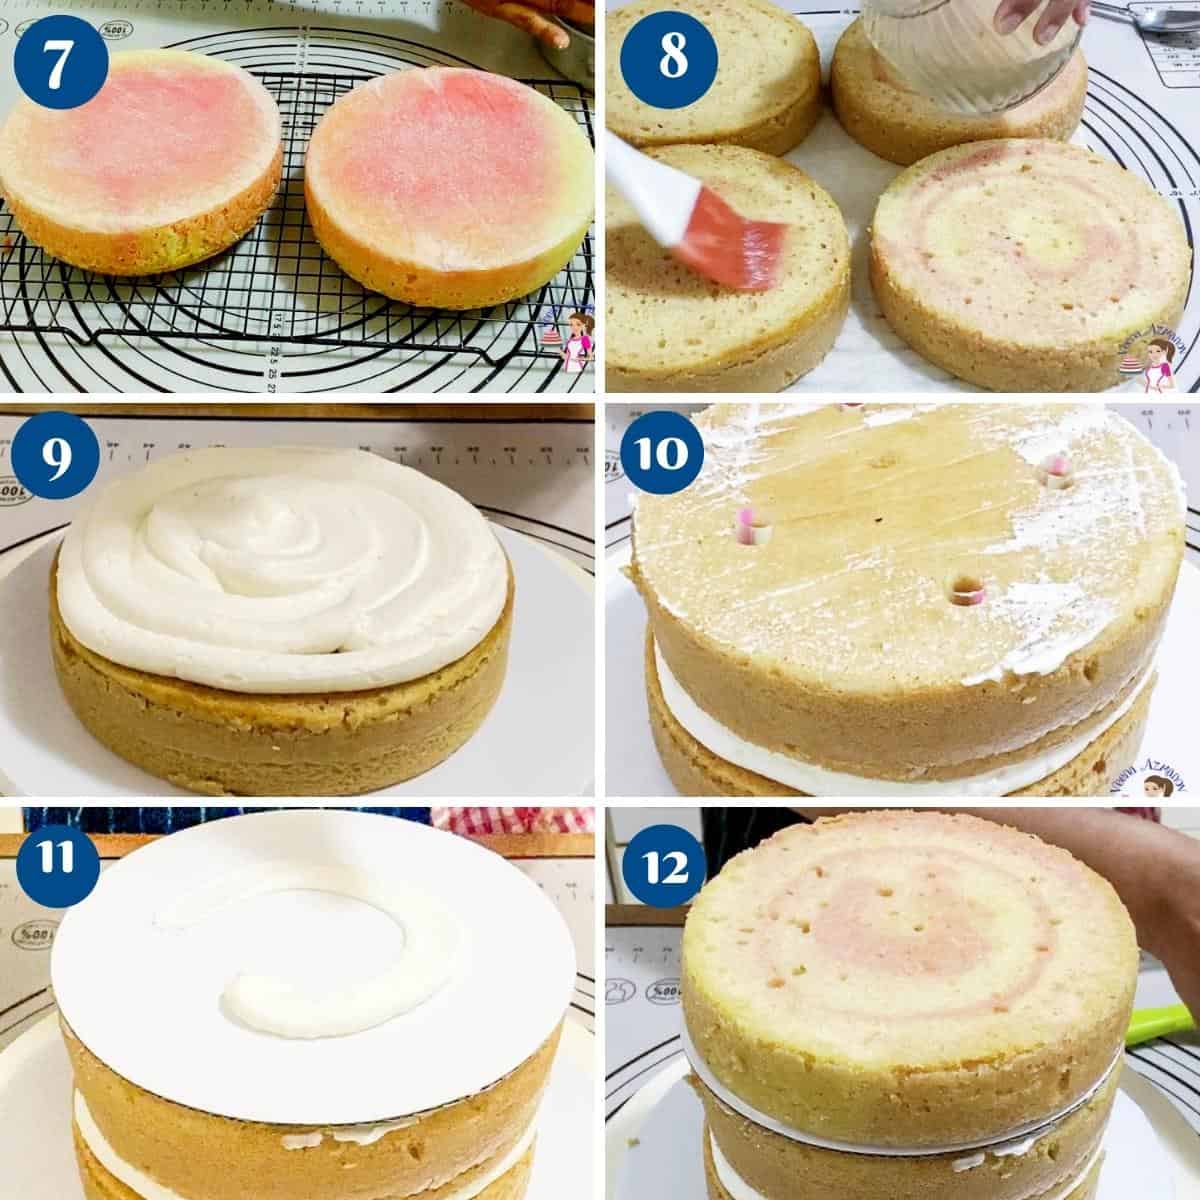
- Syrup – Prepare simple syrup to moisten the cake layers. These will keep the cake moist for longer.
- Level, moisten – Using a bread knife or cake leveler, cut the domes off the cake layers. Brush each layer with the cooled simple syrup.
Pro tip -if you plan to move the cake again, it is best to use a cake circle under the cake, so you can pick the cake with its base and without any accidents. - Two layers – Place a cake layer on the cake board or cake stand. Top with a big dollop of buttercream – spread evenly using a straight-edge spatula. Then top with the second layer.
- Dowel – Next, add 4 dowels into the cake using the first as a guide to cut the others. Make sure they are straight at 90 degrees so they do not tilt. Then, place the 6-inch cake circle on top. Add a little more buttercream and spread with a spatula.
Pro tip – Doweling the cakes will prevent the bottom layers from sinking under the weight of the top layers.
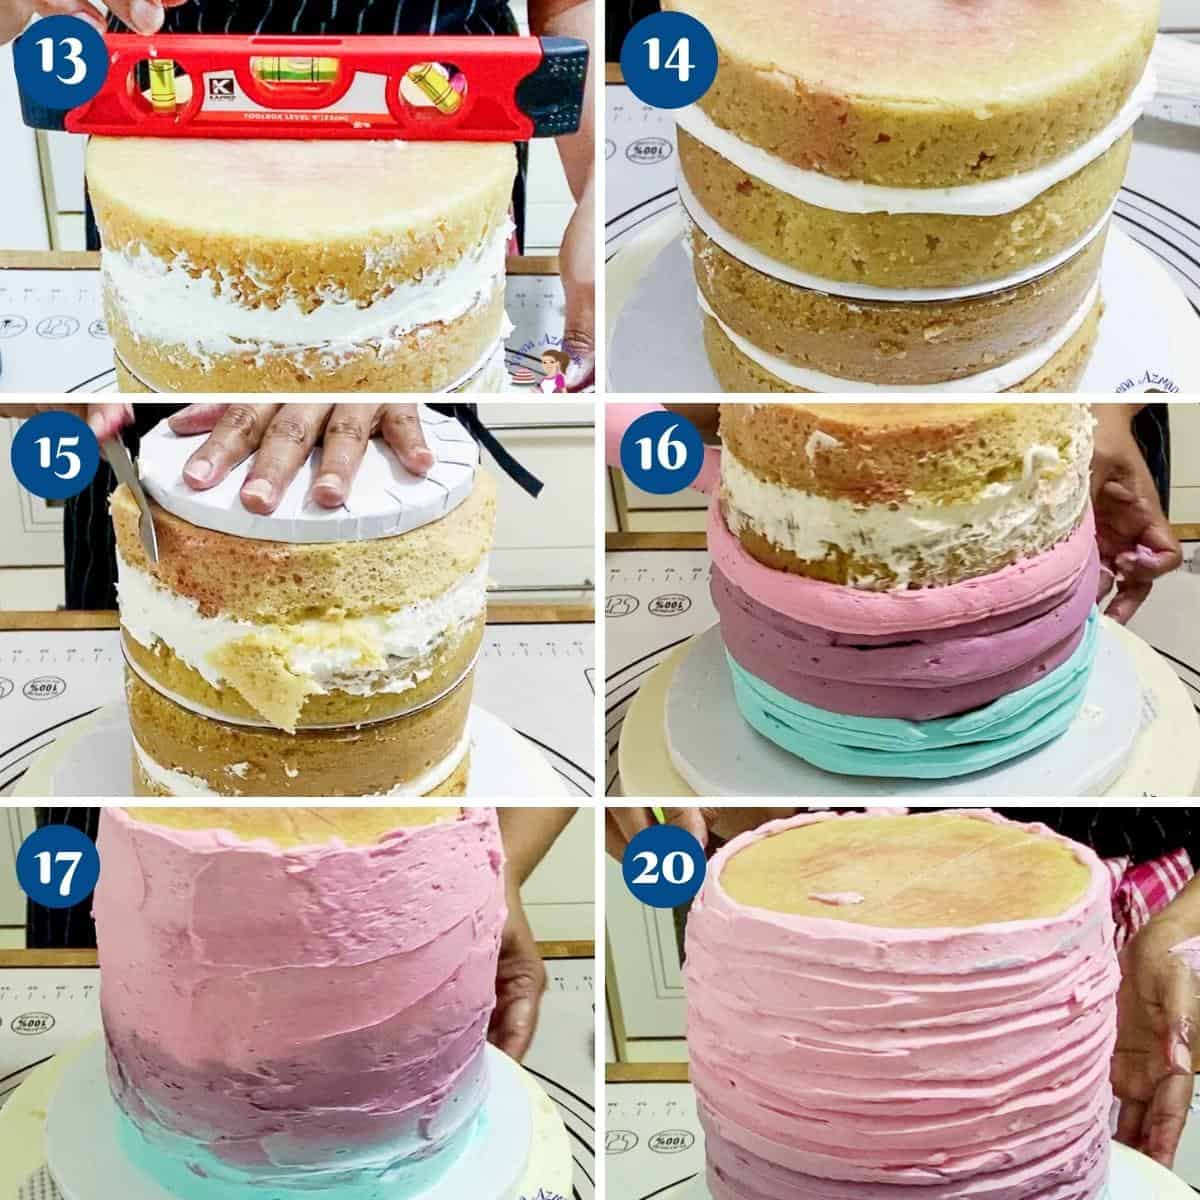
- Next two layers – Then, top the three cake layers on top, followed by more buttercream and the next layer.
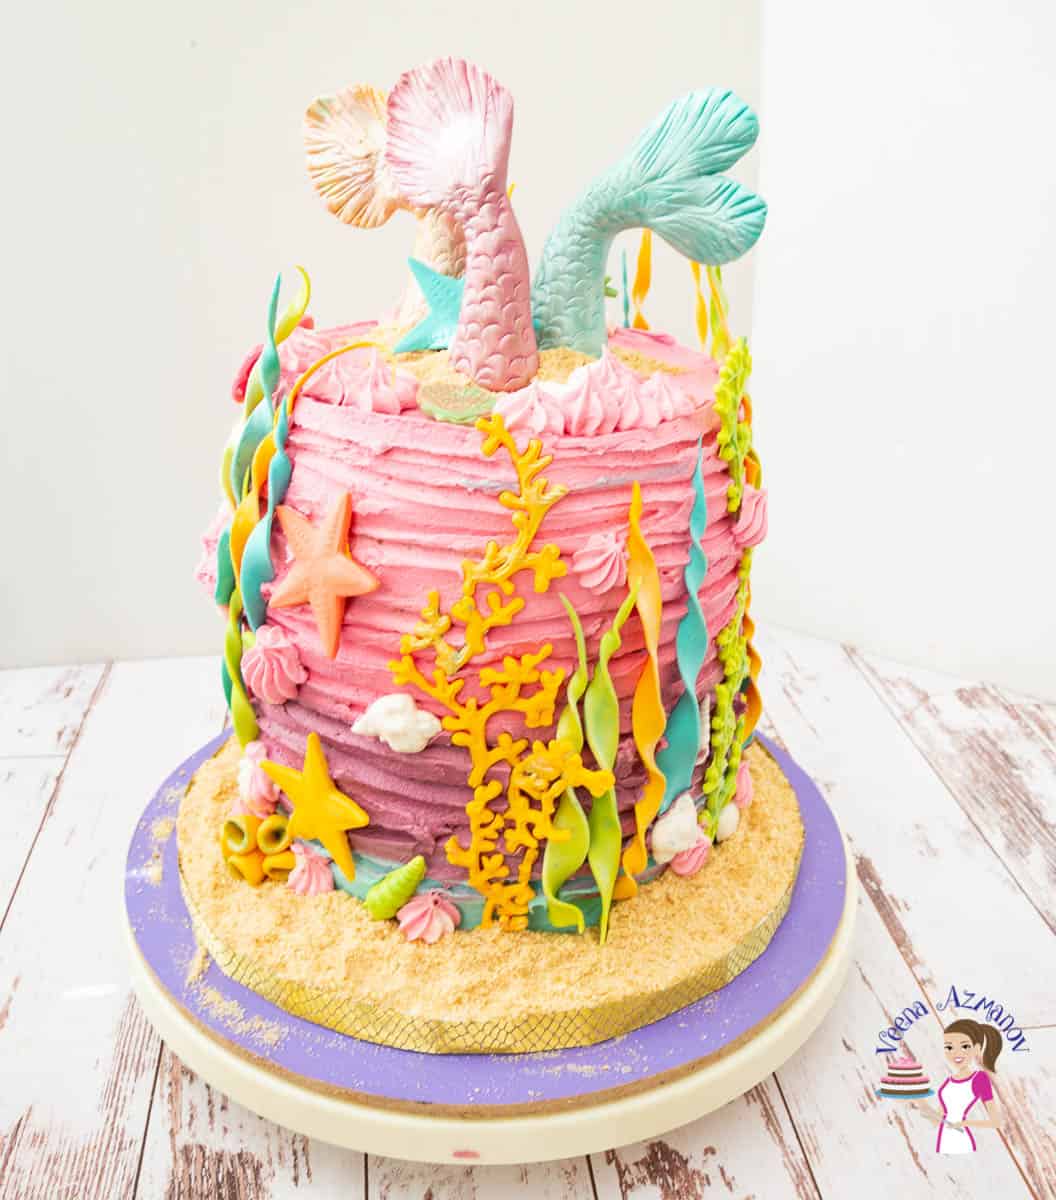
Pro tip – You need to dowel the cake only if you are using more than 3 layers of cake. 3 layers can be easily stacked without any support. - Frost – Next, pipe the colored buttercreams all around the cake, starting with the turquoise at the bottom, followed by purple, fuchsia, and pink.
Note – I wanted the top of the cake to look slightly narrower than the bottom. So, I use a 6-inch cake board as a guide to carve out the top crown. If you watch the video, it will make sense. - Smooth – Use a straight-edged spatula to spread the buttercream evenly as well as to marble some of the colors so they blend into each other.
- Pattern – Next, use the tip of a spatula to create lines all around the cake as shown in the video.
- Top – Finally, add more buttercream on top and smooth the top. Smooth it with an offset spatula.
- Chill – Place the cake in the fridge for at least 30 minutes before you assemble it.
Pro tip – Chilling will firm the buttercream, which makes it easier to place all the edible decorating without a mess.
Mermaid tails, shells, seaweed, seashells
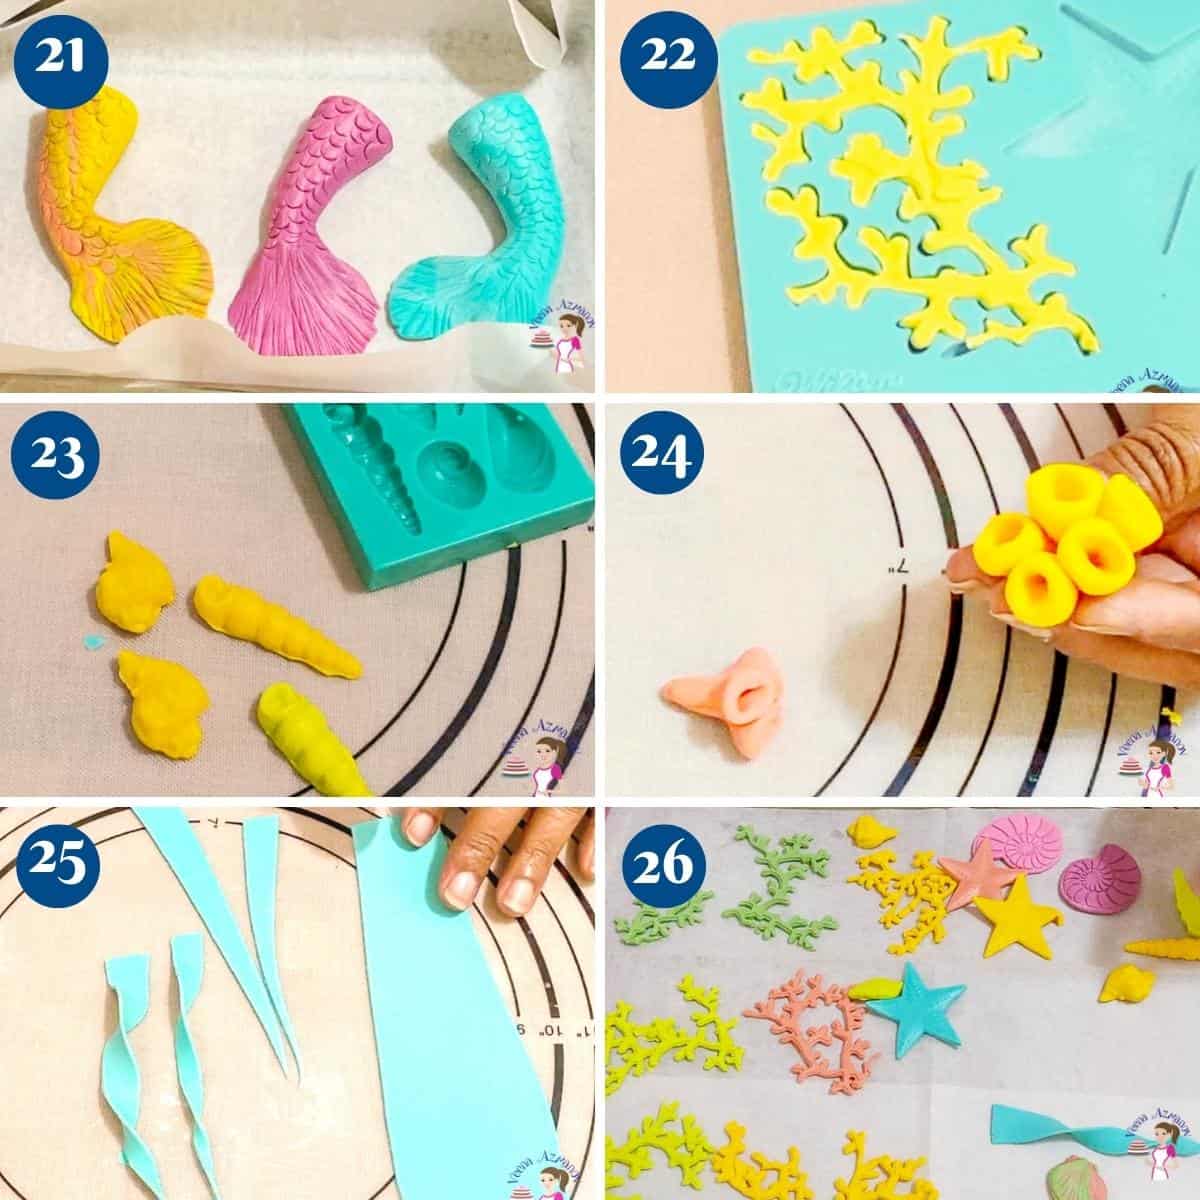
- Divide the fondant into smaller portions and use food gel colors to make different shades that will match the cake.
Pro tip – Add ½ tsp of CMC to the fondant. This will ensure it holds its shape when molded. - Tails – Create three mermaid tails freehand as shown in the video, or you can also use a mermaid tail silicone mold.
- Shells, corals – I used a seashell mold to make the seashells and corals. You can fill it with melted chocolate or use fondant as well.
- Seaweed – Cut strips of fondant in greens for the grass and seaweed.
- Dry – Place everything on a parchment-lined baking tray and let it dry completely
Pro tip – These will take 4 to 6 hours, but can be made a few days in advance as well.
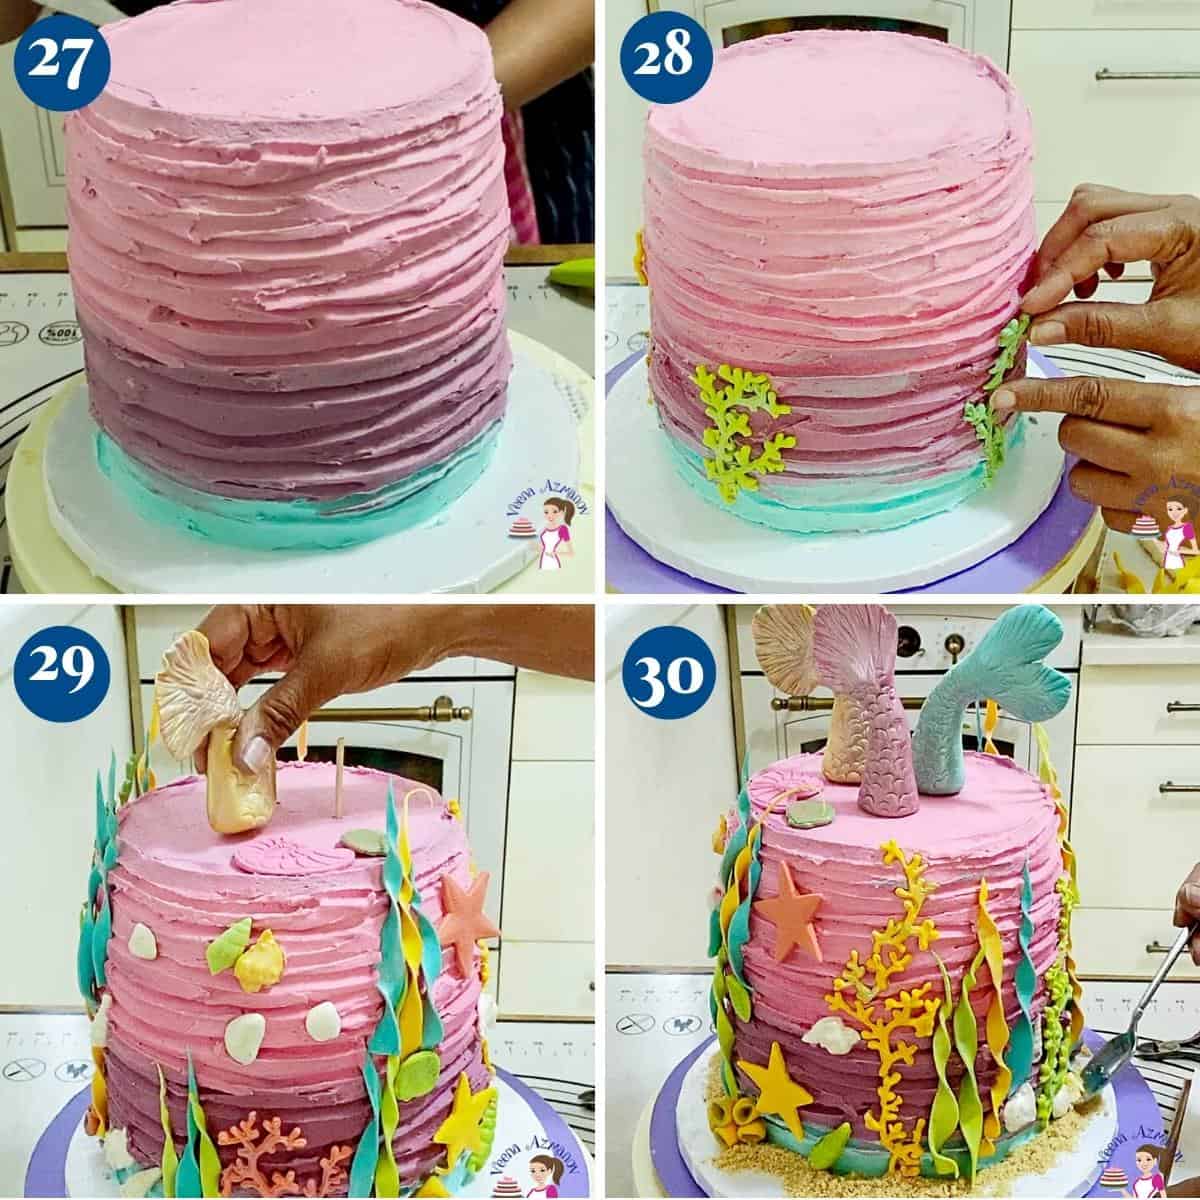
Assemble
- Decorations – Start by arranging the corals and grass around the cake. Then, add the seashells and the rest of the fondant accessories you created.
Pro tip – These will stick easily on the buttercream, so you don’t need any water or edible glue. - Center dowel – Finally, add three skewers on top of the cake and place the mermaid tails on it.
Pro tip – These will hold the weight of the tails and prevent them from sinking into the cake, as well as help support the cake. - Sand – Add all the edible sand ingredients to a bowl and combine well. Spoon edible sand all around the cake and at the base of the mermaid tails.
- Ribbon – Don’t forget to put a ribbon around the cake board. It completes the cake.


Frequently asked questions
This cake will keep on the counter in cool temperatures for up to 3 days. If you plan to travel with it, chill it thoroughly in the fridge before the trip.
The options for cake fillings and frostings are endless. Try bakery-style vanilla or chocolate frosting. Then, there is my eggless vanilla or caramel buttercream. Alternatively, less sweet options include meringue- or custard-based frostings, such as Swiss, Italian, French, or German.
This should be considered two cakes when cutting. So, the first cake is made with two layers of cake. Once you cut those slices, remove the cake board and dowels below before you cut the bottom cake with two more layers of cake.

Mermaid Cake Recipe & Tutorial
This buttercream mermaid cake is perfect whether it's a little girl's birthday party or an adult mermaid party!. This tall buttercream cake with the mermaid tail toppers and fondant accessories will steal your heart. With my step-by-step and video tutorial, you can make this for your little princess too.
Video
Ingredients
- 5 cups (600 g) All-purpose flour
- 3 tsp Baking powder
- 1 tsp Baking soda
- 1 tsp Salt
- 6 large Eggs
- 2½ cups (500 g) Sugar
- 1 cup (240 ml) Cooking Oil flavorless
- 1 cup (240 ml) Buttermilk
- ½ cup (120 ml) Sour cream
- 11/2 tbsp Vanilla extract
- 1 lb (450 g) Unsalted butter room temperature
- 2 lbs (900 g) Powdered sugar confectioners
- 80 ml (⅓ cups) Heavy cream dairy or non dairy
- 2 tbsp Meringue powder
- 2 tsp Vanilla extract
- 1 cup (240 ml) Simple syrup
- ½ lb (250 g) Fondant
- 1 tsp CMC
- 6 Food color gels turquoise, purple, fuschia, pink
- 1 Luster dust White
- 3 Petals dust green, purple, blue
- ½ cup Cookie crumbs
- ¼ cup Brown sugar
- 1 tsp Luster dust optional
Method
- Preheat the oven at 165°C/325°F/ Gas Mark 3. Grease and line with parchment paper 4 x 7-inch round cake pans (or 3 x 8-inch round cake pans).
- Dry ingredients – Combine flour, baking powder, baking soda, and salt – set aside.5 cups All-purpose flour, 3 tsp Baking powder, 1 tsp Baking soda, 1 tsp Salt
- Eggs – In the bowl of a stand mixer with a whisk attachment on medium speed whip the whole eggs for 2 minutes. Gradually add the sugar a little at a time and continue to whip until the eggs are light and foamy or ribbon stage6 large Eggs, 2½ cups Sugar
- Oil – Next, gradually add the oil while whipping continuously.1 cup Cooking Oil
- Combine – Next, add the flour mixture, buttermilk, and sour cream in three or four batches. Scraping the sides of the bowl when necessary. Finally, add the vanilla extract.1 cup Buttermilk, 1/2 cup Sour cream, 11/2 tbsp Vanilla extract
- Pans – Divide this batter between the four baking pans. I used cake strips to ensure I had flat cakes with no domes.Note – I divided the batter into 4 bowls and colored each in shades of pink (my daughter's request was pink inside) before I create a tie-dye kinda effect.
- Bake – Place the pans on the middle rack and bake for 30 to 35 minutes or until a skewer inserted in the center comes out clean.
- Cool – Once baked, cool on a wire rack for 10 minutes then invert cakes from the baking pans and cool completely. When cooled, wrap each cake in plastic wrap and chill in the fridge for at least 4 hours.
- Meringue – Combine the meringue powder, heavy cream, and approximately two cups of powdered sugar in the bowl of a stand mixer with the paddle attachment. Whip starting on low speed until you have a thick, light, and sticky mixture.80 ml Heavy cream, 2 tbsp Meringue powder, 2 lbs Powdered sugar
- Powdered Sugar – Next, gradually start adding the remaining powdered sugar in two batches.
- Butter – Once all the butter is in – run the mixer on high for about 3 to 5 minutes more. Whip until you have a light, fluffy, creamy, velvety texture similar to whipped cream. Add the vanilla extract.1 lb Unsalted butter, 2 tsp Vanilla extract
- Divide – Use 3 cups of buttercream for filling between the layers. The rest can be colored with gel food colorings – I used turquoise, purple, fuchsia, and pink. Place the colored buttercream in piping bags without tips.
- Syrup – Prepare simple syrup to moisten the cake layers. These will keep the cake moist for longer.1 cup Simple syrup
- Level, moisten – Using a bread knife or cake leveler, cut the domes off the cake layers. Brush each layer with the cooled simple syrup.
- Two layers – Place a cake layer on the cake board or cake stand. Top with a big dollop of buttercream – spread evenly using a straight-edge spatula. Then top with the second layer.
- Dowel – Next, add 4 dowels into the cake, using the first as a guide to cut the others. Make sure they are straight at 90 degrees so they do not tilt. Then, place the 6-inch cake circle on top. Add a little more buttercream and spread with a spatula.
- Next two layers – Then, top the three cake layer on top followed by more buttercream and the next layer.
- Frost – Next, pipe the colored buttercreams all around the cake starting with the turquoise at the bottom, followed by the purple, fuchsia, and pink.Note – I wanted the top of the cake to look slightly narrow than the bottom. So, I use a 6-inch cake board as a guide to carve out the top crown. If you watch the video it will make sense.6 Food color gels
- Smooth – Use a straight-edged spatula to spread the buttercream evenly as well as to marble some of the colors so they blend into each other.
- Pattern – Next, use the tip of a spatula to create lines all around the cake as shown in the video.
- Top – Finally, add more buttercream on top and smooth the top. Smooth it with an offset spatula.
- Chill – Place the cake in the fridge for at least 30 minutes before you assemble it.
- Divide the fondant into smaller portions and use food gel colors to make different shades that will match the cake.Pro tip – Add ½ tsp of CMC to the fondant. This will ensure it holds its shape when molded.½ lb Fondant, 1 tsp CMC
- Tails – Create three mermaid tails free-hand as shown in the video or you can also use a mermaid tail silicone mold.
- Shells, corals – I used a seashell mold to make the seashells and corals. You can fill it with melted chocolate or use fondant as well.
- Seaweed – Cut strips of fondant in greens for the grass and seaweed.
- Dry – Place everything on a parchment-lined baking tray and let dry completely Pro tip – these will take 4 to 6 hours but can be made a few days in advance as well.1 Luster dust, 3 Petals dust
- Decorations – Start by arranging the corals and grass around the cake. Then, add the seashells and the rest of the fondant accessories you created.
- Center dowel – Finally, add three skewers on top of the cake and place the mermaid tails on it.
- Sand – Add all the edible sand ingredients to a bowl and combine well. Spoon edible sand all around the cake and at the base of the mermaid tails.½ cup Cookie crumbs, ¼ cup Brown sugar, 1 tsp Luster dust
- Ribbon – Don't forget to put a ribbon around the cake board. It completes the cake.
Notes
- Bake the cakes in advance so they have enough time to cool. Nothing is more frustrating than a melting frosting on a cake.
- There is no need to rush the process. Use the timeline given above to plan the cake. That way you will enjoy the process and do a good job too.
- I am using buttercream frosting that can stay out of the fridge for days but if you use perishable frosting make sure to keep it chilled in the cake.
- If you live in a hot and humid climate use a frosting that will give you enough time to frost, as well as travel to your final destination.
- A cold cake is easier to transport so always chill the cake well before you move it. Fewer accidents happen when the cake is well chilled.
- Don’t make haste. Stand back and look at the cake – see what looks good and where you can add more decorations. Since this is a buttercream cake place things correctly, so you don’t have to move them around.
- You may or may not need all the edible decorations you created, so don’t feel pressured to add it all. Sometimes less is more.
Equipment you will need


Nutrition
Tried this recipe?
Mention @veenaazmanov_kitchen or tag #veenaazmanovkitchen!more cake tutorials
- Castle Cake Tutorial
- Pillow Cake
- Car Cake Tutorial
- Pregnant Belly Cake for Baby Showers
- Homer Simpson on a Pile of Donuts Cake


Don’t lose this recipe! Save it for Later!
📌 Save this Recipe for later on Pinterest so you can easily find it again.
⭐ Add Veena Azmanov Kitchen to your Google Preferred Sources.
It helps Google show you more of our recipes.
📧 Subscribe for new recipes delivered to your inbox.
🎥 Follow us for more recipes


When I originally commented I clicked the “Notify me when new comments are added” checkbox and now each time a comment is added I get four emails
with the same comment. Is there any way you can remove people from
that service? Appreciate it!
Joie. Sorry about that. There should be an unsubscribe at the bottom of that email. Please click on that to unsubscribe from future comments. Sorry, the system works so you are in control, not me.