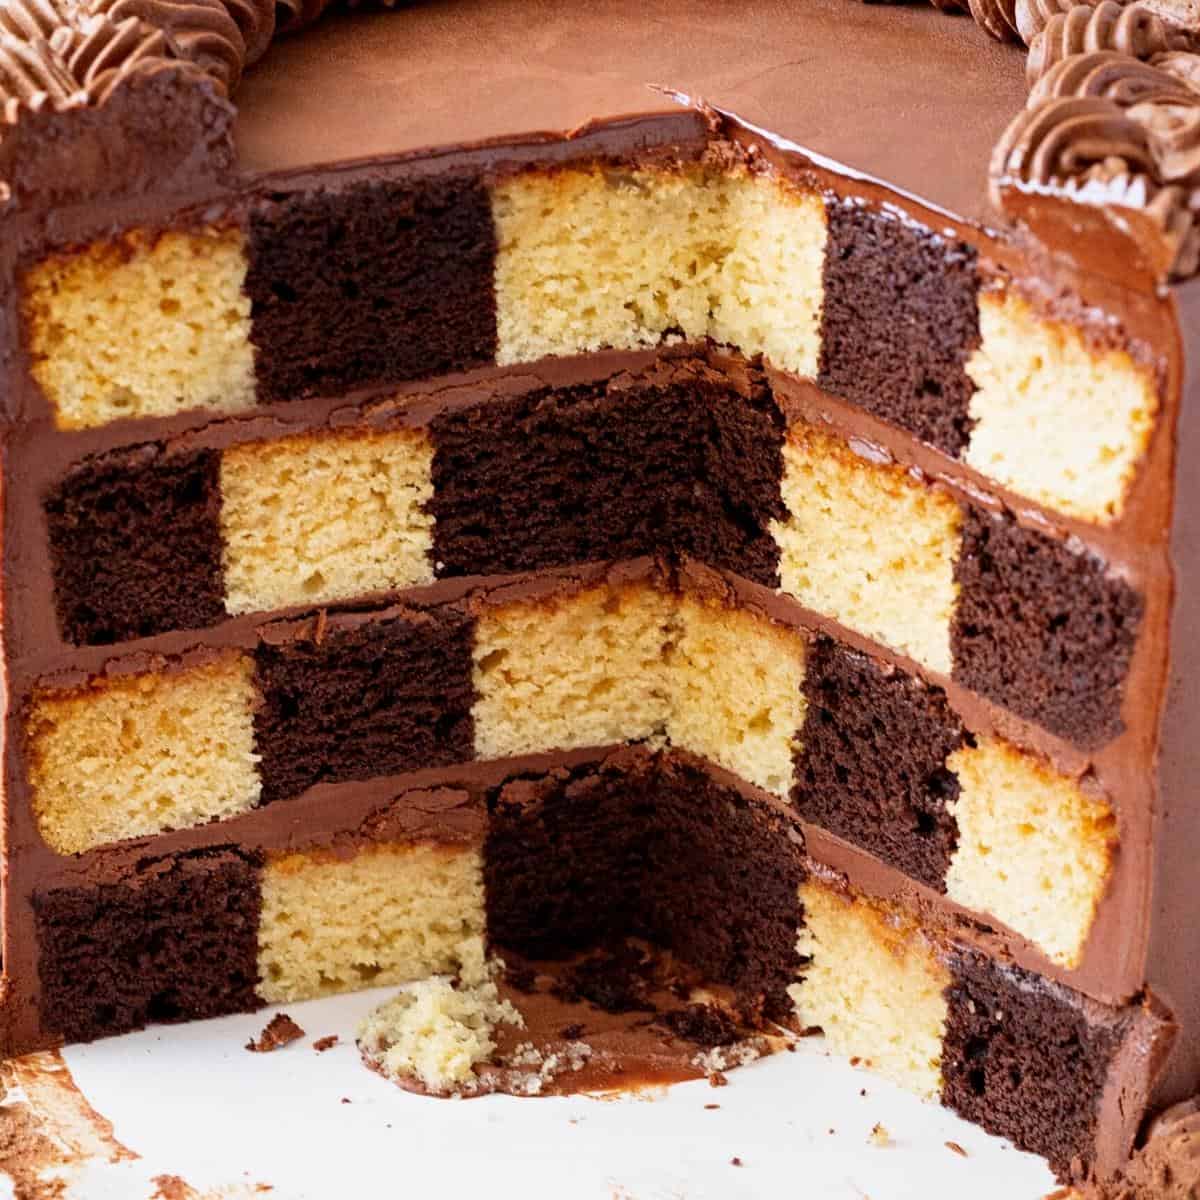
Impressive Checkerboard Cake
 Prep Time 2 hours Cook Time 25 minutes Total Time 6 hours 25 minutes
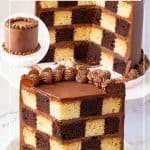
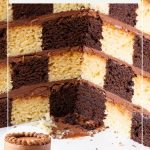
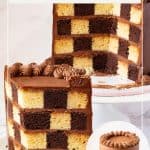
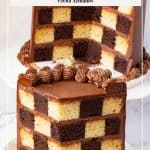
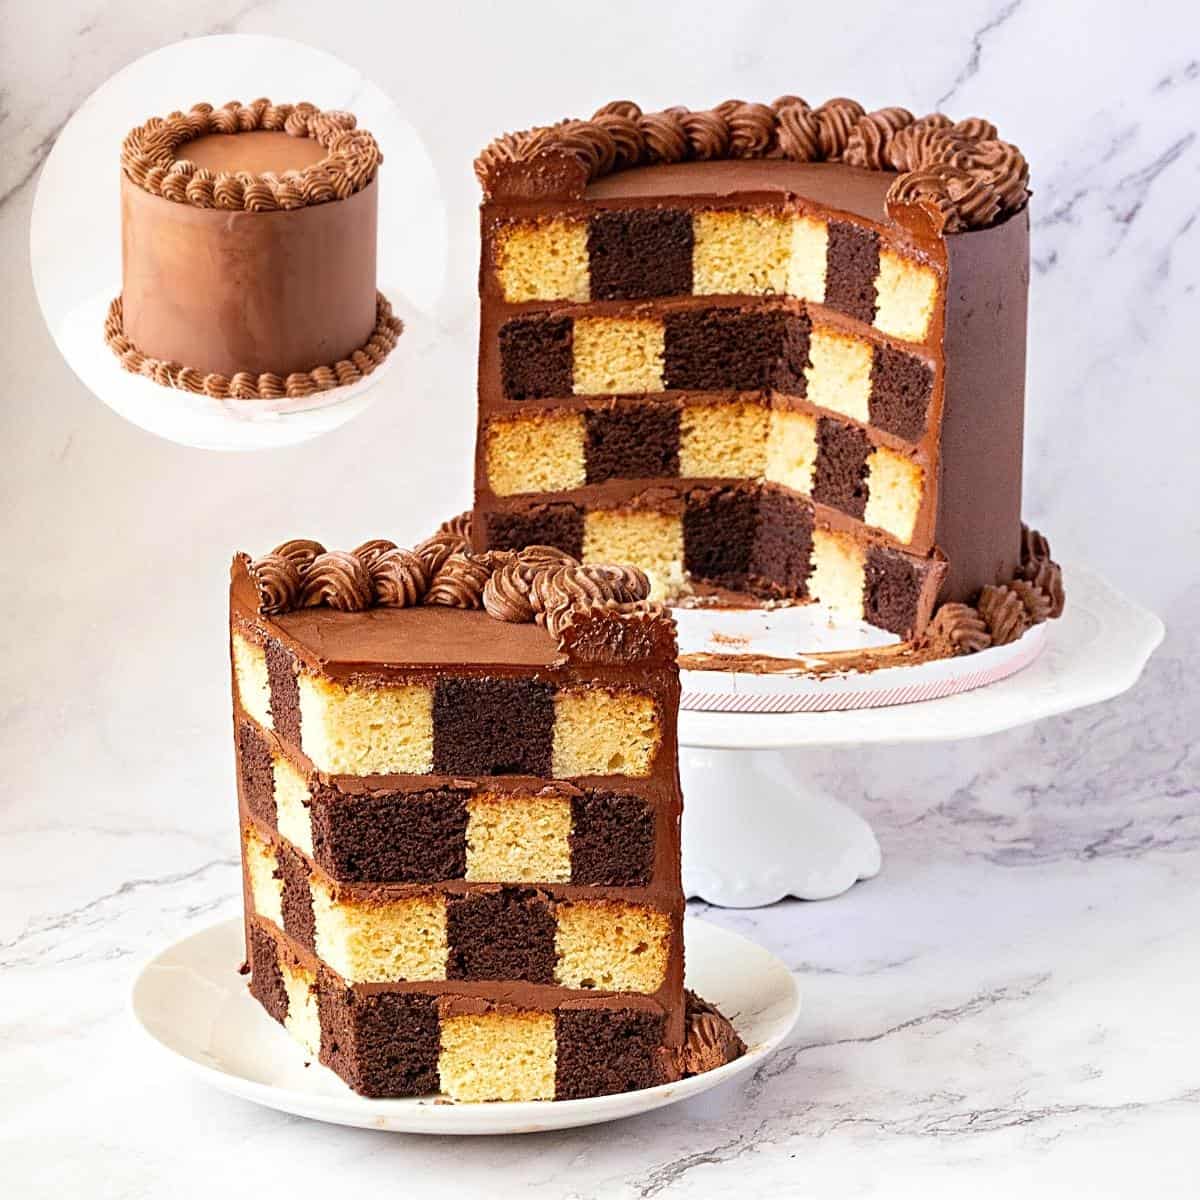
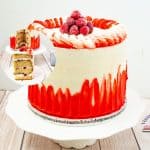
A checkerboard cake is impressive and surprisingly easy to make. Four layers of vanilla and chocolate cake frosted with chocolate ganache create this wonderful checkerboard effect. A fun new way to decorate a cake!
When I ran my cake business, one of the most exciting cakes I made—over and over again—was the Checkerboard Cake. It wasn’t just about the flavor; it was about the surprise inside. Customers loved slicing into the cake to reveal the perfectly patterned checkerboard effect, and I loved the challenge of making each one flawless.
I didn’t just stick to the classic vanilla-and-chocolate combination—I made these cakes in so many different colors and flavors! From pastel pinks and blues for baby showers to bold reds and blacks for dramatic birthday cakes, and even rainbow checkerboards that made every slice look like a celebration. Each one was customized to fit the occasion, and every time I delivered one, I knew it would bring a wow factor when it was cut.
These cakes were a true labor of love, requiring careful planning to ensure each layer and section lined up perfectly. Whether for birthdays, weddings, or special events, my checkerboard cake became one of my cake business’s most unique and requested designs. And honestly? Even after making so many, I never got tired of creating them!
Why is this the best cake recipe?
- Visual Appeal: The checkerboard pattern creates a stunning visual effect that is sure to impress.
- Flavor Variety: The combination of vanilla and chocolate layers provides a delicious contrast in flavors.
- Moist and Tender Crumb: The use of sour cream in the batter helps to keep the cake moist and tender.
- Versatility: This recipe can be easily adapted to different flavors and decorations to suit various occasions.
- Fun to Make: Creating the checkerboard pattern is a fun and creative baking project that can be enjoyed by both novice and experienced bakers.
- Great for Celebrations: The unique look of the cake makes it perfect for special occasions and celebrations.
Ingredients and substitutes
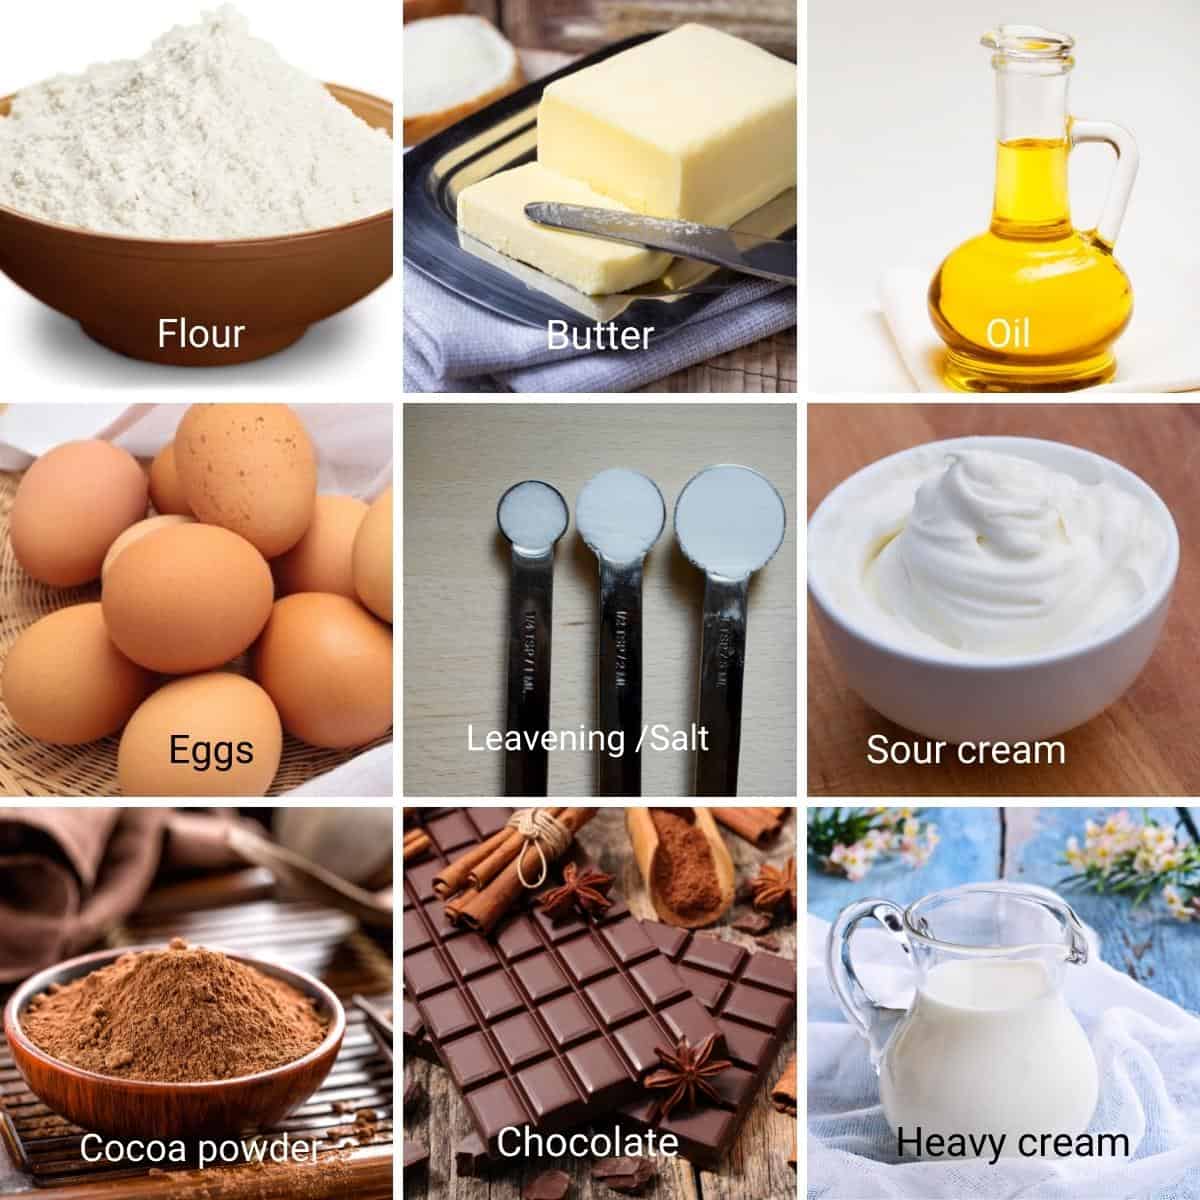
- Flour – While cake flour is great for cakes, due to the need for carving, I prefer to use all-purpose flour. I believe it gives more stability to the cake with fewer crumbs.
- Fat – I’ve used a combination of good-quality unsalted butter and cooking oil. I do believe the butter adds stability to the cake while the oil helps keep both the chocolate and vanilla batter moist.
- Sugar – Use fine-grain white sugar, such as castor, if possible, so the sugar will dissolve into the butter during the creaming process.
- Eggs – Large eggs work best for this batter. And, if you can’t use eggs, you can also use my eggless vanilla cake with eggless chocolate cake instead. Do NOT substitute eggs in the batter with egg substitutes, as it has not been tested with this recipe.
- Sour cream – gives the cake a nice, soft, tender crumb. In this recipe, you can also successfully use buttermilk or Greek yogurt instead of sour cream (I’ve tested it!)
- Vanilla – I really like to use pure vanilla extract, but you can also use vanilla bean paste. In fact, you can even substitute some of the sugar with vanilla sugar.
Step-by-step: How to make a checkerboard cake
Cake batter
- Oven & Pans – Preheat the oven to 325°F/165 °C (Gas Mark 3). Grease and line with parchment paper 4 x 7-inch round cake pans or 3 x 9-inch round cake pans.
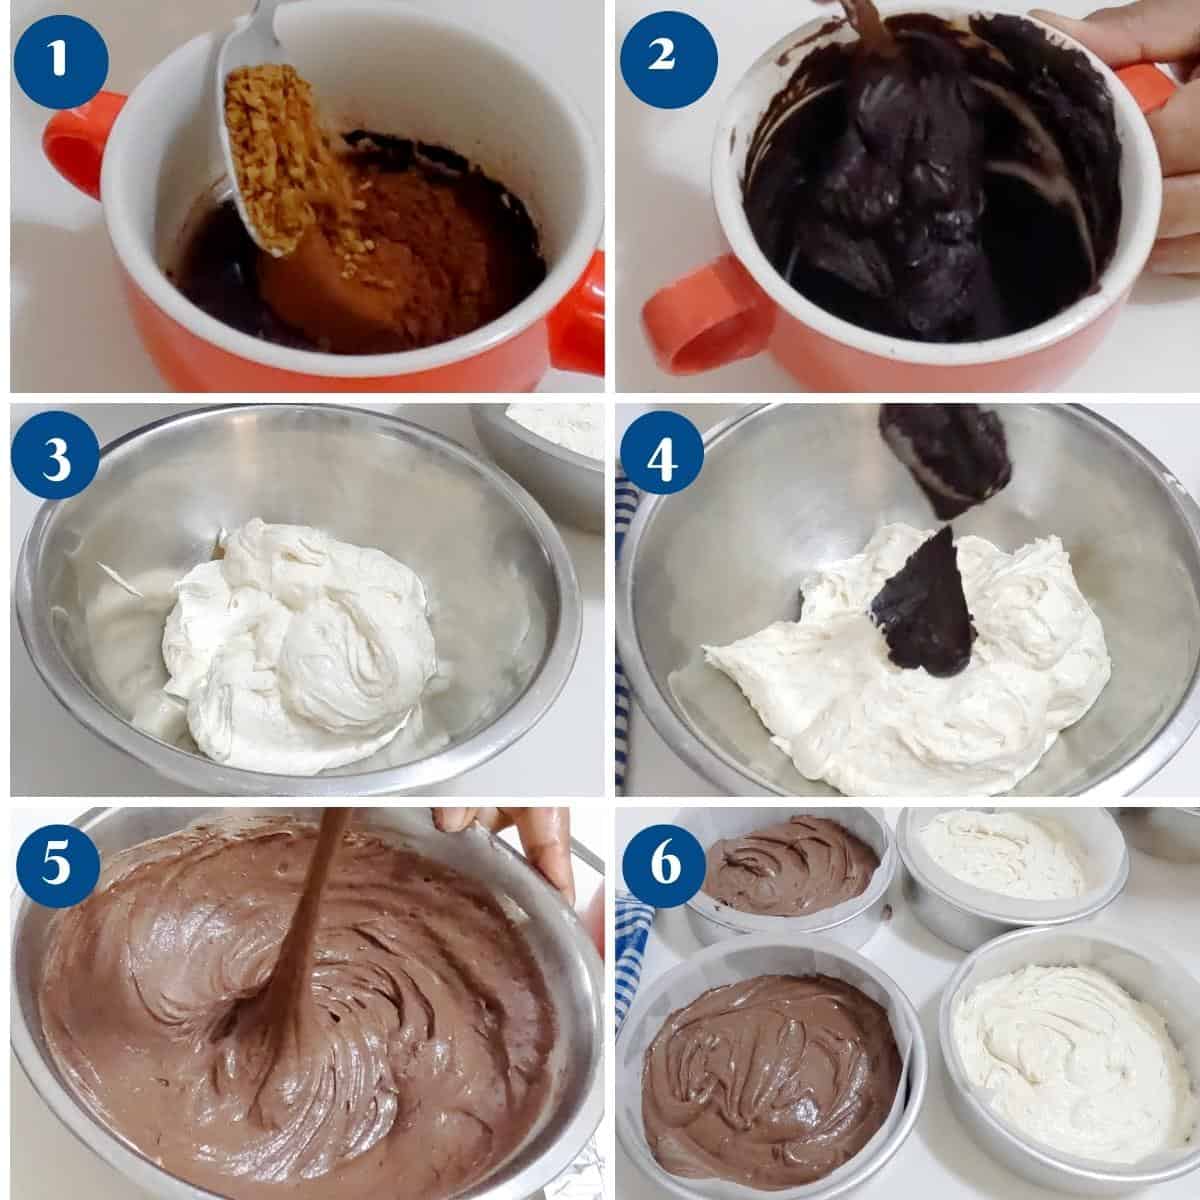
- Chocolate paste – combine the hot water, cocoa powder, and coffee to make a thick chocolate paste. Set aside to cool while you prepare the batter.
- Dry ingredients – Sift together flour, baking powder, baking soda, and salt. Set aside.
- Wet ingredients – In a bowl of a stand mixer with the paddle attachment on medium speed, cream together butter and sugar until light and fluffy. Then, gradually add the oil, followed by the eggs one at a time, and the vanilla extract.
Pro tip – Add the eggs one at a time, making sure each is well incorporated to prevent it from separating.
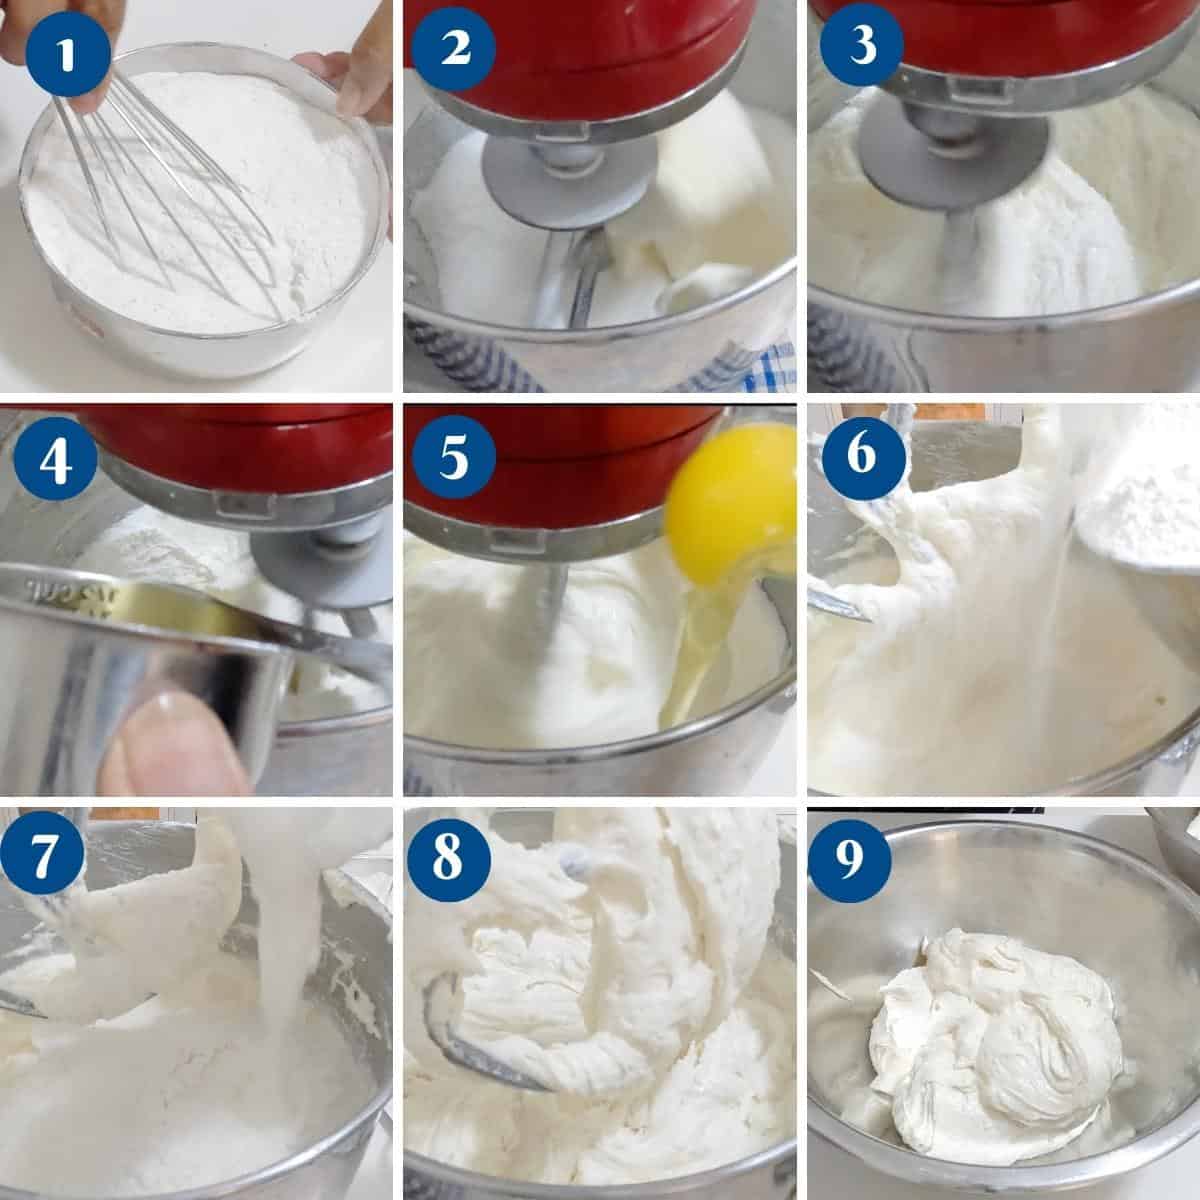
- Combine – Next, add the flour mixture and sour cream in three batches, ensuring everything is well combined, but do not overmix. This will be a thick drop consistency batter, so do not add more milk or water unless necessary.
Pro tip – Make sure to scrape the bottom and sides of the bowl to ensure no dry flour is left behind. - Divide – Using two similar-sized bowls, divide the batter into two portions. One for the vanilla and one for the chocolate.
Pro tip – I like to use two similar bowls and divide the batter approximately. Alternatively, you can also use a scale, so I have two equal portions. - Vanilla batter – Nothing needs to be done. Divide the vanilla batter between the two prepared baking pans. (2 vanilla cake layers)
- Chocolate batter – Add the chocolate paste mixture to the second batter. Then divide this batter between the other two prepared baking pans. (2 chocolate cake layers)
- Bake – Transfer the pans to the oven and bake for about 25 to 30 minutes or until a toothpick inserted in the center of the cake comes out clean.
Pro tip – If necessary, rotate the pans in the oven halfway through the baking. - Cool – When baked, cool in the pan for 10 minutes, then invert on a wire rack and cool completely. At least a few hours before frosting
Pro tip – I prefer to let the cakes cool overnight. Frosting warm cakes will cause the frosting to melt.

Frosting
- Chocolate ganache – In a microwave-safe large bowl, heat the chocolate and cream until melted and smooth. Let cool at room temperature overnight or for a few hours in the fridge until set. You want the ganache to set to about peanut consistency.
Pro tip – Alternatively, you can heat the heavy cream in a saucepan and pour hot cream over the chocolate. Stir until smooth. Then cool until thick. - Whipped chocolate ganache – Whip the chilled ganache in a stand mixer with the whisk attachment until light and fluffy. DO NOT OVERWHIP.
Pro tip – Overwhipped ganache will become hard. If that happens, add one or two tablespoons of hot milk and whip until smooth.
Checkerboard effect
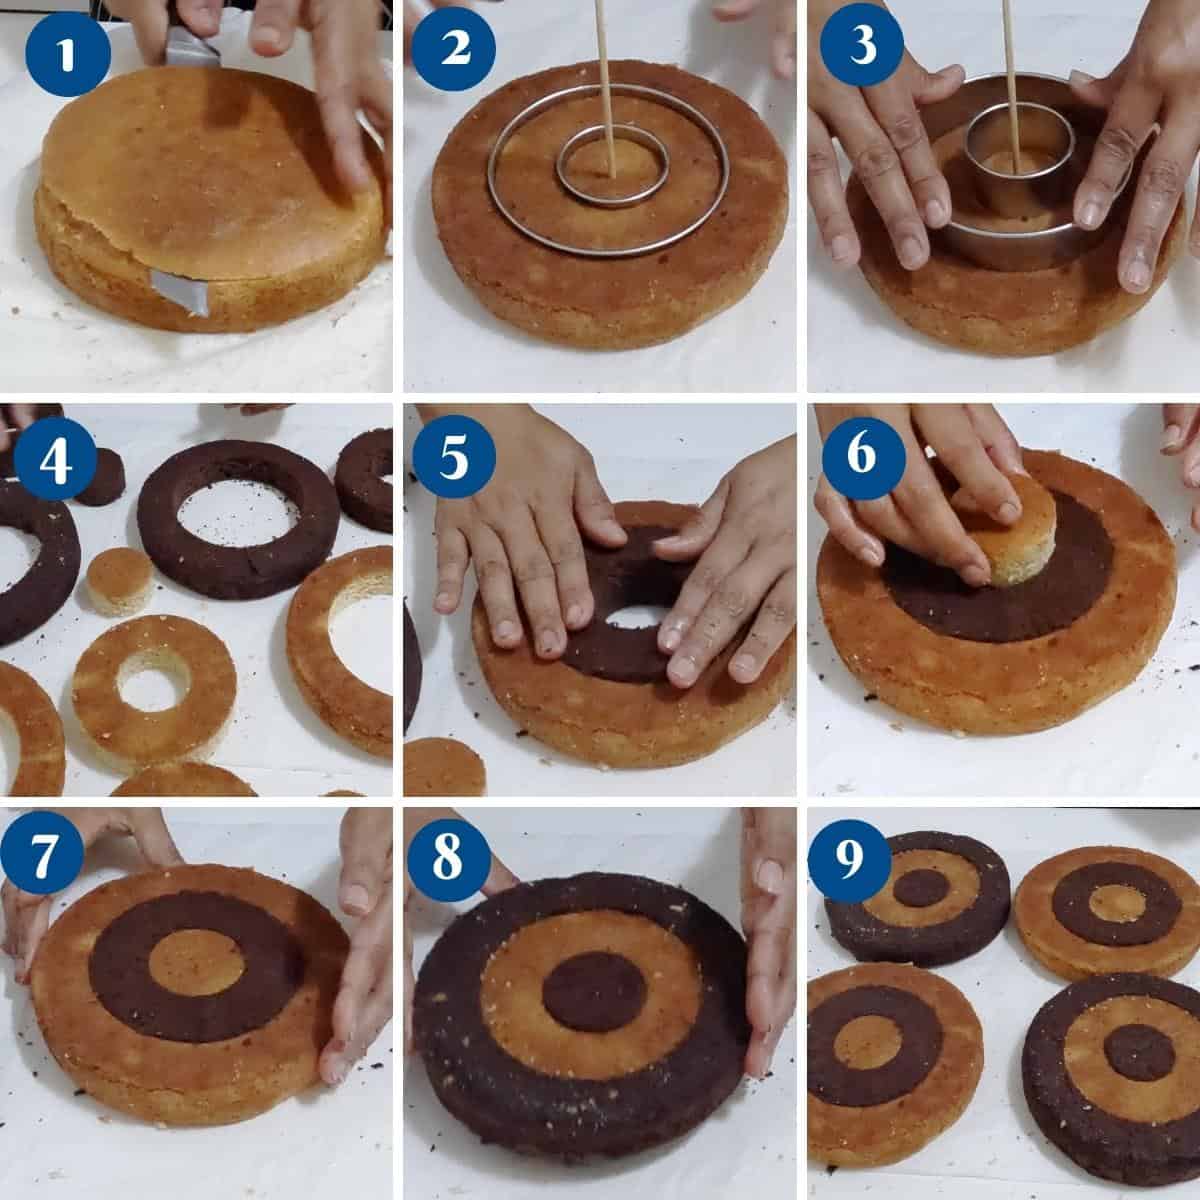
- Level – Once cooled, use a bread knife to cut the domes off the cake layers.
- Cut the circles – For the 7-inch cakes, I used a 5-inch and a 2½-inch cookie cutter.
- Using the cookie cutter, cut each cake layer into 3 rings as shown in the video.
- Do this with all four cakes.
Pro tip – You can also use a small plate, bowl, glass, etc., as a guide to cut the cake into even rings.
- Arrange the circles
- Rearrange the cake rings so you have a chocolate ring and a vanilla ring in each cake, as shown in the video.
- Now, do the same with all until you have 4 similar cakes with alternate colors.
Pro tip – It is easier to work with two cakes at a time, so you can interchange the rings without confusion.
Assemble
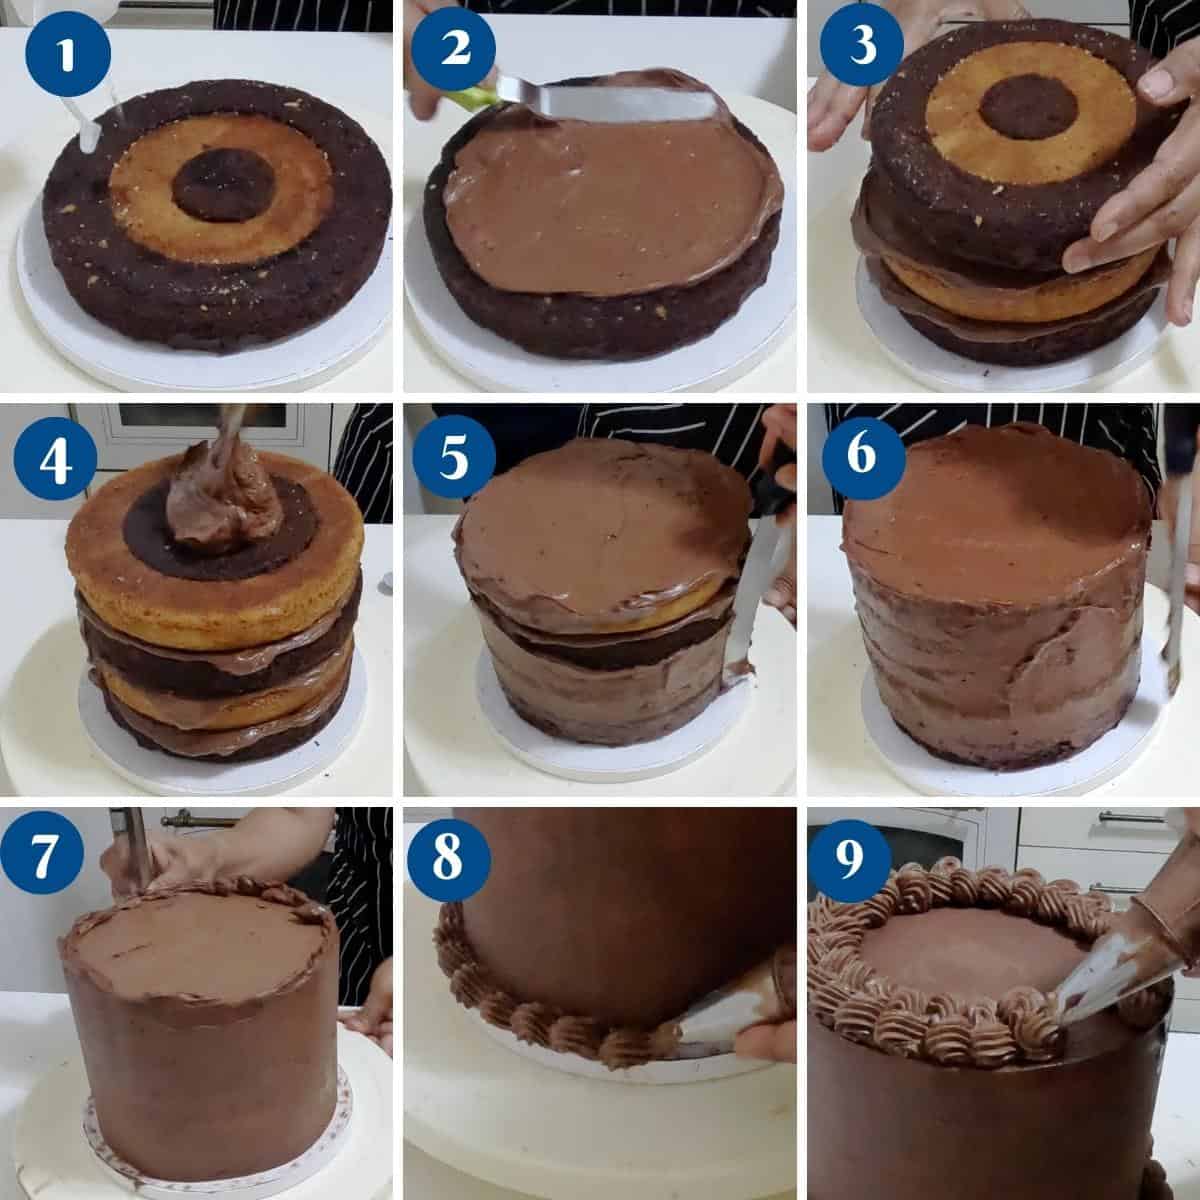
- Simple syrup – Brush each layer with the cooled simple syrup.
Pro tip – Simple syrup is sugar boiled in water until melted and cooled. It helps keep the cakes moist. - Stack – Place a cake layer on the cake board or cake stand.
- Top with a big dollop of ganache spread evenly using a straight-edge spatula.
- Top the second cake layer on top, followed by more ganache until you have used up all the cake layers.
- Crumb coat – Spread more ganache on the top and sides of the cake with a spatula. Then, place the cake in the fridge for 15 minutes. This will prevent the layers from moving while you frost the outside of the cake.
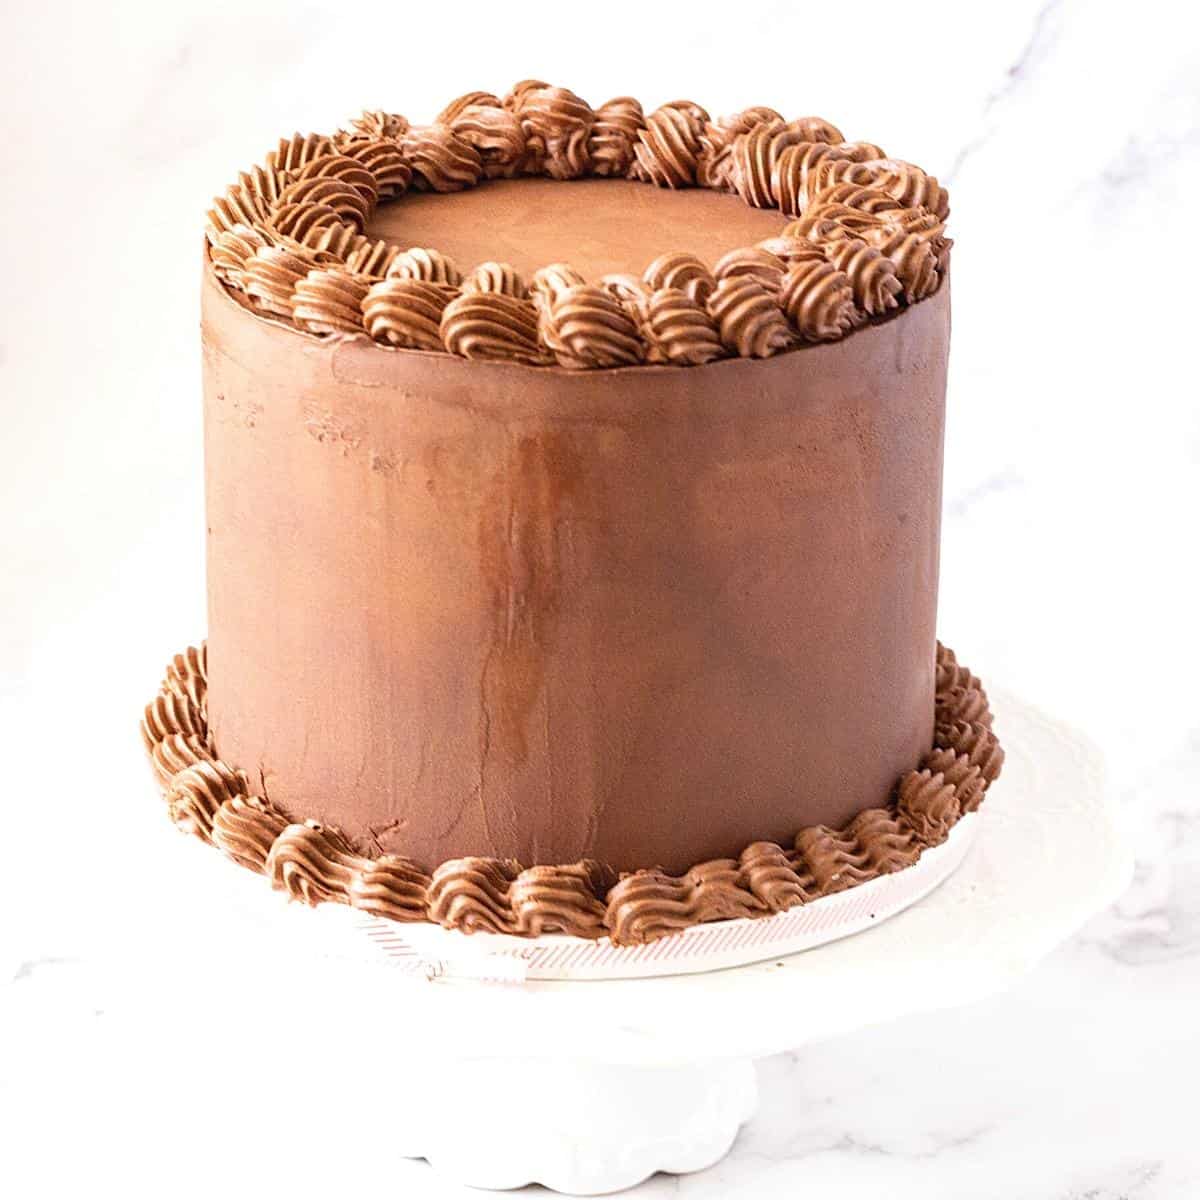
- Frost – When chilled, spread more ganache around and on the top of the cake. Use a cake bench scraper to smooth the sides and an offset spatula for the top. Smooth with a bench scraper as best you can.
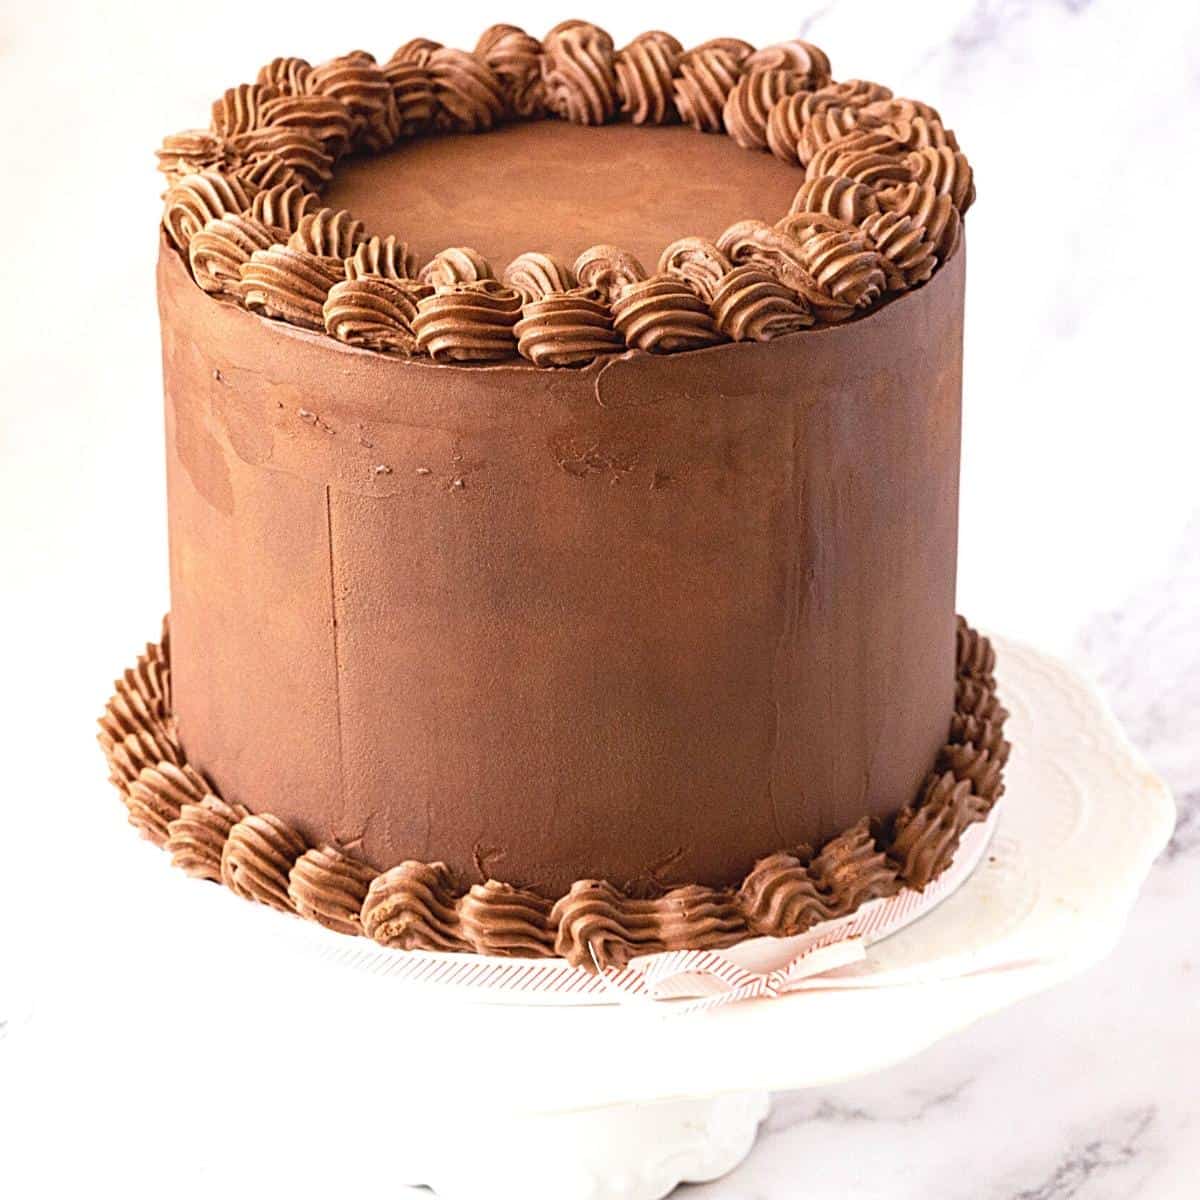
- Borders – Put any remaining frosting in a piping bag and pipe a border around the cake as well as on top of the cake.
- Garnish with chocolate decorations as desired.
- Mom’s Vanilla Cake Recipe: A Timeless Classic for Any Occasion
- Cake Decorators Chocolate Ganache
- Perfect Homemade Black Fondant
- Frozen Hot Chocolate Drink
- Cake Decorators White Chocolate Ganache

Frequently asked questions
Store a checkerboard cake in an airtight container at room temperature for up to two days, or in the refrigerator for up to five days. If the cake is frosted, store it in the refrigerator.
Yes, you can make a checkerboard cake ahead of time. Bake the cakes, let them cool completely, and then wrap them tightly in plastic wrap. Store them at room temperature for up to two days or freeze them for longer storage.
Yes, you can freeze a checkerboard cake. Wrap the unfrosted cake layers tightly in plastic wrap and then aluminum foil before freezing. Thaw the cake in the refrigerator before frosting and serving.
– First, make sure that your cake layers are all the same height. I recommend measuring your cake batter and using the same amount when baking, so you do not have to trim your layers as much.
– Use ring /cake circles/discs that are spaced equally apart – so if you have a 9-inch cake, the second circle should be cut at 6-inch circles, then 3-inch circles.
There are so many other frosting options. Such as:
Swiss or Italian Meringue Buttercream
French or German Buttercream Frosting
Chocolate Buttercream Frosting
Ermine Frosting (Less Sweet)
I have over 30-plus frosting recipes on this blog. And I highly recommend checking them out
Checkerboard Cake Recipe
A checkerboard cake is impressive and surprisingly easy to make. Four layers of vanilla and chocolate cake frosted with chocolate ganache create this wonderful checkerboard effect. A fun new way to decorate a cake!
Video
Ingredients
- 3 cups (375 g) All-purpose flour
- 2 tsp Baking powder
- ½ tsp Baking Soda
- ½ tsp Salt
- ¾ cup (170 g) Unsalted Butter unsalted, room temperature
- 2¼ cups (450 g) Sugar granulated
- ⅓ cup (80 ml) Cooking oil
- 4 large Eggs
- 2 tsp Vanilla extract
- 1½ cups (340 g) Sour cream
- ½ cup (50 g) Cocoa powder
- ¼ cup (60 ml) Hot water
- 1 tsp Coffee powder instant
- 10 0z (10 g) Chocolate semi-sweet or dark
- 1 cup (240 ml) Whipping cream 38% fat
- 1 tsp Vanilla extract
Method
- Oven & Pans – Preheat the oven to 325°F165°C/ Gas Mark 3. Grease and line with parchment paper 7-inchpans4 x 7-inch round cake pans or 2 x 9-inch round cake pans.
- Chocolate paste – combine the hot water, cocoa powder, and coffee powder to make a thick chocolate paste. Set aside to cool while you prepare the batter.½ cup Cocoa powder, 1 tsp Coffee powder, ¼ cup Hot water
- Dry ingredients – Sift together flour, baking powder, baking soda, and salt, Set aside.3 cups All-purpose flour, 2 tsp Baking powder, ½ tsp Baking Soda, ½ tsp Salt
- Wet ingredients – In a bowl of a stand mixer with the paddle attachment on medium speed, cream together butter and sugar until light and fluffy. Then, gradually add the oil followed by the eggs one at a time and the vanilla extract.¾ cup Unsalted Butter, 2¼ cups Sugar, ⅓ cup Cooking oil , 4 large Eggs, 2 tsp Vanilla extract
- Combine – Next, add the flour mixture and sour cream in three batches making sure to combine well but do not overmix. This will be a thick drop consistency batter so do not add more milk or water unless necessary.1½ cups Sour cream
- Divide – Using two similar size bowls divide the batter into two portions. One for the vanilla and one for the chocolate.
- Vanilla batter – Nothing needs to be done. Divide the vanilla batter between the two prepared baking pans. (2 vanilla cake layers)
- Chocolate batter – Add the chocolate paste mixture to the second batter. Then divide this batter between the other two prepared baking pans. (2 chocolate cake layers)
- Bake – Transfer the pans to the oven and bake for about 25 to 30 minutes or until a toothpick inserted in the center of the cake comes out clean.
- Cool – When baked cool in the pan for 10 minutes then invert on a cooling rack and cool completely. At least a few hours before frosting
- Chocolate ganache – In a microwave-safe bowl, heat the chocolate and cream until melted and smooth. Let cool at room temperature overnight or for a few hours in the fridge until set. You want the ganache to set to about peanut consistency.10 0z Chocolate, 1 cup Whipping cream, 1 tsp Vanilla extract
- Whipped chocolate ganache – Whip the chilled ganache in a stand mixer with the whisk attachment until light and fluffy. DO NOT OVERWHIP.
- Level – Once cooled, use a bread knife to cut the domes off the cake layers.
- Cut the circles – For the 7-inch cakes, I used a 5-inch and a 2½-inch cookie cutter. – Using the cookie cutter cut each cake layer into 3 rings as shown in the video. – Do that with all four cakes. Pro tip – you can also use a small plate, bowl, glass, etc. as a guide to cut the cake into even rings.
- Arrange the circles – Rearrange the cake rings so you have chocolate and vanilla in each cake as shown in the video. Now, do the same with all until you have 4 similar cakes with alternate colors.
- Simple syrup – Brush each layer with the cooled simple syrup. Which is sugar boiled in water until melted and cooled. It helps keep the cakes moist.
- Stack – Place a cake layer on the cake board or cake stand. Top with a big dollop of ganache spread evenly using a straight-edge spatula. Top the second cake layer on top followed by more ganache until you have used up all the cake layers.
- Crumb coat – Spread more ganache on the top and sides of the cake with a spatula. Then, place the cake in the fridge for 15 minutes this will prevent the layers from moving while you frost the outside of the cake.
- Frost – When chilled spread more ganache around and on the top of the cake. Use a cake bench scraper to smooth the sides and an offset spatula for the top. Smooth with a bench scraper as best you can.
- Borders – Put any remaining frosting in a piping bag and pipe a border around the cake as well as on top of the cake.
- Garnish with chocolate decorations as desired.
Notes
- Prepare Your Pans: Make sure to grease and flour your cake pans well to prevent sticking.
- Even Layers: Use a kitchen scale to divide the batter evenly between the pans for uniform layers.
- Cooling: Allow the cakes to cool completely in the pans before removing them to prevent crumbling.
- Cutting the Discs: Use a sharp, round cookie cutter to cut out the discs from the cakes. Press straight down and avoid twisting to maintain clean edges.
- Interchanging Discs: Be gentle when removing and interchanging the discs to avoid breaking them. Handle them with care.
- Frosting: Use a thin layer of frosting between the layers to help them stick together and create a stable cake.
- Chill Before Cutting: For cleaner cuts, chill the assembled cake in the refrigerator for about 30 minutes before slicing.
Equipment you will need


Nutrition
Tried this recipe?
Mention @veenaazmanov_kitchen or tag #veenaazmanovkitchen!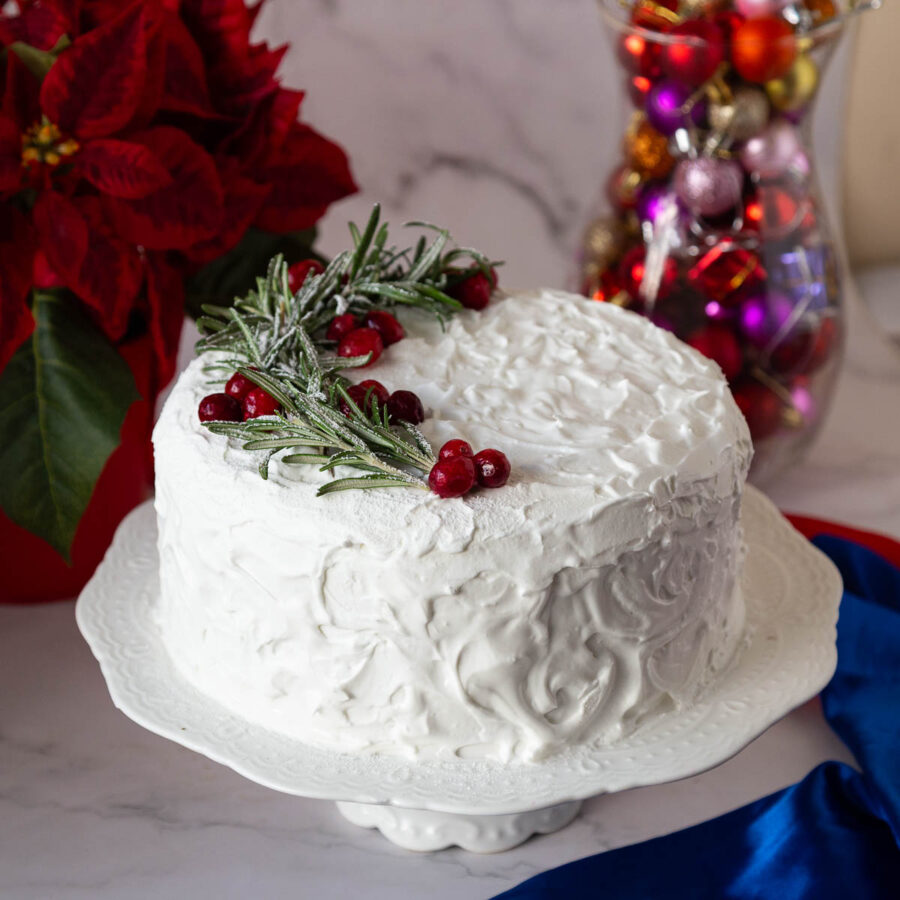

Don’t lose this recipe! Save it for Later!
📌 Save this Recipe for later on Pinterest so you can easily find it again.
⭐ Add Veena Azmanov Kitchen to your Google Preferred Sources.
It helps Google show you more of our recipes.
📧 Subscribe for new recipes delivered to your inbox.
🎥 Follow us for more recipes


I made this cake for my son’s 22nd birthday – it was wonderful. I had to make a 2nd batch of the ganache to have enough to frost the cake but it was delicious!!!
Can I use something else for the sour cream. It is one ingredient I really do not like.
Pam you can also use Greek yogurt for sour cream.
Hi Veena!
I want to try this cake but I have 9 inch pans, 8 inch pans and 6 inch pans. I don’t have 7 inch pans. Could you please suggest how I could modify the amount of the ingredients and the sizes of the inner rings of the cakrs? Thank you.
Tajashree – you can make three layers of 8-inch cakes or 2 layers 9-inch cakes. To make 4 layers of 8-inch cake you well need 11/2 times the recipe – Just use the 1 1/2X feature in the recipe card
I made the cake portion of the recipe. I did one full recipe plus half because I only had 9 inch pans. That was plenty for the pans plus 12 regular sized cupcakes and about 24 miniatures. I used simple syrup and an Ermine frosting. It was the best cake I’ve made in awhile. Thank you so much!
Thank you so much for the lovely feedback Amanda.