Best Pavlova Recipe (No-fail Method)
 Prep Time 10 minutes Cook Time 1 hour 30 minutes Total Time 1 hour 40 minutes
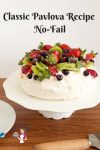
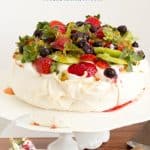
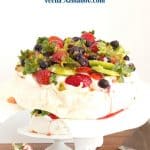
Crisp outside with a soft marshmallow-like inside is what makes the pavlova recipe so unique. Topped with whipped cream and fresh fruits this naturally gluten-free dessert uses my no-fail recipe and method.
Do you want to impress your friends and family with a dessert that looks like it came straight out of a gourmet bakery? Look no further than mastering the perfect pavlova! This light and fluffy meringue dessert topped with fresh fruit and cream is sure to wow your guests. But fear not, we know that pavlovas can be notoriously tricky to get right.
Did you know that the pavlova was named in honor of a Russian ballerina? I used to think this was a Russian dessert. And yet, it’s not! Some say it’s Australian while others say it’s from New Zealand.
The first time I had a pavlova was on my first trip to Melbourne, Australia. I fell in love and had to make it myself. I’ve had my fair share of success and failures over the years. We love making this at home and it’s now my kids’ favorite over meringue!
What is a pavlova?
I say a pavlova is where the meringue and marshmallow come together as one. Yes, a pavlova is a baked meringue resulting in a sweet sugary crisp meringue-like outside with a sweet marshmallowy-like pillow on the inside.
Meringue vs pav? Both are made of egg whites and sugar. In a meringue, egg whites are whipped to stiff peaks. While for a pav, you take a whipped meringue, add cornflour and vinegar and then bake it low and slow. So pav is essentially a baked meringue.
Why you’ll love this recipe?
- When making a Pavlova, it’s important to use the right ingredients and equipment. But even with the best of intentions, a simple mistake can turn your dream dessert into a baking nightmare. That’s where this no-fail recipe comes in. By following these tips and tricks, you will be able to make the perfect Pavlova every time.
- Not only is it a crowd-pleaser, but it’s also a versatile dessert that can be customized to suit any taste. Try my mini pavlovas or raspberry pavlova ice cream.
- Most of the ingredients are easy to find or simple pantry staples. In fact, if you have leftover egg whites this is a great dessert to use.
- And, this is a perfect make-ahead dessert. Just make the pavlova ahead of time and frost it on the day of the event.
- It is naturally gluten-free and Nut-free, so it is a great dessert to serve when entertaining.

Ingredients and substitutes
- Egg whites – Egg whites are the backbone of any pavlova recipe, and it’s essential to use fresh eggs at room temperature. If using store-bought eggs, check the expiration date and discard any that are past it. Aged eggs are considered the best for pavlova. So, if you have old egg whites (without any yolk) use them. For substitutions, aquafaba (the liquid from a can of chickpeas) can be use but that is a recipe for another day.
Pro tip – cold eggs are easier to separate. So separate them when cold but let them thaw before using. - Sugar – Granulated sugar is needed to give the pavlova structure and sweetness. However, some recipes call for caster sugar which is fine-grain white sugar, which dissolves more easily. If you don’t have caster sugar, you can make your own by blitzing granulated sugar in a blender for a few seconds Apart from that sugar stabilizes the egg whites helping them build volume and stay puffed up. how sugar affects baking
- Cream of tartar – Gives a much creamier egg white and it prevents the separation of protein and water in the whites. It’s also flavorless so it does not affect the flavor of your baked goods. The best substitute for cream of tartar is a pinch of salt, but lemon juice and vinegar are often used.
- Cornstarch – Cornflour (cornstarch in the US) is used to stabilize the egg whites and prevent weeping. This means that it absorbs any excess liquid left in your meringue so you have a nice crisp outside crust and a soft dry marshmallow on the inside without any weeping. If cornflour is not available, arrowroot powder or potato starch can be used instead.
Equipment for making pavlova
- Electric mixer: You will need an electric mixer to beat the egg whites until they are stiff and glossy. It’s best to use a stand mixer with a whisk attachment, as this will give you the best results.
- Mixing bowl: Choose a large metal or glass mixing bowl to beat the egg whites in. Plastic bowls can sometimes retain traces of oil or grease, which can affect the stability of the egg whites.
- Baking sheet: A baking sheet is essential for baking your pavlova. Make sure it’s large enough to hold the meringue and has a lip to prevent any spillages.
- Parchment paper: Line your baking sheet with parchment paper to prevent the pavlova from sticking and make it easier to transfer to a serving plate.
- Spatula: Use a silicone spatula to gently fold in the sugar and vinegar or lemon juice after beating the egg whites.
Step-by-step: Easy No-Fail Pavlova
Whip Egg Whites (10 mins)
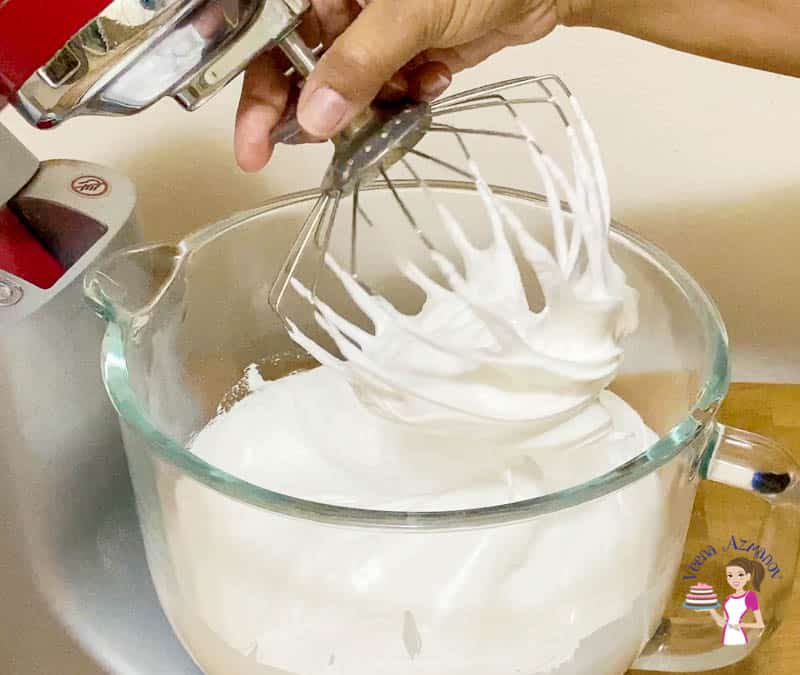
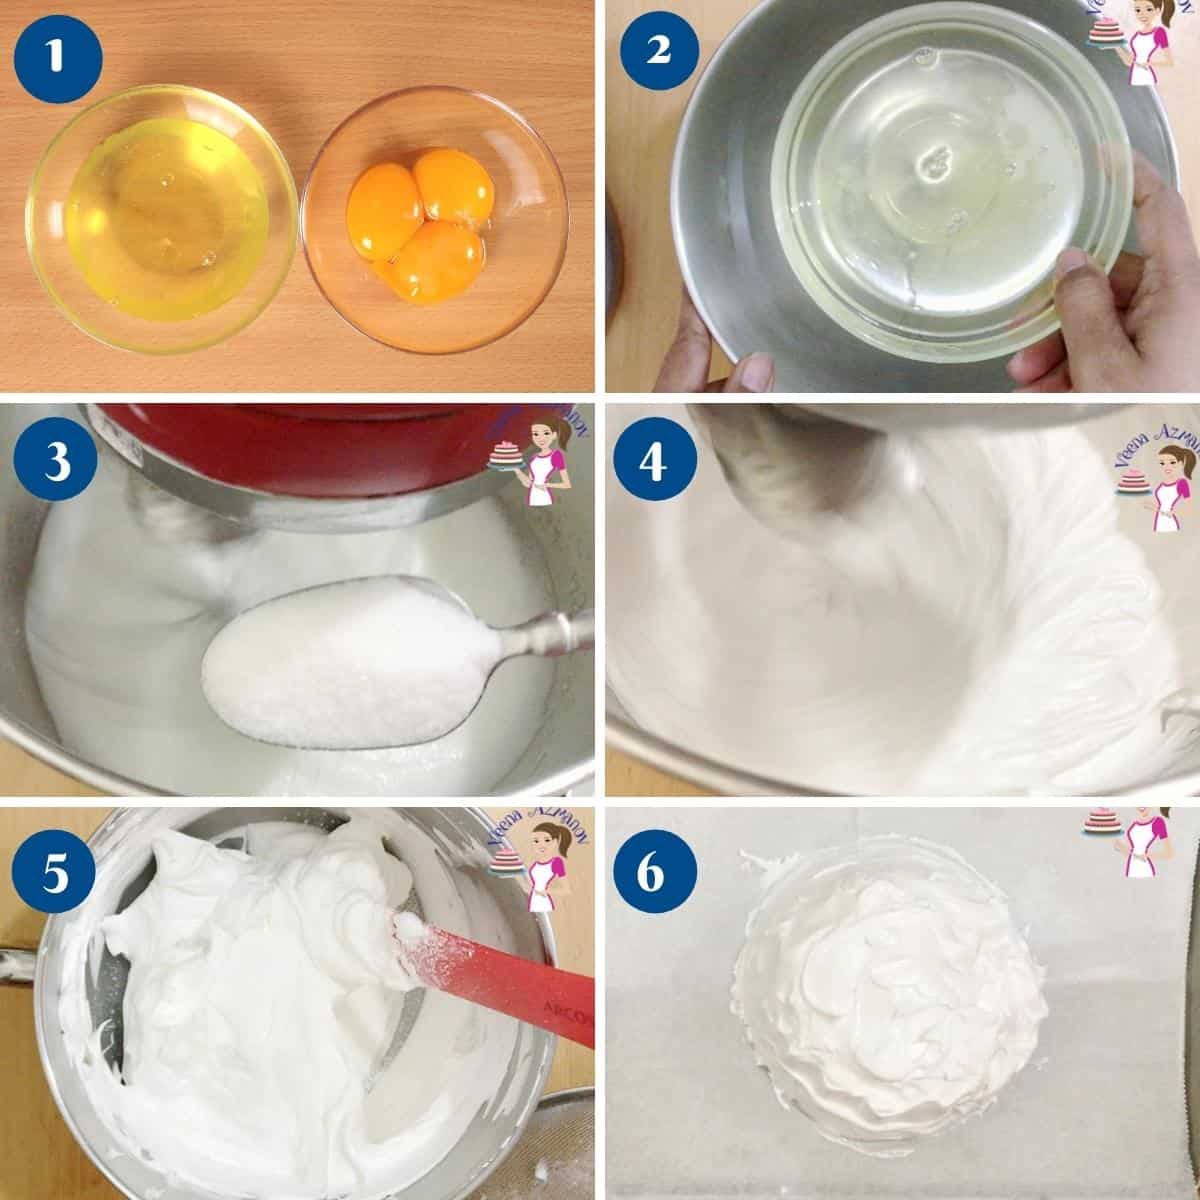
- Egg whites – In the bowl of a stand mixer with a whisk attachment – whip the egg whites with salt on medium speed. Gradually add the sugar one tablespoon at a time
Pro tip – adding the sugar slowly prevents the protein from drying out. Adding sugar quickly can cause the meringue to become flat and runny later too. - Sugar – Gradually add the sugar one tablespoon at a time. When all the sugar has been added – continue to whip the meringue until you have stiff peaks.
Pro tip – the meringue should be sticky with stiff peaks but still have a shiny appearance. - Additions – Switch to a spatula. Fold in the vanilla extract. Then sift in the cream of tartar and cornstarch.
Pro tip – Cream of tartar helps stabilizes the protein in the meringue and prevents it from separating. The cornstarch absorbs all the excess moisture and gives a crisp meringue
Shape the pavlova (10 mins)
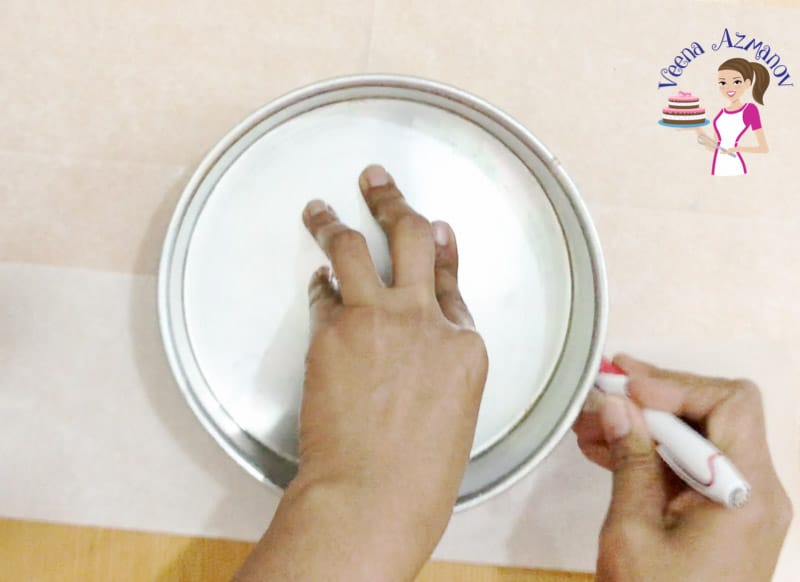
- Template – Preheat the oven to 305F/150°C/ Gas Mark 2. Line a baking tray with parchment paper. Trace an 8-inch circle as a guide on the parchment paper. Flip the paper so the pencil side is down not under the meringue.
Pro tip – we start with a higher temperature then change to a lower temperature when we place the pavlova in the oven.
- Shape – Spread the meringue on the circle you created – being careful to stay inside the circle. Use a spatula to smooth the sides evenly. Keep the sides high and the top flat.
Bake and cool the pavlova (90 Mins + 3 Hours)
- Bake – Transfer the pavlova to the oven on the center rack. Close the oven door and immediately reduce the oven temperature to 265°F/130°C/Gas Mark 1/2. Bake for 90 minutes. When the baking time is done do not open the door, let the pavlova cool inside the oven naturally.
Pro tip – (DO NOT OPEN THE OVEN DOOR DURING BAKING)You can leave it in the oven for 2 to 3 hours up to 12 hours.

Assemble (10 mins)
- Whipped cream – In the bowl of a stand mixer with the whisk attachment whip the cream with powdered sugar.1 cup Whipping cream
- Loosen – Use an offset spatula to gently loosen the pavlova from the parchment paper. Place it on a serving platter or cake board.
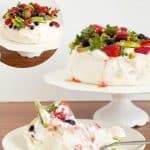
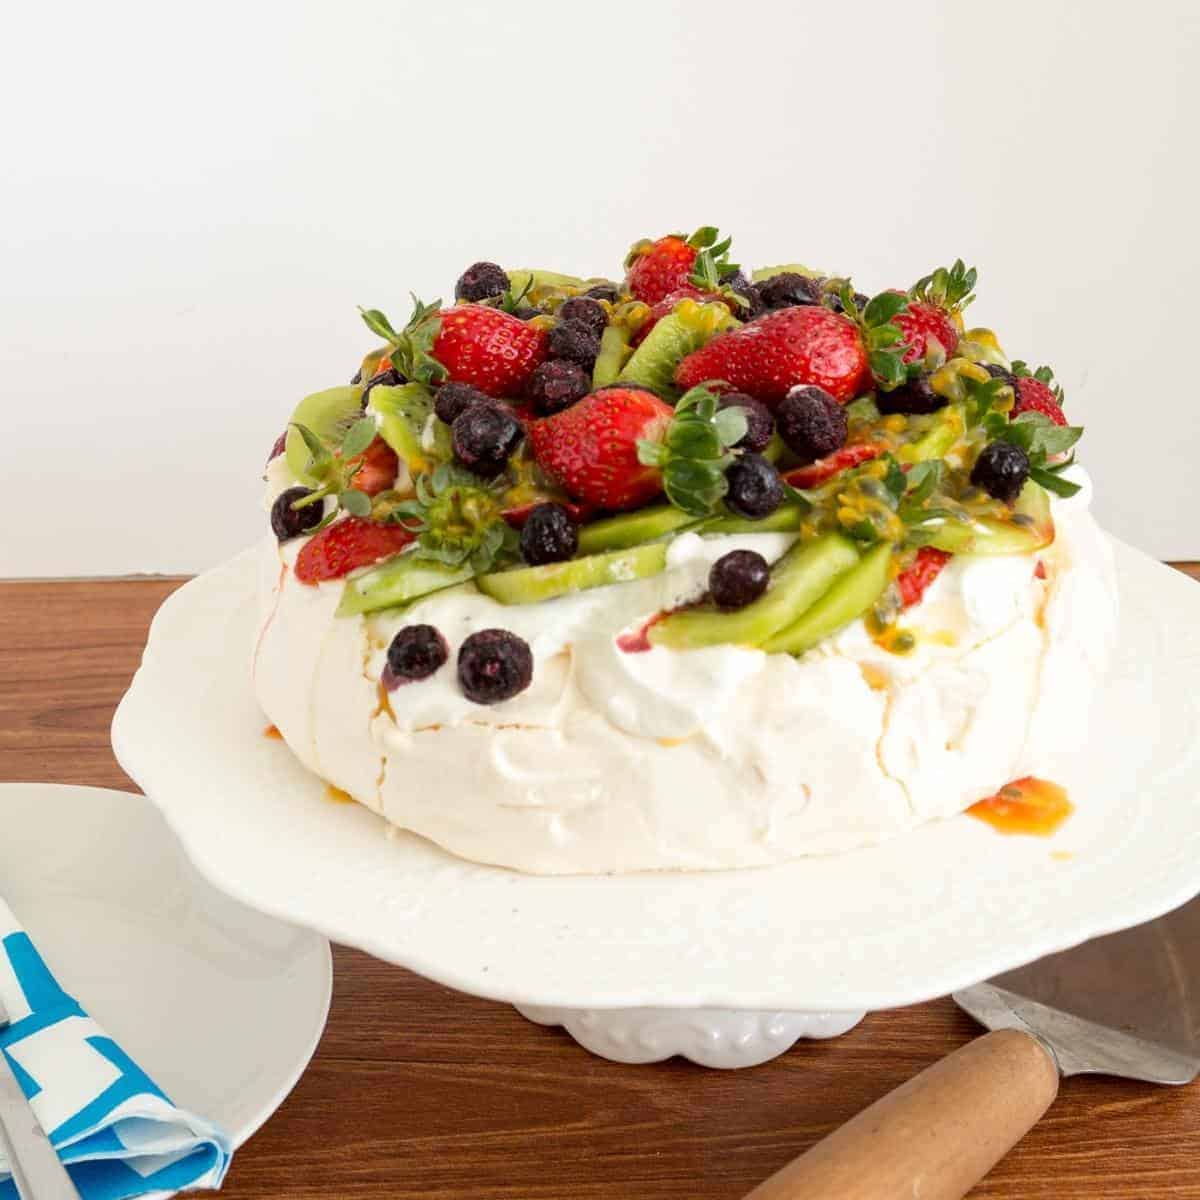
Pro tip – once assembled this is a delicate dessert to move around so always assemble it on a serving platter and not too early as the moisture from the whipping cream will make them soft - Decorate – Evenly spread or pipe the whipped cream on each pavlova. Arrange the fruits of your choice. I’m using sliced strawberries, fresh blueberries, kiwi, and mint leaves for garnish.
- Enjoy!

Pavlova tips & tricks
- Weigh your eggs to ensure you have approximately 150 to 160 grams. 4 large eggs often make between 140 to 177 grams, depending on the size. You may need more or fewer than 4 egg whites.
- Use room temperature eggs – Cold egg whites don’t whip up as well as room temperature ones. Let your eggs sit at room temperature for at least 30 minutes before separating them.
- Any grease in the egg whites will not whip the meringue. So break each egg separately in a bowl before you combine all four. If any egg yolk breaks when baking, save it for your breakfast omelet and use another egg.
- Aged eggs are often the best for making meringues. So if you have any egg whites in the freezer or fridge use them for this recipe as long as they are yolk-free.
- Add sugar slowly. Adding the sugar too quickly can cause a grainy texture. Pour it in slowly, one tablespoon at a time, while beating the egg whites.
- Meringue does require a good amount of whipping, handheld or whisk can be hard work. Use a stand mixer if possible
- Use cornstarch and vinegar: Adding cornstarch and vinegar to your egg whites stabilizes them and helps give the pavlova its signature crispy exterior and marshmallowy interior.
- A circle of 7 to 9 inches works best for this recipe. Do not make it smaller or larger than 9 inches.
- The taller the pav the higher the risk of being undercooked in the center. So, one way to ensure it cooks is to create a little dip in the top. Not too low, it also prevents sinking.
- DO NOT OPEN THE OVEN DOOR WHEN BAKING – OR AFTER THE PAV HAS BAKED. Cooling naturally in the oven will prevent sinking.
- Let it cool in the oven. Once your pavlova is finished baking, turn off the oven and let it cool inside. This will prevent cracks from forming and give the pavlova time to set.
- To cool the pav quicker, gently create an opening in the oven door with a wooden spoon. This will help the warm air to escape slowly and prevent sinking.
- A well-baked pav will have cracks on the outside with a small marshmallow-like pillow on the inside.
- Add whipped cream and fruit just before serving. Moisture from the cream and fruits will start to soften the crisp outer shell and soak into the inside.

Troubleshooting
- Why is my pavlova cracking? A baked meringue when cooled always has cracks. This is normal. When baking a pavlova it is always recommended to cool it in the oven even after switching it off. This cools it gradually, as the oven temperature gets lower, resulting in fewer cracks. And yet, there will still be cracks and this is normal.
- Why is my pavlova soft in the middle? The baked pavlova is supposed to be spongy like marshmallow but dry. As long as it’s dry, not wet, it is normal. One way to ensure the center is always cooked is to create a little dip in the center when shaping the meringue on the tray.
- Why is my pavlova weeping? Undissolved sugar in whipped egg whites can cause weeping. That is why it is recommended to use extra-fine sugar for meringue. The purpose of the cornstarch in the recipe is to absorb excess moisture from the egg whites. However, if there is too much-undissolved sugar the meringue will weep.
- Why is my pavlova runny? It is always recommended to use extra fine sugar and add it to whipping meringue slowly (one tablespoon at a time). Adding sugar quickly causes the meringue to become flat and runny. Even if the meringue does whip it has the tendency to collapse and become runny.

No posts
Frequently asked questions
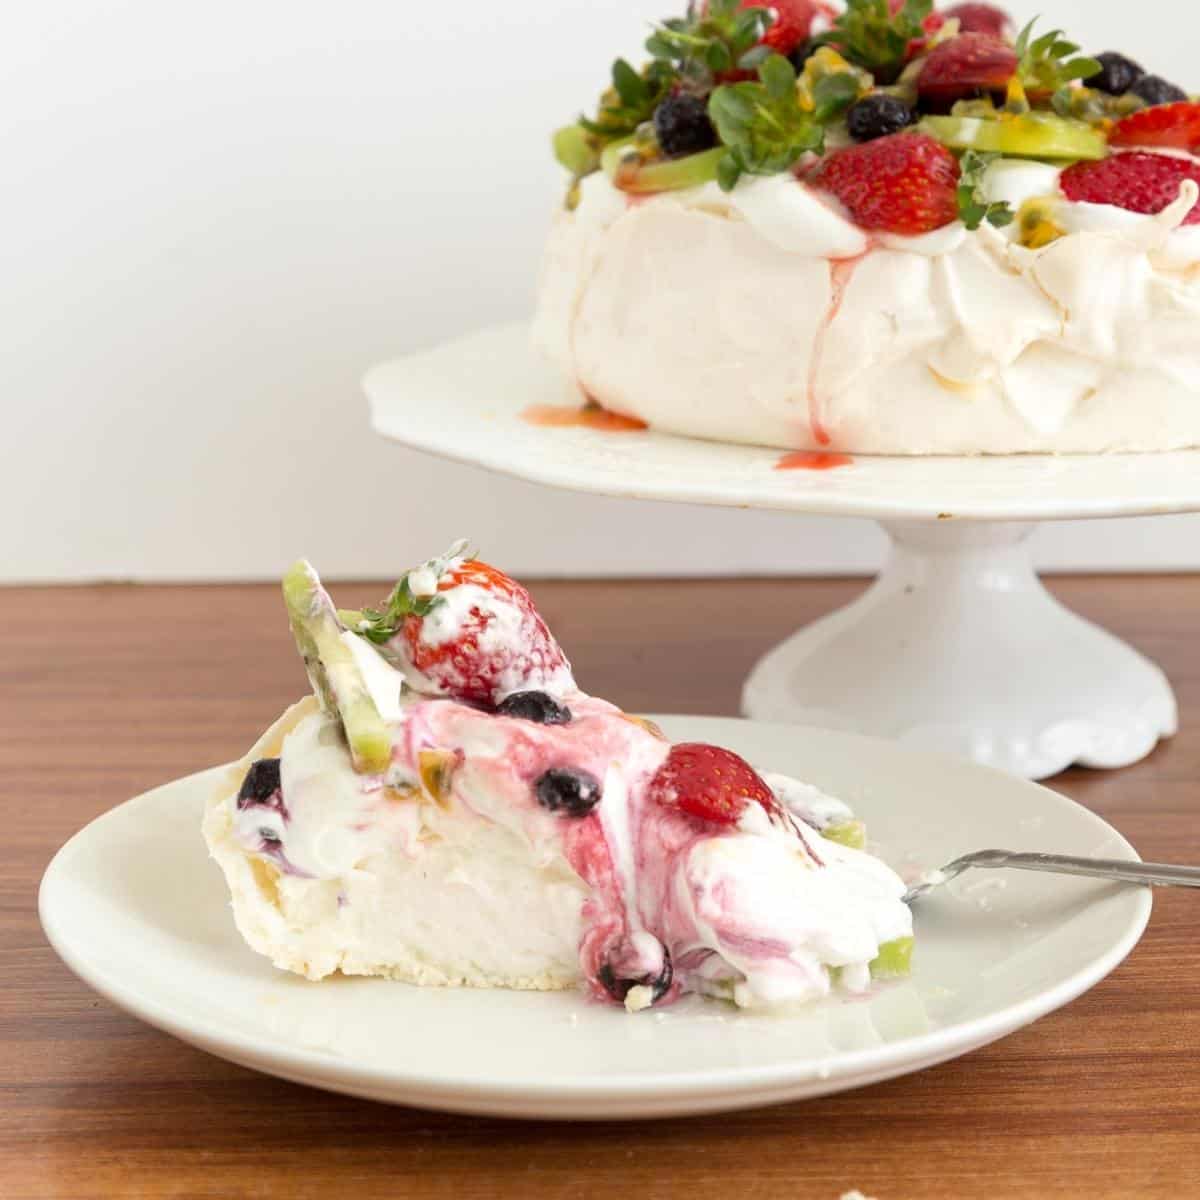
A baked pavlova will last a day at room temperature and can be kept in an airtight container for up to two days. Add the whipped cream and fruit just before serving.
A perfect pavlova should be white, perhaps slightly beige in color, dry and crisp on the outside, and soft on the inside.
Ideally, you can check with a skewer but that runs the risk of it sinking. So I prefer to use a tried and tested method for the right temperature and time. For this recipe, I find baking at a high quick blast gets a nice crisp shell, then reducing the oven temperature to low and cooking for another 90 minutes then leaving in the oven switched off for a further 2 to 3 hours ensures that the inside is baked.
Never refrigerate a baked pavlova base because condensation from the fridge will soften the crisp outside shell. Store it at room temperature in an airtight container for up to two days.
Also, any leftover pavlova with whipped cream and fruits can be left in the fridge and must be eaten within a day.
Yes, if you find that the pavlova is too soft in the center or undercooked, place it back in the oven at 150 C / 300 F for an hour.
Best Pavlova Recipe
Crisp outside with a soft marshmallow-like inside is what makes the pavlova so unique. Topped with whipped cream and fresh fruits this naturally gluten-free dessert uses my no-fail recipe and method.
Video
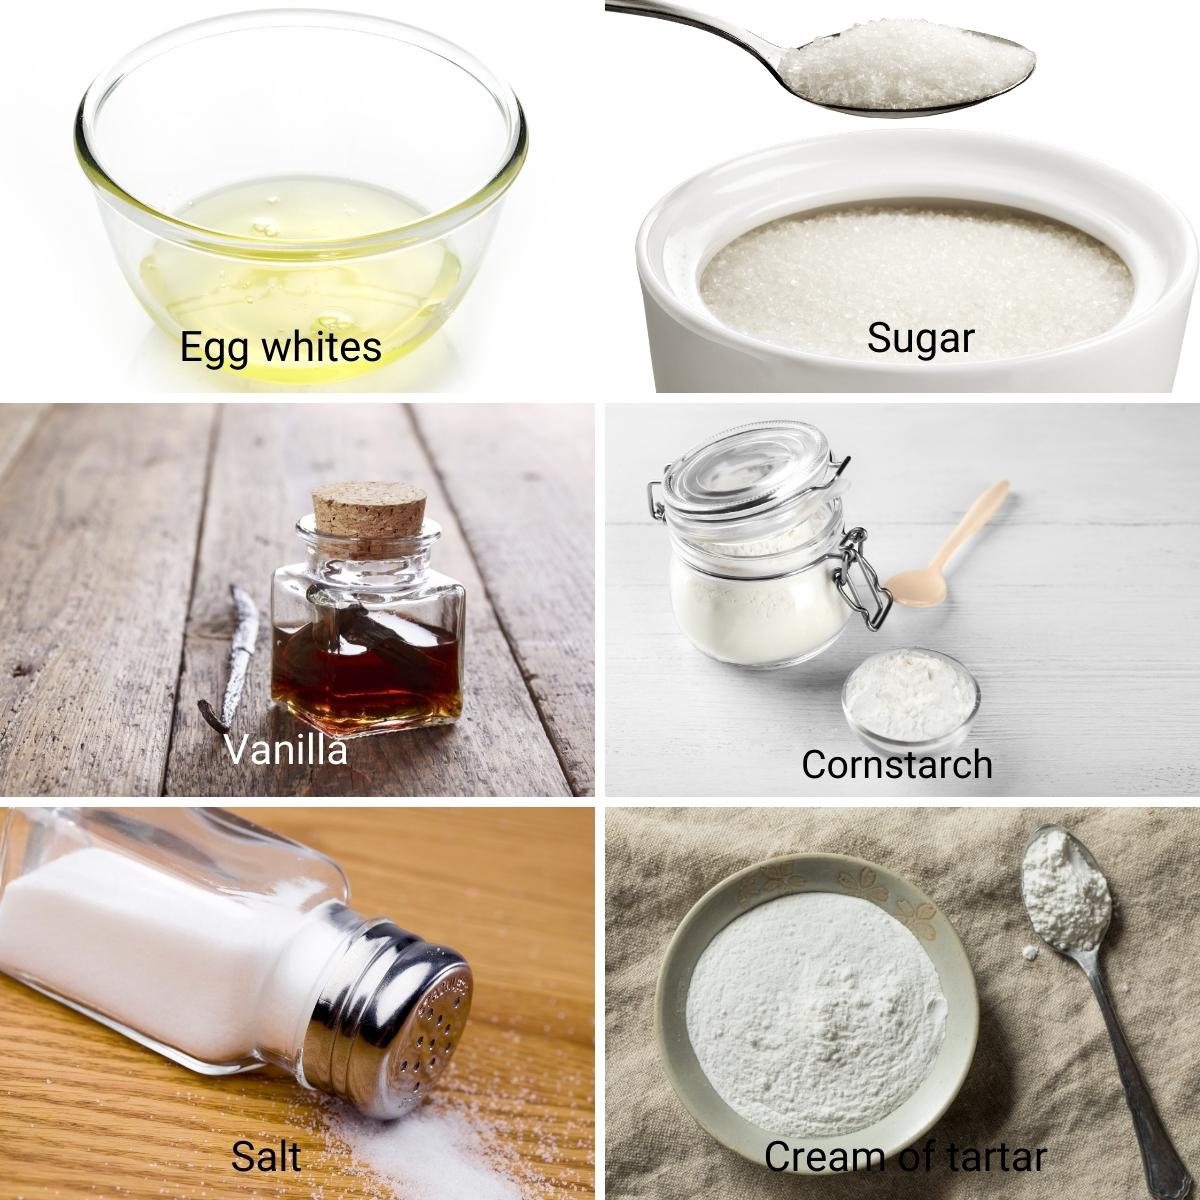
Ingredients
- 4 large (150 g) Egg whites
- 1 cup (200 g) White sugar or powdered sugar
- 2 tsp Cornstarch cornflour
- 1 tsp Cream of tartar or vinegar
- ¼ tsp Salt
- 1 tsp Vanilla extract
- 1 cup (240 ml) Whipping cream
- 2 cups (500 g) Chopped fruits
Method
- Template – Preheat the oven to 305F/150°C/ Gas Mark 2. Line a baking tray with parchment paper. Trace an 8-inch circle as a guide on the parchment paper. Flip the paper so the pencil side is down not under the meringue.Pro tip – we start with a higher temperature then change to a lower temperature when we place the pavlova in the oven.
- Whites – In the bowl of a stand mixer with a whisk attachment – whip the egg whites with salt on medium speed. Gradually add the sugar one tablespoon at a timePro tip – adding the sugar slowly prevents the protein from drying out. Adding sugar quickly can cause the meringue to become flat and runny later too.4 large Egg whites, 1 cup White sugar, 1/4 tsp Salt
- Sugar – Gradually add the sugar one tablespoon at a time. When all the sugar has been added – continue to whip the meringue until you have stiff peaks.Pro tip – the meringue should be sticky with stiff peaks but still have a shiny appearance.
- Additions – Switch to a spatula. Fold in the vanilla extract. Then sift in the cream of tartar and cornstarch.Pro tip – Cream of tartar helps stabilizes the protein in the meringue and prevents it from separating. The cornstarch absorbs all the excess moisture and gives a crisp meringue2 tsp Cornstarch, 1 tsp Cream of tartar, 1 tsp Vanilla extract
- Shape – Spread the meringue on the circle you created – being careful to stay inside the circle. Use a spatula to smooth the sides evenly. Keep the sides high and the top flat.
- Bake – Transfer the pavlova to the oven on the center rack. Close the oven door and immediately reduce the oven temperature to 265°F/130°C/Gas Mark 1/2. Bake for 90 minutes. When the baking time is done do not open the door, let the pavlova cool inside the oven naturally.Pro tip – (DO NOT OPEN THE OVEN DOOR DURING BAKING)You can leave it in the oven for 2 to 3 hours up to 12 hours.
- Whipped cream – In the bowl of a stand mixer with the whisk attachment whip the cream with powdered sugar.1 cup Whipping cream
- Loosen – Use an offset spatula to gently loosen the pavlova from the parchment paper. Place it on a serving platter or cake board.Pro tip – once assembled this is a delicate dessert to move around so always assemble it on a serving platter and not too early as the moisture from the whipping cream will make them soft
- Decorate – Evenly spread or pipe the whipped cream on each pavlova. Arrange the fruits of your choice. I'm using sliced strawberries, fresh blueberries, kiwi, and mint leaves for garnish.2 cups Chopped fruits
- Enjoy!
Notes
- Weigh your eggs to ensure you have approximately 150 to 160 grams. 4 large eggs often make between 140 to 177 grams, depending on the size. You may need more or fewer than 4 egg whites.
- Use room temperature eggs – Cold egg whites don’t whip up as well as room temperature ones. Let your eggs sit at room temperature for at least 30 minutes before separating them.
- Any grease in the egg whites will not whip the meringue. So break each egg separately in a bowl before you combine all four. If any egg yolk breaks when baking, save it for your breakfast omelet and use another egg.
- Aged eggs are often the best for making meringues. So if you have any egg whites in the freezer or fridge use them for this recipe as long as they are yolk-free.
- Add sugar slowly. Adding the sugar too quickly can cause a grainy texture. Pour it in slowly, one tablespoon at a time, while beating the egg whites.
- Meringue does require a good amount of whipping, handheld or whisk can be hard work. Use a stand mixer if possible
- Use cornstarch and vinegar: Adding cornstarch and vinegar to your egg whites stabilizes them and helps give the pavlova its signature crispy exterior and marshmallowy interior.
- A circle of 7 to 9 inches works best for this recipe. Do not make it smaller or larger than 9 inches.
- The taller the pav the higher the risk of being undercooked in the center. So, one way to ensure it cooks is to create a little dip in the top. Not too low, it also prevents sinking.
- DO NOT OPEN THE OVEN DOOR WHEN BAKING – OR AFTER THE PAV HAS BAKED. Cooling naturally in the oven will prevent sinking.
- Let it cool in the oven. Once your pavlova is finished baking, turn off the oven and let it cool inside. This will prevent cracks from forming and give the pavlova time to set.
- To cool the pav quicker, gently create an opening in the oven door with a wooden spoon. This will help the warm air to escape slowly and prevent sinking.
- A well-baked pav will have cracks on the outside with a small marshmallow-like pillow on the inside.
- Add whipped cream and fruit just before serving. Moisture from the cream and fruits will start to soften the crisp outer shell and soak into the inside.
Equipment you will need


Nutrition
Tried this recipe?
Mention @veenaazmanov_kitchen or tag #veenaazmanovkitchen!


Don’t lose this recipe! Save it for Later!
📌 Save this Recipe for later on Pinterest so you can easily find it again.
⭐ Add Veena Azmanov Kitchen to your Google Preferred Sources.
It helps Google show you more of our recipes.
📧 Subscribe for new recipes delivered to your inbox.
🎥 Follow us for more recipes


I’ve made this recipe twice and both times they turned out perfect. I’m about to make it again for a gathering, but I’d like to make two. Can I bake two of them at the same time or would that impact baking time ? Also, how far in advance can I bake them and have them sit (without toppings) before the day of the event. Should it be kept in the fridge? Thank you!!
Hi Tina,
You can bake two at once if your oven has good airflow (fan/convection helps). Just place them on two racks with space between.
I wouldn’t open the oven or rotate them though—pavlova can collapse with sudden temperature changes.
If you want the safest, most reliable result, bake one at a time.
Could I use arrowroot in place of cornstarch? Excited to surprise my husband with this for his birthday!
Yes, Sabrena, you can definitely use arrowroot instead of cornstarch in Pavlova! Just use about half the amount since arrowroot is a bit stronger. It’ll still help keep the Pavlova soft inside and crisp outside, though the texture might be slightly lighter. Either way, it’ll turn out beautifully!
Hi Verna… I was wondering how far in advance can I make the shell of the pav… can’t wait to give it a try… Lisa
You can bake the pavlova shell 1 to 2 days in advance, as long as you store it properly to maintain its crisp exterior and marshmallow-like interior.
Let the pavlova cool in the oven with the door slightly open to prevent cracks
Keep it in an air-tight container at room temperature in a dry place, away from humidity.
I just tried for the first time. It came out a Carmel color. Where do I go wrong.
Hey Mary. Sounds like the oven temperature needs to be further reduced.
This did not go well for me. My egg whites were room temperature but the did not whip up. My husband usually makes pavlova but I wanted to make it this time using your recipe. I had to throw out the egg/ sugar mixture. He asked me the process and I told him the sugar went in slowly just after I started to whip the eggs. His opinion is that you should whip the eggs first then slowly incorporate the sugar. Not wanting to lose any more eggs and sugar, I conceded and he used our long standing recipe. I hate to be the downer on this but you recipe is not a “no fail” recipe and I am frustrated that I fall for every recipe that claims to be the best.
Laurel. I am sorry to hear you say that. This has been a great recipe for many as you can see in the previous comments. Sounds like the mixer bowl was not grease-free. Any grease in the bowl will not whip eggs into a meringue. I use this method to whip egg whites even when I make macarons. It works perfectly every time. You can add the sugar gradually after whipping the eggs for just one minute.
I have my second Pavlova in the oven right now. My kids requested it and helped. I was always very intimidated by pavlova, marshmallow, and meringue but I’m finding out I can make these! My kids saw Pavlova on the tv show Bluey and asked what it was and if we could make it. I found this recipe with pictures and we gave it a go. It turned out perfectly. The only change we made was I put the cornstarch, cream of tarter and vanilla into the mixer and let it beat with the eggs when the eggs were still on very soft peaks instead of folding it in (I didn’t think I could fold it properly) Then continued to beat on high until still peaks. Turned out delicious, and impressive that we made it. This might be our new “let’s impress the company or fancy dinner night dessert” it’s so pretty and delicious when done
** it’s very humid here in Hawaii so we had to eat the whole thing at one sitting. Or It would have been sticky and gummy. But that was not a problem ?
Thank you for the lovely feedback Gretchen. I am so happy your family enjoyed this so much
Beautiful. The best so far.opted for cream of tartar not vinegar
On regular request list