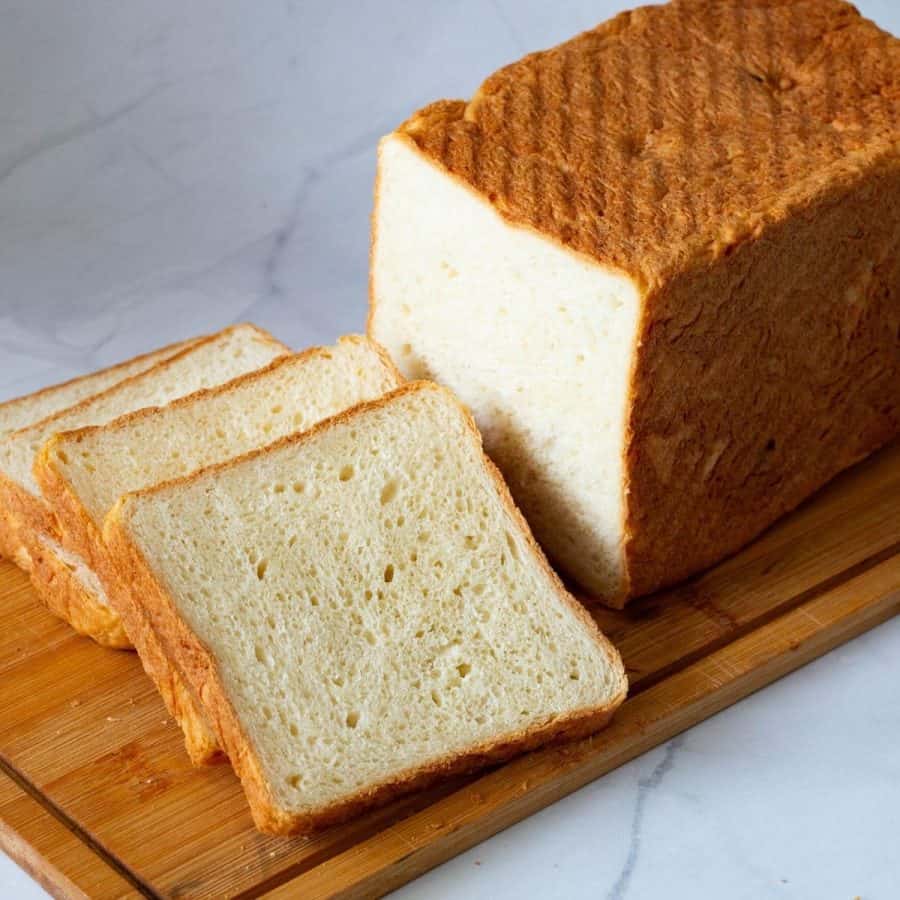
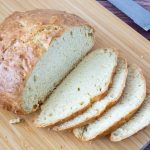
Sourdough Sandwich Bread
 Prep Time 6 hours Cook Time 55 minutes Total Time 14 hours 55 minutes

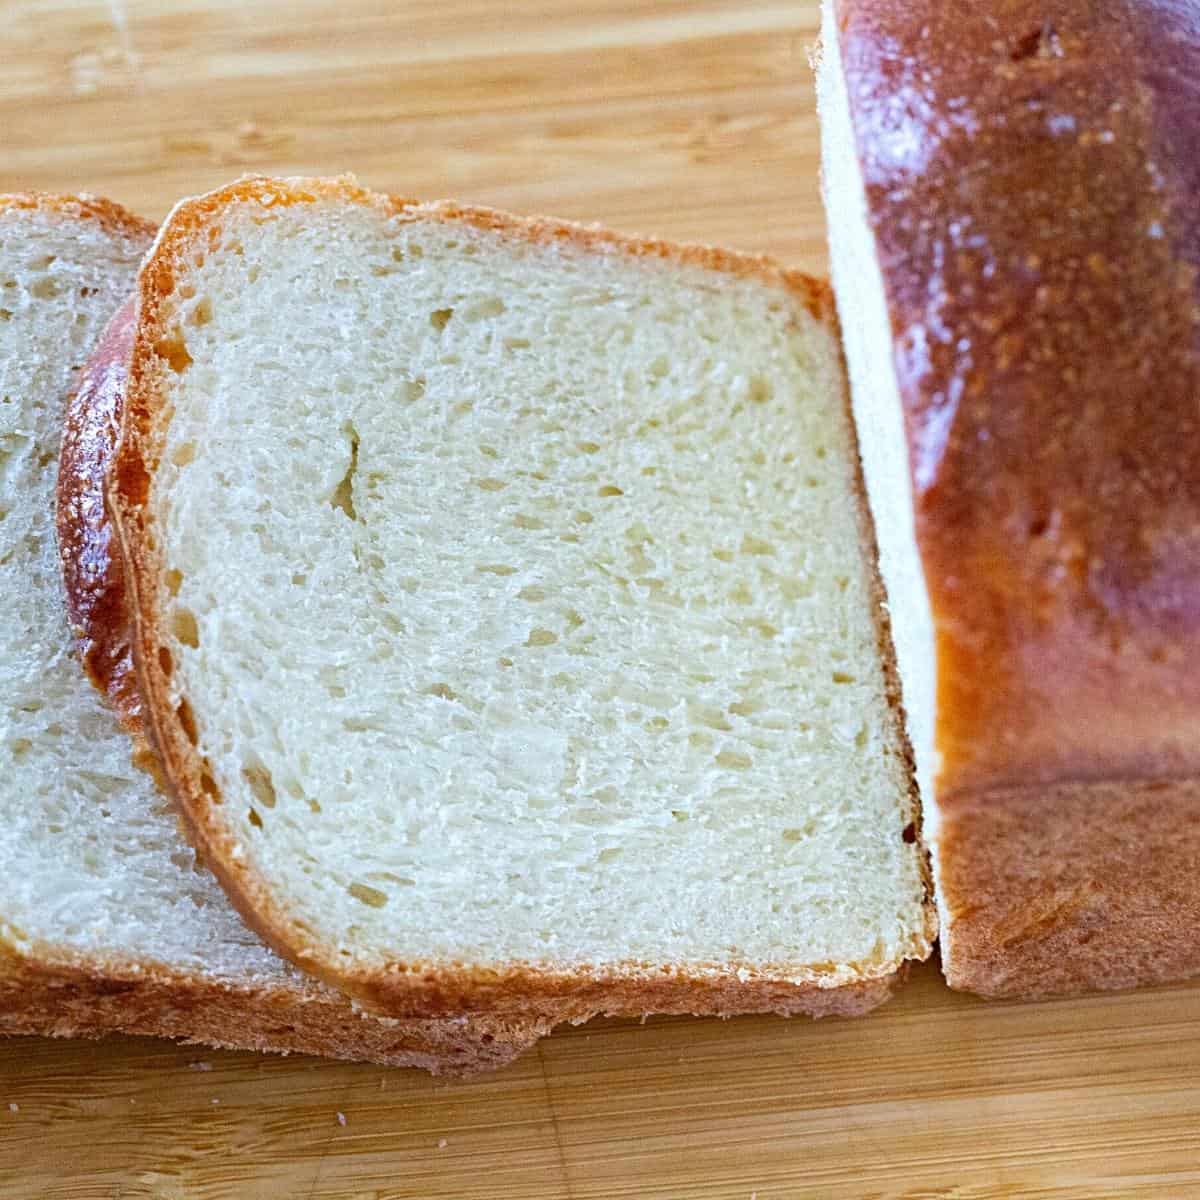
Homemade sourdough sandwich bread is easy to make. This recipe is simple and made from scratch with a homemade sourdough starter. This sliced bread is ideal for sandwiches and paninis. And step by step with video and expert tips are also included.

Sandwich bread is a staple in many households, beloved for its versatility and soft texture. When it comes to making the best sandwich bread, sourdough can take your loaves to new heights of flavor and quality.
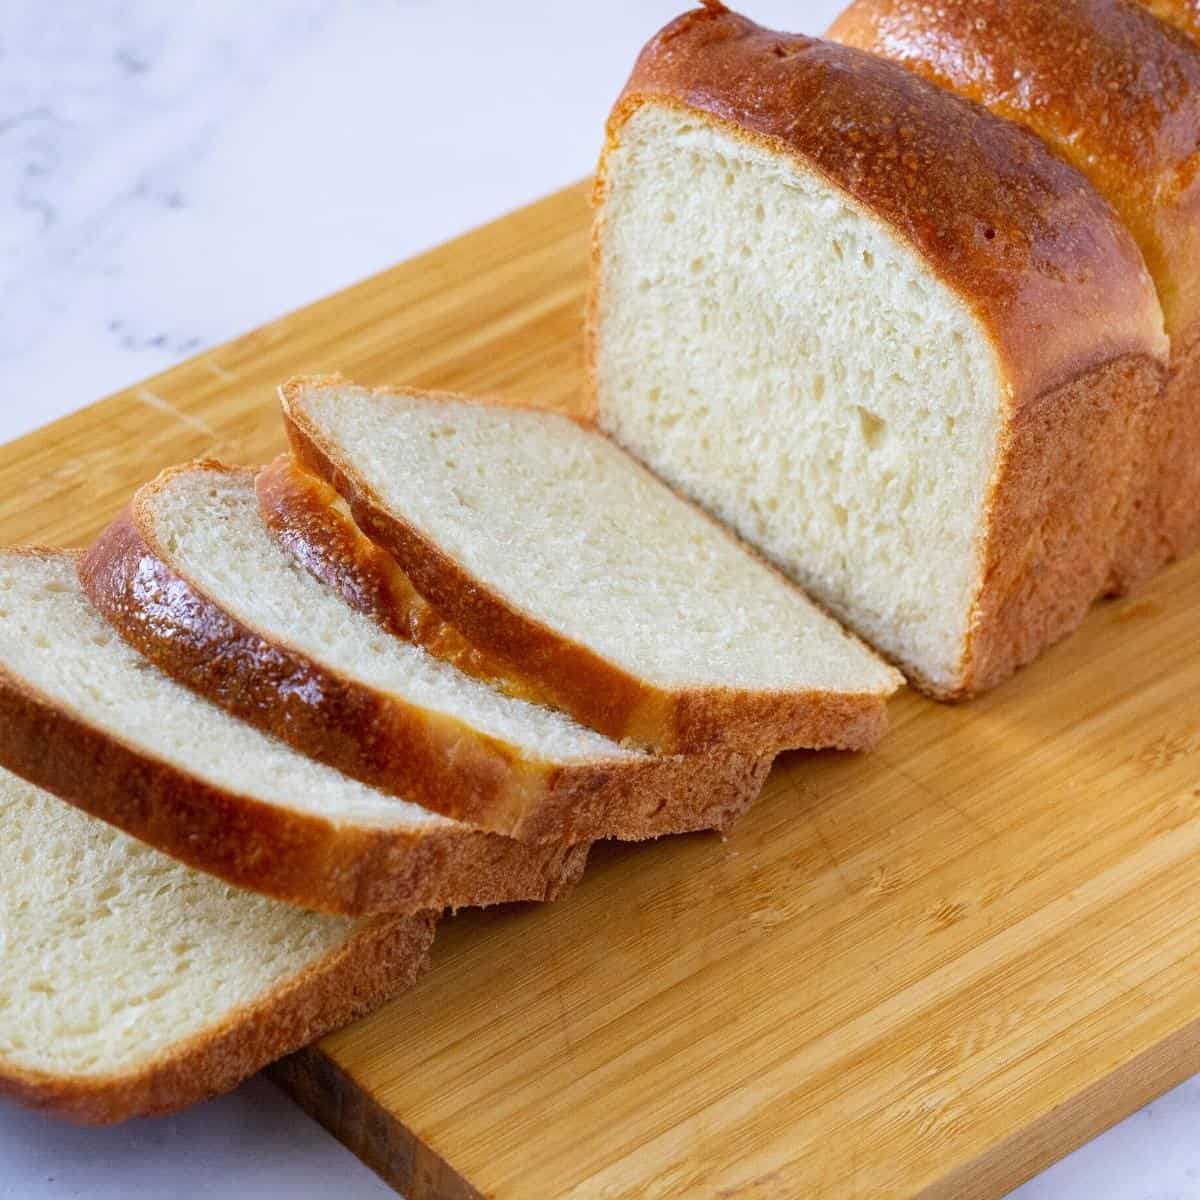
Sourdough starter adds depth and complexity to the flavor of sandwich bread, giving it a subtle tanginess that enhances any sandwich filling. The sourdough fermentation process also helps improve the bread’s texture, making it softer, moister, and longer-lasting than bread made with commercial yeast.
Why make this bread
- Flavor: The sourdough starter adds a unique, tangy flavor that enhances the bread’s taste and pairs well with a variety of sandwich fillings.
- Texture: Sourdough fermentation creates a soft and chewy texture with a tender crumb, perfect for sandwiches.
- Digestibility: The fermentation process breaks down gluten and phytic acid, potentially making the bread easier to digest and increasing nutritional value.
- Longevity: Sourdough bread tends to stay fresh longer than bread made with commercial yeast, thanks to its natural acidity.

Bakers schedule
Below is how I organized my schedule for this sandwich bread. Follow this timeline, which really has a lot of room for flexibility (the hours are just my personal schedule).
| Hour | Activity | Time |
| 2 pm | Refresh starter | 3 to 5 hours |
| 7.00 pm | Autolyse | 1 hour |
| 8.00 pm | Knead | 10 – 15 mins |
| 9 pm | Bulk Ferment | 6 to 8 hours (retard overnight) |
| 8 am | Thaw | 1 hour (next morning) |
| 9 am | Shape | 20 mins |
| 9.30 pm | Proof | 2 – 3 hrs |
| 11.15 am | Preheat oven | 15 mins |
| 11.30 am | Bake | 40 to 45 mins |
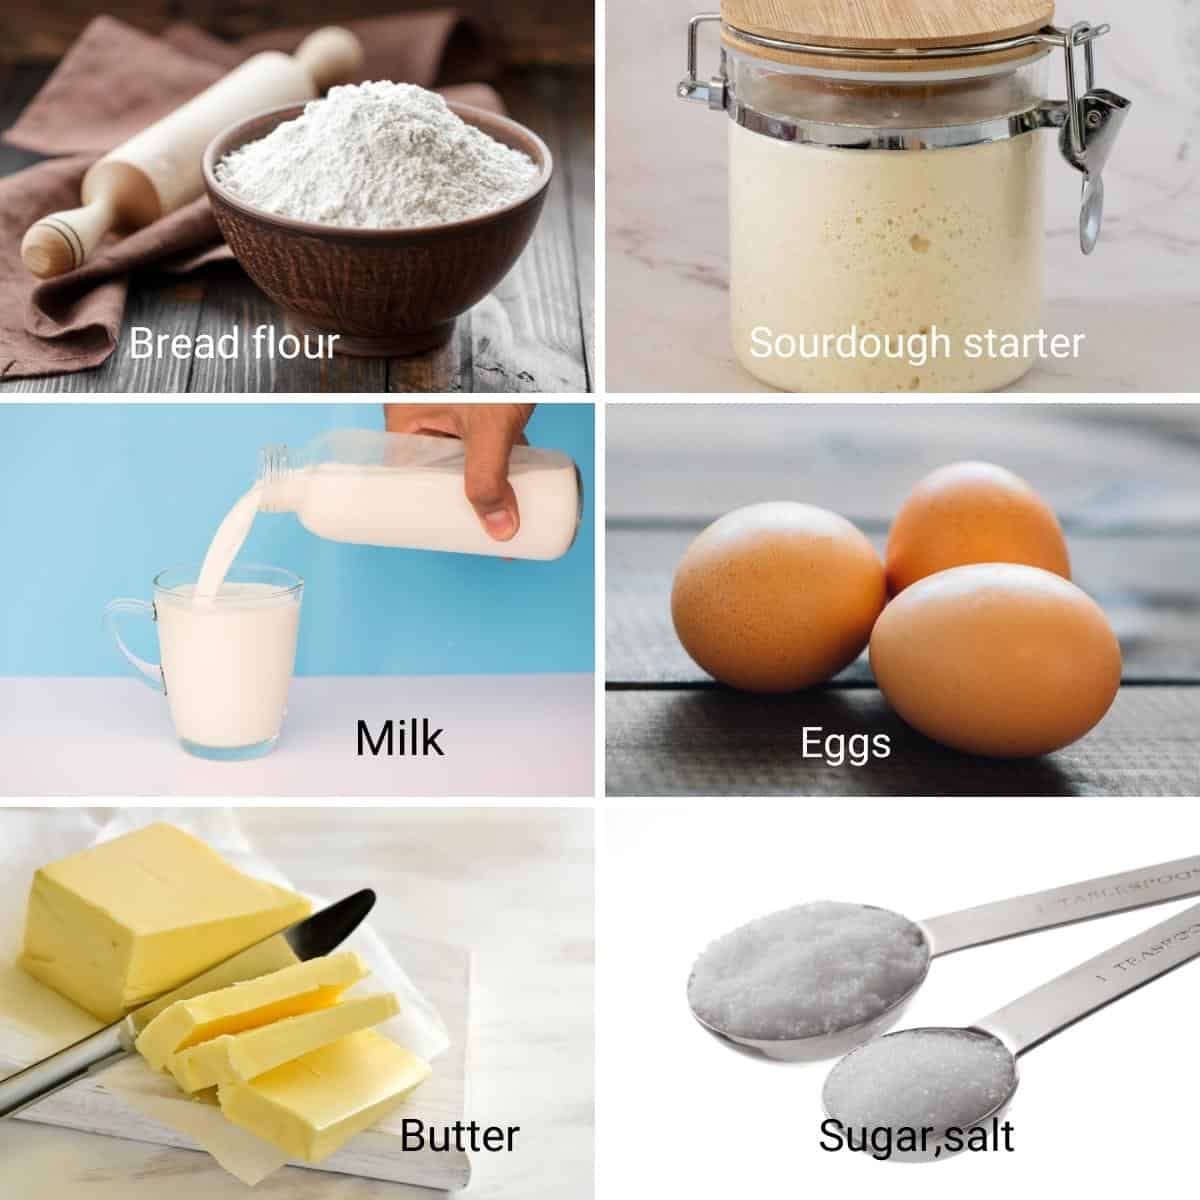
Ingredients and substitutes
- Flour – I highly recommend bread flour if you love a chewy texture to your sourdough bread. But you can also certainly use all-purpose flour. And if you want to make whole-wheat sourdough buns, replace half the flour in the recipe with whole-wheat flour.
- Salt – You can use coarse salt, but I prefer to use fine kosher salt to help the dough absorb it well.
- Sugar – This is a sweet bread, but you can certainly reduce the sugar by half. And you can also use honey or maple syrup.
- Butter – Makes the dough rich and buttery with a soft crumb.
- Eggs – Add a lot of flavor to the bread, give a tender crumb, and strengthen the texture.
- Milk – Enhances the flavor and tenderizes the dough, giving it a soft texture. The temperature of the liquid milk is an important factor in bread-making. It has to be warm, not hot, usually about 110°F.
- Levain – Levain is a larger amount of wild yeast that is made from a small quantity of sourdough starter.
Step-by-step: Soft sourdough sandwich bread recipe
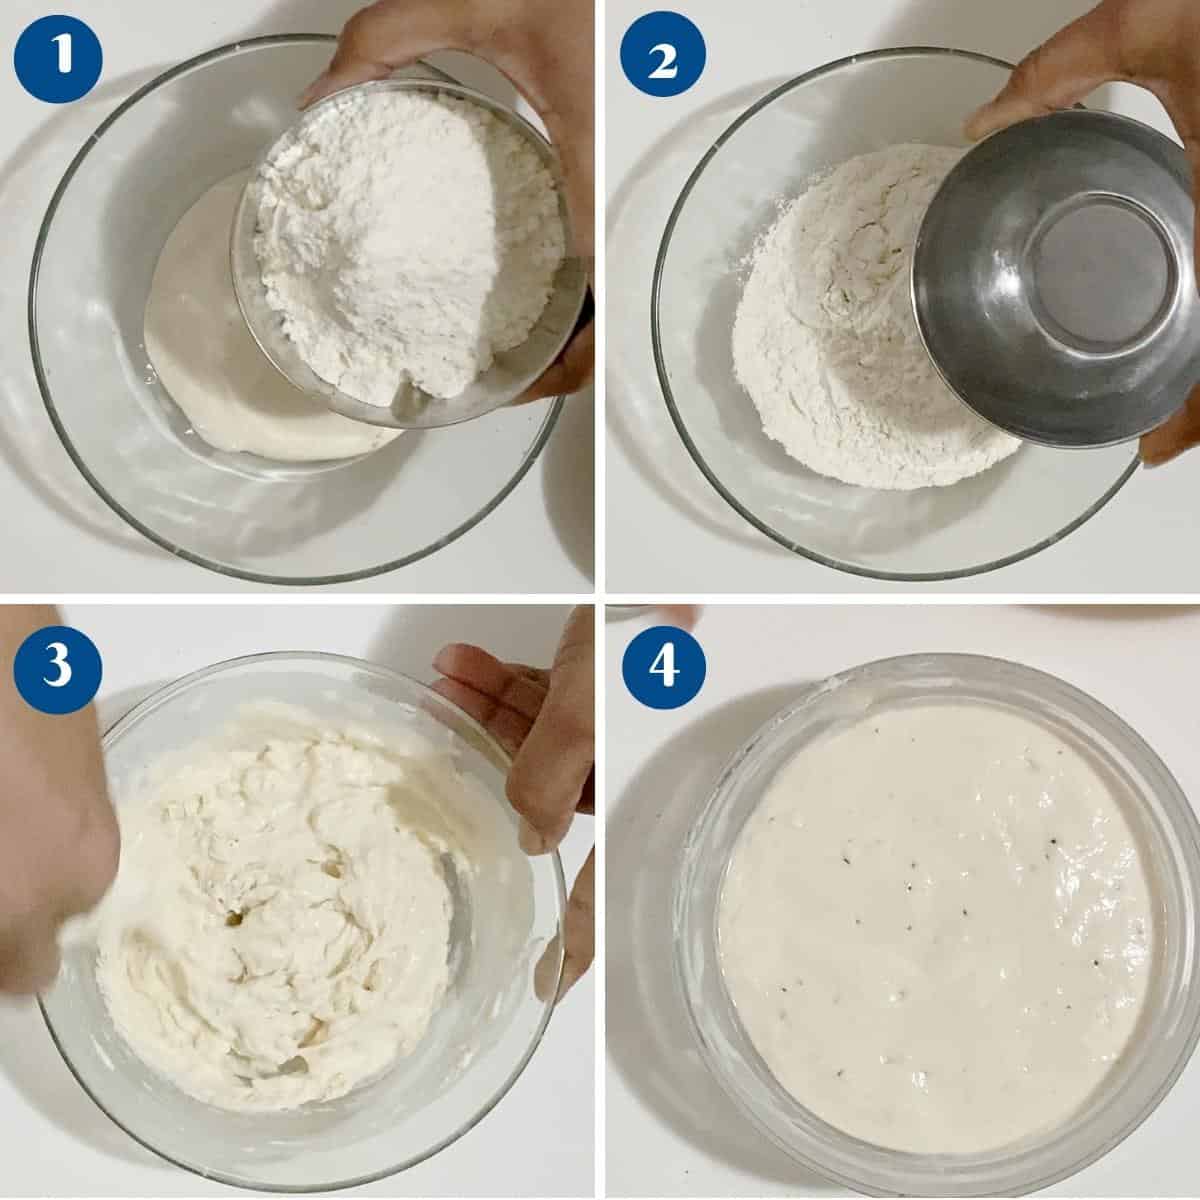
- Refresh your starter – Combine the sourdough starter, water, and flour in a medium bowl. Stir well to combine. Then, cover and leave it to rise for 3 to 5 hours at room temperature until it doubles in size.
Pro tip – You can also make the levain up to 5 days in advance and leave it in the fridge.
- Autolyze
- In a large mixing bowl of a stand mixer, add the milk, eggs, and sugar. Combine well.
- Add the flour and salt, followed by the starter. Stir well with a wooden spoon or spatula.
- Then, cover the bowl and leave it to rest for 60 minutes.
Pro tip – Autolyze will help strengthen the gluten formation in the dough. In the video, I combined the wet and dry ingredients separately, but you can do it all together in the stand mixer as well.
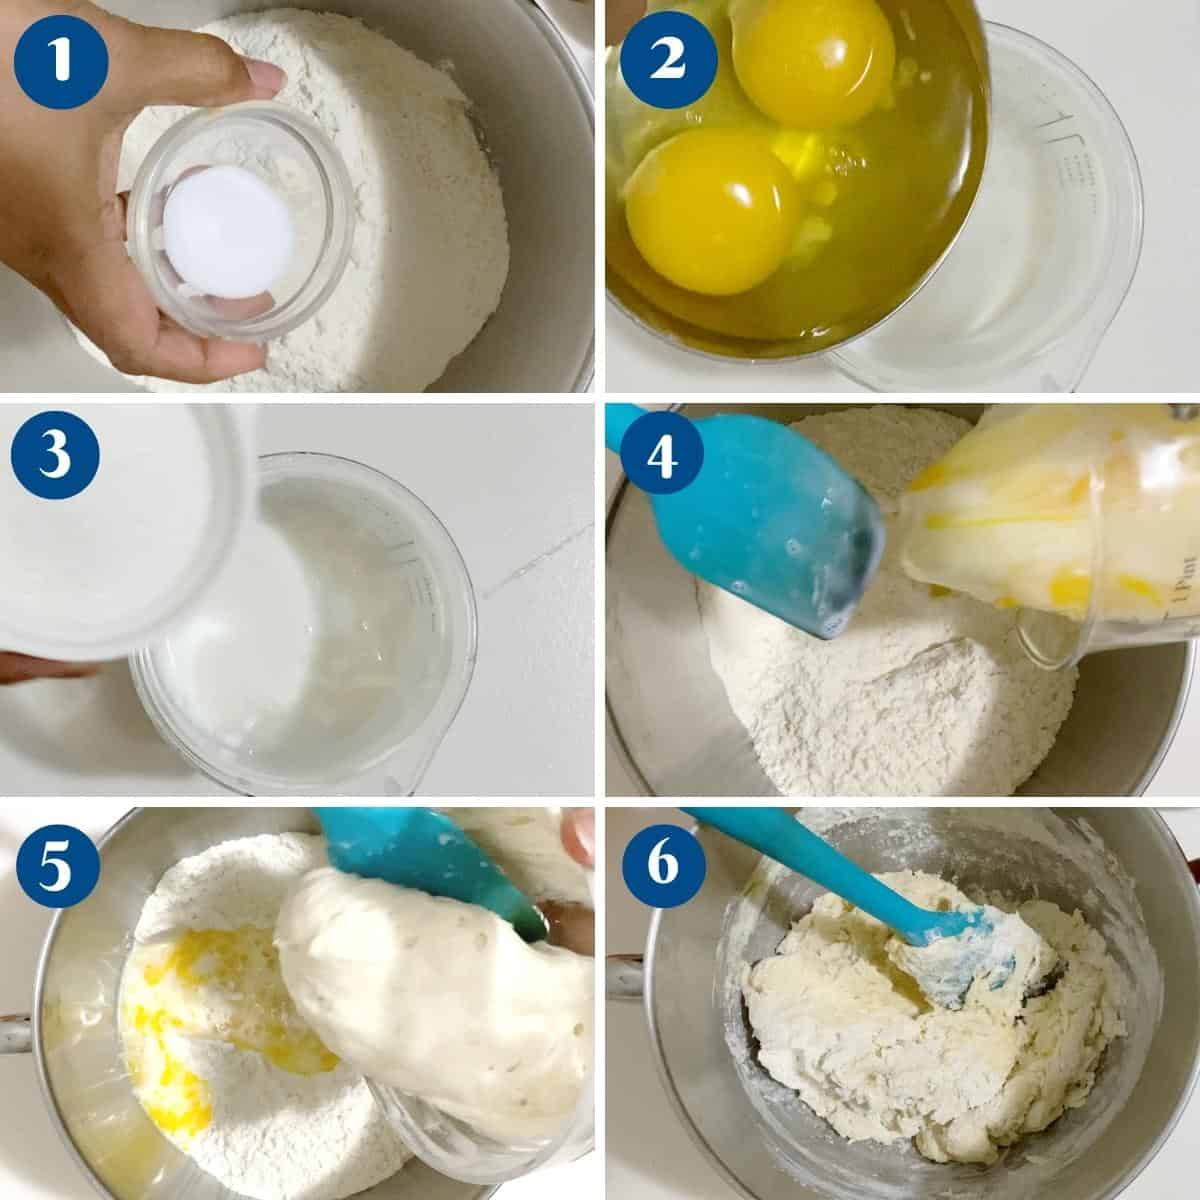
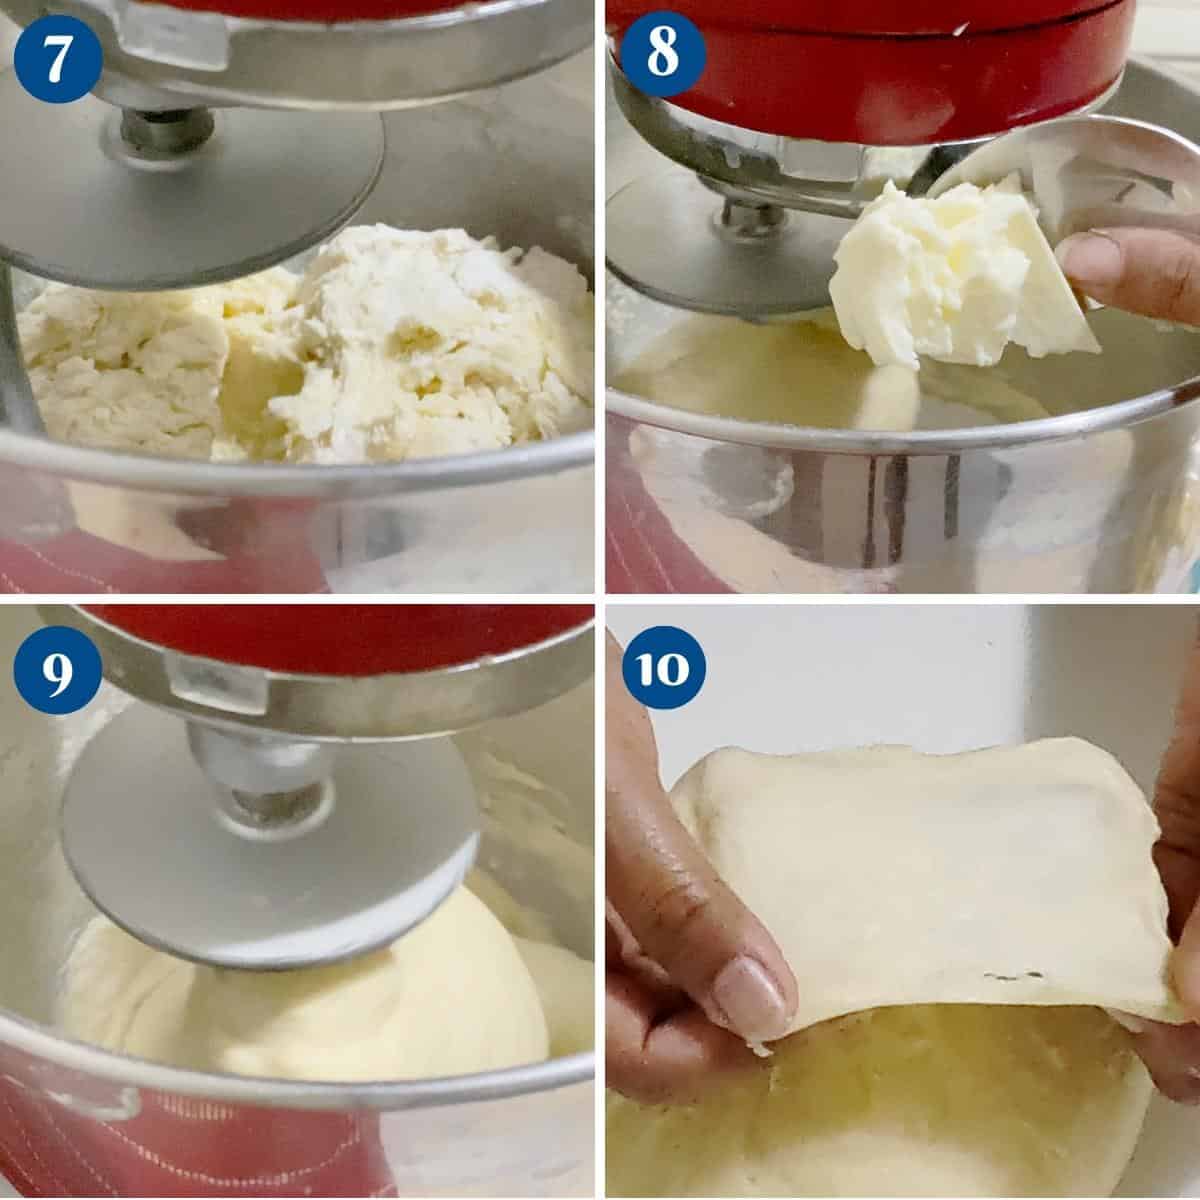
- Knead – Next, knead the dough with a dough hook attachment on medium speed for 4 to 6 minutes.
Then add the soft, room-temperature butter and knead for another 4 to 6 minutes, or until smooth and elastic.
Pro tip – The dough will still be very soft, yet smooth, shiny, and very elastic when you do the windowpane test.
Rise
- Bulk ferment – Transfer the dough to an oiled bowl and cover it with plastic wrap or a kitchen towel. Leave the dough to rise in the refrigerator (38°F / 3°C) for 6 to 8 hours.
Pro tip – The dough can be kept in the fridge for up to 24 hours. The highly enriched dough will rise very slowly. - Degas – When doubled in size, punch down and transfer to a clean work surface. Then, break any large air bubbles and shape the dough into a ball again.
Pro tip – At this point, if you are not ready to shape and bake the dough, you can put it back into the oiled bowl and let it rise again in the fridge for another 6 to 8 hours.
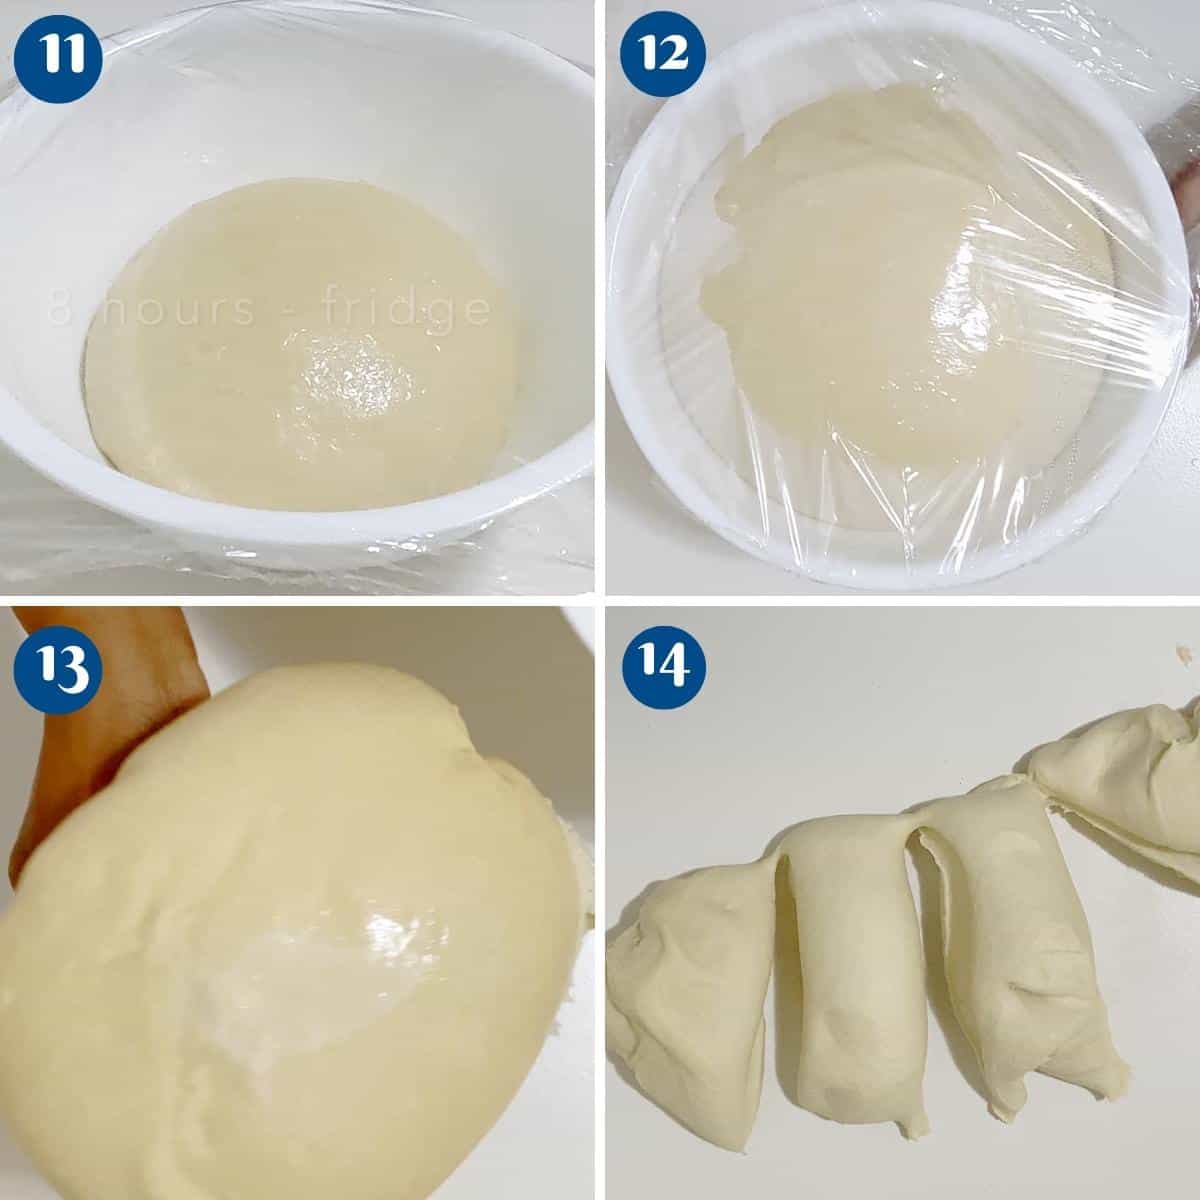
- Divide – Roll the dough into a cylinder and divide the dough into four portions. Alternatively, you can also roll the dough into one large log to make classic sandwich bread.
Pro tip – Weigh the four portions to ensure they are similar in size. Mine was about 215 to 240 grams each because I use the 9x4x4 pan. These will rise about an inch over the rim of the pan.
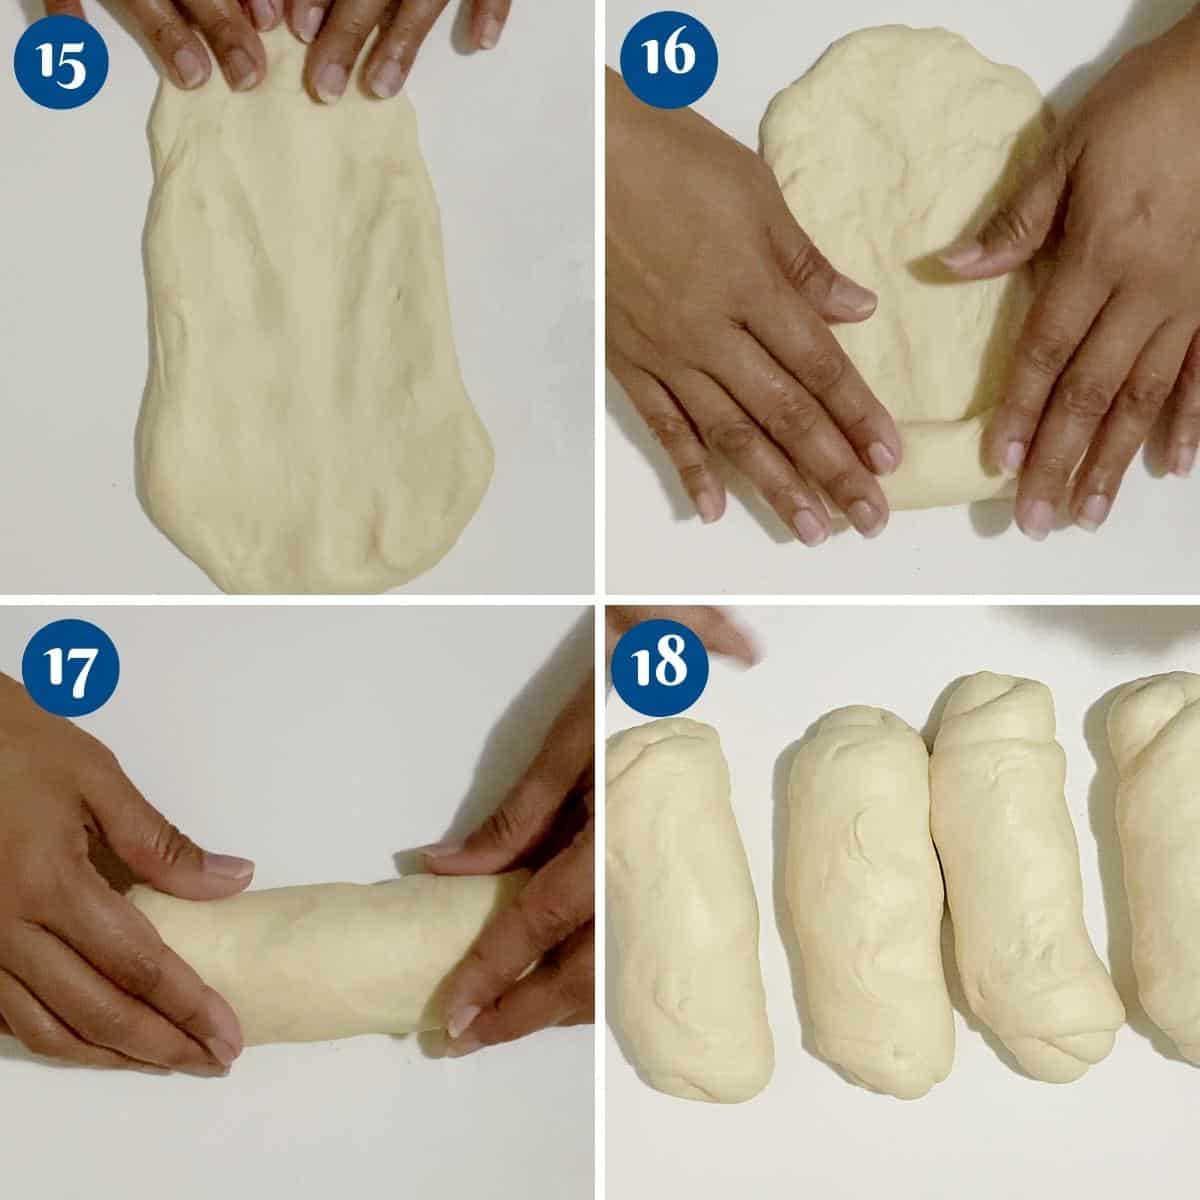
- Shape – Roll each portion into a tight roll. To do this correctly, flatten the dough on an unfloured surface. Then, fold the top and two sides in. Then, roll towards you into a sausage shape. And place the pieces in a buttered sandwich loaf pan, seam-side down. (Pan size with ingredients)
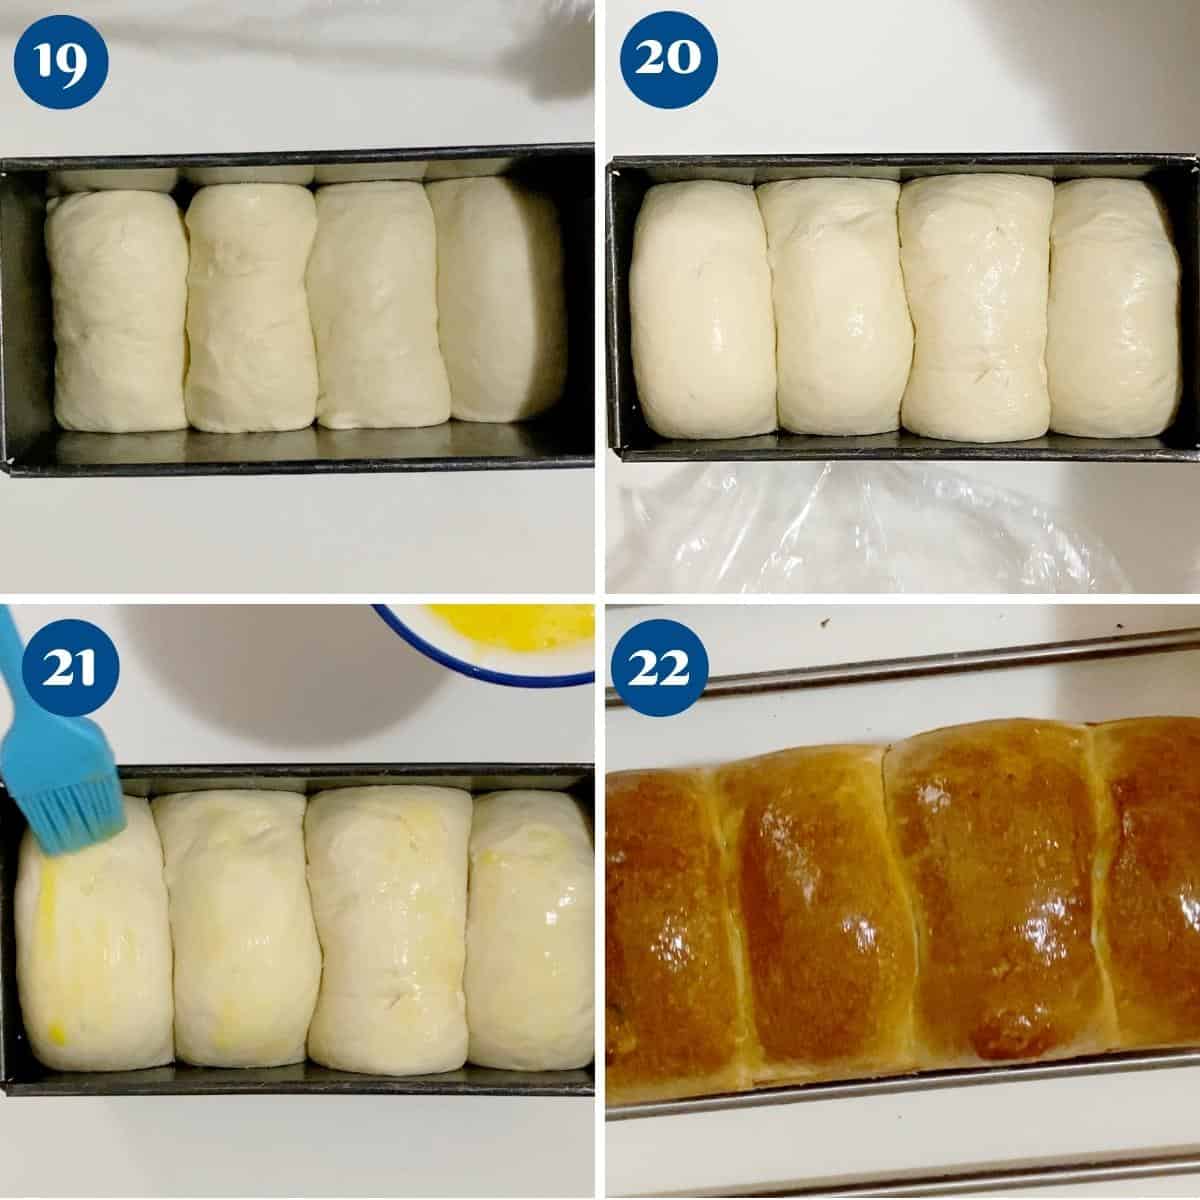
Pro tip – For a single large loaf, use a similar method: flatten, fold both sides into the center, then roll from the top to the bottom. - Proof – Cover with a clean kitchen cloth or plastic wrap and leave in a warm place for about 2 to 3 hours or until almost doubled in size.
Pro tip – Spray the plastic wrap with oil to prevent it from sticking to the rolls. In summer, the dough may rise in 90 minutes, while in winter it can take up to 3 hours.
Bake
- Preheat oven – Preheat the oven at 375°F / 190°C / Gas mark 5 for at least 20 minutes.
- Egg wash – Brush the loaf with egg wash, milk, or cream.
Pro tip – Egg wash is 1 whole egg with 2 tbsp of water. An egg wash will give a nice golden color. If you can’t use egg, milk or cream will work just as well. However, do not use oil or butter, as it will create a crust. - Bake – Bake for about 40 to 45 minutes until lightly golden on top.
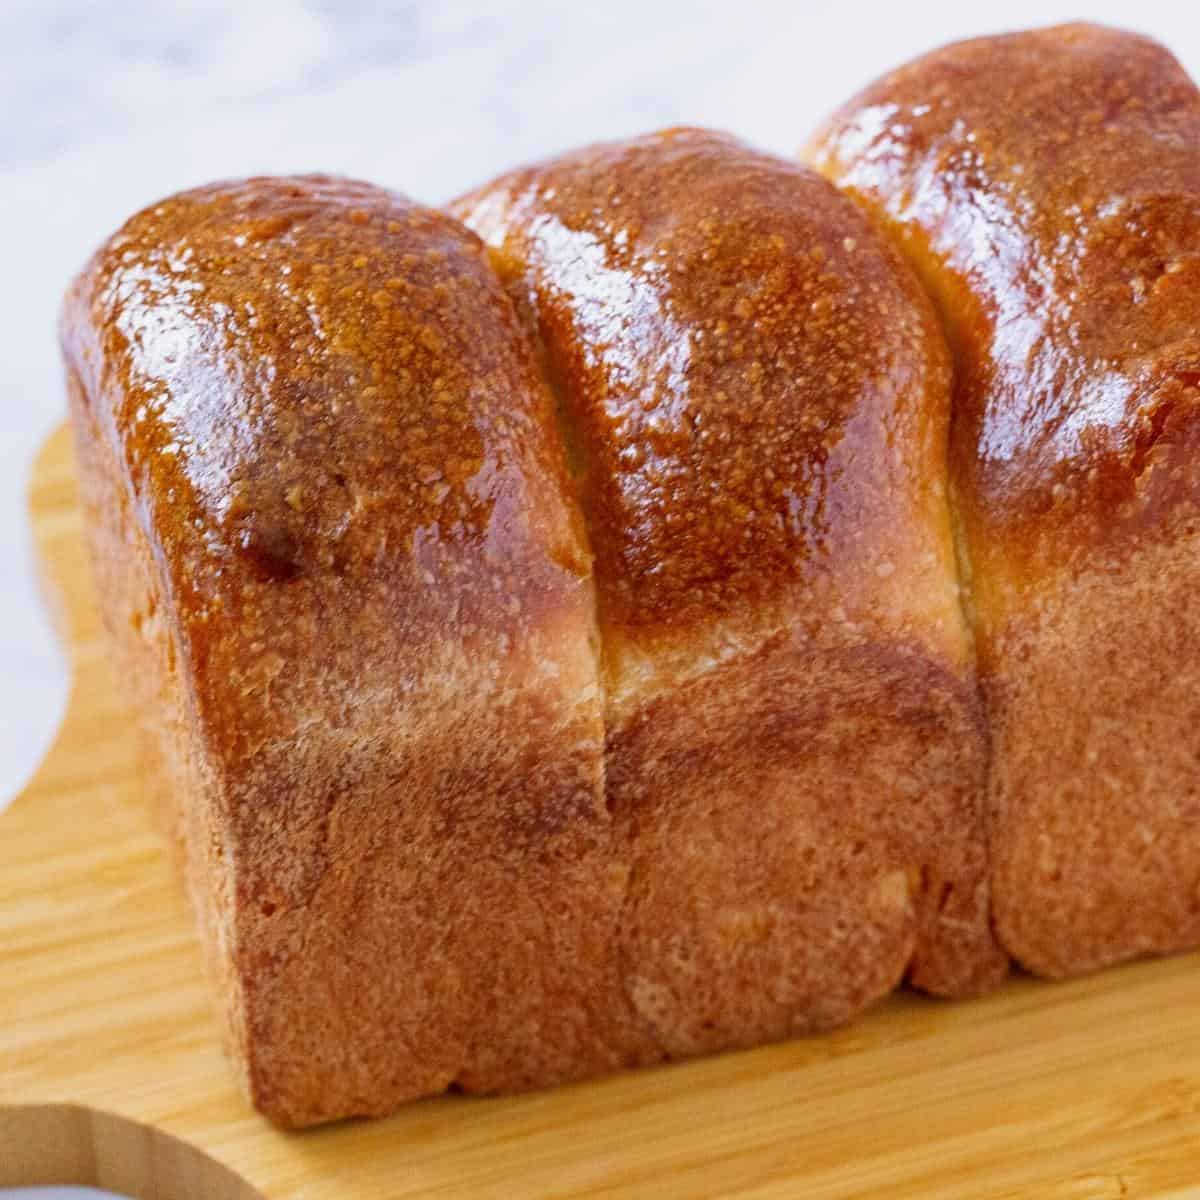
Pro tip – If the top of the sandwich bread is getting too dark, tent it with aluminum foil. - Cool – Then, take it out of the pan, and brush it with melted butter. Cool in the pan for 5 minutes, then invert on a cooling rack and cool completely before cutting.
Pro tip – Do not leave the bread in the pan for too long, as the steam will make the bread soggy on the bottom.


Frequently asked questions
Store the bread in a paper bag or bread box at room temperature for up to 3-4 days. For longer storage, freeze it as mentioned above.
The total time can vary, but it typically takes about 12 to 24 hours, including fermentation, proofing, and baking.
This recipe is specifically designed for sourdough starter, but you may be able to adapt it using commercial yeast. Here are a few sandwich bread recipes to try:
Pullman sandwich bread
Brioche sandwich bread or Brioche Pullman Loaf
No-knead sandwich bread, Whole wheat sandwich bread
Challah Sandwich Bread
The bread is done when it is golden brown on top and sounds hollow when tapped on the bottom.
Yes, you can freeze the bread. Let it cool completely, then wrap it tightly in plastic wrap and aluminum foil before freezing. It should last for up to 3 months in the freezer.
A sourdough starter is fresh wild yeast, and if you use it soon after it has been fed and peaked, it will not be sour. To achieve a sour taste, you need to let the starter go without food for a while. Starve it until it gets a brown liquid called hooch on top. This increases the acidity in the starter, which gives the sour flavor to sourdough.
Sourdough Sandwich Bread
Homemade sourdough sandwich bread is easy to make. This recipe is simple and made from scratch with a homemade sourdough starter. This sliced bread is ideal for sandwiches and paninis. Step-by-step instructions with video and expert tips are included.
Video
Ingredients
Method
- Refresh your starter – Combine the sourdough starter, water, and flour in a medium bowl. Stir well to combine. Cover and leave to rise for 3 to 5 hours at room temperature until doubled in size.
- Autolyze – Add the milk, eggs, and sugar to a large mixing bowl of a stand mixer. Combine well. Add the flour and salt, followed by the starter. Stir well with a wooden spoon or spatula. Cover the bowl and leave to rest for 60 minutes.240 grams Whole milk, 100 g Egg, 30 g Sugar, 500 grams Bread flour, 9 grams Kosher salt, 120 grams Sourdough starter
- Knead – Next, knead the dough with a dough hook attachment on medium speed for 4 to 6 minutes. Then, add the soft room-temperature butter and knead for another 4 to 6 minutes or until smooth and elastic.30 g Butter
- Bulk ferment – Transfer the dough to an oiled bowl and cover it with plastic wrap or a kitchen towel. Leave the dough to rise in the refrigerator (38°F / 3°C) for 6 to 8 hours.
- Punch – When the dough is doubled in size, punch it down and transfer it to a clean work surface. Break any large air bubbles and shape the dough into a ball again.
- Divide – Roll the dough into a cylinder and divide the dough into four portions. Alternatively, you can roll the dough into one large log to make classic sandwich bread.
- Shape – Roll each portion into a tight roll. To do this correctly, flatten the dough on an unfloured surface. Then, fold the top and two sides in. Then, roll towards you into a sausage shape. Place the pieces into a buttered sandwich loaf pan, seam side down. (loaf pan size in the ingredients)
- Proof – Cover with a clean kitchen cloth or plastic wrap and leave in a warm place to proof for about 2 to 3 hours or until almost doubled in size.
- Preheat oven – Preheat the oven at 375°F / 190°C / Gas mark 5 for at least 20 minutes.
- Egg wash – Brush the loaf with egg wash, milk, or cream.
- Bake – Bake for about 40 to 45 minutes until lightly golden on top.
- Cool – Take it out of the pan, and brush it with melted butter. Cool in the pan for 5 minutes, then invert on a cooling rack and cool completely before cutting.
Notes
- I have given two popular loaf pan measurements (9-inch and 8-inch) so you don’t have to recalculate your pan dough.
- To get the best outcome from bread recipes, it is best to weigh the ingredients rather than use cup measurements.
- The timeline for bulk fermentation and proofing is quite large, 8 to 16 hours from counter to refrigerator. This means you can start the process 24 hours ahead without being overwhelmed.
- The timeline is a guide and can be adjusted to your convenience.
- Use a kitchen scale when baking with sourdough because that will give you an accurate measure.
- This dough has 53% hydration with a 100% hydration starter. This means I use an equal amount of dough, water, and starter to make my levain.
- The dough is not very loose, but it is quite stretchy. If you are new to sourdough, take your time and work slowly. In winter, it helps to work with chilled dough.
- For the best rise, make sure to preheat your home oven for no less than 10 minutes before baking.
- Cool the bread on a wire rack for at least 20 minutes before slicing and serving. This will prevent the bread from drying out.
Nutrition
Tried this recipe?
Mention @veenaazmanov_kitchen or tag #veenaazmanovkitchen!


Don’t lose this recipe! Save it for Later!
📌 Save this Recipe for later on Pinterest so you can easily find it again.
⭐ Add Veena Azmanov Kitchen to your Google Preferred Sources.
It helps Google show you more of our recipes.
📧 Subscribe for new recipes delivered to your inbox.
🎥 Follow us for more recipes


Should the sourdough starter used for the levain be fed or unfed? I am very new to this but it almost sounds like you are feeding the starter.
Hey Ginger. Yes, feeding the sourdough for bread makes the lavain. It is confusing but yes essentially you are feeding the sourdough to make more sourdough and that is what is referred to as levain in most recipes. Please feel free to ask more questions. I have explained more here in my recipe for sourdough starter.
My dough did nothing in the refrigerator. It didn’t rise at all. I’m not sure what I should do. Also I’m not sure if I kneed the dough enough, I don’t have a mixer so I did it by hand. The dough was smooth and elastic but very sticky when it placed it in the oiled bowl. Any ideas would be greatly appreciated.
Hey Christine. Sorry to hear that. Perhaps leave it on the counter and let it rise. Maybe the levain you used was not fully developed yet. So its strength in the overall dough was weak. (I hope that makes sense)
Usually, with sourdough, it just needs more time to rise or proof.
This was much easier than I thought it would be! Turned out perfectly light and fluffy and way better than a store bought version, indeed!
Thank you for the lovely feedback, Sara. So happy to hear that.
Such a wonderful homemade bread! That texture looks perfect and I love all the tips to help make it perfect.
The perfect sourdough recipe! Easy, too. 🙂
I’m still so nervous to start making sourdough bread, but your guide is so thorough and detailed that I may finally have the courage to just do it.
There is nothing like homemade bread. This recipe was easy to follow and came out great. I will be making this again!
Thank you for the lovely feedback, Gina. So happy you enjoyed this bread.