Sourdough Brioche Buns: Soft and Fluffy
 Prep Time 6 hours Cook Time 55 minutes Total Time 14 hours 55 minutes


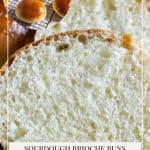
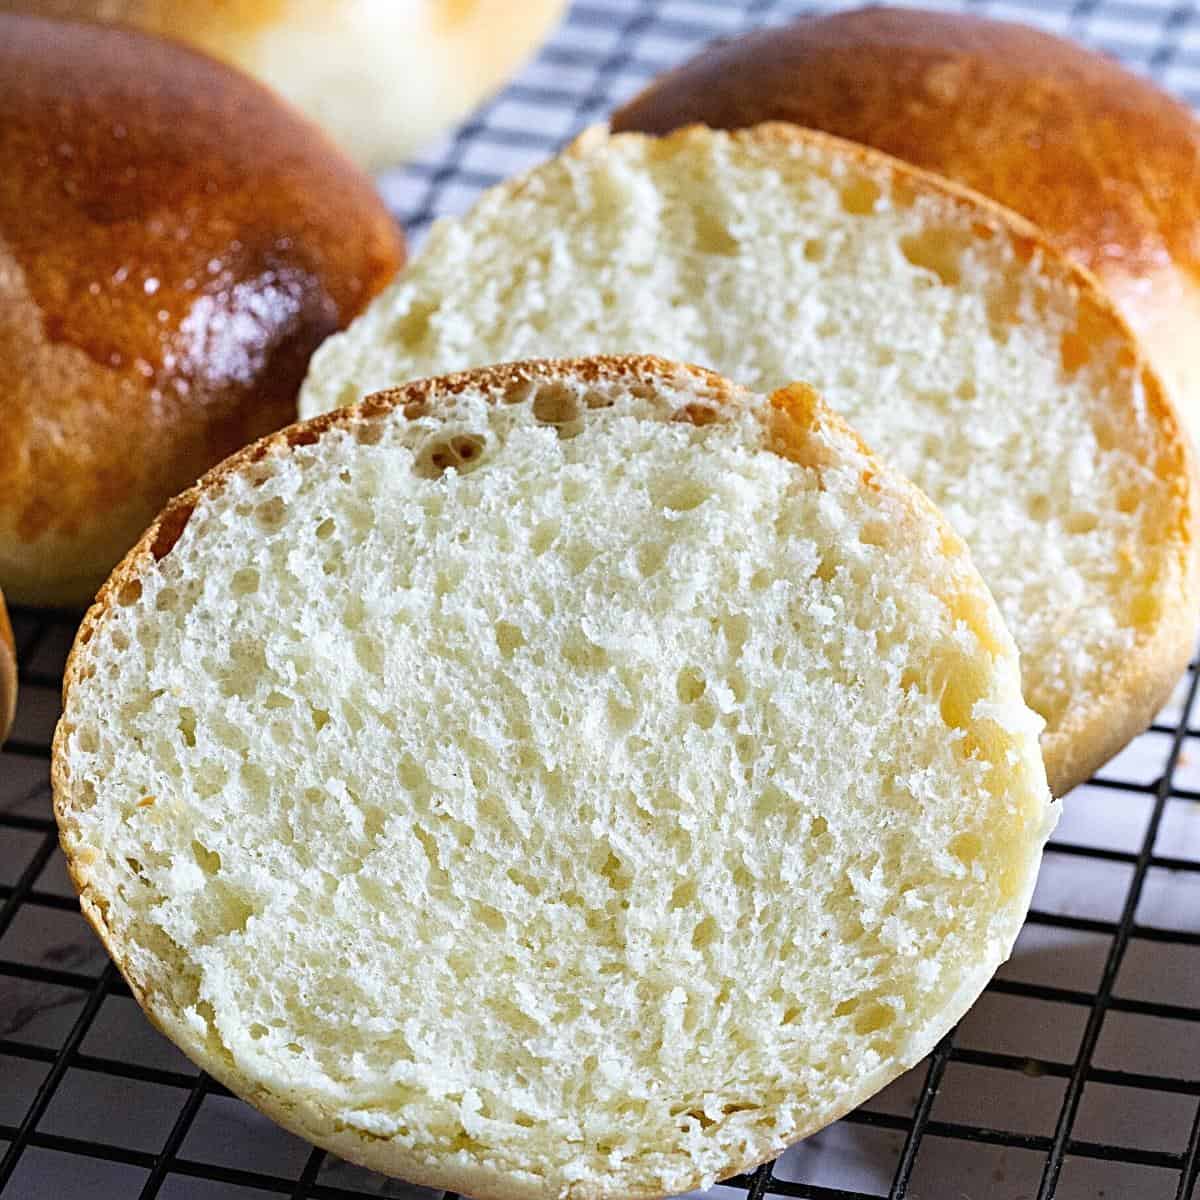
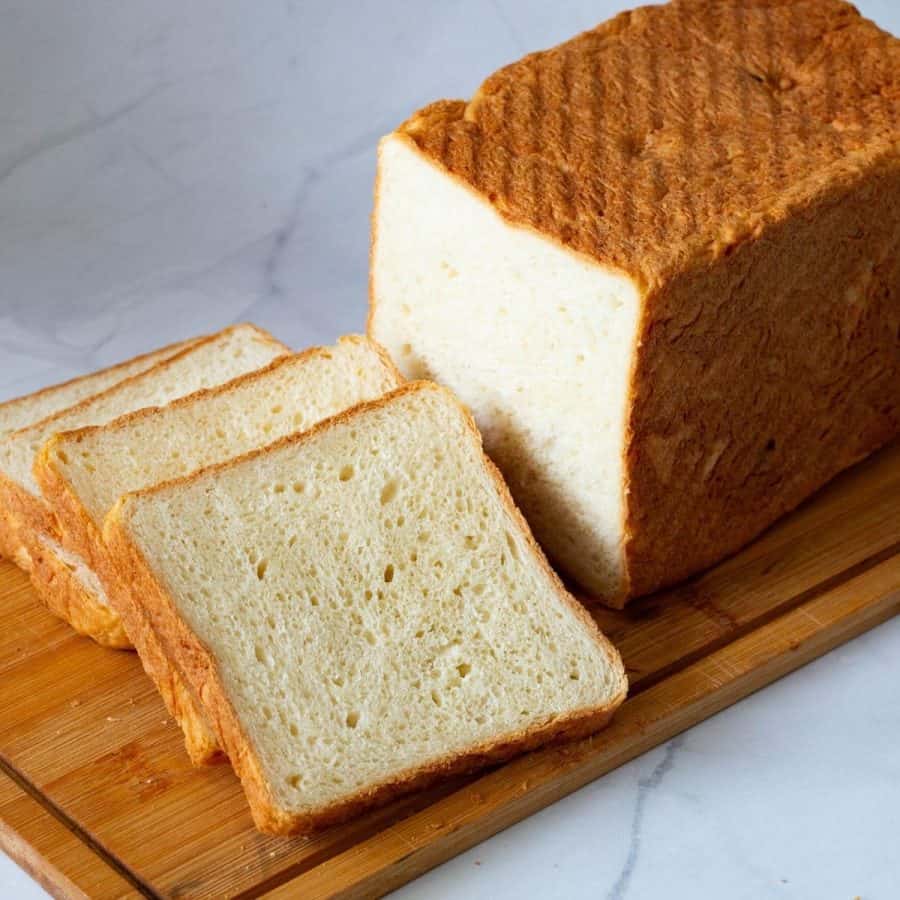
These sourdough brioche buns are airy, soft, and just a little sweet. Buns are a great addition to any sandwich. Made with a sourdough starter, I let the slow-rising dough rest overnight in the refrigerator, making it an easy and delicious way to start the day.

I’ve been baking sourdough bread for years, so it’s kind of funny that it never occurred to me to use my sourdough starter for one of my all-time favorites—brioche buns. I’ve made the classic version more times than I can count, but the day I finally swapped in sourdough… OMG. Total game changer.
If you’re into sourdough, you’ll believe me when I say the flavor is next-level—so much deeper, richer, and better than any regular burger bun out there. Plus, one of the things I love most about sourdough baking is the slow fermentation. The dough can chill and cold-proof in the fridge, which means I can work it into my schedule and bake when I’m ready, not when the dough says so!
These buns have officially ruined me for all others. Once you try them, you’ll know exactly what I mean.
Why make this recipe
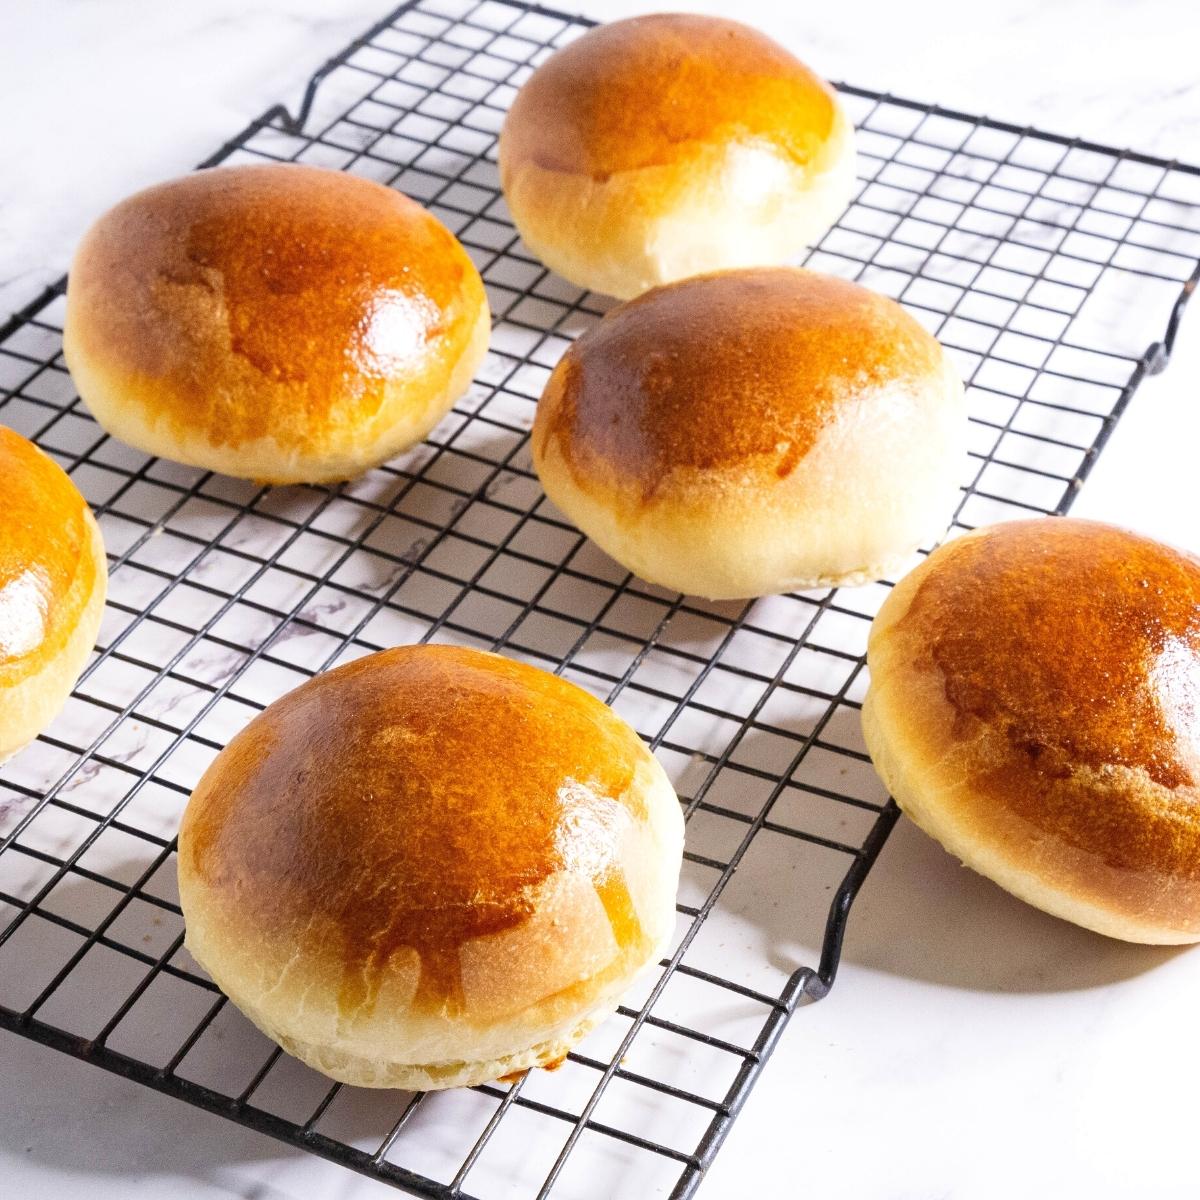
- A sourdough brioche bun with a golden crust and a tender, fluffy inside. The recipe includes a video showing how easy it is to make these buns.
- These nice soft buns are perfect for juicy burgers, and they make a great substitute for hamburger buns. And they are fantastic with braised shredded beef and sandwiches.
- Almost all the ingredients in this recipe are simple pantry staples, plus a sourdough starter.
- I use a simple method that uses shorter fermentation time and longer proofing time after shaping the loaf. In fact, this method makes shaping so much easier! Try it.
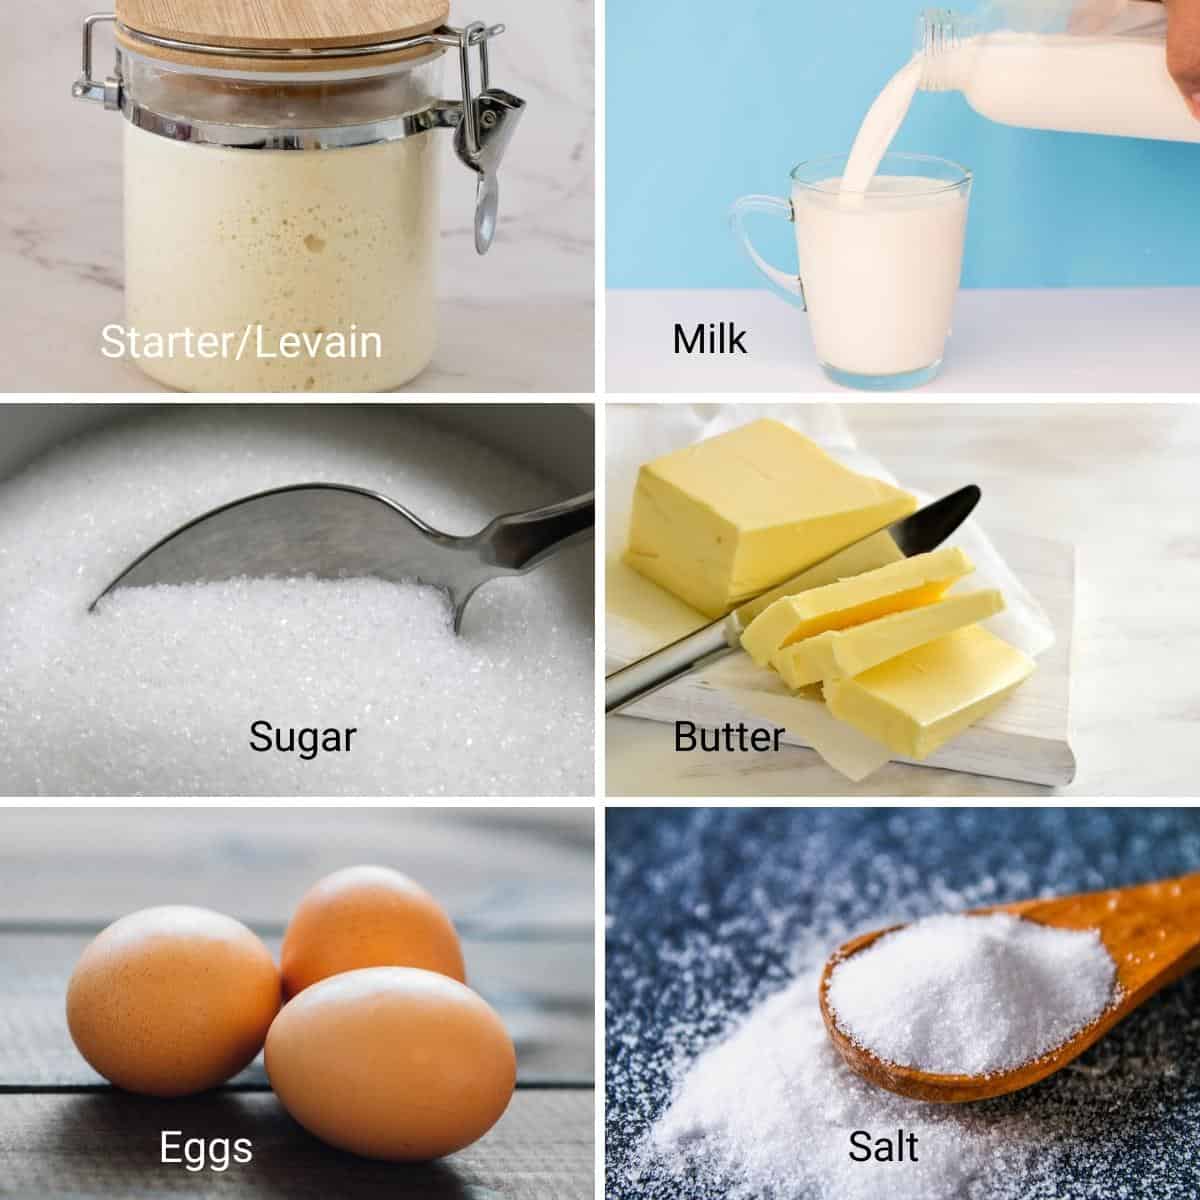
Ingredients and substitutes
- First and foremost, bread flour is the foundation of these buns. Its protein content gives the dough its structure and elasticity, resulting in that sought-after soft and fluffy texture. If you don’t have bread flour on hand, you can use all-purpose flour as a substitute, although the buns may turn out slightly less chewy.
- Next up, eggs add richness and moisture to the dough, creating a tender crumb and a beautiful golden color. They also provide structure and help with leavening.
- Milk, another key ingredient, adds a creamy and delicate flavor while contributing to the overall tenderness of the buns. If you’re lactose intolerant or prefer a non-dairy option, you can use almond milk, soy milk, or oat milk as a substitute. Just make sure to choose one that is unsweetened and unflavored to avoid any unwanted flavors in the final product.
- With its rich buttery taste, butter gives brioche its distinct flavor and luxurious texture. However, if you’re looking for a dairy-free alternative, you can use vegan butter or coconut oil instead. These substitutes will still provide the necessary fat content, resulting in deliciously moist buns.
- Of course, we can’t forget about the star of the show – the sourdough starter. This magical ingredient adds tanginess and depth of flavor to the buns and also aids in fermentation and leavening. If you don’t have a sourdough starter, you can create one by mixing equal parts of flour and water and letting it ferment for a few days until it becomes bubbly and active.
- Lastly, salt is the unsung hero that balances the dough’s sweetness and enhances all the flavors. Its presence ensures that each component harmonizes perfectly, creating a well-rounded and satisfying eating experience.
Step-by-step: Sourdough brioche buns
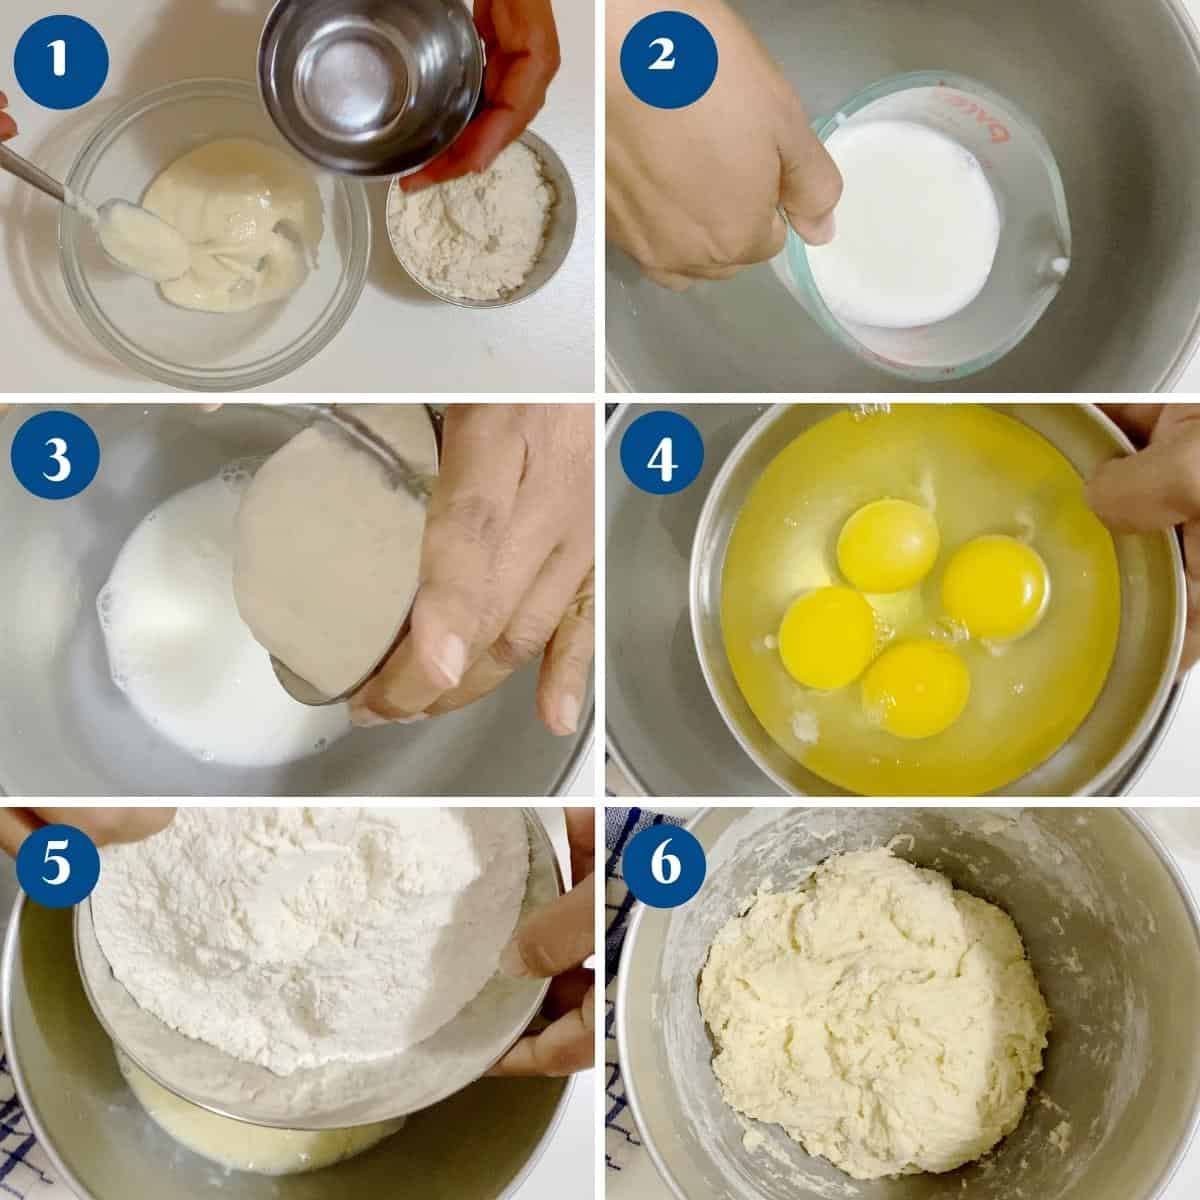
- Refresh your starter – In a medium bowl, combine 50g of sourdough starter, 50g of water, and 50g of flour. Stir well to combine. Cover and leave to rise for 3 to 5 hours at room temperature. Once your starter is ready, you can proceed with making the dough below.
Pro tip – You can also make the levain up to 5 days in advance and leave it in the fridge.
Dough
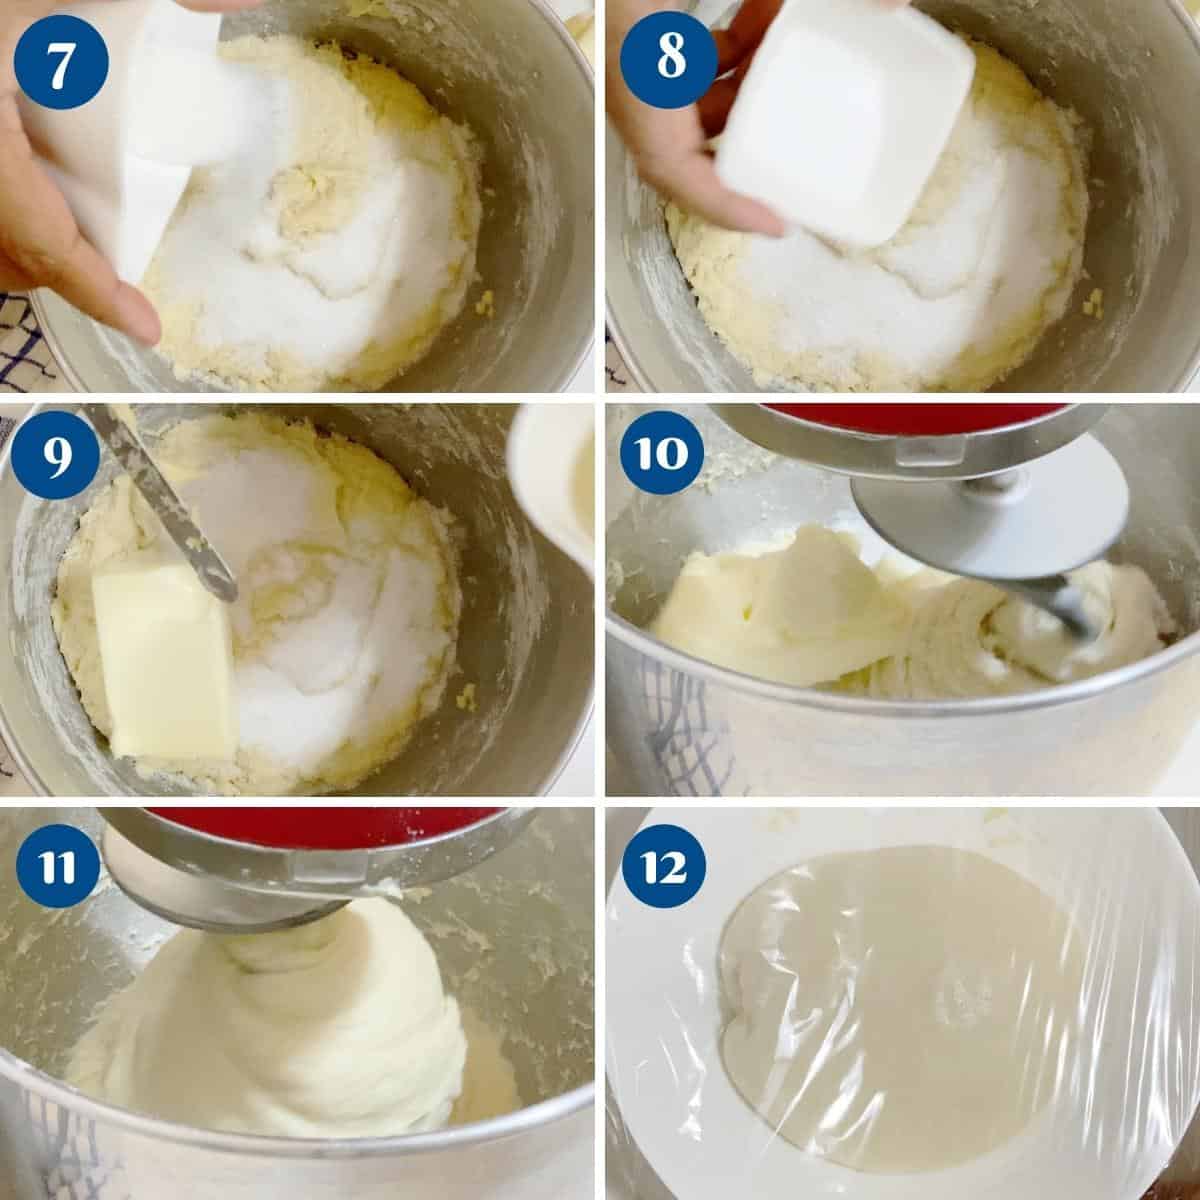
- Autolyse – In a large bowl of a stand mixer, add the milk, sourdough starter, eggs, and flour. Stir well with a wooden spoon or spatula. Cover the bowl and leave to rest for an hour.
Pro tip – Autolyze will help strengthen the gluten formation on the dough. - Knead – Next, add the sugar, salt, and butter. Knead the dough with a dough hook attachment on medium speed for 10 to 15 minutes, or until it is smooth and elastic.
Pro tip – The dough will still be very soft and slightly sticky, yet smooth, shiny, and very elastic when you do the windowpane test. - Bulk ferment – Transfer the dough to an oiled bowl and cover it with plastic wrap. Leave the dough to rise in the refrigerator (38°F / 3°C) for 6 to 8 hours.
Pro tip – The dough can be kept in the fridge for up to 24 hours. The highly enriched dough will rise very slowly.
Shape
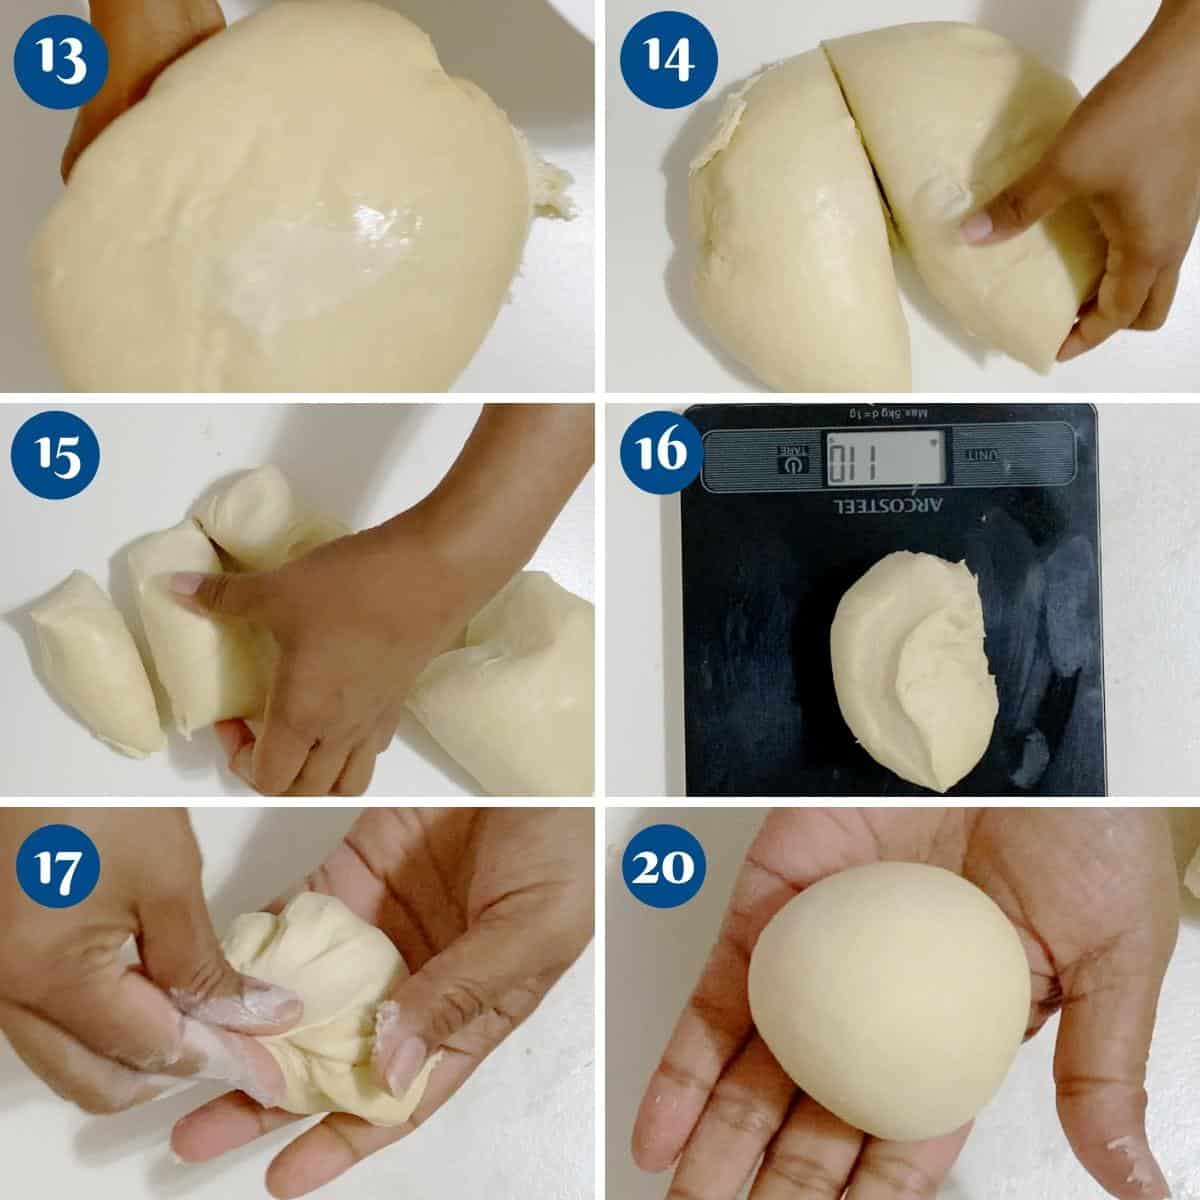
- Divide – Transfer the dough to a clean work surface. Divide the dough into 2 portions and then each portion into 6 to make 12 buns, about 110 grams each.
Pro tip – You can also make 16 smaller buns, each 85 grams, or eight large buns, each 165 grams. - Shape each portion into a tight ball. To do this correctly, roll into a ball, tucking all the seams under tightly. Then, roll the ball on an unfloured surface. The unfloured surface creates the tension we need in the dough.
Pro tip – Do not over-roll these for too long, or you will rupture the smooth top skin. - Tray – Place the buns on a baking sheet lined with parchment paper, leaving enough room for them to rise. Flatten each bun so it bakes like a flat bun, rather than a ball.
Pro tip – Flattening the buns makes a better base for the hamburgers. They also don’t topple so easily. - Proof – Cover with plastic wrap or a clean kitchen towel and let them proof until doubled in size. These can be kept for 3 hours on the counter or for 8 to 10 hours in the fridge.
Pro tip – Spray the plastic wrap with oil to prevent it from sticking to the rolls.
Bake (next day)
- Preheat the oven – Preheat the oven to 375°F (190°C) or Gas mark 5.
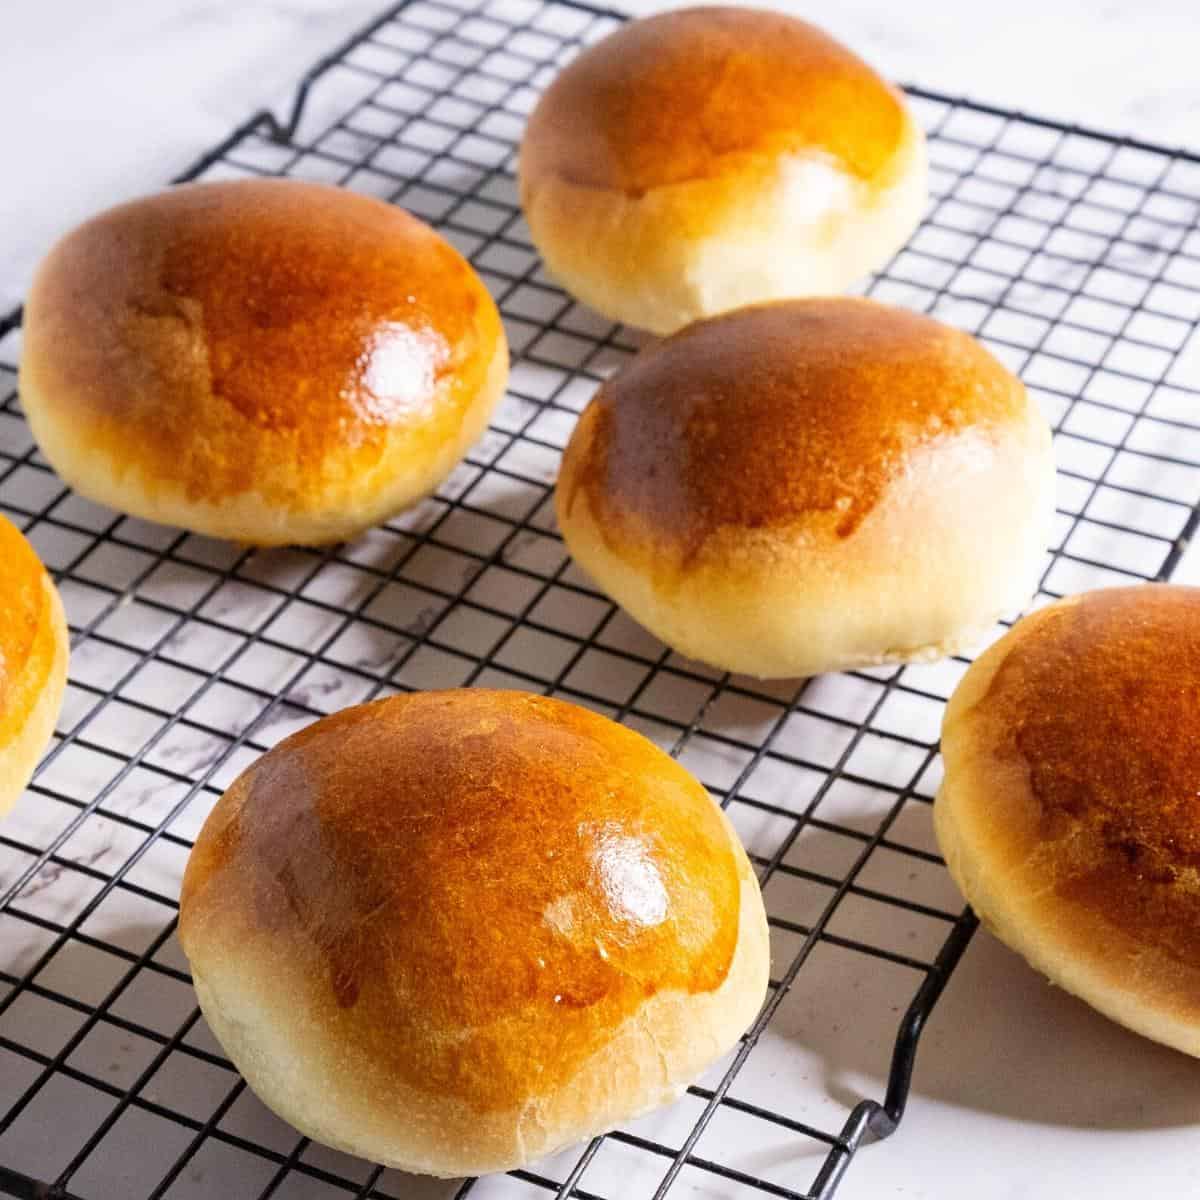
- Brush – Brush each bun with an egg wash. You can even sprinkle the buns with some sesame seeds or sugar pearls.
Pro tip – Egg wash is a full egg with 2 tbsp of water. An egg wash will give a nice golden color. And if you can’t use egg, milk, or cream will work just as well. Do not use oil or butter, as it will create a crust. - Bake small buns for 15 to 20 minutes and larger buns for about 20 to 25 minutes, or until they are golden brown.
Pro tip – When baked, the internal temperature of the hamburger buns should be about 195°F. The bread will have a hollow sound when tapped on the bottom. - Keeping them soft – As soon as you take the buns out of the oven, cover them with a clean kitchen cloth to keep them soft.
Pro tip – Do not leave the buns on the tray for too long; transfer them to a cooling rack. Otherwise, the steam will make the bread soggy on the bottom. Covering the buns with a cloth will help them retain moisture and prevent them from drying out.

Troubleshooting
- One common issue that can occur when making sourdough brioche buns is a lack of rising. If your dough doesn’t seem to rise as much as you’d like, ensure you’re following the sourdough fermentation process correctly. It’s important to give the dough enough time to develop and rise, so be patient and allow it to sit for the recommended duration. Additionally, double-check that your sourdough starter is active and healthy before incorporating it into the dough.
- Another potential problem you might encounter is a dense or heavy texture in your brioche buns. This can be caused by over-kneading the dough, which can lead to gluten development that is too strong. To avoid this, be mindful of the kneading process and stop once the dough reaches the desired level of elasticity. Remember, brioche dough should be tender and slightly sticky, not firm and tough.
- If your brioche buns come out of the oven with a pale or undercooked appearance, it may be a sign that your oven temperature needs adjustment. Invest in an oven thermometer to ensure accurate temperature readings. Additionally, make sure to bake the buns for the specified time and adjust the time as needed. A golden brown color and a slightly crispy crust are indicators of a well-baked brioche bun.
- On the other hand, if your brioche buns turn out too dark or even burnt, it might be time to reassess your baking temperature and time. Each oven is unique, so it’s important to know your oven’s quirks. Consider lowering the temperature slightly or reducing the baking time to prevent over-browning. Keep a close eye on the buns as they bake to avoid any mishaps.
- Lastly, if your brioche buns have a sticky or gooey texture on the inside, it could be due to under-baking or insufficient proofing. Make sure to proof the dough for the recommended amount of time, allowing it to rise adequately. Additionally, be sure to bake the buns until they are fully cooked through, with an internal temperature of around 200°F (93°C).


Frequently asked questions
These buns will keep at room temperature for 2 days. You can even freeze them for a month.
Yes, you can still make delicious brioche buns without a sourdough starter. However, keep in mind that the distinct tangy flavor and texture that sourdough brings will be missing. If you don’t have a sourdough starter, you can use commercial yeast instead to achieve a similar texture and rise. Here’s my classic brioche buns recipe. It uses instant yeast and has a video and tutorial.
Certainly! Sourdough brioche dough is incredibly versatile and can be used to create a variety of baked goods beyond buns. You can use it as a base for cinnamon rolls, coffee cake, or a stunning braided loaf. Let your creativity shine and explore the endless possibilities that sourdough brioche dough has to offer.
Absolutely! This dough is a basic sourdough brioche dough.
Sourdough brioche loaf – If you don’t want to make buns, you can also shape the dough into loaves and bake them in a loaf pan. This dough will make 2 x 8-inch sourdough loaves.
You can also make a classic sourdough brioche à tête by shaping the dough into a classic brioche, as shown in my classic brioche recipe.
Sourdough Brioche Buns
These sourdough brioche buns are airy, soft, and slightly sweet. Buns are a great addition to any sandwich. Made with a sourdough starter, I let the slow-rising dough rest overnight in the refrigerator, making it an easy and delicious way to start the day.
Video
Ingredients
- 150 ml (⅔ cups) Whole milk room temperature
- 200 grams (4 large) Eggs room temperature
- 560 grams (4½ cups) Bread flour (plus 1/4 cup more if still sticky)
- 180 grams (¾ cups) Sourdough Starter
- 50 grams (3 tbsp) Sugar
- 10 grams (1½ tsp) Kosher salt
- 170 grams (¾ cups) Unsalted butter
Method
- Autolyze – In a large bowl of a stand mixer, add the milk, eggs, starter, and flour. Stir well with a wooden spoon or spatula. Cover the bowl with plastic wrap and leave to rest for an hour.150 ml Whole milk, 200 grams Eggs, 180 grams Sourdough Starter, 560 grams Bread flour
- Knead – Next, add the sugar, salt, and butter. Knead the dough with a dough hook attachment on medium speed for 10 to 15 minutes, or until it is smooth and elastic.170 grams Unsalted butter, 50 grams Sugar, 10 grams Kosher salt
- Bulk ferment – Transfer the dough to an oiled bowl and cover it with plastic wrap. Leave the dough to rise in the refrigerator (38°F / 3°C) for 6 to 8 hours.
- Divide – Transfer the dough to a clean work surface. Divide the dough into two portions, and then each portion into 6 to make 12 buns, each about 110 grams.
- Shape each portion into a tight ball. To do this correctly, roll into a ball, tucking all the seams under tightly. Then, roll the ball on an unfloured surface. The unfloured surface creates the tension we need in the dough.
- Tray – Place the buns on a baking sheet lined with parchment paper, leaving enough room for them to rise. Flatten each bun so it bakes like a flat bun, rather than a ball shape.
- Proof – Cover with plastic wrap or a clean kitchen towel and let them proof until doubled in size. These can be kept for 3 hours on the counter or for 8 to 10 hours in the fridge. Refrigeration slows down the proofing time, so if necessary, leave them to rise at room temperature if they haven't doubled in size overnight.
- Preheat the oven – Preheat the oven to 375°F (190°C) or Gas mark 5.
- Brush – Brush each bun with an egg wash. You can even sprinkle the buns with some sesame seeds or sugar pearls.
- Bake small buns for 15 to 20 minutes and larger buns for about 20 to 25 minutes, or until they are golden brown.
- Keeping them soft – As soon as you remove the buns from the oven, cover them with a clean kitchen cloth to keep them soft.
Notes
-
- Firstly, it’s essential to pay close attention to the temperature of your dough throughout the entire process. Maintaining a consistent temperature, especially during the proofing and rising stages, is crucial for achieving that light, airy texture. Keep in mind that a warm environment will accelerate the yeast activity, while a cooler one will slow it down. Find a cozy nook in your kitchen, or even consider using a proofing box to help maintain the ideal temperature.
-
- Secondly, when handling the dough, resist the temptation to add too much flour. While it’s natural to want to prevent sticking, adding too much flour can result in dry and dense buns. Instead, opt for a light dusting of flour or use a non-stick baking mat or parchment paper to keep the dough from sticking without compromising its moisture.
-
- Additionally, gentle handling is key to achieving that soft and tender crumb. Avoid over-kneading the dough, as this can lead to gluten development and a chewier texture. Instead, knead the dough just until it comes together and becomes smooth, giving it time to rest and rise without too much interference.
-
- Next, be patient during the proofing stage. Allowing the dough to rise for the specified amount of time ensures that the yeast has ample opportunity to work its magic, resulting in a light and airy bun. Keep in mind that proofing times can vary depending on factors such as ambient temperature and the potency of your sourdough starter. Trust your instincts and adjust the proofing time accordingly to achieve the desired fluffiness.
-
- Lastly, when it comes time to bake your buns, be mindful of the oven temperature. Too high a temperature can cause the buns to brown too quickly on the outside while remaining undercooked on the inside. Conversely, too low a temperature can result in dense and doughy buns. Aim for a moderate oven temperature and monitor the buns closely as they bake, adjusting the time and temperature as needed to achieve that perfect golden hue.
Nutrition
Tried this recipe?
Mention @veenaazmanov_kitchen or tag #veenaazmanovkitchen!No posts
Don’t lose this recipe! Save it for Later!
📌 Save this Recipe for later on Pinterest so you can easily find it again.
⭐ Add Veena Azmanov Kitchen to your Google Preferred Sources.
It helps Google show you more of our recipes.
📧 Subscribe for new recipes delivered to your inbox.
🎥 Follow us for more recipes


Can I use all-purpose flour instead of bread flour? My starter is made of all-purpose.
Yes, Eva, you can definitely use All purpose flour for this bread.
My buns turned out fantastic! This is now my go to!!
Can’t wait to try your other recipes. Thank you Veena
Hi Susanne,
That makes me so happy to hear 😄 Brioche buns can feel intimidating at first, so I’m thrilled they turned out fantastic for you. And honestly, once you make homemade brioche buns successfully, it’s hard to go back to store-bought. Thank you so much for taking the time to leave a comment!
Is the butter melted, at room temperature or cold when you add it to the dough?
Room temperature Courtney Thanks
I put in fridge and the dough is rock hard and hasn’t grown at all? Should I leave in counter instead? Will it rise ?
Eva, leave it to proof on the counter to proof and see if they double. Then bake.
Hi, i thought you aren’t supposed to go beyond speed 2 on kitchenaid mixer when kneading. I started with 2 for 15min but the dough still seemed not as elastic so i increased the speed to 5 for 5 more min but my mixer was violently shaking.. idk if i should go beyond speed 2…
Every mixer is different, Grace, so yes, keep the mixer on medium speed and it should be enough. Don’t over-knead the dough. This is a highly enriched dough so it will be ok as long as your yeast is good.
Do we have to do the CF or can we just skip that and go to the next step…
I don’t care to CF because that’s where a lot of the sour flavor comes from and I try to minimize that
TIA!
Liz the cold ferment also helps build flavor but you can do just 2 to 3 hours on the counter. Then, shape, proof and bake if that works better for you.
Is the dough supposed to be really thick? I put it in the fridge to rise overnight and it’s rock hard and did not rise
Justina. This is a rich dough with lots of butter, so yes, when the butter chills, the dough becomes stiff!
The main rise is the first rise outside the fridge; this second cold rise does not double in volume but makes the bread very flavorful.
Once you shape and proof it will rise again
XX