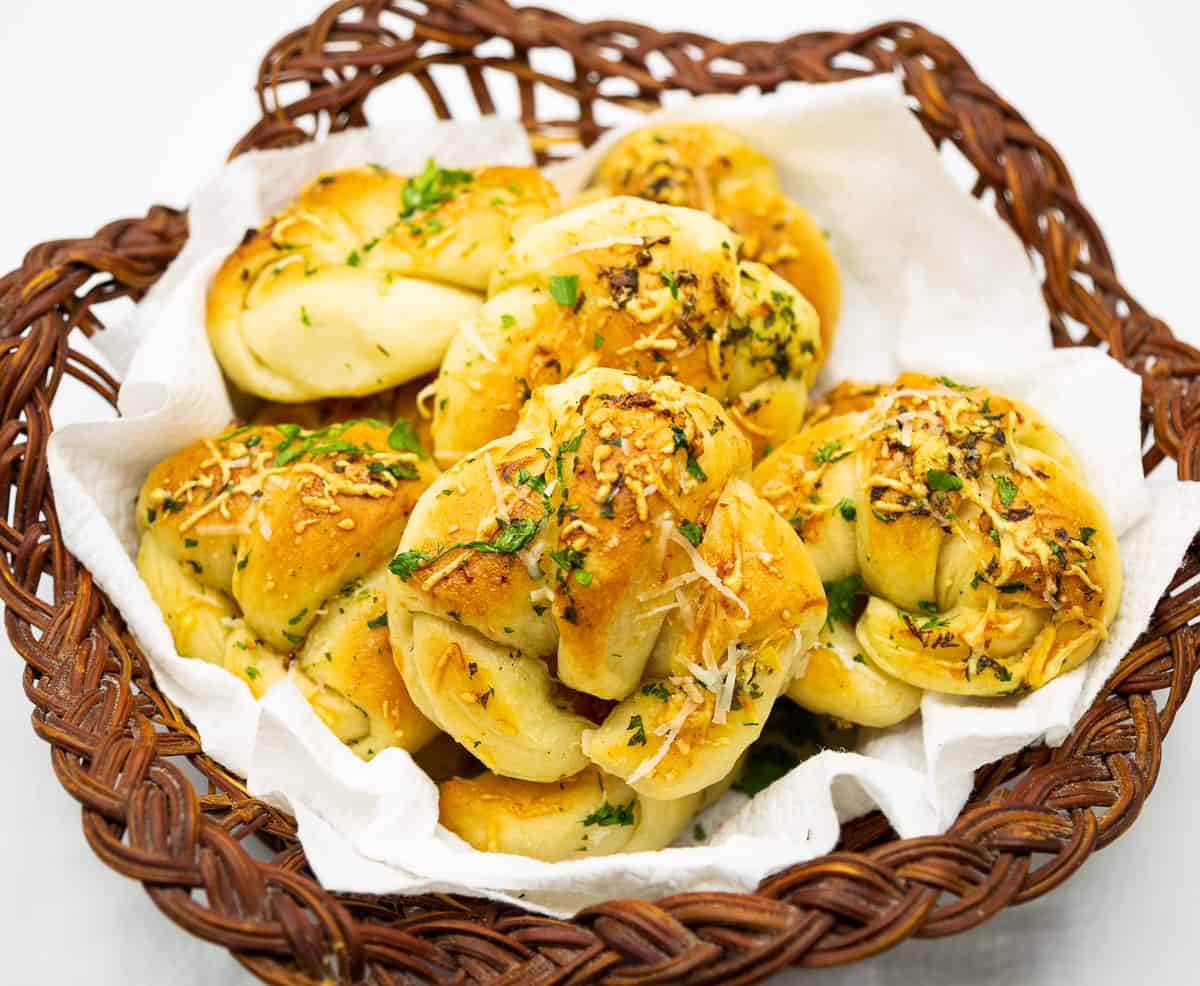
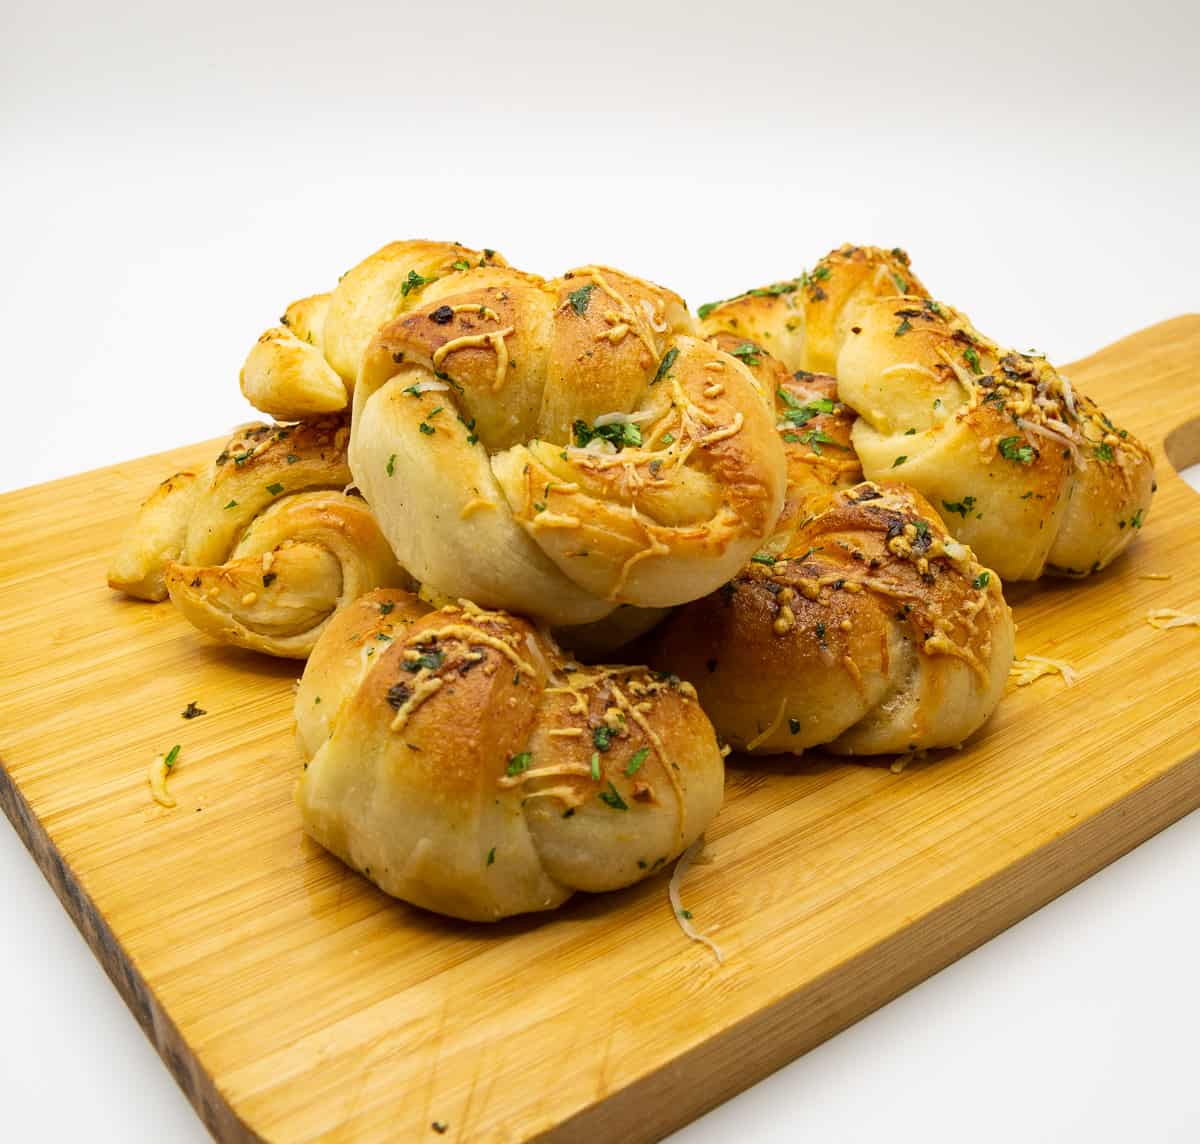
Homemade Parmesan Garlic Rolls


These Parmesan garlic rolls are for garlic lovers. Soft, light, and fluffy bread drenched with garlic herb butter. These crescent-shaped beauties are also simple and easy to make.

For me, baking bread is therapy. So, unless I’m making a video for you, I don’t use the stand mixer for bread; I knead by hand. There is something about kneading bread that just feels very rewarding. Furthermore, the texture starts with a big mess, and then slowly it ends up with this light, fluffy, elastic mass that does what you want it to do.
Why make these rolls
- First, it’s a simple recipe. The dough is like any other bread recipe with ingredients you probably already have on hand. Plus, of course, garlic and parmesan.
- Secondly, it’s easy to make. I love making the dough and letting it prove in the fridge overnight. Then, in the morning, all I do is roll with garlic parmesan, then shape, proof, and bake. Perfect for brunch.
- In addition, the smell in the house when baking these is like an Italian bakery with the aroma of Italian herbs. Perfect when you are entertaining.
- And the best thing about these rolls is that you can freeze them beautifully. As a result, they last for a month or more.

Ingredients and substitutes
- Bread flour – I like to use bread flour for this dough. But it is a wonderful dough, and you can also substitute half or just use all-purpose flour.
- Instant dry yeast – I like to use instant dry because I’ve always had great success with it. If you have to use active dry yeast, you will need 2 ¼ tsp or one packet. And if you use fresh yeast, you will need about 21 grams.
- Water – The temperature of the water is an essential factor in bread making. It has to be warm, not hot. Usually about 110 F, or lukewarm.
- Sugar – I’m using sugar, but honey works just as well.
- Olive oil – Adds a nice flavor and nourishes the yeast.

Step-by-step: Parmesan garlic rolls
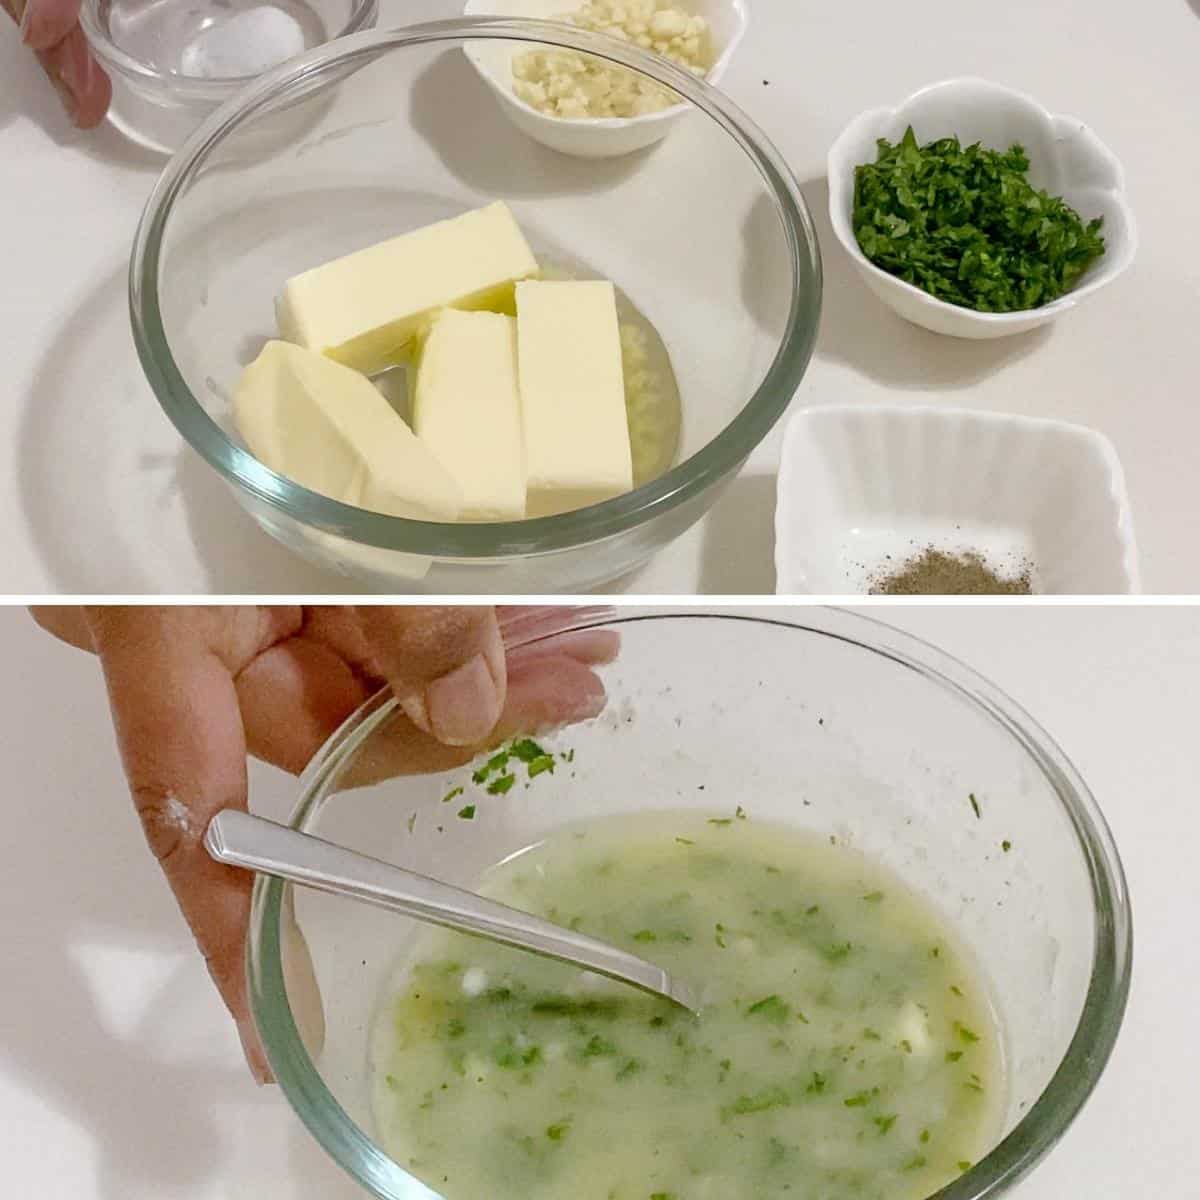
- Herbed garlic butter – In a bowl or saucepan, combine the butter, garlic, salt, pepper, and chopped parsley. Heat in the microwave or on the stovetop until melted. Set aside until ready to use.
Pro tip – I like to do this in the beginning so the butter is infused with the garlic flavor. But if you want a milder garlic flavor, you can prepare this just before using it.
Dough
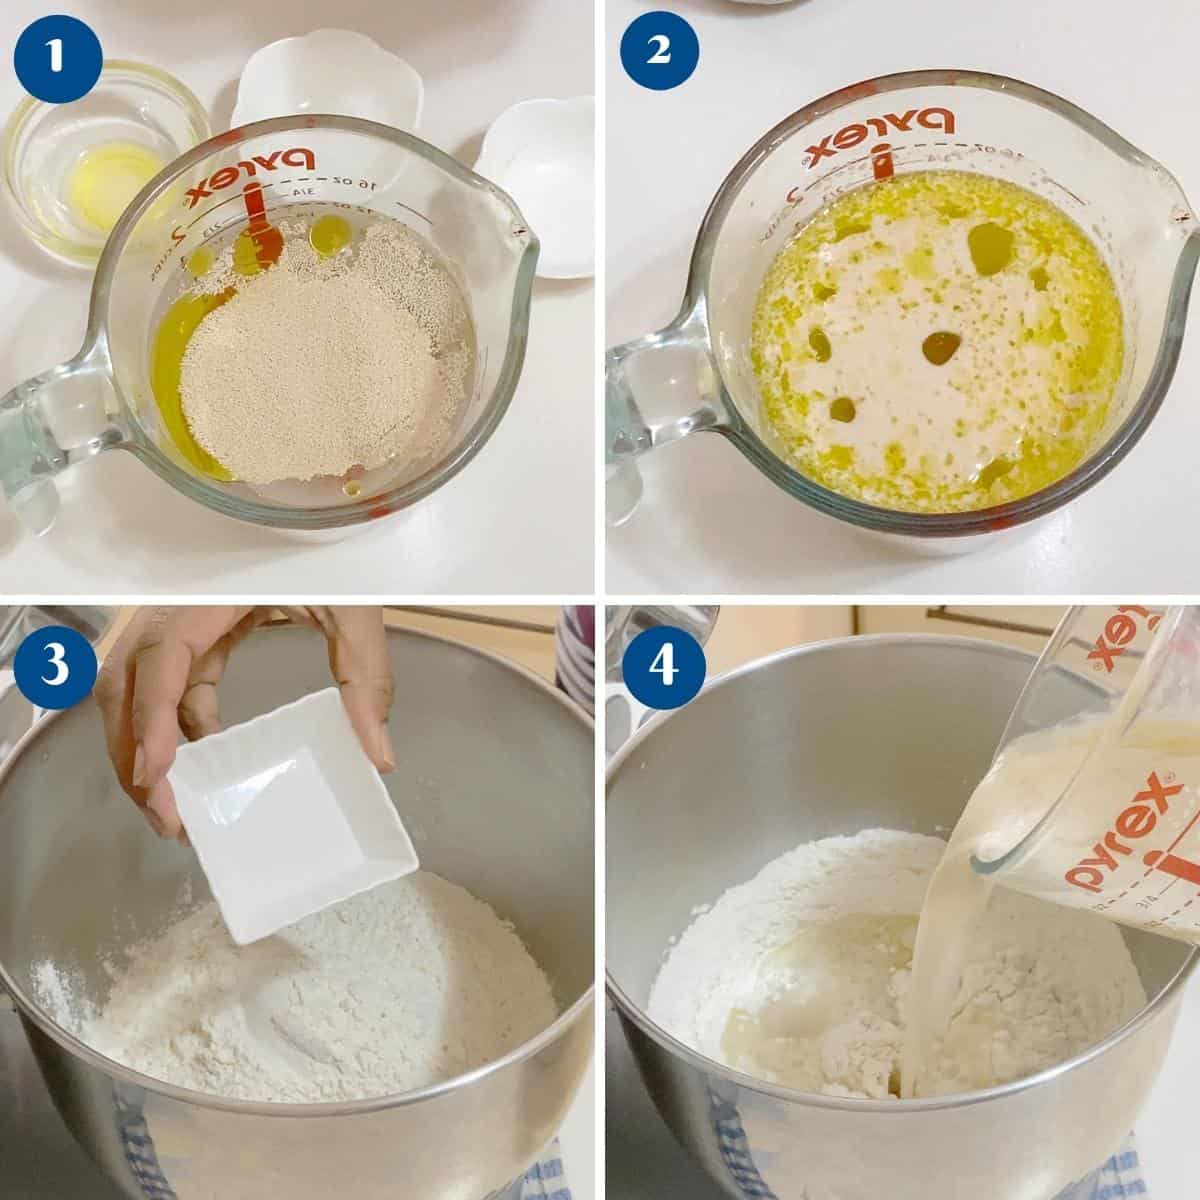
- Yeast mixture – In a mixing bowl or measuring cup, combine the warm water (110°F), yeast, sugar, and oil. Stir and set aside.
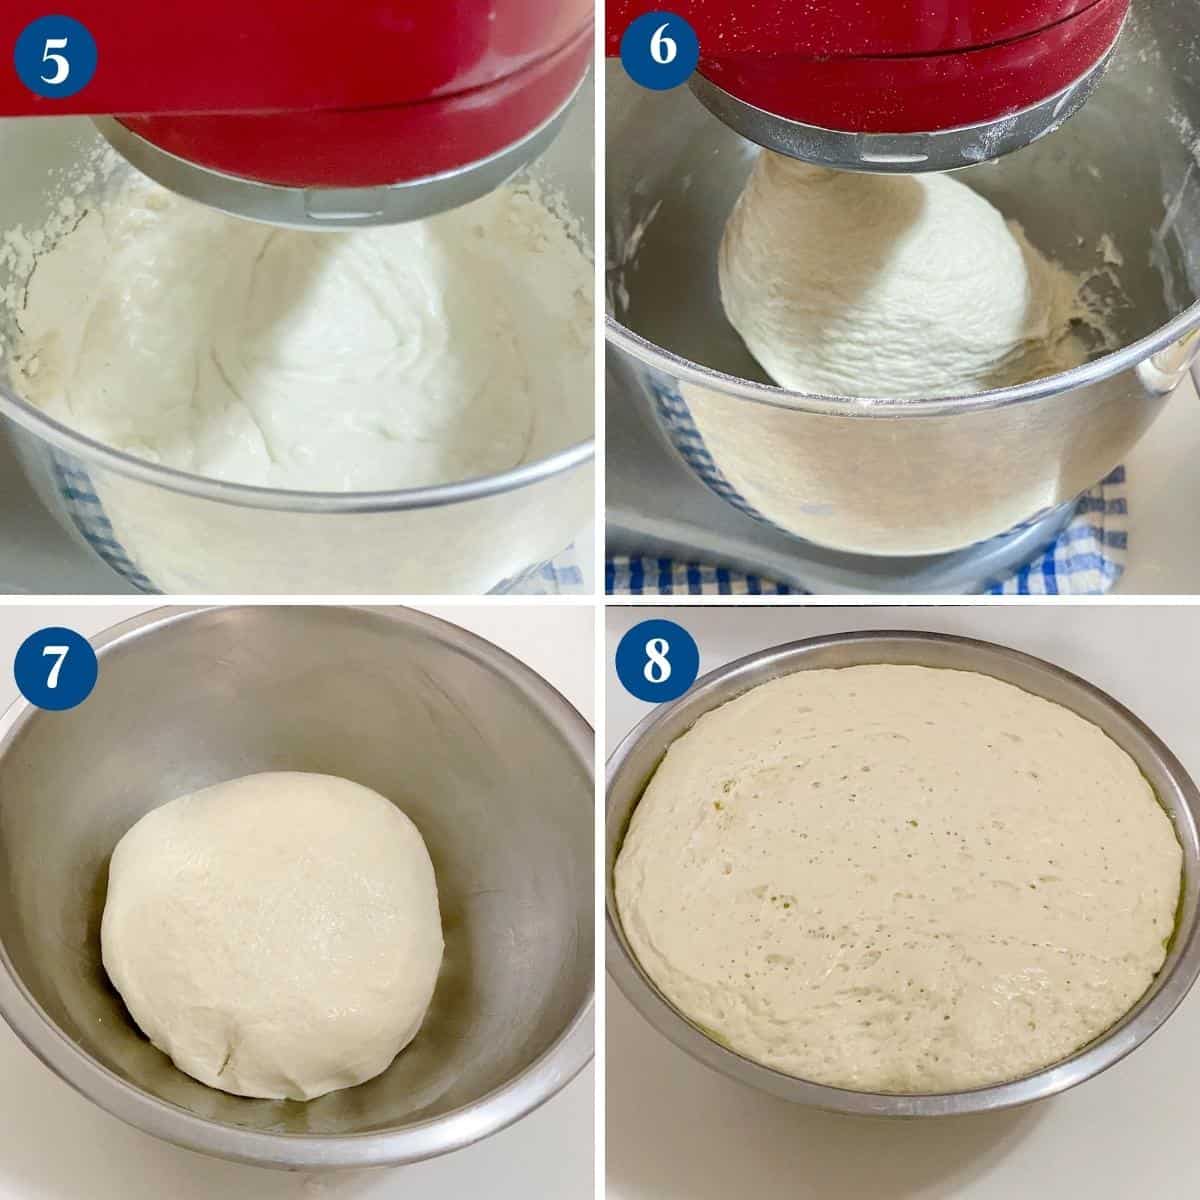
- Dry ingredients – Next, measure the flour and salt in a mixing bowl or stand mixer with the dough hook. Then, add the yeast mixture and combine well on medium-high speed for two minutes or until all the flour is well incorporated.
- Knead – Then, knead on medium speed for 5 to 7 minutes until you have a smooth, elastic dough. When the dough is soft and shiny but still slightly sticky, shape it into a ball. Place the dough in an oiled bowl, seam side down. Coat the surface with oil to prevent drying.
- Rise: Cover it with a clean kitchen cloth or plastic wrap. Leave in a warm place. Let rise for 60 minutes until doubled in volume.
Shape
- Divide – When the dough doubles in volume, transfer it to a well-dusted floured surface. Punch down and reshape into a ball. Divide the dough into two portions. Shape each into a ball and set aside.
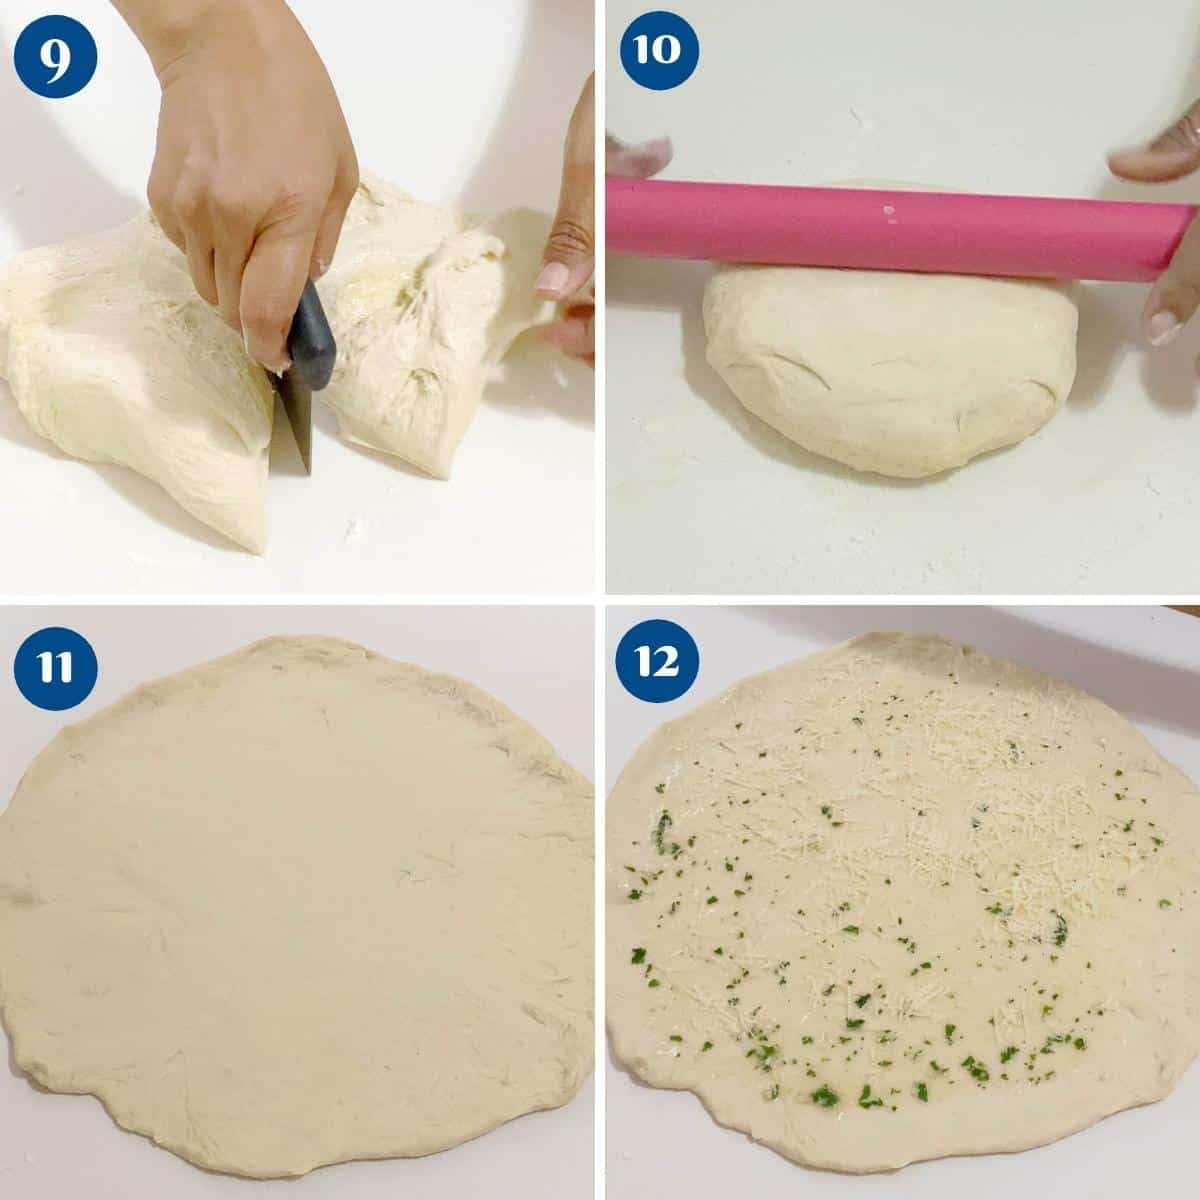
- Filling – Working with one ball at a time. Roll the dough into a round disc about 12 to 14 inches in diameter. Spread a generous amount of herbed garlic butter on the rolled dough. Then, using a pizza wheel, cut the disc into 12 slices.
Pro tip – I like to divide the disc in half first, then into four. Then, divide each quarter into three slices, making a total of 12 triangles. Similar to cutting a large pizza.
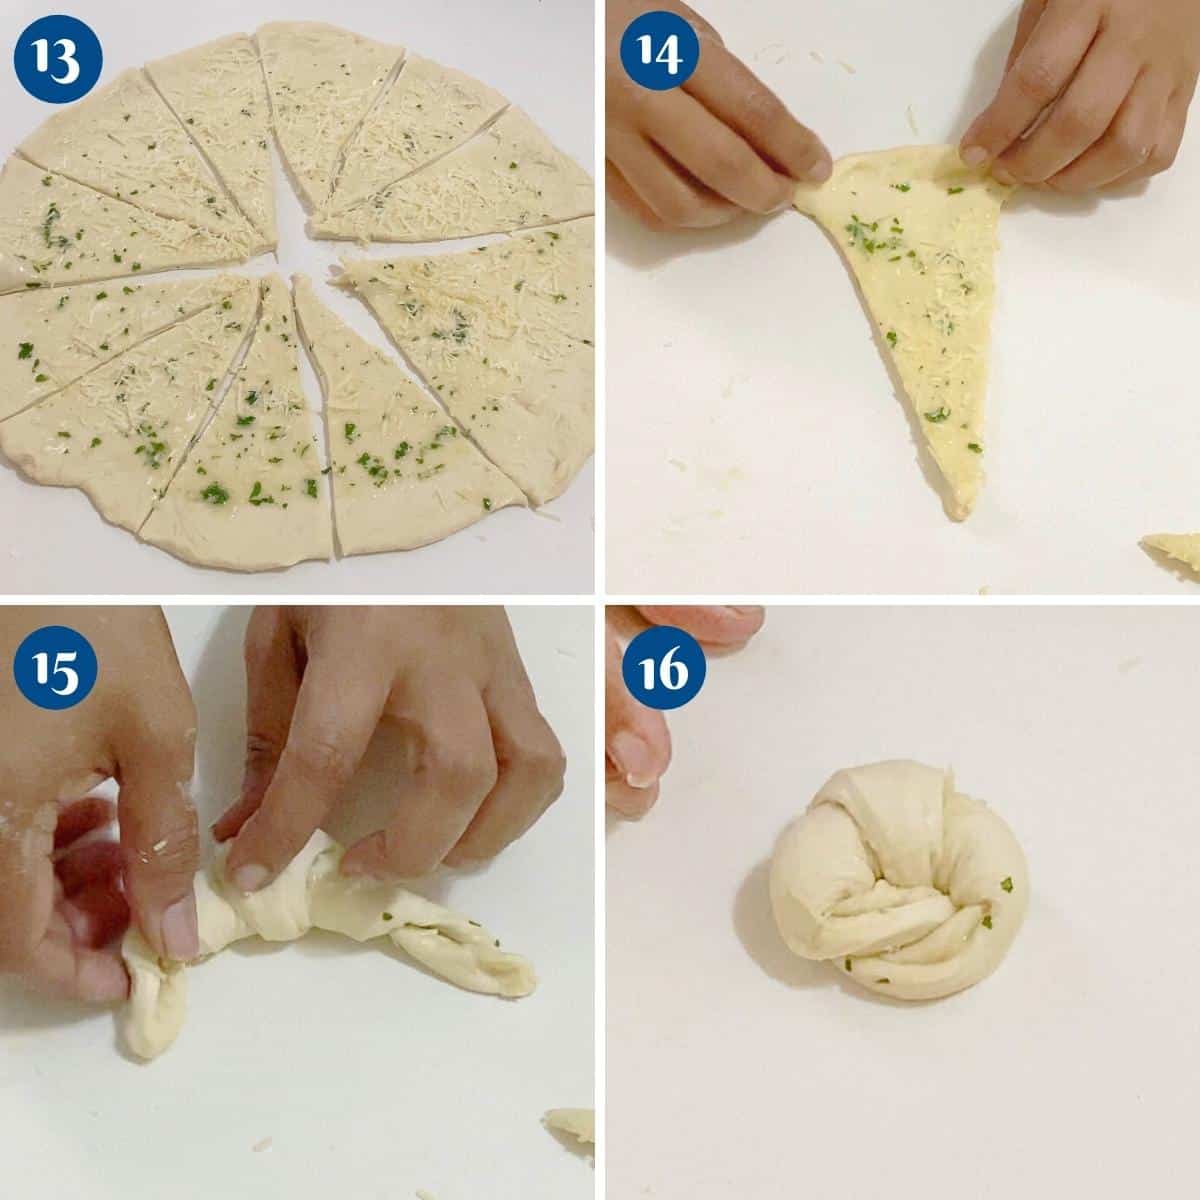
- Shape – Roll each slice into a crescent, bring the two edges towards the front, and tuck them under.
Pro tip – You can also leave these as crescents or shape them into rolls by tucking the sides under. Make sure to secure the edges under, or they will open when baking. - Tray – Place the rolls onto a baking tray, lined with parchment paper or a silicone mat. Continue with the remaining dough until all the rolls are made.
Bake
- Proof – Cover with plastic wrap or a clean kitchen cloth and let proof for 20 minutes.
Pro tip – Spray the plastic wrap with oil to prevent it from sticking to the rolls. - Oven – Preheat the oven to 360°F /180°C / Gas Mark 4.
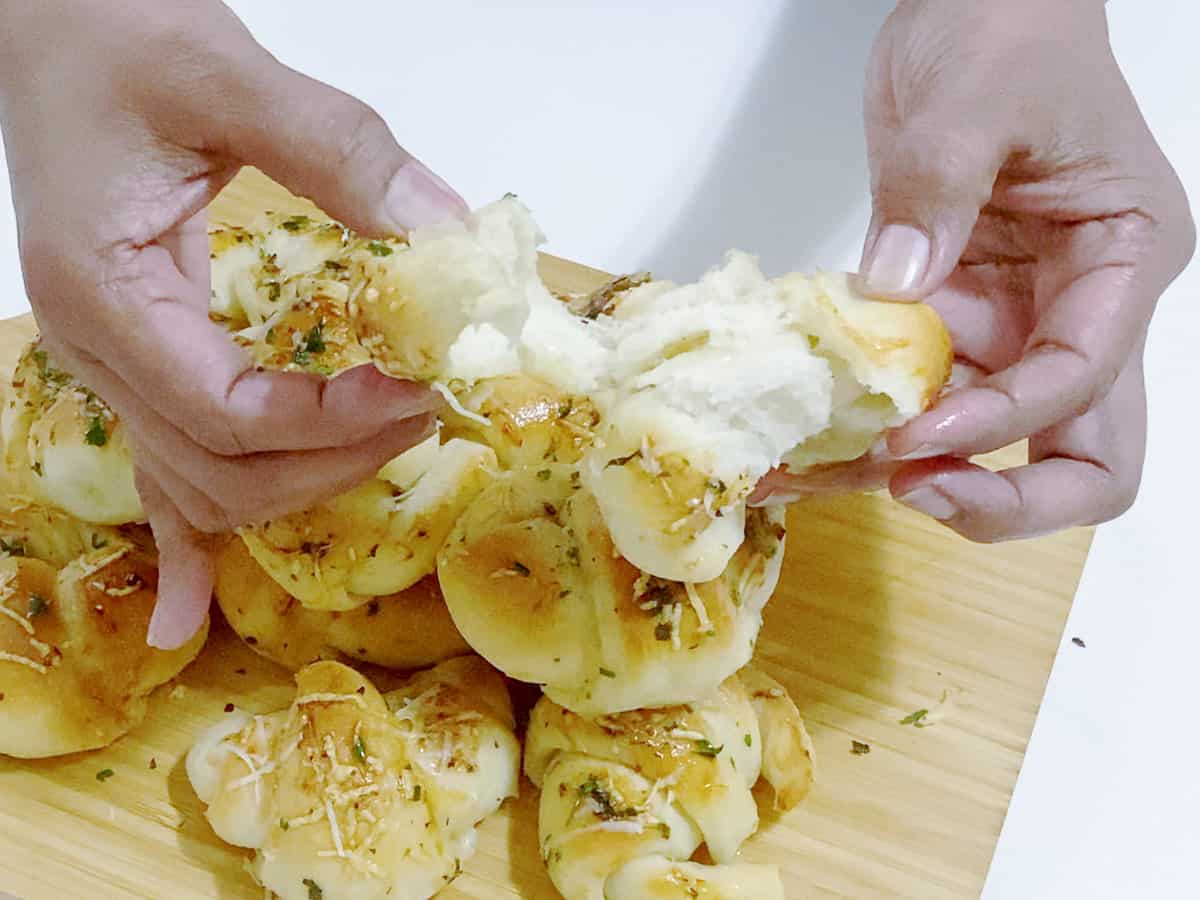
- Brush – Next, brush each roll with more herbed garlic butter, and sprinkle some grated parmesan cheese over each. Bake for 15 to 20 minutes or until lightly golden on top.
Pro tip – When baked, the rolls should reach an internal temperature of about 195°F. The bread will have a hollow sound on the bottom when tapped.

- Keeping them soft – When you take the rolls out of the oven, brush them with more herbed garlic butter, parmesan, and chopped parsley. Then, cover them with a clean kitchen cloth for 5 minutes to keep them soft.
Storage
- These buns will stay fresh for 3 to 4 days.
- They are best kept in an airtight container, rather than the refrigerator.
- You can also freeze them in a ziplock bag for up to a month.
- They are best reheated from frozen because the condensation adds moisture.
- BEST Sandwich Bread Recipe, Challah Sandwich Bread
- Shokupan Sandwich Bread, Brioche Sandwich Bread Recipe
- Homemade Soft Dinner Rolls
- Garlic Rolls – Dinner Rolls, Sun-Dried Tomatoes Olive Rolls
- See all bread recipes


Frequently asked questions
Bake them in a hot oven at 350°F for 7 to 10 minutes. You can also brush them with melted butter to keep them soft.
Yes, you can proof the dough in the fridge for a longer time instead of at room temperature. It will take longer to rise, but it will still rise. And, later, make sure to bring the dough to room temperature. Then, form the rolls and prove them again before baking.
Yes, you can also do the first rise at room temperature, form the rolls, and let them rise in the fridge before baking. Then, cover the shaped rolls tightly with cling wrap, leaving enough space for them to rise. And you can leave them overnight in the fridge, but make sure to thaw them at room temperature before baking.
These are great with any soup, stew, chili, or slow-cooked meat. Soup, salad, and dinner rolls are complete meals in our home. They are perfect to soak up the gravy in slow-cooked lamb, beef, or chicken dishes.
And my kids love lamb stew or chili with this bread.
Parmesan Garlic Rolls
You must love garlic to enjoy these Parmesan garlic bread rolls. Soft, light, and fluffy bread drenched with garlic herb butter. These crescent-shaped beauties are also simple and easy to make.
Video
Ingredients
- 340 g (1½ cups) Warm water or milk 100°F
- 7 g (2¼ tsp) Instant dry yeast (1 sachet)
- 30 g (2 tbsp) Sugar or honey
- 30 g (2 tbsp) Olive oil
- 500 g (4 cups) Bread flour or All-purpose flour
- 9 g (1 tsp) Kosher salt
- 2 – 4 tbsp Garlic cloves minced or 4 to 6 tbsp mashed roasted garlic
- 6 tbsp Butter unsalted, room temperature
- ½ tsp Pepper
- ½ tsp Salt
- 2 tbsp Parsley finely chopped
- 6 tbsp Parmesan cheese grated
- 2 tbsp Parmesan grated for garnish
- 2 tbsp Parsley chopped for garnish
Method
- Herbed garlic butter: Combine the butter, garlic, salt, pepper, and chopped parsley in a bowl or saucepan. Heat in the microwave or on the stovetop until melted. Set aside until ready to use.2 – 4 tbsp Garlic cloves, 6 tbsp Butter, ½ tsp Pepper, 2 tbsp Parsley , 6 tbsp Parmesan cheese, ½ tsp Salt
- Yeast mixture – In a mixing bowl or measuring cup, combine the warm water (110°F), yeast, sugar, and oil. Stir and set aside.340 g Warm water or milk , 7 g Instant dry yeast, 30 g Sugar, 30 g Olive oil
- Flour mixture – Next, measure the flour and salt in a mixing bowl or stand mixer with the dough hook. Then, add the yeast mixture and combine at medium to high speed until all the flour is well incorporated.500 g Bread flour, 9 g Kosher salt
- Knead – Then, knead on medium speed for 5 to 7 minutes until you have a smooth, elastic dough. When the dough is soft and shiny but still slightly sticky, shape it into a ball. Place the dough in an oiled bowl, seam side down.
- Rise – Coat the surface with oil to prevent drying. Then, cover a clean kitchen cloth or plastic wrap. Leave in a warm place. Let rise for 45 to 60 minutes until it doubles in volume.
- Divide – Transfer the dough to a well-dusted floured surface when it is doubled in volume. Punch it down and reshape it into a ball again. Divide the dough into two portions. Shape each into a ball and set it aside.
- Filling: Working with one ball at a time, roll the dough into a round disc 12 to 14 inches in diameter. Spread a generous amount of herbed garlic butter on the rolled dough. Then, using a pizza wheel, cut the disc into 12 slices. Roll each slice into a crescent, bring the two edges towards the front, and tuck them under.
- Proof – Place the rolls onto a baking tray, lined with parchment paper or a silicone mat. Continue with the remaining dough until all the rolls are made. Cover with plastic wrap or clean kitchen cloth and let proof for 20 minutes.
- Preheat – Meanwhile, preheat the oven to 360°F /180°C / Gas Mark 4.
- Bake – Brush each roll with more herbed garlic butter, and sprinkle some grated parmesan cheese. Bake for 15 to 20 minutes or until lightly golden on top.2 tbsp Parmesan , 2 tbsp Parsley
- Keeping them soft – When you remove the rolls from the oven, brush them with more herbed garlic butter, parmesan, and chopped parsley. Then, cover them with a clean kitchen cloth for 5 minutes to keep them soft.
Notes
- The amount of flour you add to your recipe is key to the success of these rolls. Avoid the temptation of adding too much flour.
- Temperature – The temperature of the water plays a huge role in bread baking. It should be approximately 41 °C / 110°F. If it is cold, it will not revive the yeast. And if it’s hot, it will, in fact, kill the yeast.
- When you cover the hot rolls in a clean kitchen cloth, you are letting the steam inside the bread cool – this keeps them soft and moist, not dried out.
- Overnight rolls – The dough can be prepared a day in advance. Proof it on the counter for an hour, then punch down and let the dough rest in the fridge overnight. Overnight proofing is a great way to add flavor to the bread. The next day, let the dough come to room temperature before you shape and bake them.
- Storing – These rolls do freeze beautifully. Cool the baked rolls, then place them in a freezer-safe storage bag. These can be frozen for up to a month.
- Kneading the dough – If possible, use an electric mixer because the dough is soft and sticky.
- Bread machine – this dough can be easily made in a bread machine. Pour all ingredients in the pan, set to dough or manual. Start and let the dough run its cycle for about 9 to 10 minutes – continue with the recipe as shown above.
Storage
- These buns will stay fresh for 3 to 4 days.
- They are best kept in an airtight container, rather than the refrigerator.
- You can also freeze them in a ziplock bag for up to a month.
- They are best reheated from frozen because the condensation adds moisture.
Equipment you will need


Nutrition
Tried this recipe?
Mention @veenaazmanov_kitchen or tag #veenaazmanovkitchen!Don’t lose this recipe! Save it for Later!
📌 Save this Recipe for later on Pinterest so you can easily find it again.
⭐ Add Veena Azmanov Kitchen to your Google Preferred Sources.
It helps Google show you more of our recipes.
📧 Subscribe for new recipes delivered to your inbox.
🎥 Follow us for more recipes


Great flavors and textures in this bread! I love that it turns out so soft and fluffy!
Thank you for the awesome directions. I always hesitate to make bread but these were actually super easy thanks to your directions. Also – delicious in every way – a total hit with my family!
Thank you so much for the lovely feedback, Cyndy
Like you, I knead all my bread by hand. It is very therapeutic. Saw these and had to make them. They came out exactly like you described them. Thanks for sharing the freezing instructions, too. They came in handy.
Thank you, Maria. So happy you enjoyed these
Hi I would like to know the steps u take for roasting the garlic.
Sure, Aliyyah. Cut garlic bulb in half. Place on a foil. Sprinkle with oil, salt, and pepper. Wrap in the foil and cook for 45 minutes at 180 C / 350 F
Nice recipe! Really appreciate your in process shots! Makes following the directions so super easy :)! And I can think of so many mealsI wanna serve these bread rolls with :)!
Thank you, Daniela. Happy you like my progress pictures.
These are absolutely heaven on earth!!! Roasted garlic makes everything better in my opinion and these rolls are gonna be part of our dinner rotation!!!
I agree. Roasted garlic makes a huge difference
I literally can smell the fresh yeasty flavour of these right now! Like seriously. Wow. Your bread making is just gorgeous and absolutely appetizing!
Thanks, yes it does have a wonderful smell.
These garlic rolls are absolutely perfect! I love bread anyway but the flavors in this bread recipe are absolutely amazing!
Thank you, Amanda. The flavor in this is really wonderful.
The smell of fresh baked bread has to be one of the top five best smells ever! These dinner rolls sound so amazing and versatile to go with any sort of dinner. All the tips and tricks you share are super helpful!
I agree – nothing like fresh baked bread. Thanks, Lauren.
I’m just like you – I find kneading dough by hand so therapeutic and relaxing! Nothing like working with dough when you’ve had a stressful day! These looks scrumptious!
Thanks, Lori. yes, love kneading dough by hand.