No-Knead Pizza Dough
 Prep Time 20 minutes Cook Time 12 minutes Total Time 6 hours 32 minutes


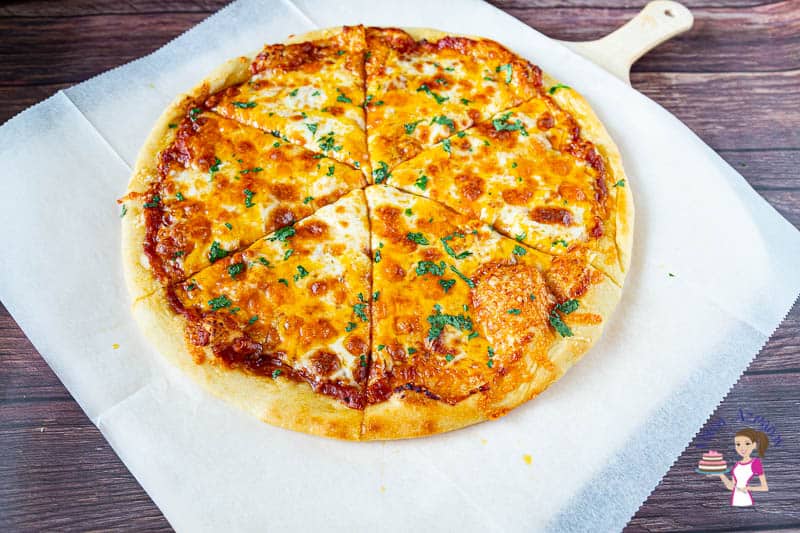
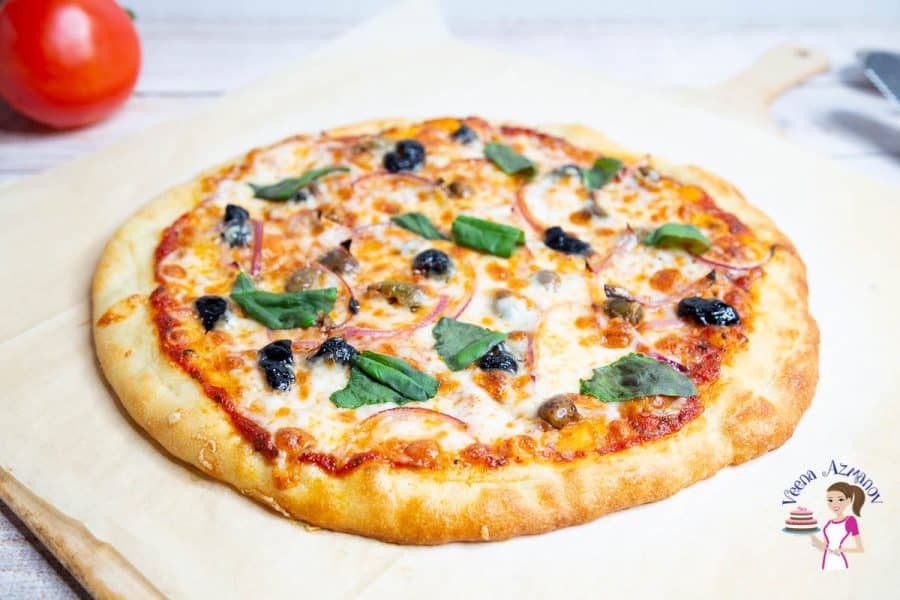
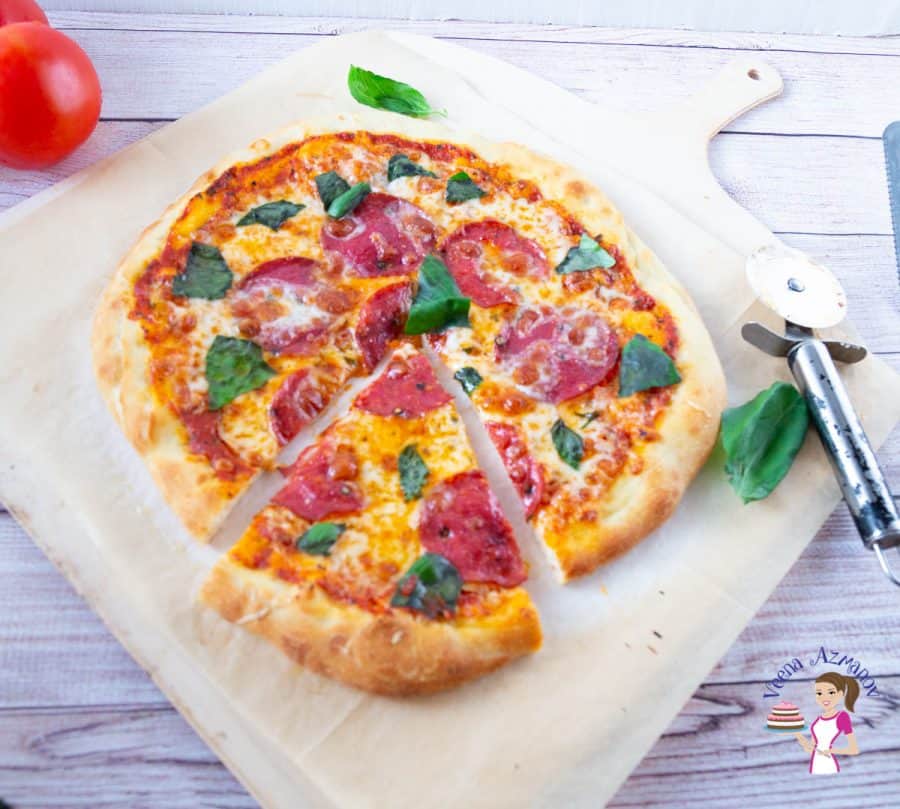
No-knead pizza dough simplifies the pizza-making process by eliminating the need for kneading. With just a few ingredients and a bit of time, you can create a flavorful dough with a chewy texture and crispy crust. Its versatility allows you to customize your pizza with your favorite toppings, making it a go-to recipe for pizza night.
No-knead dough has revolutionized home baking with its simplicity and superb results. By skipping the traditional kneading process, this technique streamlines bread and pizza dough making, making it accessible to bakers of all skill levels.
No-knead pizza dough, in particular, is a brilliant concept for several reasons. First, it requires minimal effort, allowing you to whip up a batch of dough with just a few basic ingredients and a bit of time. Second, the dough’s long fermentation period develops complex flavors and a delightful texture, resulting in a pizza crust that is crispy on the outside and chewy on the inside. Lastly, no-knead pizza dough is incredibly versatile, allowing you to customize your pizza with your favorite toppings.
Overall, no-knead pizza dough is a game-changer, offering a simple and delicious way to enjoy homemade pizza anytime.
Why is this dough the best pizza crust?
- Simplicity: The recipe requires minimal effort and expertise, making it accessible to beginners and experienced bakers alike.
- Flavor: The long fermentation time allows the dough to develop complex flavors, resulting in a delicious crust with depth and character.
- Texture: The high hydration level and long fermentation create a dough with a light and airy texture, perfect for a crisp yet chewy crust.
- Convenience: The dough can be made in advance and refrigerated for up to 3 days, making it ideal for meal planning or entertaining.

Ingredients and substitutes
- Bread Flour: Provides the structure and chewiness to the dough. You can also use all-purpose flour, but the texture may be slightly different.
- Active Dry Yeast: Acts as the leavening agent, helping the dough rise. You can also use instant yeast, but use 25% less than the amount of active dry yeast called for in the recipe.
- Salt: Enhances the flavor of the dough. Sea salt or kosher salt can be used.
- Water: Binds the ingredients together and hydrates the flour. No direct substitute, but using lukewarm water (around 105-110°F or 40-43°C) is important for activating the yeast.

Step-by-step: No-knead pizza dough
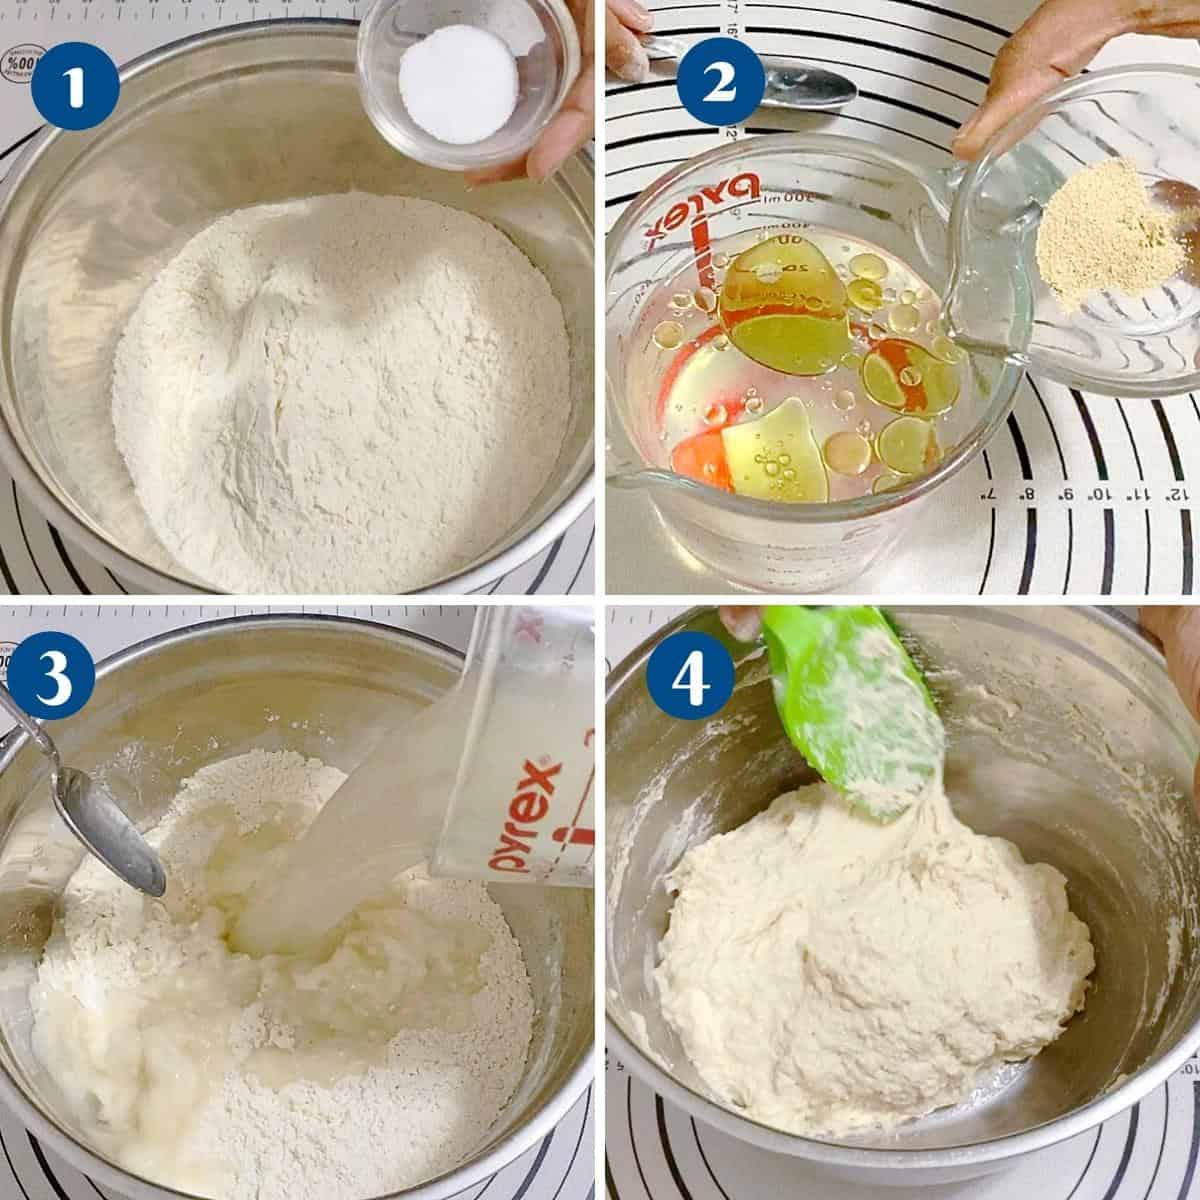
- Yeast mixture – In a small bowl, combine the warm water, yeast, sugar, and oil.
- Dry ingredients – In a large mixing bowl, combine the bread flour and salt.
- Combine – Gradually add the yeast while stirring with a wooden spoon until a shaggy dough forms.
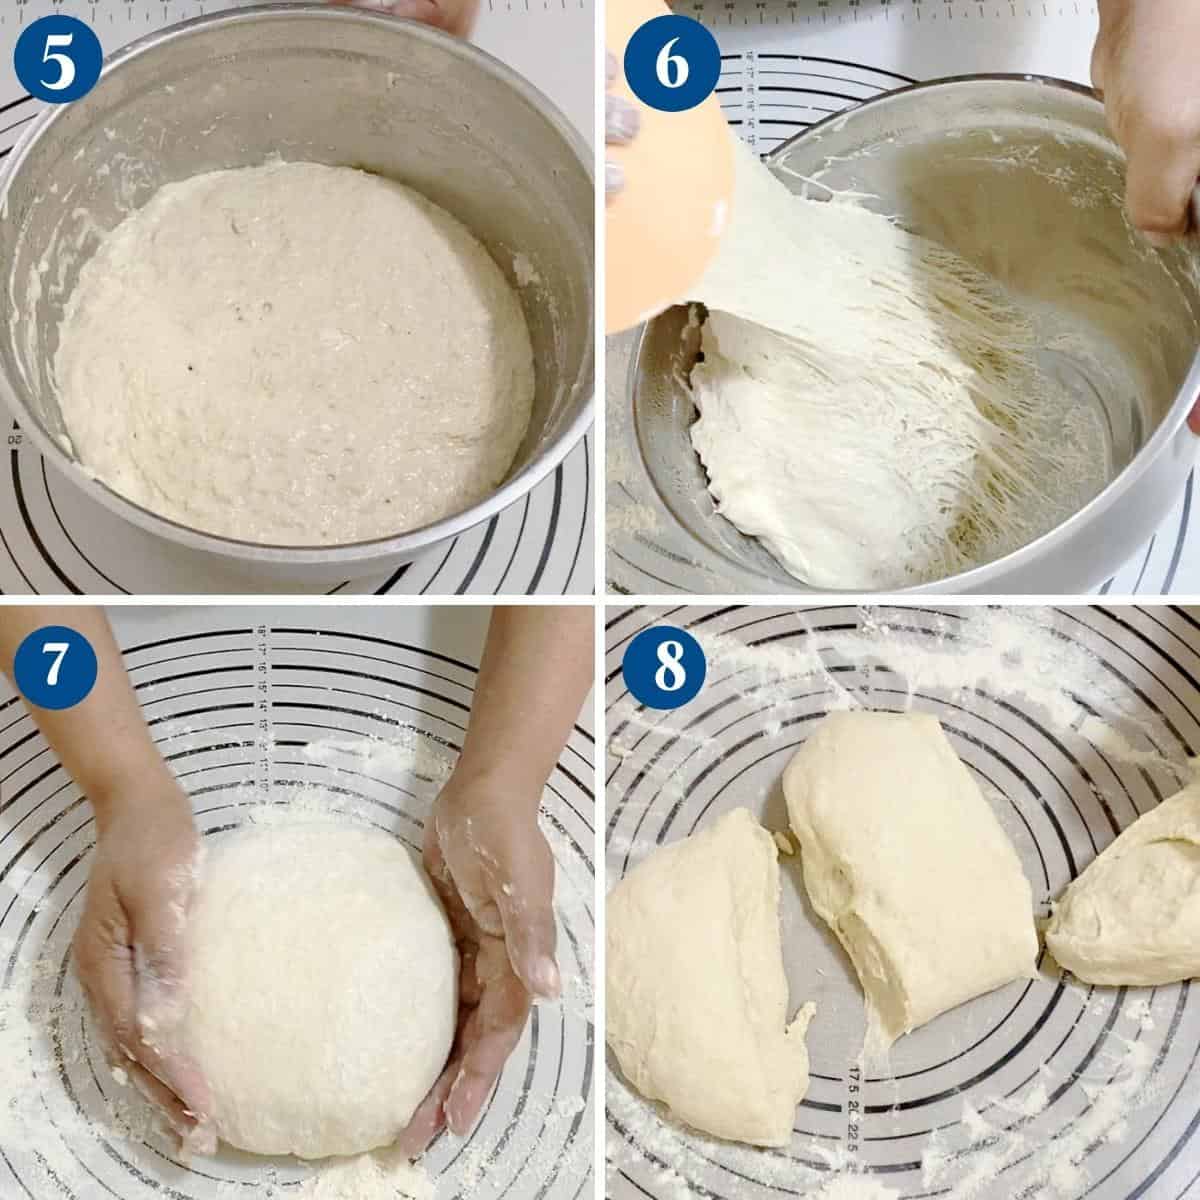
- Rise – Cover the bowl with plastic wrap and let it rest at room temperature for 12-18 hours. The dough will rise and develop bubbles.
- Oven – Preheat your oven to 500°F (260°C) with a pizza stone or upside-down baking sheet inside.
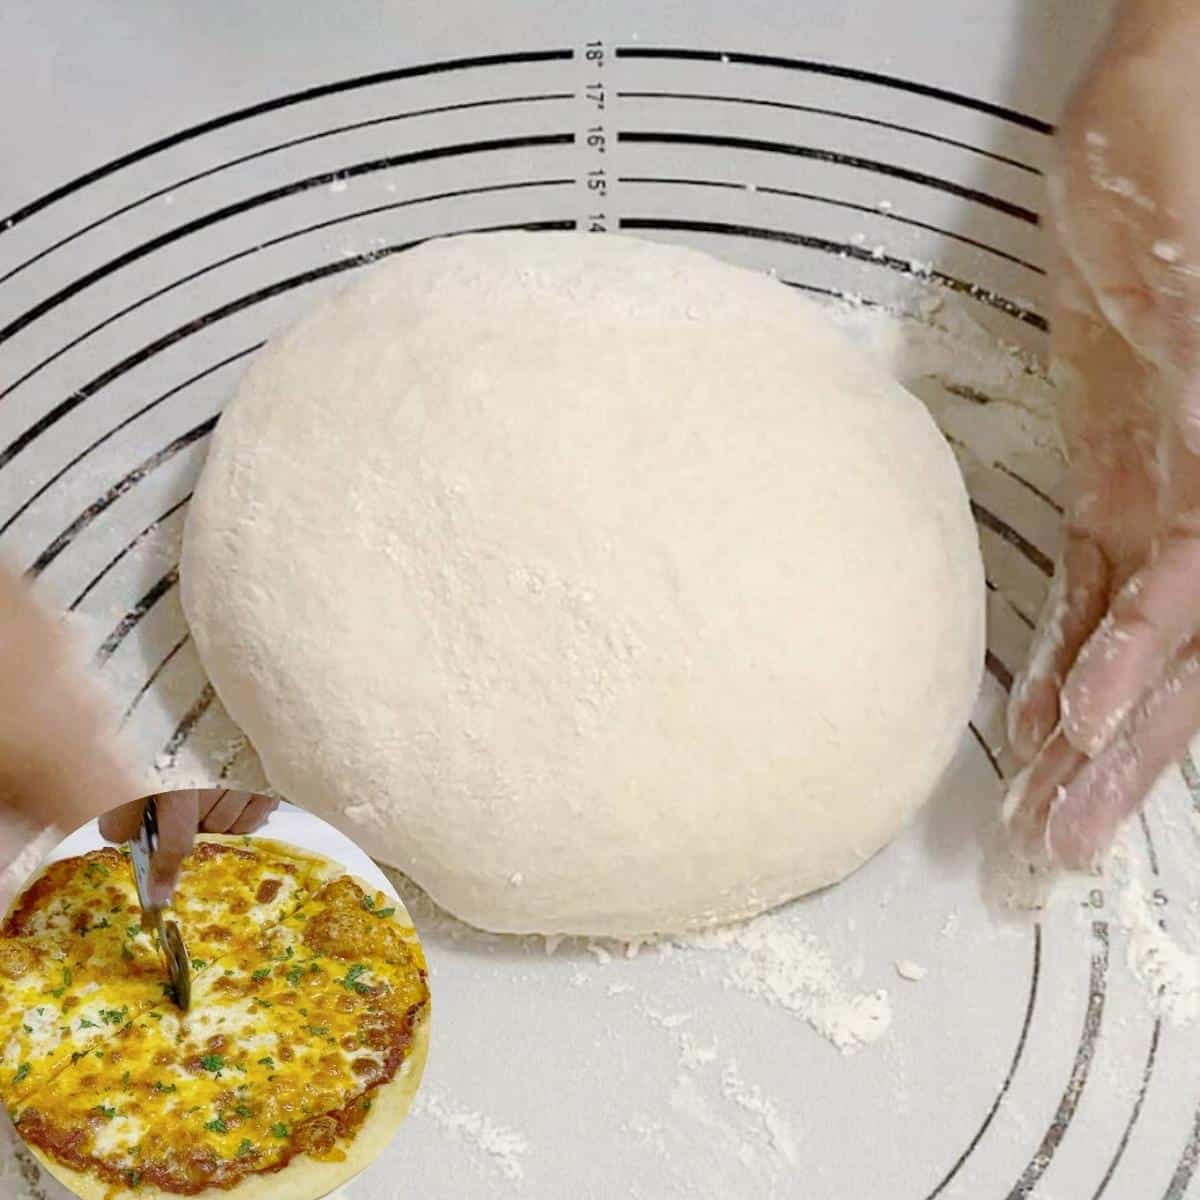
- Divide – Place the dough on a floured surface and divide it into two portions for two 12-inch pizzas. Then, shape each portion into a ball and let them rest on a floured surface, covered with a damp cloth, for 30 minutes.
- Shape – Working with one dough ball at a time, gently stretch or roll it into a 12-inch circle. Then, transfer the dough to a piece of parchment paper.
- Toppings – Add your desired toppings, such as pizza sauce and cheese, leaving a small border around the edge for the crust. Next, slide the parchment paper with the pizza onto the preheated pizza stone or baking sheet.
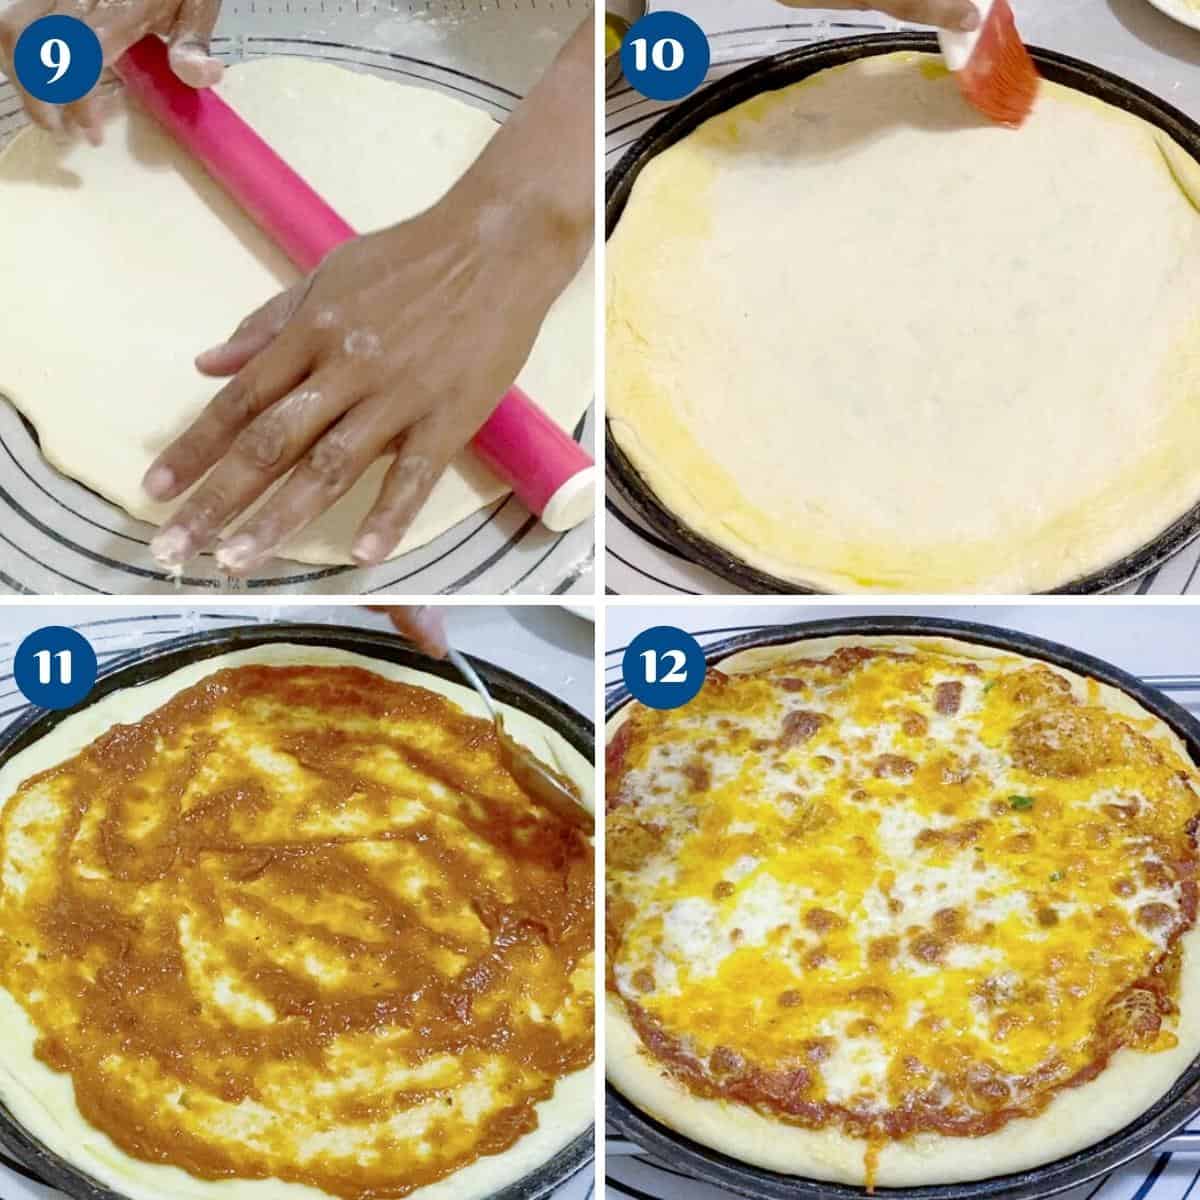
- Bake for 10-12 minutes, or until the crust is golden brown and the toppings are bubbly.
- Rest – Remove the pizza from the oven and let it cool slightly before slicing and serving.


Frequently asked questions
Pizza is always at its best fresh out of the oven. But it does have a long shelf life and can be reheated and served again.
Traditionally, tomato sauce and pizza sauce are very common. But, I also love to use pesto, BBQ sauce, Alfredo sauce, etc. You can also make a white pizza with white sauce. I love a smear of spicy enchilada sauce on my pizza, too.
You can bake the pizza, cut the slices, and cool them completely. Then, place the slices in a ziplock bag. In fact, you can also freeze these for up to three months. They make a great snack for kids.
This dough is a high-hydration bread. Therefore, it has to be soft, wet, and sticky. Don’t add more flour. And yet, if you need a more defined dough that’s easy to work with, use my overnight pizza dough. It does need some kneading but the dough is easier to work.
No-knead Pizza Dough
No-knead pizza dough simplifies the pizza-making process by eliminating the need for kneading. With just a few ingredients and a bit of time, you can create a flavorful dough with a chewy texture and crispy crust. Its versatility allows you to customize your pizza with your favorite toppings, making it a go-to recipe for pizza night.
Video
Ingredients
- 400 g (3½ cups) Bread flour or 50% bread and 50% all-purpose flour
- 7 g (1¼ tsp) Salt
- 2 g (½ tsp) Instant dry yeast
- 350 ml (1½ cups) Water room temperature
- 15 g (1 tbsp) Olive oil
- 15 g (1 tbsp) Sugar
- 1 cups Pizza Sauce
- 200 g (2 cups) Cheese Mozzarella, parmesan or other cheese of you choice.
Method
- Yeast mixture – In a small bowl, combine the warm water, yeast, sugar, and oil.2 g Instant dry yeast, 350 ml Water, 15 g Olive oil, 15 g Sugar
- Dry ingredients – In a large mixing bowl, combine the bread flour and salt.400 g Bread flour, 7 g Salt
- Combine – Gradually add the yeast while stirring with a wooden spoon until a shaggy dough forms.
- Rise – Cover the bowl with plastic wrap and let it rest at room temperature for 12-18 hours. The dough will rise and develop bubbles.
- Oven – Preheat your oven to 500°F (260°C) with a pizza stone or upside-down baking sheet inside.
- Divide – Place the dough on a floured surface and divide it into two portions for two 12-inch pizzas. Shape each portion into a ball and let them rest on a floured surface, covered with a damp cloth, for 30 minutes.
- Shape – Working with one dough ball at a time, gently stretch or roll it into a 12-inch circle. Transfer the dough to a piece of parchment paper.
- Toppings – Add your desired toppings, such as pizza sauce and cheese, leaving a small border around the edge for the crust. Slide the parchment paper with the pizza onto the preheated pizza stone or baking sheet.1 cups Pizza Sauce, 200 g Cheese
- Bake for 10-12 minutes, or until the crust is golden brown and the toppings are bubbly.
- Rest – Remove the pizza from the oven and let it cool slightly before slicing and serving.
Notes
-
- Use Bread Flour: Bread flour has a higher protein content than all-purpose flour, which helps create a chewy texture in the crust.
-
- Use Lukewarm Water: The water should be around 105-110°F (40-43°C) to activate the yeast properly. Too hot and it can kill the yeast, too cold and it won’t activate as well.
-
- Longer Fermentation: Letting the dough ferment for 12-18 hours at room temperature allows the flavors to develop and improves the texture of the dough.
-
- Parchment Paper: Use parchment paper to transfer the shaped pizza onto the hot pizza stone or baking sheet. It makes it easier to slide the pizza into the oven and prevents sticking.
-
- Preheat the Oven: Make sure your oven is fully preheated before baking the pizza. A hot oven helps the crust to cook quickly and evenly.
-
- Don’t Overload with Toppings: While it’s tempting to add lots of toppings, too many can weigh down the dough and prevent it from cooking evenly. Stick to a moderate amount of toppings for the best results.
-
- Let the Dough Rest: After shaping the dough into a ball, let it rest for 30 minutes. This allows the gluten to relax, making it easier to shape the dough.
-
- Use a Pizza Stone or Baking Steel: Preheat a pizza stone or baking steel in the oven. The hot surface helps create a crisp bottom crust.
-
- Experiment with Thickness: Depending on your preference, this dough can be shaped into thin or thick crusts. Adjust the shaping and baking time accordingly.
- Have Fun with Toppings: Once you’ve mastered the dough, get creative with your toppings. Try different cheeses, meats, vegetables, and sauces to create your perfect pizza.
- Bread machine – this dough can be easily made in a bread machine. Pour all ingredients in the pan set to dough or manual. Start and let the dough run its cycle for about 9 to 10 minutes – continue with the recipe as shown above.
- Freezing pizza dough – excess dough can be frozen for up to a month. Prepare the dough and let it rise for an hour. Then, punch the dough down and place it in a freezer-safe storage bag. Thaw overnight in the fridge for best results.
- Freezing baked pizza – leftover pizzas freeze beautifully. I like to slice them into wedges and freeze them on the tray. Once frozen, I place them in freezer-safe storage bags. These will keep for up to a month. Great snack for kids.
Equipment you will need


Nutrition
Tried this recipe?
Mention @veenaazmanov_kitchen or tag #veenaazmanovkitchen!- Classic Margherita Pizza – classic tomato and cheese.
- 3 Cheese pizza – three kinds of cheese.
- Hawaiian pizza – pineapple and ham
- Red pesto pizza – roasted red pepper sauce
- 5 minutes Pizza sauce or Fresh Tomato sauce
- Mushroom Pizza – assorted mushrooms
- Easy White Pizza Recipe – bechamel sauce and cheese.
- Olive Pizza with Red Onions – chopped olives and Spanish onions.

Don’t lose this recipe! Save it for Later!
📌 Save this Recipe for later on Pinterest so you can easily find it again.
⭐ Add Veena Azmanov Kitchen to your Google Preferred Sources.
It helps Google show you more of our recipes.
📧 Subscribe for new recipes delivered to your inbox.
🎥 Follow us for more recipes


Are you sure of the quantities? Is there not too much liquid for that amount of flour?
400 g flour with 350 ml water. That gives you 87.5% hydration, which sounds high…
In no-knead doughs, high hydration is intentional. It allows:
– Gluten to develop naturally over time (no kneading required)
– Dough to be soft, bubbly, and stretchy
– Crust to be crisp outside, chewy inside, with great oven spring
This is such an easy and delicious pizza dough recipe! I have always used a recipe that calls for kneading, so having your recipe is a game changer for me. It’s perfect for our pizza night at home! We love it with fresh mozzarella and the big pepperonis from the deli!
Thank you, Sara. So happy to hear that you are enjoying this recipe
Pizza night happens every week in my home and this is the perfect option when I don’t have the energy to pull out my stand mixer.
Thanks Lakita. Yes, this is my lazy pizza dough
Yasssss to no knead pizza dough!!! Love how informative ya made this! Thanks for sharing :).
Thank you, Daniela
Love this option – we really enjoy homemade pizza but had been without a stand mixer until recently, so having a no knead option saves a lot of effort to be sure!
Thanks, Monica.
I love pizza dough! The easier pizza dough can be, the better.
True. Thanks, Nicole