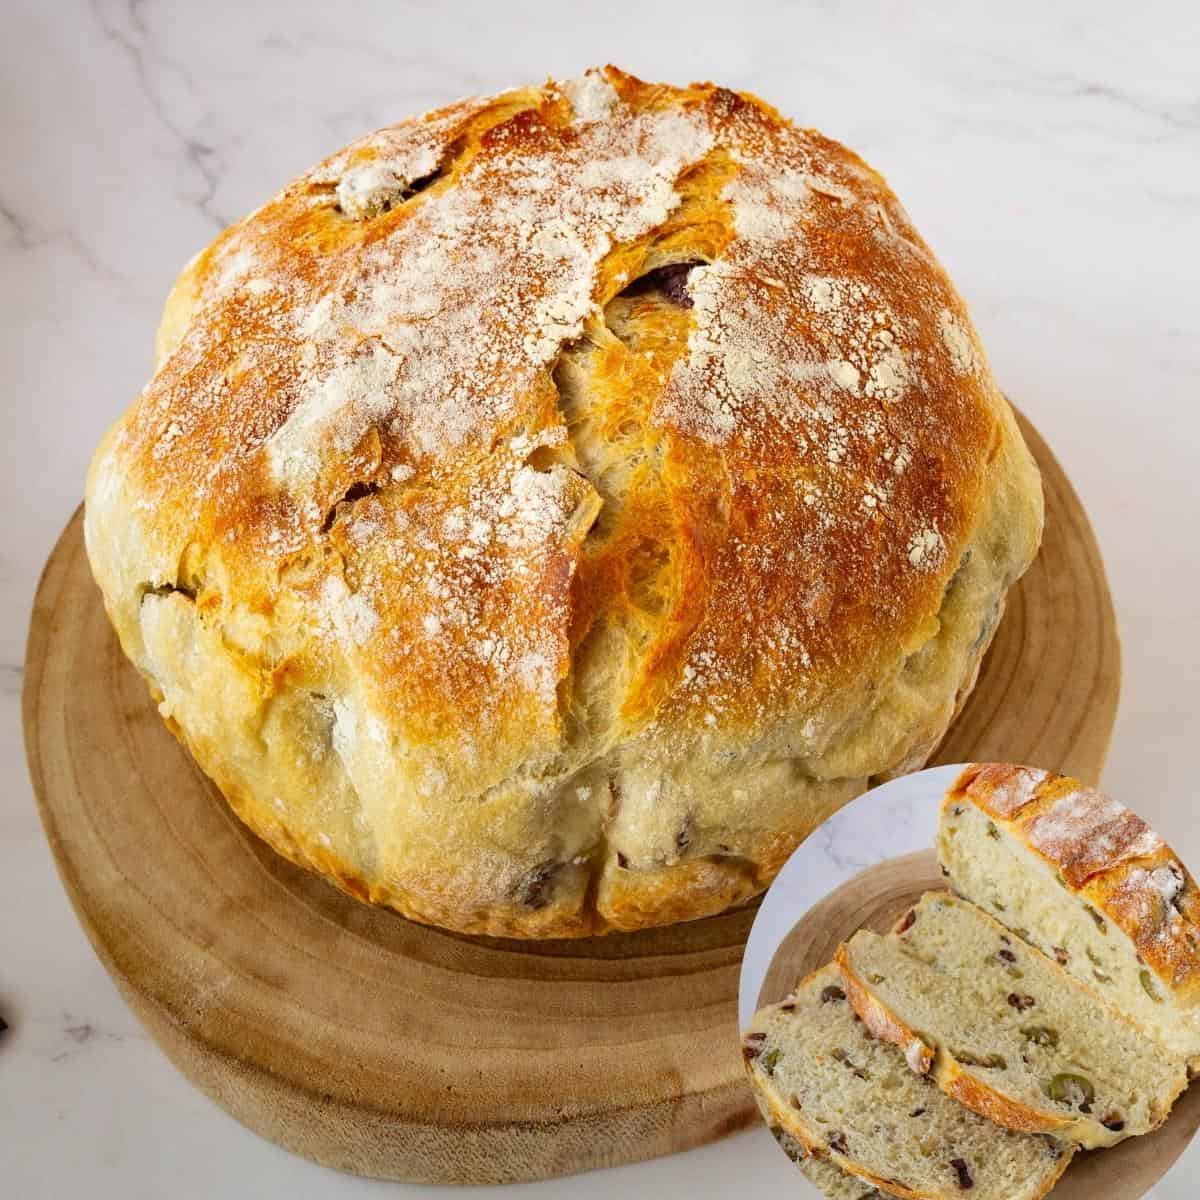
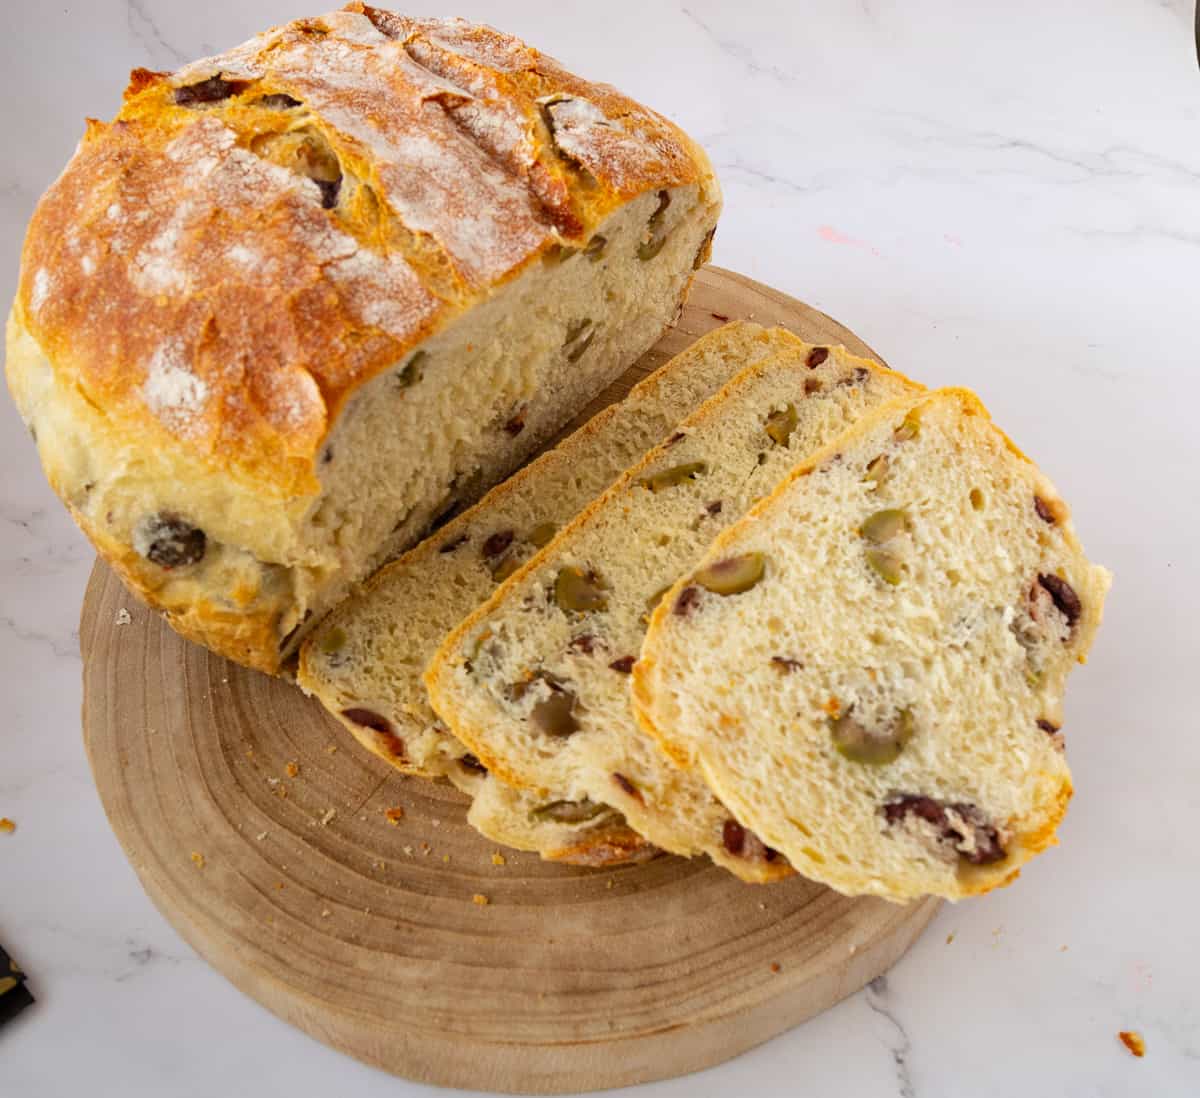
Delicious Olive Bread Recipe: No-Knead
 Prep Time 5 minutes Cook Time 45 minutes Total Time 6 hours 50 minutes
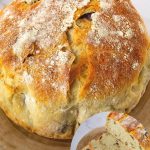
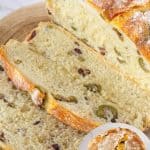


Relish the taste of authentic Mediterranean olive bread every day with this easy-to-make, no-knead recipe. The bread’s rich flavor comes from olive oil-soaked olives. With just six basic ingredients and 5 minutes of prep time, this bread is a winner every single time.
No-knead bread is a game-changer for home bakers, offering a simple and foolproof way to achieve bakery-quality bread without the labor of kneading. The magic lies in its long fermentation process, where time does the work instead of your hands. With just four basic ingredients—flour, water, salt, and yeast—this bread develops a deeply flavorful crumb and an irresistible crispy crust.
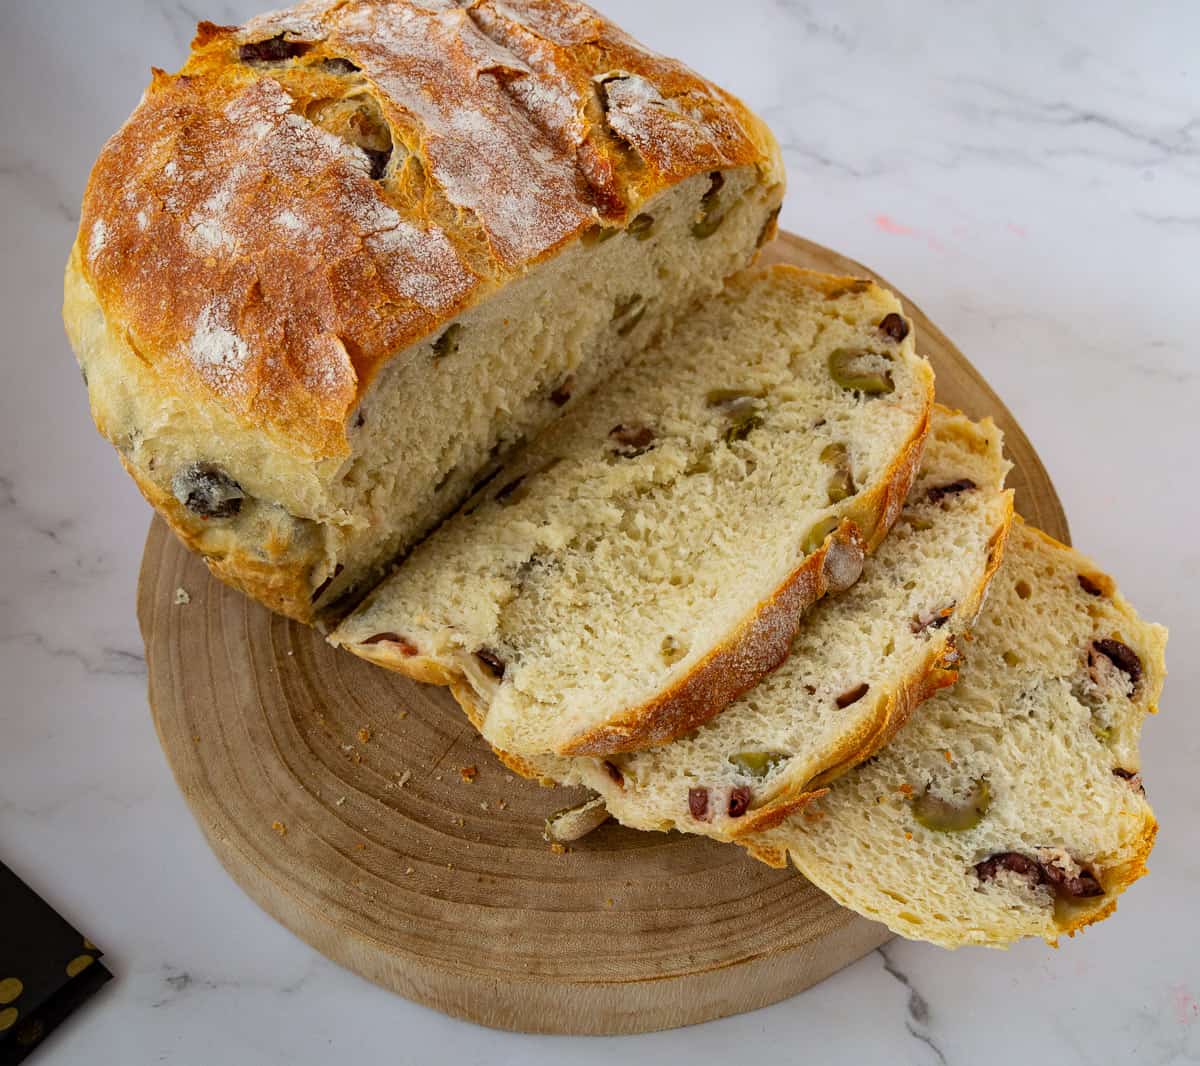
For a Mediterranean twist, adding olives to the dough takes this bread to a whole new level. The olives infuse the bread with bursts of briny, salty goodness, enhancing the rustic flavor. Use pitted Kalamata or green olives for the best results, and fold them into the dough just before the final rise. The result is a beautifully textured loaf, perfect for serving alongside olive oil, feta cheese, or as an accompaniment to soups and salads.
Why make this bread?
- Firstly, it’s a no-knead bread, which means it takes as little as 5 minutes to make the dough.
- Secondly, the recipe is simple and easy with ingredients you already have in your pantry, plus olives.
- No haste – you can let the dough proof for as little as four hours up to 18 hours, so no need to rush. In fact, the longer you leave the dough, the more the flavor of the yeast is developed.
- In addition, the dough is very forgiving. Soft, wet, and sticky, and yet that is what gives it a beautiful crust on the outside and a soft, moist bread on the inside.
Ingredients and substitutes
- Flour – I have always used all-purpose flour for no-knead bread, but bread flour is perfect for this bread. It has more gluten, which makes the bread stronger and chewier, and that’s what we want!
- Water – It is very important to use warm water, not cold or hot water. The cold water will not revive the yeast, and the hot water will kill the yeast. So, the water must be about 110°F.
- Instant dry yeast – I like to use instant dry because I’ve always had great success with it. And yet, you can also use 1 1/4 tsp active dry yeast or 16 grams of fresh or baker’s yeast.
- Sugar – If you prefer, you can substitute sugar with 2 tbsp of honey.
- Olive oil – A good source of food for the yeast, and also adds a nice flavor.
- Optional ingredients – There is so much more you can add to this bread. Try 1/2 tsp of garlic powder or a few tablespoons of roasted garlic. A teaspoon of dried herbs such as oregano, rosemary, and thyme.

Step-by-step: Easy Olive Bread Recipe
- Dry ingredients: In a bowl, combine flour and salt. Add the chopped olives – combine well and set aside.
- Wet ingredients: In a measuring cup, measure the warm water, add olive oil, sugar, and yeast. Combine well.
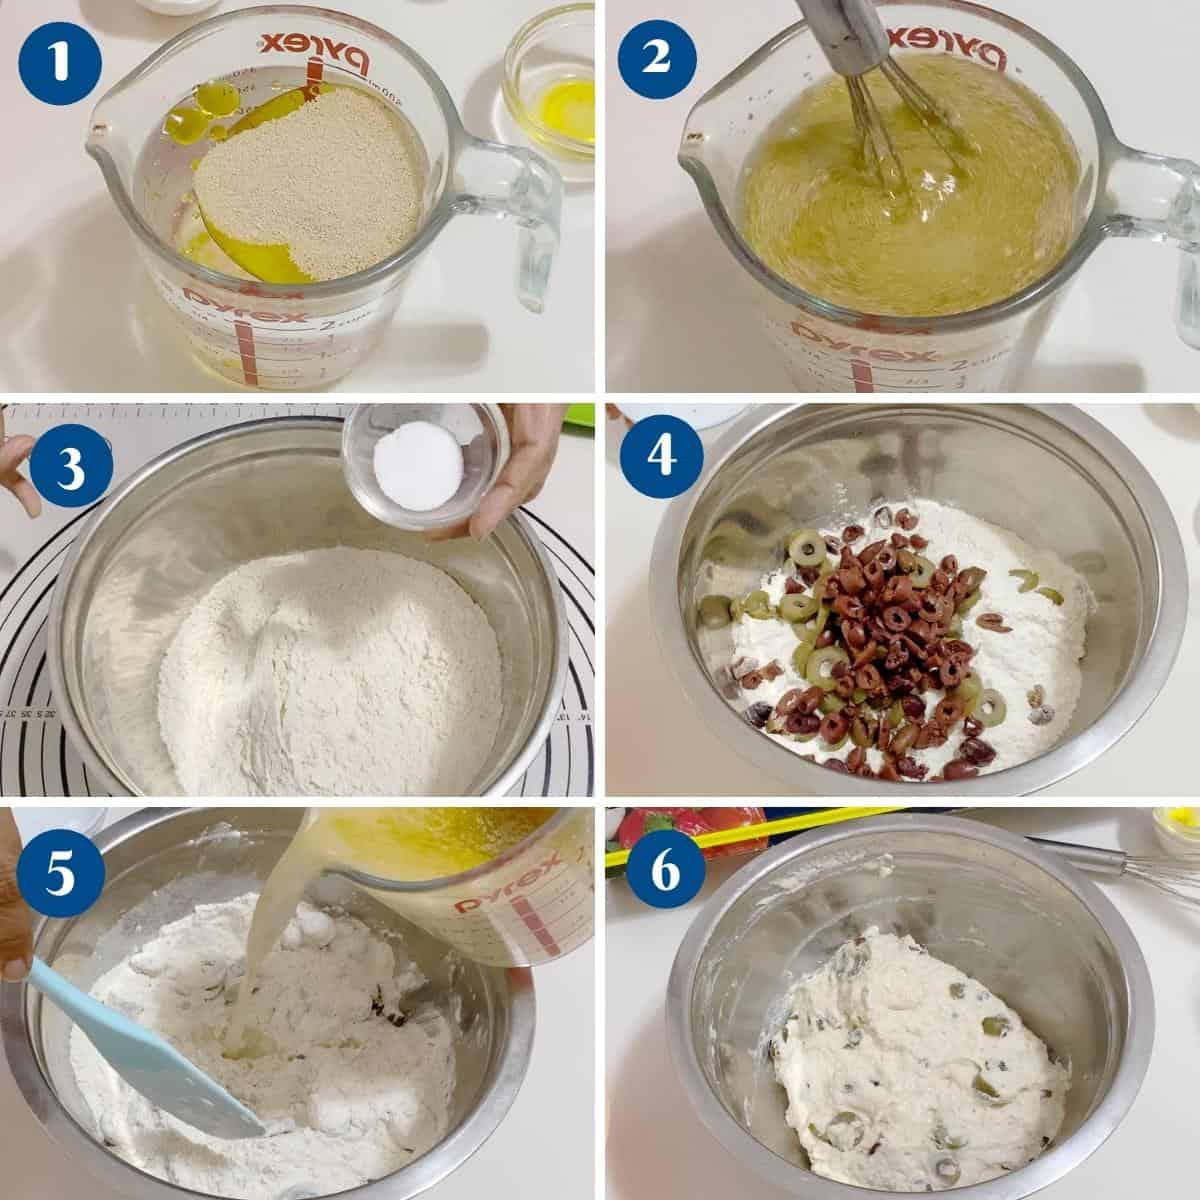
- Combine wet and dry ingredients: Add the yeast mixture to the flour mixture. Mix well with a wooden spoon or spatula, ensuring no dry flour is left on the bottom. This is a very wet dough, so don’t try touching it with your hand.
- Rise: Cover with a clean kitchen cloth or plastic wrap. Leave it on the countertop for an hour. Then, place in the fridge for 4 to 6 hours, up to 12 hours.

- Preheat: Remove the dough from the fridge and preheat the oven to 390°F / 200°C / Gas Mark 6. Place a 6-quart cast-iron or Dutch oven with its lid in the oven for 30 minutes.
- Shape: Dust your work surface generously with flour. Transfer the dough to the floured surface. It is best to use a dough scraper or floured hands to shape the dough into a ball.
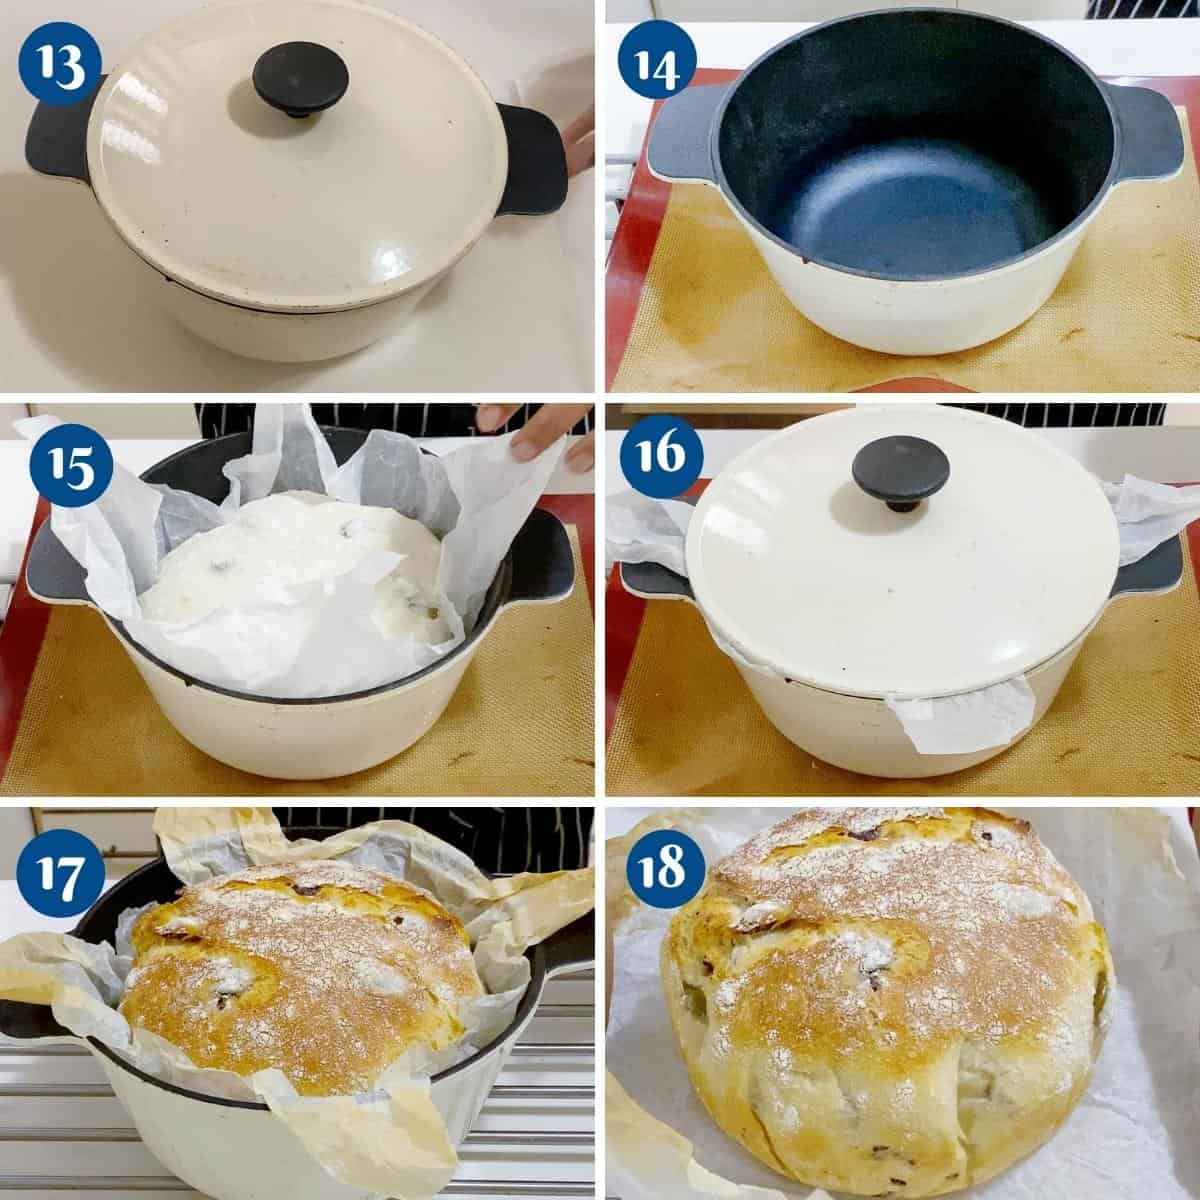
- Rest: Place the dough onto the scrunched-up parchment paper dusted with flour. Place an inverted bowl over it while you wait for the Dutch oven pan to heat up.
- Bake: Pick the dough up by the parchment and lower it into the preheated Dutch oven. Bake for 20 minutes covered, then remove the lid and continue baking for another 20 minutes uncovered or until bursting and golden on top. This will take about 40 to 45 minutes.
- Rest: Carefully remove the pan from the oven. Transfer the bread onto a wire rack to prevent it from getting soggy on the bottom. Let it cool for at least 20 minutes before you slice into it.

Artisan Olive Bread (No-Knead Recipe)
This olive bread is made using my no-knead artisan bread recipe as a base. With just six ingredients, 5 minutes to combine, and 4 hours of proofing, this makes a scrumptious bread loaded with olives.
Video
Ingredients
- 500 g (4 cups) Bread flour or all-purpose flour
- 7 g (1 tsp) Salt
- 6 g (1½ tsp) Instant dry yeast
- 470 ml (2 cups) Water warm (110 F)
- 15 ml (1 tbsp) Olive oil
- 15 g (1 tbsp) Sugar
- ¾ cup Green olives
- ¾ cup Brown or Black olives
Method
- Dry ingredients: In a bowl, combine flour and salt. Add the chopped olives. Combine well and set aside.500 g Bread flour, 7 g Salt, ¾ cup Green olives, ¾ cup Brown or Black olives
- Wet ingredients: Measure the warm water in a measuring cup. Add olive oil, sugar, and yeast. Combine well.6 g Instant dry yeast, 470 ml Water, 15 ml Olive oil, 15 g Sugar
- Combine wet and dry ingredients: Add the yeast mixture to the flour mixture. Mix well with a wooden spoon or spatula, ensuring no dry flour is left on the bottom. This is a very wet dough, so don’t try touching it with your hand.
- Rise: Cover with a clean kitchen cloth or plastic wrap. Leave it on the countertop for an hour. Then, place it in the fridge for 4 to 6 hours, up to 12 hours.
- Preheat: Remove the dough from the fridge. And preheat the oven to 390°F / 200°C / Gas Mark 6. Place a 6-quart cast-iron or Dutch oven with its lid in the oven for 30 minutes.
- Shape: Dust your work surface generously with flour. Transfer the dough to the floured surface. It is best to use a dough scraper or floured hands to shape the dough into a ball.
- Rest: Place the dough onto the scrunched-up parchment paper dusted with flour. Place an inverted bowl over it while you wait for the cast-iron pan to heat up.
- Bake: Pick the dough up by the parchment and lower it into the preheated Dutch oven. Bake for 20 minutes covered, then remove the lid and continue baking for another 20 minutes uncovered or until bursting and golden on top. This will take about 40 to 45 minutes.
- Rest: Carefully remove the pan from the oven. Transfer the bread onto a wire rack to prevent it from getting soggy on the bottom. Let it cool for at least 20 minutes before you slice into it.
Notes
- Do not cut the bread until at least 20 minutes after it is out of the oven. This will prevent moisture in the form of steam from escaping, resulting in dry bread.
- Do not cover or wrap the bread while it is warm. The steam will soften the crust.
- Do not store bread in the fridge, as it will dry out. Leave it on the counter at room temperature for 2 to 3 days.
- This bread is great for freezing for up to 3 months. You can freeze slices instead of the whole loaf.
- Has the bread sunk to the bottom? The pan in the oven must be very hot, which is why I asked you to let it heat for a minimum of 30 minutes. If the dough is in a pan that’s not hot enough, it will sink.
- Dense dough? – The dough needs to be soft, wet, and sticky. The low yeast, high water content, and slow rise help gluten development. If you add too much flour, the dough will become dense.
- Why did the dough not rise after 6 hours? You must use warm water or room-temperature water. Warm water will revive the yeast, while hot water will kill it, and the dough will not rise. If the water is at the correct temperature, check the yeast; perhaps it is past its expiration date.
- Whole wheat bread—Unlike whole-wheat flour, white flour has gluten, which makes this bread light and airy. You can replace half the white flour with whole wheat, as we did in our no-knead whole wheat olive bread. All whole wheat will need more yeast, and denser bread will be made if it is not kneaded.
Equipment you will need


Nutrition
Tried this recipe?
Mention @veenaazmanov_kitchen or tag #veenaazmanovkitchen!Tips for Success
- This dough is a high-hydration bread, which means it has to be soft, wet, and sticky. Don’t add more flour.
- Use warm water – not hot, not cold. Cold water will not revive the yeast; hot water will kill the yeast. Read here – Baking with Yeast: A Beginner’s Guide.
- Flavor ideas—You can add so many ingredients to flavor this bread, from chopped rosemary and thyme to olives, sun-dried tomatoes, caramelized onions, roasted garlic, parmesan, cinnamon, and pumpkin spice.
- Do not try to knead it. It has too much water, and trying to knead it will be difficult and also not worth the effort.
- Don’t rush the proofing. We use less yeast in this bread, so the proofing is slow. However, it also helps develop flavor and structure. You can leave this in the fridge for up to 24 hours.
- When baking, the top of the bread will have a burst effect because steam is trying to escape. If you do not like the burst effect, you can score the bread on top before baking. Mark an X or just two slashes. This will direct steam to come out from those designated vents you created.
- Pizza stone—The Dutch oven heats the bread at a very high temperature, which gives it that nice rise. At the same time, because we use the lid, it creates steam inside the pan. This steam settles on the bread, baking into a nice hard crust.
Alternatively, you can bake this without a Dutch oven directly on a pizza stone and place a bowl of water at the back of the oven. This will give you a good crust, but the bread spreads, giving you a shorter loaf like my no-knead beer bread. - Remove the bread from the tray as soon as it is out of the oven. This will prevent the bread from getting soggy on the bottom.
Troubleshooting
- Has the bread sunk to the bottom? The pan in the oven must be very hot, which is why I asked you to let it heat for a minimum of 30 minutes. If the dough is put in a pan that’s not hot enough, it will sink.
- Dense dough? The dough needs to be soft, wet, and sticky. The low yeast, high water content, and slow rise help develop gluten. If you add too much flour, the dough will become dense.
- Why did the dough not rise after 6 hours? You must use warm water or room-temperature water. Warm water will revive the yeast, while hot water will kill it, and the dough will not rise. If the water is at the correct temperature, check the yeast; perhaps it is past its expiration date.
- Whole wheat bread—Unlike whole-wheat flour, white flour has gluten, which makes this bread light and airy. You can replace half the white flour with whole wheat, as we did in our no-knead whole wheat olive bread. All whole wheat will need more yeast, and denser bread will be made if it is not kneaded.
more no-knead recipes
- No-Knead Beer Bread
- No-Knead Knotted Rolls
- or No-Knead Sandwich Bread
- Soft Flatbread Without Yeast (no-knead)
- No-Knead flatbread recipe


Frequently asked questions
The crusty no-knead bread will keep at room temperature for 2 to 3 days. Once cut, make sure to wrap the cut side of the bread well to prevent drying out.
Absolutely. I cut the bread into slices. Place it into a reusable silicone storage bag in the freezer. When I need it, I just thaw slices in the microwave for 15 to 30 seconds.
The Dutch oven gives a wonderful crust and rise to the bread. If you don’t have a Dutch oven, you can use my no-knead recipe without a Dutch oven. Alternatively, you can bake it open on a baking tray or a loaf pan as I have done here, with no-knead sandwich bread. The texture and crumb will be completely different but still delicious.
You can substitute some of the olives with sun-dried tomatoes as we did in our olive bread rolls. Also, try adding raisins u0026 walnuts, cinnamon with chopped dry fruits, dates with almonds, garlic, and parmesan cheese is also an amazing combination.
This is the perfect bread to serve alongside any main course or with cheese and salads. My kids had it today with their spaghetti meatball sauce. We often like to serve it with slow-cooked meat dishes like beef bourguignon, beef in red wine, and lamb shanks. On its own, this bead is perfect with butter, simple olive oil/balsamic, roasted garlic, olive tapenade, etc.
- No-Knead Bread Without a Dutch Oven
- and No-Knead flatbread recipe
- Crusty No-Knead Bread
- Soft Flatbread Without Yeast (no-knead)


Don’t lose this recipe! Save it for Later!
📌 Save this Recipe for later on Pinterest so you can easily find it again.
⭐ Add Veena Azmanov Kitchen to your Google Preferred Sources.
It helps Google show you more of our recipes.
📧 Subscribe for new recipes delivered to your inbox.
🎥 Follow us for more recipes


Oh! Am I a fan of Olive Bread. I will try this recipe very soon! Thank you for the idea about substituting other flavors. Would this dough work with Pumpkin puree, and pumpkin pie spices, and minced fresh ginger? I’m concerned about the liquid from pumpkin adding too much moisture.
Thank you!
I’m a big fan of olive bread and love how simple and easy to prepare this recipe is. Thanks for sharing!
The best thing about this bread recipe is that you don’t have to knead it and the second best thing is that it includes olives! It was so delicious. Thanks for sharing
Thank you, Jen.
Very big fan of no-knead bread and just wait for as long as it needs to raise and develop those flavors. You said that this olive bread will last 2-3 days on the counter. Here doesn’t last even 24 hours!
I know what you mean. In our home too! But, it does stay well if you have leftovers, Silvia.
Thank you for all the tips and tricks you provide in this recipe, they are very helpful! Going to make this bread next weekend and will let you know how it came out!
No-Knead bread are a gamechanger in the world of baking! I LOVE how simple and easy they are. I love the step-by-step instructions. And the Pro tip about hydration – YES! I wish more people would explain this to folks! Excellent job!
I cannot get over how easy this recipe is! You have some excellent pro tips as well! So helpful!
I’ll tell you something… olives are actually a fixed pantry item for me! I love my olives! Very easy to follow recipe with a favourite ingredient of mine in fresh bread – fantastic!
Thanks, Eva. Yes, olives are always in my fridge.
loved this bread recipe! very helpful! Thank you so much for sharing this idea!
We fell in love with olive bread while living in Europe, so, we were looking forward to tasting your recipe. It was a walk down memory lane. Soft & chewy in every briny bite.
Thanks!
Thank you so much, Marta. I am so happy you enjoyed this bread.