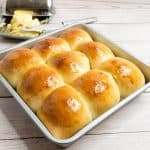
No-Knead Knotted Rolls
 Prep Time 20 minutes Cook Time 15 minutes Total Time 3 hours 20 minutes


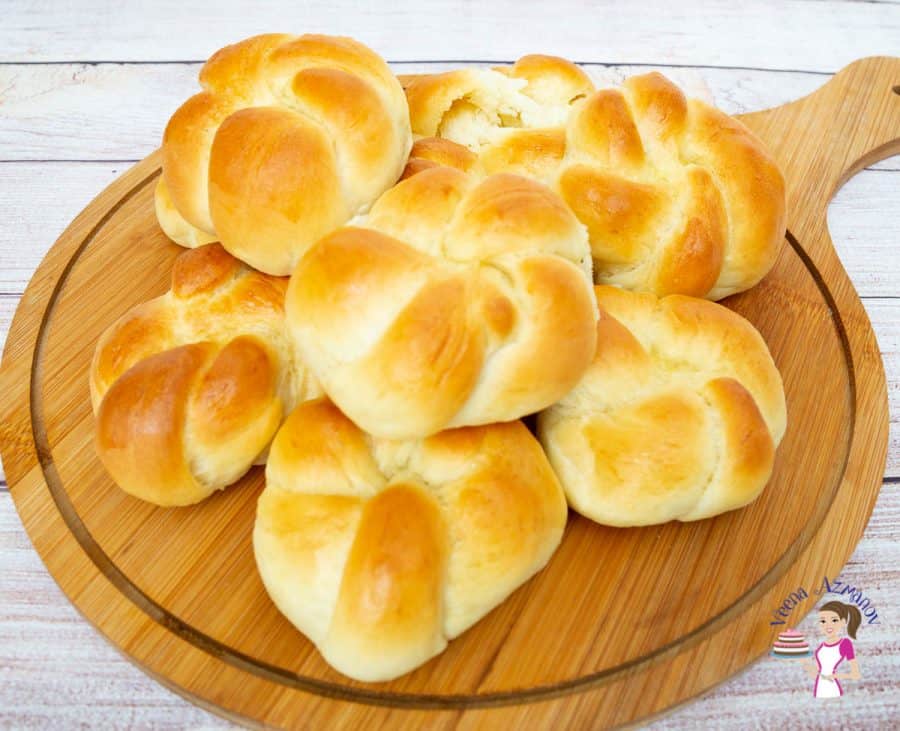
These buttery, rich, and soft knotted rolls have a melt-in-the-mouth texture. They are made from scratch with my no-knead crescent dough that’s surprisingly simple and easy to make.
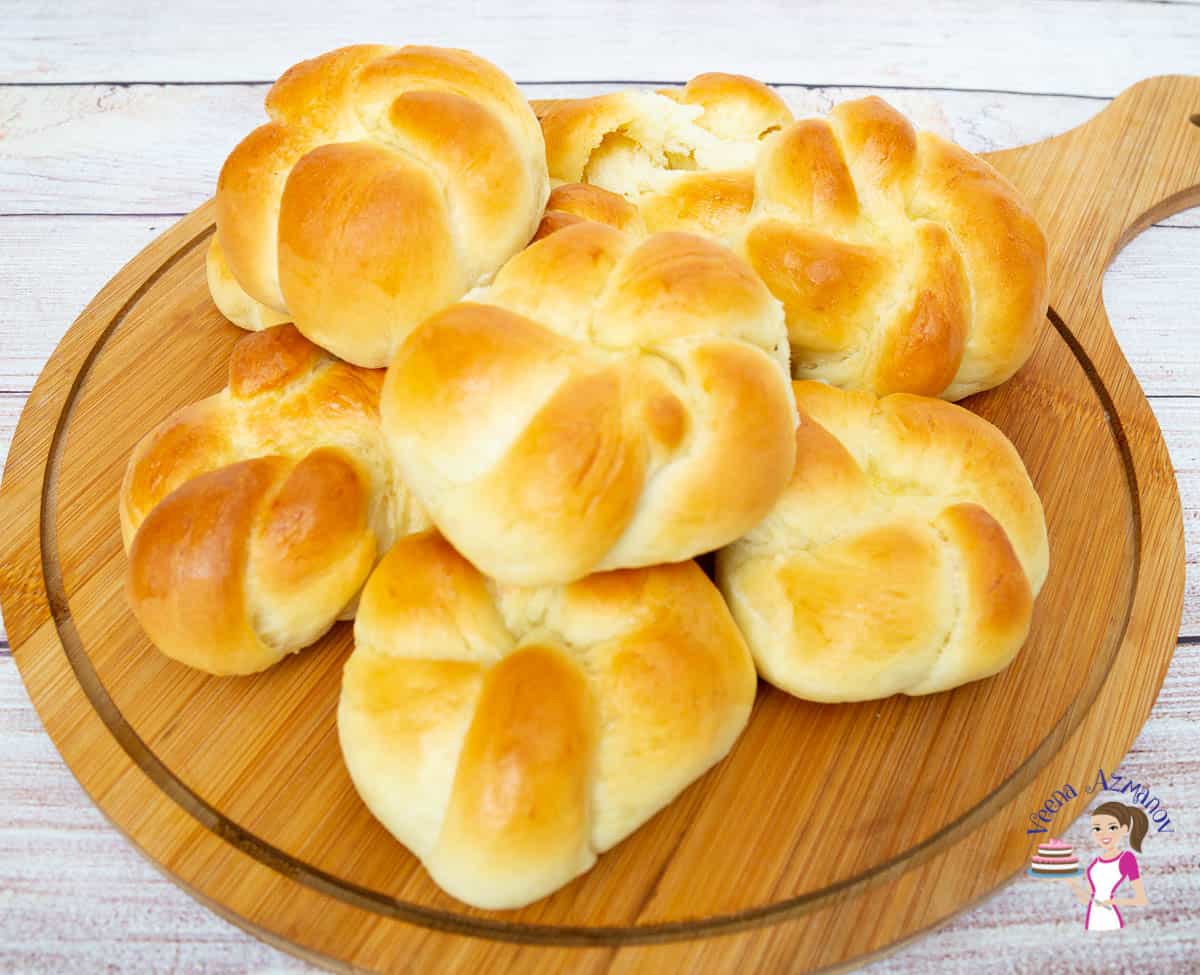
There is something about pulling apart a warm homemade dinner roll that never gets old. These no-knead knotted rolls have been one of my favorite ways to make beautiful bakery-style rolls without spending time kneading dough.
I love this dough because it does all the hard work while it rests. The rolls bake up soft and buttery with that pretty little knot shape that makes them look special enough for holidays but easy enough for a family dinner.
Why you’ll love these rolls
- Effortless to Make: With no kneading required, these rolls save you time and effort, making them perfect for busy days or last-minute baking.
- Soft and Fluffy Texture: Despite the simplicity, the no-knead method produces light, airy rolls with a delightful chew and a soft crumb.
- Impressive Presentation: The knot shape adds a beautiful, bakery-style touch that’s sure to impress guests, whether for a casual meal or a special occasion.
- Versatile and Customizable: You can brush them with butter, sprinkle with herbs, or add toppings like sesame seeds or garlic for a personal twist that pairs well with any meal.
Ingredients and substitutes
- Flour – I love to use bread flour because it produces the softest, most delicious, slightly chewy bread. But I have made this with all-purpose flour successfully.
- Instant dry yeast – I like instant dry because I’ve always had great success. You can also use the same amount of active dry yeast or 20 grams of fresh baker’s yeast.
- Egg – I use a large egg, about 60 to 65 grams in weight.
- Sugar – This bread is slightly sweeter than most other white bread. And yet, you can certainly reduce the sugar by half.
- Butter – A good quality butter at room temperature works best for flavor and consistency.
- Milk – Adds richness to the dough, but warm water works just as well.

Step-by-step instructions: No-knead knot rolls
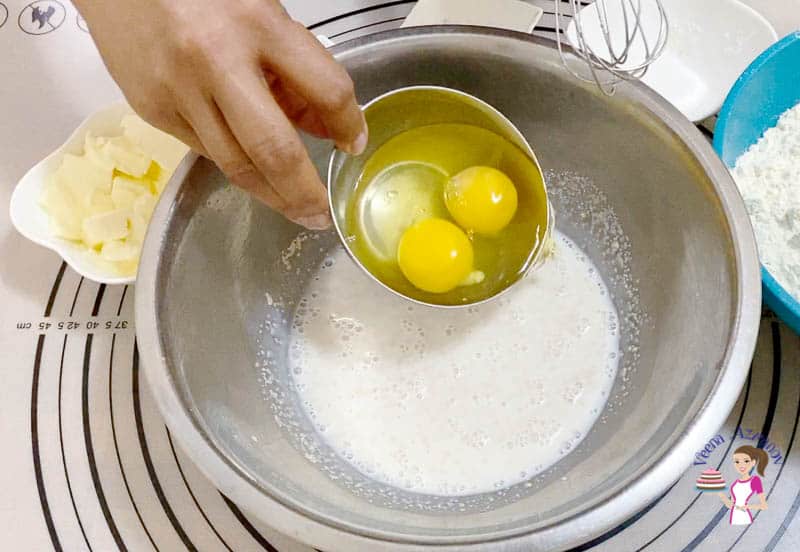
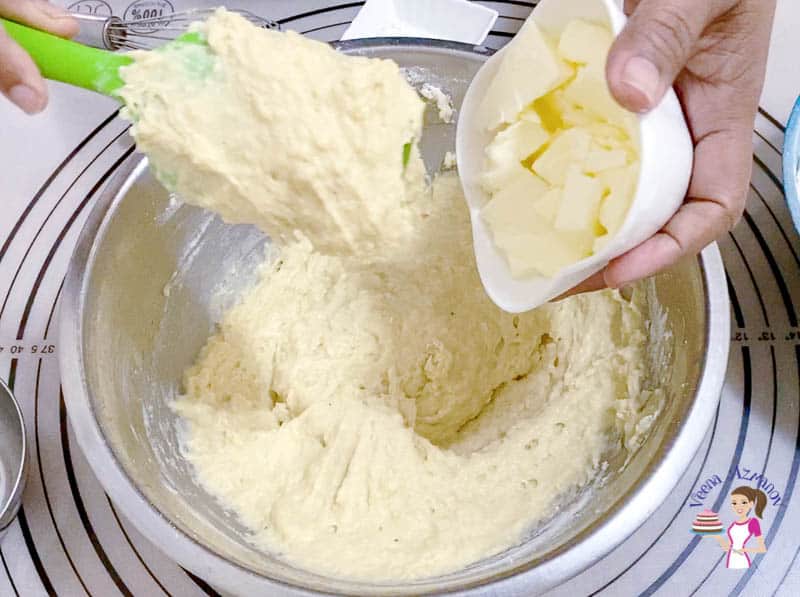
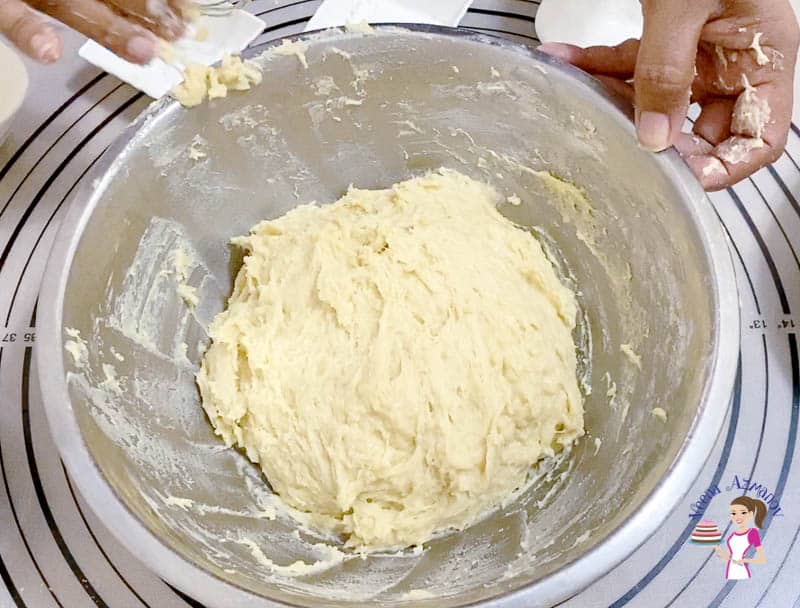
- Mix the Dough: In a large mixing bowl, combine the milk, sugar, eggs, and yeast. Then add the flour, salt, and butter in three batches using a spatula or wooden spoon to ensure the ingredients are well combined. This is a soft and sticky dough.
- First Rise: Place the dough in a greased bowl. Cover the bowl with plastic wrap or a damp cloth and let the dough rise at room temperature for 1 1/2 to 2 hours, or until it has doubled in size.

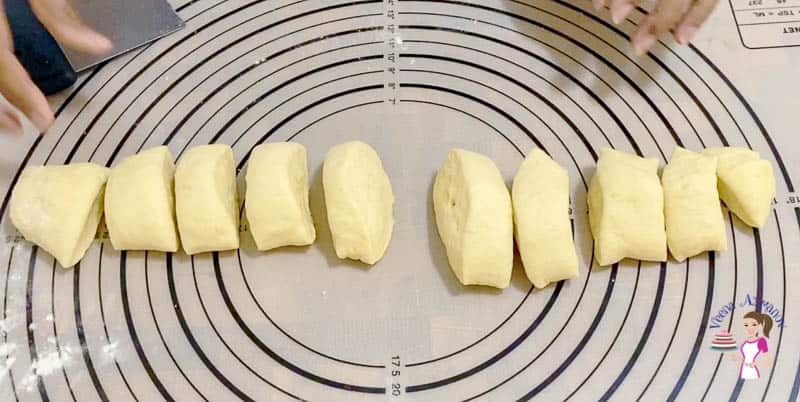
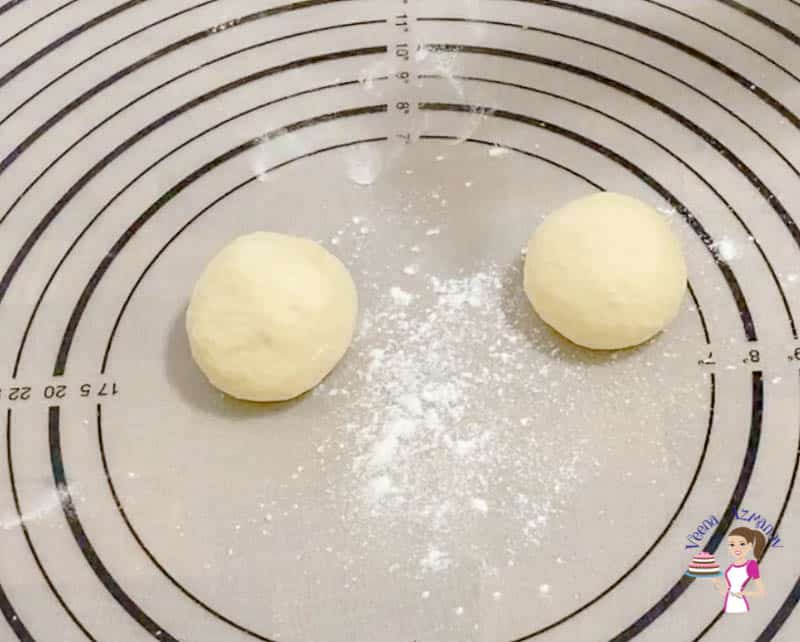
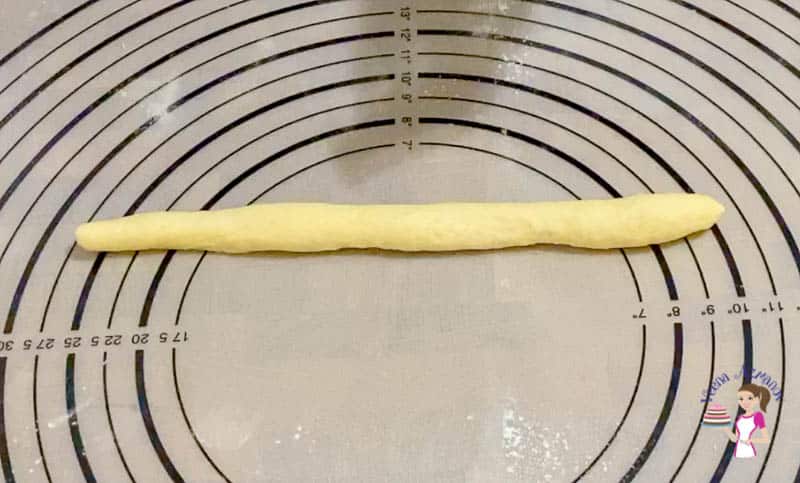
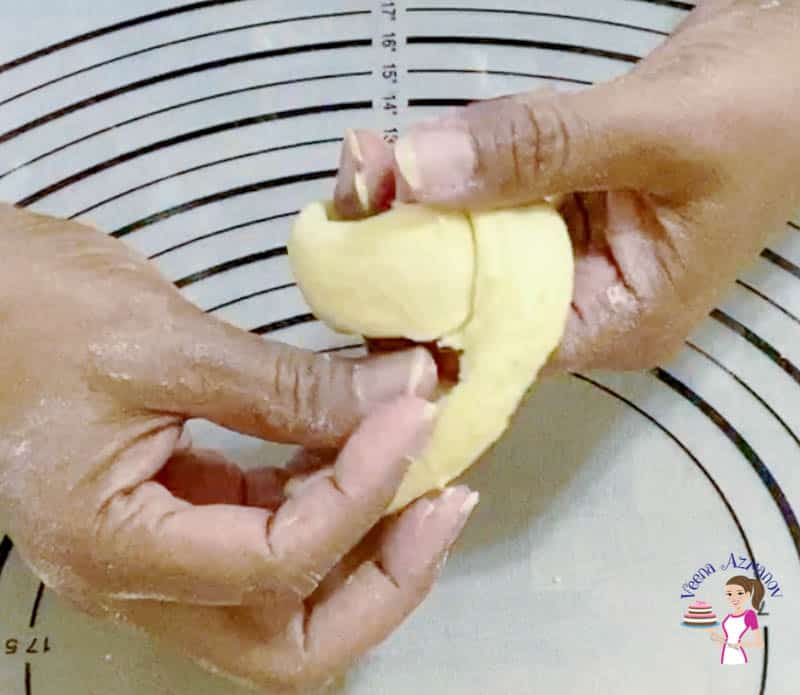
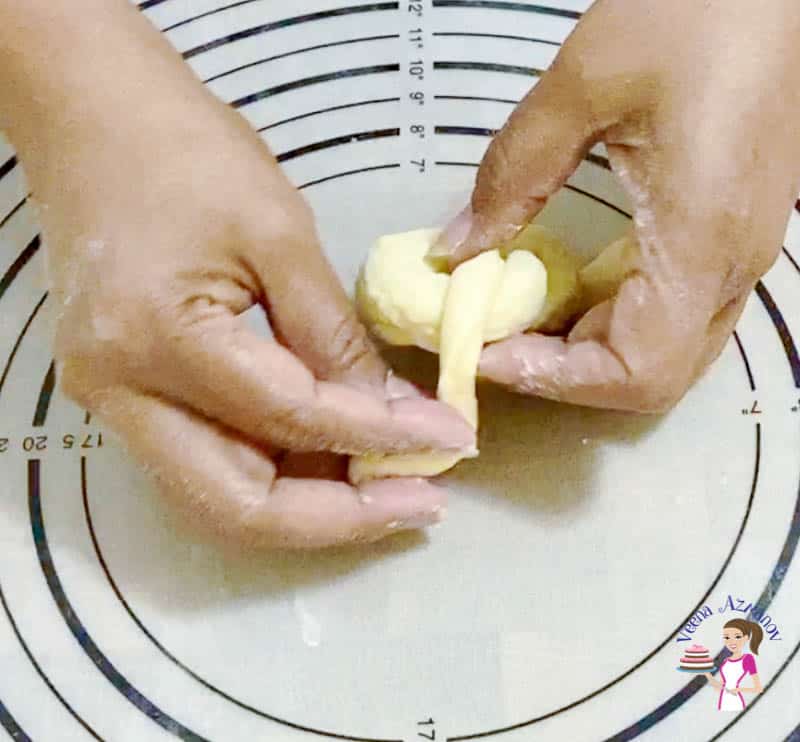
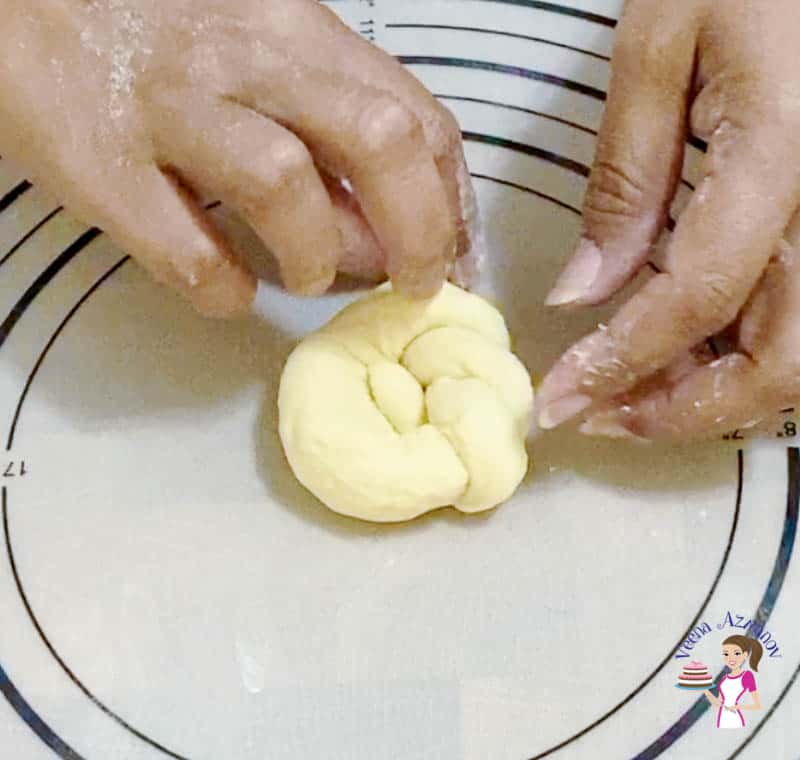
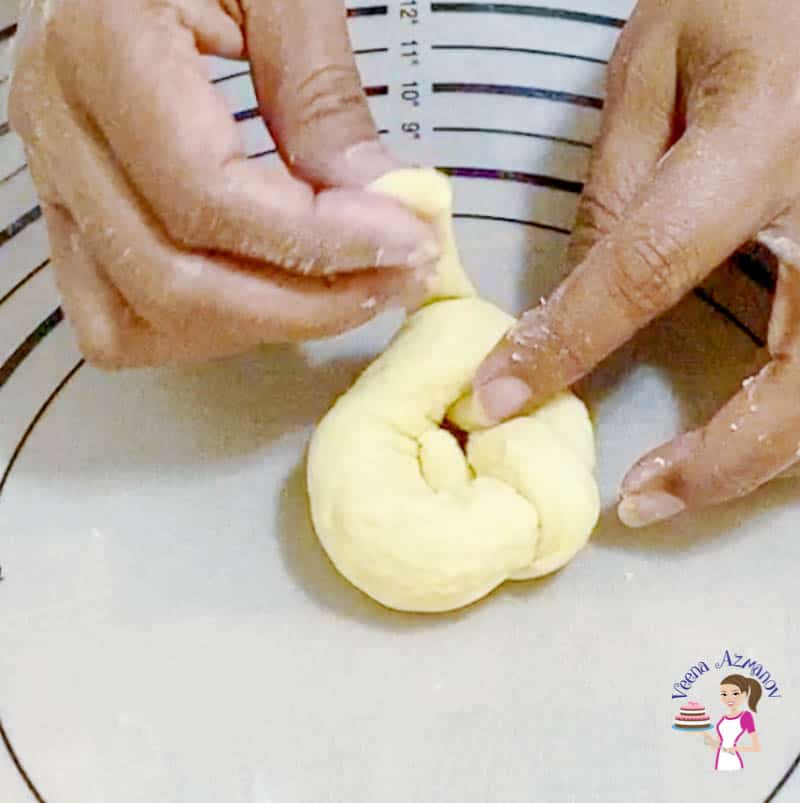
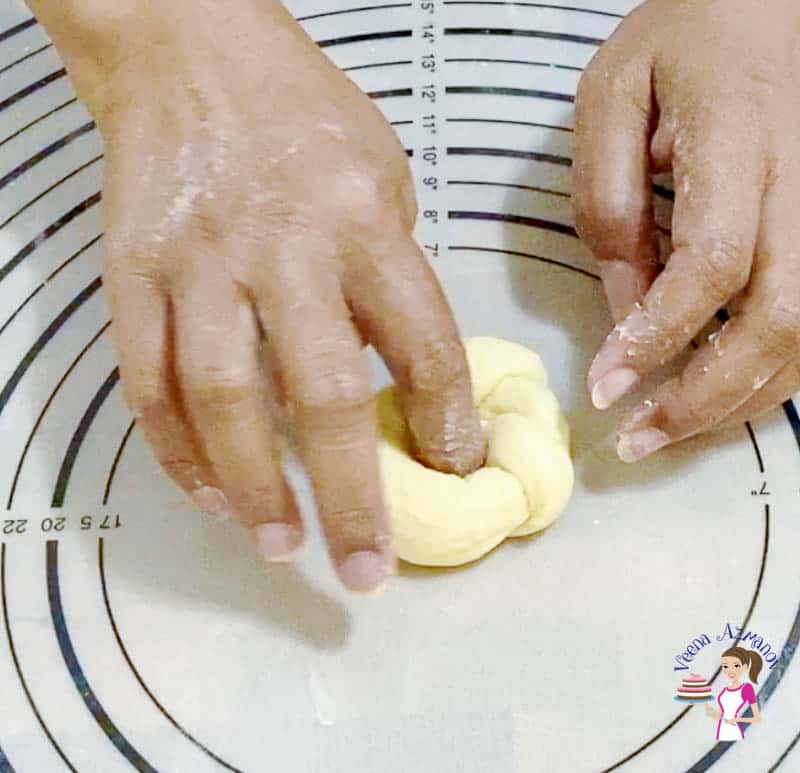
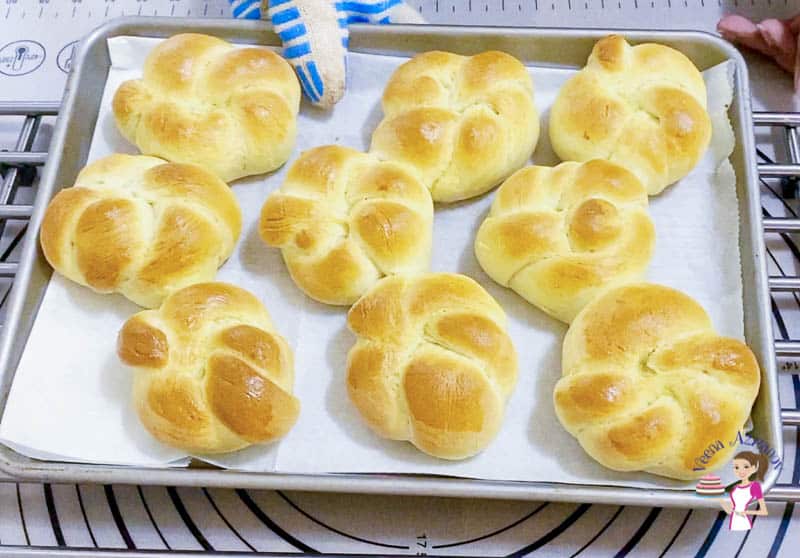
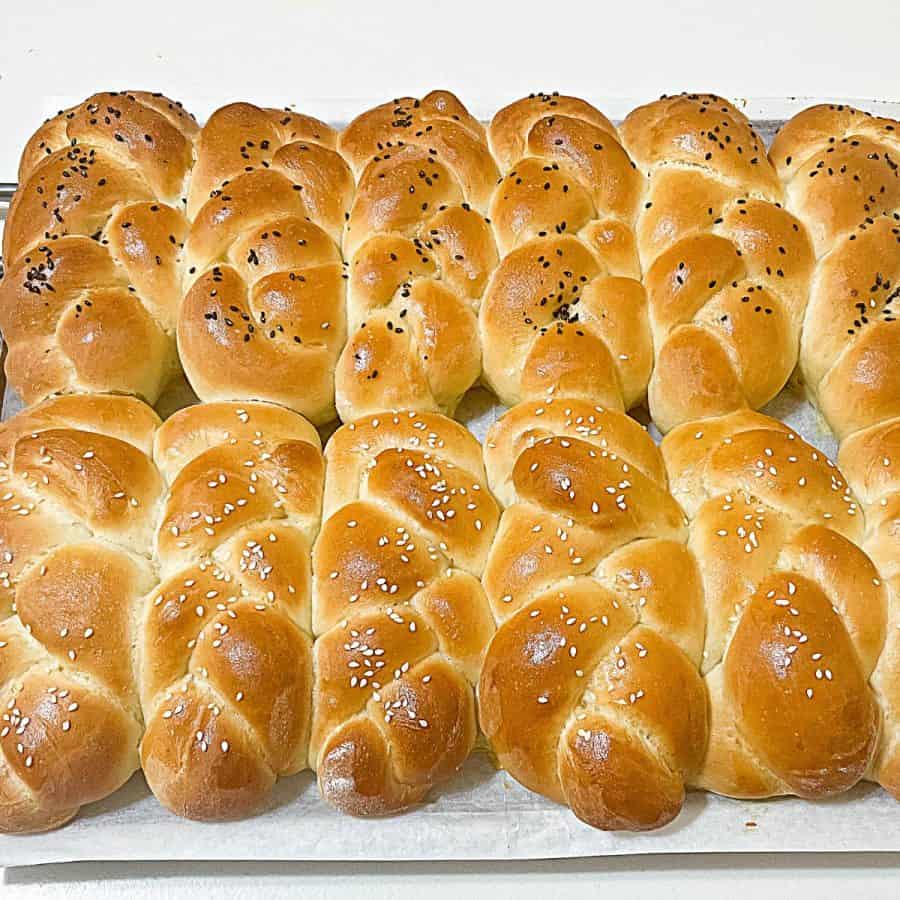
- Shape the Knots: Lightly flour your work surface and turn out the dough. Divide it into 12 equal portions (about 65-70 g each). Roll each portion into a rope (about 10-12 inches long), tie it into a knot, and tuck the ends underneath.
How to shape knotted dinner rolls
- Divide the dough into 12 equal pieces.
- Roll each piece into a rope about 10–12 inches long.
- Tie the dough into a simple knot.
- Tuck one end underneath and the other end into the center.
- Place seam-side down before proofing.

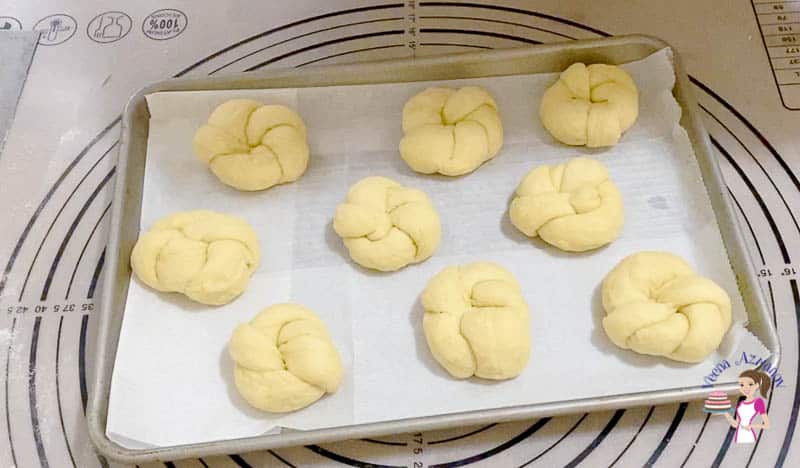
- Proof: Arrange the knots on a parchment-lined baking sheet, spacing them slightly apart. Cover loosely with a damp cloth and let them rise for 30-45 minutes or until puffed.
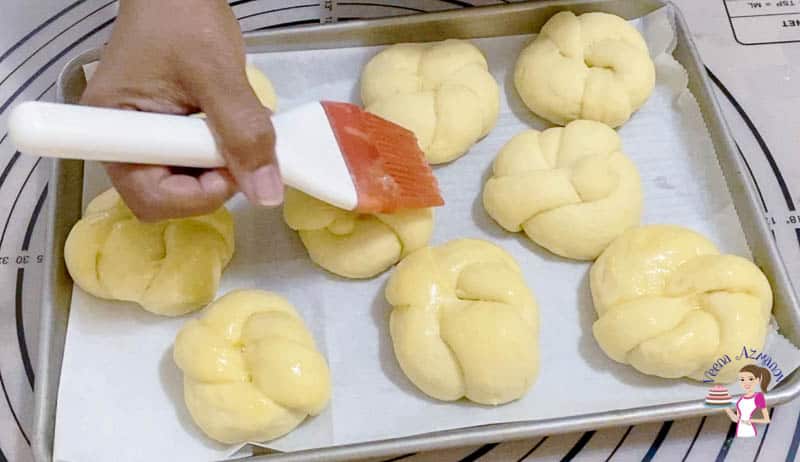
- Bake the Rolls: Preheat the oven to 190°C (375°F). Brush the tops of the rolls with melted butter or an egg wash for a shiny, golden crust. Bake for 18-22 minutes, or until the rolls are golden brown and sound hollow when tapped.
- Cool and Serve: Let the rolls cool slightly on a wire rack before serving. Optionally, brush with more melted butter for extra softness and flavor.
Video
Ingredients
- 240 ml (1 cup) Warm Milk
- 6 g (2 tsp) Instant dry yeast
- 30 g (2 tbsp) Sugar white
- 100 g (2 large) Eggs
- 50 g (3 tbsp) Butter soft, unsalted, room temperature
- 400 g (3¼ cups) Bread or All-purpose flour
- 6 g (1 tsp) Salt
- 2 tbsp melted Butter optional
- ½ Beaten egg for eggwash
Method
- Mix the Dough: In a large mixing bowl, combine the milk, sugar, eggs, and yeast. Then add the flour, salt, and butter in three batches using a spatula or wooden spoon to ensure the ingredients are well combined. This is a soft and sticky dough.240 ml Warm Milk, 6 g Instant dry yeast, 30 g Sugar, 100 g Eggs, 50 g Butter, 400 g Bread or All-purpose flour, 6 g Salt
- First Rise: Cover the bowl with plastic wrap or a damp cloth and let the dough rise at room temperature for 1 ½ to 2 hours, or until doubled in size.
- Shape the Knots: Lightly flour your work surface and turn out the dough. Divide it into 12 equal portions (about 65-70 g each). Roll each portion into a rope (about 10-12 inches long), tie it into a knot, and tuck the ends underneath.
- Proof: Arrange the knots on a parchment-lined baking sheet, spacing them slightly apart. Cover loosely with a damp cloth and let them rise for 30-45 minutes or until puffed.
- Bake the Rolls: Preheat the oven to 190°C (375°F). Brush the tops of the rolls with melted butter or an egg wash for a shiny, golden crust. Bake for 18-22 minutes, or until the rolls are golden brown and sound hollow when tapped.2 tbsp melted Butter, 1/2 Beaten egg
- Cool and Serve: Let the rolls cool slightly on a wire rack before serving. Optionally, brush with more melted butter for extra softness and flavor.
Notes
- Use Warm (Not Hot) Milk: Warm milk activates the yeast but doesn’t kill it. Aim for milk that feels warm to the touch, around 38-43°C (100-110°F).
- Don’t Over-Flour the Dough: The dough is meant to be sticky, so resist adding too much extra flour. Lightly flour your hands and surface when shaping the knots.
- Allow Sufficient Rising Time: Let the dough rise until it doubles in size, even if it takes longer than expected. A warm, draft-free spot is ideal for rising.
- Shape with Gentle Hands: When forming knots, handle the dough gently to maintain its light and airy texture.
- Brush for Shine and Flavor: Use an egg wash or melted butter on top before baking for a beautiful golden crust. Brush with butter after baking for extra softness.
- Preheat Your Oven: Ensure your oven is fully preheated for even baking and a perfectly golden finish.
- Customize Toppings: Sprinkle the rolls with sesame seeds, poppy seeds, or garlic powder for added flavor and a decorative touch.
Equipment you will need


Nutrition
Tried this recipe?
Mention @veenaazmanov_kitchen or tag #veenaazmanovkitchen!Tips for success
- Use Warm (Not Hot) Milk: Warm milk activates the yeast but doesn’t kill it. Aim for milk that feels warm to the touch, around 38-43°C (100-110°F).
- Don’t Over-Flour the Dough: The dough is meant to be sticky, so resist adding too much extra flour. Lightly flour your hands and surface when shaping the knots.
- Allow Sufficient Rising Time: Let the dough rise until it doubles in size, even if it takes longer than expected. A warm, draft-free spot is ideal for rising.
- Shape with Gentle Hands: When forming knots, handle the dough gently to maintain its light and airy texture.
- Brush for Shine and Flavor: Use an egg wash or melted butter on top before baking for a beautiful golden crust. Brush with butter after baking for extra softness.
- Preheat Your Oven: Ensure your oven is fully preheated for even baking and a perfectly golden finish.
- Customize Toppings: Sprinkle the rolls with sesame seeds, poppy seeds, or garlic powder for added flavor and a decorative touch.
more no knead bread recipes
- No-Knead Beer Bread
- No-knead Bread – Crusty White Bread
- and No-Knead Sandwich Bread
- No-Knead Sandwich Bread Recipe
- No-knead flatbread recipe with yeast


Troubleshooting
| Problem | Possible reason | Solution |
|---|---|---|
| Rolls are dense | Dough needed more rising time | Let the dough double before shaping |
| Rolls spread instead of rising | Dough was too warm | Chill briefly before shaping |
| Rolls are dry | Too much flour added | Keep dough slightly sticky |
| Pale rolls | Missing egg wash | Brush before baking |
Frequently asked questions
If stored properly, these soft dinner rolls will stay for 3 to 4 days at room temperature. They can also be frozen for a month or more. Never store bread in the fridge as it dries out.
Yes. These no-knead knotted rolls are perfect for making ahead. Prepare and shape the rolls, place them on the baking tray, cover well, and refrigerate overnight. The next day, let them sit at room temperature until puffy before baking.
The best way to keep homemade bread soft is to contain the steam within the bread. So, while they are still hot, place a clean kitchen cloth over them and let them rest for 10 minutes. Keeping these dinner rolls covered will also keep them from drying out.
For make-ahead or freezer-friendly knotted rolls, bake the rolls as instructed in this recipe. Let them cool completely. Once cooled, place them in an airtight freezer-safe ziplock bag. For best results, thaw in the fridge overnight, then reheat in the microwave for 30 seconds or more as needed.
We use these as dinner rolls. So rich, soft, buttery, and delicious. These are great with any soup, stew, chili, or slow-cooked meat.
more dinner roll recipes
- Garlic Dinner Rolls
- Whole Wheat Dinner Rolls
- Soft and Fluffy Dinner Rolls
- Sourdough Mini Challah • Dinner Rolls
- Japanese Milk Bread Rolls


Don’t lose this recipe! Save it for Later!
📌 Save this Recipe for later on Pinterest so you can easily find it again.
⭐ Add Veena Azmanov Kitchen to your Google Preferred Sources.
It helps Google show you more of our recipes.
📧 Subscribe for new recipes delivered to your inbox.
🎥 Follow us for more recipes


Your video and written steps does not match. Please proofread before posting or else, what’s the point?
Ah, you mean the video shows wet ingredients first, then dry ingredients – while the written says the opposite.. I’ll fix it now.. Thanks
Thank you! Perfect recipe! Well explained, easy to do, ingredients that are available in every home (I put water and oil instead of milk and butter and olive oil coating) and I made a knot shape which is easier for me. Next time I will leave the dough overnight and make it for breakfast. I didn’t bake for years until I discovered the no-knead option since then I bake bread, focaccia rolls and more
Thank you Efrat
I have not made these yet but they look good. In your “ingredients and substitution “ section you say the one tablespoon of sugar won’t make the rolls sweet. However the recipe calls for 4 tablespoons (5 Tablespoons). To me that is sweet. So which is it 1 tablespoon or 4 to 5 tablespoons?
Hey Deb, Sorry, yes it is 2 tbsp of sugar in the recipe. But you can add up to 5 tbsp to make the rolls sweet. Thanks
So for bread machine, no need to add butter and flour later in sequence? How about the frdige step?
Yes, you can add the butrer and flour all at once. The dough can be kept in the fridge overnight. Thaw in the morning for an hour. Then shape, proof and bake.
These are the kind of rolls my daughter loves! Can’t wait to make them with her!
Thank you, Marylynn
This is so helpful! I can’t wait to make these now! Thank you for the helpful pictures and tips!
You are very welcome Beth. Thanks
These look so light and soft. Perfect with a big bowl of soup.
Thanks, Dannii
I’ve been in such a cooking rut lately, so I’ve been exploring new recipes to make! I happened upon your recipe and I am so glad I did. I made it today and my entire family loved it! Its doing into our menu plan rotation!!
Thank you, Cindy. I am so happy to hear that you enjoyed this recipe.
No-knead rolls are great when saving time for proofing. Came out perfect, I love having them with salted butter and tea.
Thank you, Bhawana.