Perfect 3 Cheese Pizza
 Prep Time 20 minutes Cook Time 12 minutes Total Time 6 hours 32 minutes


This 3 Cheese Pizza, made with easy no-knead dough, boasts a perfectly crispy and chewy crust that’s effortless to prepare. The 5-minute pizza sauce adds a fresh, tangy flavor that perfectly complements the rich blend of parmesan, cheddar, and mozzarella. Together, they create a delicious and satisfying homemade pizza that’s quick and easy to make.

Three Cheese Pizza is a dream come true for cheese lovers, combining the rich flavors of parmesan, cheddar, fontina, and mozzarella into one delicious pizza. Each bite offers a perfect balance of sharpness, creaminess, and gooeyness, making it a comforting and indulgent treat. The blend of these three cheeses creates a complex flavor profile that’s both satisfying and irresistible, setting this pizza apart from the rest.
Using no-knead dough, 5-minute pizza sauce, and a trio of cheeses, you can create a homemade Three Cheese Pizza that rivals any restaurant. The ease of the dough, combined with the quick and flavorful sauce, makes pizza night both simple and delicious. With a perfectly crispy crust, a rich tomato base, and a gooey, cheesy topping, this pizza is sure to become a household favorite.
Why is this the best recipe?
- Effortless No-Knead Dough: The no-knead dough requires minimal effort while delivering a crispy, chewy crust with deep flavor, making it ideal for anyone looking to enjoy homemade pizza without the hassle.
- Quick and Flavorful Sauce: The 5-minute pizza sauce is rich and robust, made with simple ingredients that pack a punch, perfectly complementing the blend of cheeses for an irresistible taste.
- Perfect Cheese Blend: The combination of parmesan, cheddar, fontina, and mozzarella creates a harmonious balance of sharp, creamy, and melty textures, giving every bite a rich, cheesy delight.
- Customizable and Fresh: This recipe lets you customize, whether you want to stick to the classic three-cheese blend or experiment with different cheeses, all while using fresh ingredients for pizzeria-quality pizza at home.

Ingredients and substitutes
- All-Purpose Flour: Forms the base of the dough. You can also use bread flour for a chewier crust or whole wheat flour for a more wholesome, nutty flavor.
- Instant Yeast: Helps the dough rise without the need for proofing. You can also use active dry yeast as a substitute, but it should be proofed in warm water before adding it to the flour.
- Olive Oil: Adds richness and flavor to the dough and sauce. You can also use vegetable oil, melted butter, or even avocado oil as substitutes.
- Sugar: Feeds the yeast and adds a hint of sweetness to the dough. Honey or agave syrup can be used as an alternative.
- Garlic and Onion: Provide a flavorful base for the pizza sauce. You can also use shallots or leeks as substitutes, or you can opt for garlic powder and onion powder if fresh isn’t available.
- Crushed Tomatoes and Tomato Paste: Form the body of the pizza sauce. You can also substitute with fresh tomatoes blended with a little tomato paste, or use a store-bought pizza sauce for convenience.
- Basil and Italian Seasoning: Add depth of flavor to the sauce. You can also use fresh basil or oregano, or you can create your own mix of dried herbs like thyme, rosemary, and oregano.
- Brown Sugar: Balances the acidity of the tomatoes in the sauce. You can also use white sugar, honey, or maple syrup as substitutes.
- Parmesan Cheese: Adds a sharp, nutty flavor to the pizza. You can also use Grana Padano or Pecorino Romano as substitutes.
- Cheddar Cheese: Contributes a creamy, sharp flavor. You can substitute with Colby, Monterey Jack, or Gouda for different flavor profiles.
- Fontina Cheese: Provides a rich, buttery texture. You can also use Provolone or Gruyère as substitutes for a similar creamy melt.
- Mozzarella Cheese offers the classic, stretchy texture of pizza. For a creamier texture, you can substitute fresh mozzarella or use a cheese blend that includes mozzarella.

Step-by-step: 3 Cheese pizza
- Mix the Dough: In a large mixing bowl, combine the flour, salt, yeast, and sugar. Add the olive oil and warm water. Stir until a shaggy dough forms.
- Rest: Cover the bowl with plastic wrap and let it sit at room temperature for 8-24 hours until the dough has risen and bubbles appear on the surface.

- Prepare for Baking: Preheat your oven to 475°F (245°C) with a pizza stone or an inverted baking sheet inside. Dust your hands with flour, remove the dough from the bowl, and divide it into two portions. Shape each into a ball, cover, and let rest for 30 minutes.
- Shape the Dough: On a floured surface, stretch each dough ball into a 12-inch circle. Transfer to parchment paper for easy handling.
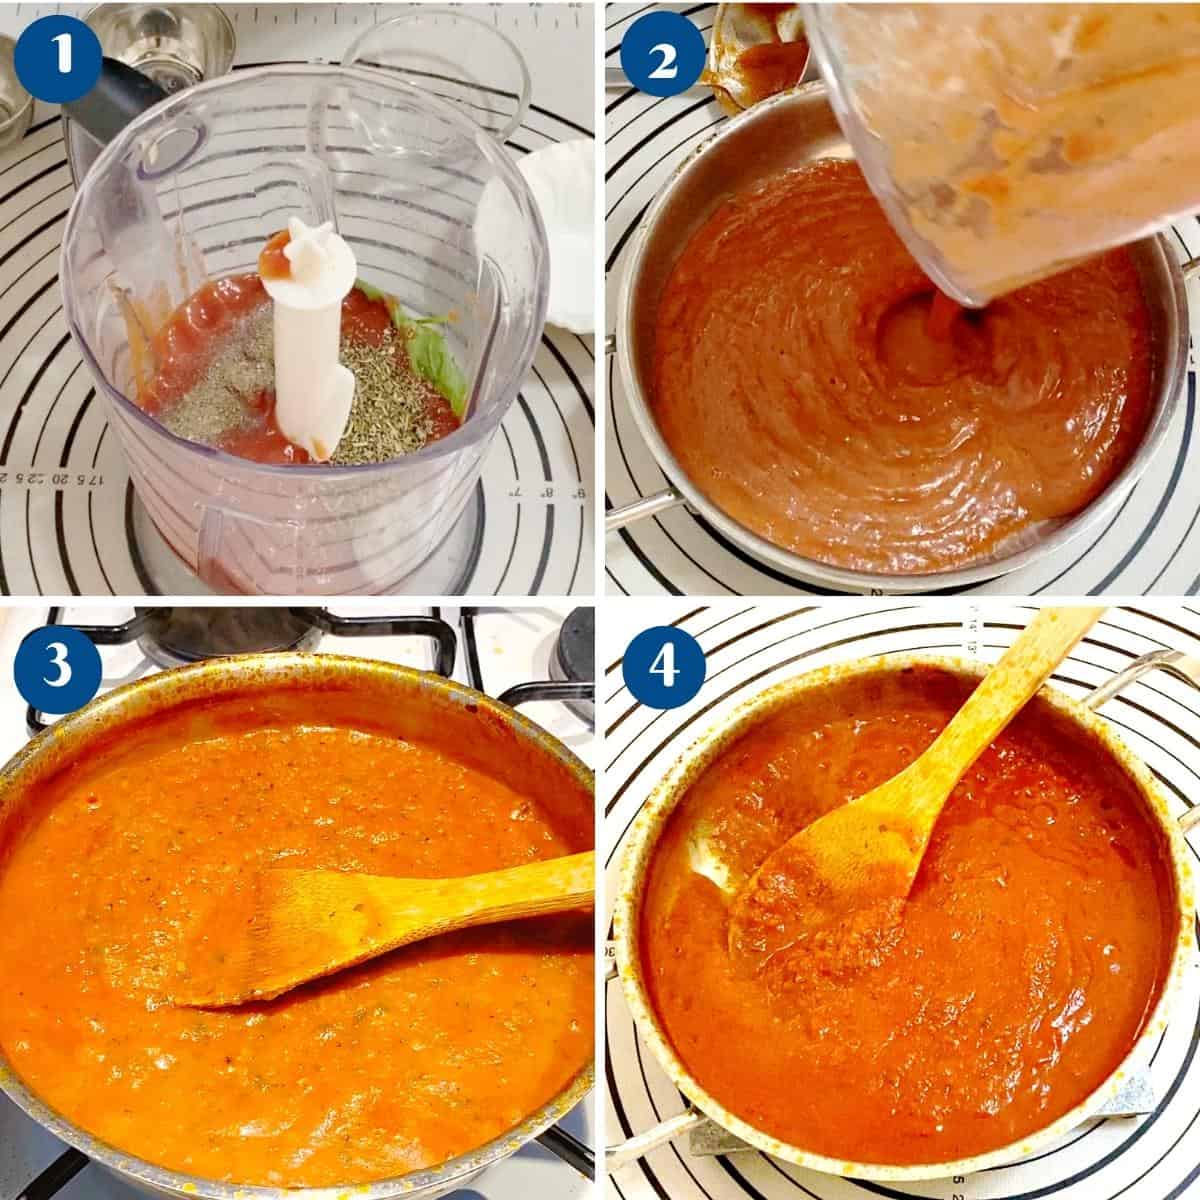
- Cook the Sauce: Combine all the ingredients of the pizza sauce in a food processor. Pour it into a saucepan and simmer for 5 minutes, stirring occasionally. Remove from heat and let cool slightly before using.
- Assemble the Pizza: Spread a thin layer of the pizza sauce over each stretched dough. Evenly sprinkle the parmesan, cheddar, fontina, and mozzarella cheeses over the sauce.

- Bake: Carefully transfer the parchment paper with the pizza onto the preheated pizza stone or baking sheet. Bake for 10-12 minutes or until the crust is golden and the cheese is bubbly and melted.
- Serve: Remove from the oven, let cool slightly, slice, and enjoy your cheesy homemade pizza!

- Margherita pizza
- Mushroom pizza
- White pizza
- Olives and red onions
- Hawaiian pizza
- Pepperoni pizza
- Pesto pizza


Frequently asked questions
Firstly, pizza is always at its best fresh out of the oven. But it does have a long shelf life and can be reheated and served again.
Traditionally, tomato sauce and pizza sauce are very common. But, I also love to use pesto, BBQ sauce, Alfredo sauce, etc. You can also make a white pizza with white sauce. And, I love a smear of spicy enchilada sauce on my pizza, too.
You can bake the pizza, cut the slices, and cool them completely. Then, place the slices in a ziplock bag. In fact, you can freeze these for up to three months. They make a great snack for kids.
This dough is a high-hydration bread. Therefore, it has to be soft, wet, and sticky. So, don’t add more flour. And, if you need a more defined dough that’s easy to work with, use my overnight pizza dough. It does need some kneading, but the dough is easier to work with.
3 Cheese Pizza
This Three Cheese Pizza, made with easy no-knead dough, boasts a perfectly crispy and chewy crust that's effortless to prepare. The 5-minute pizza sauce adds a fresh, tangy flavor that perfectly complements the rich blend of parmesan, cheddar, and mozzarella. Together, they create a delicious and satisfying homemade pizza that's quick and easy to make.
Video
Ingredients
- 4 cups (500 g) All-purpose flour
- 1 tsp Salt
- 1 tsp Instant dry yeast
- 1½ cup (350 g) Water warm
- 1 tbsp Olive oil
- 1 tbsp Sugar
- 1 large Garlic sliced
- ¼ small Onion sliced
- 15 oz (425 g) canned Tomatoes crushed
- 1 sprig Basil fresh
- 4 tbsp (65 g) Tomato paste
- 1 tbsp Italian seasoning
- 1 tbsp Brown sugar
- ¼ tsp Salt
- ¼ tsp Pepper
- 2 tbsp Olive oil
- ½ cups (50 g) Parmesan cheese (2 oz)
- 1 cup (170 g) Cheddar cheese (6 oz)
- 1 cup (200 g) Fontina cheese or Gouda (6 oz)
- 1 cup (170 g) Mozzarella (6 oz)
Method
- Mix the Dough: In a large mixing bowl, combine the flour, salt, yeast, and sugar. Add the olive oil and warm water. Stir until a shaggy dough forms.4 cups All-purpose flour, 1 tsp Salt, 1 tsp Instant dry yeast, 1½ cup Water warm, 1 tbsp Olive oil, 1 tbsp Sugar
- Rest: Cover the bowl with plastic wrap and let it sit at room temperature for 8-24 hours until the dough has risen and bubbles appear on the surface.
- Prepare for Baking: Preheat your oven to 475°F (245°C) with a pizza stone or an inverted baking sheet inside. Dust your hands with flour, remove the dough from the bowl, and divide it into two portions. Shape each into a ball, cover, and let rest for 30 minutes.
- Shape the Dough: On a floured surface, stretch each dough ball into a 12-inch circle. Transfer to parchment paper for easy handling.
- Cook the Sauce: Combine all the ingredients of the pizza sauce in a food processor. Pour it into a saucepan and simmer for 5 minutes, stirring occasionally. Remove from heat and let cool slightly before using.1 large Garlic, ¼ small Onion, 15 oz canned Tomatoes crushed, 1 sprig Basil fresh, 4 tbsp Tomato paste, 1 tbsp Italian seasoning, 1 tbsp Brown sugar, ¼ tsp Salt, ¼ tsp Pepper, 2 tbsp Olive oil
- Assemble the Pizza: Spread a thin layer of the pizza sauce over each stretched dough. Evenly sprinkle the parmesan, cheddar, fontina, and mozzarella cheeses over the sauce.½ cups Parmesan cheese, 1 cup Cheddar cheese, 1 cup Fontina cheese, 1 cup Mozzarella
- Bake: Carefully transfer the parchment paper with the pizza onto the preheated pizza stone or baking sheet. Bake for 10-12 minutes or until the crust is golden and the cheese is bubbly and melted.
- Serve: Remove from the oven, let cool slightly, slice, and enjoy your cheesy homemade pizza!
Notes
-
- Room-Temperature Ingredients: Ensure the water for the dough is warm, not hot, to activate the yeast properly. Allow the cheese to come to room temperature before assembling to ensure even melting and a creamy texture.
-
- Proper Dough Resting: Let the dough rise for at least 8 hours (or overnight) to develop the best flavor and texture. After shaping, allow the dough to rest for 30 minutes to relax, making it easier to stretch without tearing.
-
- Preheat Your Oven: Preheat your oven with a pizza stone or baking sheet to the highest temperature possible (typically 475°F to 500°F). This ensures a crispy, well-baked crust and evenly melted cheese.
-
- Use Fresh Cheese: Opt for freshly grated cheese rather than pre-shredded, which often contains anti-caking agents that can prevent proper melting. Freshly grated cheese melts better and offers a richer flavor.
-
- Balance the Sauce: Spread a thin layer of sauce on the dough to avoid a soggy crust. A lighter layer allows the cheese and crust to shine while still providing the necessary flavor from the sauce.
-
- Even Topping Distribution: Distribute the cheeses evenly across the pizza to ensure each bite is a perfect blend of flavors. Mixing the cheeses slightly can create a more cohesive flavor profile throughout the pizza.
-
- Rotate for Even Baking: Halfway through baking, rotate the pizza to ensure even cooking, especially if your oven has hot spots. This helps achieve a uniformly golden crust and perfectly melted cheese.
-
- Let It Rest: After baking, allow the pizza to rest for a few minutes before slicing. This helps the cheese set slightly, making slicing easier and preventing the toppings from sliding off.
Equipment you will need


Nutrition
Tried this recipe?
Mention @veenaazmanov_kitchen or tag #veenaazmanovkitchen!- Lahmacun – Turkish Meat Pizza
- Fluffy Turkish Bread (Ramazan Pidesi)
- Pide: Turkish Flatbread Recipe
- Cottage Cheese Flatbread
- Naan Recipe: Classic or Garlic Butter


Don’t lose this recipe! Save it for Later!
📌 Save this Recipe for later on Pinterest so you can easily find it again.
⭐ Add Veena Azmanov Kitchen to your Google Preferred Sources.
It helps Google show you more of our recipes.
📧 Subscribe for new recipes delivered to your inbox.
🎥 Follow us for more recipes


Your recipe calls for an oven temperature of 475 F.
However, my oven only goes as high as 425 F. Is there any way to work around this, and how will it affect the outcome?
You can bake at 425 for two minutes longer. Frankie