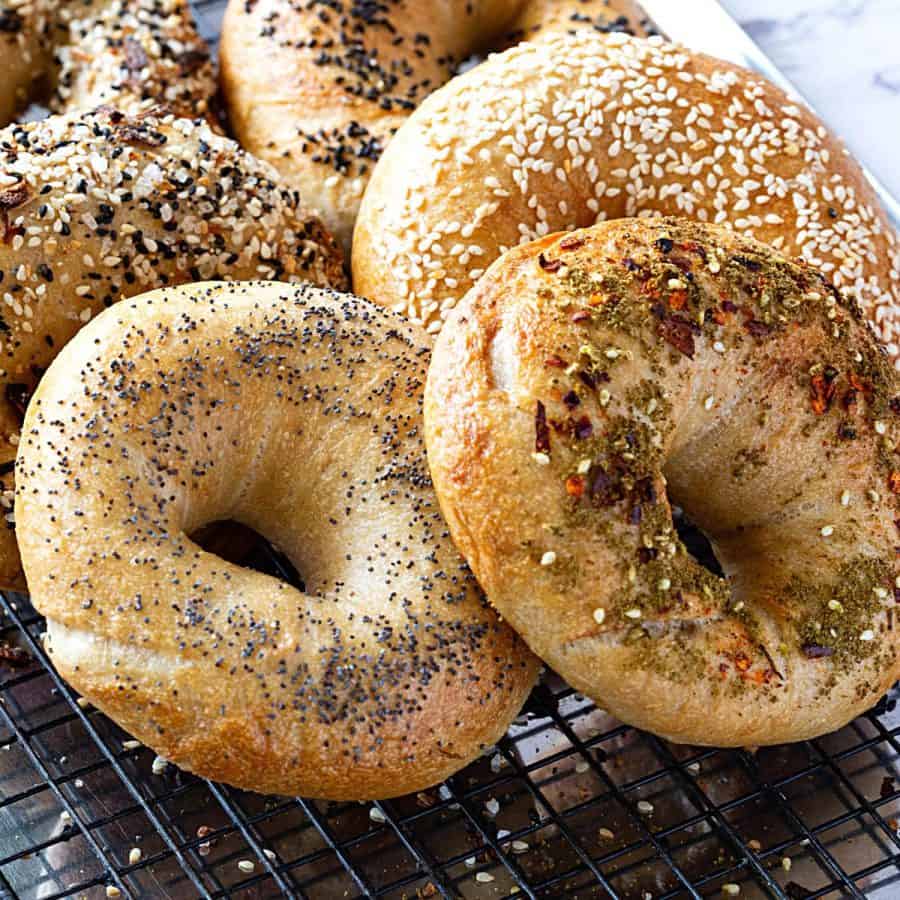
Sourdough Bread with All-Purpose Flour
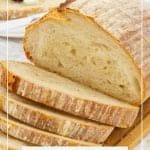


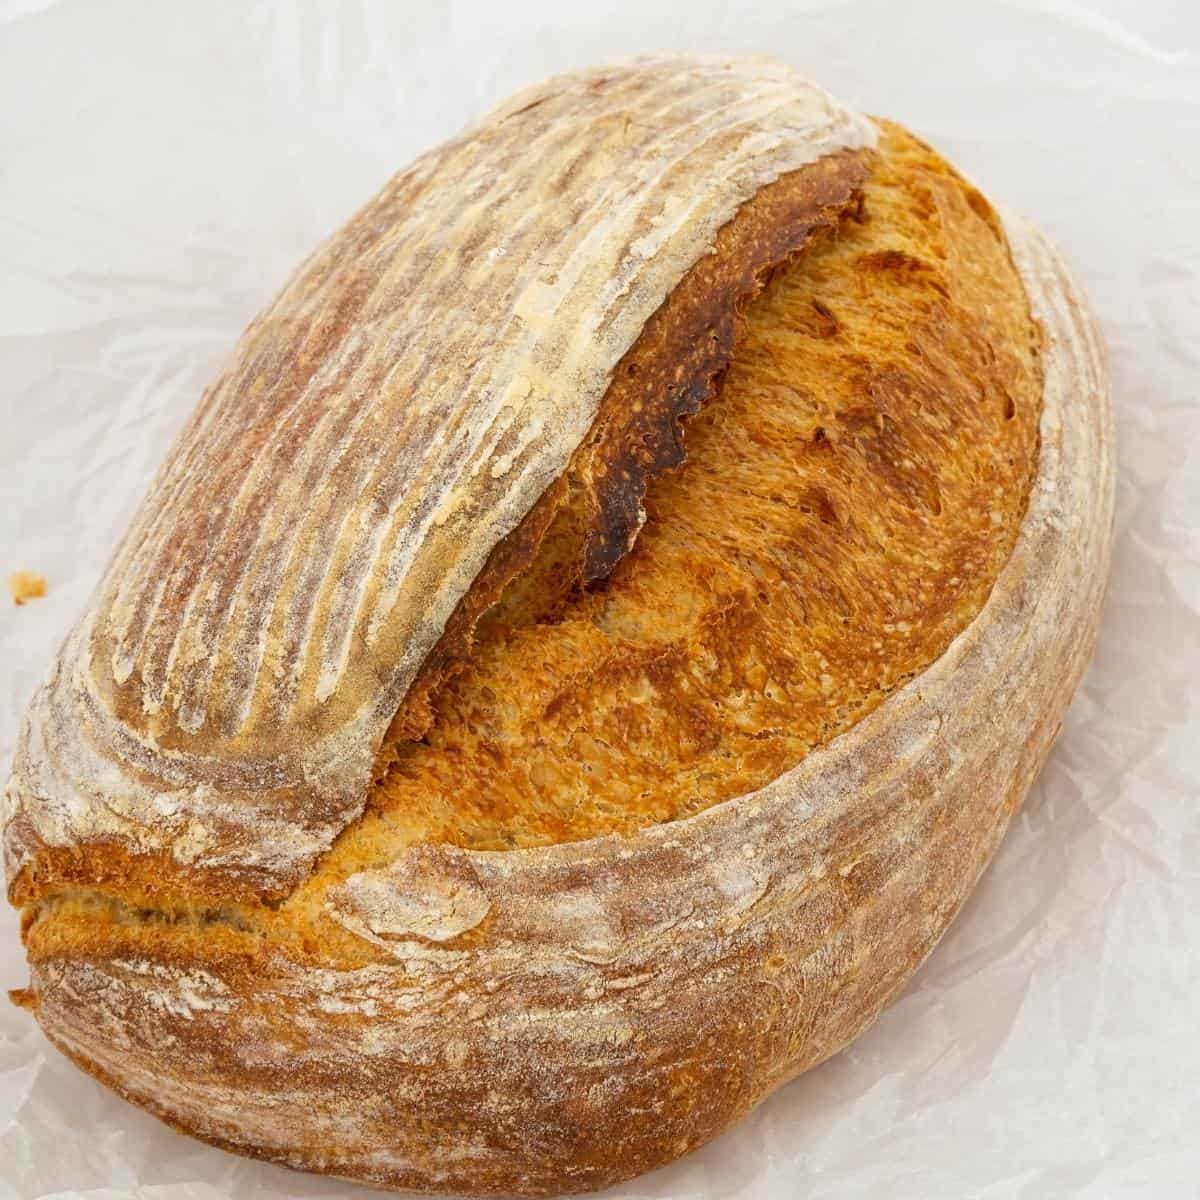
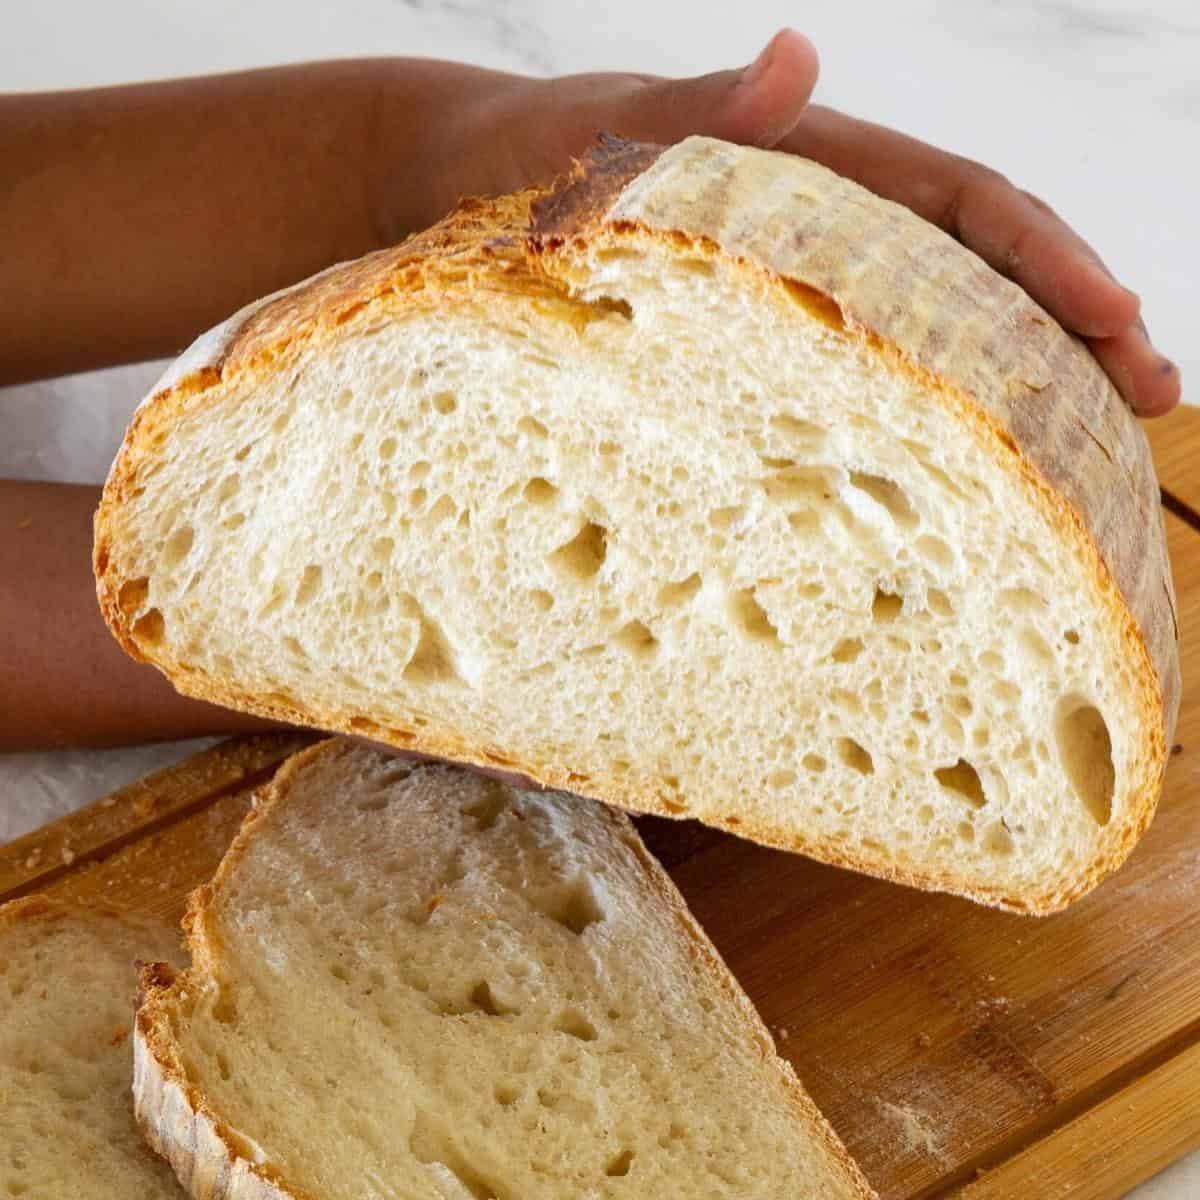
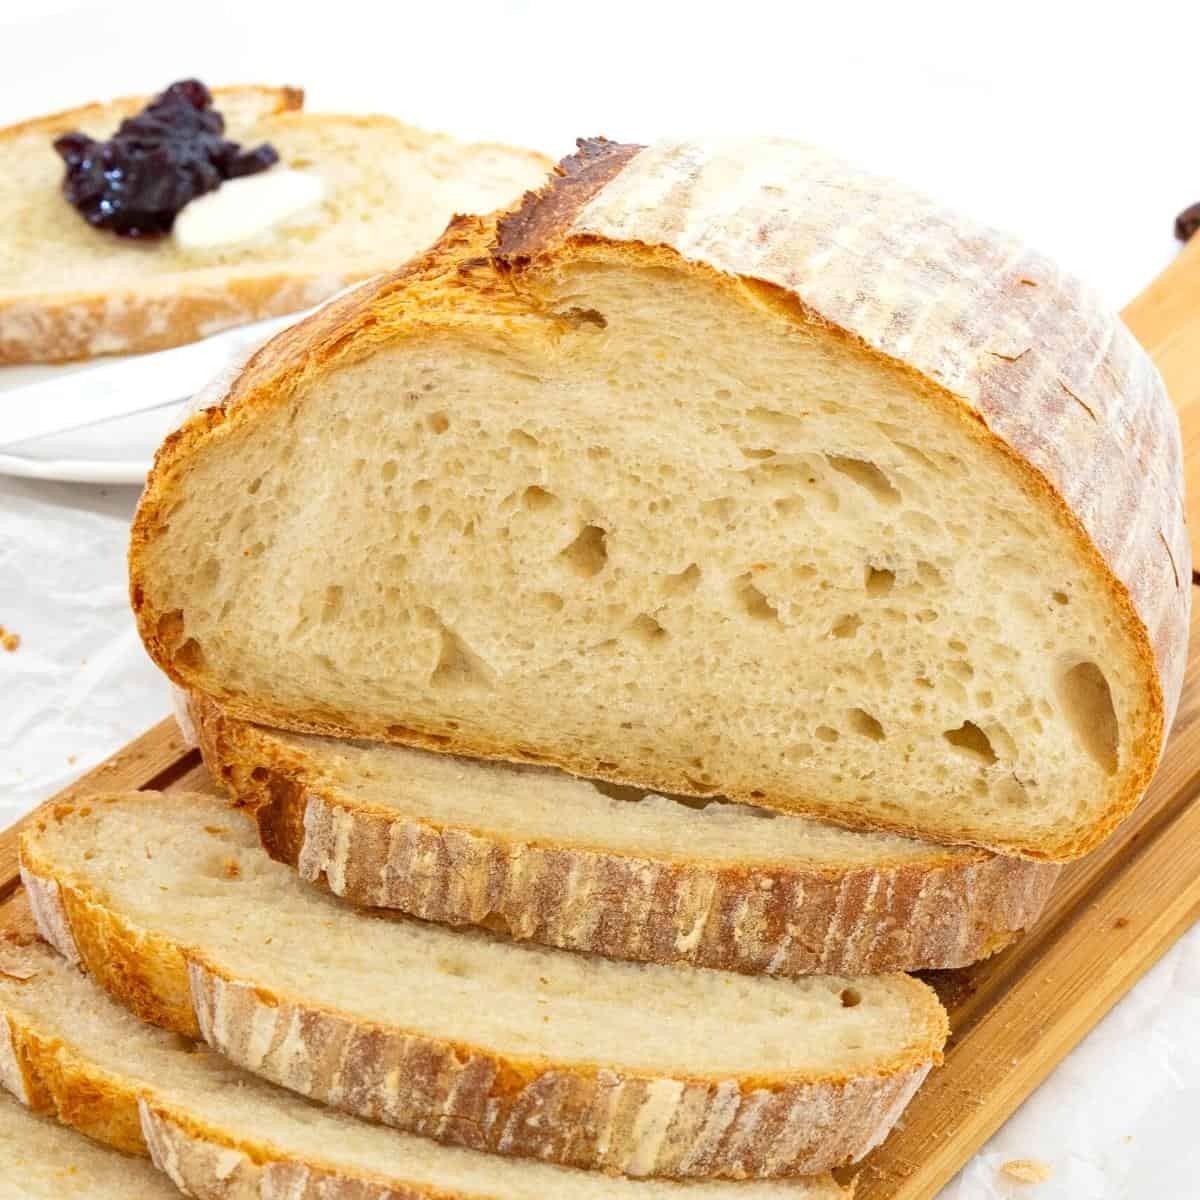
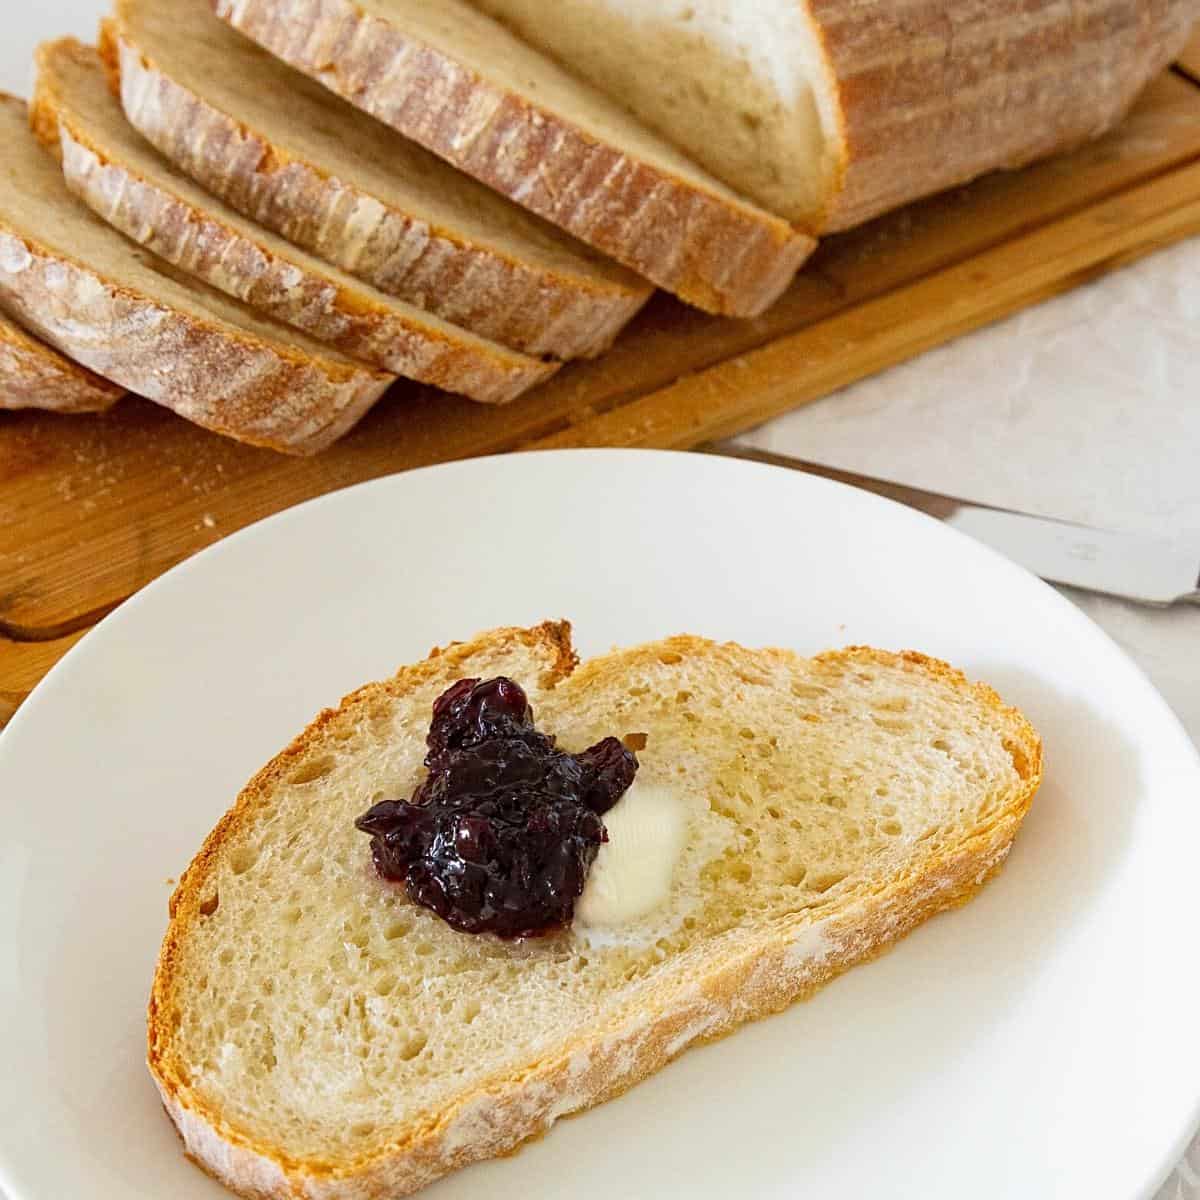
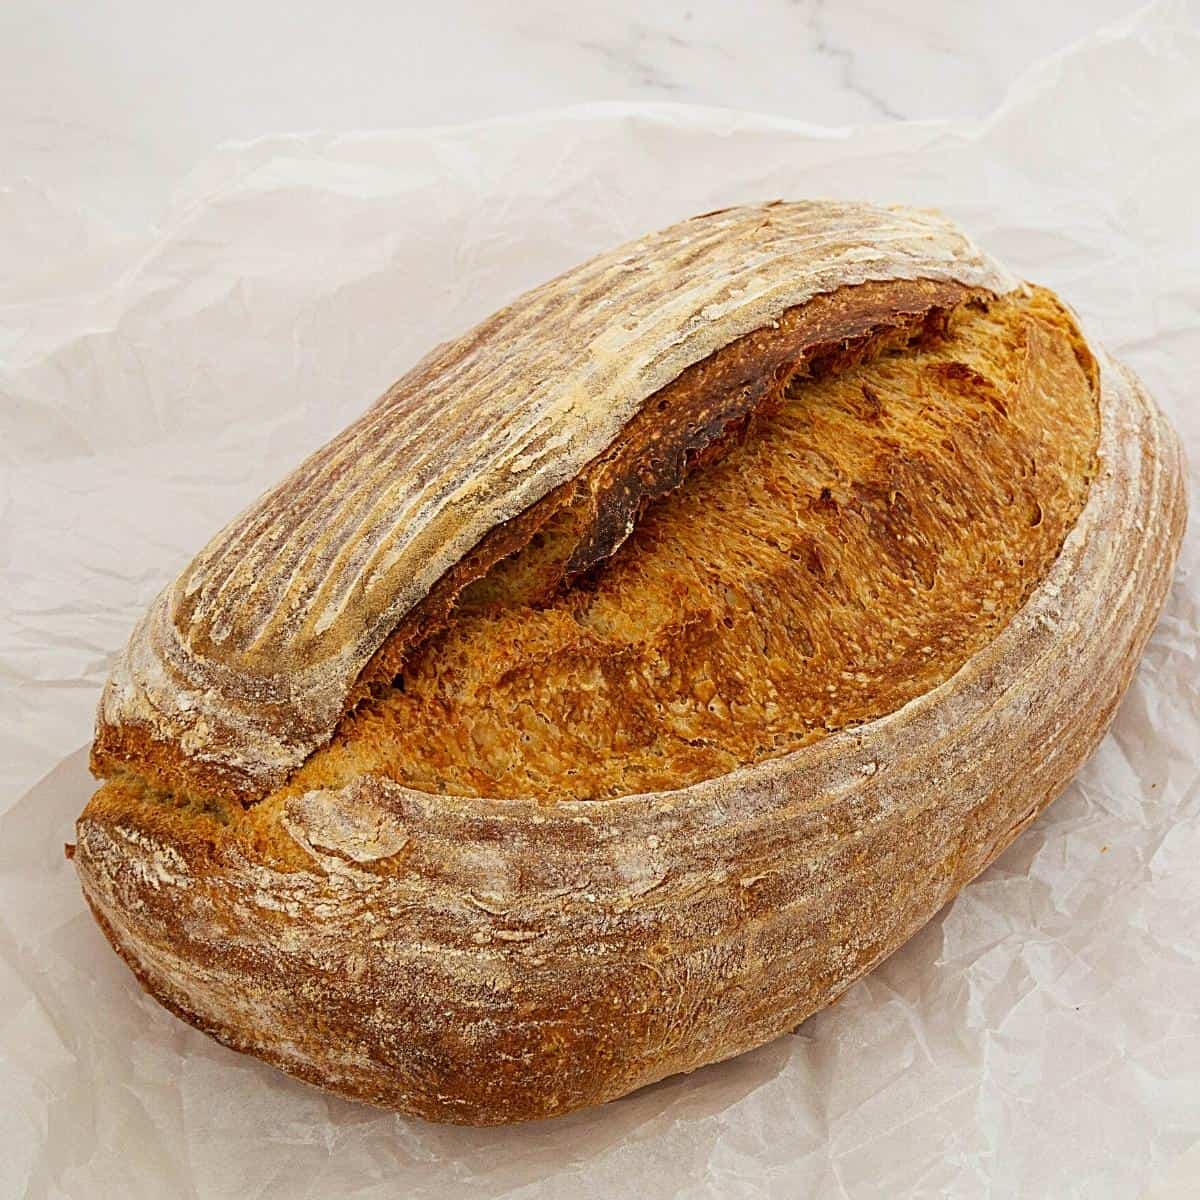
This sourdough bread is made with all-purpose flour, proving that you don’t need specialty ingredients to bake a great loaf. It has a crisp crust, a soft, chewy crumb, and a deep, complex flavor from slow fermentation. With a manageable 70% hydration, it’s perfect for both beginners and experienced bakers.
I started baking sourdough years ago when bread flour wasn’t so easy to find, so back then, all my sourdough baking was done with all-purpose flour. I remember reading so many warnings about how it wouldn’t have enough strength, wouldn’t rise well, or wouldn’t give the right texture. But I had no other choice, so I just went for it—and honestly, it wasn’t bad at all. In fact, it was really good.
Over time, I learned how to work with all-purpose flour, adjusting my stretch and folds, shaping more carefully, and sometimes letting the dough rest in the fridge to strengthen. The result? A loaf with a crisp crust, soft, chewy crumb, and a flavor just as good as any bread-flour sourdough. Even now, with easy access to bread flour, I still go back to my all-purpose-flour sourdough because it proves you don’t need anything fancy to bake great bread. It’s simple, reliable, and just as satisfying.
Why is this the best recipe
- Perfect Balance of Hydration and Structure: At 70% hydration, this dough is soft and manageable, making it easier to shape while still producing a light, airy crumb and crispy crust. It’s an ideal hydration level for beginners and experienced bakers alike.
- Works with All-Purpose Flour: Unlike many sourdough recipes that require bread flour, this recipe is designed specifically for all-purpose flour. It ensures a soft, chewy texture while still achieving a good rise and oven spring.
- Overnight Cold Proofing for Better Flavor: The long, slow fermentation in the fridge develops deep, complex flavors while making the dough easier to handle and score before baking.
- Flexible and Beginner-Friendly: This recipe follows simple steps with minimal equipment needed, making it perfect for home bakers. Whether you bake in a Dutch oven or on a pizza stone, it delivers consistently great results.
Ingredients and substitutes
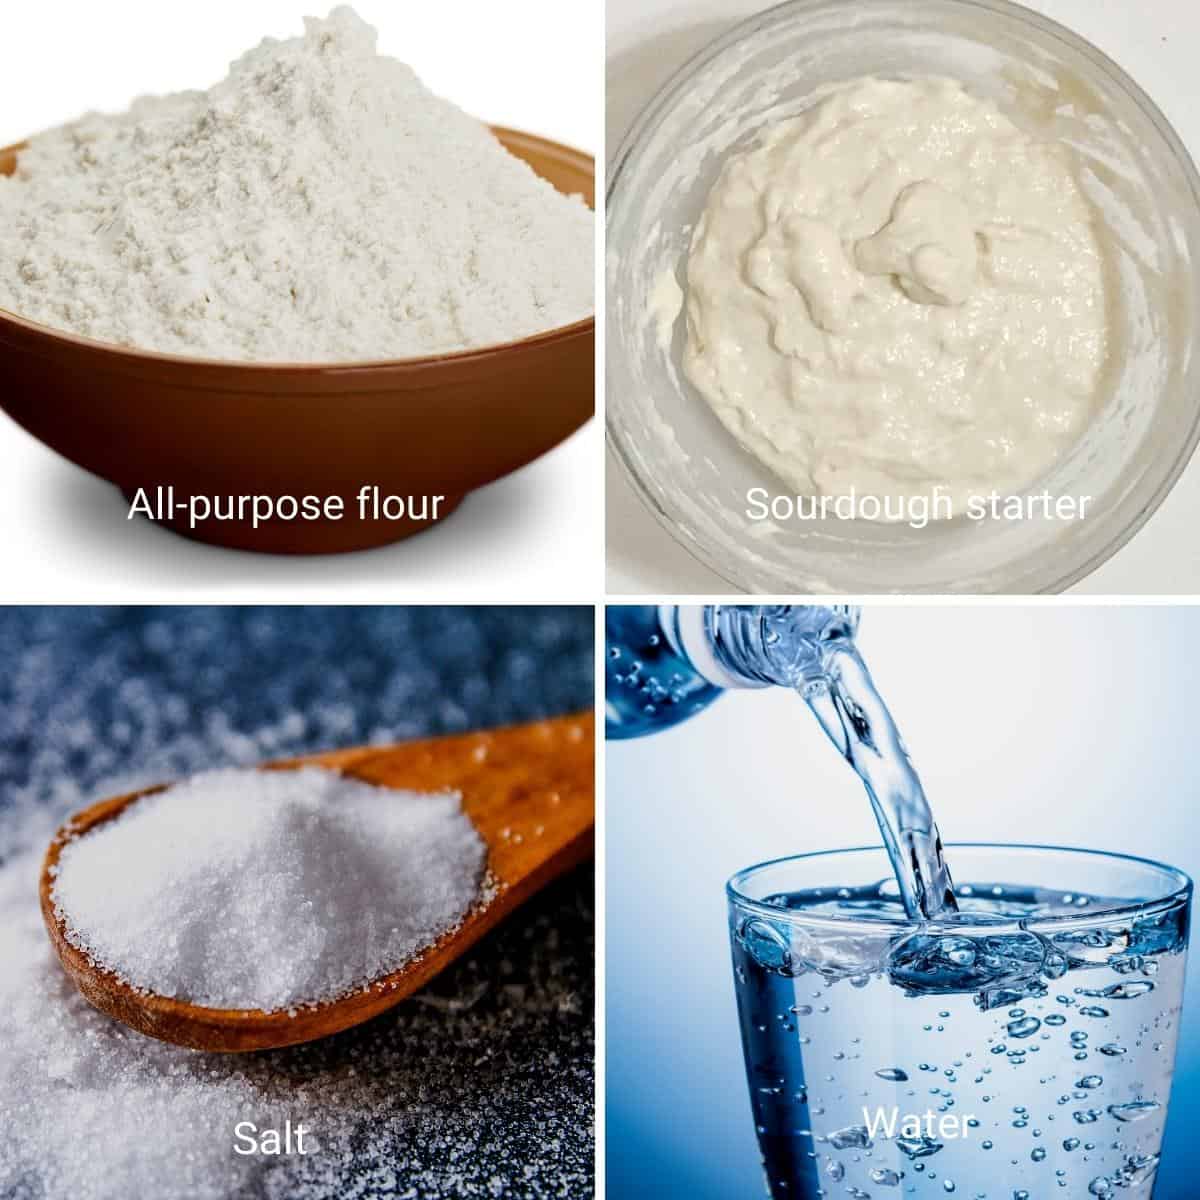
- All-Purpose Flour: This recipe is designed for all-purpose flour, which gives a softer, slightly chewy texture. If you prefer a stronger structure, you can substitute up to 20% bread flour for better gluten development or up to 20% whole wheat flour for a nuttier flavor and more fiber.
- Water: Hydrates the flour and activates gluten development. You can substitute part of the water with buttermilk or milk for a softer crumb, or beer for a deeper, malty flavor.
- Sourdough Starter: Provides natural leavening and tangy flavor. If you don’t have an active starter, you can use a poolish (equal parts flour and water with a pinch of yeast) or a biga, but the flavor won’t be as complex.
- Salt: Enhances flavor and strengthens the gluten network. You can use sea salt, kosher salt, or Himalayan salt, but avoid iodized table salt, which can interfere with fermentation.
Refreshing active sourdough starter
- Refresh your sourdough starter: Begin by refreshing it, ensuring its liveliness and readiness for the bread-making process. This involves discarding a portion of the starter and feeding it with equal parts of flour and water. Allow it to sit at room temperature for at least a few hours or until it becomes bubbly and active. Then you can begin with the dough below.
Step-by-step: Sourdough bread recipe
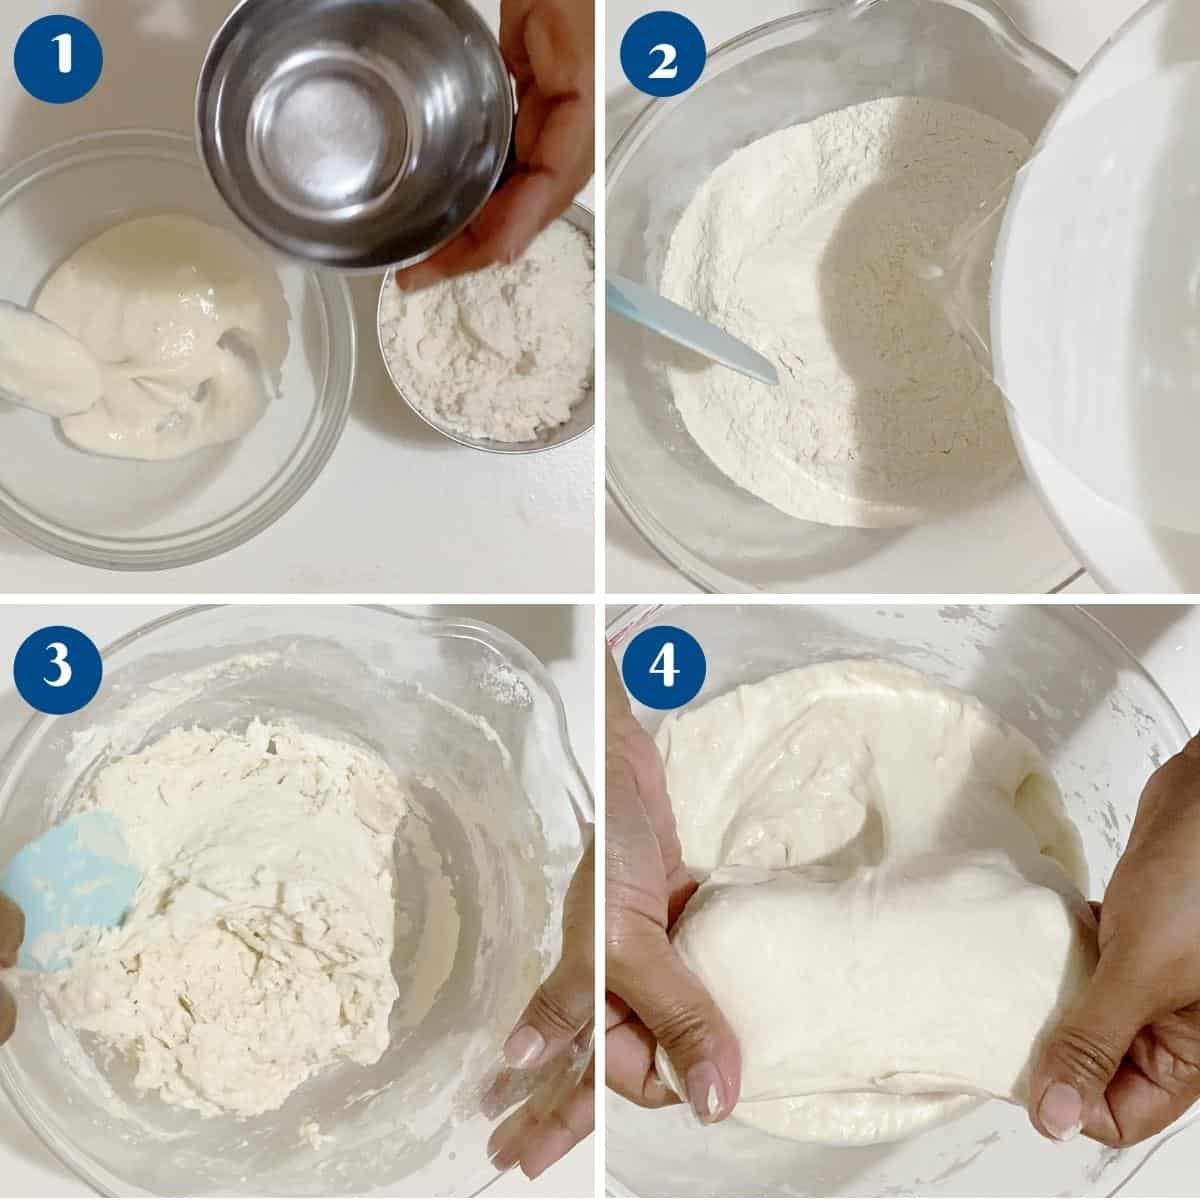
- Mix & Autolyze – In a large bowl, mix the flour and most of the water until no dry flour remains. Cover and let it rest for 30-60 minutes to allow the flour to absorb the water.
- Add Starter & Salt – Add the sourdough starter and mix well until incorporated. Dissolve the salt in the reserved water and mix it into the dough. Use stretch-and-fold or the Rubaud mixing method to fully combine.
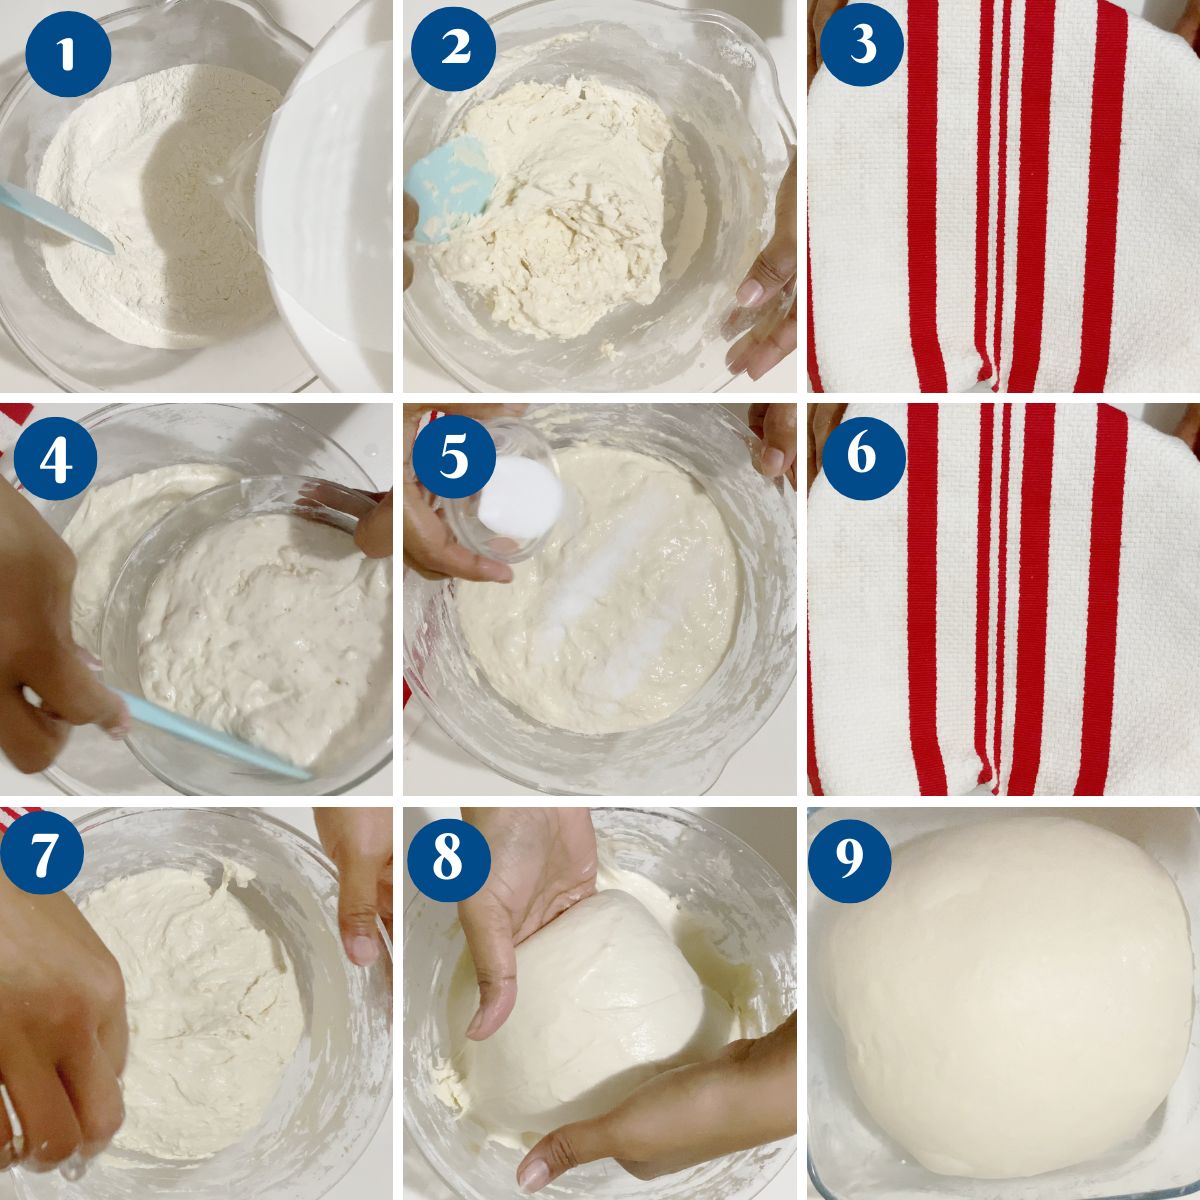
- Stretch & Folds – Every 30 minutes for the first 2 hours, perform stretch & folds to strengthen the gluten.
- Bulk Fermentation – After the last stretch and fold, let the dough ferment undisturbed at room temperature (21-24°C / 70-75°F) for 4 hours until it increases by 50-75% in volume.
- Pre-Shape & Bench Rest – Lightly flour your work surface. Turn out the dough and gently pre-shape it into a round or oval. Let it rest uncovered for 20-30 minutes to relax the gluten.
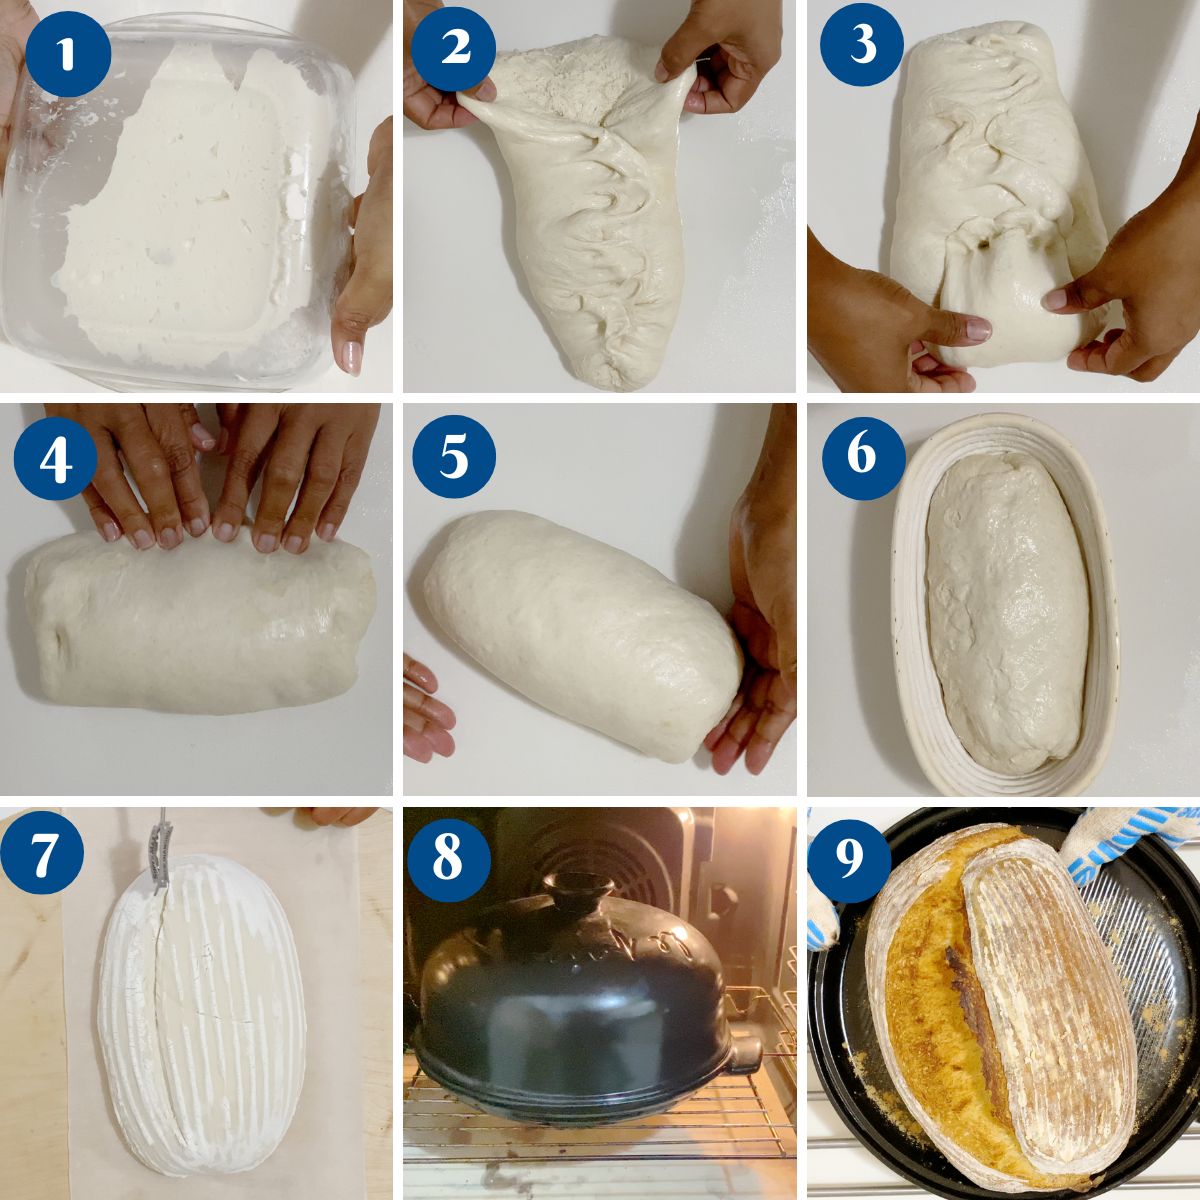
- Final Shaping & Cold Proofing – Shape the dough into a tight boule or batard, creating good surface tension. Place it into a floured banneton basket or a towel-lined bowl. Cover and refrigerate for an overnight cold proof (8-16 hours) to develop flavor.
- Preheat and Score – Preheat the oven to 475°F (245°C) for at least 45-60 minutes. If using a Dutch oven, place it inside the oven while preheating. Flip the dough onto parchment paper and score it with a sharp blade.
- Bake with steam:
- Dutch oven: Bake covered for 20-25 minutes, then uncovered for 15-20 minutes.
- Pizza stone: Bake for 40-45 minutes total, adding steam in the first 20 minutes.
- Cooling & Storing – Let the bread cool completely before slicing to set the crumb properly. Store at room temperature, wrapped in a towel or paper bag, for up to 3 days. If storing longer, freeze in slices and reheat for a fresh-baked texture.
- Recipe for Sourdough Starter
- Easy Beginners’ Sourdough Bread Recipe
- Whole Wheat Sourdough Bread
- Sourdough Loaf Bread
- Rosemary Focaccia Bread


Frequently asked questions
This sourdough bread stays fresh for 2-3 days at room temperature before it starts to dry out. The crust may harden slightly over time, but the inside will remain soft if stored properly.
Store the bread at room temperature, wrapped in a clean kitchen towel or in a paper bag to maintain the crust while keeping the inside soft. Avoid plastic bags unless you prefer a softer crust. A bread box also helps regulate moisture and keeps it fresh longer.
Yes! Sourdough freezes well. To freeze, slice the bread and place it in an airtight bag or wrap it tightly in plastic wrap and foil. Freeze for up to 3 months. When ready to eat, toast slices straight from the freezer or let the whole loaf thaw at room temperature before reheating in the oven at 325°F (165°C) for 10-15 minutes.
A hard crust forms due to long baking times, high temperatures, or lack of steam in the oven. If your crust is too thick, try baking with steam for the first 20 minutes, reducing the baking time slightly, or wrapping the loaf in a kitchen towel after baking to soften the crust. Using all-purpose flour instead of bread flour can also result in a slightly thinner crust.
Yes! To bake two loaves, simply double all ingredients and divide the dough into two equal portions after bulk fermentation. If baking in a Dutch oven, you may need to bake one loaf at a time unless you have two Dutch ovens. If baking on a pizza stone, space the loaves apart and ensure your oven is large enough to allow proper air circulation.
Underproofed: The dough feels dense, tight, and doesn’t hold an indentation when gently poked. If baked, it may have a dense crumb with few air pockets and poor oven spring.
Properly Proofed: The dough has risen about 50-75%, feels slightly puffy, and springs back slowly when pressed with a finger. This gives the best oven spring and an airy crumb.
Overproofed: The dough looks very bubbly and deflates easily when touched. If baked, it may spread too much, resulting in a flat loaf with a tight crumb and little oven spring.
Sourdough bread with All Purpose Flour
This sourdough bread is made with all-purpose flour, proving that you don’t need specialty ingredients to bake a great loaf. It has a crisp crust, a soft, chewy crumb, and a deep, complex flavor from slow fermentation. With a manageable 70% hydration, it’s perfect for both beginners and experienced bakers.
Video
Ingredients
- 500 grams (4 cups) All-purpose flour (preferably 11-12% protein)
- 350 grams (1½ cups) Water (room temperature or warm, about 80-85°F / 26-29°C)
- 100 grams (½ cups) Active sourdough starter (100% hydration)
- 10 grams (1½ tsp) Kosher salt
- Extra flour for dusting and shaping
Method
- Mix & Autolyze – In a large bowl, mix the flour and most of the water until no dry flour remains. Cover and let it rest for 30-60 minutes to allow the flour to absorb the water.500 grams All-purpose flour, 350 grams Water
- Add Starter & Salt – Add the sourdough starter and mix well until incorporated. Dissolve the salt in the reserved water and mix it into the dough. Use stretch and folds or the Rubaud mixing method to combine fully.100 grams Active sourdough starter, 10 grams Kosher salt
- Stretch & Folds – Every 30 minutes for the first 2 hours, perform stretch & folds to strengthen the gluten.
- Bulk Fermentation – After the last stretch and fold, let the dough ferment undisturbed at room temperature (21-24°C / 70-75°F) for 4 hours until it increases by 50-75% in volume.
- Pre-Shape & Bench Rest – Lightly flour your work surface. Turn out the dough and gently pre-shape into a round or oval. Let it rest uncovered for 20-30 minutes to relax the gluten.Extra flour for dusting and shaping
- Final Shaping & Cold Proofing – Shape the dough into a tight boule or batard, creating good surface tension. Place it into a floured banneton or a towel-lined bowl. Cover and refrigerate overnight for a cold proof (8-16 hours) to develop flavor.
- Preheat and Score – Preheat the oven to 475°F (245°C) for at least 45-60 minutes. If using a Dutch oven, place it inside the oven while preheating. Flip the dough onto parchment paper and score it with a sharp blade.
- Bake with steam: Dutch oven: Bake covered for 20-25 minutes, then uncovered for 15-20 minutes. Pizza stone: Bake for 40-45 minutes total, adding steam in the first 20 minutes.
- Cooling & Storing – Let the bread cool completely before slicing to set the crumb properly. Store at room temperature, wrapped in a towel or paper bag, for up to 3 days. If storing longer, freeze in slices and reheat for a fresh-baked texture.
Notes
- Use high-protein all-purpose flour: Since all-purpose flour has less gluten than bread flour, choose one with at least 11-12% protein for better structure. Lower-protein flour may result in a softer dough that spreads more.
- Be gentle with stretch and folds: All-purpose flour develops gluten more slowly than bread flour, so stretch and fold carefully to build structure without overworking the dough. Aim for 3-4 sets of stretches and folds during bulk fermentation.
- Create good surface tension during shaping: A well-shaped dough holds its form better, preventing spreading in the oven. When shaping, pull the dough tightly without tearing to help it maintain its structure.
- Refrigerate overnight for better flavor and handling: Cold-proofing in the fridge for at least 8 hours improves flavor and makes the dough easier to score. If the dough spreads too much, chilling it for 15-20 minutes before baking can help firm it up.
- Bake with steam for a crisp crust: If using a pizza stone, place a pan with ice cubes or boiling water in the oven to create steam. If using a Dutch oven, bake with the lid on for the first 20-25 minutes to trap moisture.
- Let the bread cool completely before slicing: Cutting into warm bread releases trapped steam, making the crumb gummy. Allow it to cool for at least an hour for the best texture.
Troubleshooting 70% Hydration Sourdough with All-Purpose Flour
- Dough is too sticky and hard to handle: All-purpose flour absorbs less water than bread flour, making the dough feel stickier. Work with wet hands instead of adding flour, and let the dough rest in the fridge for 15-20 minutes before shaping if it’s too soft.
- Loaf spreads instead of rising: Weak gluten development or shaping can cause the dough to flatten. Make sure to stretch and fold properly during bulk fermentation and create good surface tension when shaping. If needed, chill the shaped dough for 15 minutes before baking.
- Poor oven spring (loaf doesn’t rise much in the oven): This can be caused by overproofing, underproofing, or not preheating the oven properly. Make sure the dough is proofed just until slightly puffy, and bake it in a fully preheated oven with steam for the first 20 minutes.
- The crust is too thick and hard: Baking too long or without enough steam can lead to an overly thick crust. Ensure you use a covered Dutch oven or a steam pan in the first half of baking, and if needed, reduce the baking time slightly.
- Scoring disappears in the oven: If the cut seals up during baking, the dough may be overproofed or not shaped tightly enough. Score at a 30-45° angle, at least ½ inch deep, and bake straight from the fridge for better definition.
- Crumb is too dense or gummy: Underproofing, slicing too soon, or excess moisture can cause a dense texture. Ensure the dough rises 50-75% during bulk fermentation, and let the bread cool completely before slicing to allow the crumb to set properly.
- The loaf has large air pockets at the top and a dense bottom. This happens when shaping traps air unevenly. Try degassing the dough slightly while shaping and ensure even tension for a more uniform crumb.
Equipment you will need


Nutrition
Tried this recipe?
Mention @veenaazmanov_kitchen or tag #veenaazmanovkitchen!


Don’t lose this recipe! Save it for Later!
📌 Save this Recipe for later on Pinterest so you can easily find it again.
⭐ Add Veena Azmanov Kitchen to your Google Preferred Sources.
It helps Google show you more of our recipes.
📧 Subscribe for new recipes delivered to your inbox.
🎥 Follow us for more recipes


I loved making my own bread! Thanks for all the detailed steps!
I love that you used APFlour this is great since that’s what I use all the time and we love this bread thanks so much!
This was so incredible. The instructions were absolutely perfect. Thank you!!
Thank you Tracy
I have lots of friends who have been trying different sourdough recipes lately and I can’t wait to share this one with them! Thank you!
This sour dough bread looks perfect. Thanks for the recipe.pinned to try this soon.
This is such a great recipe! I love how easy you made it with all the detailed step by step instructions. Thanks!
Thank you, Danielle. Happy you found this one useful.
We loved this bread it was easy and flavorful and will make it again over store-bought now
Thank you for the lovely feedback, Claudia. Happy you found it easy.
This came out perfectly! Thank you for such an informative post!
Thank you for the lovely feedback. Kris.
Homemade bread is so much tastier than shop bought. This sourdough recipe was great, especially as it’s made with all-purpose flour!
I couldn’t believe how easy this bread was to make! I had never made sourdough bread from scratch before I found this recipe, but I think I’ll be making it a lot more often at home (vs. buying from the store) now!
Thank you, Anjali. Happy you found it easy.