Homemade Pita Bread Recipe (Soft, Fluffy & Easy)
 Prep Time 10 minutes Cook Time 24 minutes Total Time 2 hours 4 minutes


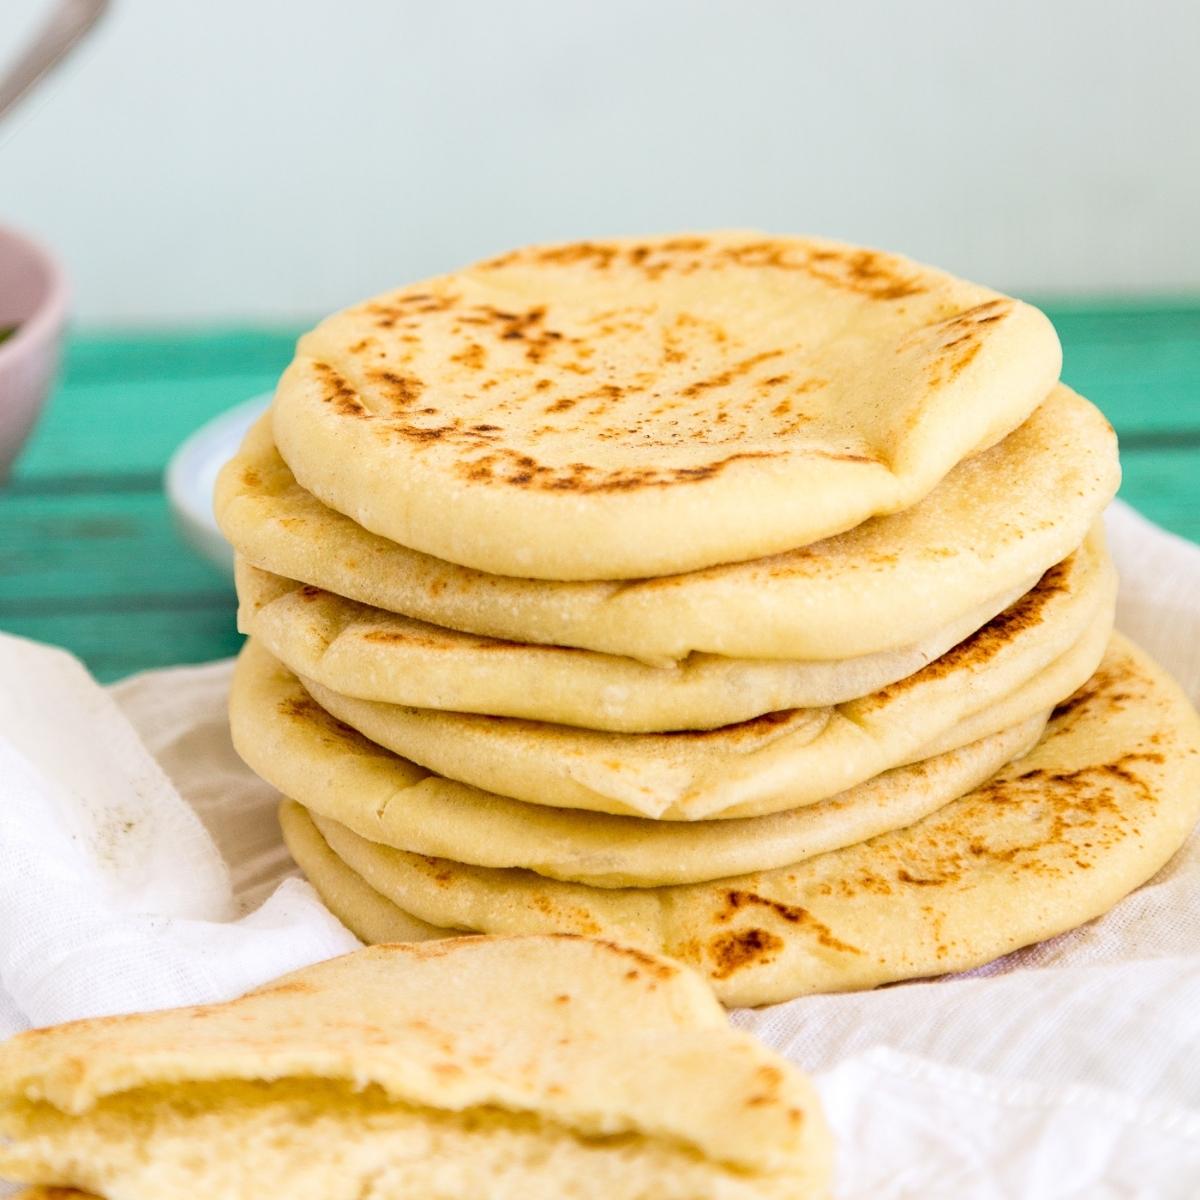
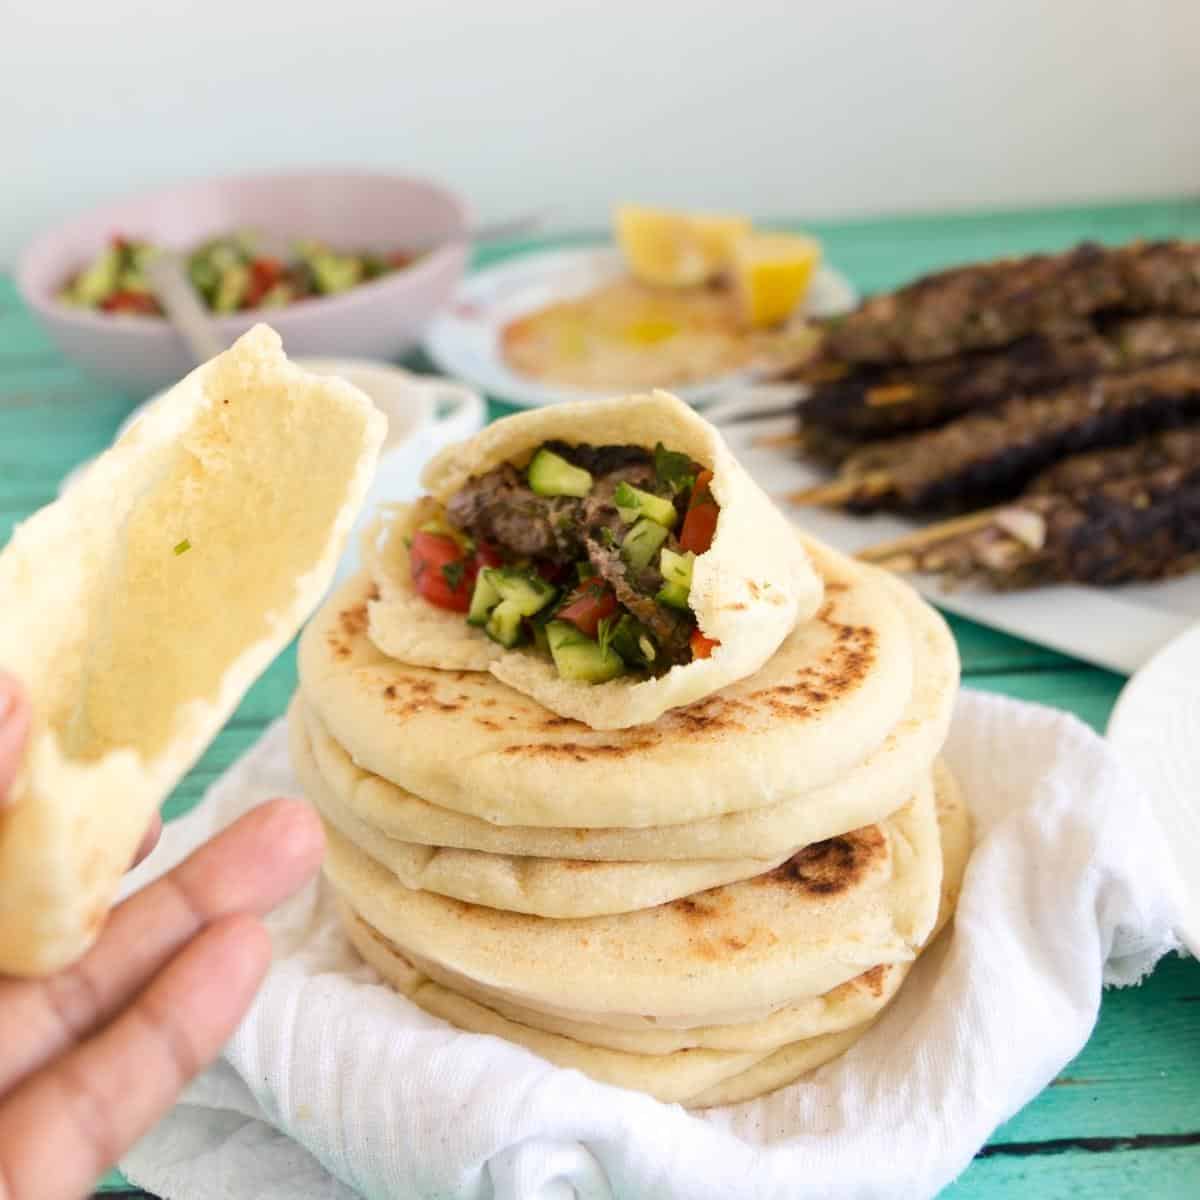
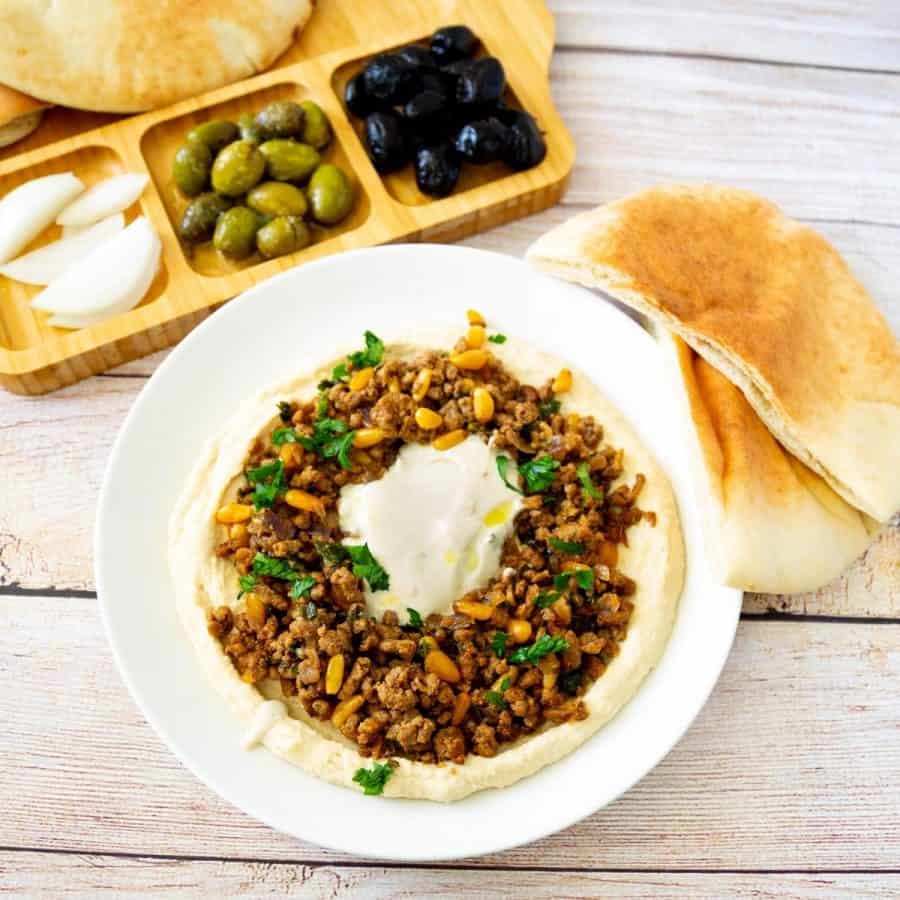
This easy homemade pita bread recipe makes soft, fluffy pitas that puff beautifully every single time. Whether you cook them on the stovetop or bake them in a hot oven, you’ll get warm, pillowy pita pockets perfect for stuffing with hummus, falafel, gyros, kebabs, and more. If your pita has ever turned out flat or dry, I’ll show you exactly how to get that perfect puff.
I actually didn’t grow up eating pita every day. In India, it was more of a treat — something my mom would make occasionally when she cooked Middle Eastern food like hummus, tahini, shakshuka for weekend breakfast or babaganoush, kebabs, or falafel for lunch or dinner.. Fast forward to me marrying a Jewish Israeli, and suddenly pita wasn’t just a treat — it was the bread of daily life.
For my husband, pita is what chapati is for Indians — it’s on the table with almost every meal. So when we started a family, I knew I wanted my kids to experience both cultures at home: the Indian flatbreads I grew up with, and the Israeli/Middle Eastern breads their father grew up with. That’s how I learned to make fresh pita bread from scratch, experimenting until I could get that soft, fluffy pocket just right.
Why will you love this pita bread recipe
- Cook pita bread without an oven – stovetop option included
- Uses everyday ingredients you already have in your pantry
- Makes soft pita with pockets that won’t collapse
- Freezer-friendly and easy to reheat
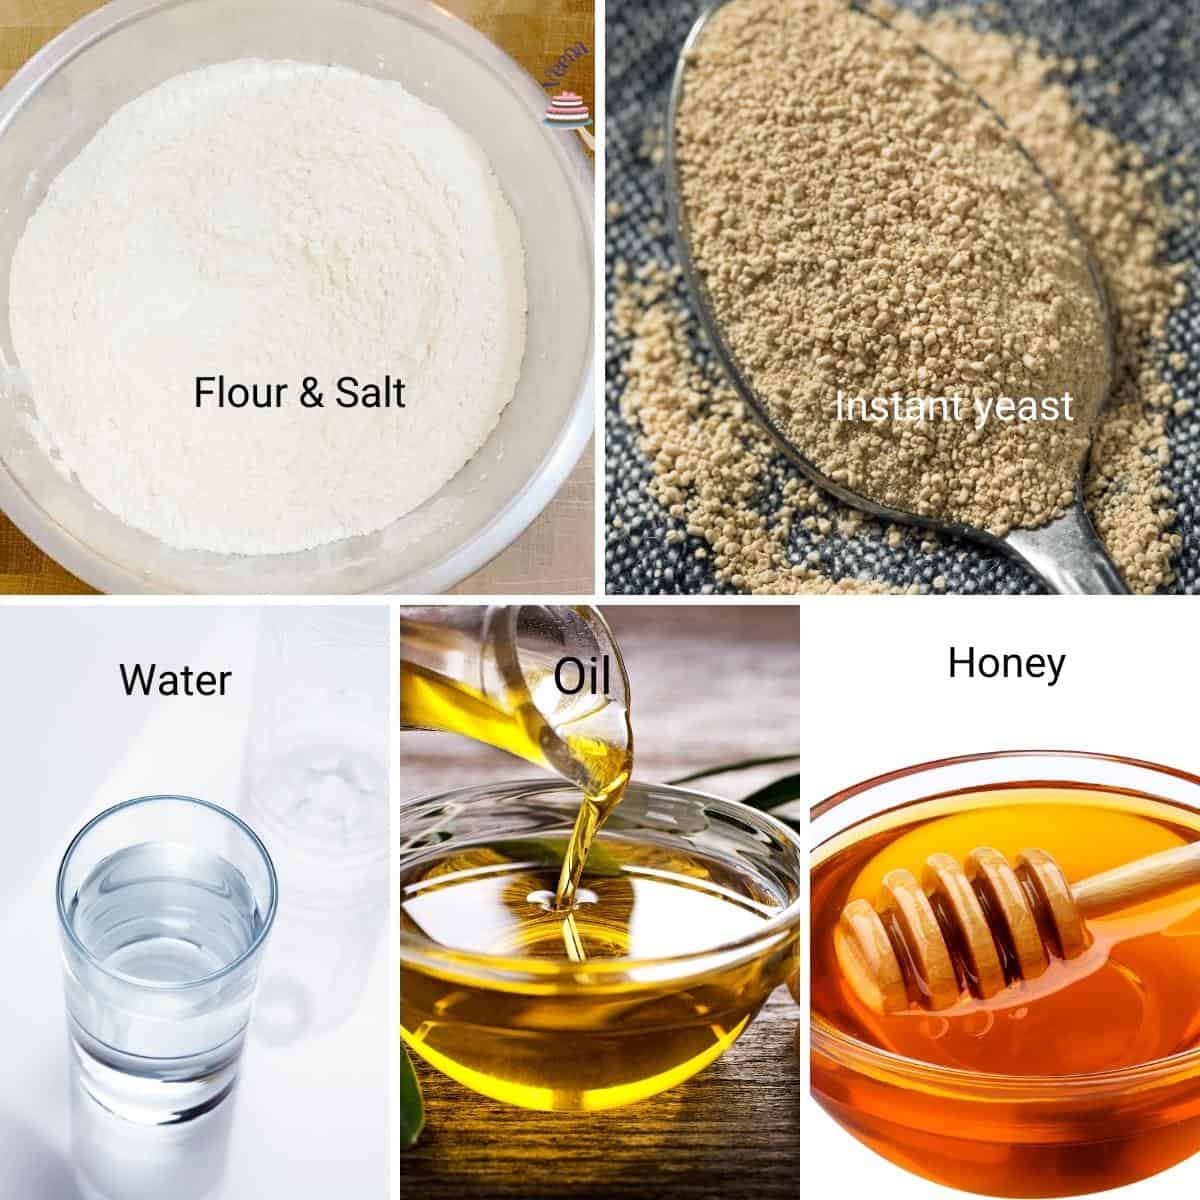
Ingredients to make pita bread
- Bread flour – for chewy, bakery-style pita. But, you can also use 50% bread with 50% all-purpose flour or just 100% all-purpose flour. For a whole wheat pita bread, swap half the bread flour with whole wheat.
- Instant dry yeast – I like to use instant dry yeast because I’ve always had great success with it. If you have to use active dry yeast, you will need 2 1/4 tsp or one packet. And if you use fresh yeast, you will need about 21 grams.
- Water – The temperature of the water is an important factor in bread making. It has to be warm, not hot. Usually about 110°F, but you don’t really need a thermometer. The temperature is around the same as when you give milk to a baby. So, think, if this water were to be fed to a baby, would it be warm enough?
- Honey – I think the flavor of honey works great with pita, but you can definitely use a tbsp of sugar instead. While it adds flavor, it also helps nourish the yeast.
- Olive oil – Adds a nice flavor and also nourishes the yeast. You can use other oils as well, such as coconut, avocado, etc.
Step-by-step: Easy Homemade pita bread recipe
Pita bread dough
- Yeast – In a small bowl, combine lukewarm water, yeast, honey, and oil. Stir well and set aside.
- Combine – In the bowl of a stand mixer with the dough hook attachment, combine the flour and salt. Add the yeast mixture and combine on medium-high speed until all the flour is incorporated. Scrape the sides of the bowl.
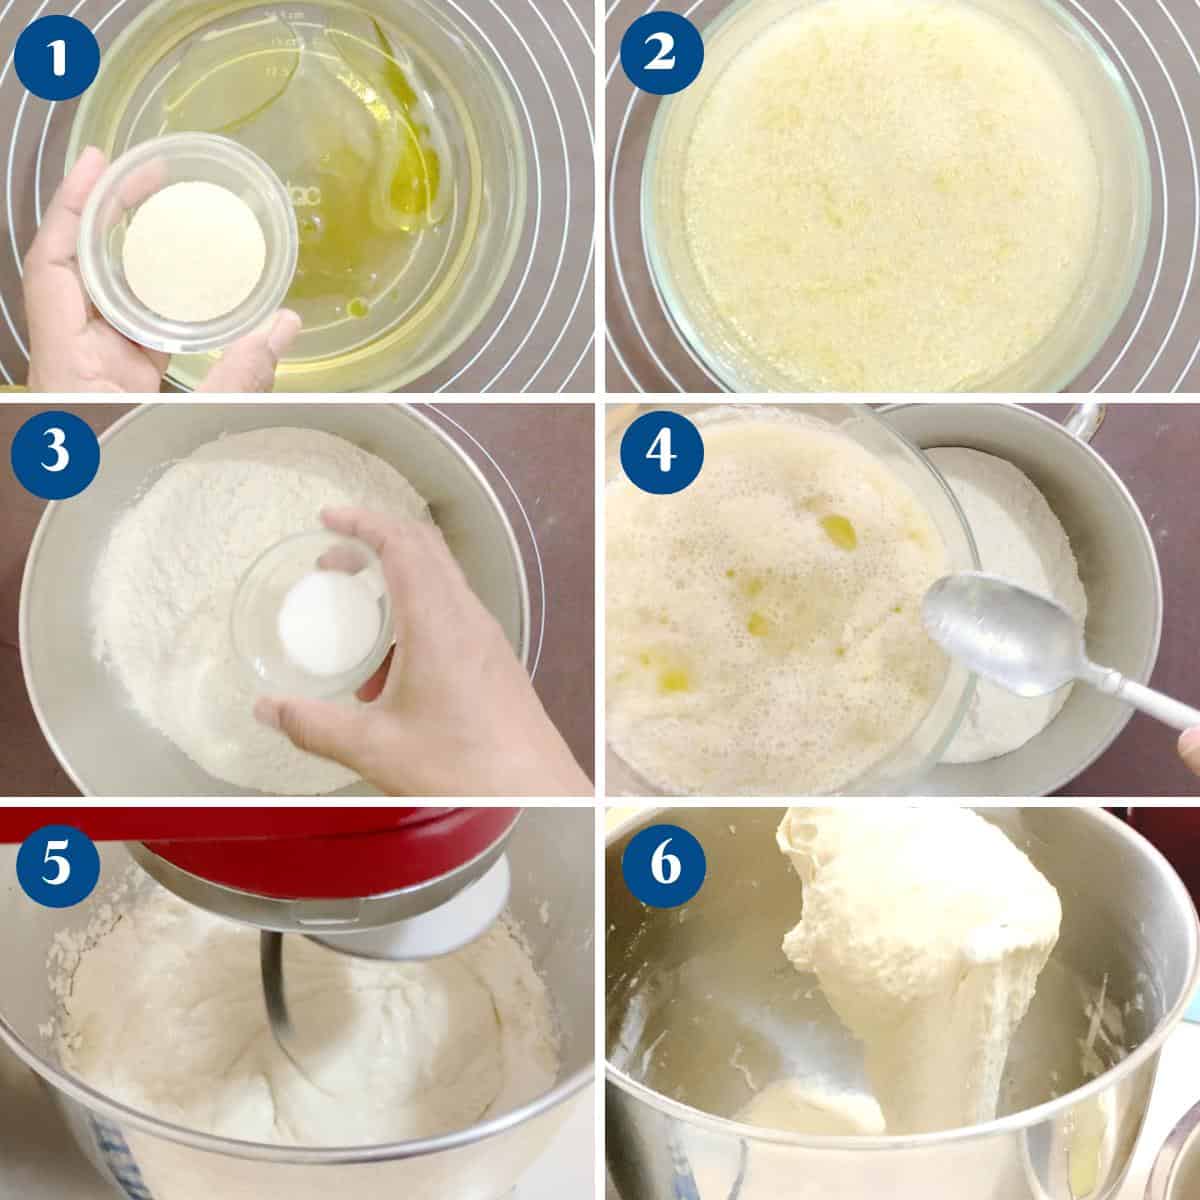
- Knead – Continue to knead on medium speed for 15 to 18 minutes until you have a soft, elastic dough.
Pro tip – You can also knead by hand on a lightly floured surface for about 20 to 25 minutes. When you press the dough with your fingers, the dough should spring back. - Rise – Shape the dough into a ball and place it in an oiled bowl. Cover with plastic wrap and rest in a warm place for about 60 to 90 minutes or until doubled in volume.
Pro tip – In winter, you may need 90 minutes or more, but in summer, the dough may double in 45 minutes. If you can’t attend to it at that moment, punch down, reshape, and let it double in volume again.

- Divide – When doubled in volume, transfer to a well-dusted floured surface. De-gas, reshape into a ball. Then roll it into a small log. Using a dough scraper, divide this log into four portions, and then divide each of those portions into three again. This should give you 12 portions. Shape each portion into a smooth ball.
Pro tip – I am making 12 pita bread, but you can make these bigger by dividing the dough into fewer portions.
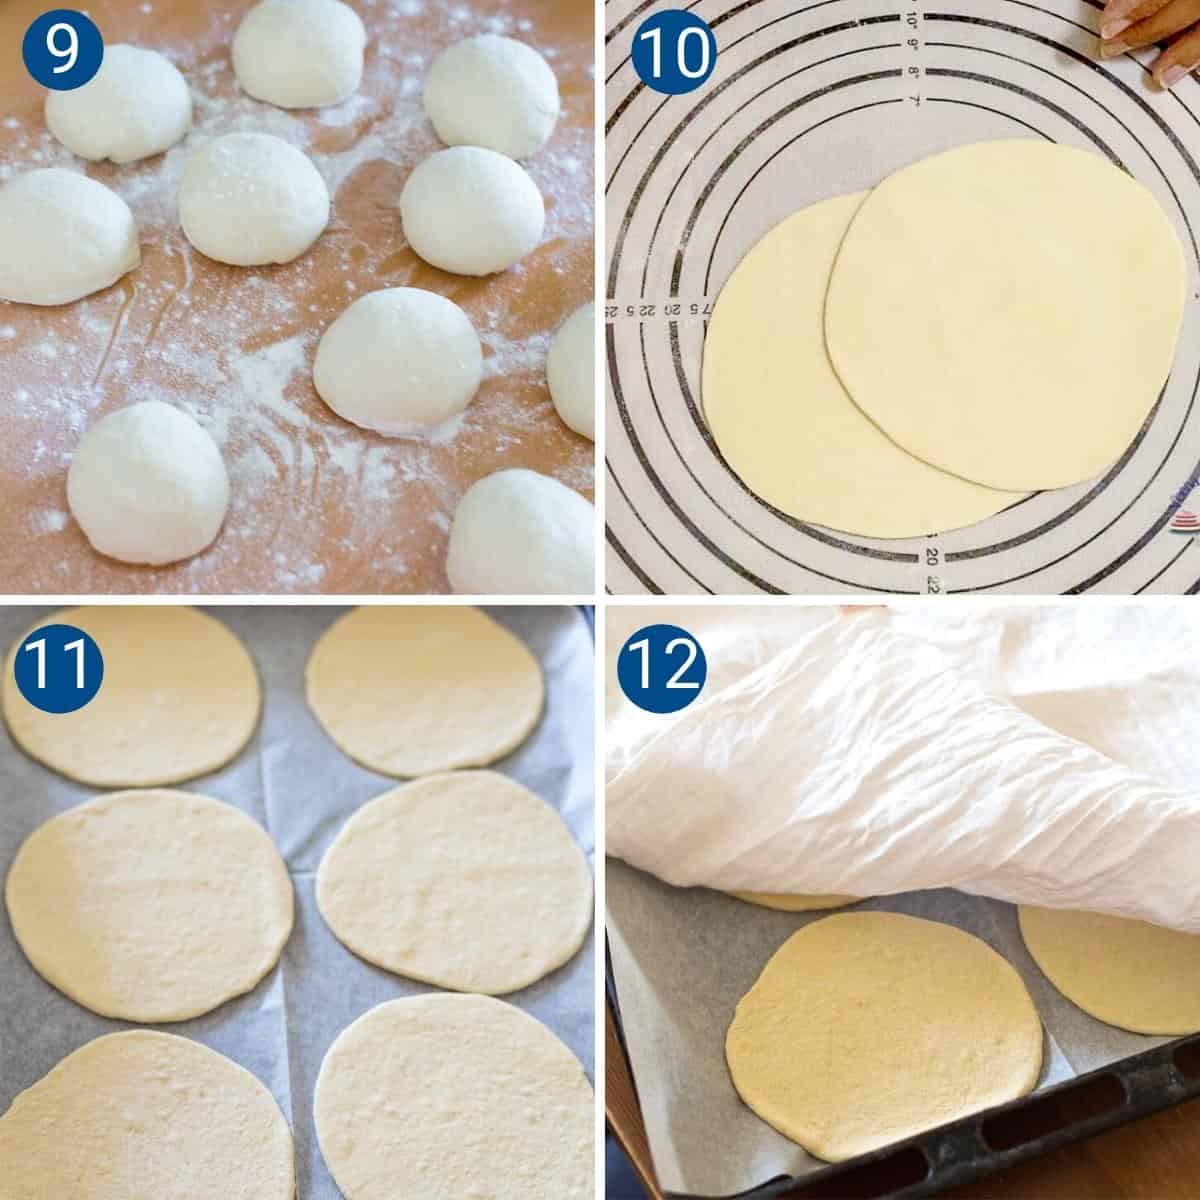
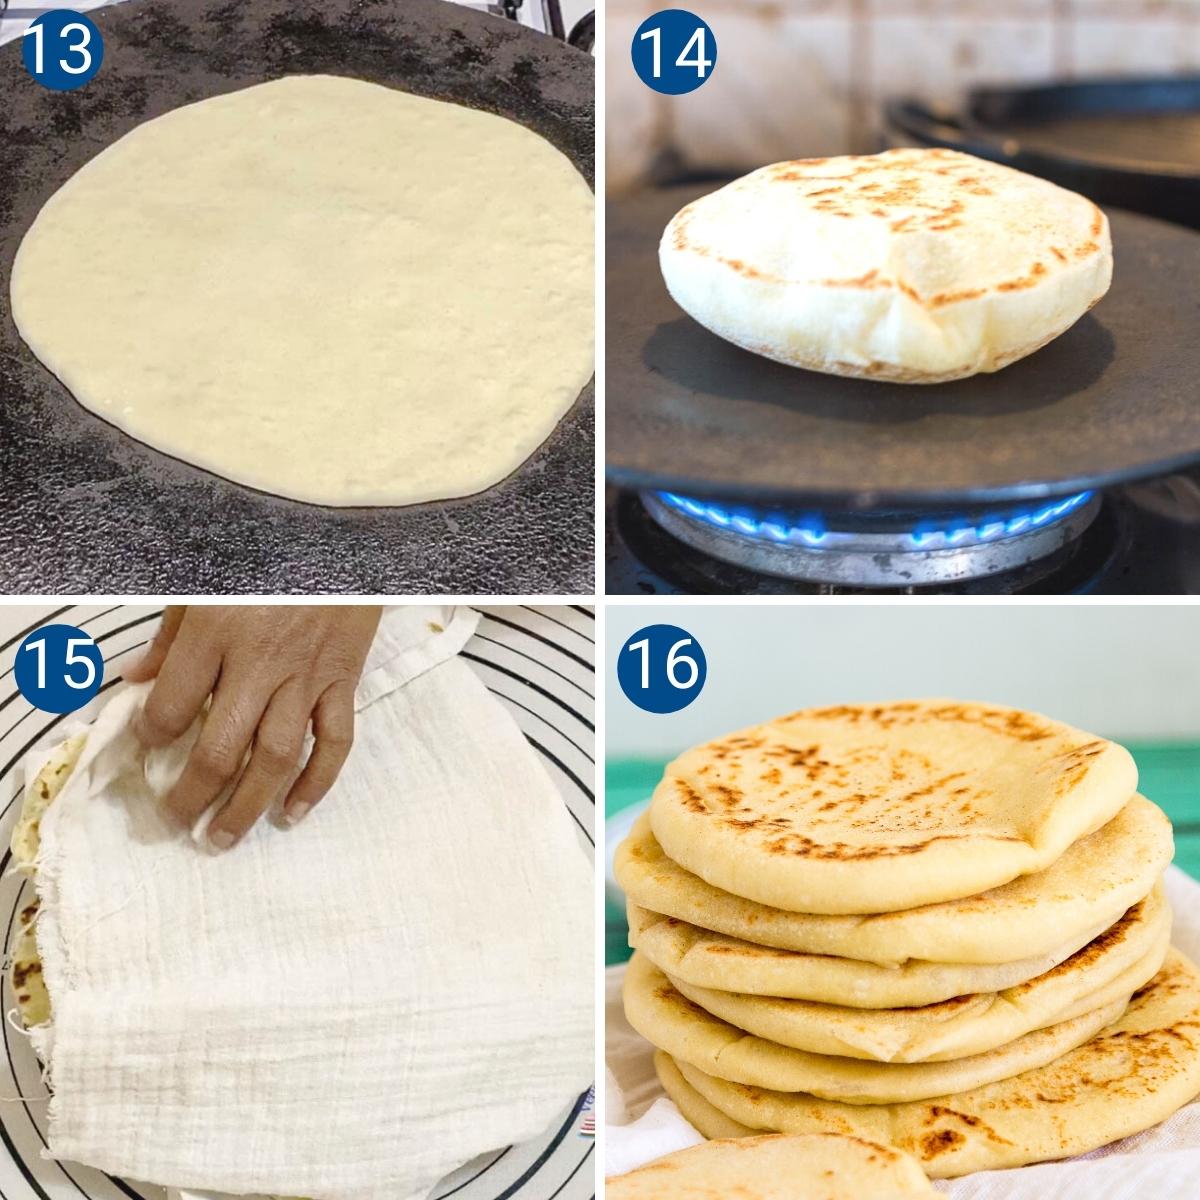
- Roll – Shape each portion into a smooth ball. Let rest for 5 to 10 minutes, then using a rolling pin, roll each dough ball into a 6-inch disc. Do not roll them too thin, as we do want some thickness for the pocket to appear.
Pro tip – Shaping them will ensure you have a smooth pita. Resting helps the gluten relax and makes working with dough easy. Otherwise, you will find that the disc does not get larger. - Proof – Place all the discs on a baking sheet with parchment paper, lightly dusted with flour to prevent sticking. Let rest for 30 minutes, covered with a clean kitchen towel or cheesecloth.
Pro tip – This resting is important; otherwise, you will get flatbread, not pita. The resting will let the yeast rise, giving us a soft bread-like flatbread – pita!
Cook – Stovetop (No Oven Needed!)
- Heat a cast-iron skillet or frying pan on high heat.
- Each pita will take about 2 minutes to cook, 30 seconds at a time on each side.
- 1. Place the pita bread on the skillet and let it cook for 30 seconds.
- 2. Flip once – let cook another 30 secs.
- 3. Flip again – cook for 30 seconds – the pita should now start to puff up.
- 4. And flip again – the pita should now puff up completely – cook for 30 secs or less.
Cook- Pizza stone (for bakery-style pita)
- Heat the oven to 500°F/ 260°C Gas Mark 10 with the pizza stone for at least 20 minutes.
Pro tip – We need a hot oven for a short cooking time; otherwise, the pita will become dry. - Place two to three pitas on the hot pizza stone. Bake for two minutes until puffed up.
Pro tip – Work with a number that you are comfortable working with. Personally, I don’t put more than three at a time. - Use the broiler if the pita is pale in color.
Pro tip – Do not overheat the pita with the broiler on, as it can make the pita dry.

Wrap and keep warm
- As soon as the pita bread is cooked or baked. Keep it wrapped in a clean kitchen towel or cheesecloth to keep them soft.
- These will stay at room temperature for 2 to 3 days.
You can freeze them for over a month.
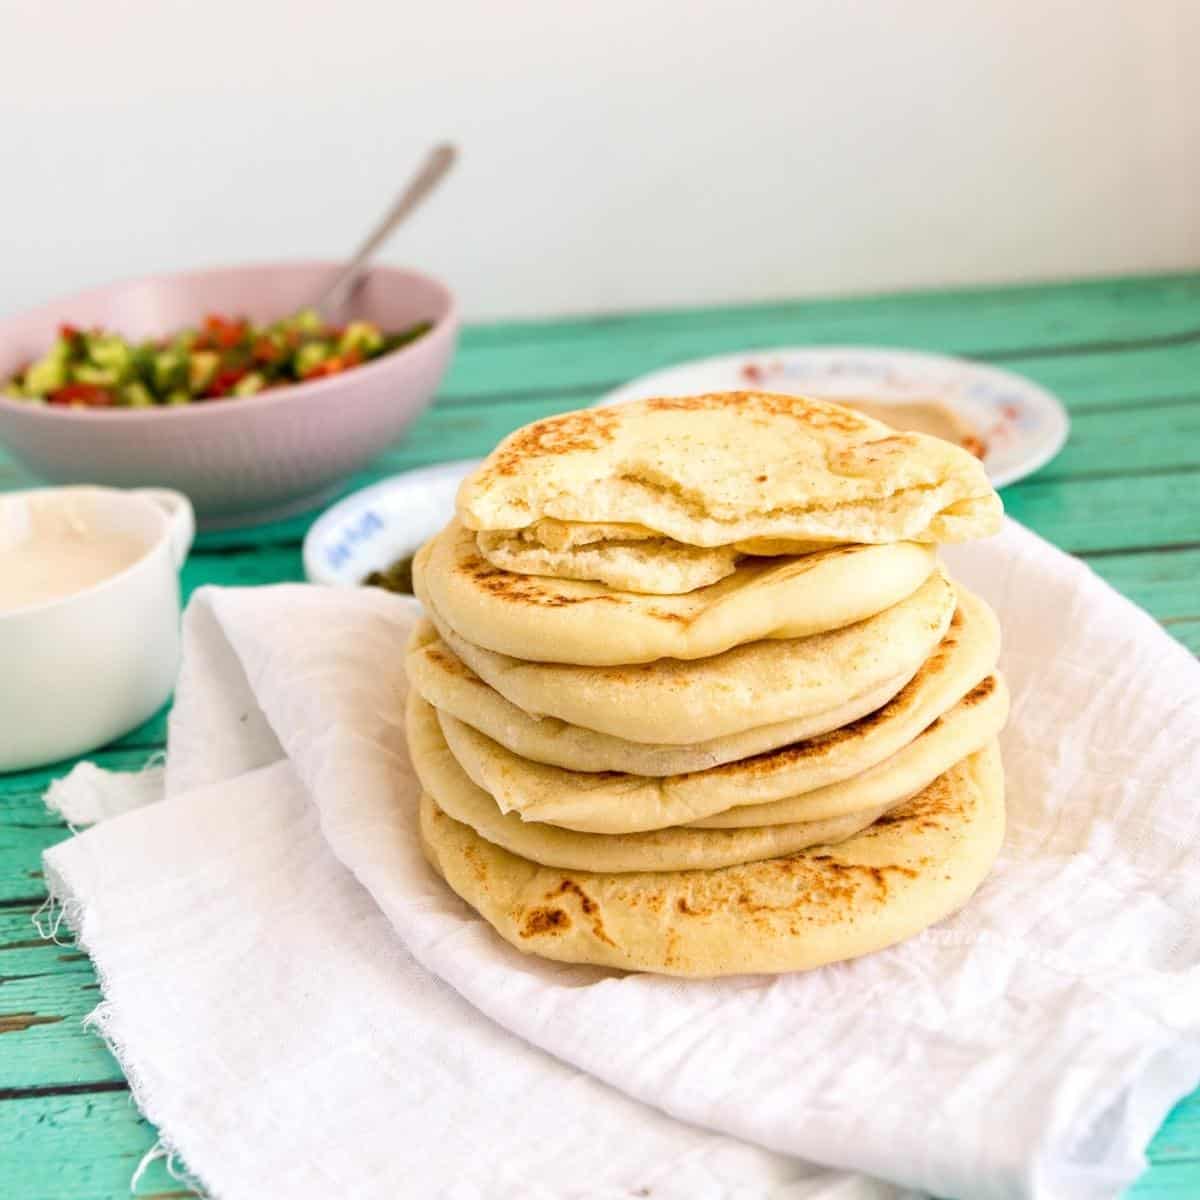
Soft Fluffy Homemade Pita Bread Recipe
This homemade pita bread makes a soft, chewy, and delicious pita with a gorgeous pocket using ingredients you probably already have in your pantry. Use these to stuff with your favorite foods such as hummus, falafel, gyros, kebabs, and more. The best part is you can make these on the stovetop or in the oven.
Video
Ingredients
- 320 g (1⅓ cups) Warm water
- 9 g (2¼ tsp) Instant dry yeast (1 sachet)
- 30 g (2 tbsp) Honey
- 30 g (2 tbsp) Olive oil
- 12 g (2 tsp) Salt
- 600 g (4¾ cups) Bread flour or 50% Bread and 50% all-purpose flour
Method
- Yeast – In a small bowl, combine lukewarm water, yeast, honey, and oil. Stir well and set aside320 g Warm water , 9 g Instant dry yeast , 30 g Honey , 30 g Olive oil
- Combine – In the bowl of a stand mixer with the dough hook attachment, combine the flour and salt. Add the yeast mixture and mix on medium-high speed until all the flour is incorporated. Scrape the sides of the bowl.600 g Bread flour , 12 g Salt
- Knead – Continue to knead on medium speed for 15 to 18 minutes until you have a soft, elastic dough.
- Rise – Shape the dough into a ball and place it in an oiled bowl. Cover with plastic wrap and rest in a warm place for about 60 to 90 minutes or until doubled in volume.
- Divide – When doubled in volume, transfer to a well-dusted floured surface. Punch down and reshape into a ball. Then roll it into a small log. Using a dough scraper, divide this log into four portions, and then each of those portions into three again. This should give you 12 portions. Shape each portion into a smooth ball.
- Roll – Shape each portion into a smooth ball. Let rest for 5 to 10 minutes, then using a rolling pin, roll each dough ball into a 6-inch disc. Do not roll them too thin, as we do want some thickness for the pocket to appear.
- Prove – Place all the discs on a baking sheet with parchment paper, lightly dusted with flour to prevent sticking. Let rest for 30 minutes, covered with a clean kitchen towel or cheesecloth.
- Heat a cast-iron skillet or frying pan on high heat. Each pita will take about 2 minutes to cook, 30 seconds at a time on each side.1. Place the pita bread on the skillet and let it cook for 30 seconds.2. Flip once – let cook another 30 secs.3. Flip again – cook 30 seconds – the pita should now start to puff up.4. And flip again – the pita should now puff up completely – cook 30 seconds or less.
- Heat the oven to 500°F/ 260°C Gas Mark 10 with the pizza stone for at least 20 minutes.
- Place two to three pitas on the hot pizza stone. Bake for two minutes until puffed up.
- Use the broiler if the pita is pale in color.
- As soon as the pita bread is cooked or baked. Keep it wrapped in a clean kitchen towel or cheesecloth to keep them soft.
- These will stay at room temperature for 2 to 3 days. You can freeze them for over a month.
Notes
Equipment you will need


Nutrition
Tried this recipe?
Mention @veenaazmanov_kitchen or tag #veenaazmanovkitchen!Storage
- Pita bread can dry out easily, so always keep it wrapped.
- They will stay fresh when wrapped in a cheesecloth or towel for up to 3 days.
- I prefer not to keep them in the fridge as they dry out.
- You can place them in ziplock bags and freeze them for a week.
- If wrapped well in aluminum foil, they will stay in the freezer for up to a month.

Tips – My secret to the best soft fluffy pita
- The dough must be soft, not stiff, so don’t add too much flour.
- Roll to the right thickness – too thin = flatbread, too thick = doughy pita.
- Don’t skip the rest time before cooking your pita bread; this helps them proof a little, making them fluffy.
- Always use high heat on the stovetop. This helps the steam rise, creating that pocket
- If making whole wheat pita bread, rest the dough a little longer.
- Wrap fresh pita in a towel. Retaining that steam is your secret to soft pita bread.
Troubleshooting – homemade pita
| Problem | Likely Cause | Fix |
|---|---|---|
| Pita didn’t puff | Rolled too thin, dough not rested, heat too low | Rest the dough 30 mins, roll evenly, use high heat |
| Pita is dry/hard | Cooked too long, heat too low | Keep cooking time short, use medium-high heat |
| Pita has no pocket | Not enough steam, dough too dense | Use softer dough, cover briefly while cooking |
| Pita too chewy | Overkneaded or undercooked | Knead until soft & elastic, don’t undercook |
| Burnt spots | Heat too high, skillet too hot | Lower the heat slightly, and rotate the pita while cooking |
More pita bread variations
- Cheese-Stuffed Pita Bread Recipe
- Potato Stuffed Pita Bread Recipe
- Zaatar pita bread – a generous sprinkle of the Middle Eastern spice zaatar.
- Pita chips – leftover pita can be toasted in the oven to make pita chips
- Ground beef with pita – make a flat pita with no pocket, then spread a generous amount of hummus, top with kebab-flavored ground beef, and top with tahini sauce.
- Pita with grilled chicken – make a flat pita with no pocket, then spread a generous amount of hummus, top with grilled chicken, and top with tahini sauce.


Frequently asked questions
Both are flatbreads. Pita is a Middle Eastern bread, while naan is an Indian bread. Pita is a basic bread dough, while naan dough is made with yogurt, milk, and often eggs. However, the big difference between the pita and naan is the presence of a pocket in the pita. The pita pocket is usually stuffed with things, while the Indian naan is flat and is often used as a wrap.
Pita bread is a soft, fluffy Middle Eastern flatbread known for its signature pocket. This homemade pita bread recipe makes easy pita pockets that puff beautifully whether baked in a hot oven or cooked on the stovetop. Perfect for hummus, falafel, shawarma, kebabs, and sandwiches, fresh homemade pita is softer and more flavorful than store-bought pita bread.
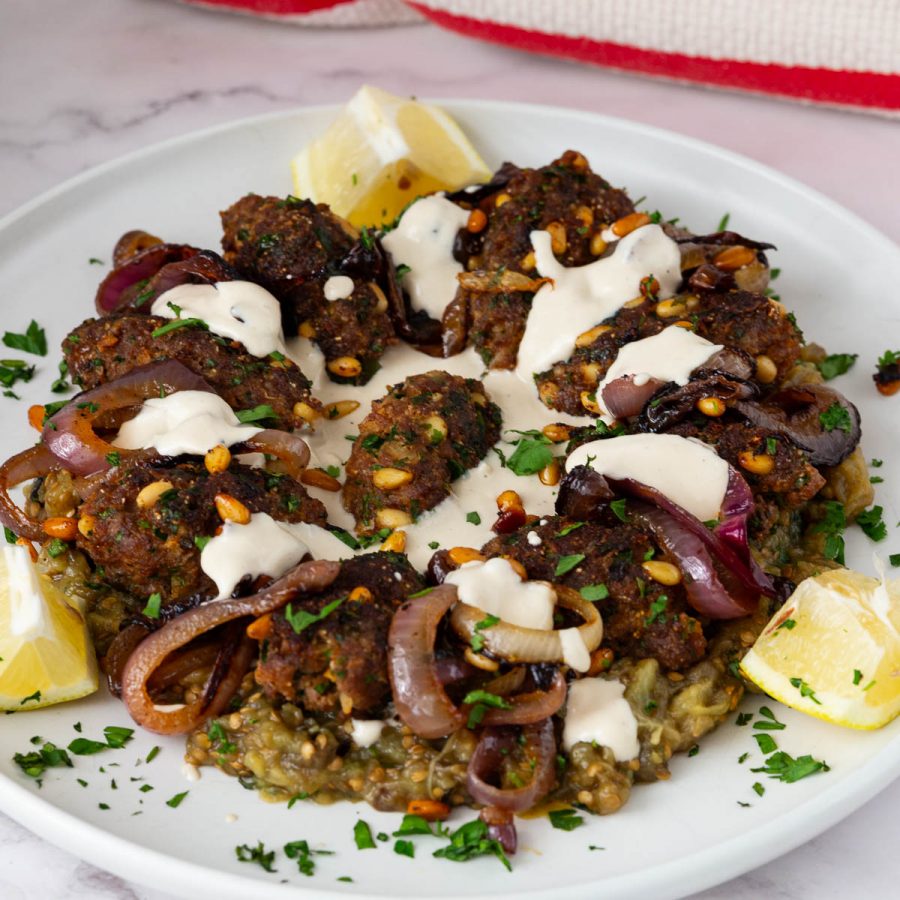
Pita bread is the basic everyday bread in the Middle East. And, it’s a staple for breakfast, lunch, and dinner as well as in-between snacks. Try my homemade hummus, tahini sauce, shakshuka, babaganosh, shawarma chicken, roasted eggplant salad, and falafel.
Fresh pita – wrap in a damp paper towel and heat for 30 seconds up to a minute.
Frozen pita – microwave from frozen for up to a minute – then lightly torch on an open flame for 30 secs on all sides (this method is my preferred as it gives soft pita just like freshly made pita).
Yes. This pita bread recipe can be made either on the stovetop in a hot skillet or in a very hot oven. Both methods create the steam needed for soft pita bread with pockets.
Usually the dough wasn’t rested long enough, rolled too thin, or the skillet wasn’t hot enough.
Yes. Replace half the flour with whole wheat for a more rustic pita. Add 1–2 tbsp extra water to keep it soft.
Always wrap fresh pita in a towel immediately after cooking. The steam helps trap moisture and keeps them soft
Whole wheat is not just nutritious, but also adds so much in terms of texture. Having said that, whole wheat means less gluten. Gluten gives pita its chewy, elastic quality, which is why we still need white flour in whole-wheat pita bread. Whole wheat may be less chewy than white pita.
The pocket in the pita is made by steam, which puffs up the dough from the bottom towards the center during cooking. When the bread is flipped, the same thing happens on the other side. When cooled, the puffed-up bread becomes flat, leaving a pocket in the middle. Hence the name pita pocket


Don’t lose this recipe! Save it for Later!
📌 Save this Recipe for later on Pinterest so you can easily find it again.
⭐ Add Veena Azmanov Kitchen to your Google Preferred Sources.
It helps Google show you more of our recipes.
📧 Subscribe for new recipes delivered to your inbox.
🎥 Follow us for more recipes


This is the perfect t recipe, I have tried many others and have not been able to get them to puff up. This one does everyone. I am thinking it’s the 15 min knead that really does it and the correct thickness of the dough.
Thank you!
Thank you, Amie, for the lovely feedback. I am so happy you enjoyed this recipe.
Day 10 done
Cooking these on the stovetop was a game changer! I got all but one pita to puff up perfectly. I rolled it to about a quarter inch thick, and that was perfect. Please…read Veena’s pro tips! She has good tips to make your pitas perfect!
Thank you, Danielle
Day 10 completed
Day 10 Done
day 10 done
Hi Veena, I have made up to the stage just before cooking, can I put them raw in the fridge to cook tomorrow night please. Thank you.
Ali, they will overproof all night in the fridge. It would be best to roll them tomorrow and then cook them.
Day 10 done
Best Pita Bread Ever! Day 10 done
The recipe has salt going in with the yeast mixture, then salt going in with the flour as well. When should the salt be added? Thanks
Liane. There is honey or sugar in the yeast and salt in the flour. Thanks