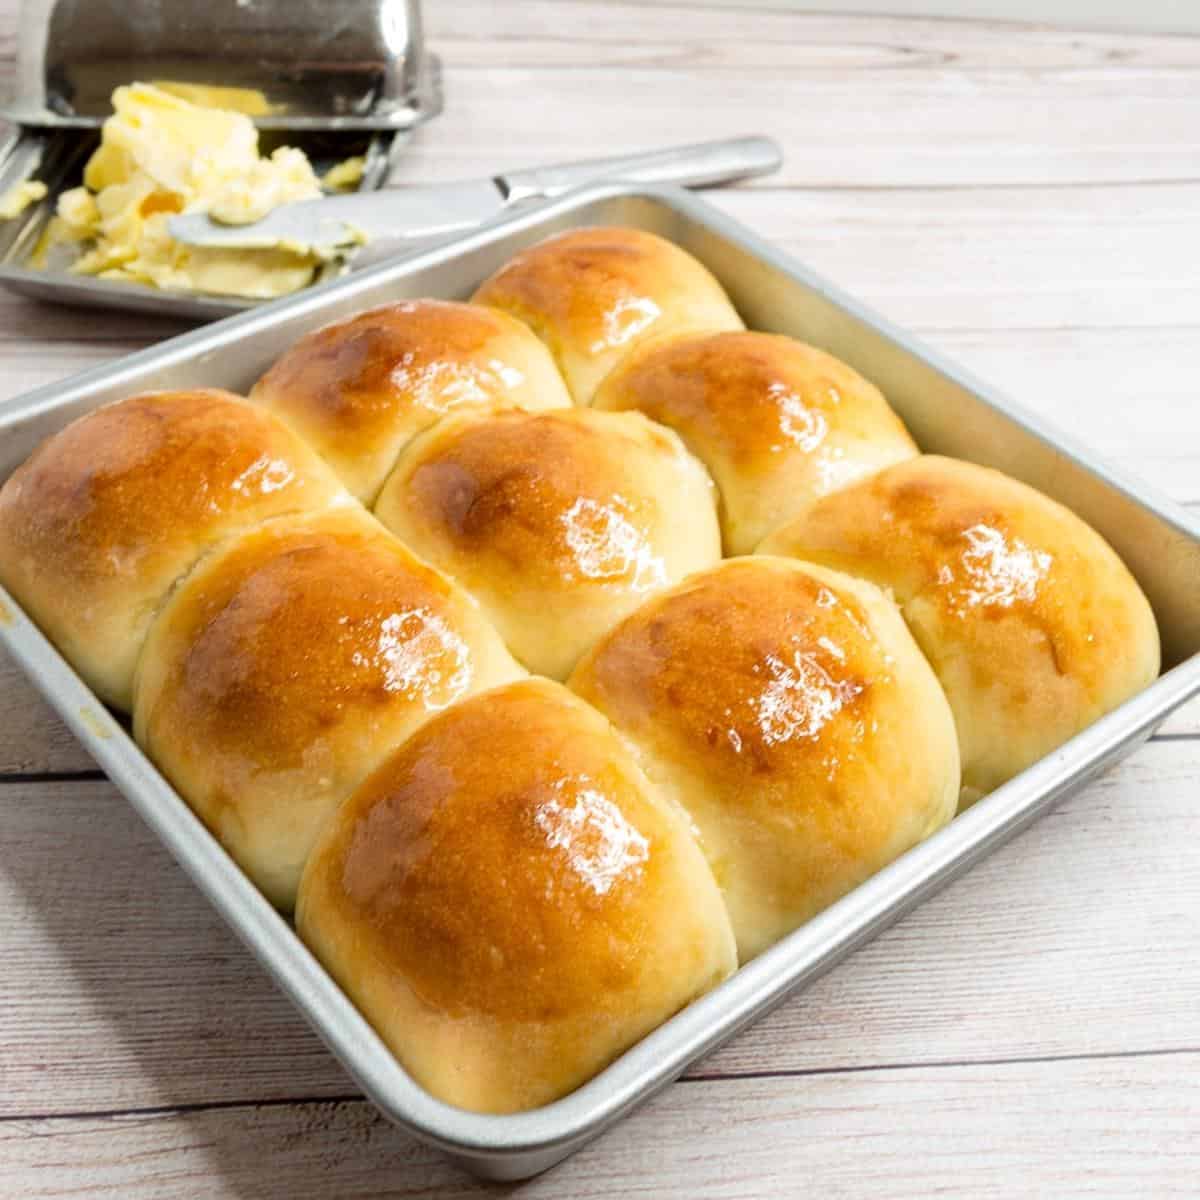
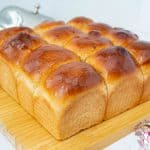
Soft and Fluffy Dinner Rolls


Buttery, fluffy, and soft dinner rolls are the best to have with any main course. This bread recipe needs only 6 ingredients, 10 minutes to prep, and 20 minutes to bake, with some proofing time in between.
Are you tired of serving store-bought, lackluster dinner rolls that barely elicit a polite nod from your guests? It’s time to take matters into your own hands and unleash your inner baker!
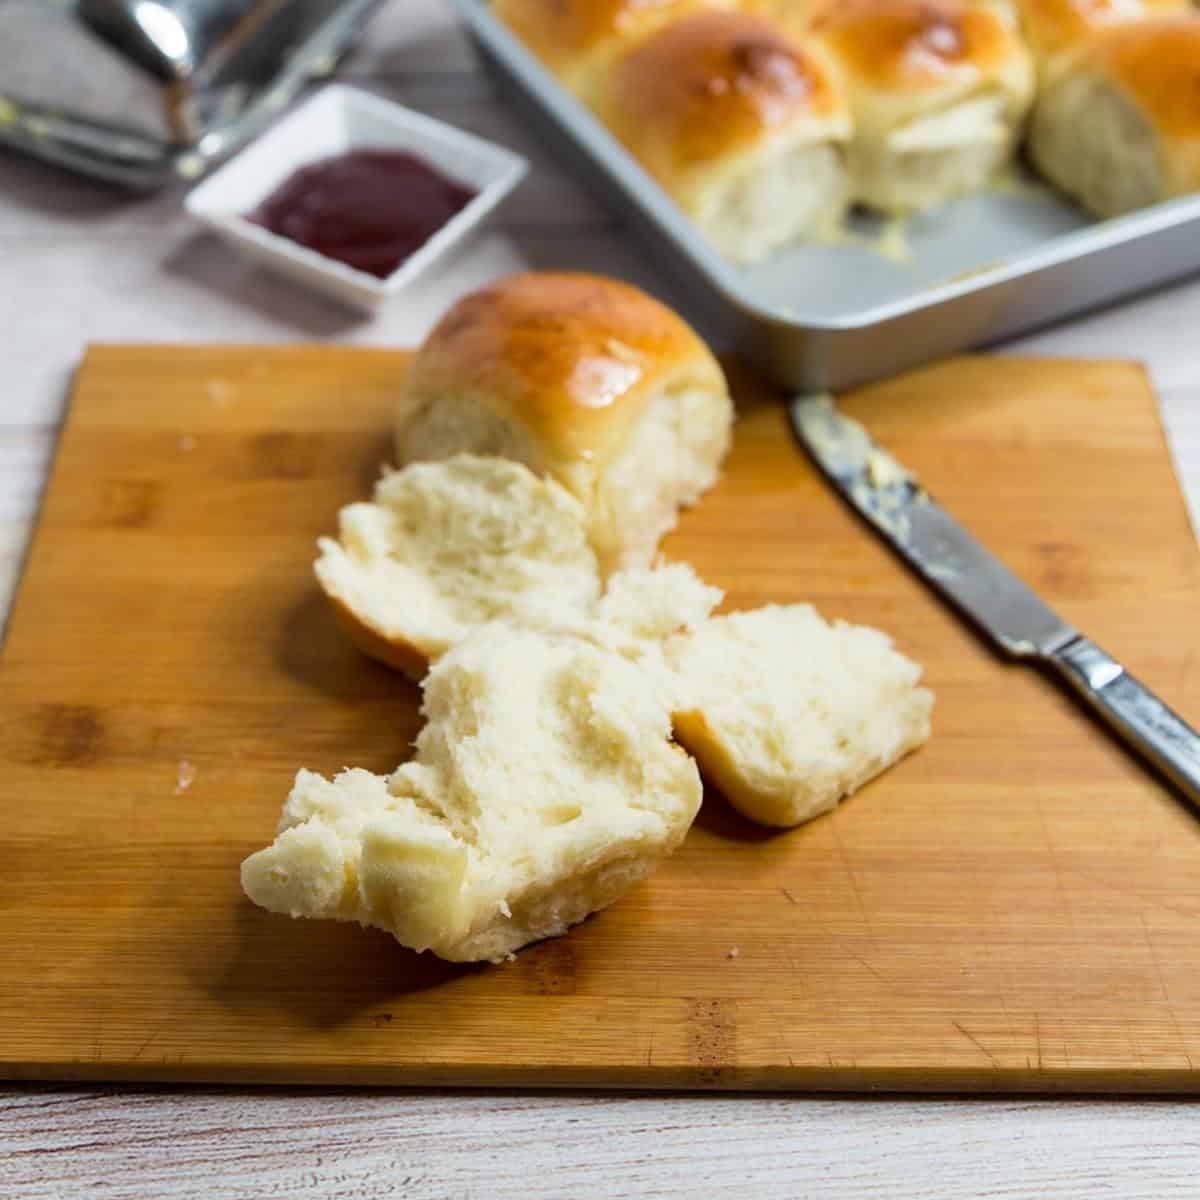
These rolls are my all-purpose bread, used for anything and everything. Kids will snack on them with butter and jam, and sometimes they make sandwiches with cold cuts and cheese. Often, I will make sliders with some chicken and cheese for dinner. We rarely have these go stale. But if I do have stale bread, then I cut it into cubes and toast it like croutons with a sprinkle of milk, butter, and parmesan. The kids feast on those croutons.
Why are these the best dinner rolls?
- First and foremost, these dinner rolls are ridiculously delicious, with a perfect balance of buttery richness and a fluffy, delicate texture.
- Best of all, most of the ingredients for these dinner rolls are simple pantry staples you always have on hand. And, because these are made without any eggs, even people with allergies can enjoy them.
- What sets this recipe apart is its simplicity. With just a handful of basic ingredients and a straightforward method, you can achieve bakery-worthy dinner rolls without any fuss. Whether you’re an experienced baker or a novice in the kitchen, this recipe is foolproof and easy to follow.
- Another reason why this recipe stands out is its versatility. You can customize these dinner rolls to suit your taste or complement any meal.
- Furthermore, these dinner rolls are perfect for any occasion. Whether you’re hosting a casual family dinner or a grand holiday feast, these rolls will elevate your meal and impress your guests.
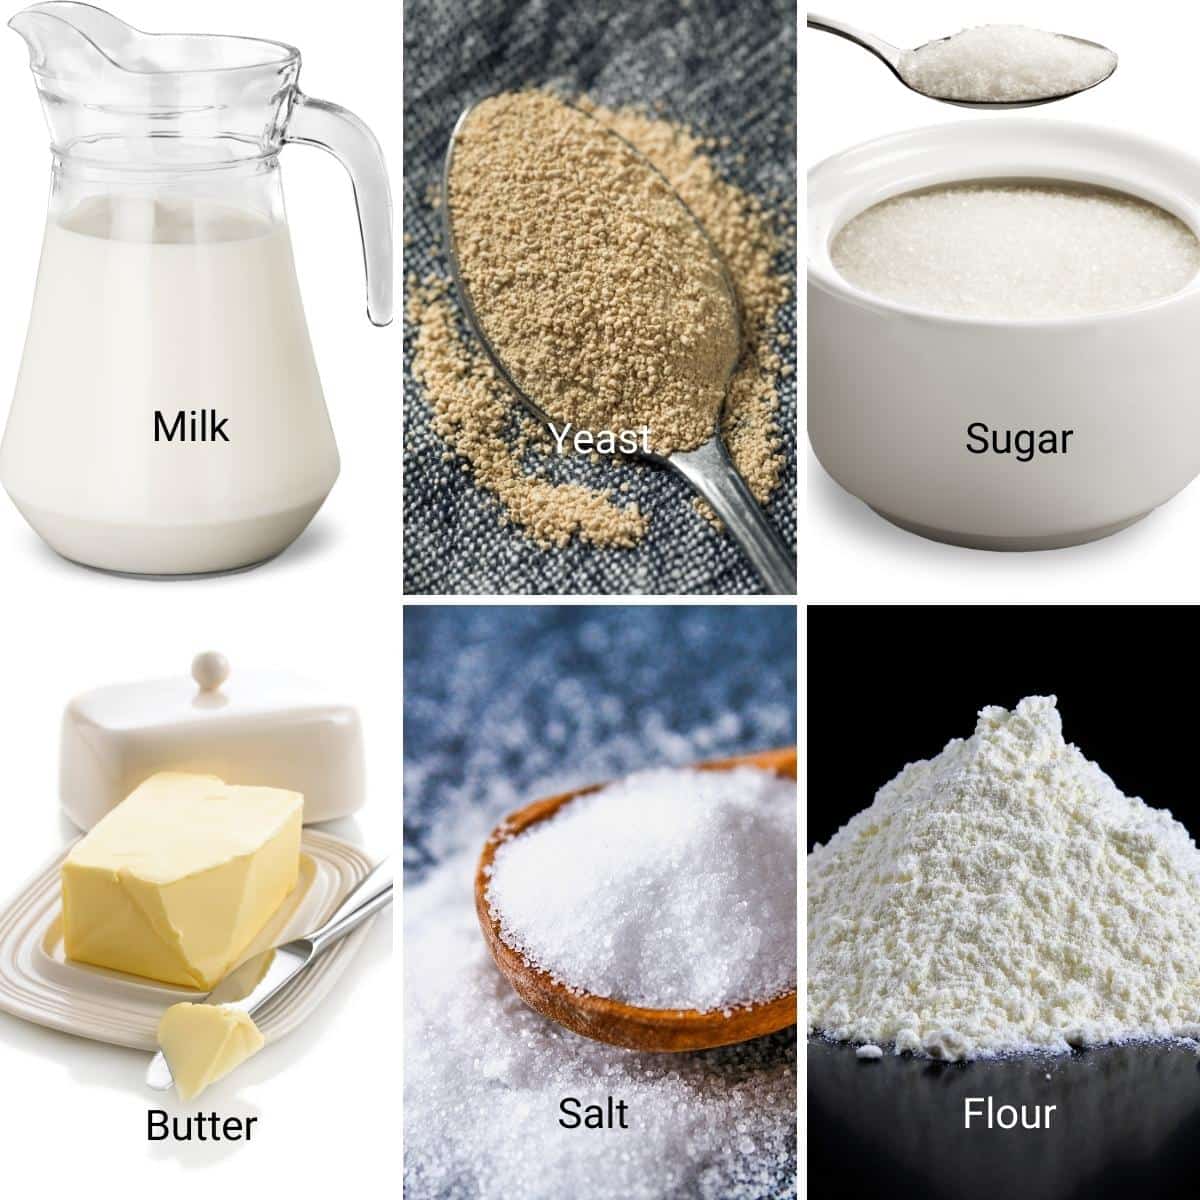
Ingredients and substitutes
- Flour – All-purpose flour yields soft, fluffy rolls with a classic pull-apart texture. If you want something a little nuttier, swap up to 50% with whole wheat flour — know the rolls will be slightly denser (still tasty, just more “wholesome bakery” than “cloud-soft”).
- Yeast – Active dry yeast is my everyday choice, but instant yeast works perfectly too, and rises a bit quicker. If you’re lucky enough to have fresh yeast, use about 14 g and simply rise the dough until it doubles — fresh yeast is more about watching the dough than the clock.
- Milk – Adds moisture and richness, which is why these rolls stay tender. Whole milk is best, but you can also use low-fat or even plant-based milks if that’s what you have. Just keep the liquid warm—not hot—so the yeast stays happy.
- Butter – Gives flavor, softness, and that gorgeous bakery smell. Unsalted is standard, but you can also use salted if that’s what’s in your fridge—just reduce any added salt slightly. Dairy-free? A good plant-based butter makes lovely rolls, too.
- Sugar – A bit of sugar balances flavor and helps the yeast wake up. You can also use brown sugar, honey, or maple syrup; each adds its own little personality. (Honey rolls are especially good with soups and stews!)
Step-by-step instructions: Best dinner rolls recipe
Dough
- Yeast – In a large bowl of the stand mixer with the dough hook attachment. Combine the warm milk (110 F), yeast, and sugar.
- Combine – Add the flour and salt. Then, combine well on medium-high speed for 2 to 3 minutes until all the flour is well incorporated.
Pro tip – If you do not like kneading by hand, I highly recommend using a stand mixer.
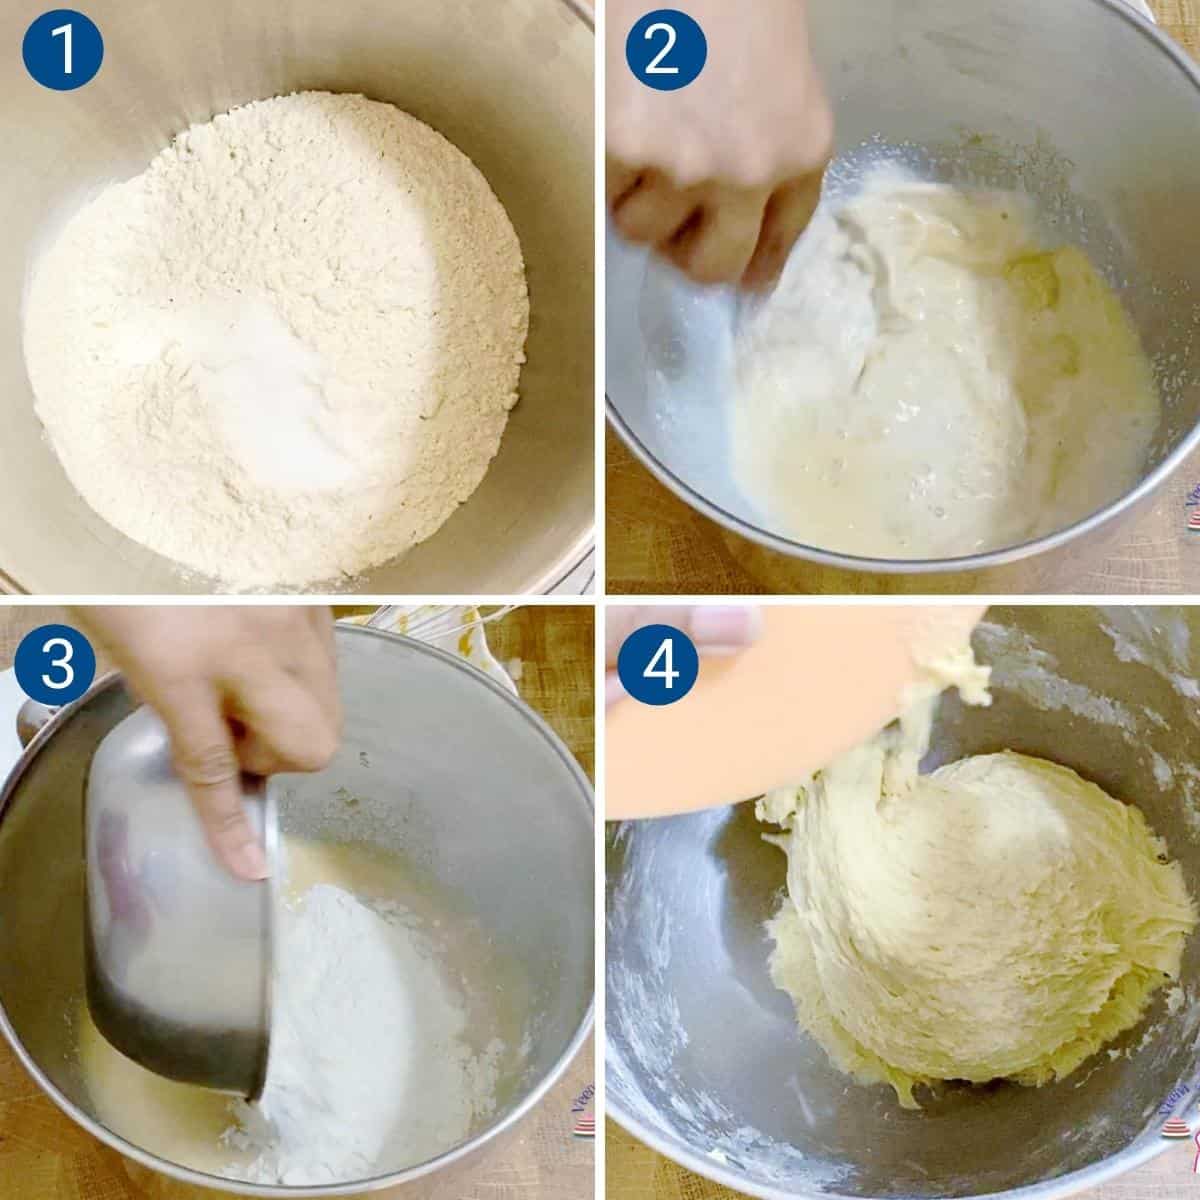
- Knead – Continue to knead on medium speed for 3 to 4 minutes. Then, add the butter and continue kneading for 2 to 3 minutes more, until you have a soft, smooth, and elastic dough.
Pro tip – Avoid the temptation to add more flour. We want soft, light, and fluffy rolls, and this is only possible when the dough is soft, elastic, yet slightly sticky - Bowl – When the dough is soft and shiny, but still slightly sticky, shape it into a ball. Place the dough in an oiled bowl seam side down. Next, coat the surface with cooking spray to prevent drying. Then, cover with a clean kitchen towel or plastic wrap.
- Rise – Leave in a warm place. Let it rise for 60 to 90 minutes until it doubles in volume.
Pro tip – In winter, you may need 90 minutes or more, but in summer, the dough may double in 45 minutes. If you can’t attend to it at that moment. De-gas, reshape, and let double in volume again.
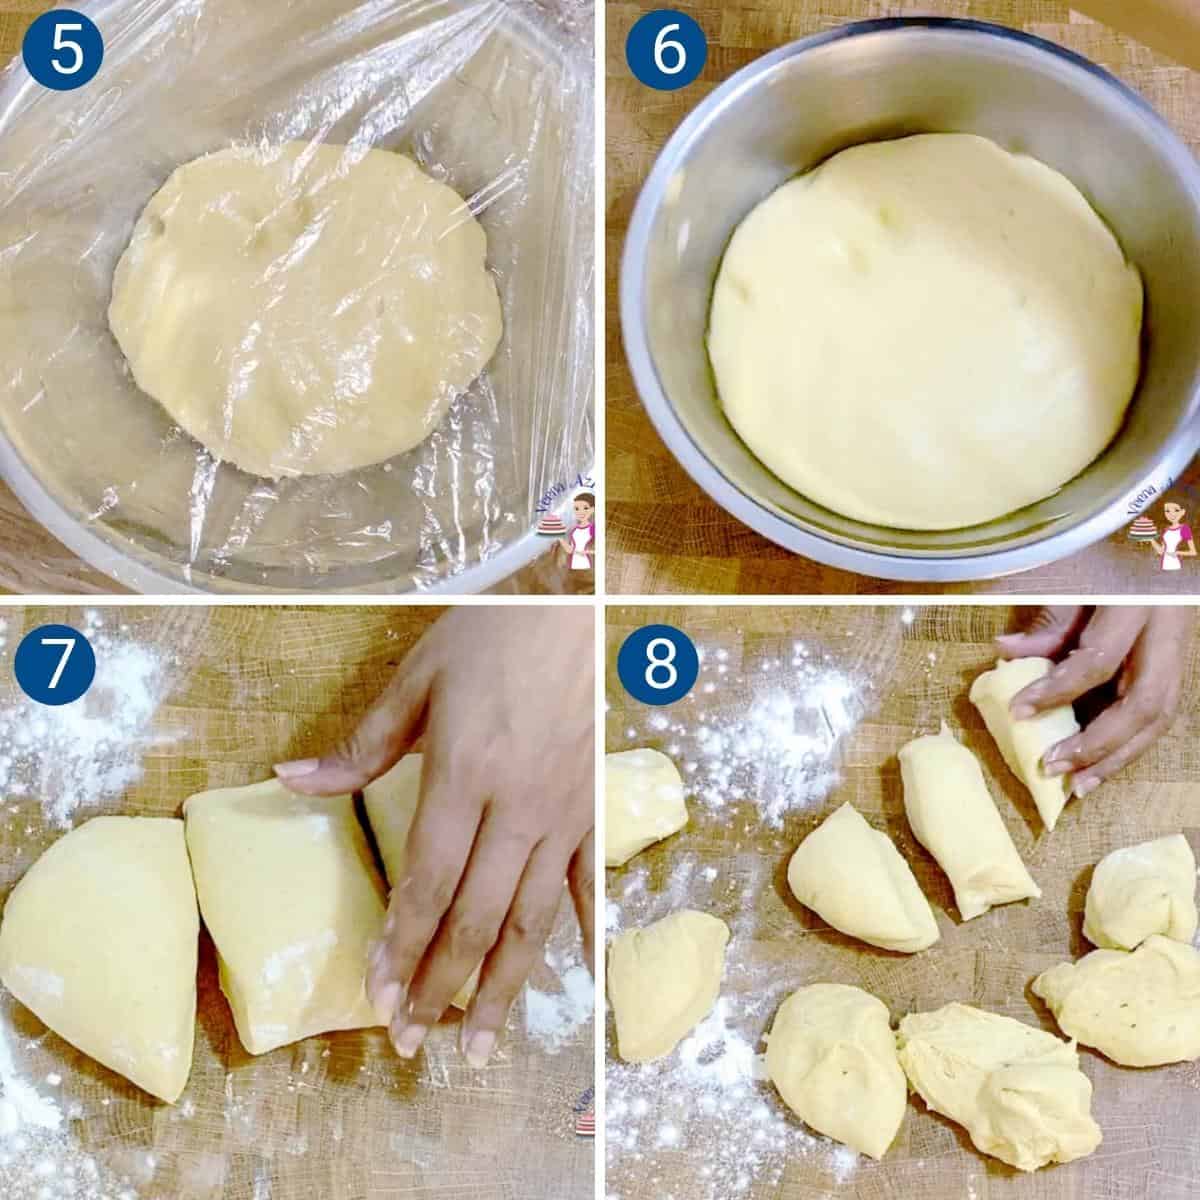
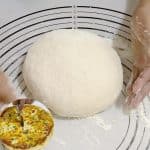
- Punch – When the dough is doubled in volume, transfer it to a well-dusted floured work surface. Punch down and reshape into a ball. Then roll it into a small log.
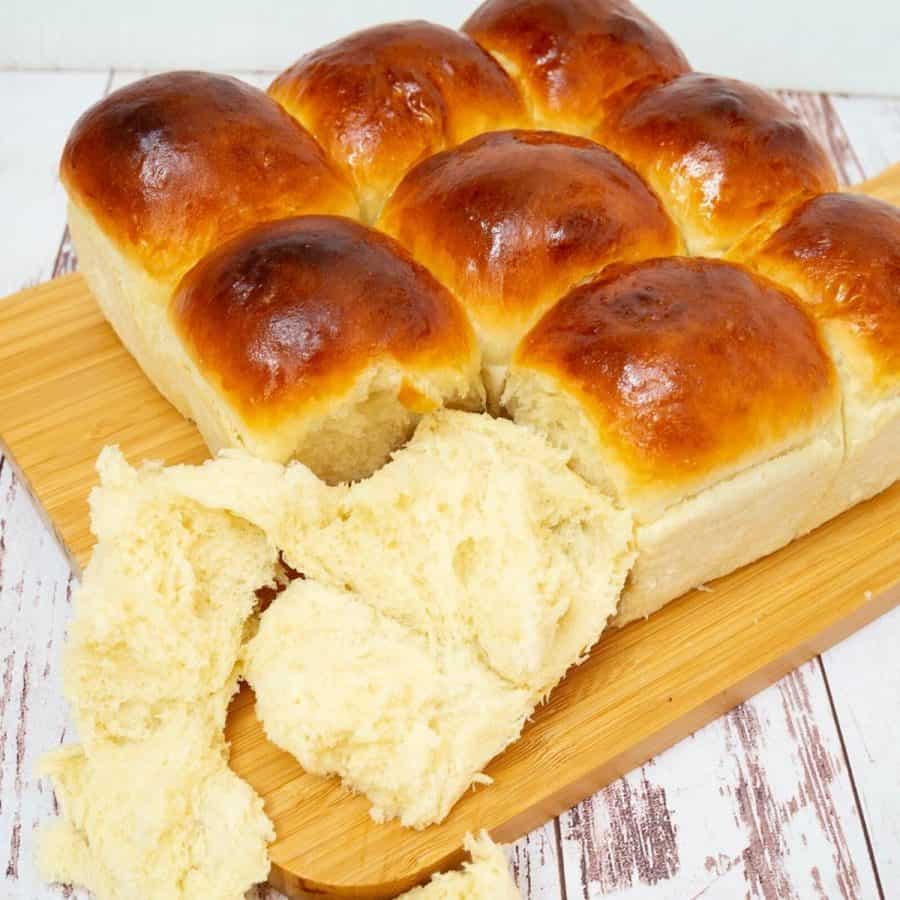
Pro tip – At this point, there is no need for additional flour. So use a light dusting of flour. - Divide – Using a dough scraper, divide this log into three portions and then each of those portions into 3 again. This should give you 9 dinner rolls.
Pro tip – The odd number 9 is because we are using a square baking pan. You can also divide into 8 medium or 12 small rolls, using an 8-inch round or quarter sheet pan.
Shape and bake
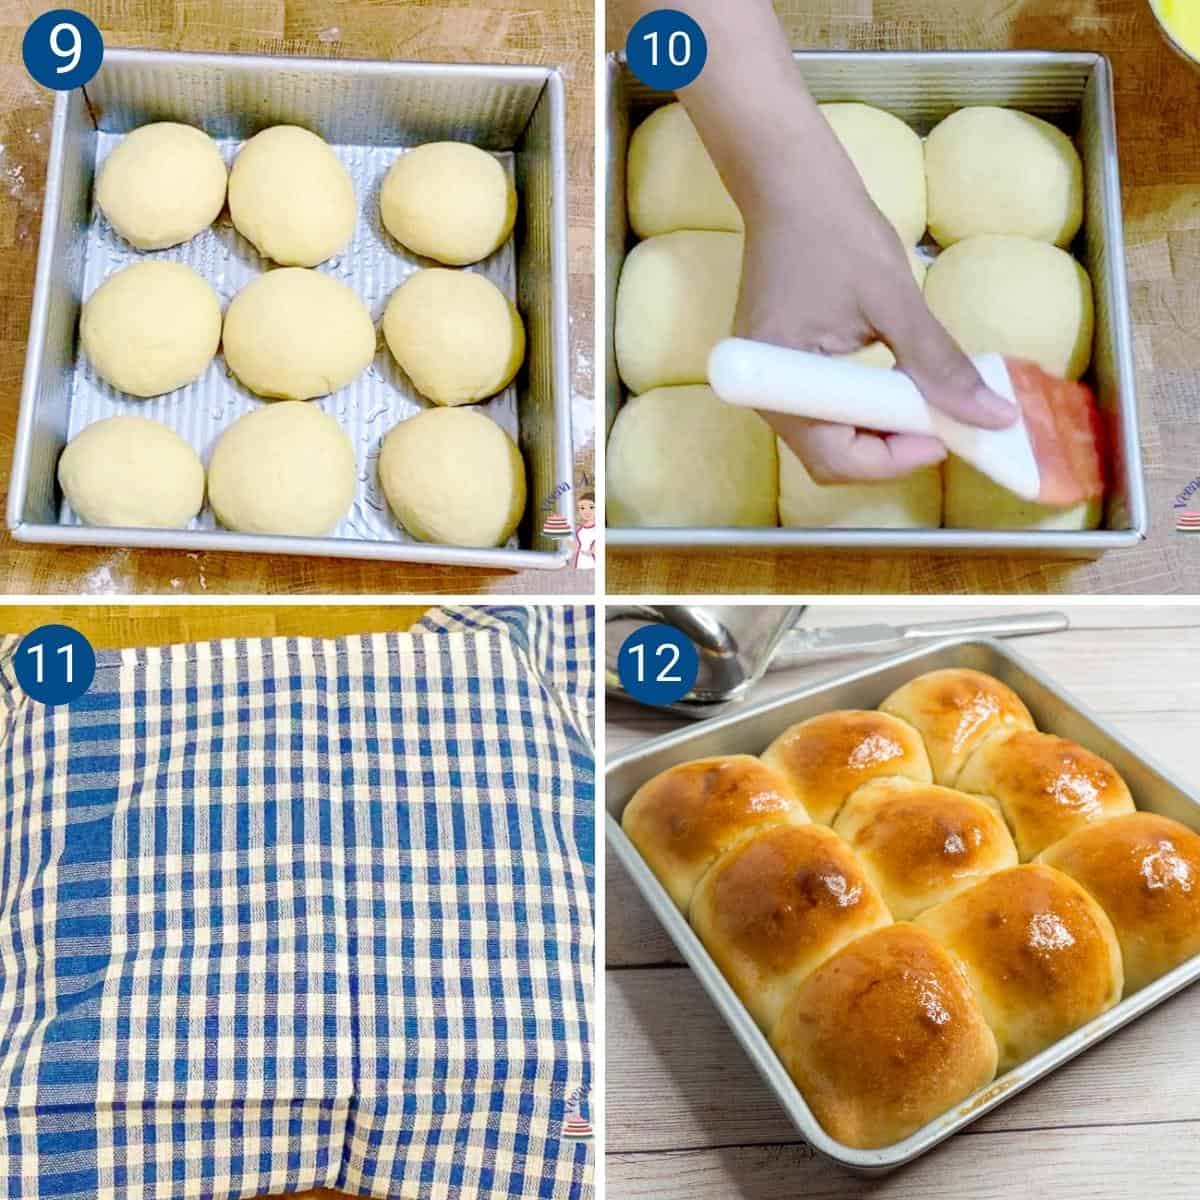
- Shape – Hold each piece of dough in your hand and gather all the seams together. Pinch the seams at the bottom, then place the ball on a non-floured surface while still holding it in your hand.
Loosen the grip on the dough and roll it back and forth into a tight circle against the work surface. You will feel the dough become tight and smooth.
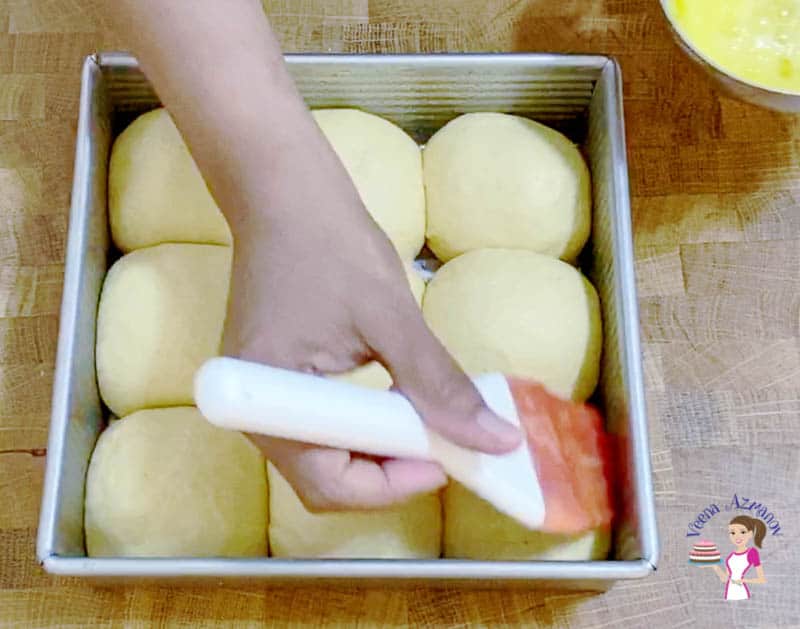
Pro tip – The goal is to create a tight, smooth ball. If you overdo the rolling, you will rip the top surface, which will give a rough, not smooth roll. - Proof – Grease or spray a 9 x 9 square baking pan. Place the rolls in the pan. Seam side down. Cover with a clean kitchen cloth or plastic wrap and leave in a warm place for about 45 minutes until almost double in size.
Pro tip – Spray the plastic wrap with oil to prevent it from sticking to the rolls. - Oven – When the rolls are almost double in volume at about 30 minutes, preheat the oven to 375°F /190°C / Gas Mark 5
- Egg wash – Brush the rolls with milk, cream, or egg wash.
Pro tip – Egg wash is a full egg with 2 tbsp of water. An egg wash will give a nice, golden-brown color.
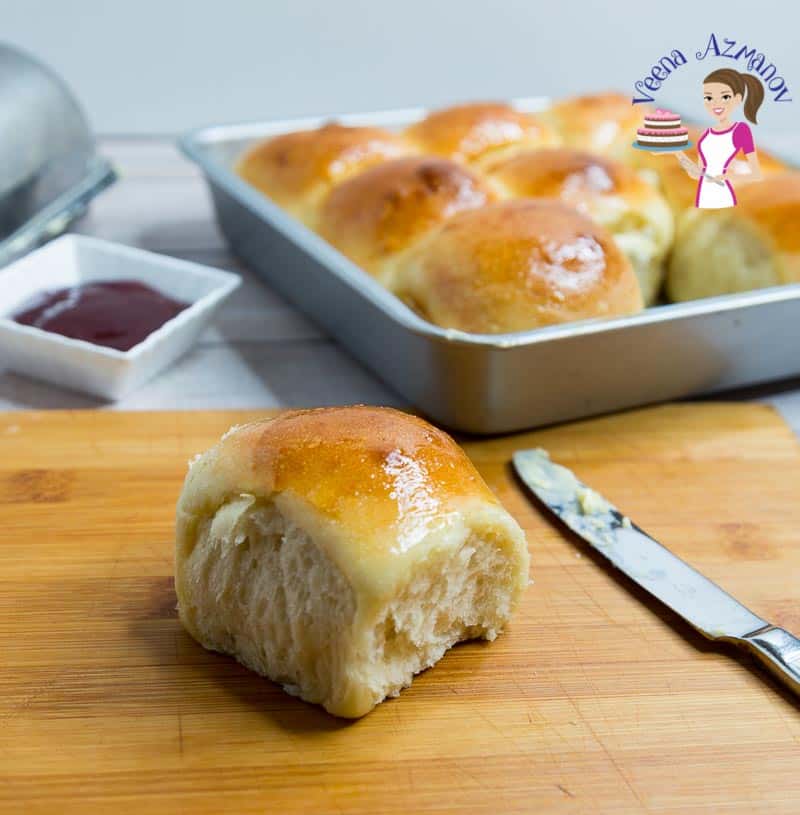
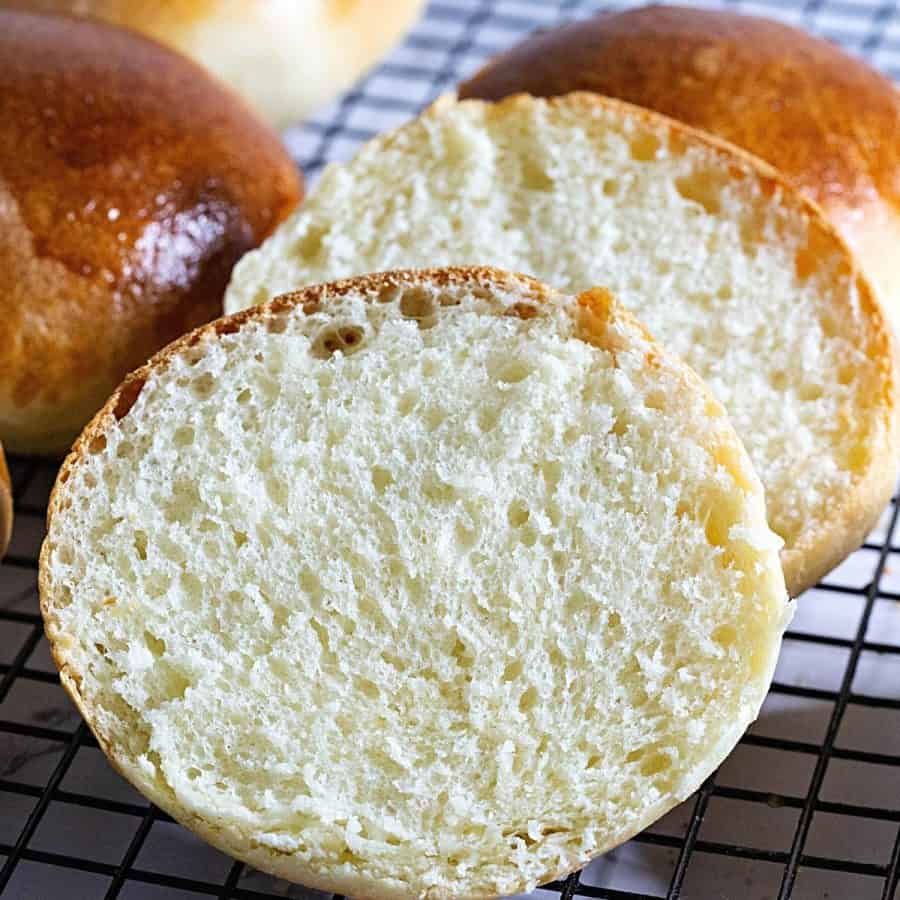
- Bake for about 20 to 22 minutes until lightly golden on top. When baked, brush with melted butter
Pro tip – This is optional, but it adds a nice flavor and keeps the top crust soft. - Cool – Take them out of the pan and cover them with a clean kitchen cloth for at least 5 minutes to keep them soft
Pro tip – Do not leave the rolls in the pan for too long, as the steam will make the bread soggy on the bottom.
Tips for success
- Use soft, room-temperature ingredients – Warm liquids and softened butter help the dough rise properly and keep the rolls fluffy.
- Knead just until smooth and elastic – Over-kneading makes rolls tough; stop as soon as the dough feels stretchy and no longer sticky.
- Let the dough rise fully—aim for “double in size.” Under-proofing makes dense rolls; over-proofing makes them collapse.
- Bake until just golden – Lightly golden rolls stay soft; too much color dries them out fast.
- Overnight option – Make the dough, let it rise once, punch down, refrigerate overnight. Shape and bake the next day.
- Freezer-friendly – Freeze baked rolls once cool — they thaw beautifully and reheat soft.
Troubleshooting
| Issue | Cause | Fix |
|---|---|---|
| The dough didn’t rise | Liquid too cold/hot or yeast inactive | Use warm liquid (≤110°F / 41°C); check yeast freshness |
| The rolls turned out dense | Too much flour or under-kneading | Keep dough soft & slightly sticky; knead until elastic |
| Rolls collapsed in the oven | Over-proofed before baking | Proof until almost doubled; not more |
| Dry or hard rolls | Over-baked or oven too hot | Bake until lightly golden; check oven temp accuracy |


Frequently asked questions
3–4 days at room temperature in an airtight container. They also freeze well for up to 1 month.
Yes. Shape the rolls, refrigerate overnight, bring to room temp, then bake.
Absolutely. Freeze fully cooled rolls in a freezer bag. Thaw at room temperature or warm briefly in the oven
Yes. Use the dough cycle, then shape and bake as directed.
These are great with any soup, stew, chili, or slow-cooked meat, anything saucy.
Soup, salad, and dinner rolls are a complete meal in our home.
They are perfect to soak up the gravy in slow-cooked lamb, beef, or chicken dishes.
My kids love lamb stew or chili with this bread.
Soft Dinner Rolls – Homemade
Buttery, fluffy, and soft dinner rolls are the best to have with any main course. This bread recipe needs only 6 ingredients, 10 minutes to prep, and 20 minutes to bake with some proofing time in between
Video
Ingredients
- 180 g (¾ cups) Warm milk l(110F)
- 5 g (1 tsp) Instant dry yeast or 21 grams bakers yeast
- 30 g (2 tbsp) Sugar or honey
- 50 g (3½ tbsp) Unsalted butter, room temperature
- 6 g (1 tsp) Kosher salt
- 355 g (2¾ cups) All-purpose flour or bread flour
- 2 tbsp Milk or ½ beaten egg
Method
- Yeast – In a large bowl of the stand mixer with the dough hook attachment. Combine the warm milk (110 F), yeast, and sugar.180 g Warm milk, 5 g Instant dry yeast, 30 g Sugar
- Combine -Add the flour and salt. Combine well on medium-high speed for 2 to 3 minutes until all the flour is well incorporated.355 g All-purpose flour, 6 g Kosher salt
- Knead – Continue to knead on medium speed for 3 to 4 minutes. Then, add the butter and continue to knead for 2 to 3 minutes more until you have a soft, smooth, and elastic dough.50 g Unsalted butter, room temperature
- Bowl – When the dough is soft and shiny, but still slightly sticky shape it into a ball. Place the dough in an oiled bowl seam side down. Coat the surface with cooking spray to prevent drying. Cover with a clean kitchen towel or plastic wrap.
- Rise – Leave in a warm place. Let rise for 60 to 90 minutes until it doubles in volume.
- Punch – When the dough doubles in volume transfer it to a well-dusted floured surface. Punch down and reshape into a ball. Then roll it into a small log.
- Divide – Using a dough scraper divide this log into four portions and then each of those portions into 3 again. This should give you 12 dinner rolls.
- Shape – Hold each piece of dough in your hand and gather all the seams together. Pinch the seams at the bottom then place the ball on a non-floured surface while still holding it in your hand. Loosen the grip on the dough and roll it back and forth into a tight circle against the work surface. You will feel the dough become tight and smooth.
- Proof – Grease or spray a 9 x 9 square baking pan. Place the rolls in the pan. Seam side down. Cover with a clean kitchen cloth or plastic wrap and leave in a warm place for about 45 minutes until almost double in size.
- Oven – When the rolls are almost double in volume at about 30 minutes, preheat the oven to 375°F /190°C / Gas Mark 5
- Egg wash – Brush the rolls with milk, cream, or egg wash.2 tbsp Milk
- Bake for about 20 to 22 minutes until lightly golden on top. When baked brush with melted butter
- Cool – Take them out of the pan and cover them with a clean kitchen cloth for at least 5 minutes to keep them soft
Notes
- Use soft, room-temperature ingredients – Warm liquids and softened butter help the dough rise properly and keep the rolls fluffy.
- Knead just until smooth and elastic – Over-kneading makes rolls tough; stop as soon as the dough feels stretchy and no longer sticky.
- Let the dough rise fully – Aim for “double in size”—under-proofing makes dense rolls, over-proofing makes them collapse.
- Bake until just golden – Lightly golden rolls stay soft; too much color dries them out fast.
- Overnight option – Make the dough, let it rise once, punch down, refrigerate overnight. Shape and bake the next day.
- Freezer-friendly – Freeze baked rolls once cool — they thaw beautifully and reheat soft.
-
- Overnight Rolls – The dough can be prepared a day in advance. Proof them for an hour on the counter, then punch down and let the dough rest in the fridge overnight. Overnight proofing is a great way to add flavor to the bread. The next day, continue with the recipe as directed, rolling and shaping the chilled dough.
- Storing these rolls– These dinner rolls do freeze beautifully. Cool the baked buns, then place them in a freezer-safe storage bag. These can be frozen for up to a month.
- Kneading the dough – The dough does need kneading, so if possible, try using an electric mixer.
- Bread machine – these rolls can be easily made in a bread machine. Pour all ingredients into the pan set to dough or manual. Start and let the dough run its cycle for about 9 to 10 minutes – continue with the recipe as shown above.
Equipment you will need


Nutrition
Tried this recipe?
Mention @veenaazmanov_kitchen or tag #veenaazmanovkitchen!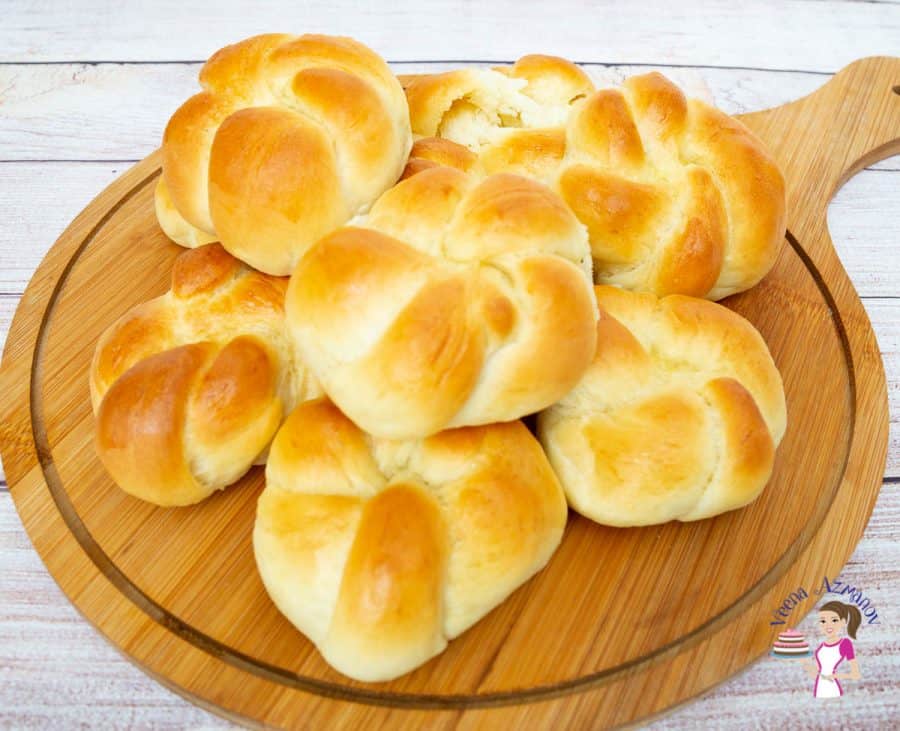

Don’t lose this recipe! Save it for Later!
📌 Save this Recipe for later on Pinterest so you can easily find it again.
⭐ Add Veena Azmanov Kitchen to your Google Preferred Sources.
It helps Google show you more of our recipes.
📧 Subscribe for new recipes delivered to your inbox.
🎥 Follow us for more recipes


The dinner rolls came out fantastic. Really appreciate Veena for this amazing recipe and instructions with tips to make the best dinner rolls. You are amazing, Veena. GOD bless you and your talent.
Thank you so much for the lovely comment, Laniya. Happy you enjoyed these dinner rolls. Thanks for coming back to write this feedback
This has become my go-to roll recipe. It turns out every time. I use it for dinner rolls, hamburger buns, and sub rolls. Today I am going to try it in a loaf. It’s my husband’s and son’s favorite also. I make these every week.
Thank you, Tiffany. I am so happy to hear that. It is our family favorite too
Hello Veena,
Thanks for the great recipe. Could you please let me know how long do we have to preheat the oven? Is it 20 min similar to your olive and sun dried tomato rolls? I followed the instructions and they came out great. Thank you
Hey Uma. Happy you enjoyed these dinner rolls. Thanks for coming back to write this feedback.
I have a setting on my oven that beeps when the oven is pre-heated. I think it usually takes about 10 minutes for my oven.
When making Pizza on the other hand I do heat the oven for a minimum of 20 minutes or more because the pizza stone takes longer to heat even when the oven is preheated.
The time for preheating depends from oven to oven. I hope that makes sense. Have a wonderful day.
Thank you Veena!
Wow! These rolls are amazing. I cannot work yeast bread but your directions were clear & concise. They came out great! 1 question: you mention oil in the directions with the yeast & milk but it is not in the ingredient list. Thank you for a great recipe!
Ah thank you Jill for letting me know about that. Just fixed it. So happy you had success with this recipe and that you enjoyed it. Thank you so much for coming back to write this feedback. Always love to hear from those who try my recipes. Have a great day.
Hi! I watched your clover leaf roll video, and read another roll recipe, and saw that you added an egg to your yeast. This recipe calls for an egg, but you don’t mention using the egg in the actual dough, just the egg wash. Was that an error, or is there really no egg in the dough?
I loved your video, by the way! I thought it was really sweet that you had one of your children helping you!
Hey Robyn, So sorry for that. My bad. That was an error. I must have missed writing the word egg in the method. I just added it. Thank you so much for your lovely comment.
I am making these but I can’t seem to see where it says how much water to add to the yeast?
Sorry, Lissa. yes, it is 1 cup milk and 1/2 cup water. Thanks
what to do if we don’t use yeast? how to replace it? I tried once with baking powder and eno fruit salt but flour didn’t rise , and buns were dense and crusty.. ?
Sorry Cherry. Not tried making this bread without yeast so can’t suggest any substitute. Perhaps look on line for a recipe that has been tried and test without yeast – Thanks
sorry..due to excitement i got confused with self raising n all purpose.we sure ger maida or all purpose .but not self raising.
we dont get all purpose flour.so how to replace it?
Maharana, All purpose flour is flour used for all purposes, Maida.
I don’t know where you are but in India for all my recipes that call for A P Flour, Bread flour or cake Flour – you will have use maida.
Hope this helps.
Can I make this and storein the fridge a day ahead?
Yes, Let it rise for one hour outside in a warm place.
Then punch the dough again and let rest in the fridge over night.
You can also form them into buns on the baking tray, cover with a warm kitchen cloth and let them rise in the fridge over night.
Take them off an hour to come to room temperature.
Egg wash and bake as shown.
Thanks
Thank you so much for your reply
Day 3 week 1 done. The bottom of the rolls got charred a little. Will keep it for 20 minutes next time. Thanks again.