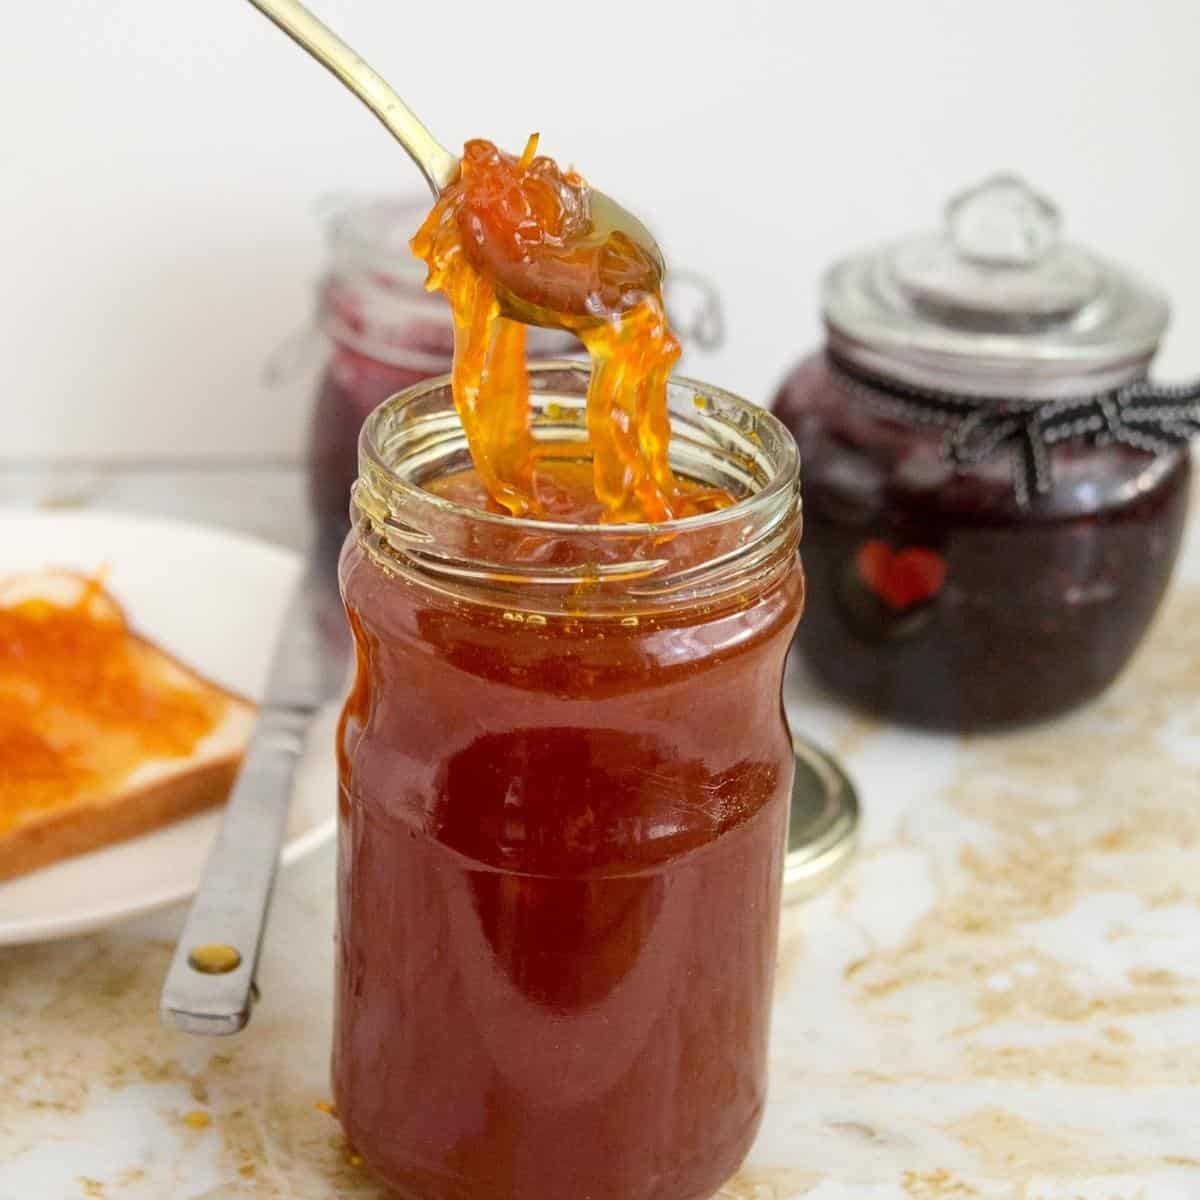
Fruity Orange Marmalade: No-Pectin


This orange marmalade or confiture d’orange is low in sugar. It’s made all-natural the old-fashioned method without pectin or artificial flavoring. So, it’s sweet, sticky, and less bitter than commercial condiments, made with my no-fail method below.

If you’ve never tasted homemade orange marmalade before, then you’ll be in for a treat with this one. The biggest advantage of making a good homemade marmalade is that you can use less sugar. The disadvantage of making homemade marmalade is that it’s low in sugar, so it’s more delicious, and everyone eats it with a spoon, straight from the jar (me), instead of on a slice of bread.
Now, there are many different ways to make marmalade. Traditionally, you thinly slice oranges on a mandoline and place them in a stainless-steel pot with lemon and sugar. This keeps a lot of the white stuff between the fruit and skin, which tastes bitter, so you have to add more sugar. Today, I scrape the zest into thin strands, which I think look nicer. The main advantage of the course is that it is less bitter, so you can add less sugar.
Why make this marmalade?
- No-fail method – This recipe is simple and easy. And if you’ve never made homemade jam, you will definitely start now.
- Not bitter – The preparation for oranges does require a little effort, but it’s worthwhile when you see kids enjoy orange marmalade without complaining that it’s bitter.
- No canning – This homemade recipe is without the fuss of canning. Just pour the marmalade or jam into sterilized jars and save them in the fridge or freezer. However, I have also given you the detailed process for canning.
- No pectin – Fruits have natural pectin in the skin and seeds, and we use that natural pectin to make this marmalade.
- Low-sugar – Unlike commercial marmalade, this one is not loaded with sugar. In fact, we use sweet oranges and just half the amount of sugar that is typically used in jams.

Ingredients and substitutes
- Oranges – The best time to make homemade orange marmalade is when oranges are in season. Fruits in season are always at their best, sweet and juicy. Seville oranges are considered sour and juicier, which works perfectly for jams and marmalade with a large amount of sugar. You can also use navel oranges. Make sure to use organic oranges that have not been treated with pesticides, since we also use the zest.
- Sugar – Unlike commercial jams, I like to use less sugar, which is usually half the quantity of the fruit. For example, if I have 1 kg of fruit, I usually add 500 grams of sugar. So my jam is more fruity rather than just sugary sweet. But if you like it sweet, you can add more. Most commercial jams are made with 3/4 of the amount of sugar, in this case, 750 grams.
- Lemon Juice – It’s best to use fresh lemon juice and organic lemons for the zest. It also helps prevent crystallization. Lemons also have a lot of natural pectins.
- Butter – Now you don’t really need butter, and yet if you notice, often there is foam or scum in the marmalade when cooking. Adding a small amount of butter helps clarify the orange marmalade.
- Flavor/spice – Orange marmalade does well with a few flavors. A hint of ginger adds a nice warmth. So does cinnamon. Other flavors like star anise and nutmeg work too.

Step-by-step: Easy orange marmalade recipe
- Place two small ceramic plates in the freezer so we can use them to test the marmalade later.
Alternatively, you can use a candy thermometer to check the doneness of the jam.
Prepare fruits
- Zest and juice the lemons – and set aside.
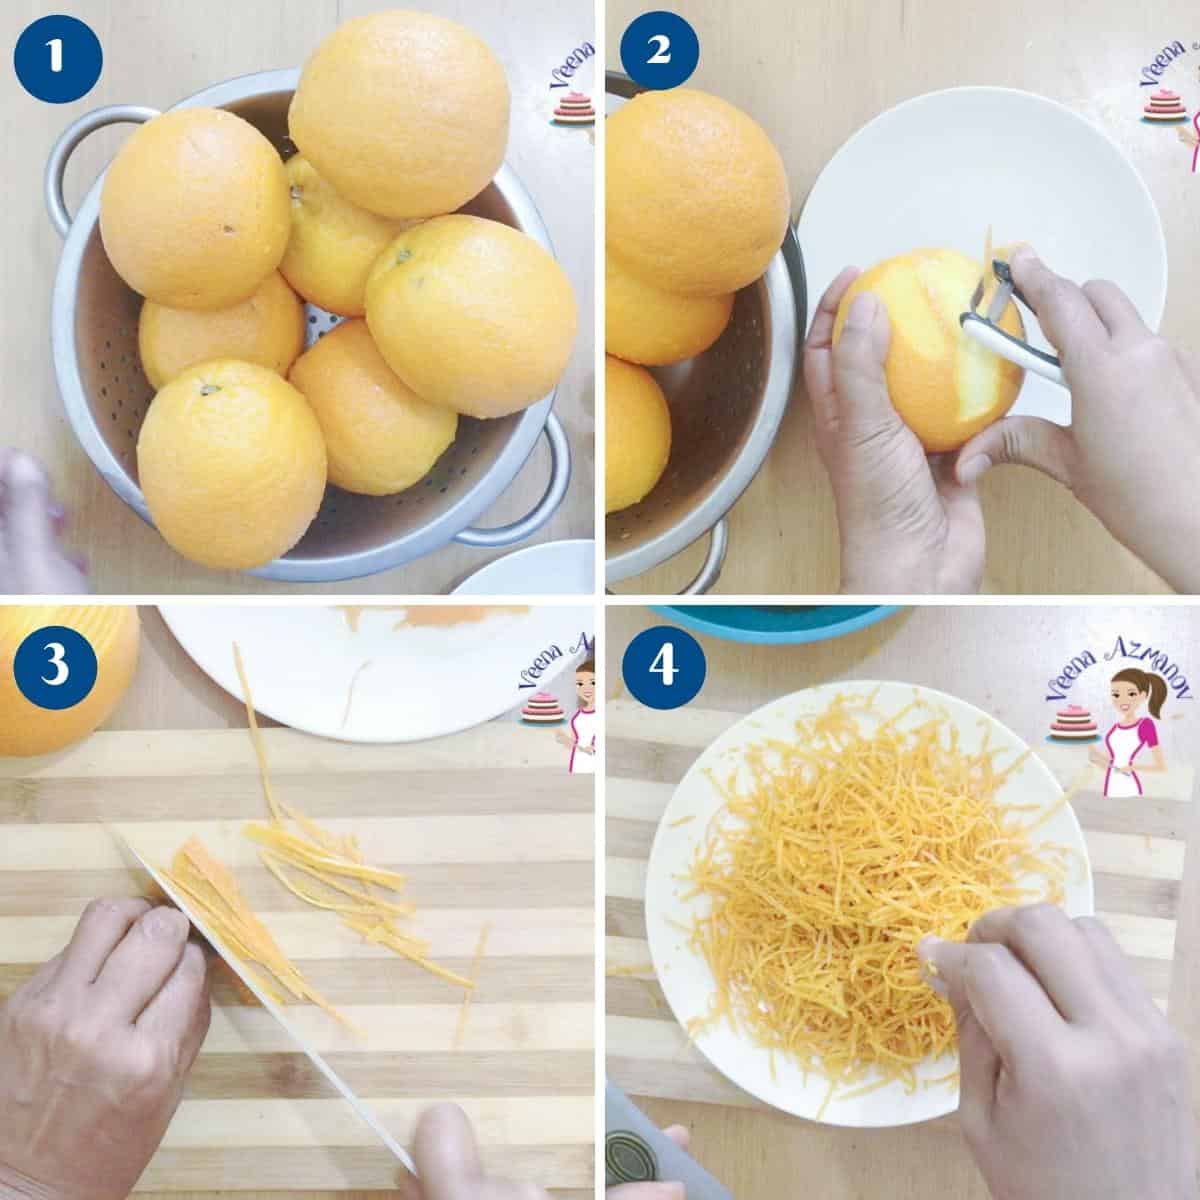
- Zest the oranges – Use a sharp vegetable peeler or paring knife and peel the bright orange-colored zest, making sure not to get the bitter white pith (the white part) underneath. Julienne or cut the zest into strips. Set aside. Alternatively, you can use a citrus zester that I have used in the video to zest the oranges. And set aside.
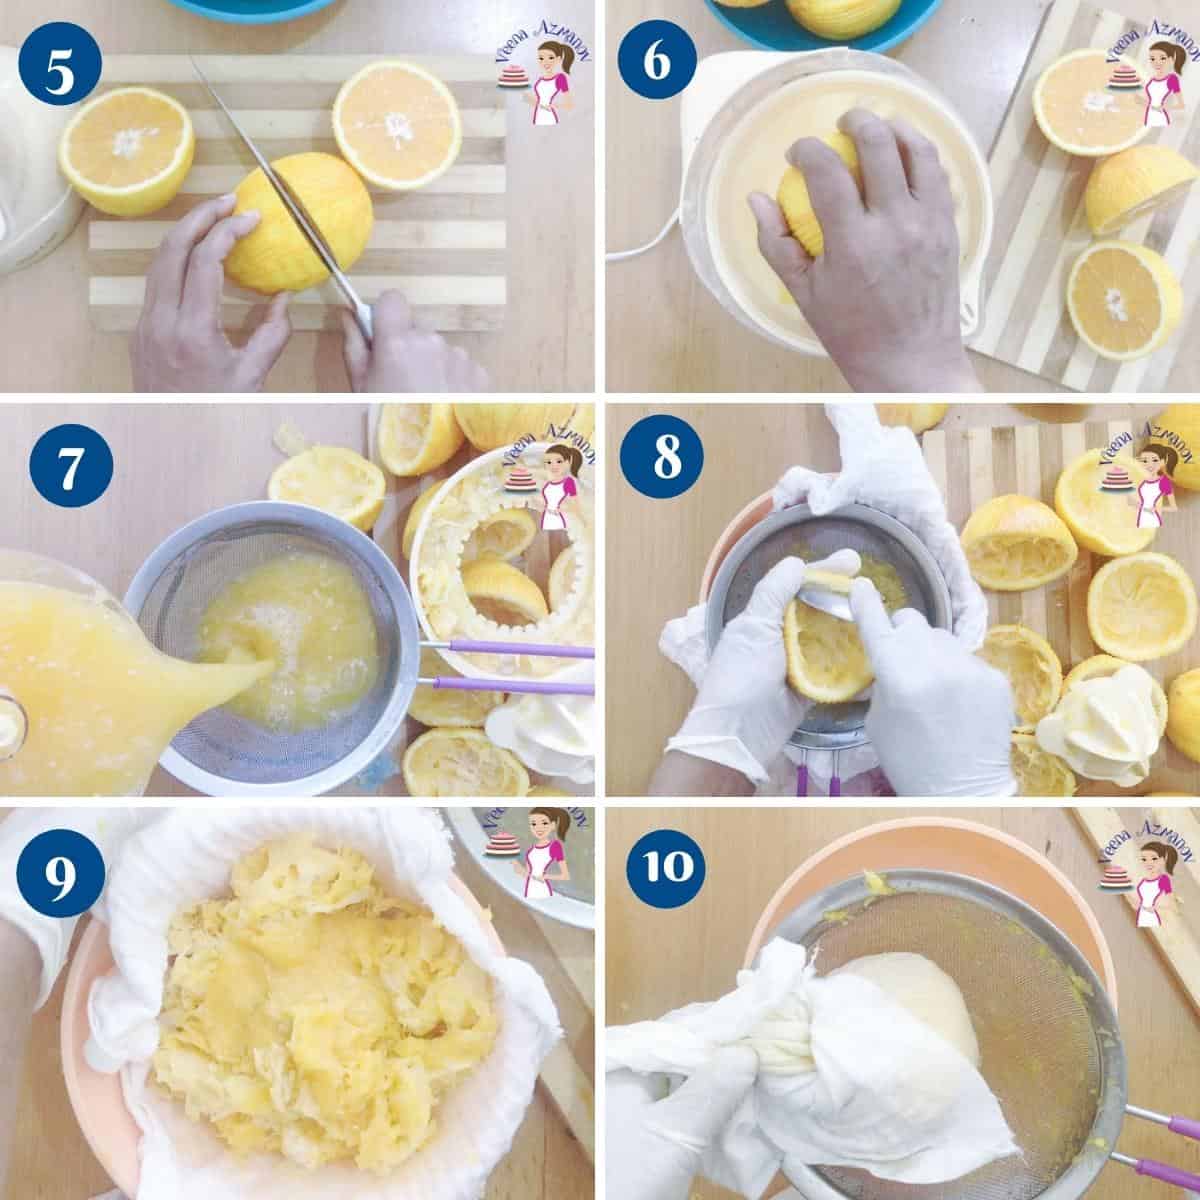
Pro tip – Thoroughly wash and lightly scrub the orange peels so they are clean before you zest them. - Juice the oranges – Cut the oranges in half and squeeze the juice out. Work over a bowl to catch all the juice. Strain the juice to remove any peps or pulp. Set aside.
Pro tip – I like to work over a strainer to ensure I get as much of the juice as possible. - Collect the pith and membranes – Collect the pulp, pips, and remove as many membranes from the sliced oranges as possible (see video). Tie it all in a cheesecloth. And set aside for later.
Pro tip – The pectin we need to make marmalade is in these pips, pulp, and zest, so make sure to save and collect as much as you can.
Cook the zest/rind first
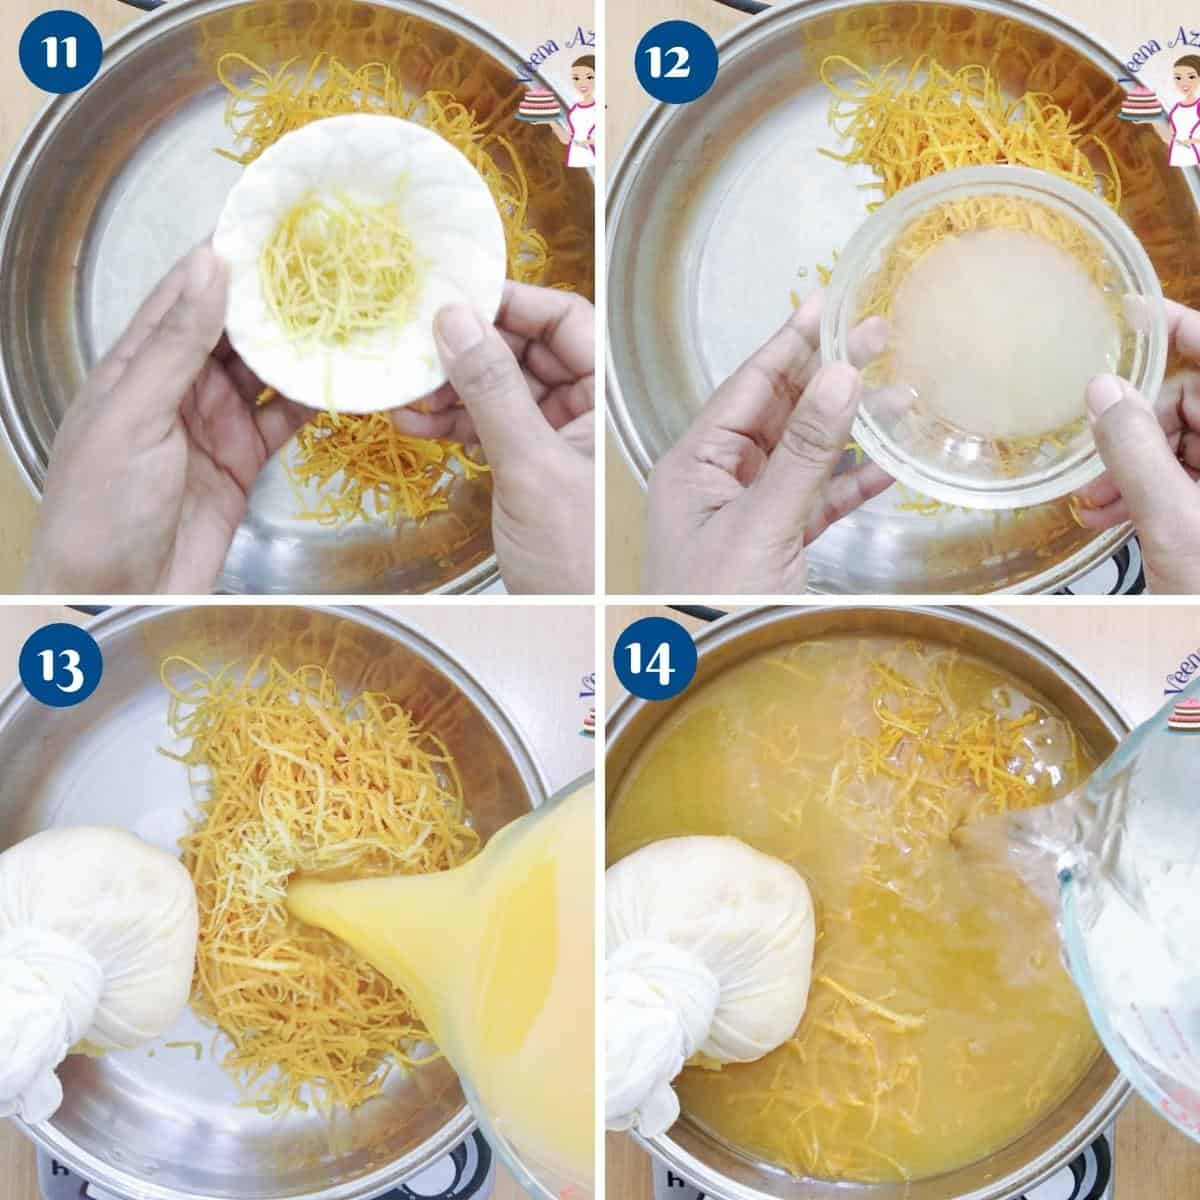
- In a heavy-bottom pan or a large saucepan, add the orange and lemon zest, lemon and orange juice, and water. Place the cheesecloth with the membranes inside the pot as well.
Pro tip – Make sure the cheesecloth is tied well so it does not open in the pot when boiling. - Bring to a boil. Then, cook on medium simmer, partially covered. Cook until the orange zest becomes soft. The liquid will reduce to about one-third of its original volume.
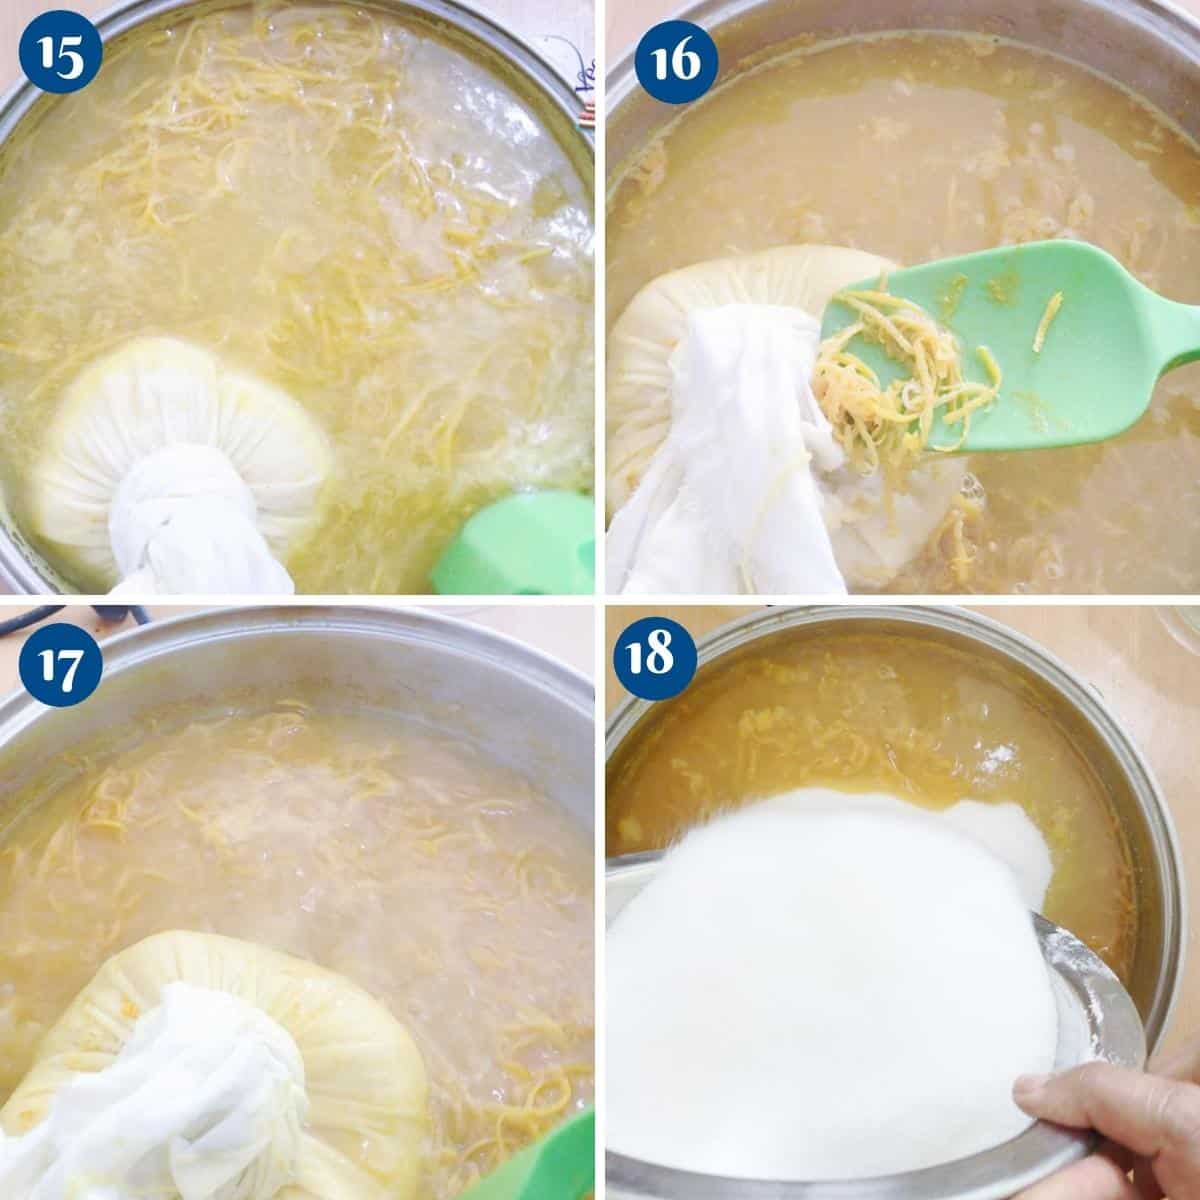
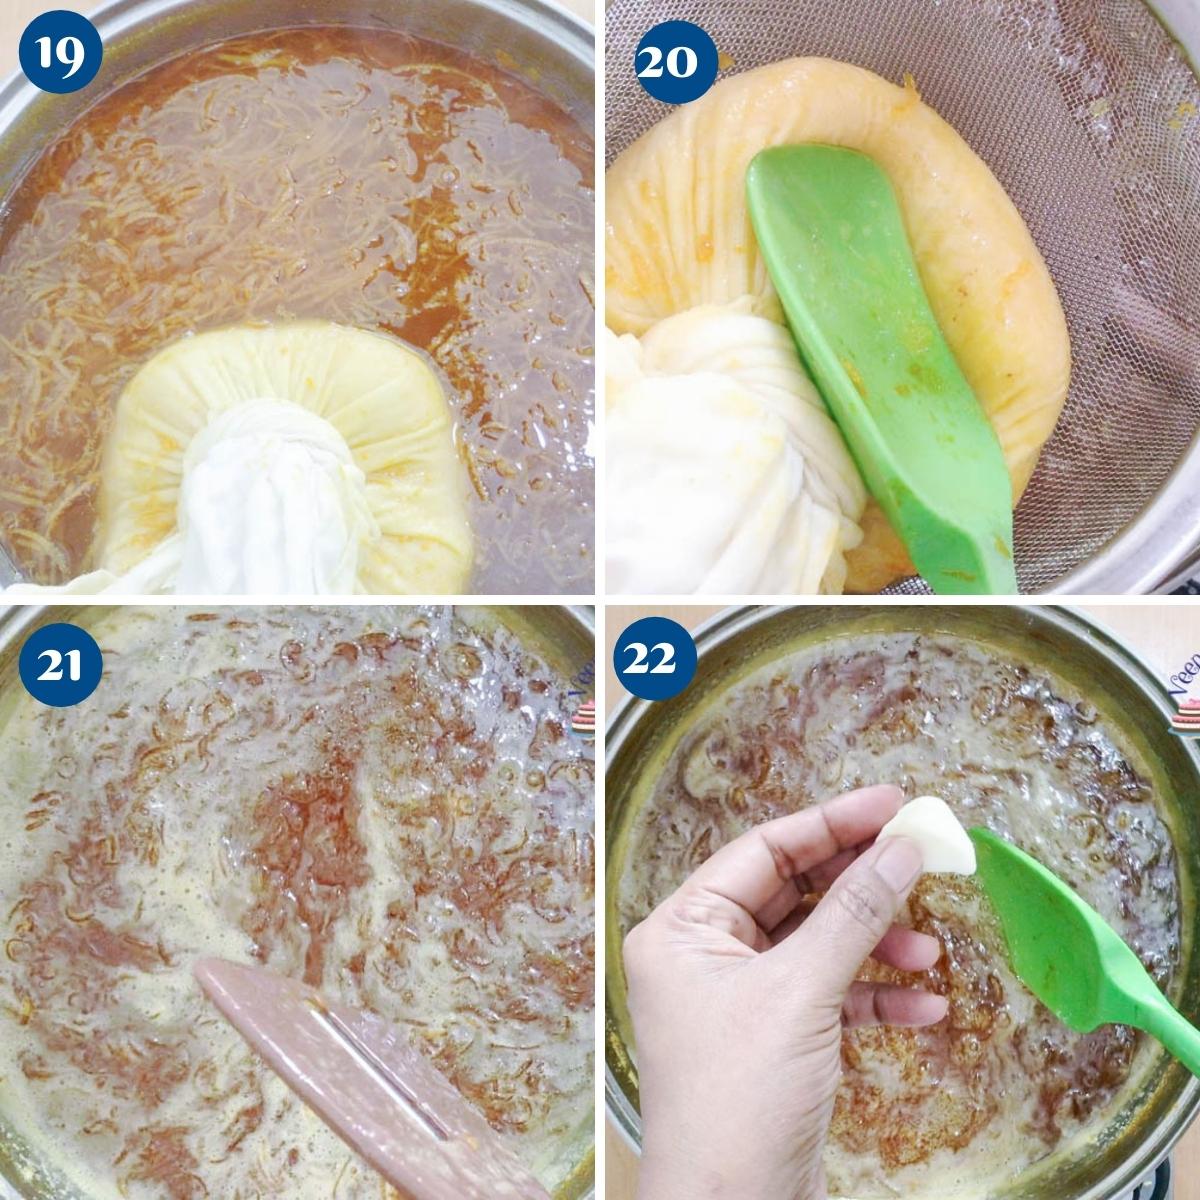
Pro tip – It can take from 20 to 30 minutes, depending on the zest as well as the time and temperature of heating. What is important is that the zest gets soft. - Then remove the bag from the pan, squeezing out as much liquid as possible.
Pro tip – It is best to take this bag out now before we add the sugar. Otherwise, it gets harder to squeeze the sweeter juice out later.
Start the marmalade process
- Once the orange zest is soft, add the sugar. Cook over medium heat until the sugar dissolves. Then, turn the heat up and let the mixture come to a boil. Let it boil for two minutes on medium-high. Then, reduce the heat to medium-low.
Pro tip – The marmalade should still be simmering, but at a low simmer, not bubbling. - Continue to simmer on medium-low for about 20 to 30 minutes more, stirring frequently with a ladle to prevent sticking to the bottom of the pan. The marmalade will continue to thicken and deepen in color as it cooks.
Pro tip – The cooking time will depend on the quantity of the marmalade as well as the heat applied to it. It’s ok to cook a little longer, but there must be a simmer for the gelling process to start.
Test the marmalade
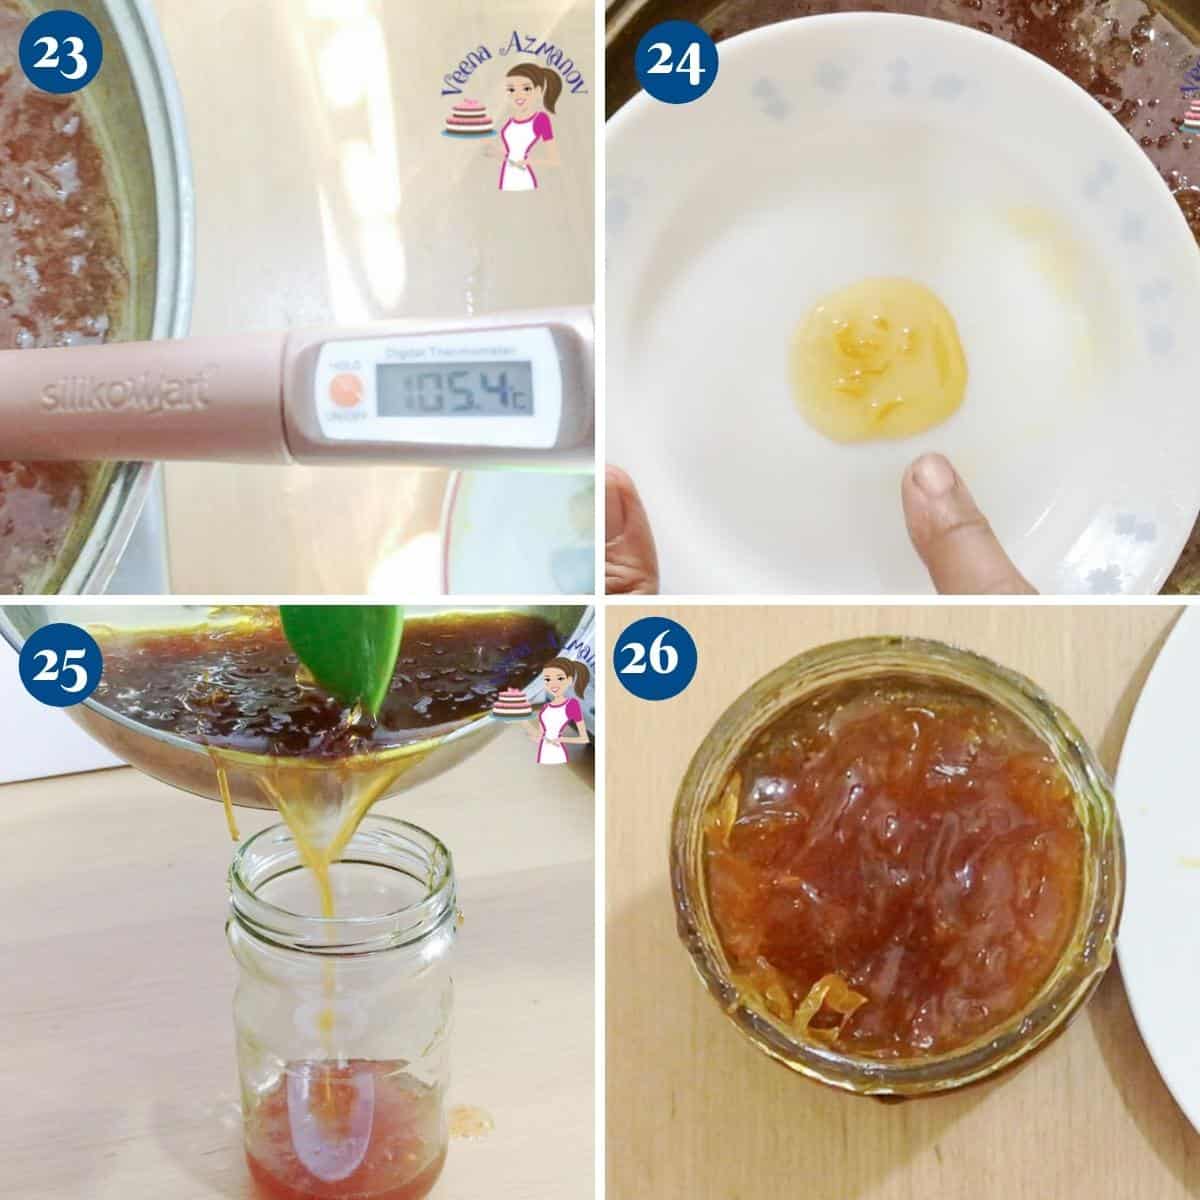
- Remove one of the ceramic plates from the freezer. Place a teaspoon of marmalade on the cold small plate.
Pro tip – The cold plate will help cool the marmalade almost instantly and give you a good indication if it is ready. - Set aside for 2 to 3 minutes. Then, test with your finger. Simply move/push the marmalade with your finger. If it wrinkles/crinkles, it means it is ready. And if not, let the marmalade cook a couple of minutes more and test again.
Pro tip – You may need to test on a ceramic plate more than once or a couple of times, depending on how early you start checking. - Alternatively, you can use a candy thermometer – the marmalade should reach 105 °C / 221°F.
Pro tip – I find the thermometer to be the easiest and foolproof method to check for doneness.
- Optional – Just when you are ready to take the marmalade off the heat, add a teaspoon of butter and stir well. Butter helps dissolve the foam that accumulates on top of the jam.
Pro tip – You don’t need more than 1 teaspoon of butter to help with the foam. It will also give you that glossy shine. - Pour the marmalade into warm, sterilized jars, leaving 1/4 inch space from the top. Use a clean, sterilized knife or spatula to move it a bit – this will remove any air pockets.
- Place a piece of wax paper on the top before you place the lid on tightly. Clean the rim of the jar with a clean paper towel. Top the lid.
Alternatively, use the lid with screw-on rings that come with the canning jars.
The canning process (if you plan to can the marmalade)
Sterilize the jars
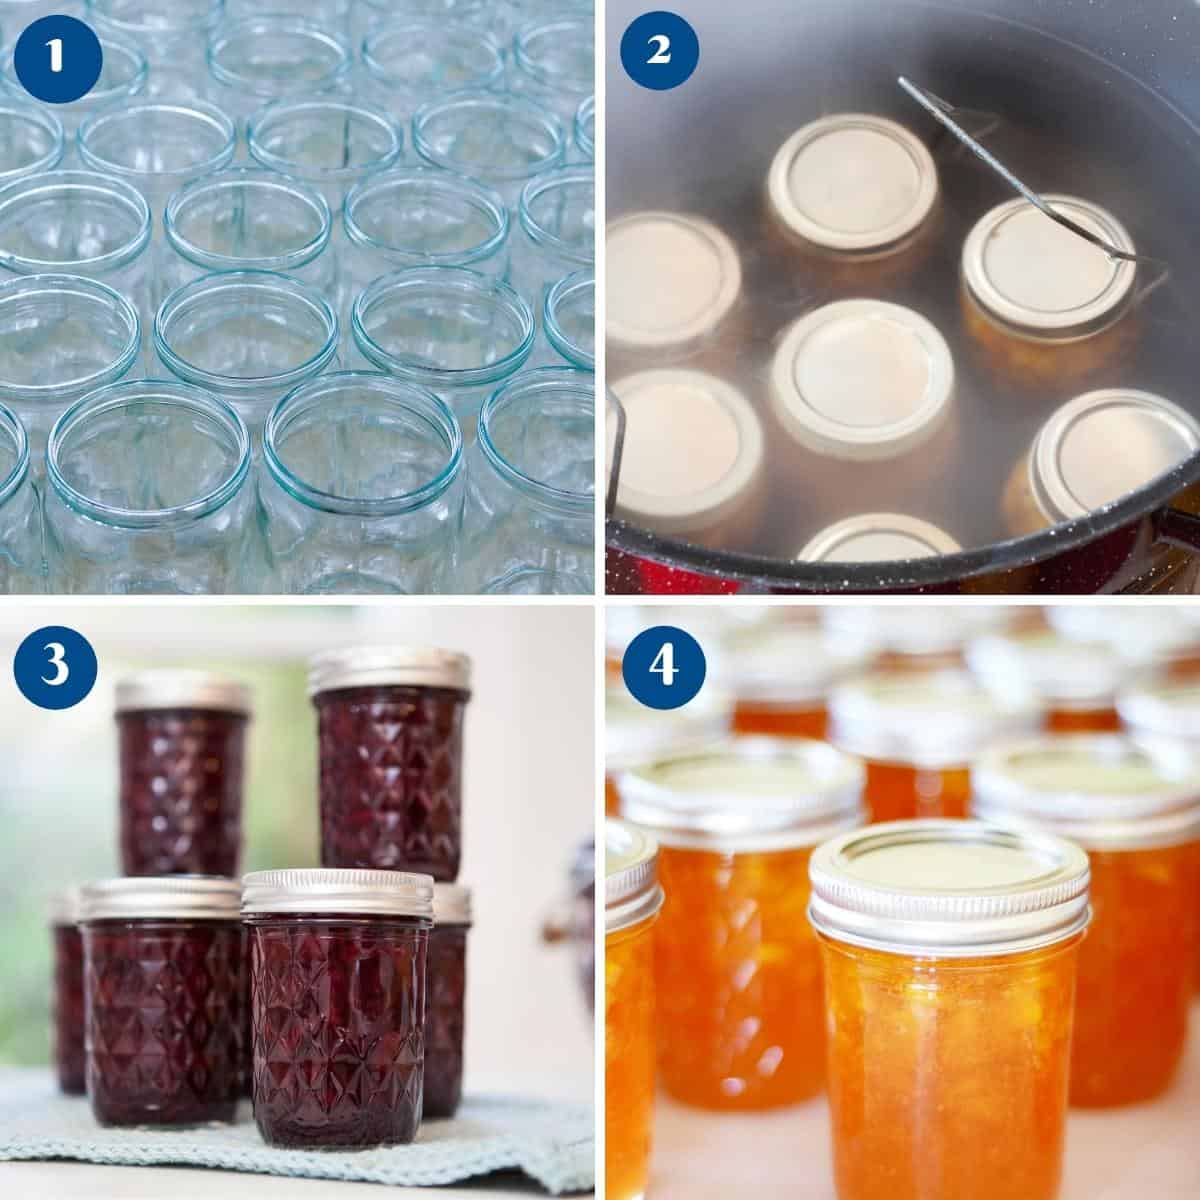
- Sterilize 4 x 8 oz (250 g) jars by washing them in hot soapy water or cleaning them in the dishwasher with a gentle cycle. Then, place them in the oven for 20 minutes at a low temperature of 284 °F / 140 °C.
Pro tip – I find the dishwasher does a good job of cleaning, and the oven dries any excess moisture in the bottles. - Note – Leave them in the oven until you are ready to use them (you can turn the oven off). Don’t forget to wash and sterilize the bottle lids as well.
Canning process
- Place a rack in the bottom of a large stockpot or boiling water canner. Fill half the pot with water. Bring the water in the pot to a boil on high heat.
- Lower the jars onto the rack, leaving enough space between them.
Pro tip – The level of water should be at least an inch above the top of the jars. So if necessary pour more boiling water. - Bring the water to a boil again. Cover the pot and process/simmer for 15 minutes.
- Then, carefully remove the jars from the stockpot and place them on a kitchen towel to absorb any excess moisture. Cool completely.
Pro tip – The hot jars are very delicate, so make sure to use tongs when taking them out and place them on soft towels to prevent them from breaking. - Press the top of the lid to ensure the seal is tight – the lid should not move at all. Store in a cool, dry place.
Storage
- If canning, the canned orange marmalade will stay in a cool, dry place in the pantry for up to a year or even longer.
- When not canned, the marmalade will stay at room temperature for a month or more in good weather.
- You can also keep the marmalade in the fridge for 3 to 6 months.
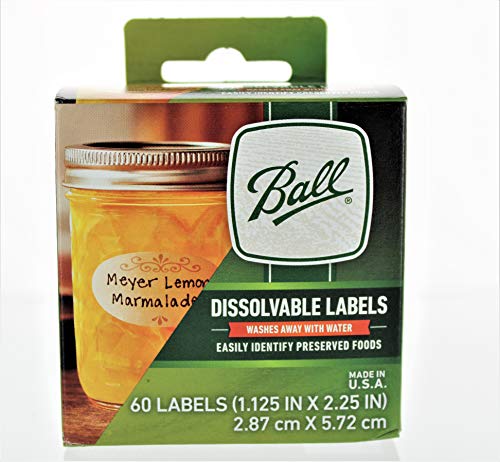
- Label the jar with the name and date so you know what is in it and when you made it.
Orange Marmalade No-Pectin
This orange marmalade or confiture d'orange is low in sugar. It's made all-natural the old-fashion method without pectin or artificial flavoring. So, it's sweet, sticky, and less bitter than commercial condiments using my no-fail method below.
Video
Ingredients
- 4.5 lbs (2 kg) Oranges washed & scrubbed
- 4 cups (800 g) Sugar
- 2 Lemons
- 3.5 cups (800 ml) Water
Method
- Place two small ceramic plates in the freezer so we can use these to test the marmalade later. Alternatively, you can use a candy thermometer to check the doneness of the jam.
- Zest and juice the lemons – and set aside.
- Zest the oranges – Use a sharp vegetable peeler or paring knife and peel the bright orange-colored zest making sure not to get the bitter white pith underneath. Julienne or cut the zest into strips. And set aside.Alternatively, you can use a citrus zester that I have used in the video to zest the oranges. And set aside.Pro tip – Thoroughly wash and lightly scrub the oranges to ensure the peels are clean before you zest them.
- Juice the oranges – Cut the oranges in half and squeeze the juice out. Strain the juice to remove any peps or pulp. Set aside.Pro tip – I like to work over a strainer to ensure I get as much of the juice as possible.
- Collet the pith and membranes – Collect the pulp, pips, and remove as many membranes from the orange as possible (see video). Tie it all in a cheesecloth. And set aside for later.Pro tip – The pectin we need to make marmalade is in these pips, pulp, and zest, so make sure to save collect as much as you can.
- In a heavy-bottom pan, add the orange and lemon zest, lemon and orange juice, and water. Place the cheesecloth with the membranes inside the pot as well.Pro tip – Make sure the cheesecloth is tied well so it does not open in the pot with boiling.
- Bring to a boil. Then, cook on medium simmer partially covered. Cook until the orange zest becomes soft, the liquid will reduce to about one-third of its original volume.Pro tip – It can take from 20 to 30 minutes depending on the zest as well as the time and temperature of heat. What is important is that the zest gets soft.
- Then, remove the bag from the pan making sure to squeeze out as much of the liquid as possible. Pro tip – It is best to take this bag out now before we add the sugar. Otherwise, it gets harder to squeeze the sweeter juice out later.
- Once the orange zest is soft, add the sugar. Cook on medium heat until the sugar is dissolved. Then, turn the heat up and let the mixture come to a boil. Let it boil for two minutes on medium-high. Then, reduce the heat to medium-low.Pro tip – The marmalade should still be simmering but at a low simmer, not bubbling.
- Continue to simmer on medium-low for about 20 to 30 minutes more stirring often so it does not stick to the bottom of the pan. The marmalade will continue to thicken as well as deepen in color as it cooks.Pro tip – The cooking time will depend on the quantity of the marmalade as well as the heat applied to it. It's ok to cook a little longer, but there must be a simmer for the gelling process to start.
- Remove one of the ceramic plates from the freezer. Place a teaspoon of marmalade on the cold plate. Pro tip – The cold plate will help cool the marmalade almost instantly and give you a good indication if it is ready.
- Set aside for 2 to 3 minutes. Then, test with your finger. Simply move/push the marmalade with your finger. If it wrinkles/crinkles it means it is ready. And if not, let the marmalade cook a couple of minutes more and test again.Pro tip – You may need to test on a ceramic plate more than once or a couple of times depending on how early you start checking.
- Alternatively, you can use a candy thermometer – the marmalade should reach 105 C / 221 F.Pro tip – I find the thermometer to be the easiest and fool-proof method to check for doneness.
- Optional – Just when you are ready to take the marmalade off the heat add a teaspoon of butter and stir well. Butter helps dissolve foam that accumulates on top of the jam. Pro tip – You don't need more than 1 teaspoon of butter to help with the foam. It will also give you that glossy shine.
- Pour the marmalade into warm sterilized jars leaving 1/4 inch space from the top. Use a clean sterilized knife or spatula to move it a bit – this will remove any air pockets.
- Place a piece of wax paper on the top before you place the lid on tightly. Clean the rim of the jar with a clean paper towel. Top the lid. Alternatively, use the lid with screw-on rings that come with the canning jars.
- Sterilize 4 x 8 oz (250 g) jars by washing them in hot soapy water or cleaning them in the dishwasher with a gentle cycle. Then, place them in the oven for 20 minutes at a low 284 F / 140 C.Pro tip – I find the dishwasher does a good job of cleaning and the oven dries any excess moisture in the bottles.
- Note – Leave them in the oven until you are ready to use them (you can turn the oven off). Don’t forget to wash and sterilize the bottle lids as well.
- Place a rack in the bottom of a large stockpot. Fill half the pot with water. Bring the water in the pot to a boil on high heat.
- Lower the jars over the rack leaving enough space between the jars.Pro tip – The level of water should be at least an inch above the top of the jars. So, if necessary pour more boiling water.
- Bring the water to a boil again. Cover the pot and process/simmer for 15 minutes.
- Then, carefully remove the jars from the stockpot and place them on a kitchen towel to absorb any excess moisture. Cool completely. Pro tip – The hot jars are very delicate so make sure to use tongs when taking them out and place them on soft towels to prevent them from breaking.
- Press the top of the lid to ensure the seal is tight – the lid should not move at all. Store in a cool dry place.
Notes
- Shelf life – Homemade marmalade made with sugar and fresh fruit can have a long shelf life. If processed with the canning method, and stored properly in a cool dark place, marmalade can last for up to 2 years. Once opened it can be kept in the refrigerator for up to 3 months
- Bitter marmalade – The best way to take the bitterness out of orange marmalade is to make sure to use the outer zest or rind of the orange. Making sure to not get the white underneath. The white pith is where the bitterness is. This does require a little bit of effort but it will give you the best sweet (with a slight bitterness) homemade orange marmalade.
- Do you need lemon juice? Almost all jams use lemon juice. Lemon is a great way to cut down on that sweetness with a citrus edge. It also prevents the sugar from crystallizing. Most importantly the lemon helps prevent any growth of bacteria when canning the marmalade.
- How long do you cook marmalade? We often say low-heat slow cooking is what makes a good jam. This does not mean it takes a long time. Usually, a good 20 minutes is all it needs for about 1 kg / 2 lbs of fruit jam to reach a set point. You can start checking the marmalade after it has been cooking for 18 to 20 minutes.
- Marmalade no setting -Often the reason a jam or marmalade does not set though reduced to half is that it has not been boiled enough. The low-heat slow cooking is what makes marmalade reach its setting point. If cooked too fast the liquid is reduced but without going thru the natural process of setting. So, low-heat slow cooking is the key to a perfect marmalade.
- Over-cooked marmalade – It is possible to overcook marmalade. It is better to undercook rather than overcook a marmalade. Because undercooked can be cooked again, but once overcooked you have to add water to thin the jam. Note, once you add water you reduce the shelf life of the marmalade as well. Best to get it right the first time.
- Jam done test – getting the marmalade off the heat is critical and often we take it off too soon or too late resulting in a runny or too thick marmalade. So here is an old mom’s method that works great to test any fruit marmalade.
- Place two ceramic plates in the freezer or fridge. These cool while the marmalade is cooking. When you are ready to test – bring the cold plate out. Put a spoonful on the plate. The cold plate will instantly cool it giving you an indication of how much it has set. Simply put the mixture on the plate from the corner towards the center. If it wrinkles it is set. Time to take the marmalade off the heat. If not, continue with a few more tests – every 3 to 5 minutes.
- If you do have a candy thermometer on hand you can use it and take the guesswork out. I used mine for instructional videos to show the process for those who would like to use a candy thermometer.
Storage
- If canning, the canned orange marmalade will stay in a cool dry place in the pantry for up to a year or even longer.
- When not canned, the marmalade will stay at room temperature for a month or more in good weather.
- You can also keep the marmalade in the fridge for 3 to 6 months.
- Label the jar with the name and date so you know what is in and when you made it.
Equipment you will need


Nutrition
Tried this recipe?
Mention @veenaazmanov_kitchen or tag #veenaazmanovkitchen!Tips for success
- Shelf life – Homemade marmalade made with sugar and fresh fruit can have a long shelf life. If processed with the canning method and stored properly in a cool, dark place, marmalade can last for up to 2 years. Once opened, it can be kept in the refrigerator for up to 3 months
- Bitter marmalade – The best way to take the bitterness out of orange marmalade is to make sure to use the outer zest or rind of the orange. Make sure not to get the white underneath. The white pith is where the bitterness is. This does require a little bit of effort, but it will give you the best sweet (with a slight bitterness) homemade orange marmalade.
- Do you need lemon juice? Almost all jams use lemon juice. Lemon is a great way to cut down on that sweetness with a citrus edge. It also prevents the sugar from crystallizing. Most importantly, the lemon helps prevent bacterial growth when canning the marmalade.
- How long do you cook marmalade? We often say low-heat, slow cooking is what makes a good jam. This does not mean it takes a long time. Usually, a good 20 minutes is all it needs for about 1 kg / 2 lbs of fruit jam to reach a set point. You can start checking the marmalade after it has been cooking for 18 to 20 minutes.
- Marmalade no setting – Often, the reason a jam or marmalade does not set, though reduced to half, is that it has not been boiled enough. The low-heat slow cooking is what makes marmalade reach its setting point. If cooked too fast, the liquid is reduced, but without going through the natural process of setting. So, low-heat slow cooking is the key to a perfect marmalade.
- Over-cooked marmalade – It is possible to overcook marmalade. It is better to undercook than to overcook marmalade. Because undercooked can be cooked again, but once overcooked, you have to add water to thin the jam. Note, once you add water, you reduce the shelf life of the marmalade as well. Best to get it right the first time.

more jam recipes
- Microwave Strawberry Jam,
- Strawberry Jelly
- Mixed Berry Jam,
- Fresh Fig Jam,
- Blueberry Jam Recipe,
- See all jam recipes


Frequently asked questions
Pectin is an essential ingredient for jams, jellies, and preserves. Without pectin, our jams and jellies will not set. Pectin is naturally found in many fruit seeds and skins, but can also be produced artificially.
Commercial pectin is usually made from the fruit rind. Using artificial pectin can reduce the jam cooking time and give you a high yield, but it lacks that intense flavor produced through longer, slower cooking by the natural production of pectin in jam.
All fruits have pectin, which is a natural substance. Some fruits have more pectin than others, such as blueberries and apples. Oranges have plenty of pectin, so you don’t really need any more pectin.
Our grandmothers did not use any artificial pectin either. And yet, they’ve made us some amazing jams and marmalades. Low-heat, slow cooking is the key to making a good orange marmalade because that’s when the pectin is naturally released.
Yes, you can use other citrus fruits like blood oranges, lemons, lime, grapefruits, and mandarins. Some fruits may be more bitter and tart than others.
The pith, pips, and membranes are the parts of the fruit that are rich in pectin, so they are important ingredients in the process of making orange marmalade. If you choose to omit the natural process of pectin in this marmalade-making process, I highly recommend using artificial pectin. You will need about 2 boxes for this recipe, which is about 12 tbsp.
Yes, it is possible to overcook marmalade. It is better to undercook rather than overcook. Because undercooked can be cooked again, but once overcooked, you have to add water to thin the marmalade. And once you add water, you reduce the shelf life of the jam or marmalade
Spread it over chicken thighs and bake till done for a simple yet scrumptious orange chicken.
Spoon over plain homemade yogurt to make a fruity orange yogurt.
Mix it in a cocktail with gin for an orange marmalade martini
Spread it in the base of a baked tart, then top it with vanilla crème patisserie for an orange tartlet.
Serve it with French toast, waffles, and pancakes.
Use it as a filling in cupcakes for wonderful orange cupcakes.
Spread it over Brie and bake it wrapped in puff pastry for a delicious baked orange brie.
more recipes with oranges
- Orange Macarons with Orange Curd
- Moist Orange Bundt Cake
- Frosted Orange Birthday Cake
- One Bowl Almond Orange Cake
- Orange Curd Filling (No-Fail Recipe)
- Fruity Orange Marmalade: No-Pectin


Don’t lose this recipe! Save it for Later!
📌 Save this Recipe for later on Pinterest so you can easily find it again.
⭐ Add Veena Azmanov Kitchen to your Google Preferred Sources.
It helps Google show you more of our recipes.
📧 Subscribe for new recipes delivered to your inbox.
🎥 Follow us for more recipes


Recipe works a treat with a lovely tang and I’m really fussy with marmalade.
Thank you, Rose, for the lovely feedback. I am so happy that you enjoyed this recipe
I was given a lot of oranges and found this recipe. EXCELLENT! Thank you so much
Thank you Cathy
Absolutely blinding! What a brilliant recipe find this was.
This afternoon me and my daughter made this marmalade with the oranges and lemons from our garden. It took a bit more time than we expected but the results are amazing. A good well set marmalade with just the right amount of sweetness. We added three star anise at the initial stage and then popped them in the bag with the pulp…..definitely a great flavour enhancer. Next time we will try cinnamon .
Thank you so much for sharing your recipe.
Thank you so much for the lovely feedback.
Do I have to strain the pulp out? Can I leave the pulp in the marmalade?
Thanks for such great instructions and tips.
The pulp is bitter!
I couldn’t even read the recipe because of the pop up ad from “Freestyle Libre 2” coming up smack dab in the middle of the screen MORE than 12 times!!!!
Get them to stop!!!!!
Linda what pop-ups are you talking about? If you can please send me a screenshot ([email protected]) so I can contact the ad tech guys. I don’t see what you see. And they insist that my ads are within the norm.
Can coconut sugar be substituted?
I have not tried!
Foolproof. I do this recipe every January when Seville oranges appear and it never fails me! I love that it is low in sugar and yet still sets well, as I usually find jams unnecessarily sweet but am always worried it won’t work without equal parts fruit and sugar. So good!
Thank you so much, Claire. I am so happy you enjoyed this recipe.