Letter Cakes Recipe Tutorial


These letter cakes or alphabet cakes are in trend these days. And they are perfect to celebrate no matter what the age. This letter Z is made with a delicious vanilla cake, layers of caramel whipped cream, and seasonal fruits.
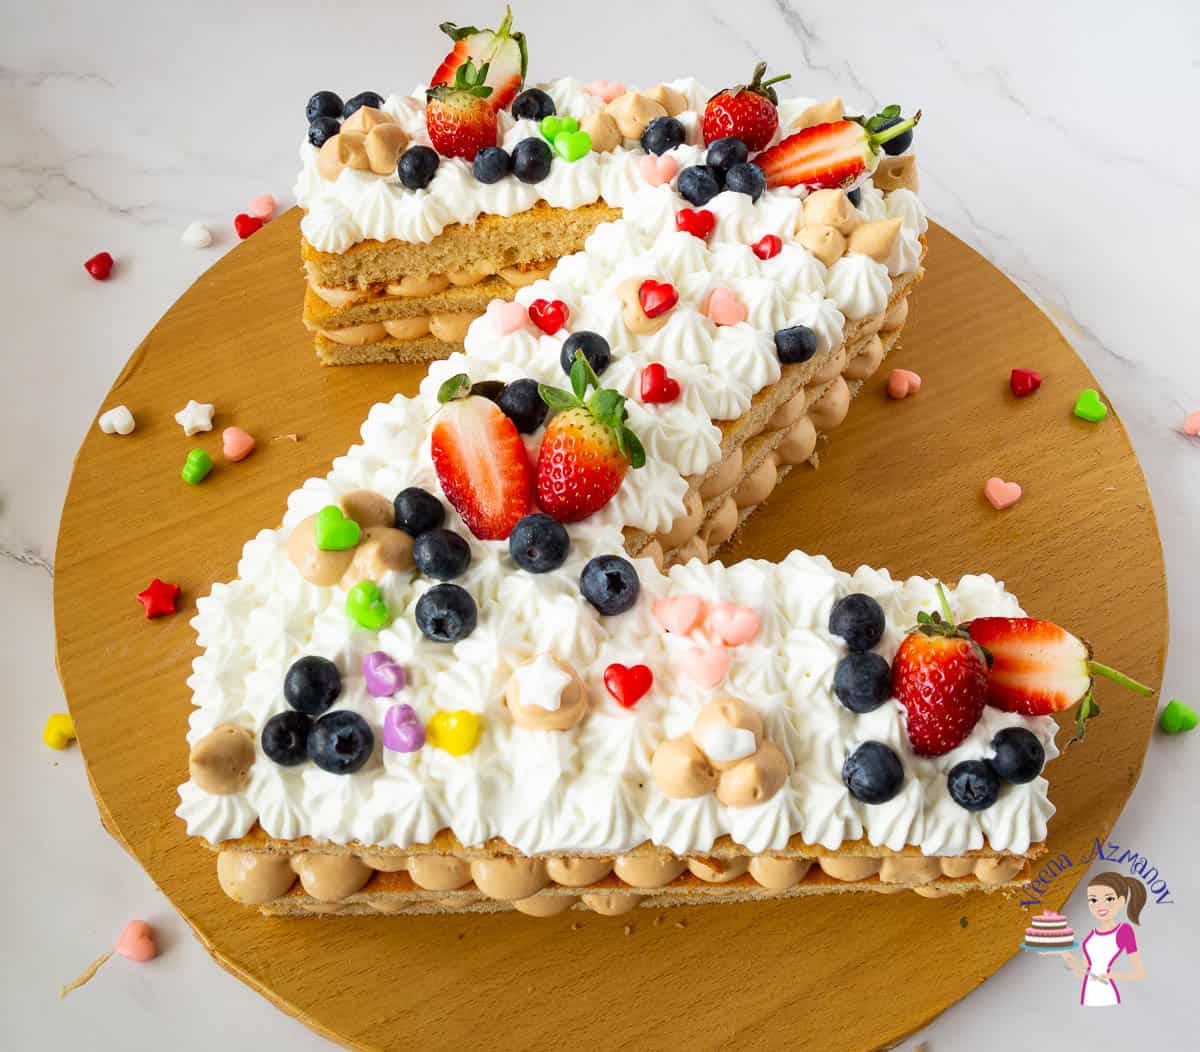
This alphabet cake features the letter Z for Ziv, my husband, who celebrated his birthday recently. It was such a refreshing dessert compared to all the layer cakes we usually make. In particular, the caramel whipped cream is finger-licking good!
Why make this cake?
- It looks so impressive, but, honestly, very easy to make.
- Additionally, you don’t need a special pan; all you need is a printed image of the letter, number, or shape in the desired size.
- The image does not have to be a special printout. Just use your home printer and cut around the edges. Additionally, if desired, you can use clean tape to prevent the template from getting stained with oil.
- Today, I am frosting it with caramel frosting and whipped cream, but almost any frosting you like would work with this recipe.

Ingredients and substitutes
- Flour – I highly recommend all-purpose flour for this cake. The butter adds stability while the oil keeps it moist yet light and airy.
- Sugar – I am using brown sugar because it adds a nice caramel flavor to the cake. This complements the caramel whipped cream. But you can certainly use white sugar, too.
- Fat – I am using a combination of butter for that rich flavor and oil, as it keeps the cake moist. While you can use all butter, I do not recommend all oil, as it can cause the fruit to sink.
- Sour cream – Gives a nice soft crumb and texture to the cake. You can also make homemade sour cream. Of course, Greek yogurt is often a great substitute for sour cream as well.
- Vanilla – You can use vanilla extract, bean paste, and vanilla sugar.

Step-by-step instructions: Letter cake
Cake batter
- Preheat the oven to 325°F / 165°C / Gas mark 3.
- Grease and line three 9 x 11-inch sheet pans with parchment paper. You can also make just two thicker cake layers.

- Dry ingredients – In a bowl, combine the all-purpose flour, baking powder, baking soda, and salt. Set aside.
- In a bowl of a stand mixer with the paddle attachment, cream the butter, oil, and sugar until light and fluffy.
- Then, add the eggs, one at a time, to the batter, making sure to combine each one well.

- Next, add the flour mixture and sour cream in three batches. Combine well, but avoid overmixing.
- Pour the batter into the prepared baking pans and spread with an offset spatula towards the edges. Tap on the counter a few times to remove air pockets.
- Bake for 25 to 30 minutes or until a skewer inserted in the center comes out clean. When baked, cool in the pan for 10 minutes, then transfer to the cooling rack.
Caramel frosting
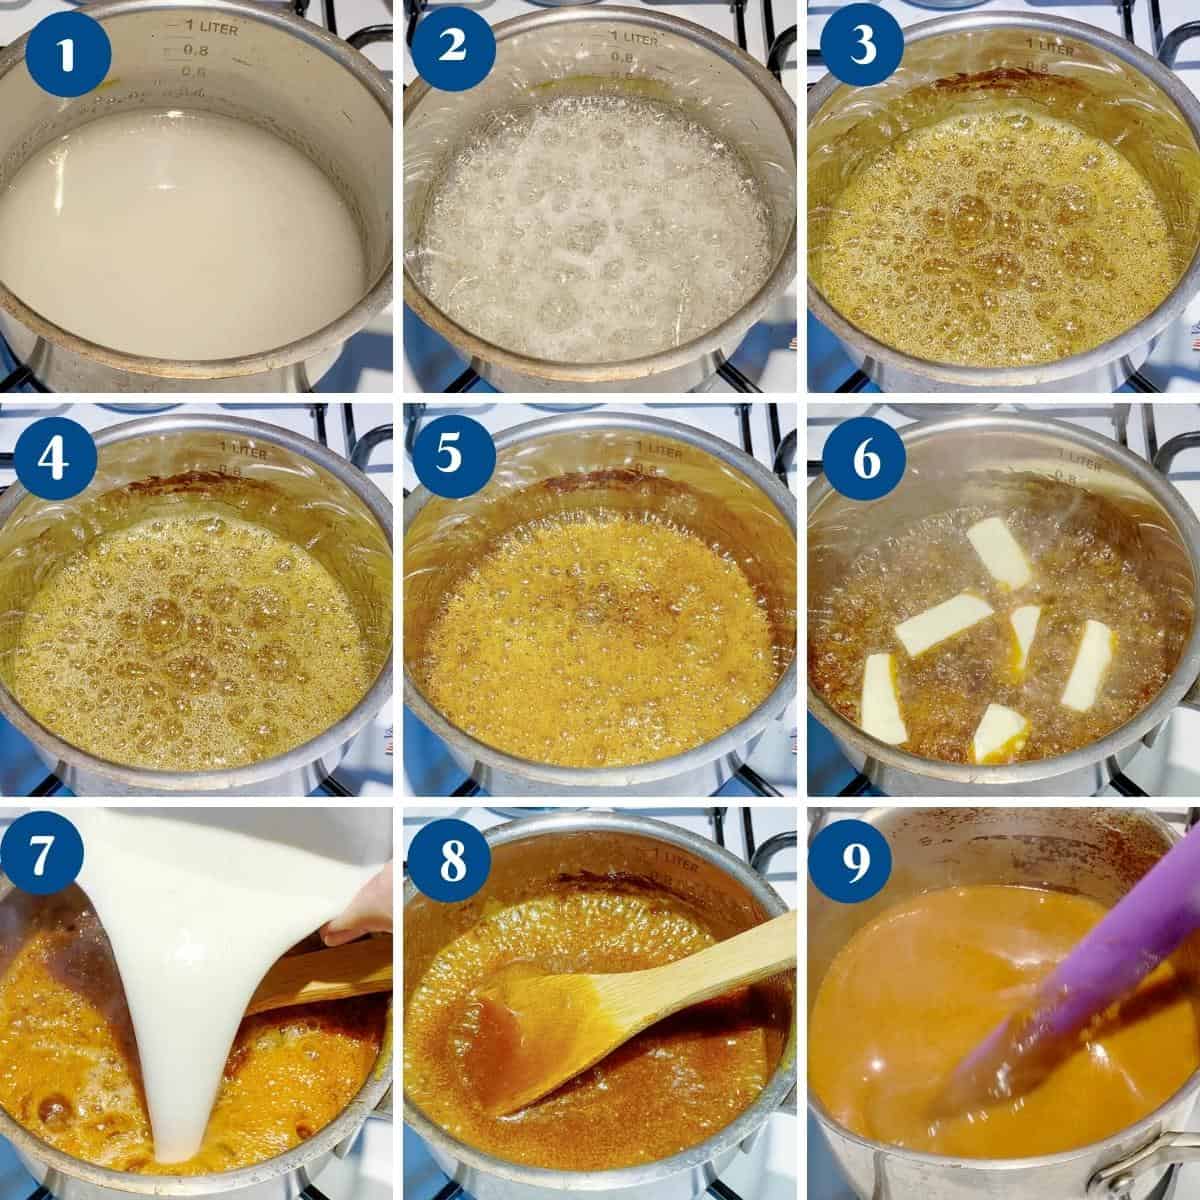
- In a heavy-bottomed deep saucepan, add the sugar, water, and corn syrup. With the heat on medium, bring the sugar to a boil. Then, shake
- The sugar should now be a deep amber color. Now, add the sea salt, followed by the butter, heavy cream, and vanilla extract.
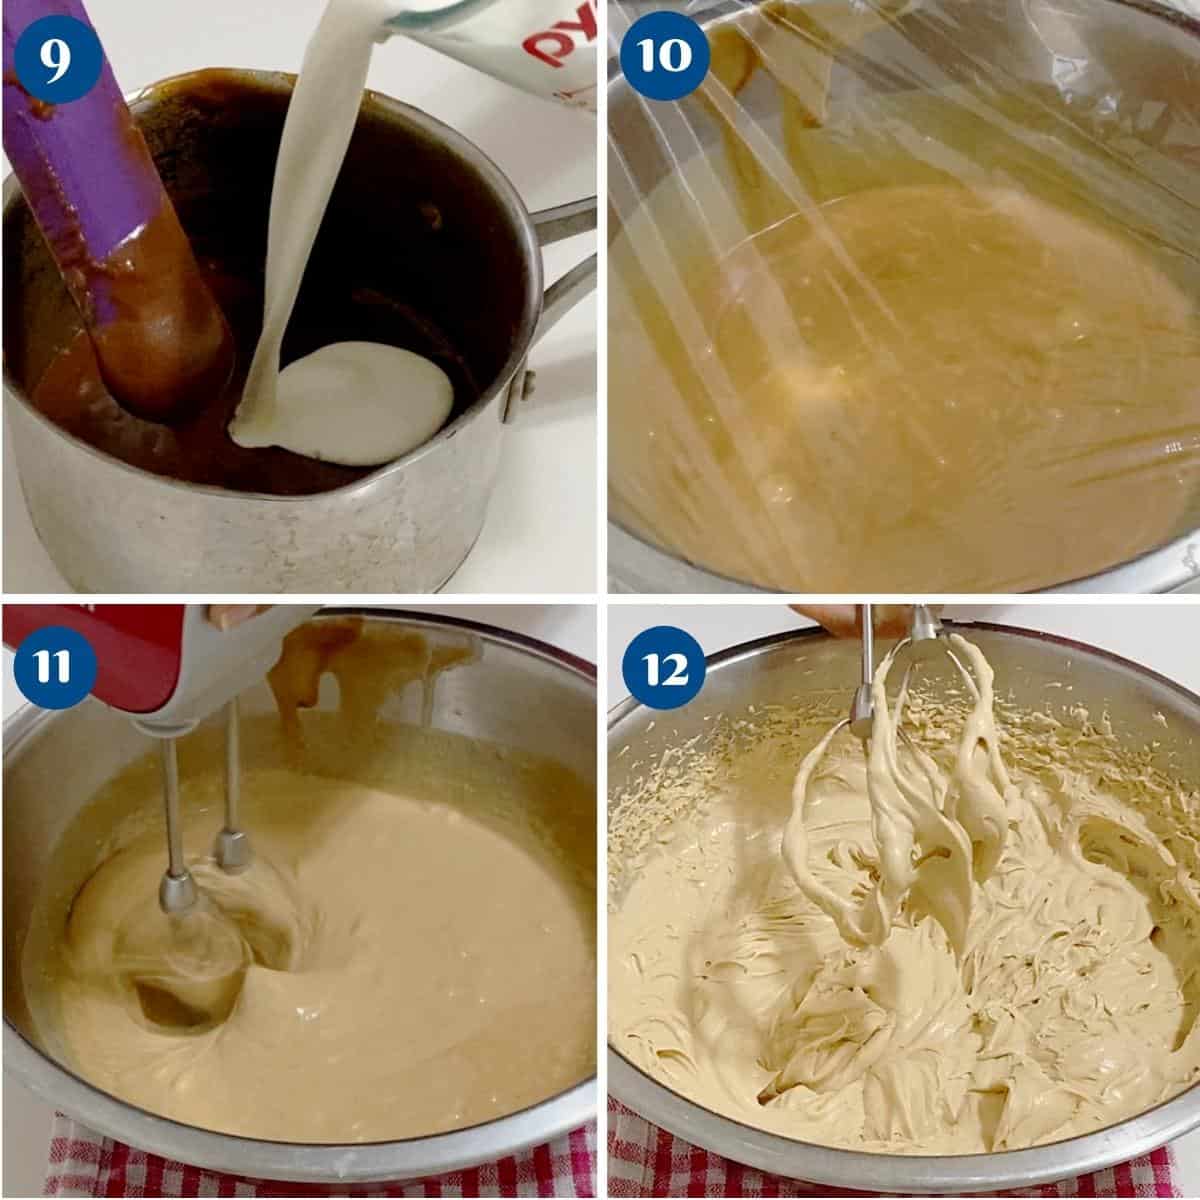
- Remove it from the heat and let it cool to room temperature. Then, add the remaining whipping cream. Pour the mixture into another bowl, cover it with plastic wrap, and refrigerate for at least 4 hours or overnight.
- Once cold, transfer to the stand mixer with a whisk attachment and whip to stiff peaks. Transfer to a piping bag with a round piping tip.
Whipping cream
- In a stand mixer with the whisk attachment, whip the whipping cream to stiff peaks. Transfer to a piping bag with a star piping tip.
Assemble
- Prepare simple syrup – cool completely before using.
- Using a bread knife or cake leveler, cut the domes off the cake layers.
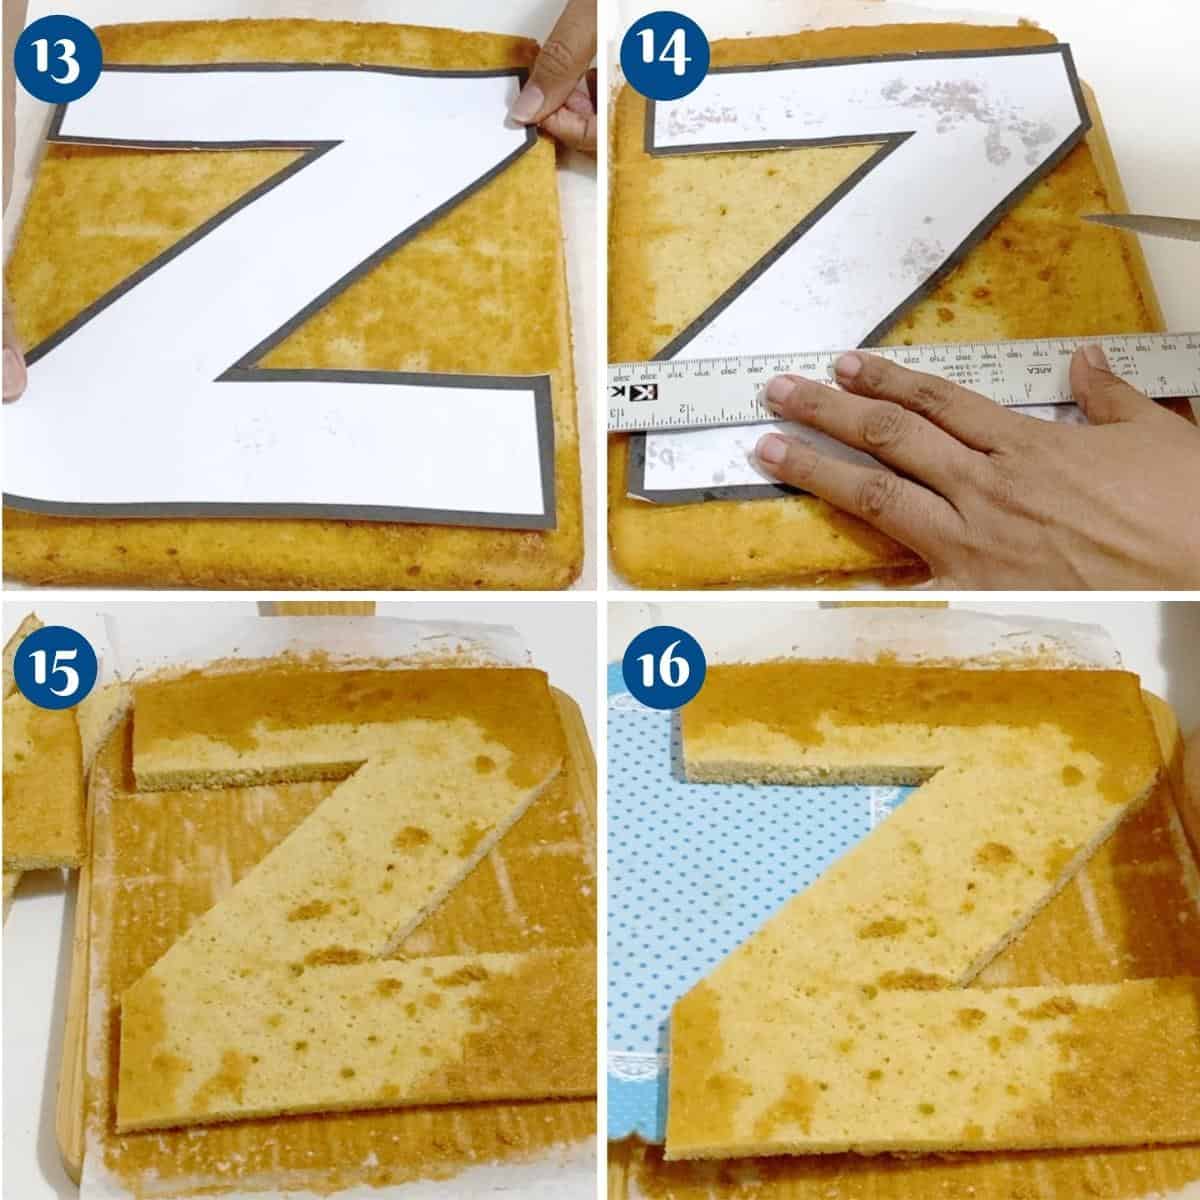
- Peel the parchment paper from the cake. Using the alphabet template, cut the cake into the desired shape, as shown in the video. Do this with all three sheet cakes.
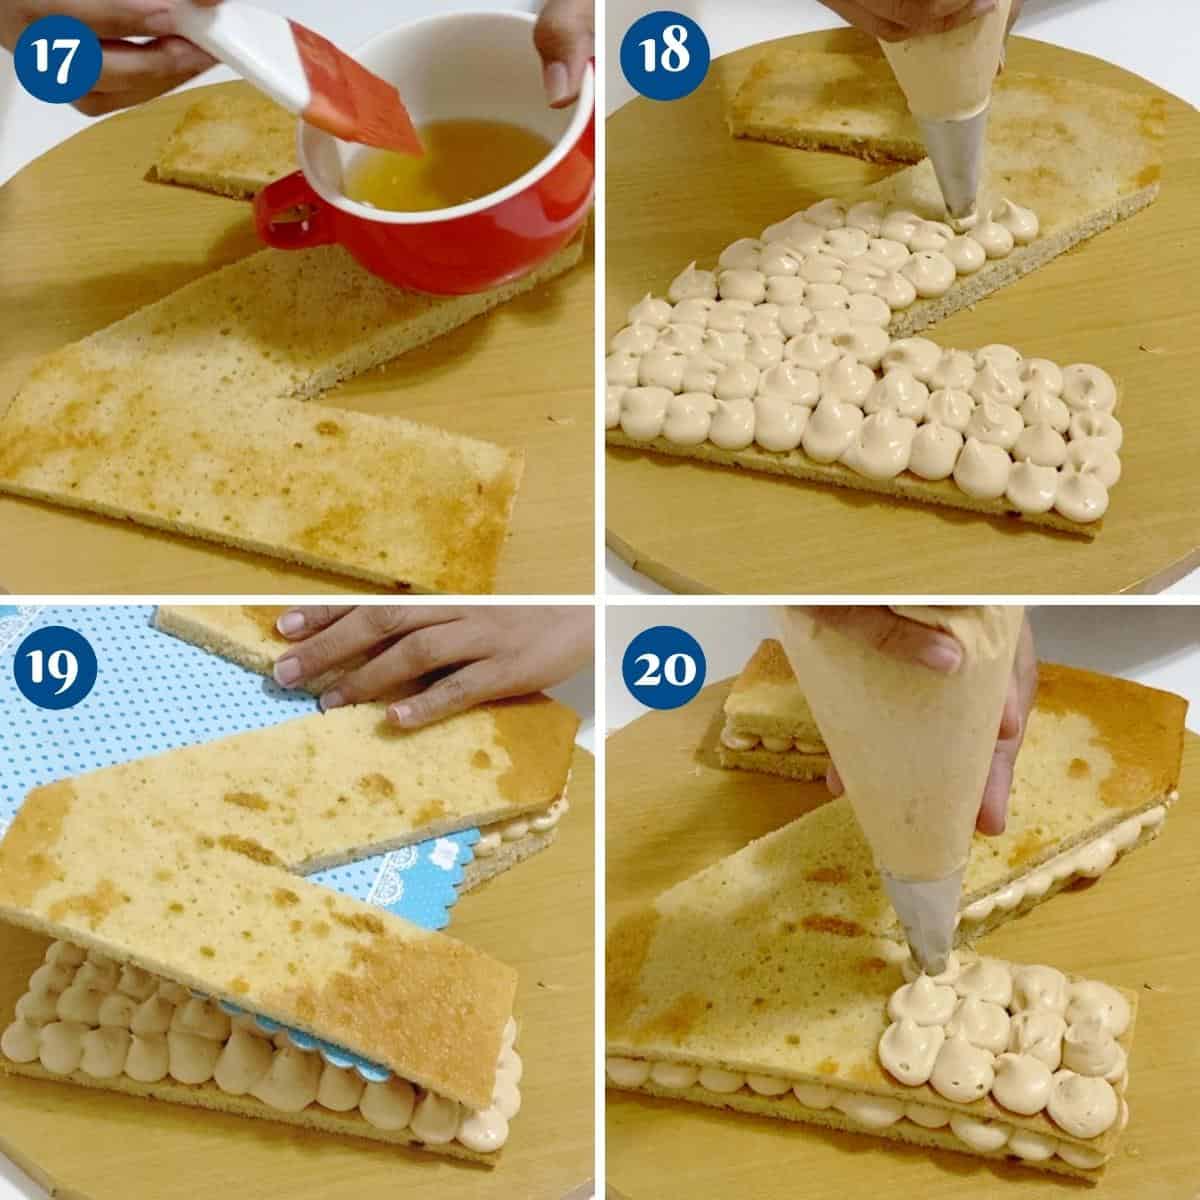
- Place the first layer on the cake board or cake stand. Brush each layer with the cooled simple syrup.
- Pipe the caramel frosting all over the alphabet, as shown in the video. Then, place the second layer on top, brush with simple syrup, and pipe more caramel frosting.
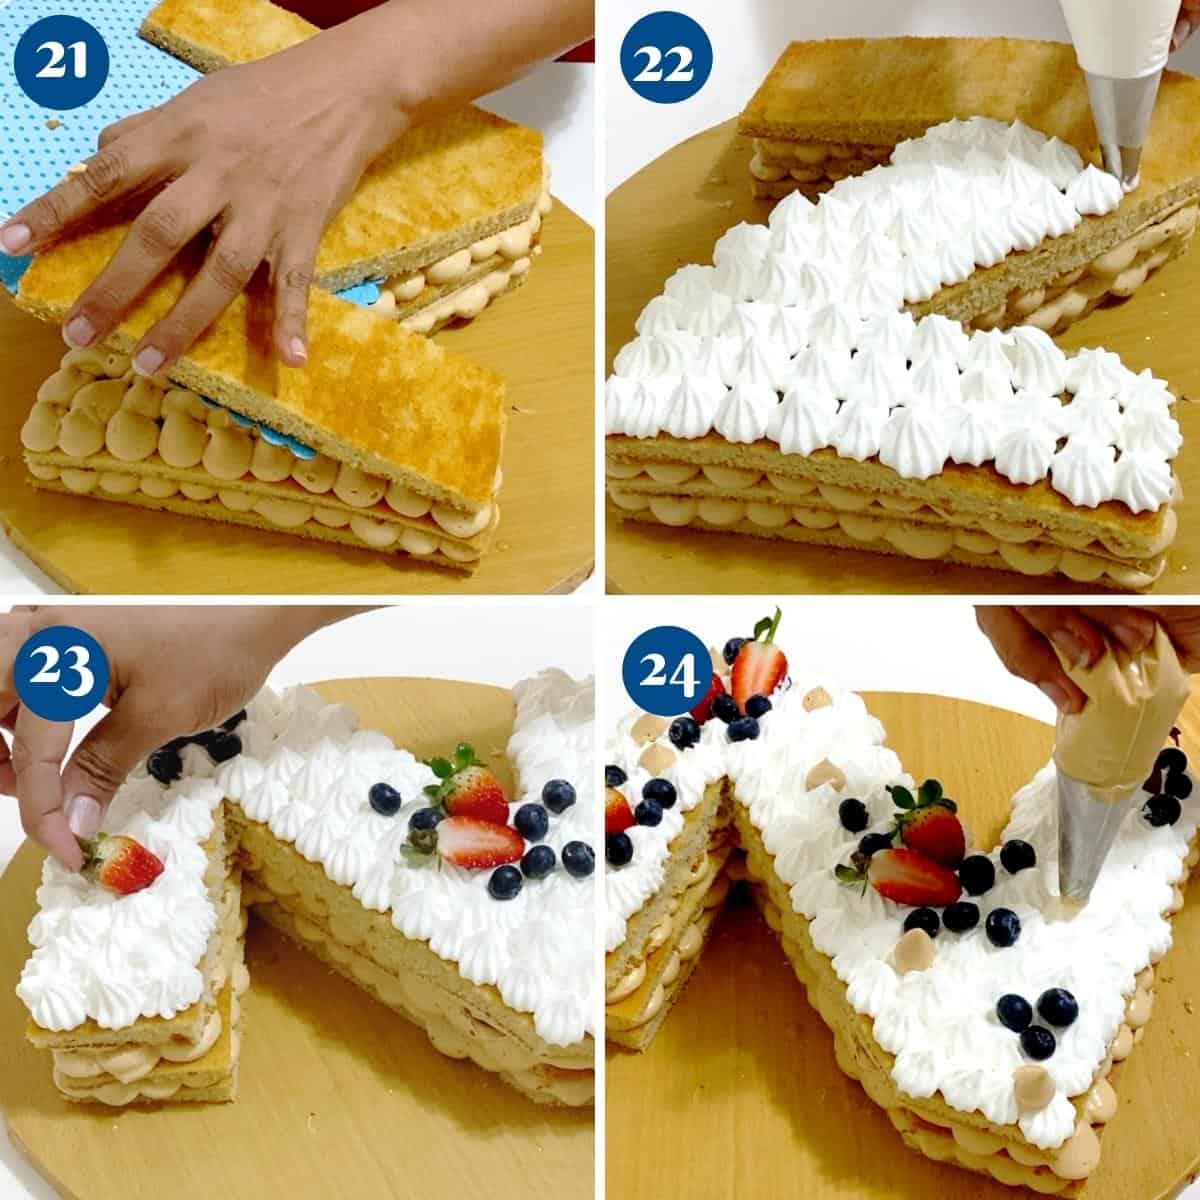
- Finally, top with the third layer, and this time, pipe the whipped cream all over.
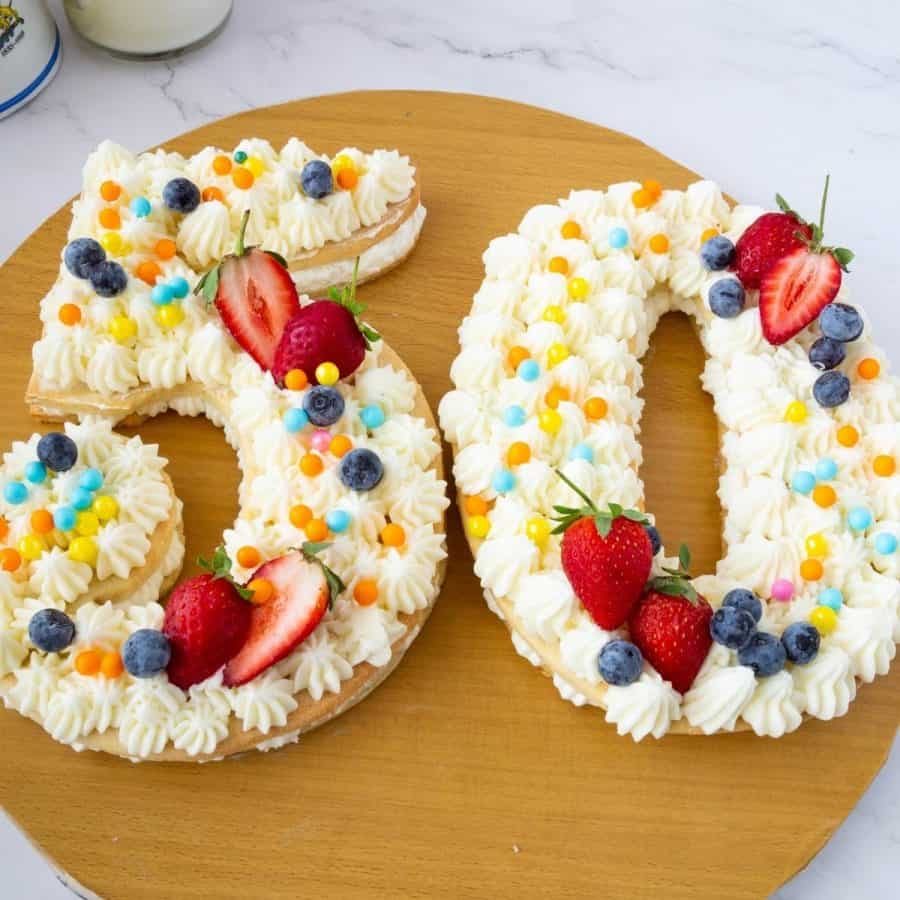
- Top the alphabet cake with fresh fruits or other decorations. I used strawberries and blueberries, along with a few colored heart candies.
- Enjoy!

More frosted cakes


Frequently asked questions
This cake will keep in the fridge for 3 to 4 days. The cake must be kept in the fridge because it contains whipped cream.
A letter cake can be made using a cake base, as we did today, or a cookie base, using cookie dough to cut out the alphabet or numbers. Layered with frosting and decorations of your choice.
When it comes to sculpted cakes, it is best to use a butter-based cake. This cake is wonderful because it has butter for stability and oil for moisture.
The options for decorations are plenty, from simple chocolate, biscuits, and candy to macarons, marshmallows, and fresh fruit.
You can buy plenty of novelty cake pans from the market. The problem, of course, is that not all of them have multiple uses for them. I personally prefer this method of using a template to cut the letter or number cake, so I am not stuck with a shaped cake pan once the project is done.
Letter Cake Recipe
These letter cakes or alphabet cakes are in trend these days. And they are perfect to celebrate no matter what the age. This letter Z is made with a delicious vanilla cake, layers of caramel whipped cream, and seasonal fruits.
Video
Ingredients
- 500 g (4 cups) All-purpose flour
- 2 tsp Baking powder
- 1 tsp Baking soda
- ½ tsp Salt
- 113 g (½ cup) Unsalted butter room temperature
- 120 ml (½ cup) Cooking oil flavorless
- 440 g (2 cups) Brown sugar
- 4 Eggs large
- 470 g (2 cups) Sour cream
- 2 tsp Vanilla extract
- 300 g (1½ cup) Granulated sugar
- 2 tbsp Light corn syrup
- 60 ml (¼ cup) Water
- 113 g (½ cup) Butter unsalted, room temperature
- 470 ml (2 cups) Heavy cream or Whipping cream (38% fat)
- 1 tsp Sea salt
- 1 tsp Vanilla extract
- 240 ml (1 cup) Heavy cream / Whipping cream for the top layer (38% fat)
- 2 – 3 tbsp Powdered sugar
- 60 – 90 ml (¼ -⅓ cup) Simple syrup
- 8 Strawberries
- 20 Blueberries
Method
- Preheat the oven at 325°F / 165°C / Gas mark 3. Grease and line three 9 x 11- inch sheet pans with parchment paper. You can also make just two thicker cake layers
- Dry ingredients – In a bowl, combine the all-purpose flour, baking powder, baking soda, and salt. Set aside.500 g All-purpose flour, 2 tsp Baking powder, 1 tsp Baking soda, ½ tsp Salt
- Wet ingredients – In a bowl of a stand mixer with the paddle attachment, cream the butter, oil, and sugar until light and fluffy. Then, add the eggs, one at a time, to the batter, making sure to combine each well into the batter.113 g Unsalted butter, 120 ml Cooking oil , 440 g Brown sugar, 4 Eggs
- Dry to wet – Next, add the flour mixture and sour cream in three batches. Combine well but do not overmix. Add the vanilla extact.470 g Sour cream, 2 tsp Vanilla extract
- Bake – Pour the batter into the prepared baking pans, spread with an offset spatula towards the edges. Tap on the counter a few times to remove air pockets. Bake for 25 to 30 minutes or until a skewer inserted in the center comes out clean. When baked, cool in the pan for 10 minutes then transfer to the cooling rack.
- In a heavy-bottom deep saucepan, add the sugar, water, and corn syrup. With the heat on medium, bring the sugar to a boil. Shake the pan slowly guiding the distribution of heat. DO NOT STIR.300 g Granulated sugar, 2 tbsp Light corn syrup , 60 ml Water
- The sugar should now be a deep amber color. Now, add the sea salt followed by butter, heavy cream, and vanilla extract. Remove it from the heat and let it cool to room temperature. Then, add the remaining heavy cream.113 g Butter, 470 ml Heavy cream or Whipping cream, 1 tsp Sea salt, 1 tsp Vanilla extract
- Remove it from the heat and let it cool to room temperature. Then, add the remaining heavy cream. Pour the mixture into another bowl, cover it with plastic wrap, and refrigerate for at least 4 hours or overnight.
- Pour the mixture into another bowl, cover it with plastic wrap, and refrigerate for at least 4 hours or overnight. Once cold, whip the mixture in a the stand mixer fitted with a whisk attachment until stiff peaks form. Transfer the frosting to a piping bag with a round piping tip.
- In a stand mixer with the whisk attachment, whip the whipping cream with powdered sugar to stiff peaks. Transfer to a piping bag with a star piping tip.240 ml Heavy cream / Whipping cream
- Prepare simple syrup – cool completely before using. Using a bread knife or cake leveler cut the domes off the cake layers.60 – 90 ml Simple syrup
- Peel the parchment paper from the cake. Using the alphabet template, cut the cake into the desired shape as shown in the video. Do this with all three sheet cakes.
- Place the first layer on the cake board or cake stand. Brush each layer with the cooled simple syrup
- Pipe the caramel frosting all over the alphabet as shown in the video. Then, place the second layer on top, brush with simple syrup, and pipe more frosting.
- Finally, top with the third layer, and this time, pipe the whipped cream all over. Alternatively, you can continue to pipe with more caramel whipped cream.
- Top the alphabet cake with fresh fruits or other decorations. I used strawberries and blueberries along with a few colored heart candies.8 Strawberries, 20 Blueberries
- Enjoy!
Notes
- Use room temperature ingredients for the cake and do not skip on creaming the butter and sugar.
- Always add eggs one at a time to prevent the batter from curdling.
- Will this batter you can make 2 thick layers or 3 thinner layers of cake.
- Thinner layers are best when using a light whipped frosting such as this caramel frosting. A buttercream frosting will hold thicker layers of cake better.
- The cake can be prepared a few days in advance.
- The unfrosted cake wrapped well in plastic will keep in the fridge for 3 to 4 days. It can even be frosted for up to a month.
- Print the image you want from the computer and cut around the outline to get the correct shape.
- Make sure the printed image is the same size as the cake.
- Once carved the cake will have exposed sides that can dry easily when exposed to air or the fridge.
- The butter in the caramel will help stabilize the whipped cream as it cool in the fridge. If you want you can also stabilize the whipped cream with gelatin.
Nutrition
Tried this recipe?
Mention @veenaazmanov_kitchen or tag #veenaazmanovkitchen!Don’t lose this recipe! Save it for Later!
📌 Save this Recipe for later on Pinterest so you can easily find it again.
⭐ Add Veena Azmanov Kitchen to your Google Preferred Sources.
It helps Google show you more of our recipes.
📧 Subscribe for new recipes delivered to your inbox.
🎥 Follow us for more recipes


I have this cake bookmarked for my daughter’s next birthday, her name starts with an “A.” I love that it’s different from a traditional cake. She is going to be SOOO excited!!
This letter cake is amazing! I’ve always wondered how to make this and I’m so glad I found your recipe. I can’t to try these and the caramel cream looks so delicious!
I’ve never made an alphabet cake but it’s so beautiful I’ll have to give it a try. When you bake the cake, what is the correct cooking time? You have 35 to 20 which doesn’t make sense. Is it supposed to be 20-35 minutes or is it 35 to possibly 40? Also, will a boxed cake work with that delicious caramel whipped cream? Can’t wait to impress someone special with this cake.
Thanks, Linda. It is 25 to 30 minutes baking. yes, any vanilla cake would work with caramel whipped cream.
love your recipes and this easy-to-follow recipe is a new addition. You made making letter cakes easy to imagine and execute. Am surely going to try this method and make a letter cake next.
Thank you so much for sharing this! It’s really helpful and very easy to understand! Will surely make this one again, really easy to make! Highly recommended!
Happy you enjoyed making this letter cake, Alyssa. Thank you for the lovely feedback.
This is such a beautiful dessert! Definitely going to have to make this for my husbands birthday next week; looks too good to pass up!
Absolutely stunning!! Not only does this cake look gorgeous, but the flavors packed into each layer sound incredible too.
What a stunning cake! Your tutorial and step-by-step photos are so helpful.
Your tips were so helpful! This is such a trendy cake, and looks very daunting, but you made it sounds so easy. Can’t wait to try it!
So creative! The cake looks so beautiful and sooo delicious!