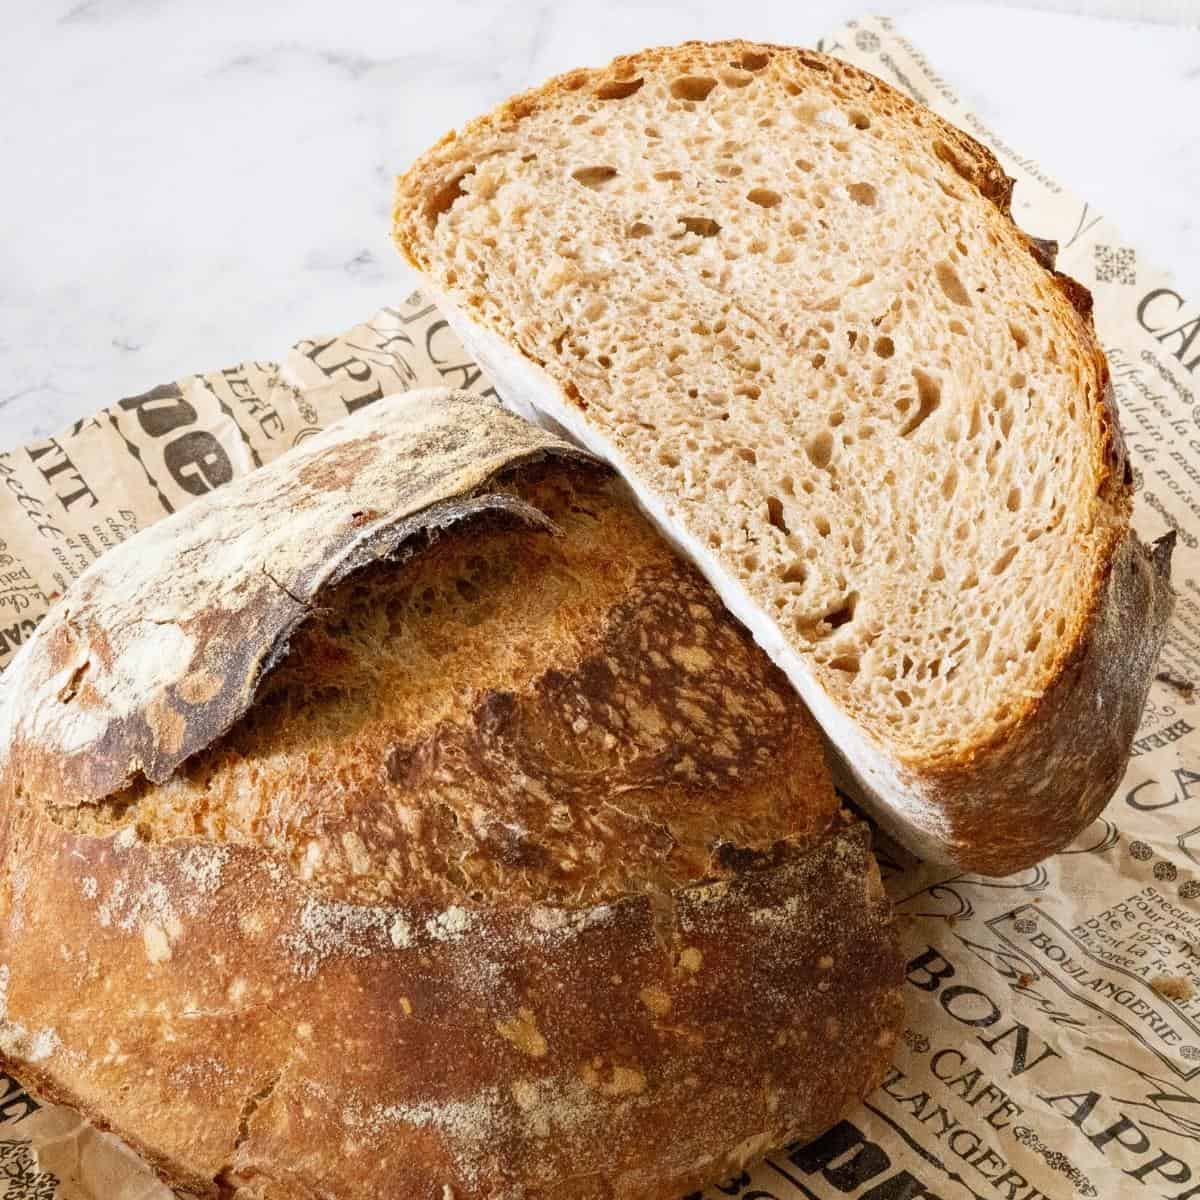
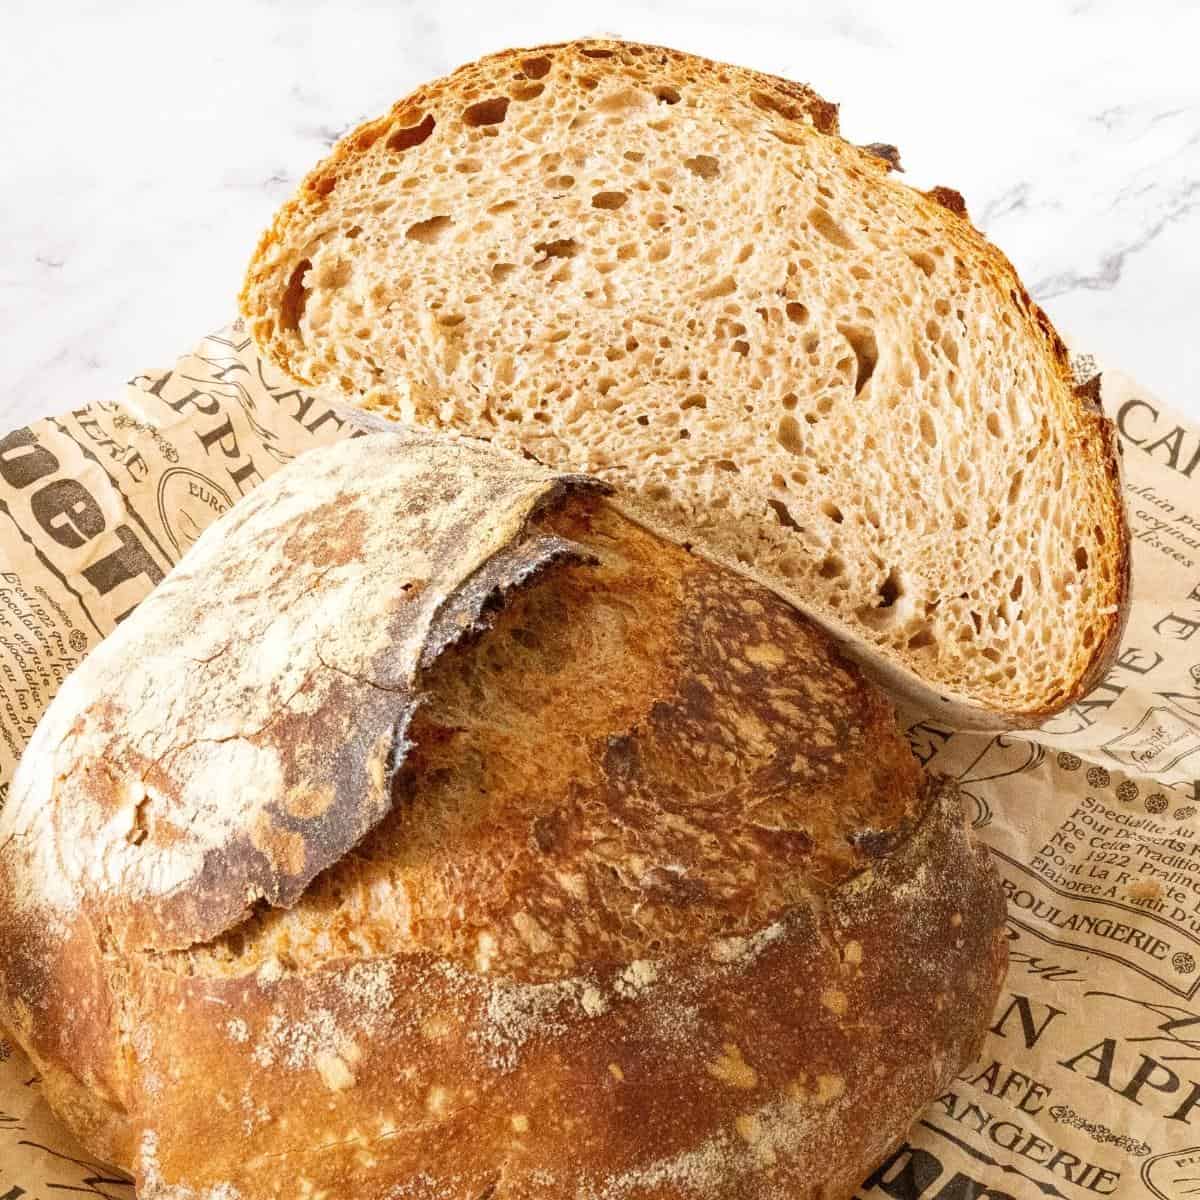
50% Whole Wheat Sourdough Bread Recipe


Discover the wholesome goodness of homemade sourdough with our 50% whole wheat sourdough bread recipe. This step-by-step guide will take you through the process, from creating a lively sourdough starter to baking a beautifully crusty loaf. Elevate your bread-making skills and enjoy the rich flavor and nutritional benefits of whole wheat in every slice.
Sourdough bread is a part of a culinary tradition that spans centuries. Baking sourdough is not just about creating a loaf of bread; it’s about connecting to a rich heritage of artisanal baking and timeless techniques. By embracing sourdough, you become part of this legacy. You are carrying forward the art and science of fermentation and preserving a centuries-old tradition.
Why make this recipe?
- The key to this recipe’s greatness lies in its ability to harness the power of sourdough. Sourdough is not just a leavening agent; it’s a living ecosystem of wild yeasts and bacteria that lend unique flavors and textures to your bread. By cultivating and nurturing this living culture, you are able to create a loaf that is not only delicious but also brimming with the rich history of fermentation.
- But why whole wheat sourdough bread specifically? Whole wheat flour adds depth and complexity to your bread, offering a nutty flavor and a hearty texture that is unparalleled. The natural sweetness of the whole wheat is complemented by the tangy notes from the sourdough fermentation process, resulting in a harmonious blend of flavors that will leave your taste buds satisfied.
- What sets this recipe apart is also its careful balance of ingredients and techniques. The combination of whole wheat flour, water, and a mature sourdough starter creates an ideal environment for fermentation, allowing the flavors to develop and the dough to rise to its fullest potential.

Bakers schedule
Day 1:
- 9:00 am: Autolyse
- 10:00 am: Mix in starter and salt, then set in proofer at 79°F.
- Rest for 45 minutes.
- Perform 3 sets of stretches and folds every 30 minutes.
- 2:30 pm: Pre-shape and bench rest for 30 minutes.
- 3:00 pm: Shape and place in the fridge for 18 hours.
Day 2:
- Next day: Bake at 450°F for 20 minutes with the lid on, then 20 minutes with the lid off.
Ingredients and substitutes
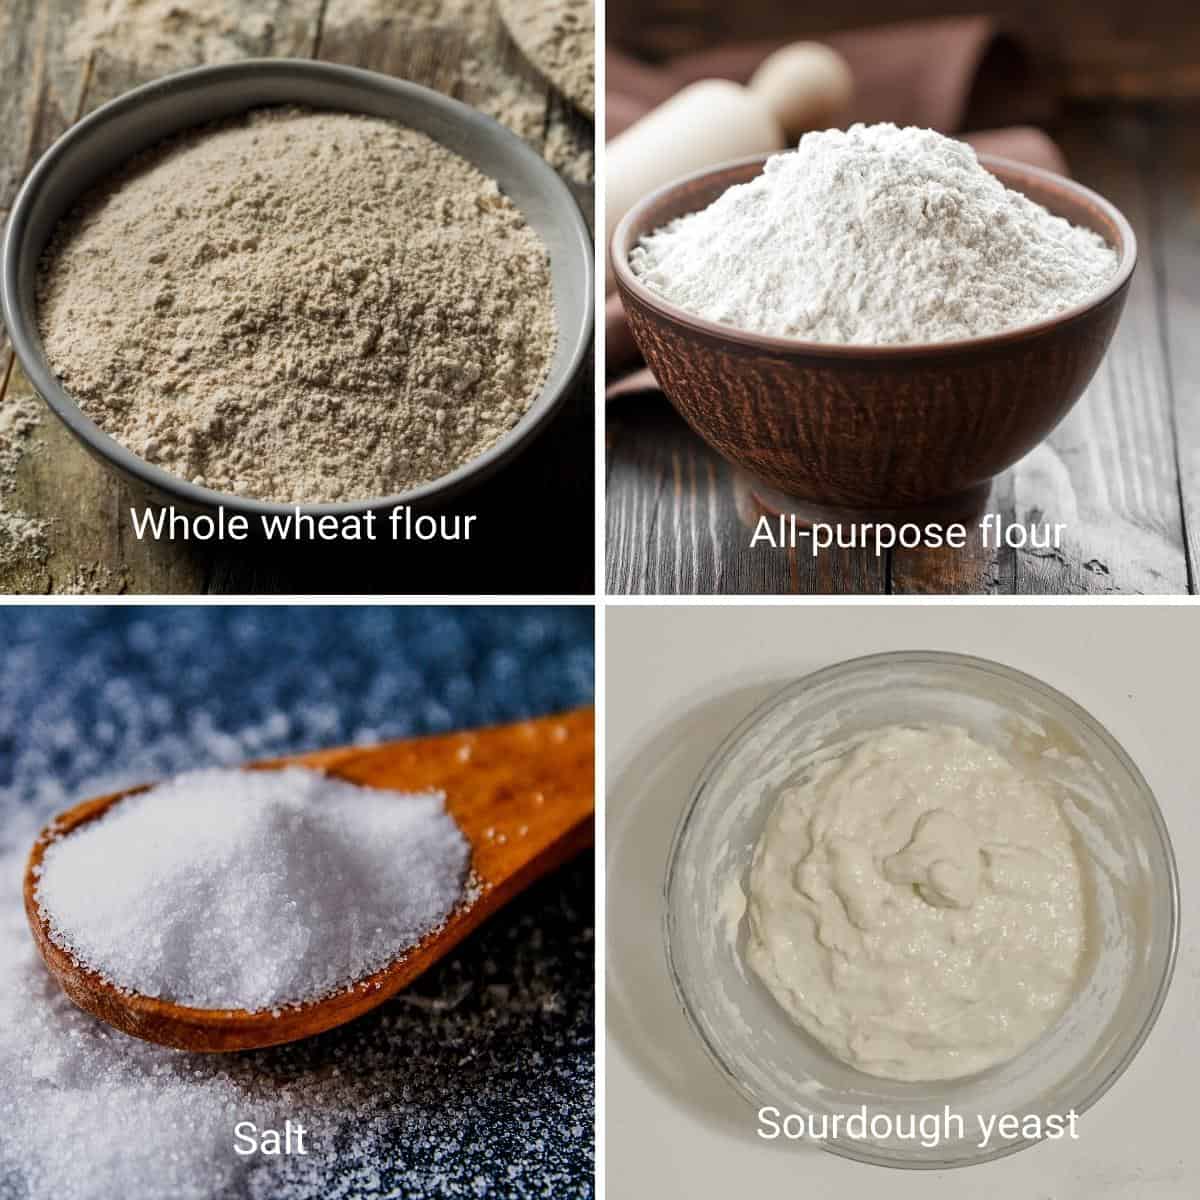
- First and foremost, let’s talk about the star of the show: whole wheat flour. This hearty, nutrient-rich flour brings a distinct flavor and texture to your sourdough bread. Its slightly nutty taste and dense crumb add depth and complexity to each bite. If you prefer a lighter loaf, you can experiment with a blend of whole wheat and all-purpose flour to achieve the perfect balance.
- We use 50% whole wheat, which preserves most of the bran and germ of the wheat grain. I highly recommend bread flour in combination with whole wheat flour if you love a chewy texture to your sourdough bread, but it also makes whole wheat loaves that are wonderfully light and airy. Of course, you can definitely make sourdough bread with all-purpose flour instead of bread or rye flour instead of whole wheat.
- Next, we have the sourdough starter, the backbone of any great sourdough bread. This live culture is responsible for the tanginess and airy texture that we all love. If you don’t have a sourdough starter on hand, don’t fret! You can create one from scratch by fermenting a mixture of flour and water over several days. Alternatively, you can ask a local bakery or even a friend for a small portion of their starter to get you started.
- Water may seem like an ordinary ingredient, but it plays a vital role in the development of your bread’s flavor and texture. The chlorine and other chemicals found in tap water can impede the fermentation process, resulting in a less tangy loaf. If you’re concerned about the quality of your water, you can use filtered or bottled water to ensure the best possible outcome.
- Salt is another essential ingredient that enhances the overall taste of your sourdough bread. It not only adds flavor but also helps control the fermentation process, allowing the flavors to develop more harmoniously. While it’s best to use a high-quality sea salt or kosher salt, you can always experiment with different types to find your preferred level of saltiness.
- Lastly, let’s discuss the various substitutes you can explore to tailor this recipe to your dietary preferences. For those who are gluten intolerant, you can replace the whole wheat flour with gluten-free flour blends or alternative grains like buckwheat or quinoa flour. Additionally, if you’re looking to add some extra crunch to your bread, consider incorporating a handful of seeds or nuts into the dough.
Step-by-step: Whole wheat sourdough bread
- Step 1: Refresh Your Sourdough Starter: Before diving into the bread-making process, ensure that your sourdough starter is active and ready to go. Take it out of the fridge and let it sit at room temperature for a couple of hours to warm up. Then, discard all but a small amount of the starter and feed it with equal parts of flour and water. Mix well and leave it to ferment for at least 3 to 5 hours, or until it becomes bubbly and doubles in size.
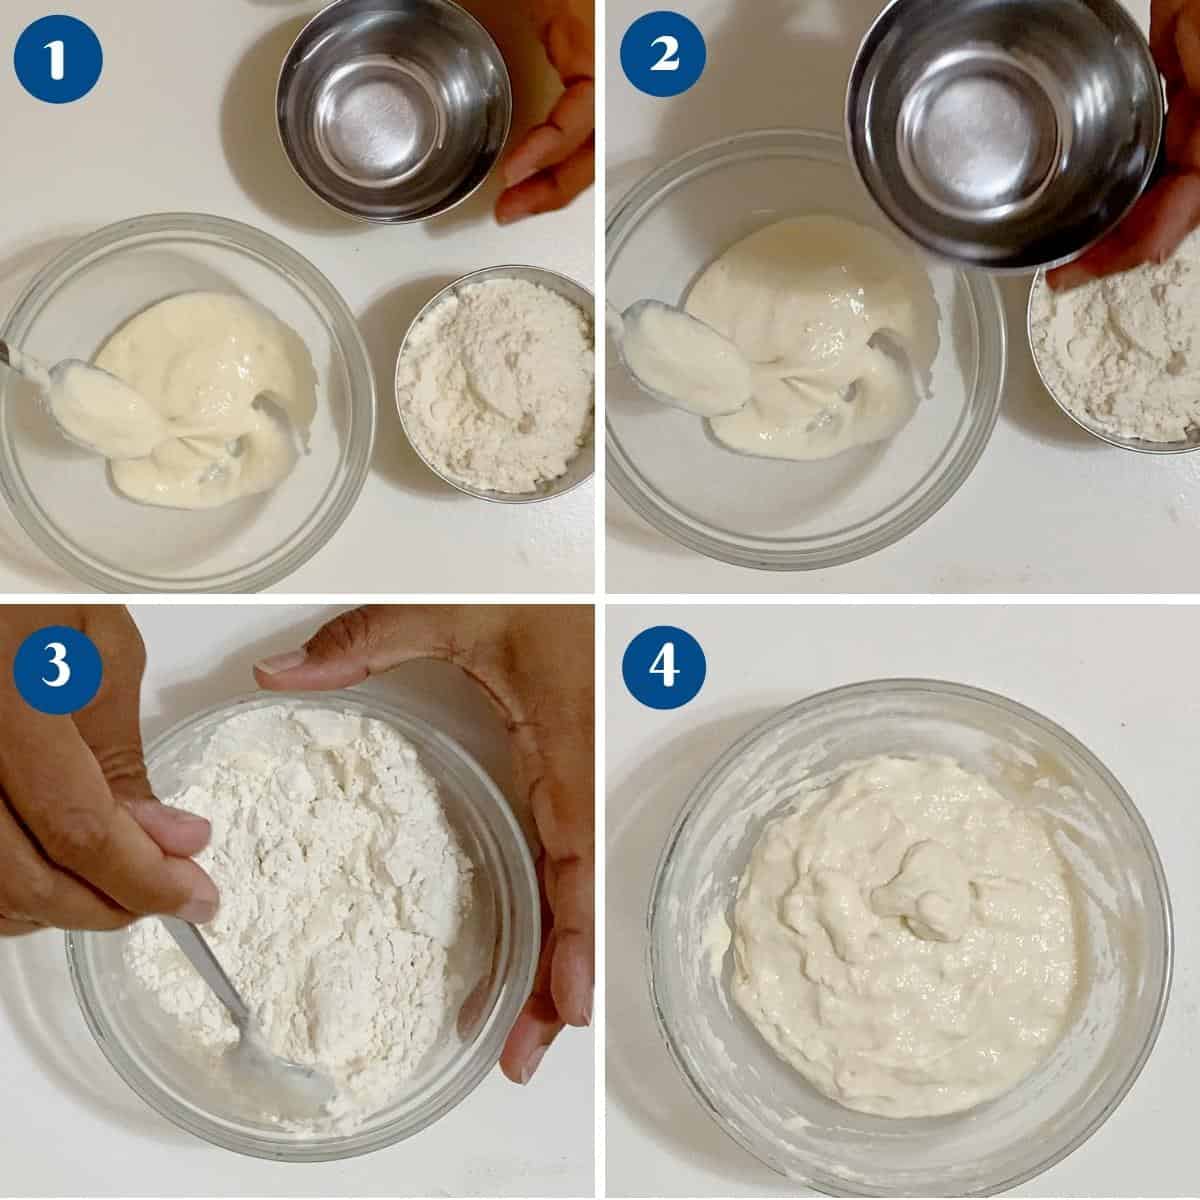
- Step 2: Autolyze: In a large mixing bowl, combine the whole wheat flour, all-purpose flour, and water. Use a wooden spoon or your hands to mix everything until the dough comes together and there are no dry spots. Cover the dough and leave it to rest for an hour.

- Step 3 Starter/salt: After the autolyse, it’s time to incorporate your active sourdough starter, followed by the salt, into the dough. Using your hands or a dough scraper, gently fold and knead the dough until the starter and salt are fully incorporated. Once the starter and salt are well mixed, cover the bowl again and let the dough rest for 30 minutes. This short rest will make it easier to handle the dough during the next step.
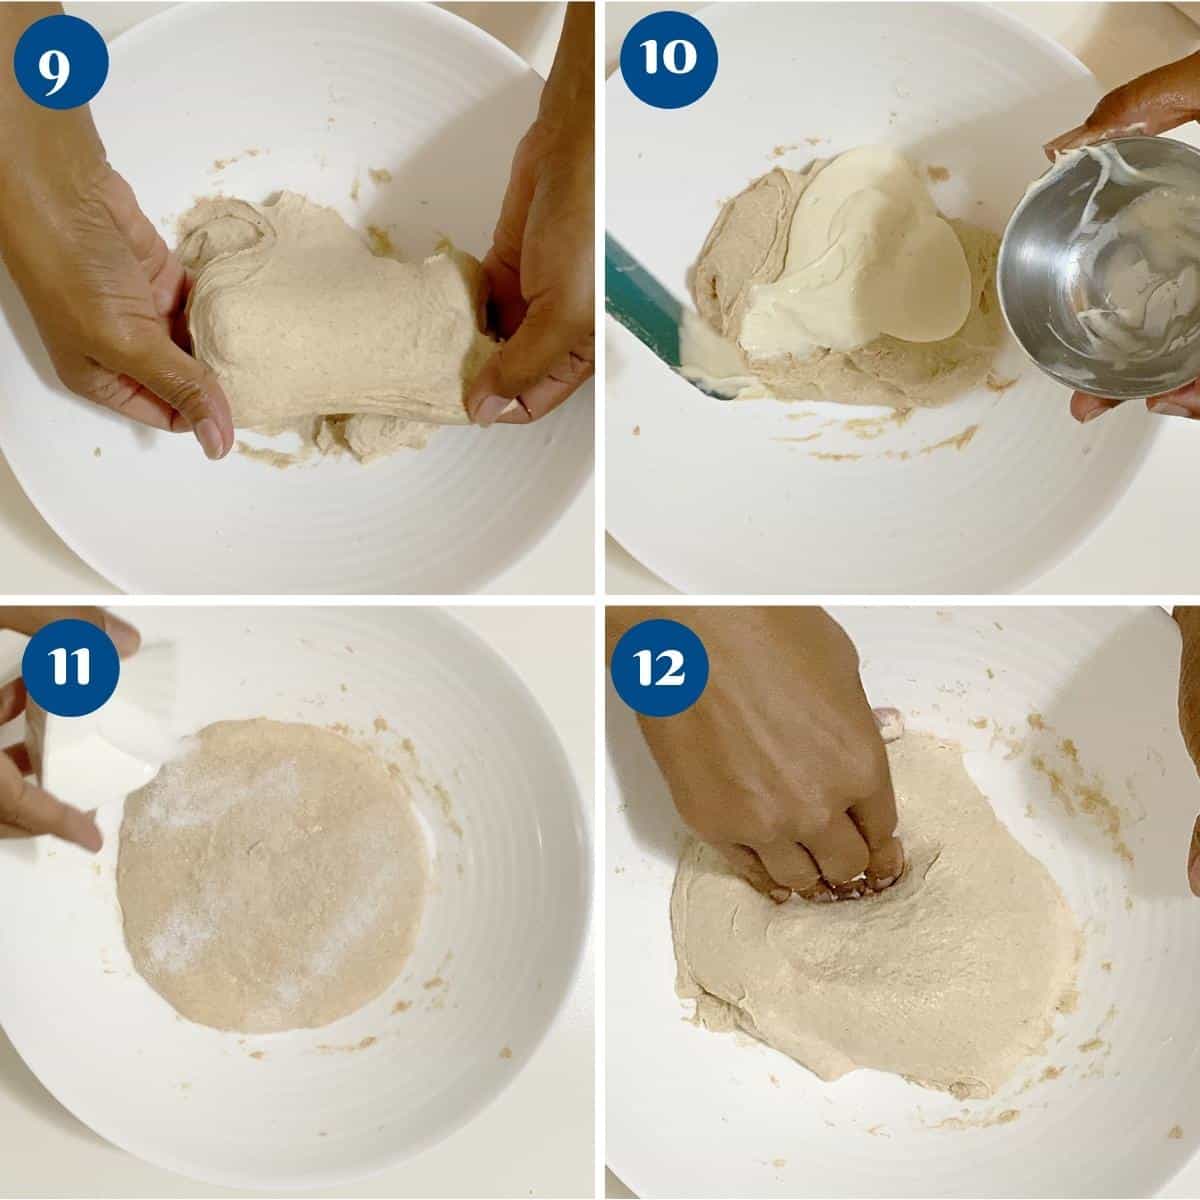
- Step 5: Stretch & fold x 4: It’s time for the stretch and fold technique. Wet your hands to prevent sticking and grab one side of the dough. Stretch it out and fold it over the rest of the dough. Rotate the bowl and repeat this process for each side of the dough until you’ve completed a full round (4 folds in total). Cover the bowl and let the dough rest for 30 minutes. Repeat the stretch and fold process three more times, allowing the dough to rest for 30 minutes between each set. This technique helps develop the gluten structure and creates tension in the dough, resulting in a beautiful, airy crumb.
- Step 6: Rest: After the final set of stretches and folds, cover the bowl and let the dough bulk ferment at room temperature (78℉/25℃) for an hour.

- Step 7: Shape: Once the dough has doubled, it’s time to shape it into an oval loaf. Gently transfer the dough onto a lightly floured surface and fold the sides toward the center, creating tension on the surface. Then, starting from the top, roll the dough tightly towards you, creating a log shape. To shape the dough
- First, stretch the sides and bring them toward the center.
- Next, fold the top of the dough to the center.
- Then, the middle is toward the bottom.
- Turn the dough and fold again until you have a small, tight sausage.
Pro tip – Rolling the dough on the oil-sprayed surface will create surface tension and prevent the dough from drying out. You can also shape this dough into an oval or round shape.
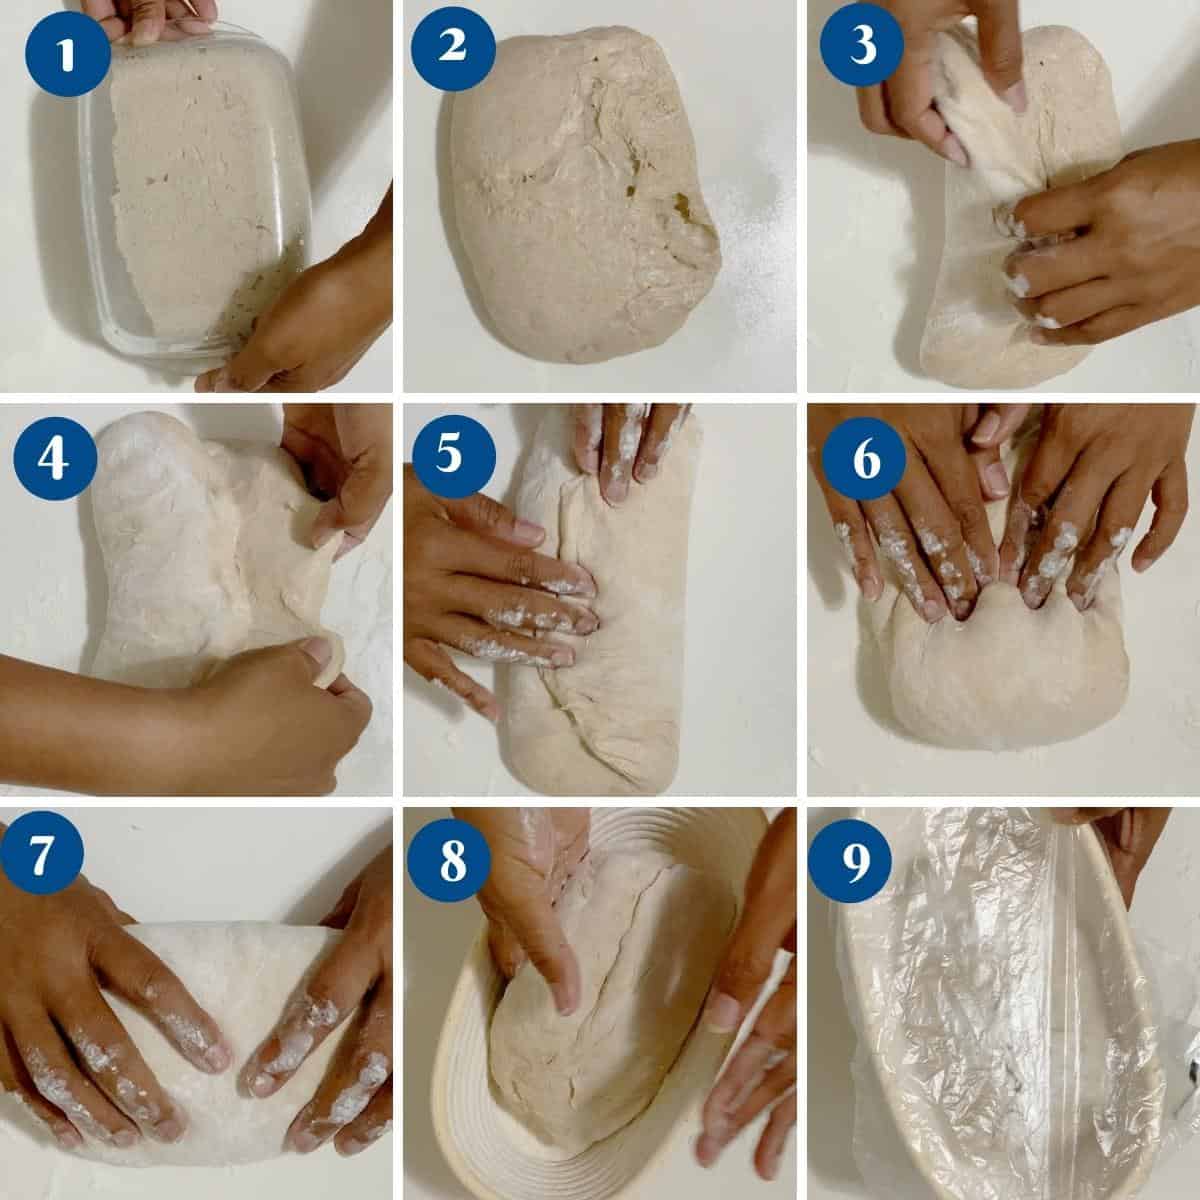
- Step 8: Cold proof: Generously dust a 9-inch oval banneton basket with flour. Place the loaf smooth side down (seam side up) in the basket. Cover and leave the bread to rise in the refrigerator (38°F / 3°C) for 18 hours.
Pro tip – This is one large loaf in a 9-inch oval banneton, but you can also make 2 x 6-inch bannetons for two small loaves. - Step 9: Preheat: Preheat the oven to 450°F / 230°C / Gas mark 8 with a cloche or Dutch oven for at least an hour.
Pro tip – To get a nice crust on the loaf, it is important to heat the cloche or Dutch oven in the oven for at least an hour.
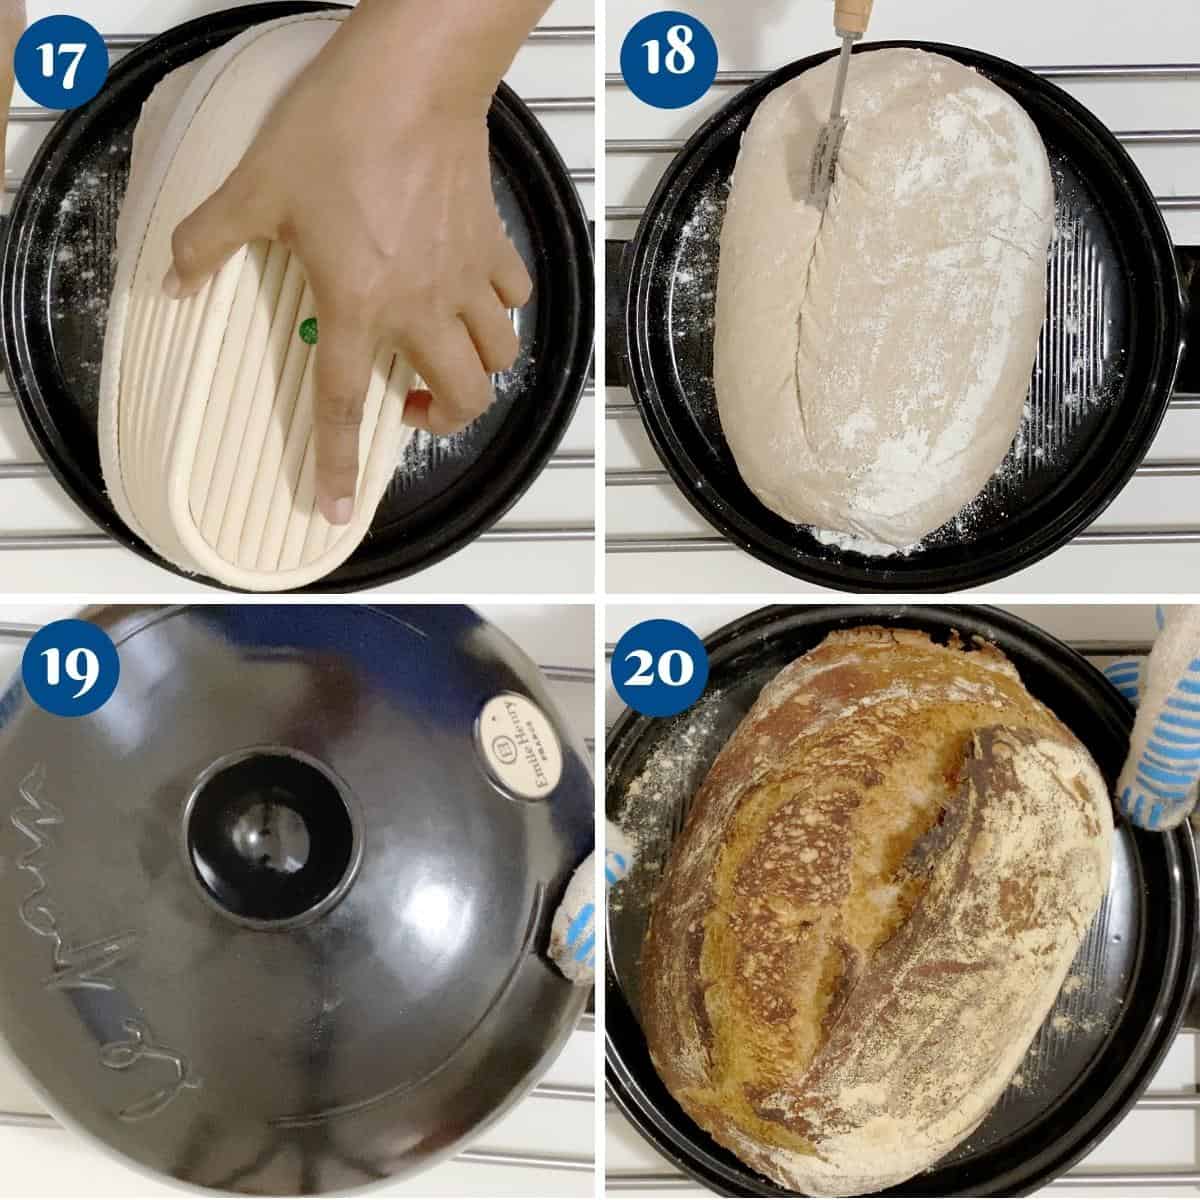
- Step 10 : Score: When the cloche is preheated, remove it from the oven with oven gloves. Invert the bread onto the base and dust it with flour to prevent sticking. Then, using a bread scoring tool or sharp knife, score the bread, making a deep (almost 1/4 inch) cut. If you use a Dutch oven, score the loaf on parchment paper and gently place it in the pot.
Pro tip – Scoring the bread will allow for steam to escape the bread. If you do not score it, it will cause a natural burst, which can misshape the loaf. - Step 11: Bake: Cover the Dutch oven with its lid (or use a large oven-safe bowl to cover the baking stone) and bake for 20 minutes. After 20 minutes, remove the lid (or bowl) to allow the crust to brown and bake for an additional 20-25 minutes, or until the crust is deeply browned and the internal temperature of the bread reaches at least 205°F (96°C).
- Rest: Remove the bread from the oven and let it cool on a wire rack for at least 1 hour before slicing.

Troubleshooting
- One common challenge is achieving the right rise in your sourdough bread. If your loaves are consistently dense and heavy, it could be due to underproofing. Remember that sourdough bread requires time to ferment and rise. So be patient and give your dough ample time to develop those beautiful air pockets. On the other hand, if your bread ends up flat and overly spread out, it may have been overproofed. Adjusting the proofing time and temperature can help you strike the perfect balance.
- Another potential issue is a lack of sourness in your bread. If your sourdough is turning out milder than you prefer, consider extending the fermentation period. This allows more time for the lactobacilli bacteria to create that tangy flavor profile. Alternatively, you can also experiment with increasing the proportion of sourdough starter in your recipe to enhance its tanginess.
- In some cases, you may encounter problems with your dough being too sticky or too dry. If your dough feels excessively sticky and unmanageable, try reducing the hydration level by adding a bit more flour. On the other hand, if your dough feels dry and difficult to shape, gradually incorporate small amounts of water until you achieve the desired consistency. Remember, finding the right hydration level may require some trial and error, so don’t hesitate to adjust as needed.
- Lastly, if your crust is turning out too thick and hard, it could be a result of baking at too high a temperature or for too long. Experiment with lowering the oven temperature slightly and reducing the baking time to achieve a crust that is perfectly crisp without being overly tough.
- Recipe for Sourdough Starter
- Easy Beginners’ Sourdough Bread Recipe
- Sourdough Loaf Bread
- Rosemary Focaccia Bread
- No-Knead Bread or No-Knead Sandwich Bread
- Shokupan Sandwich Bread
- BEST Sandwich Bread Recipe
- Challah Bread Recipe – 4 strands
- No-Knead Olive Bread
- See all bread recipes or sourdough bread recipes


Frequently asked questions
The best thing about sourdough bread is that it can last for 4 to 5 days at room temperature.
Yes, you can use regular whole wheat flour for sourdough bread. However, it’s important to note that different brands of flour may have varying protein levels. This can affect the structure and texture of your bread. It’s recommended to experiment with different brands and adjust your recipe accordingly to achieve the desired results. Additionally, consider combining whole wheat flour with a small percentage of bread flour or all-purpose flour to improve the dough’s elasticity and rise.
Knowing when your sourdough bread is fully proofed is crucial to achieving optimal results. A well-proofed loaf will have a slightly domed shape, and when gently pressed with a finger, the indentation should slowly fill back up without completely disappearing. Keep in mind that the proofing time can vary depending on the temperature and humidity in your kitchen. It’s always best to rely on visual cues and the characteristics of your dough rather than strict time frames.
Yes, you can freeze whole wheat sourdough bread. Freezing is a great option to preserve freshness and flavor. Ensure the bread is completely cooled before wrapping it tightly in plastic wrap or a freezer bag to protect it from freezer burn. To thaw, simply leave it at room temperature for a few hours or warm it up in a preheated oven.
To maintain a healthy sourdough starter, it’s important to feed it regularly. Depending on your baking schedule, you can feed your starter daily or store it in the refrigerator and feed it once a week. Feed your starter with equal parts of flour and water, discarding a portion of the starter before each feeding to prevent it from becoming too large. The consistency of the starter should be similar to a thick pancake batter. By maintaining a consistent feeding schedule, you’ll have a robust starter ready to leaven your bread to perfection.
Add 5 grams of instant yeast or 15 grams of baker’s yeast to the water in the recipe. Then, follow the above process, using a long bulk fermentation and proofing time to help develop flavor and texture.
Yes, you can use all whole wheat flour instead of 50% whole wheat flour and 50% bread flour. The bread will be a little denser and less chewy because the gluten in bread flour is what makes the loaf chewy.
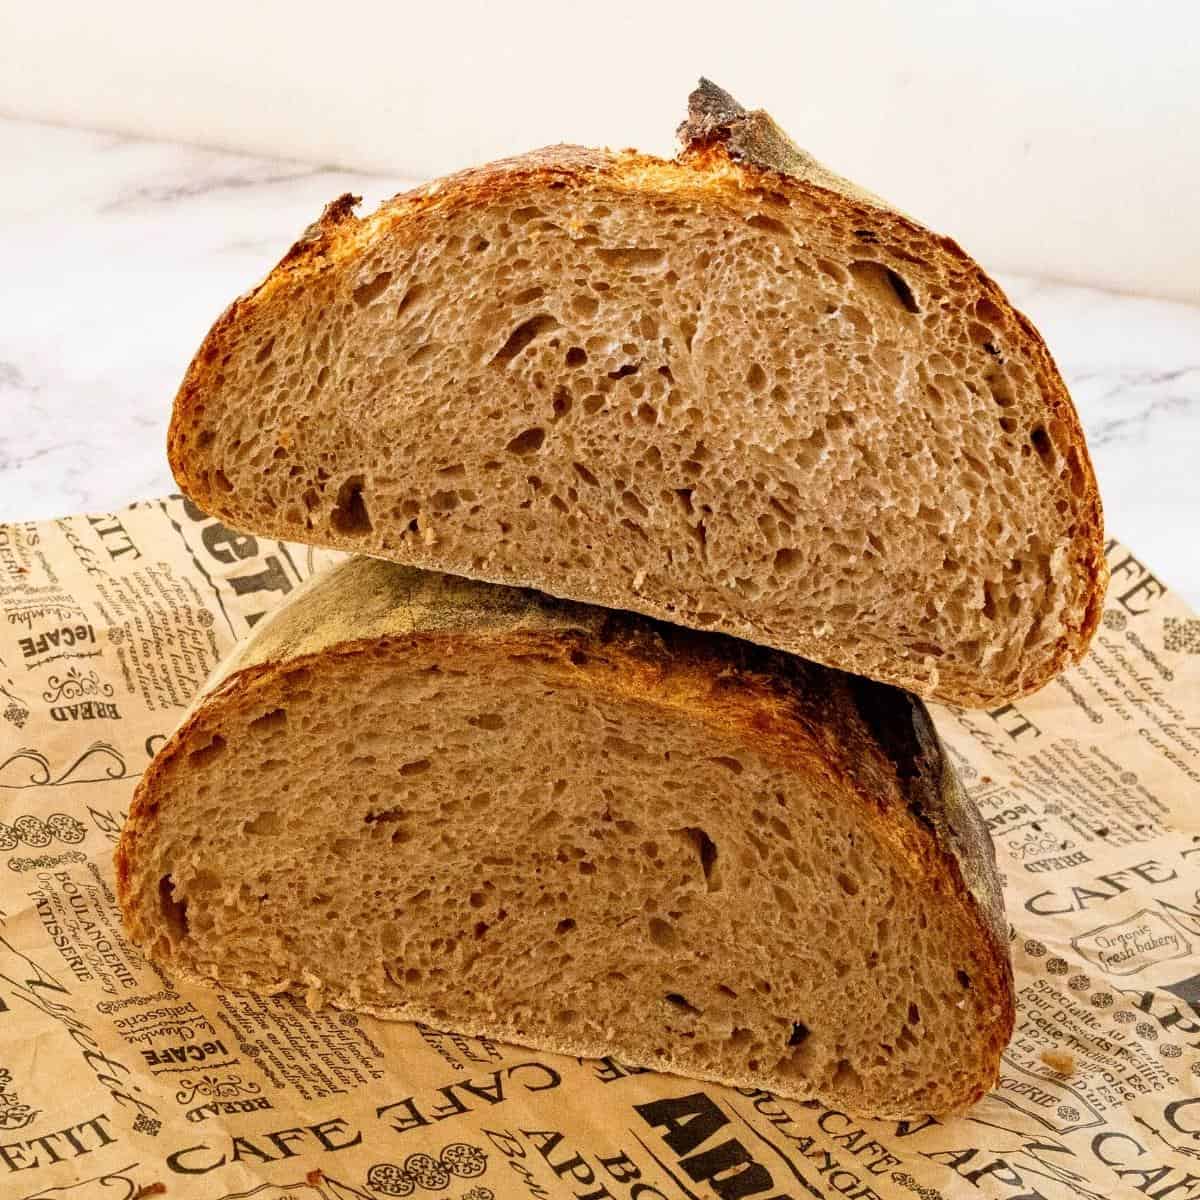
Whole Wheat Sourdough Bread
Discover the wholesome goodness of homemade sourdough with our 50% whole wheat sourdough bread recipe. This step-by-step guide will take you through the process, from creating a lively sourdough starter to baking a beautifully crusty loaf. Elevate your bread-making skills and enjoy the rich flavor and nutritional benefits of whole wheat in every slice.
Video
Ingredients
- 200 grams (1¾ cups) Whole wheat flour
- 200 grams (1¾ cups) Bread flour
- 310 grams (1⅓ cups) Water room temperature
- 120 grams (½ cups) Sourdough starter
- 10 grams (1½ tsp) Kosher salt
- 15 grams (1 tbsp) Honey (optional for flavor)
- 15 grams (1 tbsp) Olive oil (optional for flavor)
Method
- Refresh the starter (Previous day) – Combine the sourdough starter, water, and flour in a medium bowl. Stir well to combine. Cover loosely and let it ferment at room temperature (70-75°F or 21-24°C) for 4-6 hours or until doubled in size and active.
- Autolyse (9.00 am): Add the water, all-purpose, and whole wheat flour in a large bowl. Stir well with a wooden spoon or spatula. Cover the bowl and leave to rest for 1 hour.200 grams Whole wheat flour, 200 grams Bread flour, 310 grams Water
- Starter/Salt (10.00 am): Add the sourdough starter, followed by the salt, and combine well. Cover the bowl and let the dough rest for another 45 minutes.120 grams Sourdough starter, 10 grams Kosher salt, 15 grams Honey, 15 grams Olive oil
- Stretch & Folds x 3 (11.30, 12.00, 12.30 pm): Perform a set of stretches and folds every 30 minutes for a total of 3 sets.Wet your hands to prevent sticking and grab one side of the dough. Stretch it out and fold it over the rest of the dough. Rotate the bowl and repeat this process for each side of the dough until you’ve completed a full round (4 folds). Cover the bowl and let the dough rest between each fold.
- Rest (12.30 – 1.30 pm): After the final set of stretches and folds, cover the bowl and let the dough bulk ferment at room temperature (78℉/25℃) for an hour.
- Shape( 2.30 pm): Shape the dough into tight rounds and place them in floured proofing baskets or bowls.Method – To shape the dough, first, stretch the sides and bring them toward the center. Next, fold the top of the dough to the center. Then, the middle is toward the bottom. Turn the dough and fold again until you have a small, tight sausage.
- Cold proof (3.00 pm – Next day, 9.00 am) – Cover the baskets with plastic wrap and place them in the refrigerator for 18 hours.
- Preheat oven (8.00 am): Preheat the oven to 450°F / 230°C / Gas mark 8 with a cloche or Dutch oven for at least 45 minutes.
- Bake: Once the oven is preheated, carefully transfer the dough to the cloche, Dutch oven, or baking stone. Score the top of the dough with a sharp knife or razor blade. Cover the Dutch oven with its lid (or use a large oven-safe bowl to cover the baking stone) and bake for 20 minutes. After 20 minutes, remove the lid (or bowl) to allow the crust to brown and bake for an additional 20-25 minutes, or until the crust is deeply browned and the internal temperature of the bread reaches at least 205°F (96°C).
- Rest – Remove the bread from the oven and let it cool on a wire rack for at least 1 hour before slicing.
Notes
-
- Maintain a Consistent Feeding Schedule: Consistency is key in sourdough baking. Establish a regular feeding schedule for your sourdough starter, ideally once a day, simultaneously. This helps maintain the strength and activity of your starter, resulting in better flavor and rise for your bread.
-
- Use a Kitchen Scale: To achieve consistent results, measuring ingredients accurately is essential. Invest in a reliable kitchen scale and weigh your ingredients, including flour and water, rather than relying on volume measurements. This precision will contribute to the perfect texture and structure of your bread.
-
- Experiment with Different Flours: While this guide focuses on whole wheat sourdough bread, feel free to experiment with different types of flour. Try incorporating rye flour or spelt flour into your recipe to add unique flavors and textures to your loaf. Mix and match to find your favorite combination.
-
- Adjust the Fermentation Time: The fermentation time can greatly impact the flavor profile of your sourdough bread. If you prefer a milder tang, shorten the fermentation time by reducing the number of hours your dough spends resting. Conversely, if you like a stronger tang, extend the fermentation time slightly. Don’t be afraid to experiment and find the perfect sourness for your taste buds.
-
- Play with the Scoring Patterns: Scoring your bread adds a beautiful aesthetic and also allows the dough to expand properly during baking. Experiment with different scoring patterns, from simple lines to intricate designs, and observe how they impact the final appearance of your loaf. Scoring can be a creative outlet for expressing your personal style.
Nutrition
Tried this recipe?
Mention @veenaazmanov_kitchen or tag #veenaazmanovkitchen!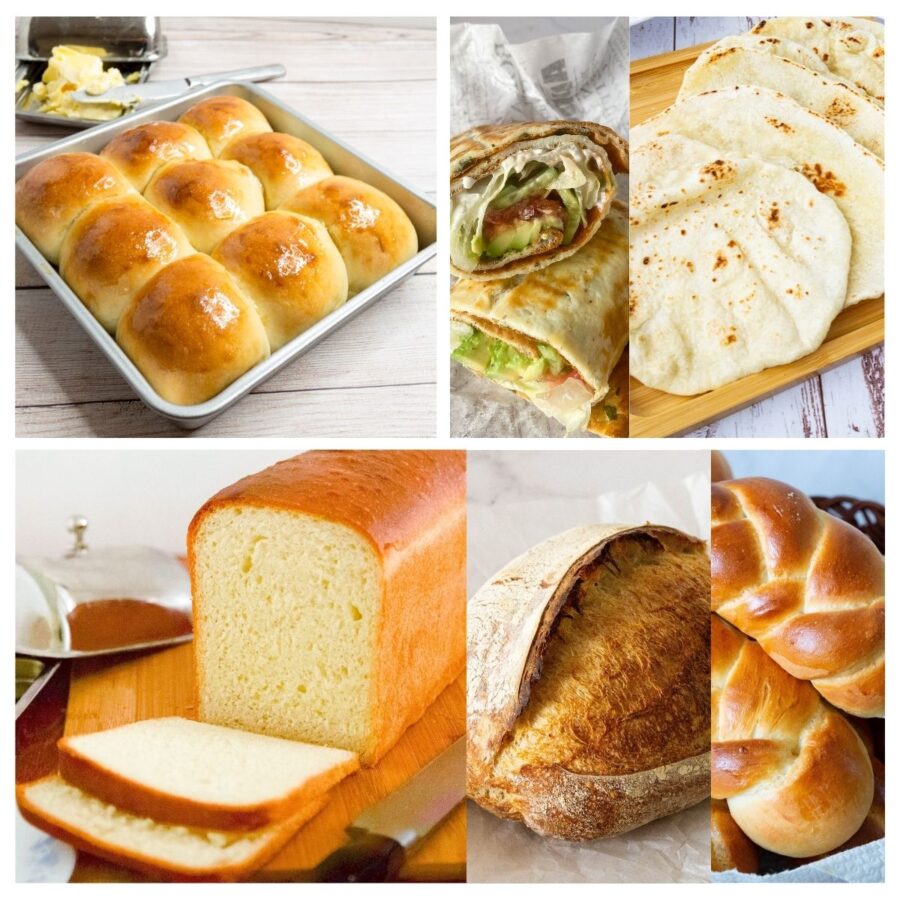


Don’t lose this recipe! Save it for Later!
📌 Save this Recipe for later on Pinterest so you can easily find it again.
⭐ Add Veena Azmanov Kitchen to your Google Preferred Sources.
It helps Google show you more of our recipes.
📧 Subscribe for new recipes delivered to your inbox.
🎥 Follow us for more recipes


A healthy sourdough bread, thank you. I made a favorite comfort food of grilled cheese with my bread. Can I just say it not only tasted great but looked fantastic too.
Thank you, Mikayla. So happy to hear your feedback.
Love the whole wheat sourdough bread! Looks so yum and thanks for the detailed recipe. Will save this for later!
Thank you so much for sharing this amazing recipe! Will surely have this again! It’s really easy to make and it tasted so delicious! Highly recommended!
Thank you for your lovely feedback, Allyssa.
Thank you so much for sharing this amazing whole wheat sourdough bread recipe! Will surely have this again! It’s really easy to make and it tasted so delicious! Highly recommended!
Thank you for the lovely feedback, Allyssa.
Yum, sourdough bread! So delicious right out of the oven, adding a little butter on it! Also a great change of pace for sandwiches!
I adore sourdough bread and this wholewheat version looks amazing.
The bread came out so good! Your step by step instructions make it so easy to follow!
I like whole wheat sourdough bread for toasts yet I have never made them before. Thanks for such a detailed post, hopefully making some over the weekend!
I use sourdough too, it’s perfect for bread! I will try your recipe, thank you
Love this recipe for healthier sourdough bread!! This looks so fluffy and delicious – I can’t wait to try this soon!