Homemade Ciabatta Recipe
 Prep Time 30 minutes Cook Time 20 minutes Total Time 3 hours 30 minutes


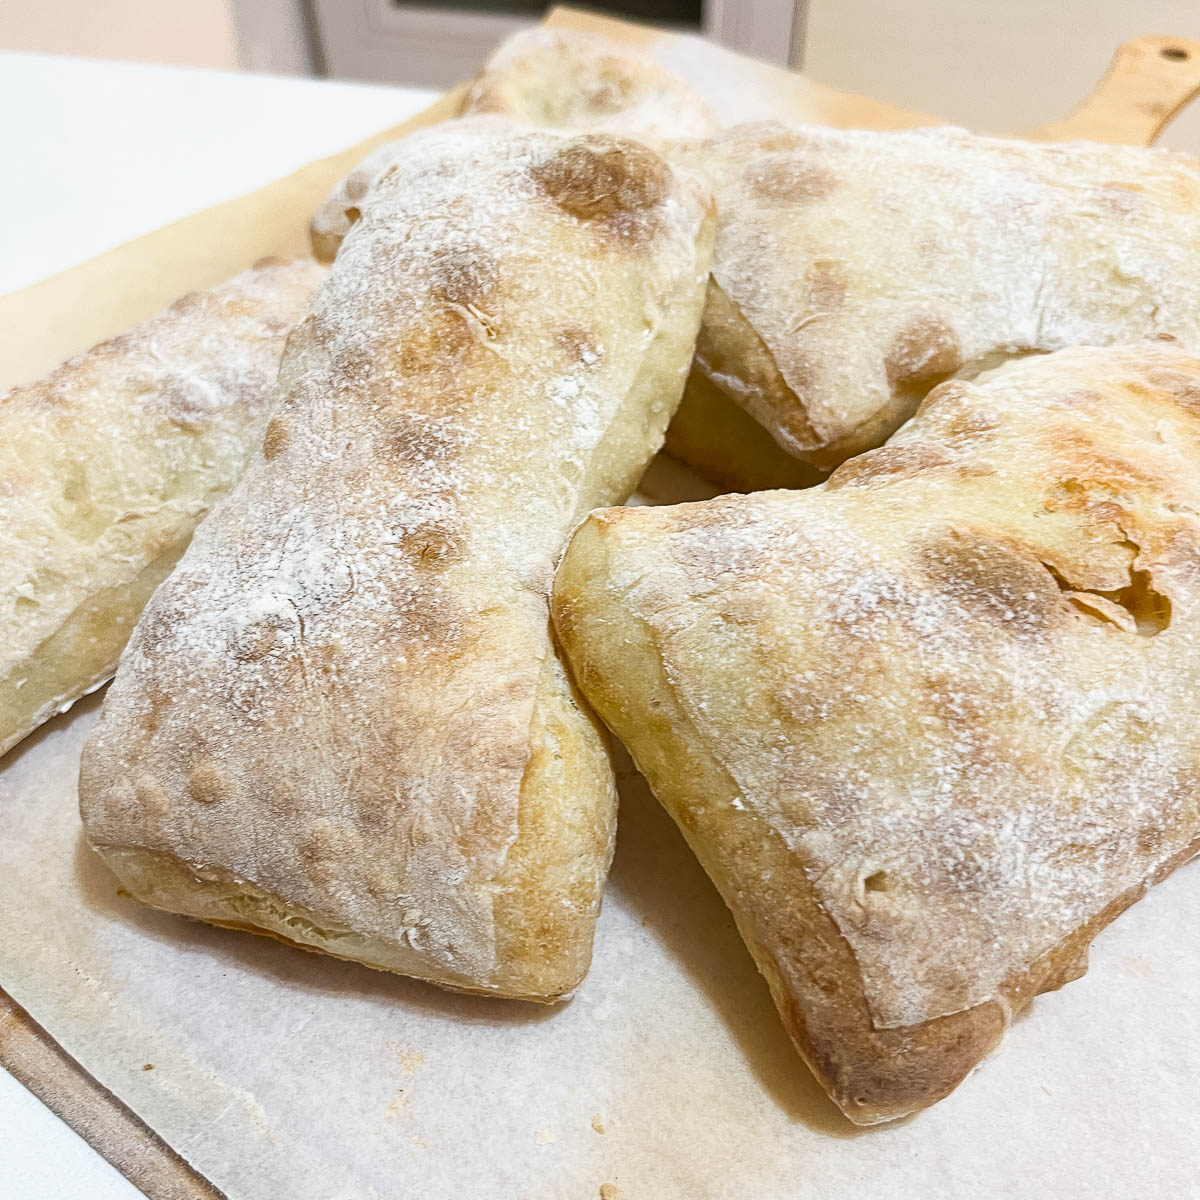
Ciabatta is an Italian rustic bread known for its airy, open crumb and chewy texture. This version uses instant yeast, making it simple and easy to prepare at home. The high hydration dough requires minimal handling, relying on stretch and folds to build strength.

Ciabatta sandwiches are a staple in our home. Whether it’s a classic caprese with fresh mozzarella and basil, a hearty grilled chicken sandwich, or just a simple olive oil and balsamic dip, ciabatta is always our favorite bread. Its light, airy texture and crisp crust make it perfect for just about anything.
But here’s the thing—ciabatta is best eaten fresh. Store-bought ones never taste quite the same, and by the time we bring them home, they’ve lost their crispness. That’s why I often make them from scratch.
Time permitting, I love making sourdough ciabatta. The slow fermentation process brings out a depth of flavor that makes the bread even more special. But let’s be real—sometimes, life is busy. When I don’t have time for an overnight ferment, I turn to this quick ciabatta recipe with instant yeast.
Why This is the Best Ciabatta Recipe
- Authentic Open Crumb Texture – The high hydration dough (80% water) and gentle handling create the signature airy, hole-filled structure that makes ciabatta so light and chewy.
- Minimal Effort, Maximum Flavor – The autolyze and stretch-and-fold method develops gluten naturally without kneading, making this a no-fuss yet effective recipe for soft, flavorful bread.
- Golden Crispy Crust – Baking at high heat with steam gives the ciabatta its characteristic crispy, crackly crust while keeping the inside soft and tender.
- Simple Ingredients, Bakery-Quality Bread – This recipe requires only five basic ingredients. Yet, it delivers a professional-level ciabatta perfect for sandwiches, dipping in olive oil, or enjoying fresh out of the oven.
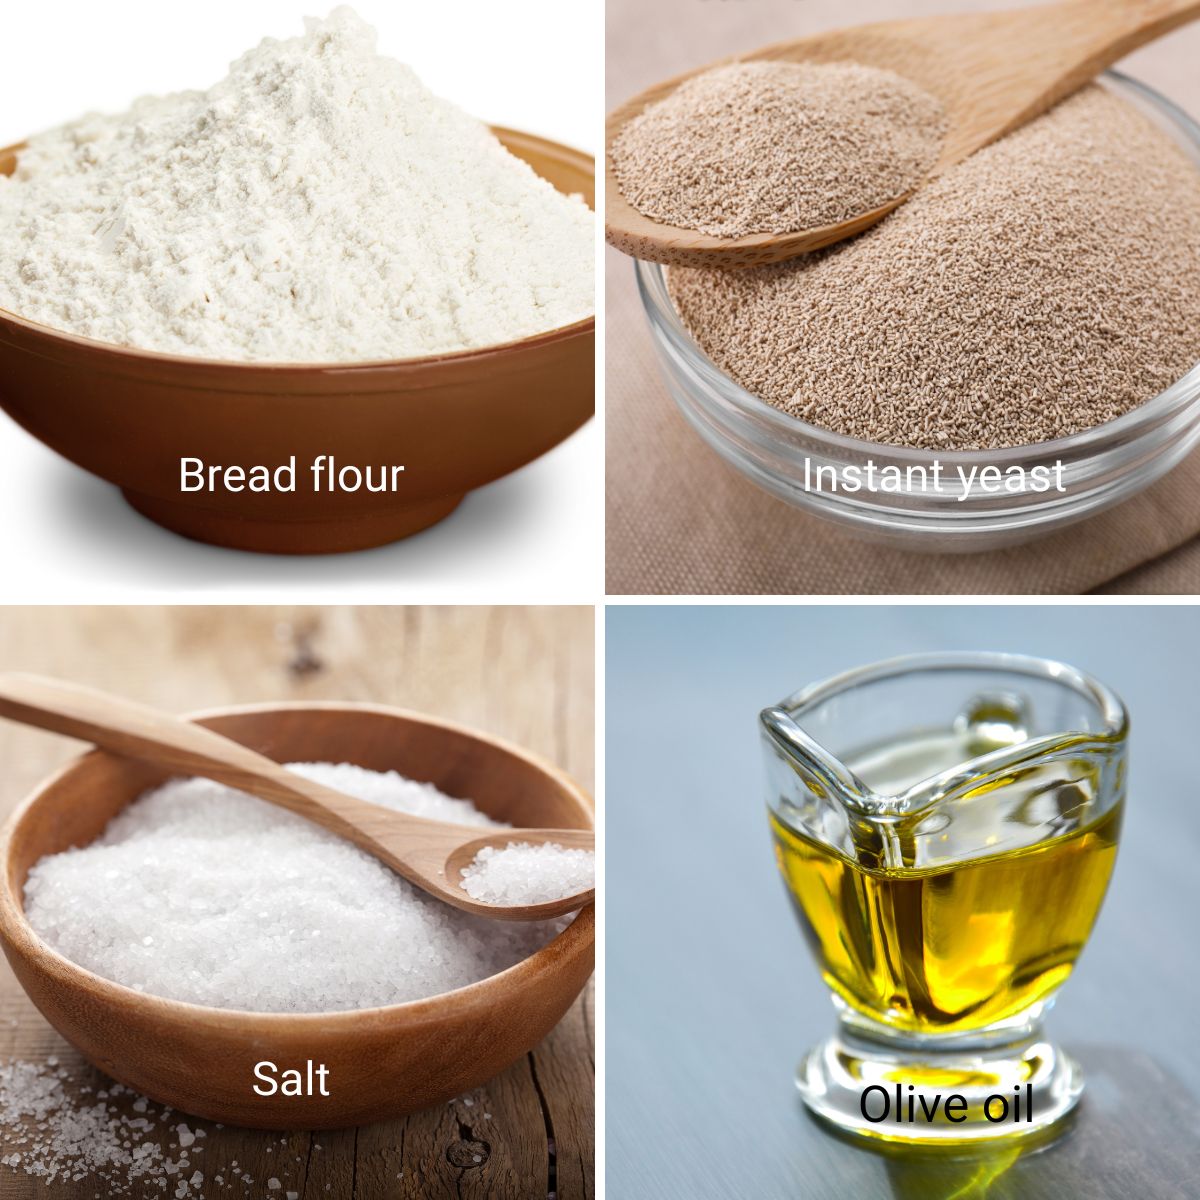
Ingredients and substitutes
- Bread Flour: Provides a strong gluten structure for the classic airy ciabatta texture. You can substitute all-purpose flour, but the crumb may be slightly denser. For a whole grain version, mix 50% whole wheat flour with bread flour to maintain structure.
- Water: Essential for hydration and gluten development. Avoid reducing it, as ciabatta relies on high hydration for its open crumb.
- Instant Yeast: Speeds up fermentation while maintaining great flavor. You can substitute active dry yeast by first dissolving it in warm water. If using fresh yeast, triple the amount.
- Salt: Enhances flavor and helps strengthen gluten. If salt is reduced for dietary reasons, the dough may be softer and slightly less structured.
- Olive Oil: Adds subtle richness and improves the crust. You can substitute melted butter or leave it out for a leaner dough.
Step-by-step: Homemade Ciabatta
- Step 1: Mix the Dough & Autolyse – In a large mixing bowl, add water, flour, salt, and olive oil. Stir until just combined into a shaggy dough. Cover the bowl and let the dough autolyze for 30 minutes. This allows the flour to absorb the water and begin gluten development.
- Step 2: Stretch and Folds – After autolysis, perform a series of three stretches and folds at 30-minute intervals: Grab one side of the dough, stretch it up, and fold it over itself. Rotate the bowl and repeat on all four sides. Cover and rest for 30 minutes between each round.
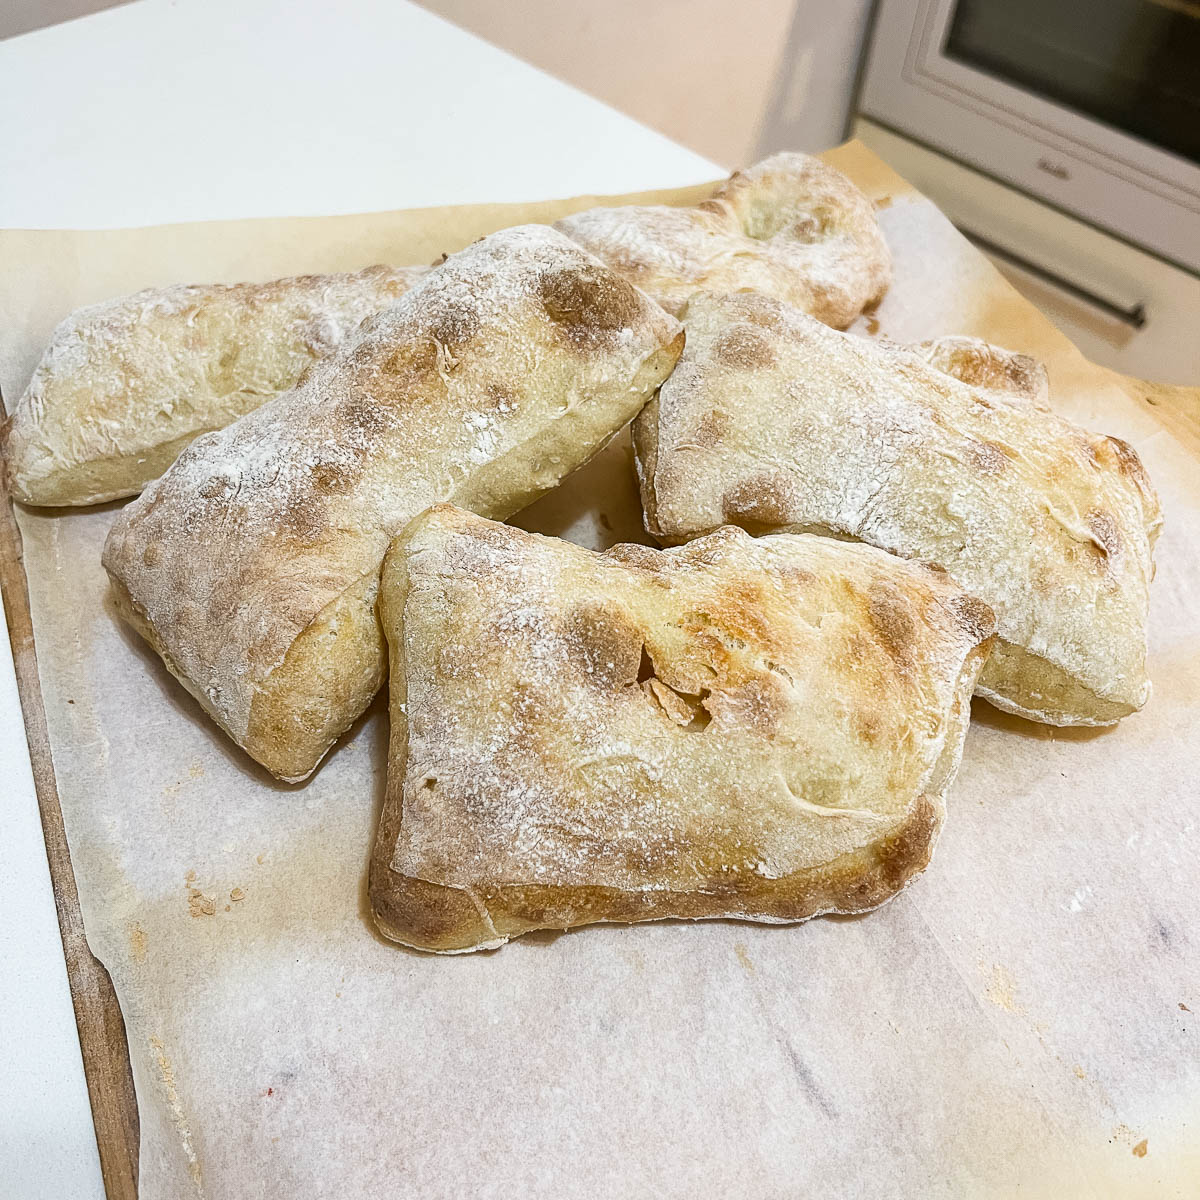
- Step 3: Shaping and Dividing – Generously flour a work surface. Gently pour the dough onto the floured surface without deflating it. Carefully stretch the dough into a large square or rectangle using floured hands. Using a bench scraper or sharp knife, cut into six equal rectangles.
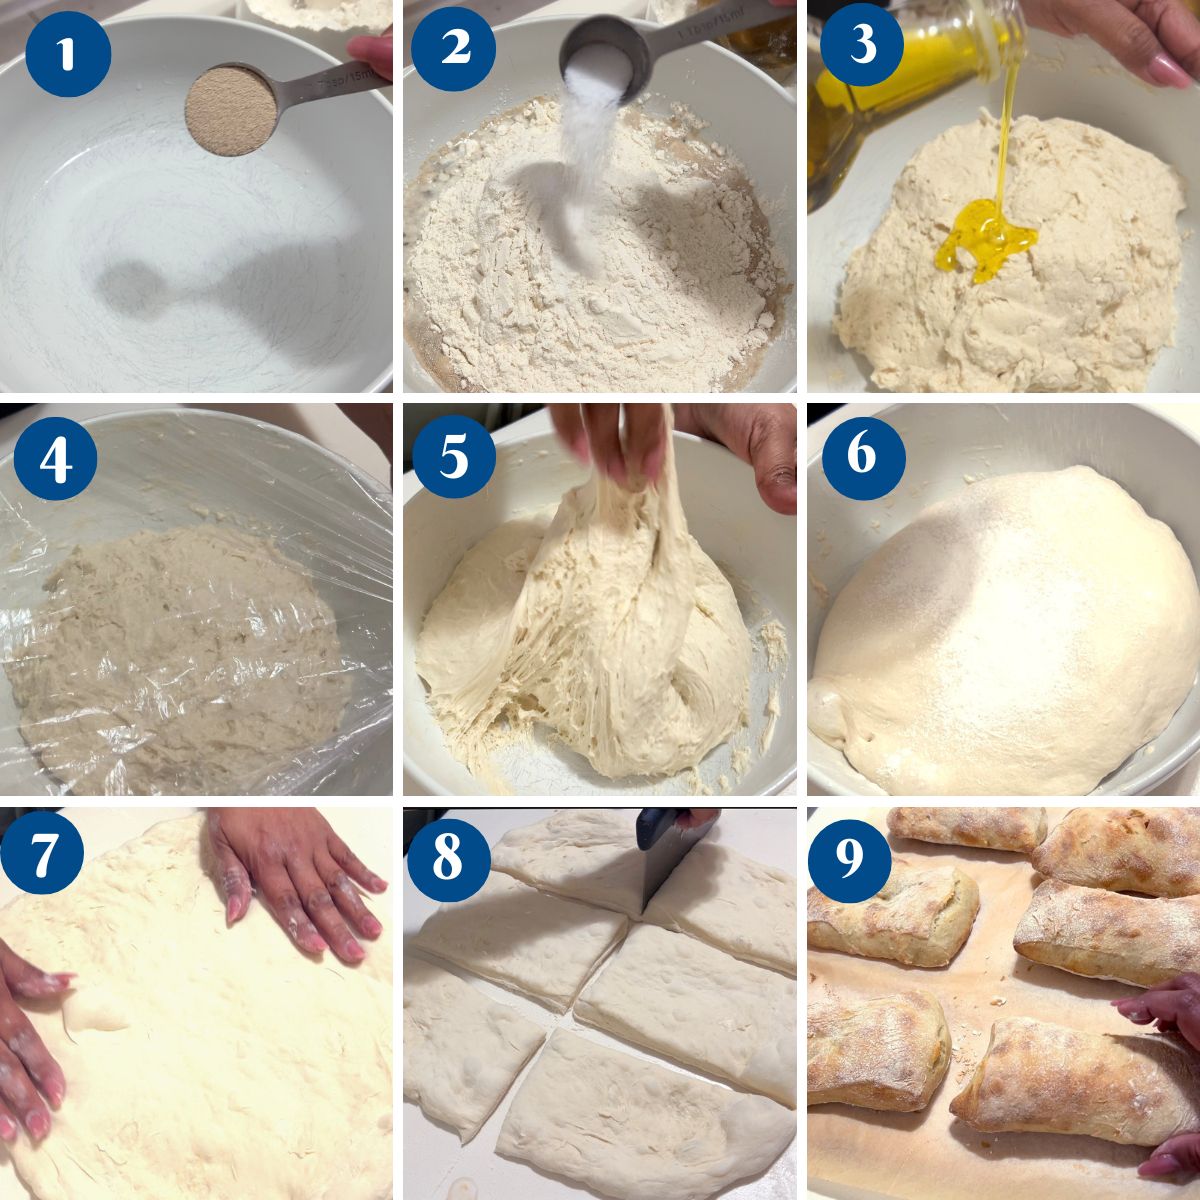
- Step 4: Proofing – Transfer the dough pieces onto a parchment-lined baking sheet or pizza peel, ensuring space between them. Cover with a clean kitchen towel and let them rest for 30–40 minutes for a final proof.
- Step 5: Baking – Preheat your oven to 230°C (450°F). If using a baking stone, place it in the oven while preheating. Optionally, place a pan of hot water in the oven for steam, which enhances the crust. Bake the ciabatta for 15–20 minutes or until golden brown with a crisp crust. Remove from the oven and let cool completely on a wire rack before slicing.
- Baking with Yeast – Beginner’s Guide
- Delicious Sourdough Ciabatta
- Chocolate Cheesecake Tart
- Skinny Baked Chicken Potato Casserole Recipe
- Sweet and Sour Chicken Recipe

Frequently asked questions
Store it in a paper bag at room temperature for 1–2 days. To revive, warm in the oven at 180°C (350°F) for 5 minutes.
To freeze, wrap in plastic and freeze for up to 3 months. Reheat at 180°C (350°F) for 5-7 minutes.
Yes! You can make it in advance. After shaping, you can refrigerate the dough overnight. Bring to room temperature the next day, proof for 30 minutes, and bake as usual.
Traditional ciabatta does not require kneading. The stretch-and-fold method builds gluten gently, preserving the airy texture. Kneading may result in a denser crumb.
Use high-hydration dough (don’t add extra flour). Handle the dough gently to avoid deflating the bubbles. Let it proof fully—it should be puffy and slightly jiggly before baking. Bake on a hot surface (preheated tray or pizza stone) for a strong oven spring.
Ciabatta has a high hydration level (80%), making the dough naturally sticky and wet. Instead of adding more flour, use floured hands and a bench scraper to handle it. The dough will strengthen after stretching and folding.
Homemade Ciabatta Recipe
Ciabatta is an Italian rustic bread known for its airy, open crumb and chewy texture. This version uses instant yeast, making it simple and easy to prepare at home. The high hydration dough requires minimal handling, relying on stretch and folds to build strength.
Video
Ingredients
- 500 g (4 cups) Bread flour
- 400 ml (1⅔ cups) Water (room temperature)
- 7 g (2¼ tsp) Instant yeast
- 10 g (1¾ tsp) Salt
- 20 ml (1½ tbsp) Olive oil
- ½ – 1 cup Extra flour for dusting
Method
- Step 1: Mix the Dough & Autolyse – In a large mixing bowl, add water, flour, salt, and olive oil. Stir until just combined into a shaggy dough. Cover the bowl and let the dough autolyse for 30 minutes. This allows the flour to absorb the water and begin gluten development.500 g Bread flour, 400 ml Water , 7 g Instant yeast, 10 g Salt, 20 ml Olive oil
- Step 2: Stretch and Folds – After autolysis, perform a series of three stretch and folds at 30-minute intervals: Grab one side of the dough, stretch it up, and fold it over itself. Rotate the bowl and repeat on all four sides. Cover and rest for 30 minutes between each round.
- Step 3: Shaping and Dividing – Generously flour a work surface. Gently pour the dough onto the floured surface without deflating it. Carefully stretch the dough into a large square or rectangle using floured hands. Using a bench scraper or sharp knife, cut into 6 equal rectangles.½ – 1 cup Extra flour for dusting
- Step 4: Proofing – Transfer the dough pieces onto a parchment-lined baking sheet or pizza peel, ensuring space between them. Cover with a clean kitchen towel and let them rest for 30–40 minutes for a final proof.
- Step 5: Baking – Preheat your oven to 230°C (450°F). If using a baking stone, place it in the oven while preheating. Optionally, place a pan of hot water in the oven for steam, which enhances the crust. Bake the ciabatta for 15–20 minutes or until golden brown with a crisp crust. Remove from the oven and let cool completely on a wire rack before slicing.
Notes
- Embrace the High Hydration Dough – Ciabatta dough is very wet and sticky, which is key for its open crumb. Instead of adding extra flour, use floured hands and a bench scraper to handle it.
- Gentle Handling for Airy Texture – Avoid excessive kneading or deflating the dough. Instead, rely on stretch-and-folds to build gluten without losing air pockets.
- Use a Hot Oven and Steam – Preheat your oven to 230°C (450°F) and place a tray of hot water inside to create steam. This helps develop a crispy crust while keeping the inside soft.
- Let the Dough Fully Proof – After shaping, let the ciabatta rest until puffy and slightly jiggly. This ensures the bread rises properly in the oven instead of spreading too much.
- Bake on a Pizza Stone or Preheated Tray – A hot surface gives the best oven spring, creating the ideal crust and texture. If you don’t have a stone, preheat a baking tray and transfer the dough carefully onto it.
- Cool Completely Before Slicing – Freshly baked ciabatta is delicate and needs time to set its crumb. Let it cool on a rack for at least 30 minutes before slicing to avoid compressing the airy texture.
- Experiment with Sourdough for More Flavor – If you have time, try using a sourdough starter instead of yeast for a deeper, tangier flavor and a slightly chewier texture.
Equipment you will need


Nutrition
Tried this recipe?
Mention @veenaazmanov_kitchen or tag #veenaazmanovkitchen!Don’t lose this recipe! Save it for Later!
📌 Save this Recipe for later on Pinterest so you can easily find it again.
⭐ Add Veena Azmanov Kitchen to your Google Preferred Sources.
It helps Google show you more of our recipes.
📧 Subscribe for new recipes delivered to your inbox.
🎥 Follow us for more recipes


My kids devoured it. I had to make another batch the next day. Great instructions!
Thank you, Ames for the lovely feedback.
This recipe made me feel like a real baker! My whole house smelled like a bakery. I think I would love to get back to baking homemade bread – going to try your Pullman bread next. Love your style of recipe writing.
Thank you so much, Zainab, for the lovely comment. Appreciate the lovely feedback.
I’ve tried a lot of ciabatta recipes and this one is hands down the best. Reliable and so flavorful. No one believed it was with instant yeast, not sourdough.
Thank you, Paul for the lovely feedback.
This has become my weekend baking tradition. Sooo…. airy inside and crisp on the outside. 10/10. Thank you so much.
Thank you so much, Nadia, for the lovely comment. Appreciate the lovely feedback.
I was nervous to try this, but your steps made it so easy. My loaf looked AND tasted amazing!
Thank you so much, Dave, for the lovely comment. Appreciate the lovely feedback.
How many times does the dough need to be stretched?
I do 4 x 30 mins (4 times every 30 minutes) Ghislaine.