Moist, Fluffy Vanilla Bean Cake
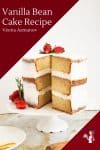
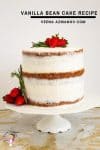
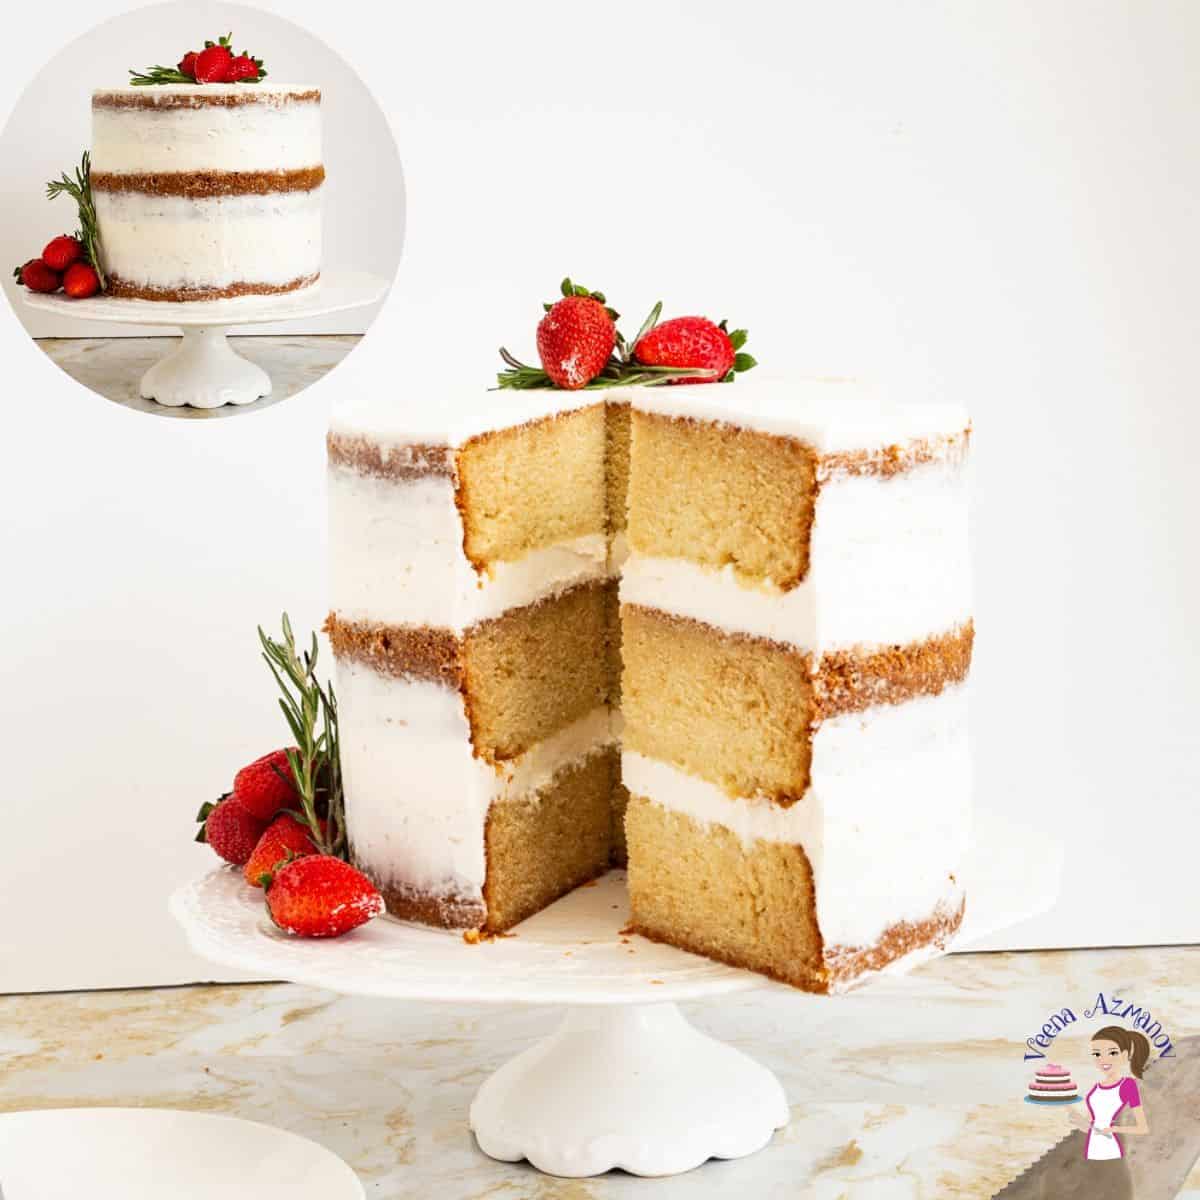
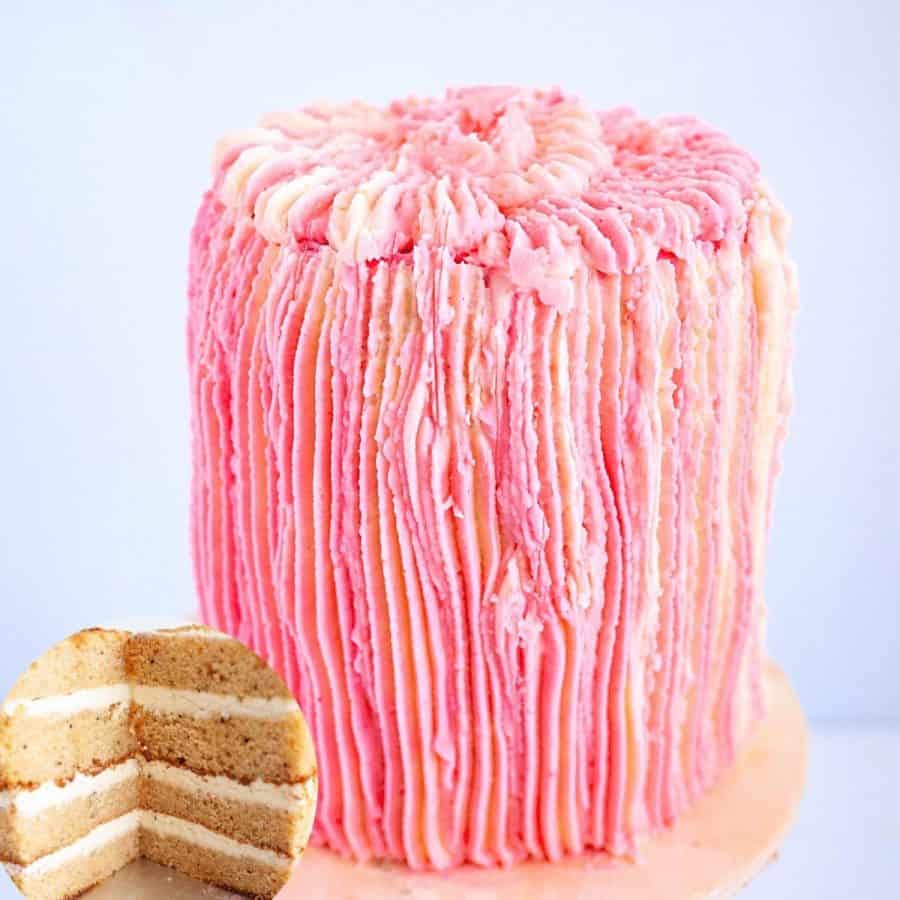
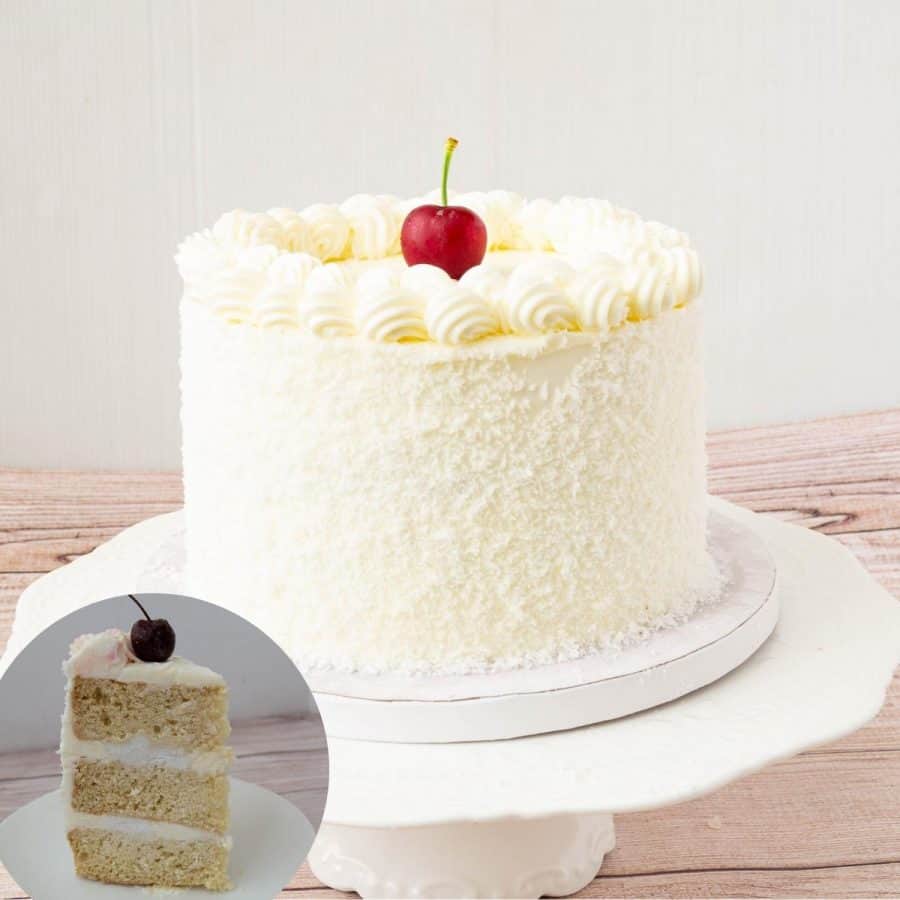
This moist vanilla bean cake is my butter-based cake batter flavored with wonderful vanilla bean paste. Delicious on its own and can also be accompanied by many different fillings and frostings. Today, I make it a naked cake so the rich vanilla flavor can shine through.

Every baker, whether a home baker or a professional, needs to master the art of the perfect vanilla bean cake. It’s the ultimate test of baking skills—simple yet incredibly rewarding.
As someone who ran her own cake business for years, I was always amazed by how often people chose this classic flavor, despite all the other exciting options on my menu. There’s just something timeless about the rich, buttery aroma of real vanilla beans and the moist, tender crumb of a perfectly baked vanilla cake.
It’s the kind of cake that shines on its own or becomes the perfect canvas for endless creative possibilities. If there’s one recipe you should perfect, it’s this one—it’s a true crowd-pleaser every single time!
Why make this cake?
- Rich Vanilla Flavor: Made with real vanilla beans, this cake boasts an authentic, luxurious vanilla flavor that’s unmatched by extracts alone.
- Tender, Moist Crumb: The perfect balance of ingredients creates a soft, fluffy texture that melts in your mouth while staying moist for days.
- Versatile and Reliable: Whether you’re baking it as a standalone cake, a layered masterpiece, or a cupcake, this recipe delivers consistently beautiful results every time.
- Perfect for Any Occasion: From elegant weddings to casual birthdays, this classic vanilla bean cake is a timeless choice that never goes out of style.

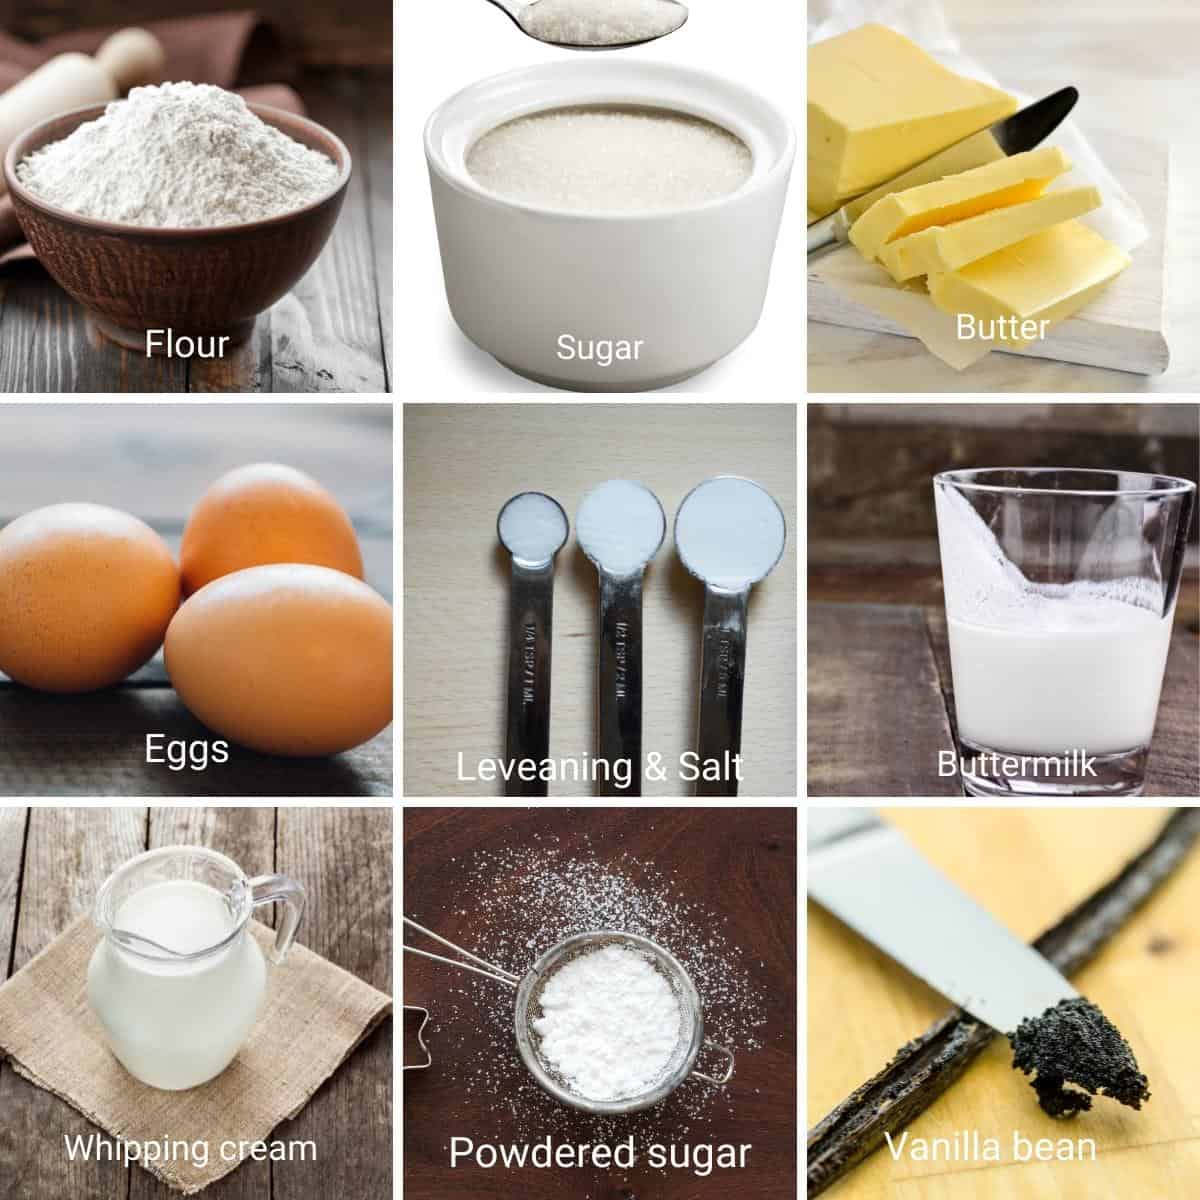
Ingredients and substitutes
- Cake flour – Cake flour gives the cake a wonderfully soft crumb. But you can certainly use all-purpose flour. And if you have only self-raising flour on hand, use it, but reduce the baking powder by half.
- Unsalted butter – I always use unsalted so I can control the amount of salt. And yet, if salted butter is all you have, use it and omit salt in the recipe.
- Sugar – I’m using white sugar so I can have a white cake. It’s always best to use fine-grain white sugar, so it dissolves easily in the butter.
- Buttermilk – If you don’t have buttermilk on hand, don’t worry. It takes just 5 minutes to make homemade buttermilk for baking.
- Vanilla bean paste – High-quality vanilla is very important, especially in a vanilla cake. I’m using vanilla bean paste, but you can use vanilla bean scrapings or a good-quality vanilla extract.
- Substitutions – If you’re missing any of these ingredients, don’t worry – there are substitutes you can use. For example, you can use vegetable oil instead of butter, or soy buttermilk instead of dairy buttermilk. Just keep in mind that these substitutions may affect the flavor and texture of the cake.
Step-by-step instructions: Moist vanilla bean cake
Cake
- Oven and Pans – Preheat the oven to 325°F/165 °C/Gas Mark 3. Grease and line 3 x 8-inch round baking pans with parchment paper.
Pro tip – You can make 2 x 8-inch round cakes and divide them into 4 layers.
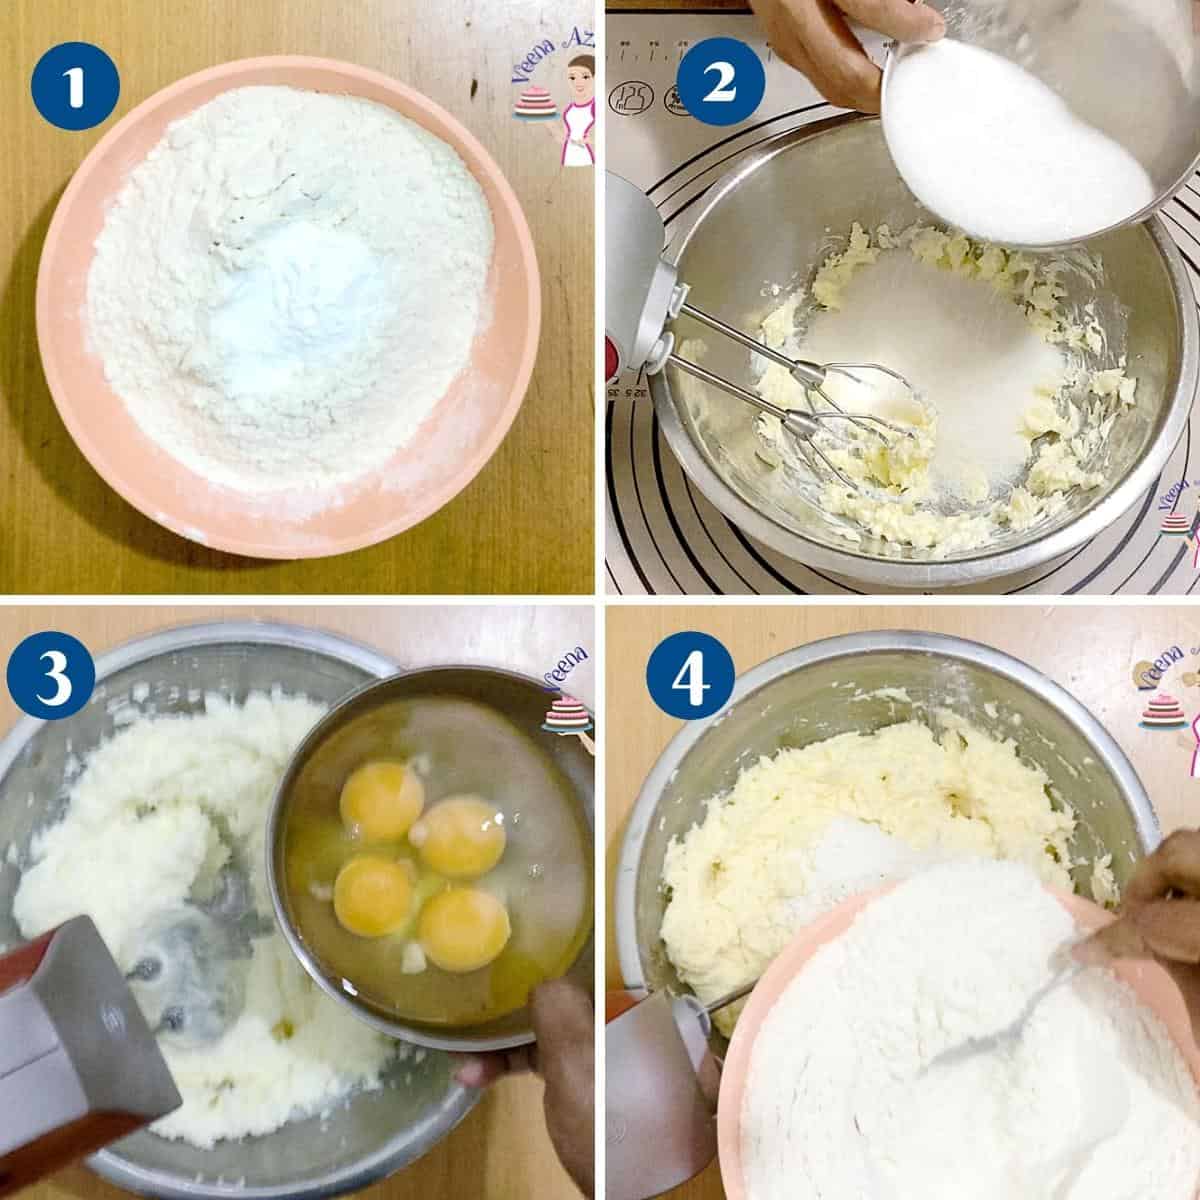
- Dry ingredients – In a medium bowl, combine the flour, baking powder, baking soda, and salt.
- Wet ingredients – In the bowl of a stand mixer fitted with the paddle attachment, cream the butter and sugar on medium speed until light and fluffy. Next, add the eggs, one at a time, followed by the vanilla bean paste.
- Combine – add the flour mixture and buttermilk in three batches. Scrape the sides and bottom of the bowl with a rubber spatula to ensure you have a smooth batter.

- Bake – Divide the batter equally between the prepared baking pans. Place the pan on the middle rack in the oven and bake for 30 to 35 minutes or until a skewer inserted in the center of the cake comes out clean.
Pro tip – I like to use cake strips to ensure my layer cakes bake flat. - Cool in the baking pan for 5 minutes. Invert and cool on a cooling rack completely before you decorate.
Frosting
- Buttercream – In the bowl of a stand mixer, with the paddle attachment, cream the butter and powdered sugar until well combined. Then, add the cream and vanilla extract. Continue to whip until light and airy – at least 2 to 3 minutes.
Pro tip – It is important to whip so you have a whipped-cream-like consistency. Otherwise, the buttercream will be too soft to spread.

Assemble
- Level – Using a bread knife or cake leveler, cut the domes off the cake layers. Brush each layer with the cooled simple syrup.
Pro tip – If you baked two layers, you can split each layer horizontally to make four layers. - Stack – Place a cake layer on the cake board or cake stand. Top with a big dollop of buttercream – spread evenly using a straight-edge spatula. Then, top the next cake layer on top, followed by more buttercream and more layers. Chill for 15 minutes.
Pro tip – Chilling the cake at this point will ensure the layers don’t move when you frost the outside.

- Frost – Next, spread the ganache around and on top of the cake. Using a paddle motion when spreading will help smooth the ganache better. Remove as much frosting as possible so the cake is barely coated, but the naked cake can still be seen through.
Pro tip – Frosting the outside will help seal the cake and lock in all the moisture, preventing it from drying out. Then remove as much as you can to show the naked cake below. - Decorate with strawberries or similar garnish.


Troubleshooting
- If your cake is coming out dry, it might be overcooked. Check the cooking time and temperature, and consider reducing the time in the oven by a few minutes. Another possibility is that you’re using too much flour; be sure to measure your ingredients precisely, as too much flour can make your cake dry and dense.
- On the other hand, if your cake is coming out overly moist, the issue may be with the ingredients. Be sure that your eggs are at room temperature before mixing them into your batter. Cold eggs can make your cake overly damp. You may also want to consider slightly reducing the amount of liquid in your recipe.
- If your cake is coming out slightly uneven or lopsided, make sure that your oven racks are level, and that you’re placing your cake pans in the center of the oven. If all else fails, you can try adding a few baking strips around your pans to help distribute the heat more evenly.
- Finally, if your cake is sticking to the pan, you may not have greased and floured it sufficiently. Be sure to coat your pans generously with cooking spray or butter, then dust them lightly with flour before adding your batter. You can also try lining the bottoms of your pans with parchment paper for added insurance.


Frequently asked questions
If stored properly, this cake will last for 2 to 3 days at room temperature. It can also be kept in the fridge for up to 5 or 6 days.
While both vanilla extract and vanilla bean paste add a distinct vanilla flavor, they differ in texture and strength. Vanilla extract is the most common vanilla flavoring used in baking. It is made from vanilla beans that have been macerated in alcohol and has a strong, pure vanilla flavor. Vanilla bean paste, on the other hand, is made by blending vanilla bean seeds with sugar syrup and has a thicker consistency with visible vanilla bean specks. It has a more complex, almost caramel-like flavor than vanilla extract.
Yes, you can make the cake ahead of time and store it in an airtight container at room temperature for up to three days. Alternatively, you can wrap it in plastic wrap and freeze it for up to three months.
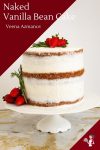
Naked Vanilla Bean Cake
This moist vanilla bean cake is my butter-based cake batter flavored with wonderful vanilla bean paste. Delicious on its own and can also be accompanied by many different fillings and frostings. Today, I make it a naked cake so the rich vanilla flavor can shine through.
Video
Ingredients
- 3 cups (375 g) Cake flour or all-purpose flour
- 2 tsp Baking powder
- ½ tsp Baking soda
- ½ tsp Salt
- 1¼ cup (280 g) Butter unsalted, room temperature
- 2 cups (400 g) White sugar
- 4 large (200 g) Eggs
- 1 cup (250 ml) Buttermilk
- 2 tsp Vanilla bean paste
- 1 cups (227 g) Butter unsalted, room temperature
- 3½ cups (420 g) Powdered sugar icing sugar
- ¼ cup (60 ml) Whipping cream (4 tbsp)or more for consistency
- 1 tsp Vanilla bean paste or extract
- ½ cup (120 ml) Simple syrup
Method
- Oven and Pans – Preheat the oven to 325 °F/ 165 °C/ Gas Mark 3. Grease and line 7-inch3 x 8-inch round baking pans with parchment paper.
- Dry ingredients – In a medium bowl, combine the flour, baking powder, baking soda, and salt.3 cups Cake flour, 2 tsp Baking powder, ½ tsp Baking soda, ½ tsp Salt
- Wet ingredients – In the bowl of a stand mixer, with the paddle attachment on medium speed, cream the butter and sugar until light and fluffy. Next, add the eggs, one at a time, followed by the vanilla bean paste.1¼ cup Butter, 2 cups White sugar, 4 large Eggs, 2 tsp Vanilla bean paste
- Combine – add the flour mixture and buttermilk in three batches. Scrape the sides and bottom of the bowl with a rubber spatula to ensure you have a smooth batter.1 cup Buttermilk
- Bake – Divide the batter equally between the prepared baking pans. Place the pan on the middle rack in the oven and bake for 30 to 35 minutes or until a skewer inserted in the center of the cake comes out clean.
- Cool in the baking pan for 5 minutes. Invert and cool on a cooling rack completely before you decorate.
- Buttercream – In the bowl of a stand mixer, with the paddle attachment, cream the butter and powdered sugar until well combined. Then, add the cream and vanilla extract. Whip until light and airy – at least 2 to 3 minutes.1 cups Butter, 3½ cups Powdered sugar, ¼ cup Whipping cream, 1 tsp Vanilla bean paste
- Level – Using a bread knife or cake leveler cut the domes off the cake layers. Brush each layer with the cooled simple syrup.½ cup Simple syrup
- Stack – Place a cake layer on the cake board or cake stand. Top with a big dollop of buttercream – spread evenly using a straight-edge spatula. Then, top the next cake layer on top followed by more buttercream and more layers. Chill for 15 minutes.
- Frost – Next, spread the ganache around and on the cake. Using a paddle motion when spreading will help smooth the ganache better. Remove as much of the frosting as possible so the cake is barely coated, but the naked cake can still be seen through.
- Decorate with strawberries or similar garnish.
Notes
- Use room temperature ingredients: Mix more evenly, creating a smoother batter that bakes more evenly. Take your eggs, butter, and milk out of the fridge at least 30 minutes before you begin.
- Don’t overmix: Overmixing your batter can make your cake tough and dry. Mix your ingredients just until they come together, then stop.
- Measure accurately: Precise measurements are essential for baking a perfect cake. Use a kitchen scale for the most accurate results, especially for flour and sugar.
- Grease and flour your pans: Prevent your cake from sticking by greasing and flouring your cake pans before pouring in the batter. You can also use parchment paper to line the bottom of the pan for extra insurance.
- Freezing the cake – Freeze it on a baking tray for a few hours then wrap well in cling/plastic wrap, followed by the parchment paper and then aluminum foil. Thaw wrapped in the fridge for 24 hours so the condensation will stay on the papers, not the cake.
- Level Your Cake Layers – Use a serrated knife or cake leveler to level off any domed tops on your cake layers to make sure your naked cake has a flat surface.
- Add a Filling – While a naked cake has minimal frosting, adding a layer of filling between each cake layer can add variety and flavor. Try using fresh fruit, jam, or whipped cream as filling options. Of course, you can also use just buttercream frosting.
- Frosting the Top – Using a small offset spatula, add a layer of frosting to the top of each cake layer before stacking. Chill the cake for 15 minutes. This will help keep the layers in place and prevent slipping.
- Crumb Coat – Before adding the final layer of frosting, do a “crumb coat.” Spread a thin layer of frosting over the entire cake to trap any loose crumbs. This will make your final frosting layer look clean and smooth.
- Final Frosting – Using your small offset spatula, add a thin layer of frosting to the top and sides of the cake. Scrape off any excess with a straight edge tool to create a naked, rustic look.
- If your cake is coming out dry, it might be overcooked. Check the cooking time and temperature, and consider reducing the time in the oven by a few minutes. Another possibility is that you’re using too much flour; measure your ingredients precisely, as too much flour can make your cake dry and dense.
- On the other hand, if your cake comes out overly moist, the issue may be with the ingredients. Ensure your eggs are at room temperature before mixing them into your batter. Cold eggs can cause your cake to be overly damp. You may also want to consider reducing slightly reducing the liquid in your recipe amount of liquid in your recipe slightly.
- If your cake is coming out slightly uneven or lopsided, ensure that your oven racks are level and that you’re placing your cake pans in the center of the oven. If all else fails, add a few baking strips around your pans to help distribute the heat more evenly.
- Finally, if your cake sticks to the pan, you may not have greased and floured it sufficiently. Be sure to give your pans a generous cooking spray or butter coating, and then dust them lightly with flour before adding your batter. You can also try using parchment paper to line the bottom of your pans for added insurance.
Storage
- Once decorated the cake does not need to be refrigerated.
- It can stay at room temperature for two days or in the fridge for up to 5 days.
- Once cut always cover the cut side of the cake with cling/plastic wrap so the cake does not dry out.
Other pan suggestions
- If you don’t want to make a layer cake like this,
- You can make this into a ‘Vanilla Sheet Cake’ sheet cake.
- You can also pour the batter into a well-greased and dusted bundt pan for a ‘Vanilla Bundt Cake‘.
- This recipe can also be baked into 24 beautiful vanilla cupcakes
Equipment you will need


Nutrition
Tried this recipe?
Mention @veenaazmanov_kitchen or tag #veenaazmanovkitchen!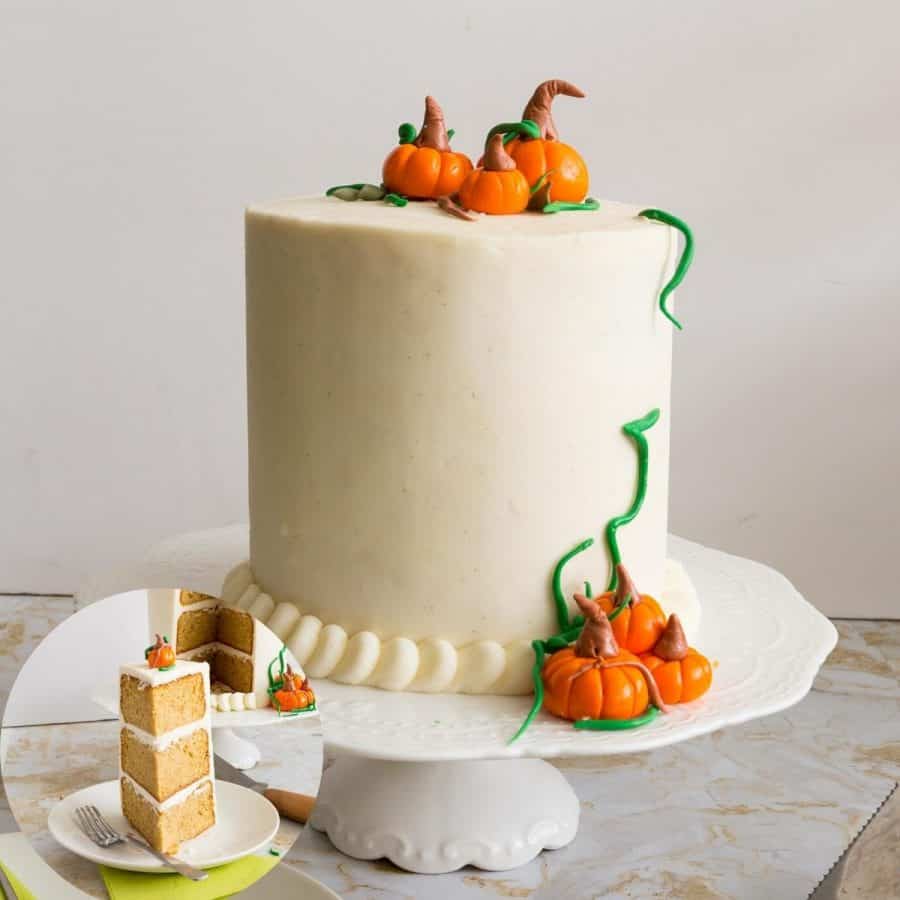

Don’t lose this recipe! Save it for Later!
📌 Save this Recipe for later on Pinterest so you can easily find it again.
⭐ Add Veena Azmanov Kitchen to your Google Preferred Sources.
It helps Google show you more of our recipes.
📧 Subscribe for new recipes delivered to your inbox.
🎥 Follow us for more recipes


The naked frosting look is perfect for this cake. The color pops and you can tell how fluffy and moist it is.
Thank you, Tara. Yes, it sure is light and airy inside.
Delicious, delicious, delicious! This is such a lovely, simple recipe. I love the use of vanilla bean paste which adds just enough vanilla flavor. Thank you for a wonderful recipe!
Thank you, Rebecca.
I love the look of naked cakes! To me, they are the best. This cake is beautiful and being a basic vanilla bean cake, you can customize it as you wish. Thank you!
Absolutely, Nicoletta. I hope you try this one
What a delicious vanilla cake! It’s so simple to make, and I love how you can dress it up in so many different ways.
Thank you, Amanda
The cakes look moist and wonderful…lots of fabulous tips here for baking cakes which is still a challenge for me at times especially layer cakes. A perfect classic recipe to keep on hand 🙂
This is very easy Tammy, you must try. Layer cakes are fun.
I love everything about this cake, the simplicity, the flavor, and the fact that it’s “naked.” I’ve never been a fan of having a lot of icing on my cake so this is absolutely perfect for my taste!
Thank you, Shannon. I hope you try this.
Hello. I’d like to make this cake for my wedding. Can I bake and ice it a couple of days in advance in put it in the fridge? Will it keep well? Thanks!
yes, this cake does stay well in the fridge for a few days. If you make it in advance be generous with the simple syrup and make sure to wrap it well in plastic wrap to prevent it from drying out. Congratulations on your wedding.
This vanilla cake looks beautiful! I am not the best at making layer cakes, but your step by step instructions breaks it down and makes it look simple to follow.
Thanks, LaKita. This is so easy even a novice can make it. I hope you try.
Sometimes simple flavours really are the best. There’s really no replacement for a delicious, well textured vanilla layer cake.
Absolutely, Bernice. I hope you try this recipe. Thanks
I only have 8 inch cake pans. How can I use this recipe using 3 8-inch round pans?
You can make 3 x 8-inch cakes with this recipe Jody
can i reduce the sugar in the cake? And by how much. I only have vanilla extract. Is that fine?
You can reduce sugar by 1/4 cup not too much. My cakes are not too sweet because I use sugar syrup. Yes, vanilla extract is fine
I managed to find two 8 inch by 3 inch high cake pans. Would that work because the pans are higher?
This makes 2 x 7-inch cakes if you want 2 x 8-ich cakes you need more cake batter along with the bigger pans. You will need another half recipe. Just change the number of servings in the bottom and it will calculate the recipe for you.
What a fantastic tutorial for such an impressive looking cake! I have never made a 3 layer cake before but after seeing this I feel like maybe I could (well at least try)?! Have pinned and will give it a go for my son’s birthday.
Kay, a three-layer is not so different than a two-layer to make. But, it does look more impressive. I do hope you try this recipe. Thanks
Is the batter supposed to be super thick? It’s almost like a dough, and I followed the instructions to the T. It’s in the oven now so I’m just waiting to see how it comes out.
Katie, Every flour absorbs moisture differently but you can add a few tablespoons of milk or water. This one is supposed to be a pouring consistency
Could u specify if the butter in the cake recipe is melted or softened?
It says room temperature butter, you can read more about butter here
Thanks for the info on using butter. Your buttercream recipe says room temp butter but your cake recipe does not specify, which is why I asked. I wanted to be sure.
Jody, the cake recipe ingredients say room temperature butter. I just checked again. Thanks
Vanilla is my favorite cake recipe! I was eager to try this recipe because it’s hard to find one that really hits the spot! This recipe was absolutely delicious and moist! Thanks so much for sharing!
Thank you so much, Tami. So happy to hear you enjoyed this recipe. Thank you for coming back to write this feedback.