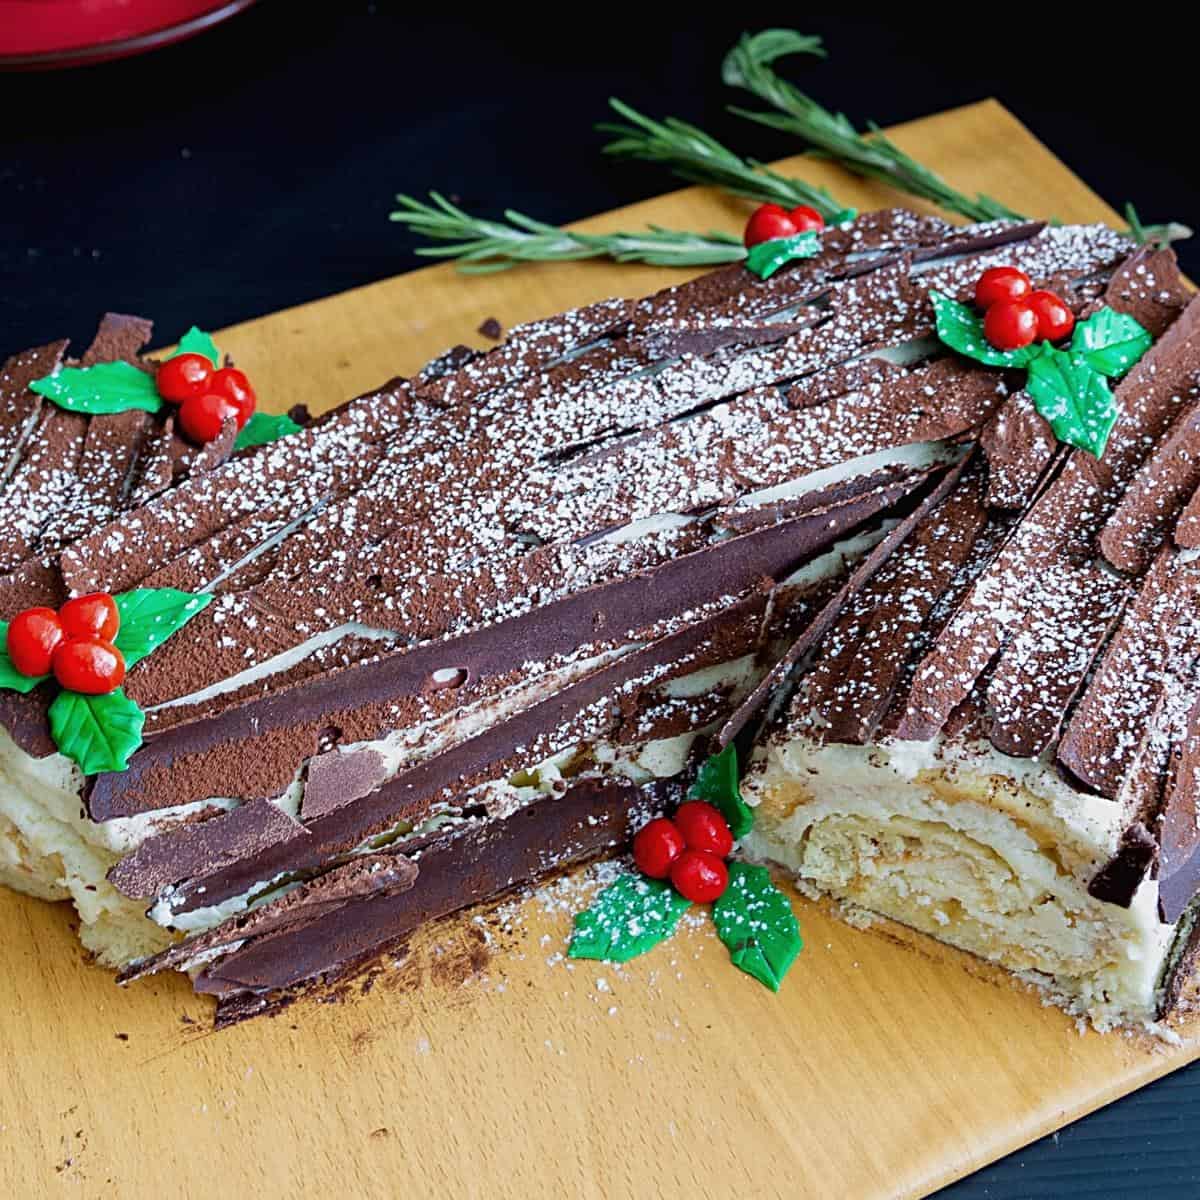
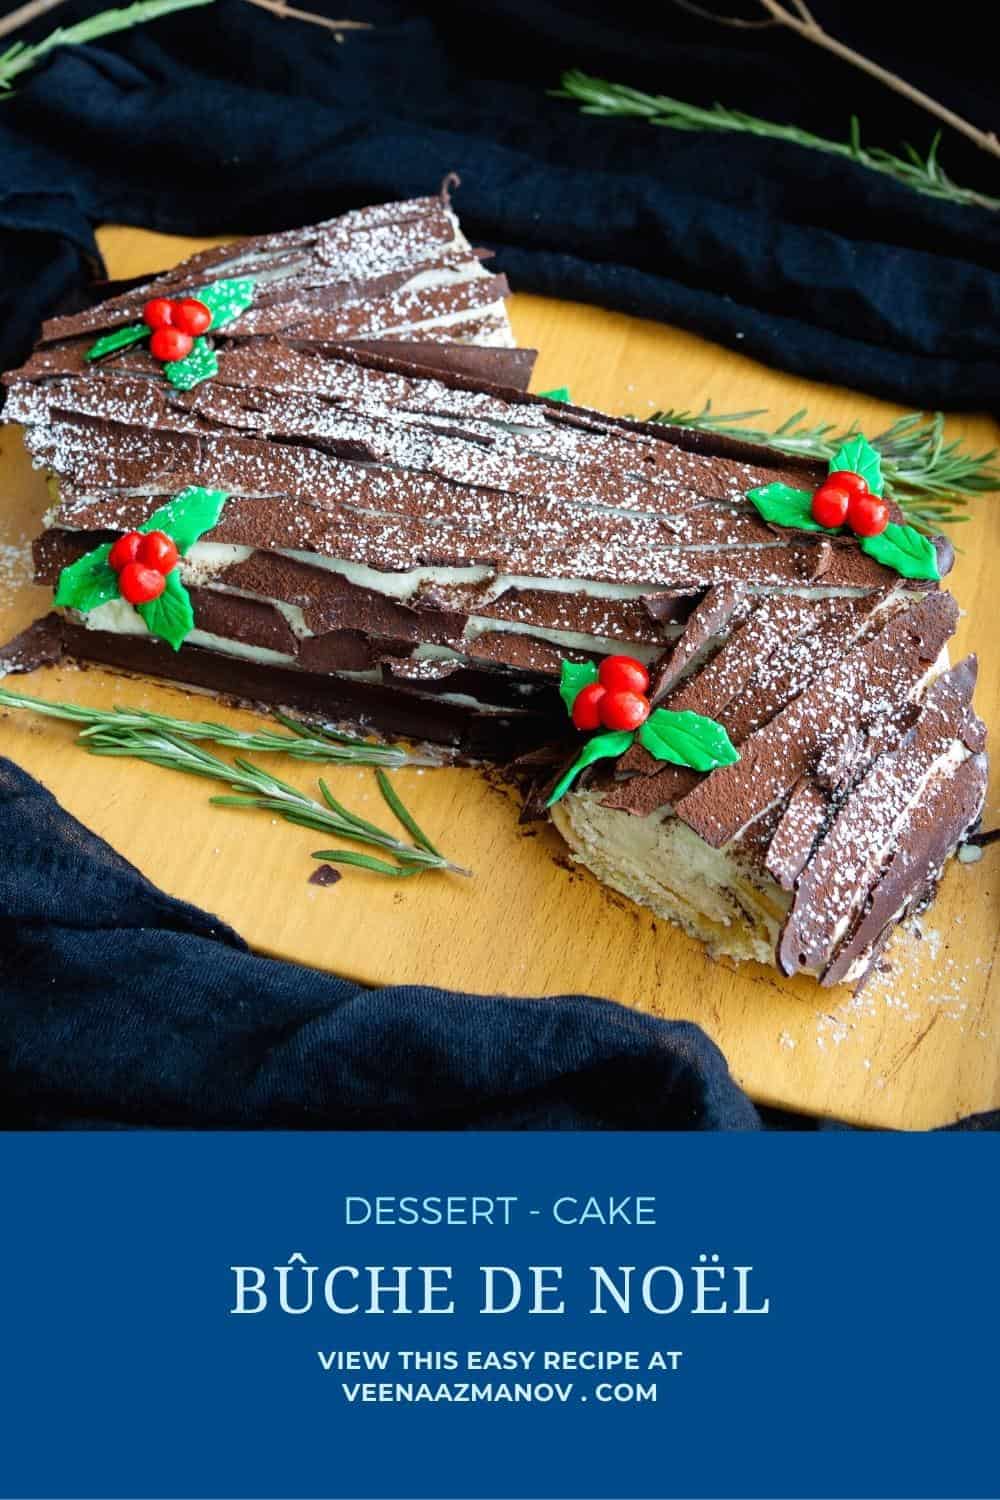
Yule Log Cake – Bûche De Noël

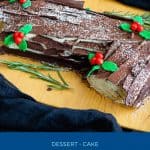
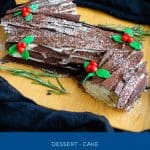


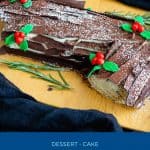
There is no better way to celebrate Christmas than with a cake shaped like a yule log and decorated like a Christmas tree! Here is my recipe and tips to bake an eggnog yule log cake using a homemade Swiss roll.
What is a yule log cake?
A yule log is a traditional Christmas cake, also known as Buche de Noël in France. It was originally a Nordic tradition to chase away the winter by burning a log. I believe the Yule is the name of the Winter Solstice, which has now become a Christmas ritual. A large piece of the log is carefully chosen and brought into the house. A small fire is lit at one end of the log every day for the next 12 days before Christmas.
Making a log cake sounds very daunting. But in truth, it is very simple and easy. This eggnog-flavored yule log cake is a wonderful twist on that classic.
Why make this log cake?
- If you love eggnog, you will enjoy this recipe. It has a wonderful, rich eggnog flavor. I am using homemade eggnog, but you can also use store-bought eggnog.
- Also, this recipe is fuss-free, simple, and easy with a standard creaming method.
- And most of the ingredients are simple pantry staples or easy to find, such as eggnog.
- I am baking the cake in a Swiss roll cake pan , but you do not need any special pan; just a sheet pan will do.
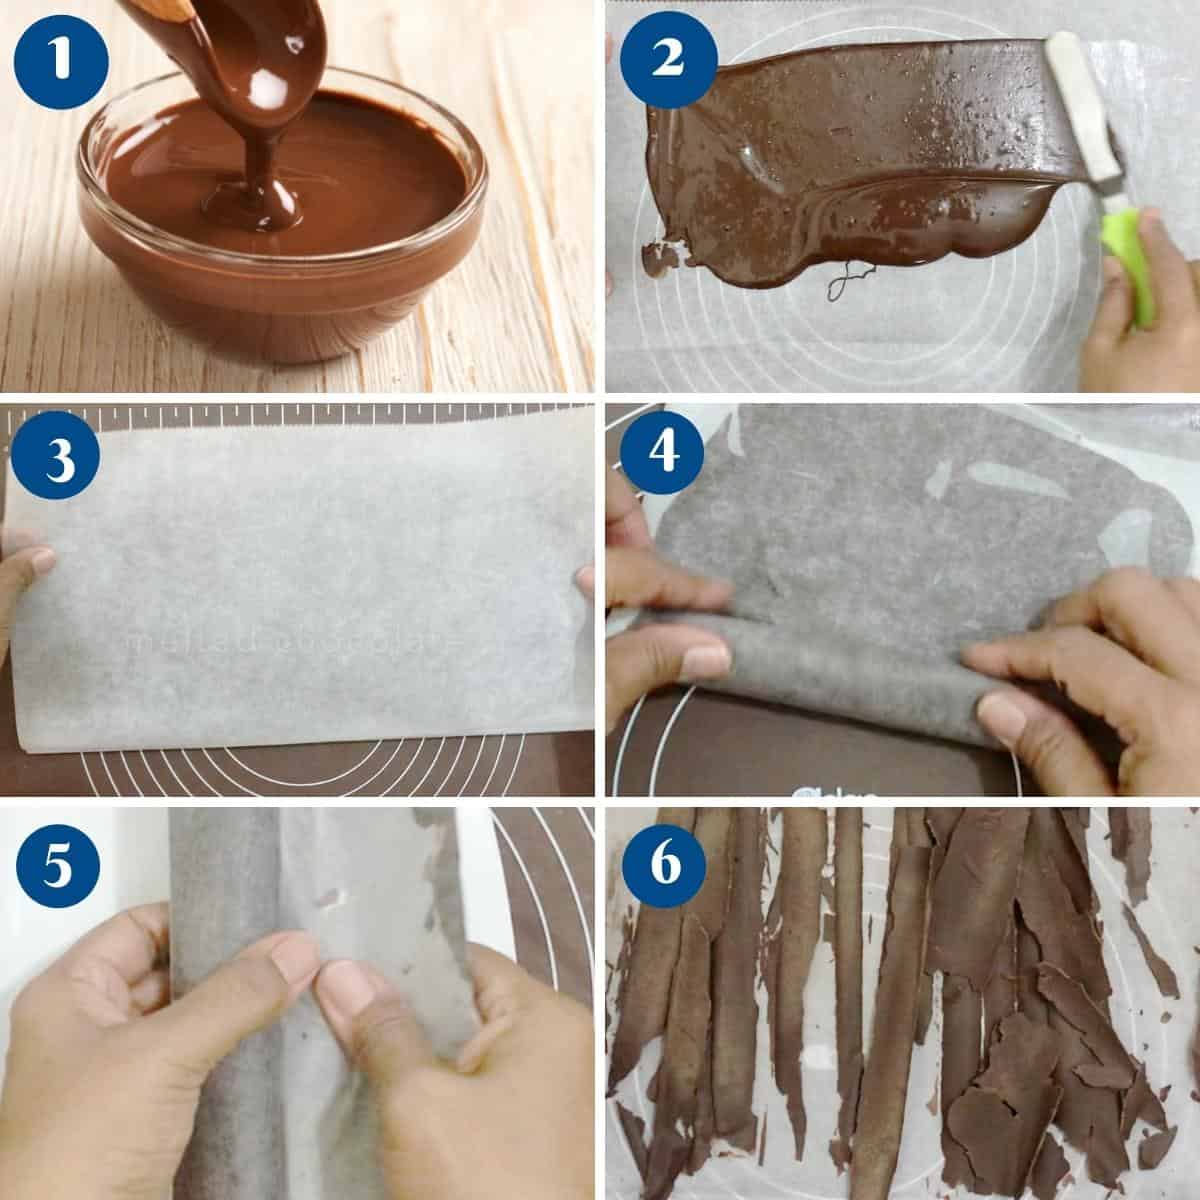
- Making the chocolate bark is surprisingly simple, with just melted chocolate and parchment paper.
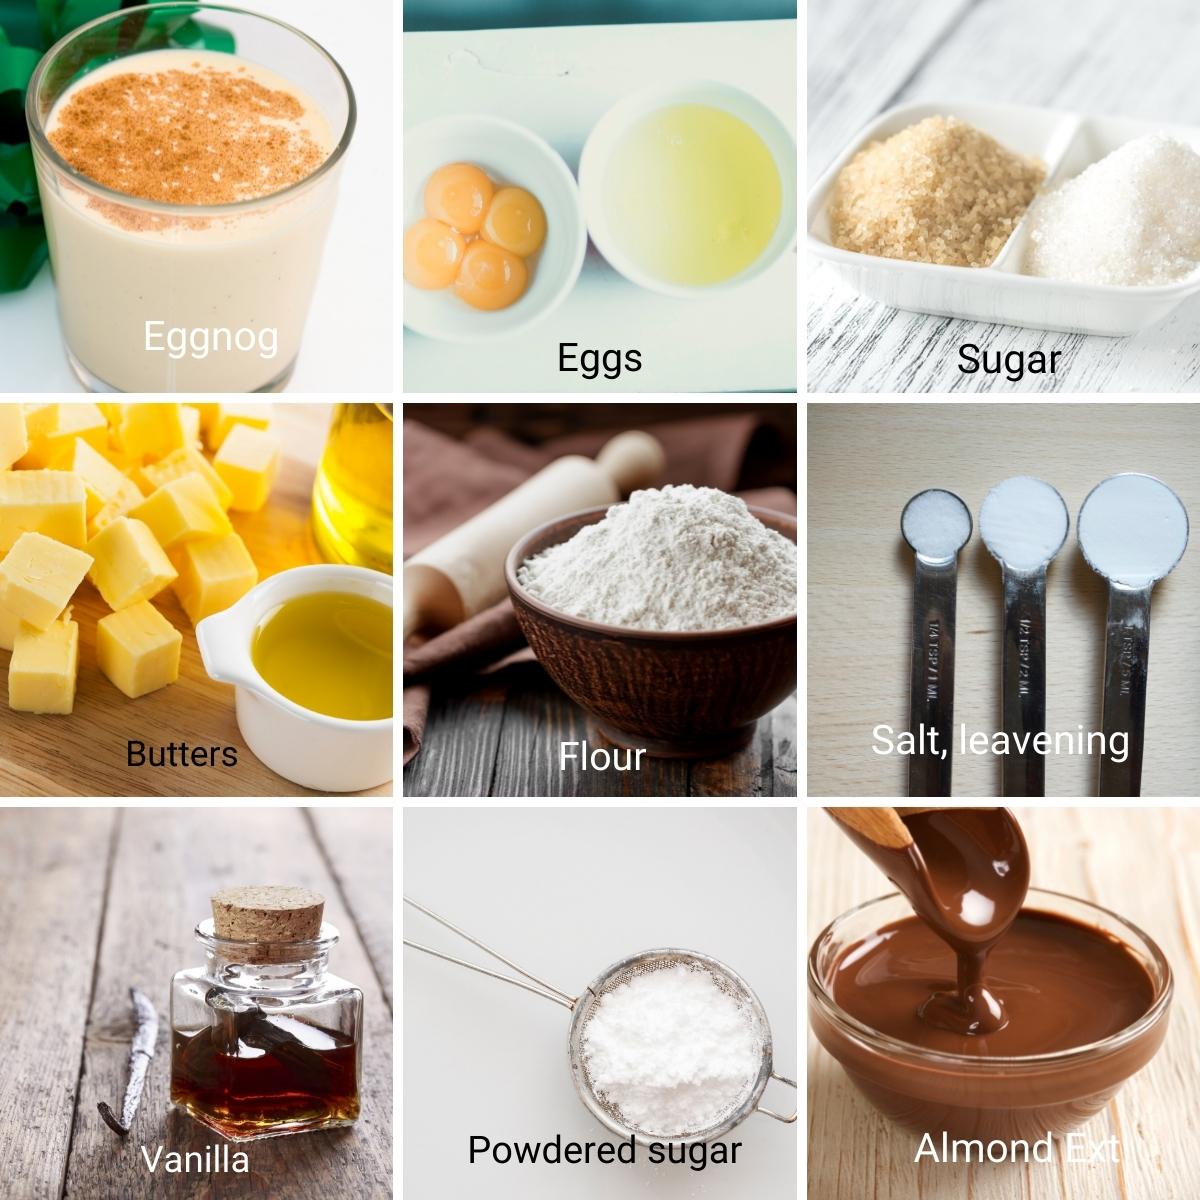
Ingredients and substitutes
- All-purpose flour – Cake flour is most commonly used for this cake. And yet, you can also use all-purpose flour.
- Butter – There is not much butter in this recipe. So, I like to use a good quality European butter, which has a high-fat content. But you can also use regular butter.
- Eggnog – You can make homemade eggnog or buy the commercially available brand. And if you don’t want eggnog flavor, you can also substitute milk or buttermilk.
- Eggs – It is important that you use good, large eggs for this recipe. The real light-and-airy texture of this cake comes from whipping the egg whites to stiff peaks.
- Cream of tartar – Helps stabilize the egg whites and prevents the protein in the egg whites from separating. But if you can’t find it, you can also omit it. A pinch of salt works just fine.
- Vanilla extract – I am using vanilla bean paste, but pure vanilla extract works great too. You can also substitute some of the white sugar in the recipe with vanilla sugar.
Step-by-Step: How to make a yule log cake – Bûche De Noël
Chocolate sponge cake
- Preheat the oven to 325 °F/ 165°C / Gas Mark 3
- Line a spring roll pan, 15 x 10 inches, with parchment paper. Make sure the parchment covers the sides of the baking tray too.
- Dry ingredients – In a large bowl, combine flour, baking powder, and half the salt – and set aside.
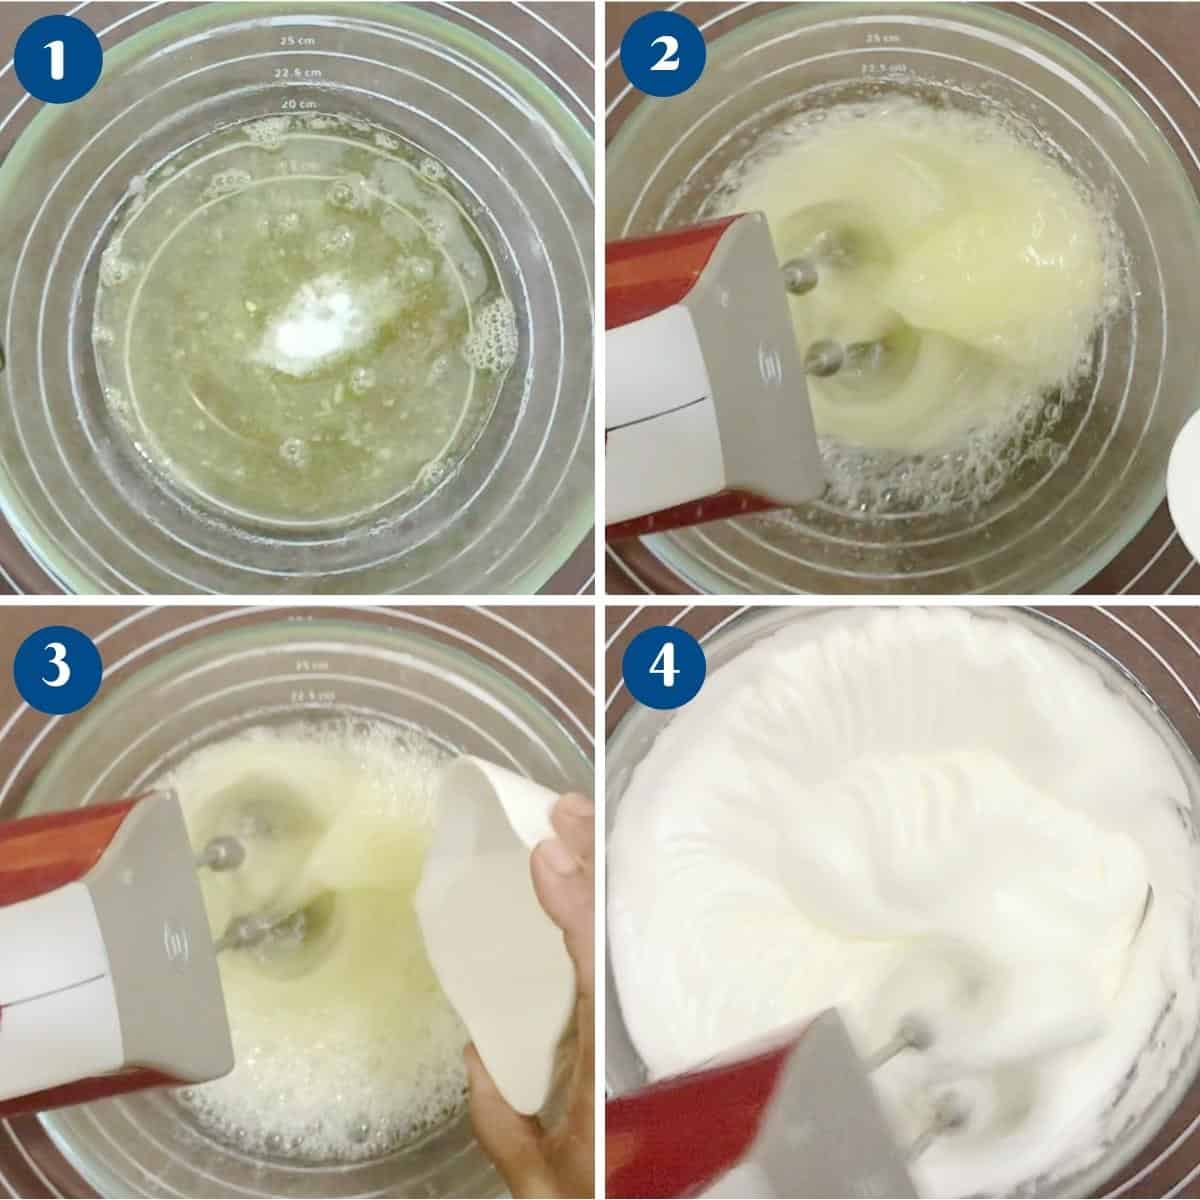
- Whip eggs – In the bowl of a stand mixer with a whisk attachment, on medium speed, start whipping the egg whites with cream of tartar and the remaining salt. Gradually add the white sugar and continue whipping on medium speed. Once all the sugar is added, turn the speed to medium-high speed and whip to almost stiff peaks form. Remove from the bowl and set aside.
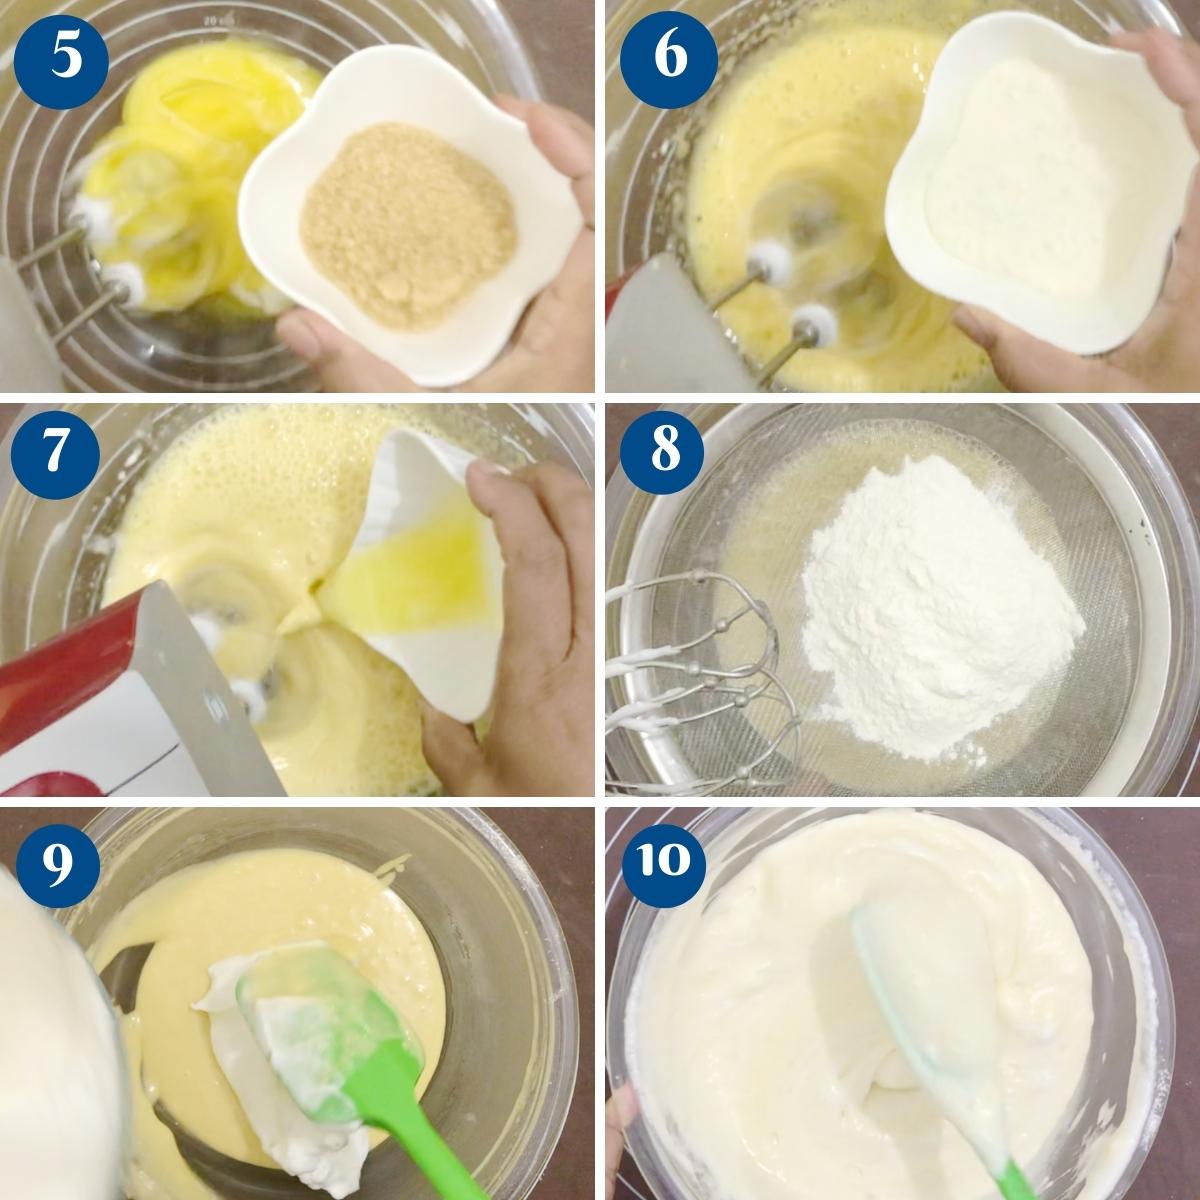
- Wet ingredients – In the same bowl of the stand mixer, with the paddle attachment, whip the egg yolks with the brown sugar until the sugar is almost melted. Next, add the eggnog mixture, vanilla extract, and melted cooled butter.
- Combine and Fold – Sift in the flour mixture, then combine well, but do not overmix. Finally, fold the whipped egg whites into the mixture in three or four additions.
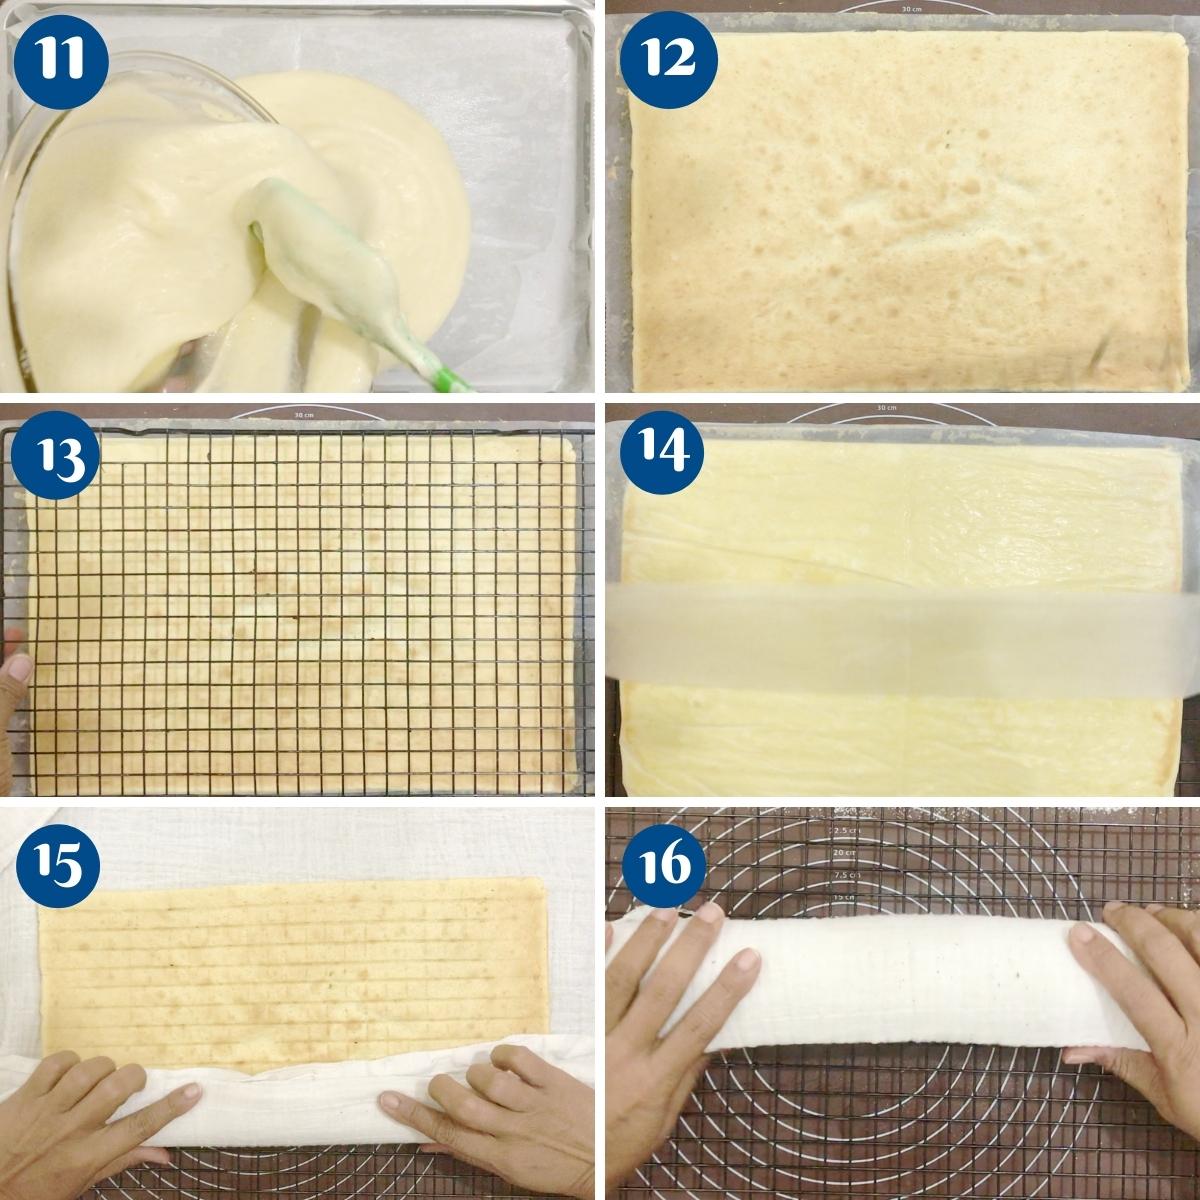
- Bake – Pour the batter into the prepared baking tray. Spread evenly with a spatula. Tap the tray three times on the countertop. Bake in the preheated oven for 11 to 12 minutes until the top is springy and a toothpick inserted comes out clean.
- Pour the batter into the prepared baking tray. Spread evenly with a spatula. Tap the tray three times on the countertop.
- Bake in the preheated oven for 11 to 12 minutes until the top is springy, and a toothpick inserted comes out clean.
- Then, as soon as the cake is out of the oven, carefully slide the parchment paper from the baking tray to the cooling rack. Wait five minutes, then flip the cake over using a second wire rack. Gently peel the bottom parchment paper.
- Dust the cake with powdered sugar and place a clean kitchen towel or parchment paper on top. Flip the cake over again, then roll it into a jelly roll using the cheesecloth (as shown in the video). Set aside to cool.
Roll and Cool
- As soon as the cake is out of the oven, carefully slide the parchment paper from the baking tray to the cooling rack. Wait five minutes, then flip the cake over using a second wire rack. Gently peel the bottom parchment paper. Dust the cake with powdered sugar and place a clean kitchen towel or parchment paper on top. Flip the cake over again, then roll it into a jelly roll using the cheesecloth (as shown in the video). Set aside to cool.
Frosting and Bark
- Buttercream – In the bowl of a stand mixer with the paddle attachment, cream butter for a minute. Add the salt and vanilla extract.
Followed by the eggnog and powdered sugar in three batches. Then, whip for 2 to 3 minutes more until light and fluffy. - Chocolate bark – Melt the chocolate in a microwave-safe bowl at 30-second intervals. Spread evenly over a sheet of parchment paper. Roll into a log (as shown in the video).
Let it set in the fridge for 10 to 20 minutes until firm. When set, unroll and let the chocolate break naturally. Keep in the fridge until ready to use.
Assemble
- Fill – Unroll the cake and remove the cheesecloth. Generously brush with eggnog. Using an offset spatula, spread a generous amount of buttercream and roll the cake back firmly into a jelly roll.
- Carve – Using a serrated knife, cut both ends of the roll at an angle or make diagonal cuts (as shown in the video). Then, attach the cut pieces to create branches with the diagonal side towards the log (see video).
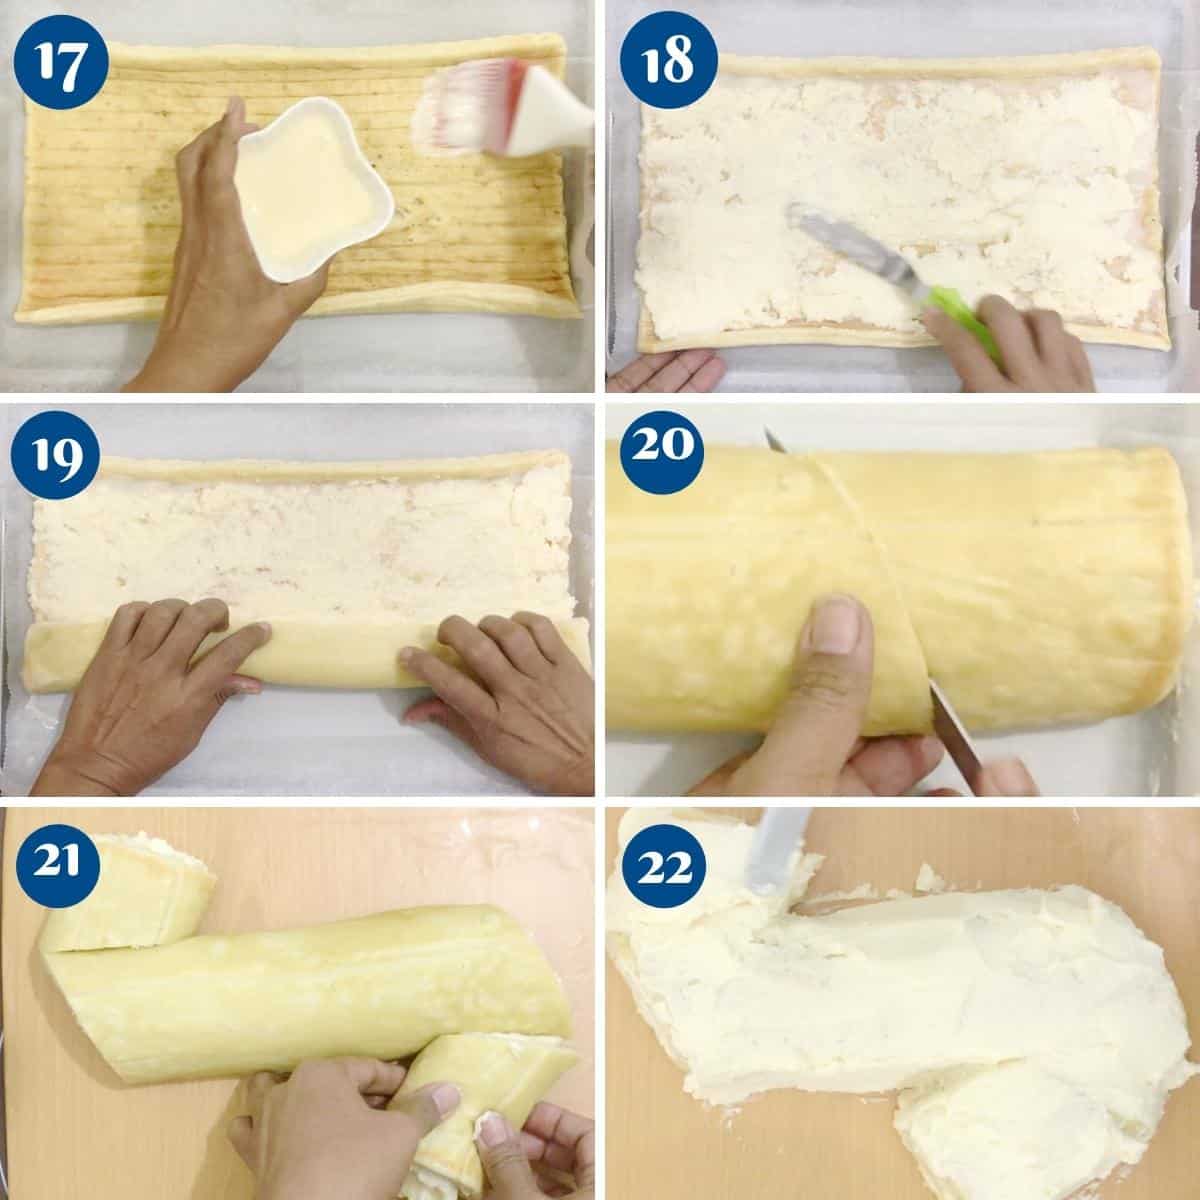
- Frost – Spread a generous amount of buttercream all over the log using an offset spatula. This does not need to be smooth.
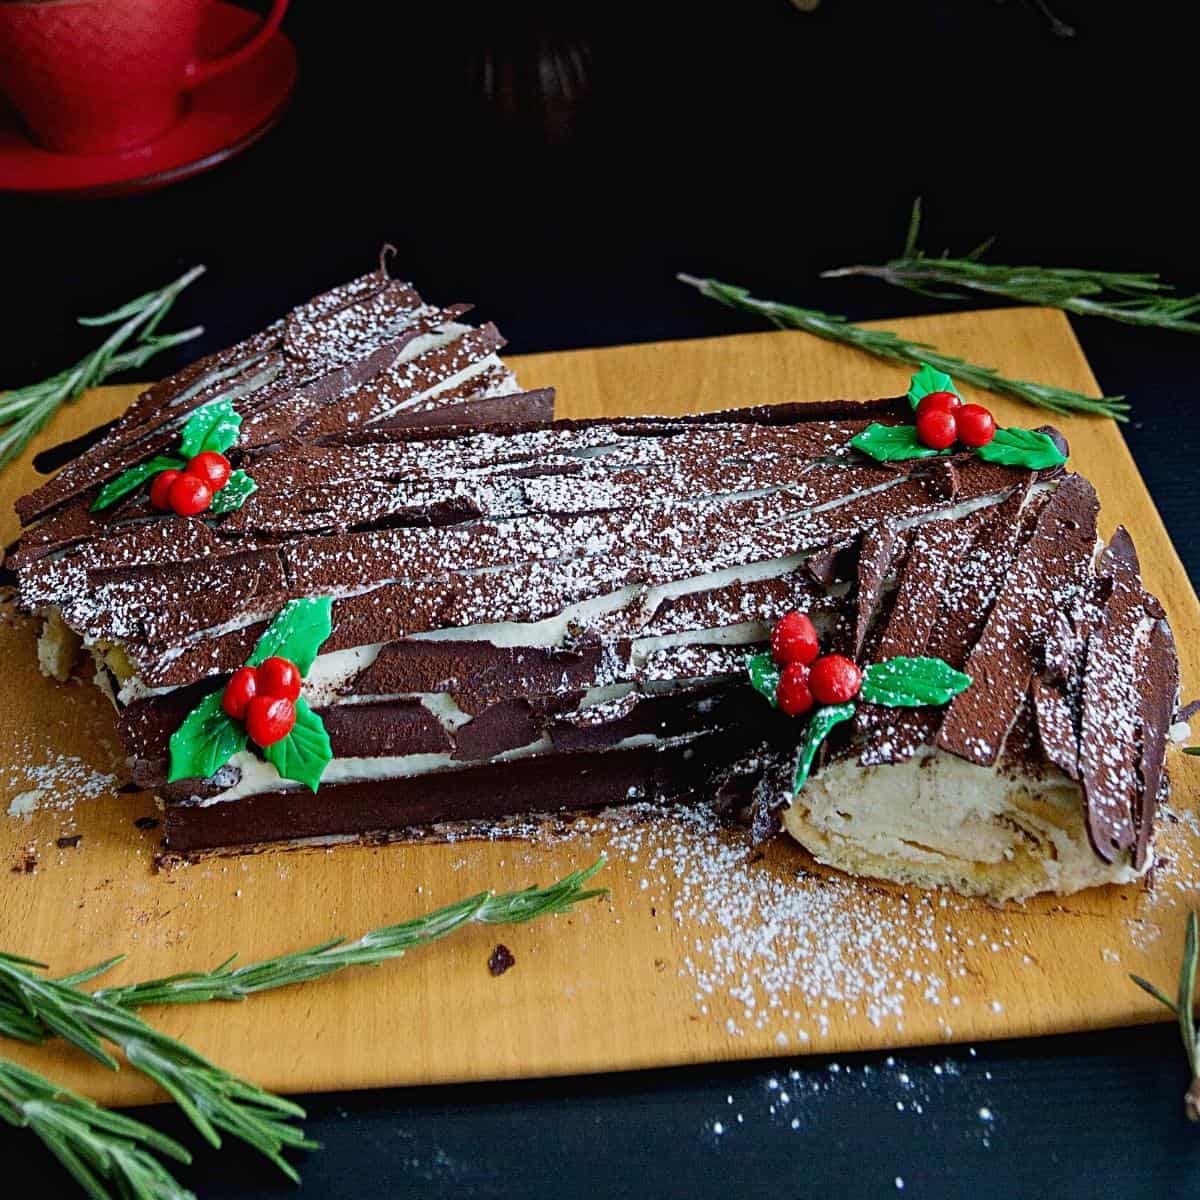
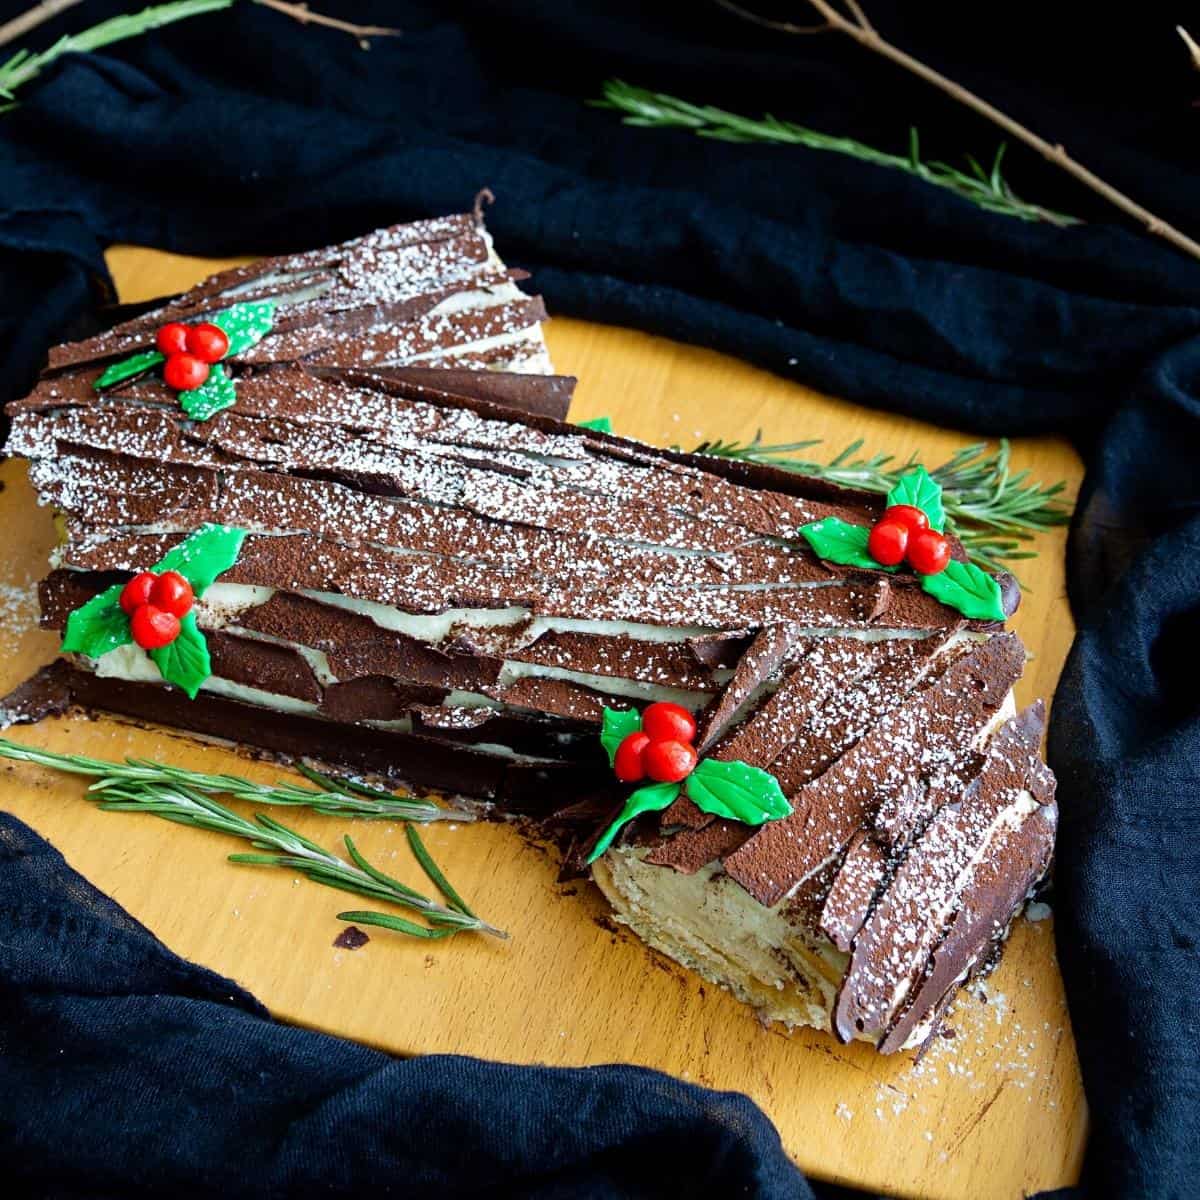
- Bark – Attach chocolate bark pieces all over the buttercream. Dust with cocoa powder. Then, give a light dusting of powdered sugar for a snowy effect.
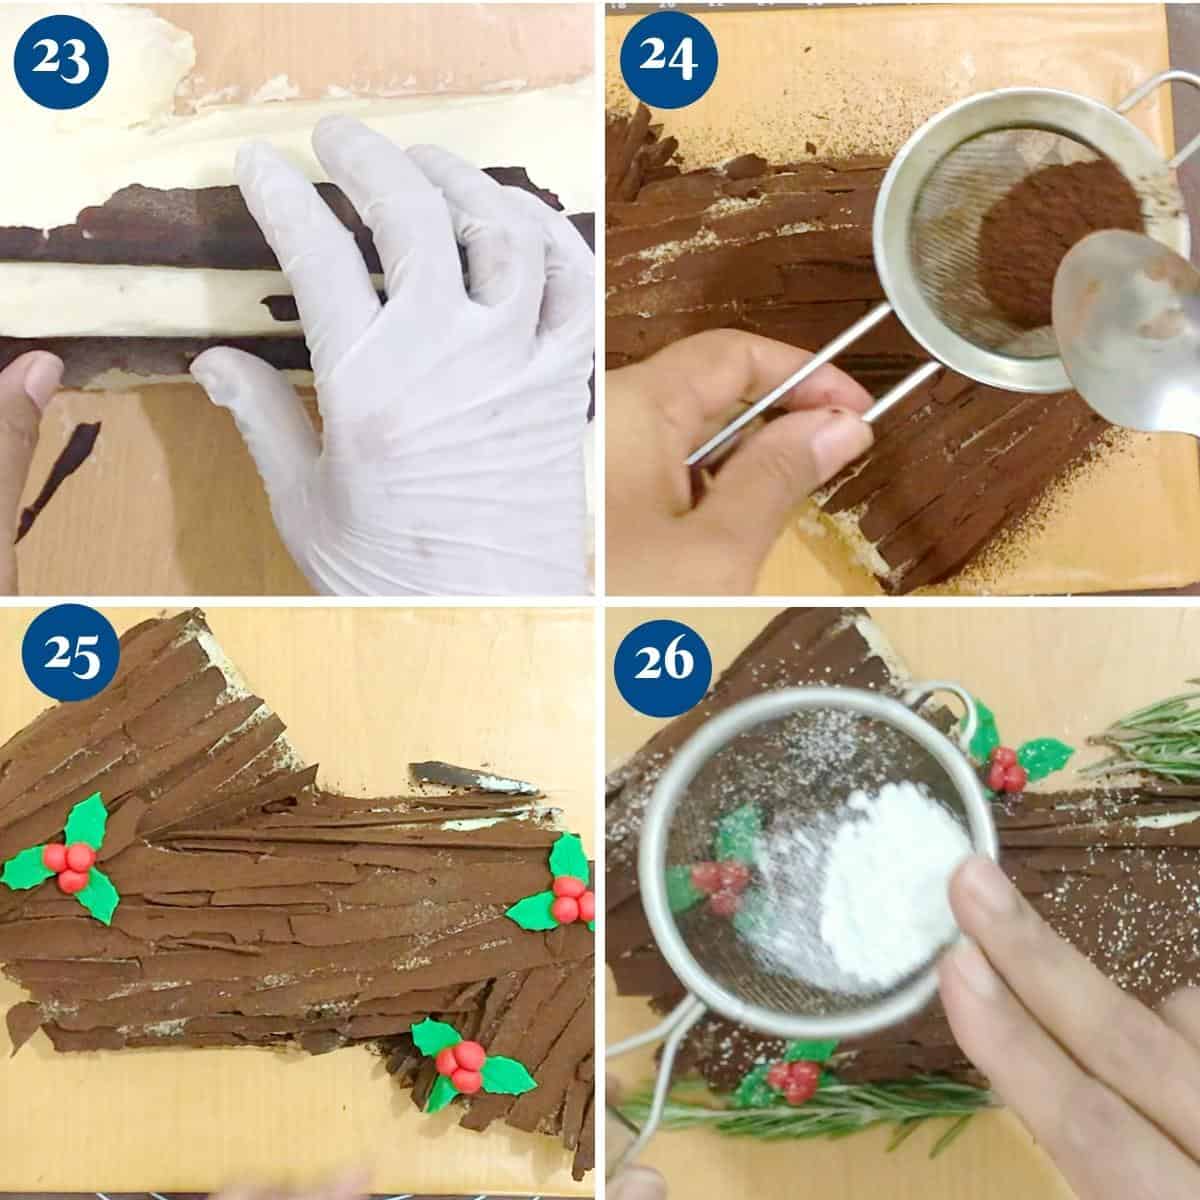
- Berries and Holly – Decorate with little fondant Christmas berries and leaves as shown in the video. I also used rosemary for garnish.
Tips for success
- Separate the eggs carefully, making sure no egg yolks get into the egg white. The yolks represent fat, which will prevent the whites from whipping into a meringue, which is what we need for this sponge cake to make it light and airy.
- Add the sugar into the egg whites gradually; this will help whip the egg whites out of the protein, separating and building some volume.
- The cake must be rolled while it is still hot. Otherwise, it will crack if you try to roll it cold.
- Dusting the cake with powdered sugar before rolling will prevent it from sticking to the kitchen cloth or parchment paper.
- When you unroll the cake again, it may not be flat, but it still holds its rolled position.
- I have used eggnog buttercream for this cake, but you can also use chocolate buttercream to frost the cake. Alternatively, you use the whipped cream filling with confectioners’ sugar for a white log cake.
- Christmas MM Cookies
- Marzipan Cake or Chocolate Marzipan Squares
- Christmas Star Cookies or Stenciled Christmas Sugar Cookies
- Christmas Cake Wreath or Christmas Pavlova
- and Christmas Spritz Cookies (No-fail Recipe)
- Cranberry Cake Christmas
- Ice Cream Cone Christmas Tree Cupcakes
- See all Christmas recipes


Frequently asked questions
This cake will keep for a few hours at room temperature because eggnog contains eggs and thus needs to be refrigerated. It will keep in the fridge for 4 to 5 days.
You can freeze this cake, but before frosting. The sponge cake can be rolled and frozen with or without a buttercream filling (not whipped cream filling). Thaw it in the fridge overnight for best results. Then, on the day of serving, you can frost the outside and decorate as desired.
This sounds complicated, but as you can see in the video, you simply roll the sponge cake and then cut the two ends. The most important thing to remember is to roll the cake while it is still hot/warm (not cold). That way, you have almost no cracks, which makes the process easy peasy.
The option for decorations can be as simple or as elaborate as you like.
To keep it simple, so you can omit carving the two ends, frost it with chocolate frosting, create a few lines with the tines of a fork, and dust with powdered sugar.
For a more elaborate presentation, you can carve the two ends as shown in the video and frost it with buttercream and bark. For decorations, you can also use sugared cranberries and rosemary or make some meringue mushrooms dusted with cocoa powder.
Yule Log Cake – Bûche De Noël
There is no better way to celebrate Christmas than with a cake shaped like a yule log and decorated like a Christmas tree! Here is my recipe and tips to bake an eggnog yule log cake using a homemade Swiss roll.
Video
Ingredients
- 5 large Eggs separated
- ¼ cup (50 g) White sugar
- ¼ cup (55 g) Brown sugar
- ½ cup (60 g) All-Purpose Flour
- ¼ tsp Baking Powder
- ¼ tsp Salt
- ⅛ tsp Cream of Tartar
- 1 tsp Vanilla Extract
- 2 tbsp Butter melted, coold
- ¼ cup (60 ml) Eggnog
- 8 oz (225 g) Butter unsalted
- 2 tsp Vanilla extract
- ¼ cup (60 ml) Eggnog
- 1 lb (450 g) Powdered sugar
Method
- Preheat the oven to 325 °F / 165°C / Gas Mark 3
- Line a spring roll pan 15 x 10 inches with parchment paper. Make sure the parchment covers the sides of the baking tray too.
- Dry ingredients – In a large bowl, combine flour, baking powder, and half the salt – set aside.
- Whip eggs – In the bowl of a stand mixer with a whisk attachment, on medium speed, start whipping the egg whites with cream of tartar and the remaining salt. Gradually add the white sugar and continue whipping on medium speed. Once all the sugar is added, turn the speed to medium-high speed and whip to almost stiff peaks form. Remove from the bowl and set aside.
- Wet ingredients – In the same bowl of the stand mixer, with the paddle attachment, whip the egg yolks with the brown sugar until the sugar is almost melted. Next, add the eggnog mixture, vanilla extract, and melted cooled butter.
- Combine and Fold – Sift in the flour mixture, then combine well, but do not overmix. Finally, fold the whipped egg whites into the mixture in three or four additions.
- Bake – Pour the batter into the prepared baking tray. Spread evenly with a spatula. Tap the tray three times on the countertop. Bake in the preheated oven for 11 to 12 minutes until the top is springy and a toothpick inserted comes out clean.
- Roll and Cool – As soon as the cake is out of the oven, carefully slide the parchment paper from the baking tray to the cooling rack. Wait five minutes, then flip the cake over using a second wire rack. Gently peel the bottom parchment paper. Dust the cake with powdered sugar and place a clean kitchen towel or parchment paper on top. Flip the cake over again, then roll it into a jelly roll using the cheesecloth (as shown in the video). Set aside to cool.
- In the bowl of a stand mixer with the paddle attachment, cream butter for a minute. Add the salt and vanilla extract. Followed by the eggnog and powdered sugar in three batches. Then, whip for 2 to 3 minutes more until light and fluffy.
- Melt the chocolate in a microwave-safe bowl at 30-sec intervals. Spread evenly over a sheet of parchment paper. Then, roll into a log (as shown in the video). Let set in the fridge for 10 to 20 minutes until firm. When set, unroll and let the chocolate break naturally. Keep in the fridge until ready to use.
- Fill – Unroll the cake and remove the cheesecloth. Generously brush with eggnog. Using an offset spatula spread a generous amount of buttercream and roll the cake back firmly into a jelly roll.
- Carve – Using a serrated knife, cut both ends of the roll at an angle or make diagonal cuts (as shown in the video). Then, attach the cut pieces to create branches with the diagonal side towards the log (see video).
- Frost – Spread a generous amount of buttercream all over the log using an offset spatula. This does not need to be smooth.
- Bark – Attach chocolate bark pieces all over the buttercream. Dust with cocoa powder. Then, give a light dusting of powdered sugar for a snowy effect.
- Berries and Holly – Decorate with little fondant Christmas berries and leaves as shown in the video. I also used rosemary for garnish.
Notes
- Separate the eggs carefully, making sure no egg yolks get into the egg white. The yolks represent fat, which will prevent the whites from whipping into a meringue, which is what we need for this sponge cake to make it light and airy.
- Add the sugar into the egg whites gradually; this will help whip the egg whites out of the protein, separating and building some volume.
- The cake must be rolled while it is still hot. Otherwise, it will crack if you try to roll it cold.
- Dusting the cake with powdered sugar before rolling will prevent it from sticking to the kitchen cloth or parchment paper.
- When you unroll the cake again, it may not be flat, but it still holds its rolled position.
- I have used eggnog buttercream for this cake, but you can also use chocolate buttercream to frost the cake. Alternatively, you use the whipped cream filling with confectioners’ sugar for a white log cake.
Equipment you will need


Nutrition
Tried this recipe?
Mention @veenaazmanov_kitchen or tag #veenaazmanovkitchen!Don’t lose this recipe! Save it for Later!
📌 Save this Recipe for later on Pinterest so you can easily find it again.
⭐ Add Veena Azmanov Kitchen to your Google Preferred Sources.
It helps Google show you more of our recipes.
📧 Subscribe for new recipes delivered to your inbox.
🎥 Follow us for more recipes


Hello, I want to make an eggless Swiss roll.. can you suggest if your classic eggless vanilla cake recipe (with curd and oil) would work for it or I should use recipes with condensed milk.. thanks in advance.
Hey Sri, No both my eggless vanilla cake recipes won’t work for a Swiss roll. You need a different recipe with a much lighter batter because a Swiss roll needs to be rolled. I don’t have one at the moment on the blog. Sorry..
This is a SHOWSTOPPER dessert for the holidays, so gorgeous!!! I love eggnog and would never have thought to incorporate it into the cake and icing, I normally just drink it!
Thank you, Melisa. It’s a great flavor for buttercream as well as drinking.
What a festive cake and so beautifully decorated. I love a classic yule log- reminds me of being at my grandma’s for the holidays.
Thank you, Jen. Yes, this is a classic.
Oh this is brilliant. the flavors of eggnog would work so beautifully in the cake. Love all the details you shared for this recipe
Thank you, Jyothi.
Veena, I am so glad I came across this cake. I have some eggnog I need to use up. I will be trying your recipe soon.
Thank you so much, Mirlene. So happy to hear that.
Many thanks for this brilliant looking recipe, today is the day & i feel the need to get this Christmas Eggnog Yule Log Cake done, practice makes perfect i suppose?
& with christmas just around the corner, this will really make an amazing centre feature on my dining table as my guests tuck in to it …. many thanks once again for your amazing ideas, and all the hard work that you do!!!!
Thank you, Ddan. So happy to hear that. I think your guest will love this.
What a gorgeous yule log, I am going save this recipe, your cake looks amazing. I have been looking for a good recipe for a while now.
Thank you, Mahy. I hope you enjoy it.