Christmas Pavlova Wreath Recipe
 Prep Time 10 minutes Cook Time 45 minutes Total Time 3 hours 55 minutes
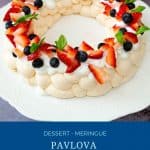
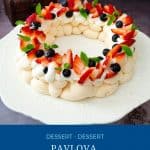
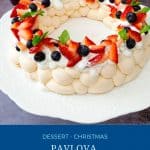
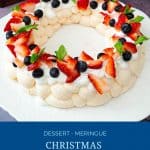
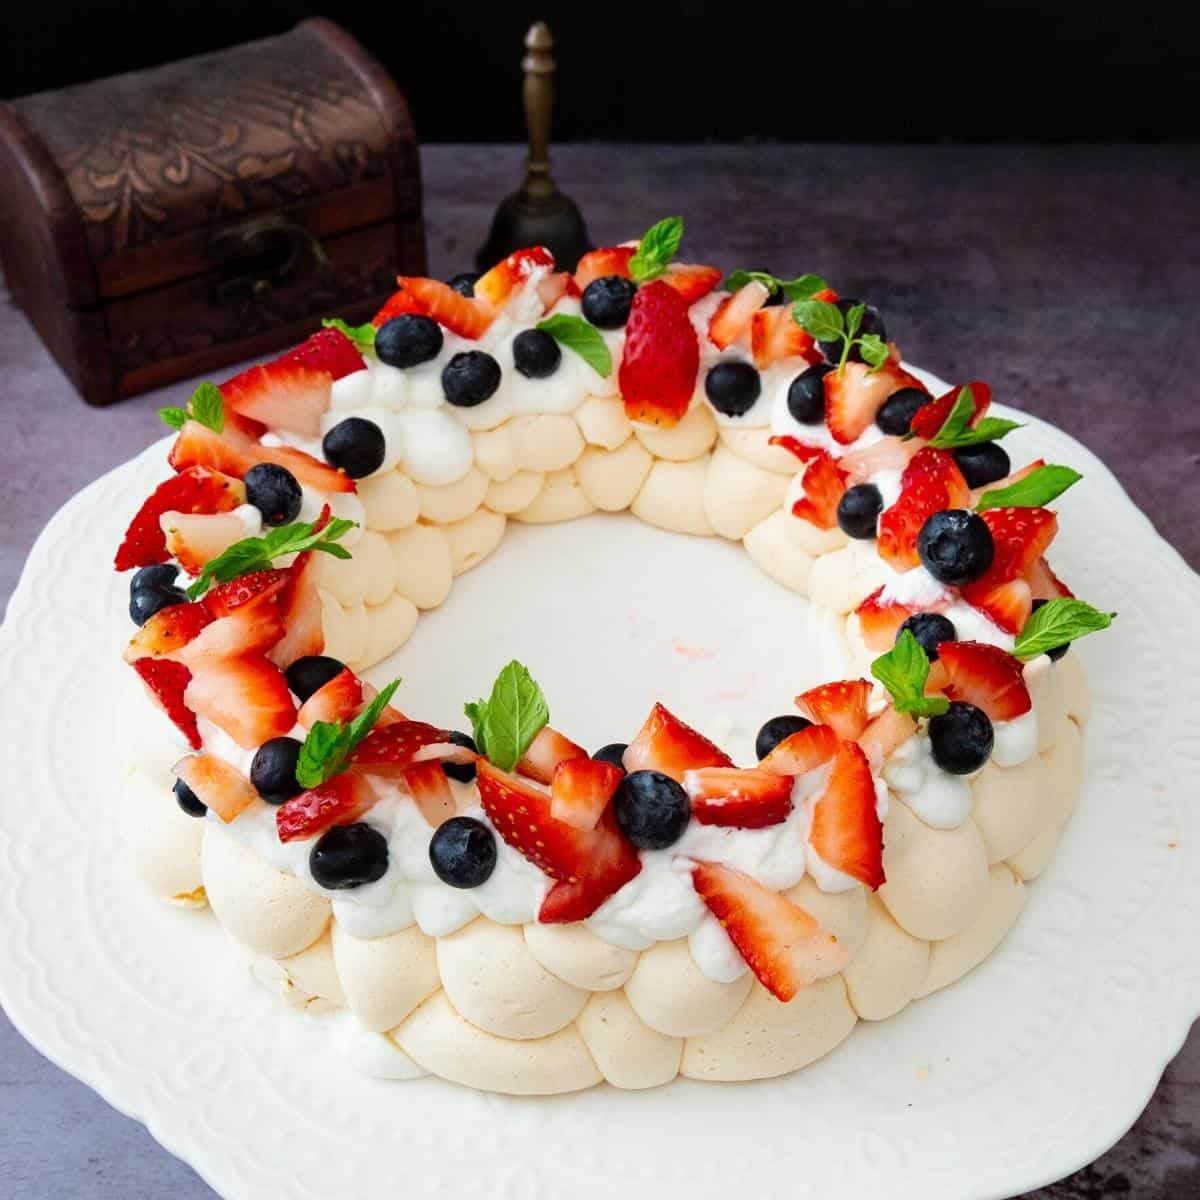
This Christmas Pavlova Wreath is a light, showstopping dessert for your holiday table. A crisp meringue wreath, soft marshmallowy center, clouds of whipped cream, and lots of fresh berries and mint make it look like an edible Christmas garland. It’s naturally gluten-free, easy to make ahead, and always the first dessert to disappear.
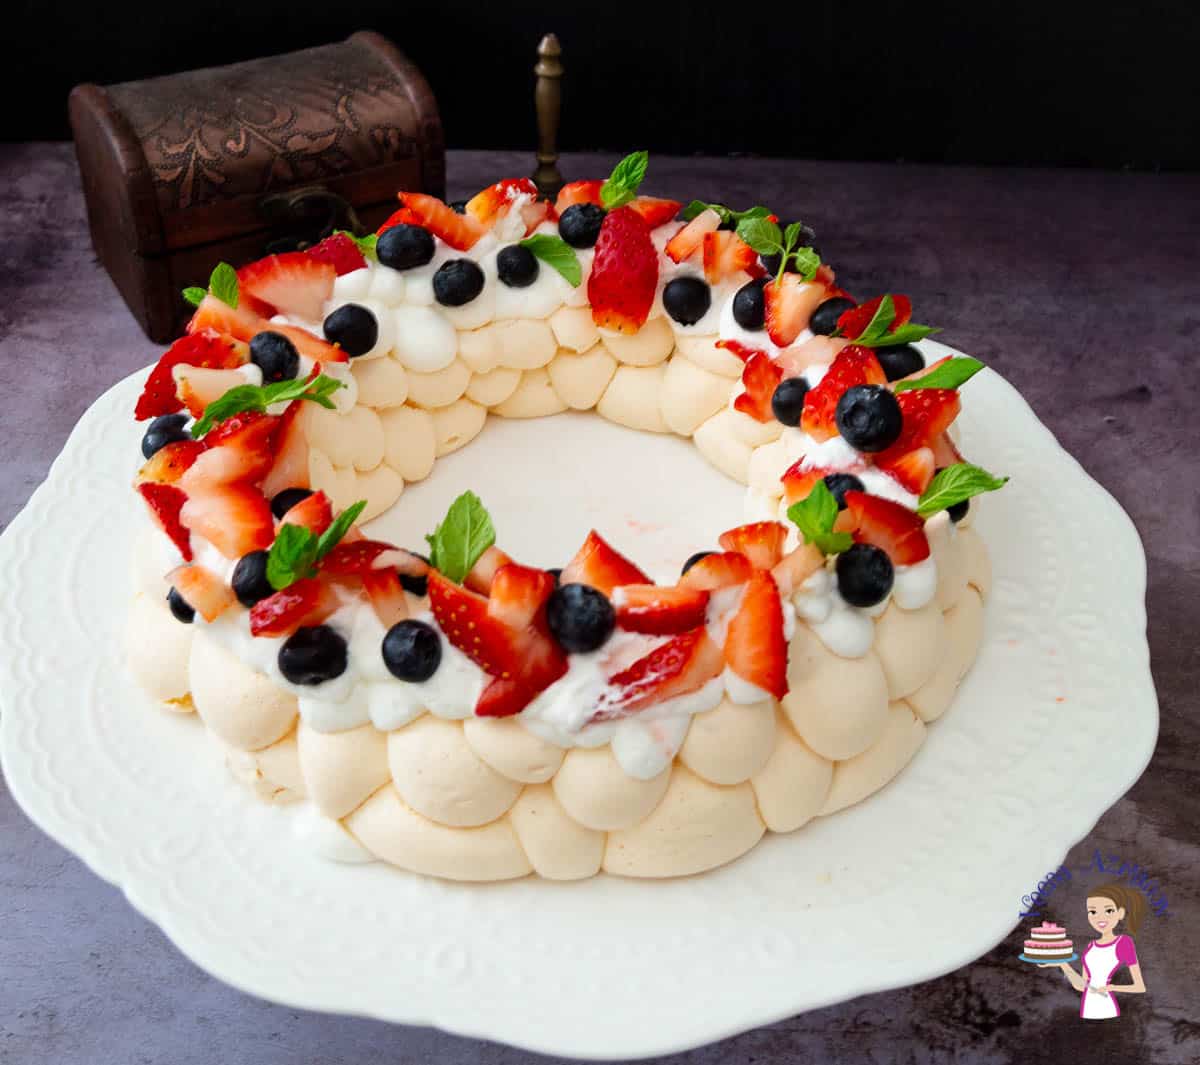
If you love meringue, pavlova feels like the ultimate treat. I started making this Christmas pavlova wreath as a lighter option after heavy holiday dinners – something pretty, not too rich, and full of fresh fruit. The wreath shape makes it feel extra festive, and my kids love helping decorate it with strawberries, blueberries, and mint leaves like little “Christmas elves” around the table.
⭐ Why You’ll Love This Christmas Pavlova Wreath
- Texture: crisp shell, soft marshmallow inside, cool whipped cream, and juicy fruit.
- Looks: the wreath shape, white meringue, and red-green fruit make it a natural centerpiece.
- Make-ahead friendly: you can bake the meringue in advance and assemble just before serving.
- Lighter than cake: perfect after a big Christmas meal when people “aren’t hungry” but somehow still manage dessert.
If you’re looking for a Christmas pavlova dessert that feels special but isn’t technically scary, this is it.

Ingredients and substitutes
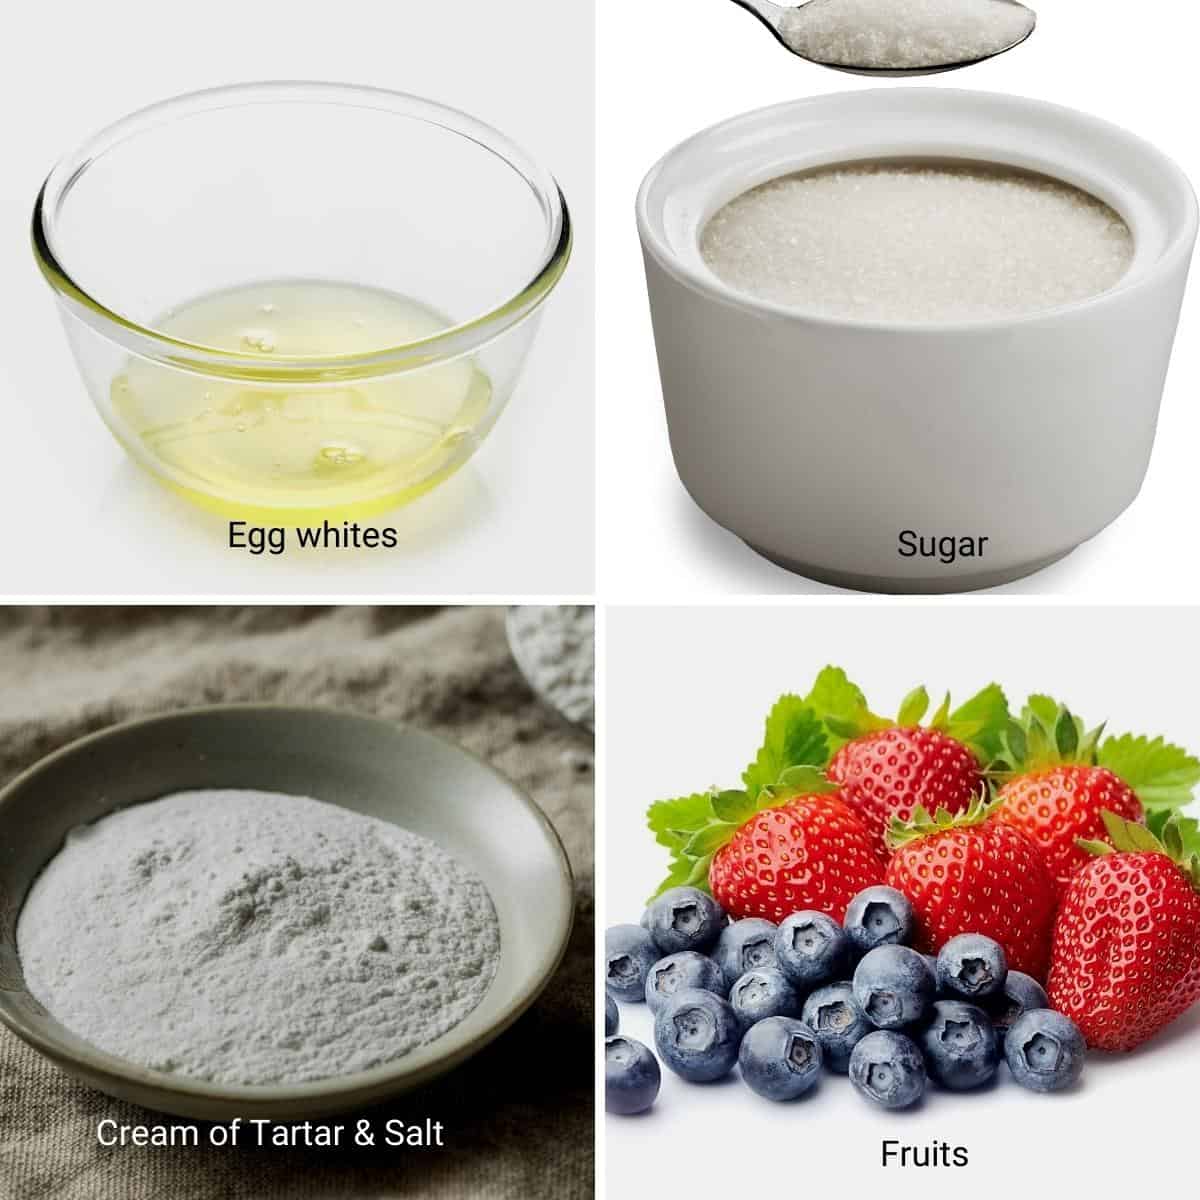
- Egg whites – Use large egg whites at room temperature for maximum volume. Cold eggs are easier to separate, then let the whites warm up. Aged whites whip even better if you have them.
- Sugar – Fine white sugar dissolves best in meringue and gives a smooth, glossy finish.
- Cream of tartar – Stabilizes the egg whites and helps them hold volume. You can substitute with a few drops of lemon juice or white vinegar.
- Cornstarch (cornflour) – Absorbs extra moisture for a crisp shell and soft, marshmallowy center.
- Salt – Just a pinch to balance the sweetness.
- Vanilla – Adds a soft background flavor; you can skip it if you like a cleaner meringue taste.
- Whipping cream – Use heavy/whipping cream with at least 32% fat so it whips well and holds shape.
- Powdered sugar – Lightly sweetens and stabilizes the whipped cream.
- Fruit & garnish – I use strawberries, blueberries, and mint leaves, but raspberries, pomegranate arils, kiwi, or red currants also look very Christmassy.
👣 Step-by-Step: How to Make a Pavlova Christmas Wreath
1. Prepare the template
Preheat the oven to 300°F / 150°C.
Draw a 7-inch circle on parchment, flip the paper so the pencil side is down, and place it on a baking tray. This will be your wreath guide.
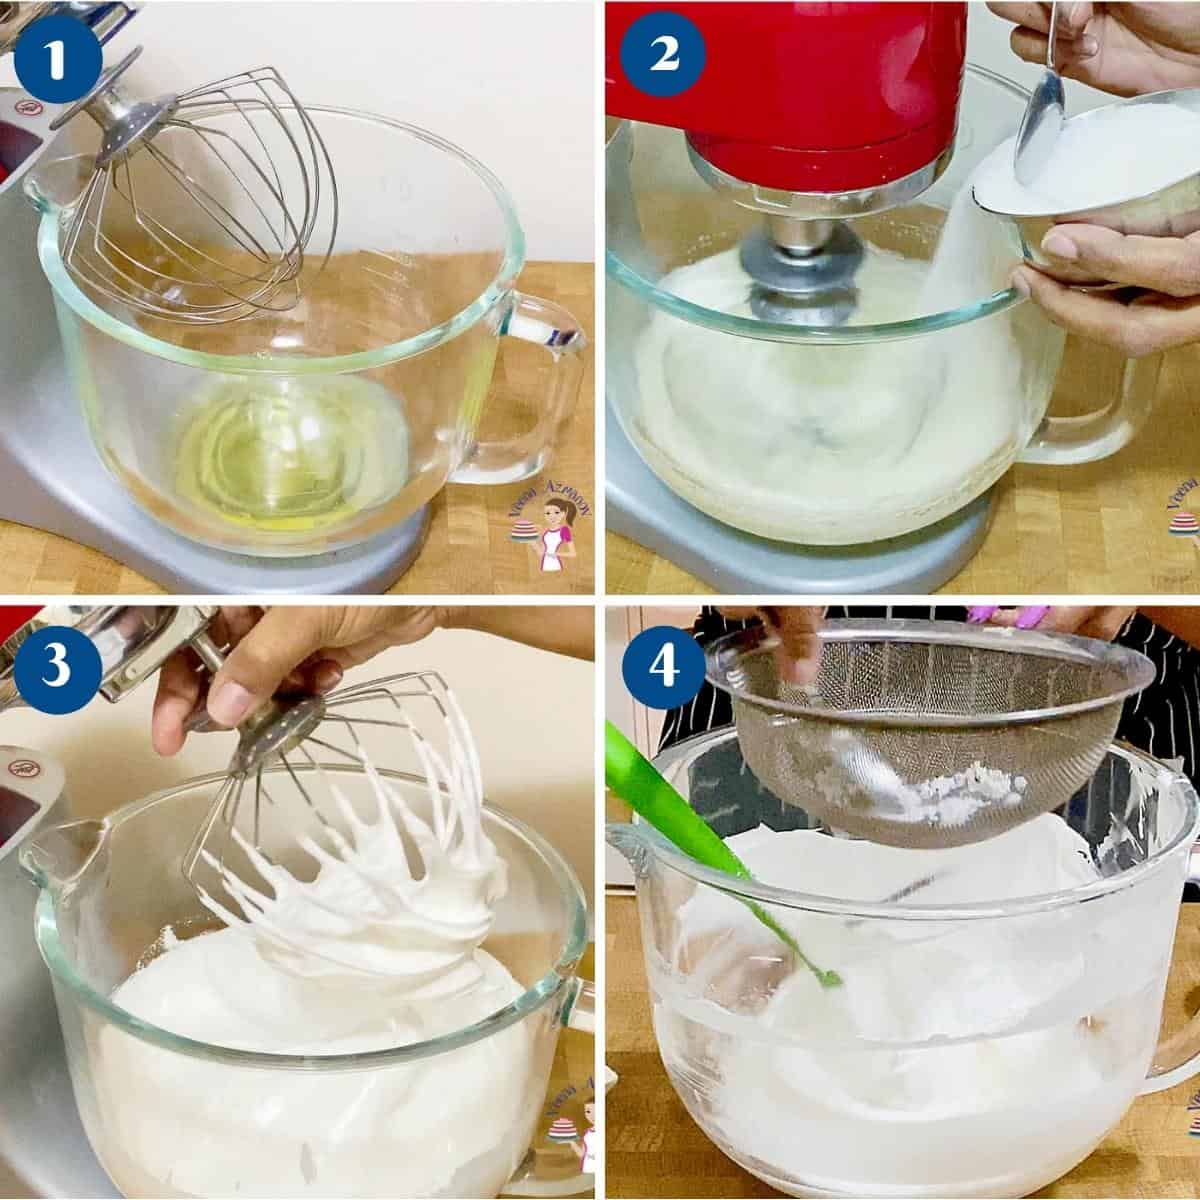
2. Whip the meringue
Add egg whites and salt to a clean, dry mixer bowl with the whisk attachment.
Whip on medium speed until soft peaks form.
Gradually add the sugar, one tablespoon at a time, whipping until the mixture is thick, glossy, and holds stiff peaks.
Fold in vanilla, then sift in cream of tartar and cornstarch and fold gently to avoid knocking out the air.
Transfer the meringue to a piping bag fitted with a large round tip.
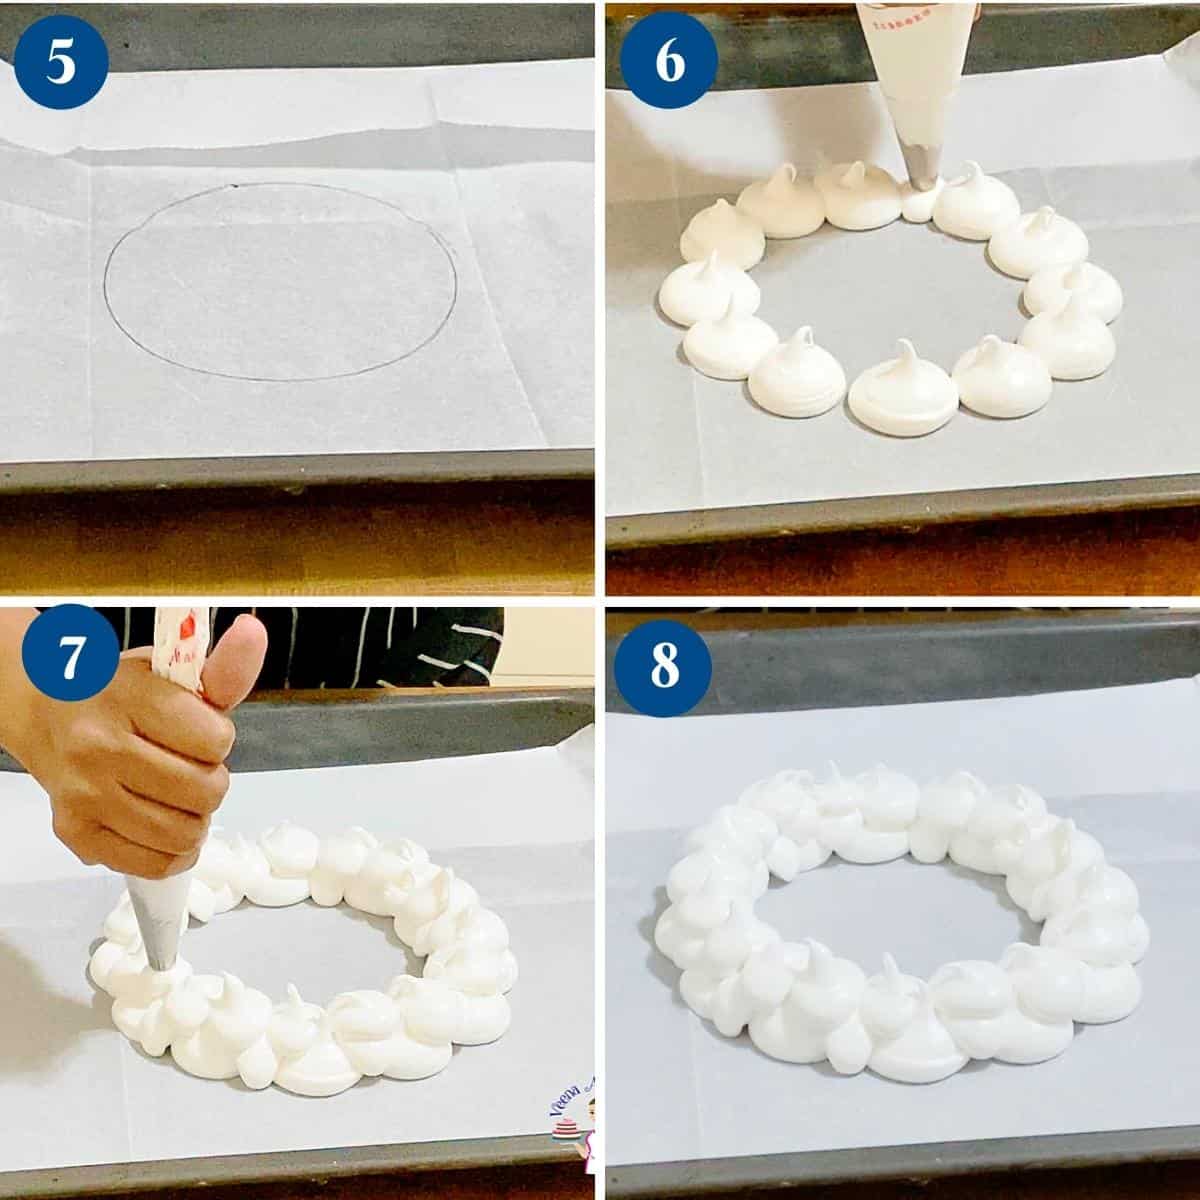
3. Pipe the wreath
Pipe large dollops of meringue around the circle, then add more in between and on top to build height and shape a thick ring.
Use any leftover meringue to pipe mini pavlovas or meringue kisses on the same tray.
4. Bake and cool
Place the tray on the center rack and immediately reduce the oven temperature to 260°F / 130°C.
Bake for about 45 minutes.
When the time is up, turn the oven off but don’t open the door. Let the pavlova cool completely in the oven – a few hours or even overnight – so it dries slowly and doesn’t crack badly.
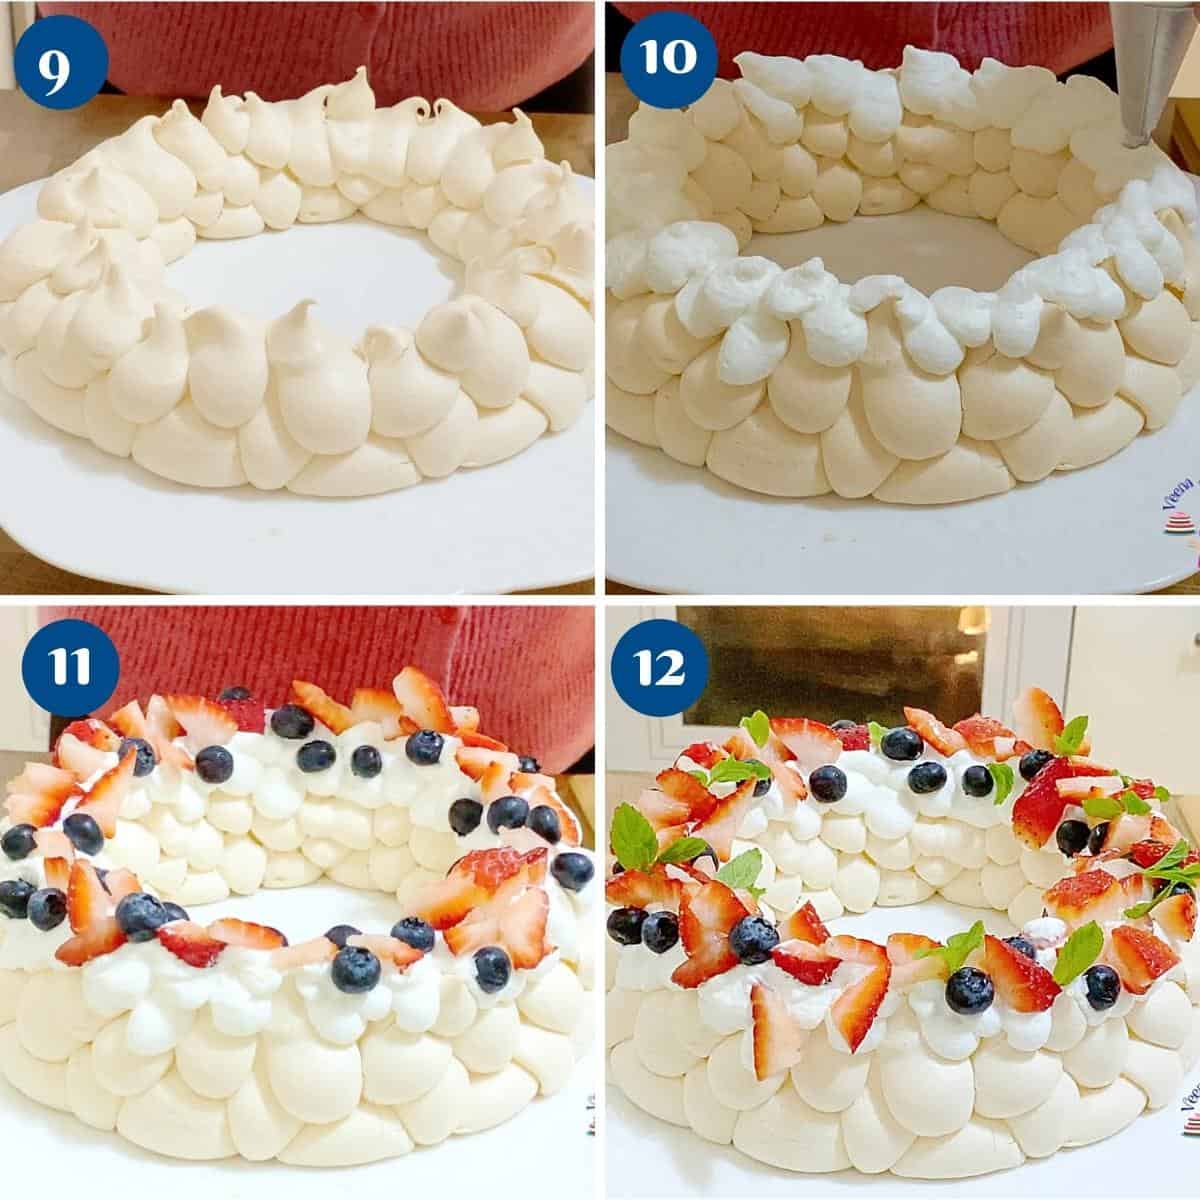
5. Whip the cream & prep the fruit
Whip the cream with powdered sugar until soft–medium peaks form.
Hull and slice strawberries, and prepare blueberries and mint (or any fruit you’re using).
6. Assemble the wreath
Gently loosen the pavlova from the parchment with an offset spatula and transfer it to a serving platter.

Tips for success
- Use spotless, grease-free bowls and whisks – any fat kills the meringue.
- Add sugar slowly so it dissolves fully and the meringue stays glossy.
- Bake low and slow, then cool in the oven to reduce cracking.
- Make the meringue ahead, but add cream and fruit close to serving time.
- If it does crack a bit, don’t panic – the cream and fruit hide everything.
Troubleshooting
| Problem | Likely Cause | Quick Fix |
|---|---|---|
| Meringue weeps/beads | Sugar not fully dissolved | Beat longer after adding sugar; use fine sugar |
| Wreath collapses | Temperature change too fast | Always cool completely in the oven |
| Shell sticky, not crisp | Underdone or humid storage | Bake a little longer; store undecorated in an airtight container |
| Lots of cracks | Oven too hot or opened door | Lower temp slightly; never open during baking |
- Christmas Wreath Cake
- Santa Christmas Tree Cookies Gingerbread
- Christmas MM Cookies
- and Christmas Spritz Cookies or Christmas Star Cookies
- Cranberry Cake Christmas
- Stenciled Christmas Sugar Cookies
- See all Christmas recipes and tutorials


Frequently asked questions
A baked pavlova will last a day at room temperature and can be kept in an airtight container for up to two days. Add the whipped cream and fruits just before serving.
Absolutely! The beauty of this dessert is that you can prepare the meringue base ahead of time. Once it has completely cooled, store it in an airtight container at room temperature for up to a week. However, it’s best to assemble the pavlova just before serving to ensure the meringue stays crisp.
Definitely! While this recipe suggests using seasonal fruits like strawberries, kiwi, or pomegranate seeds, feel free to experiment with any fruit you love. Raspberries, blackberries, or even tropical fruits like mangoes and passion fruit can add a delightful twist to your pavlova.
No worries! If you don’t have a piping bag to make the individual meringue nests, simply use two spoons to scoop and shape the meringue onto the baking sheet. The result may be less uniform, but it will still taste delicious.
Absolutely! If you prefer a lighter option, you can substitute the whipped cream with Greek yogurt or coconut cream. These alternatives will add a tangy or tropical flavor to your pavlova, perfect for those looking for a healthier twist.
While it’s unlikely you’ll have any leftovers, if you do, they can be stored in the refrigerator for up to two days. However, keep in mind that the meringue may lose some of its crispness over time.
A perfect pavlova should be white, perhaps slightly beige, dry and crisp on the outside, and soft on the inside.
It can take up to 5 minutes for the meringue to get stiff peaks, but it depends on the method and equipment you use.
My perfect method for stiff peaks is – Use a stand mixer, start at medium speed, and whip until the eggs are foamy – about one minute. Then, add sugar slowly, one tablespoon at a time (this should take about a minute). Once all the sugar is in, turn the mixer to medium-high and whip for three full minutes. This should give you a perfectly stiff meringue.
Never refrigerate a baked pavlova because condensation from the fridge will soften the crisp outside shell. Store it at room temperature in an airtight container for up to two days.
Also, any leftover pavlova with whipped cream and fruits can be left in the fridge and must be eaten within a day.
Yes, if you find that the pavlova is too soft in the center or undercooked, place it back in the oven at 150 °C / 300°F for half an hour.
Video
Ingredients
- 4 large (150 g) Egg whites
- 1 cup (200 g) Sugar
- 2 tsp Cornflour
- 1 tsp Cream of tartar or white vinegar
- ¼ tsp Salt
- 1 tsp Vanilla extract
- 1 cup (240 ml) Whipping cream
- 2 tbsp Powdered sugar
- 1 cup (150 g) Strawberries chopped
- ½ cup (75 g) Blueberries
- ¼ cup Mint leaves (I like using the tips of the mint sprigs)
Method
- Prep – Preheat the oven to 300°F / 150°C. Draw a 7-inch circle on parchment, flip the paper so the pencil side is down, and place it on a baking tray. This will be your wreath guide.
- Whip the meringue – Add egg whites and salt to a clean, dry mixer bowl with the whisk attachment. Whip on medium speed until soft peaks form. Gradually add the sugar, one tablespoon at a time, whipping until the mixture is thick, glossy, and holds stiff peaks.Fold in vanilla, then sift in cream of tartar and cornstarch, and fold gently to avoid knocking out the air. Transfer the meringue to a piping bag fitted with a large round tip.4 large Egg whites, 1 cup Sugar, 2 tsp Cornflour, 1 tsp Cream of tartar, 1/4 tsp Salt, 1 tsp Vanilla extract
- Pipe the wreath – Pipe large dollops of meringue around the circle, then add more in between and on top to build height and shape a thick ring. Use any leftover meringue to pipe mini pavlovas or meringue kisses on the same tray.
- Bake and Cool – Place the tray on the center rack and immediately reduce the oven temperature to 260°F / 130°C. Bake for about 45 minutes. When the time is up, turn the oven off, but don’t open the door. Let the pavlova cool completely in the oven – a few hours or even overnight – so it dries slowly and doesn’t crack badly.
- Whip the cream and prep the fruits – Whip the cream with powdered sugar until soft, medium peaks form. Hull and slice strawberries, and prepare blueberries and mint (or any fruit you’re using).1 cup Whipping cream, 2 tbsp Powdered sugar, 1 cup Strawberries, 1/2 cup Blueberries, 1/4 cup Mint leaves
- Assemble the wreath – Gently loosen the pavlova from the parchment with an offset spatula and transfer it to a serving platter.
Notes
- Use spotless, grease-free bowls and whisks – any fat kills the meringue.
- Add sugar slowly so it dissolves fully and the meringue stays glossy.
- Bake low and slow, then cool in the oven to reduce cracking.
- Make the meringue ahead, but add cream and fruit close to serving time.
- If it does crack a bit, don’t panic – the cream and fruit hide everything.
Equipment you will need


Nutrition
Tried this recipe?
Mention @veenaazmanov_kitchen or tag #veenaazmanovkitchen!No posts
Don’t lose this recipe! Save it for Later!
📌 Save this Recipe for later on Pinterest so you can easily find it again.
⭐ Add Veena Azmanov Kitchen to your Google Preferred Sources.
It helps Google show you more of our recipes.
📧 Subscribe for new recipes delivered to your inbox.
🎥 Follow us for more recipes


My family and I loved this recipe! I can’t wait to make this recipe again soon! Such a big hit here at the house!
Thank you, Beth. So, happy you enjoyed this recipe.
What a gorgeous dessert. I like that it can be made ahead. It’ll be an impressive dessert for Christmas without the rush of trying to do the day of.
This is such a pretty pavlova for the holidays! Delcious.
So perfect for christmas! this is such a beautiful recipe and thanks for the detailed instructions!
Pavlovas always seem so overwhelming to make but with your wonderful tips and tricks I’m sure I could do it. Thanks for sharing!
Wow, 10 minutes! Sounds like a dessert I need to try. So interesting about the cornstarch and cream of tartar. It’s always great to learn new tips like that.
I always hesitated to try any kind of pavlova but this is so pretty and fun that I think I really need to try it! I love how it’s decorated. So festive!
This Christmas pavlova would look so stunning on my Christmas table. I’ve never had the courage to make a pavlova but your pics and tips make it seem doable! Going to give it a try!