Danish Pastry – Dough, filling, and shaping


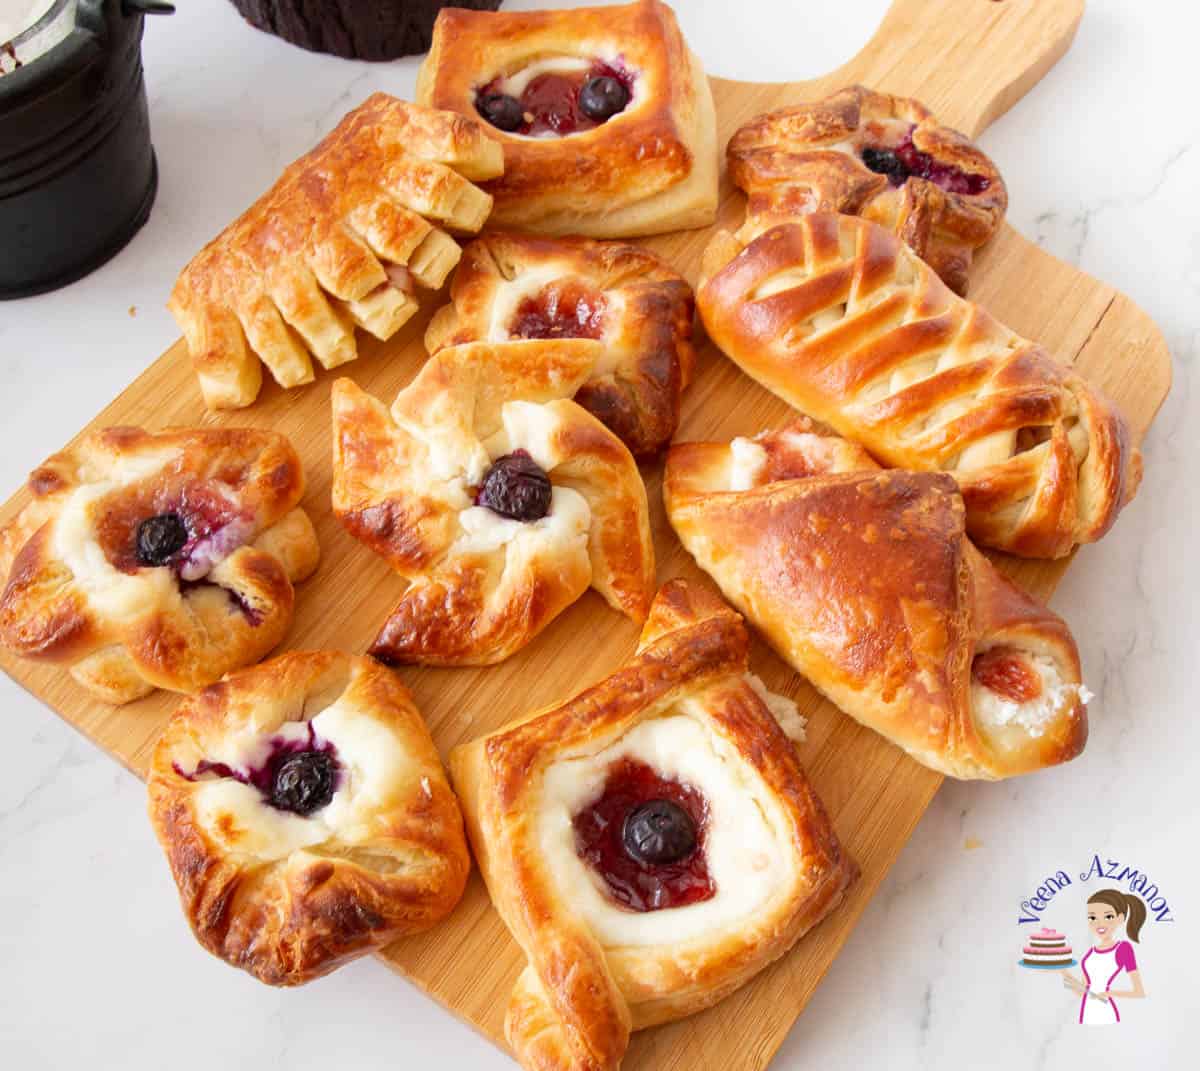
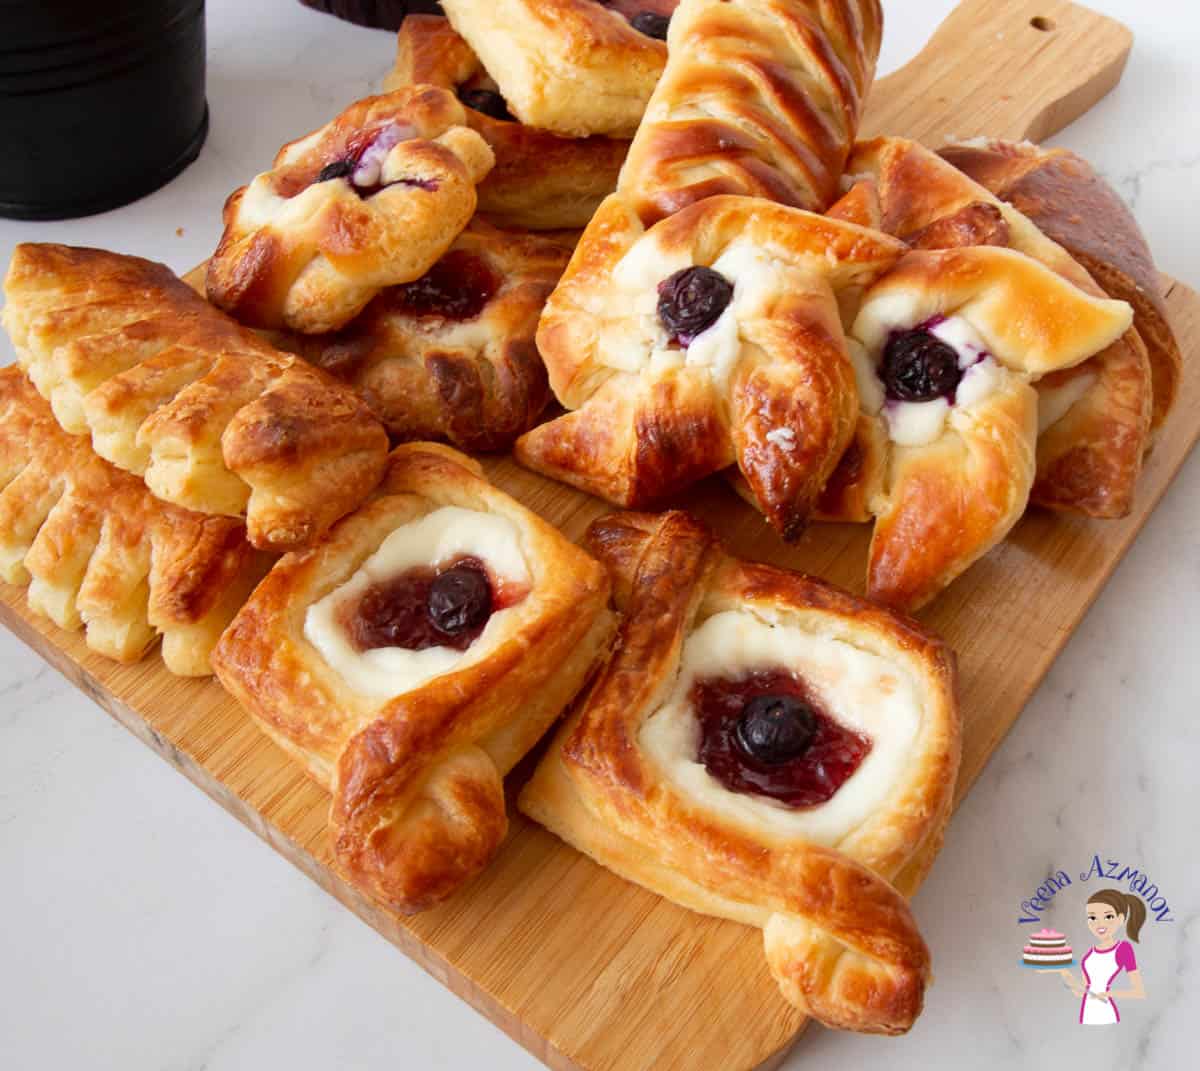
Make your own Danish pastry (also called breakfast pastry) from scratch with a variety of wonderful fillings and shapes. This flaky, buttery, rich pastry is a laminated dough similar to croissants and puff pastry.
Danish pastries are a type of pastry called Viennese (wienerbrød) in Denmark. They are made with a butter lamination similar to puff pastry and croissants. However, this dough also has yeast, which results in more tender but rich, flaky, buttery pastries with lots of layers.
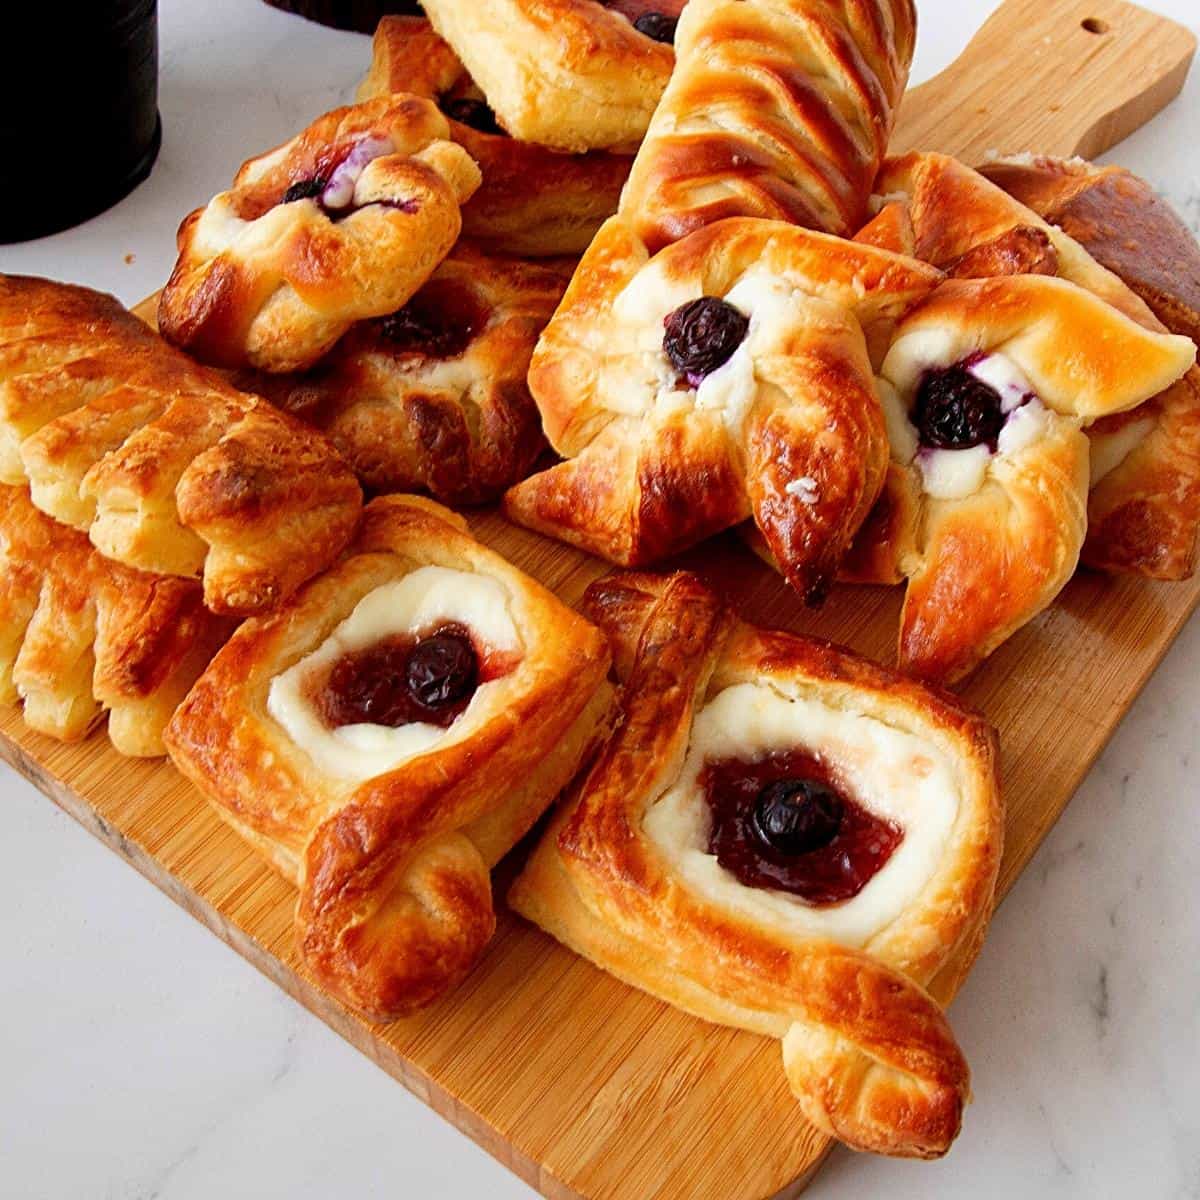
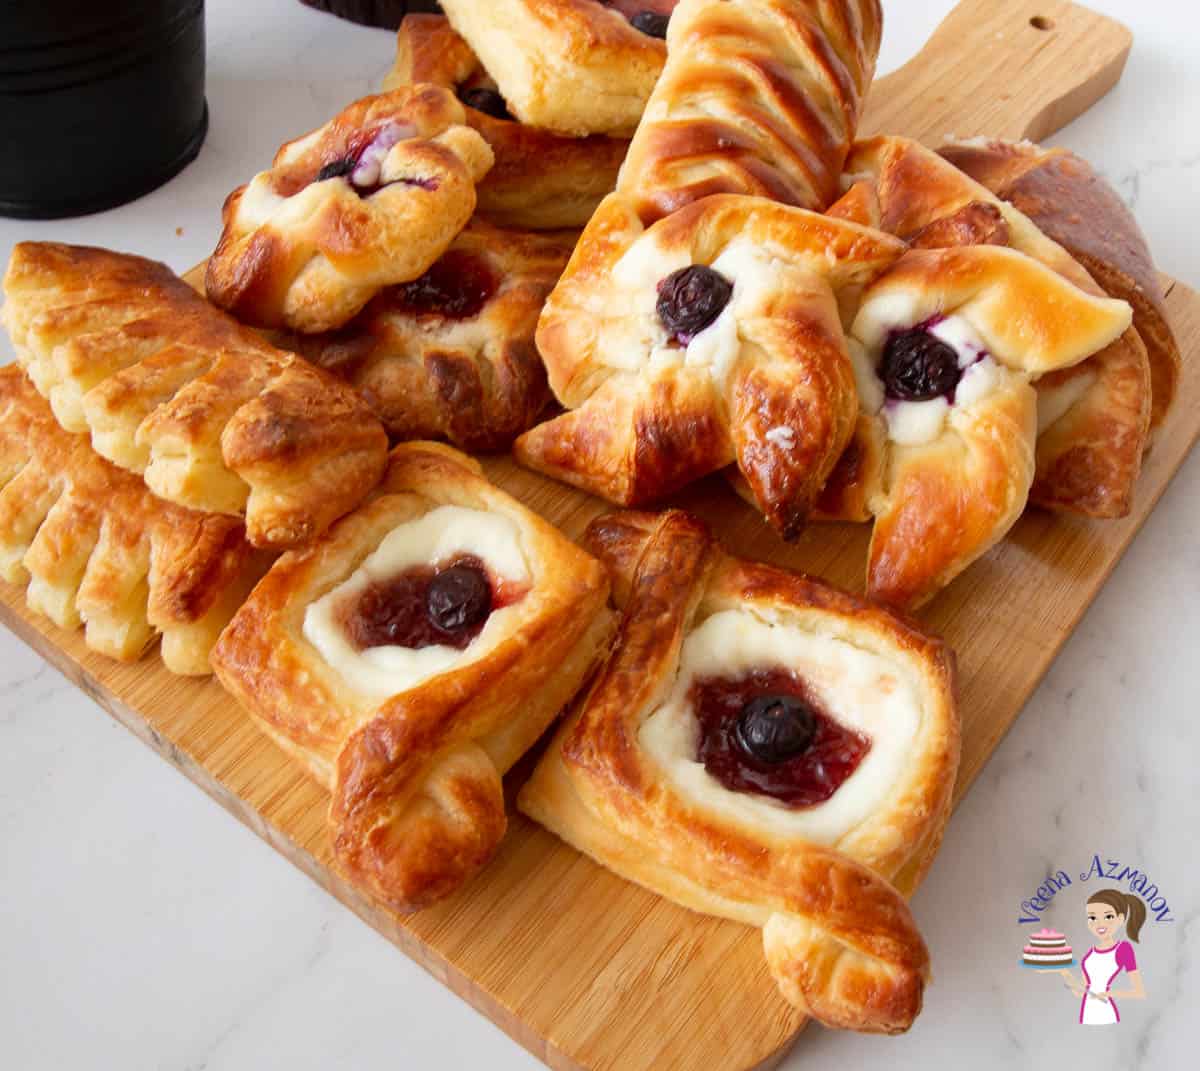
And, this pastry is a dough that can be used to create many different shapes or varieties of Viennese (pastries) such as these Cream raisins spirals, cinnamon sugar spirals, pinwheels or darts, cheese cylinders, stars, braids, envelops, pockets, combs, squares, horns, etc.

Why make your own Danish?
- The dough – This is a simple yeast-based dough with eggs, butter, and sugar. It can be soft and sticky to work with, so don’t skip the chilling times.
- Butter block – Yes, it is a lot, which we cream with a little flour and then laminate between the dough. And, the purpose of the flour is to help stabilize it. In fact, most professionals often skip the flour, but I recommend you use it.
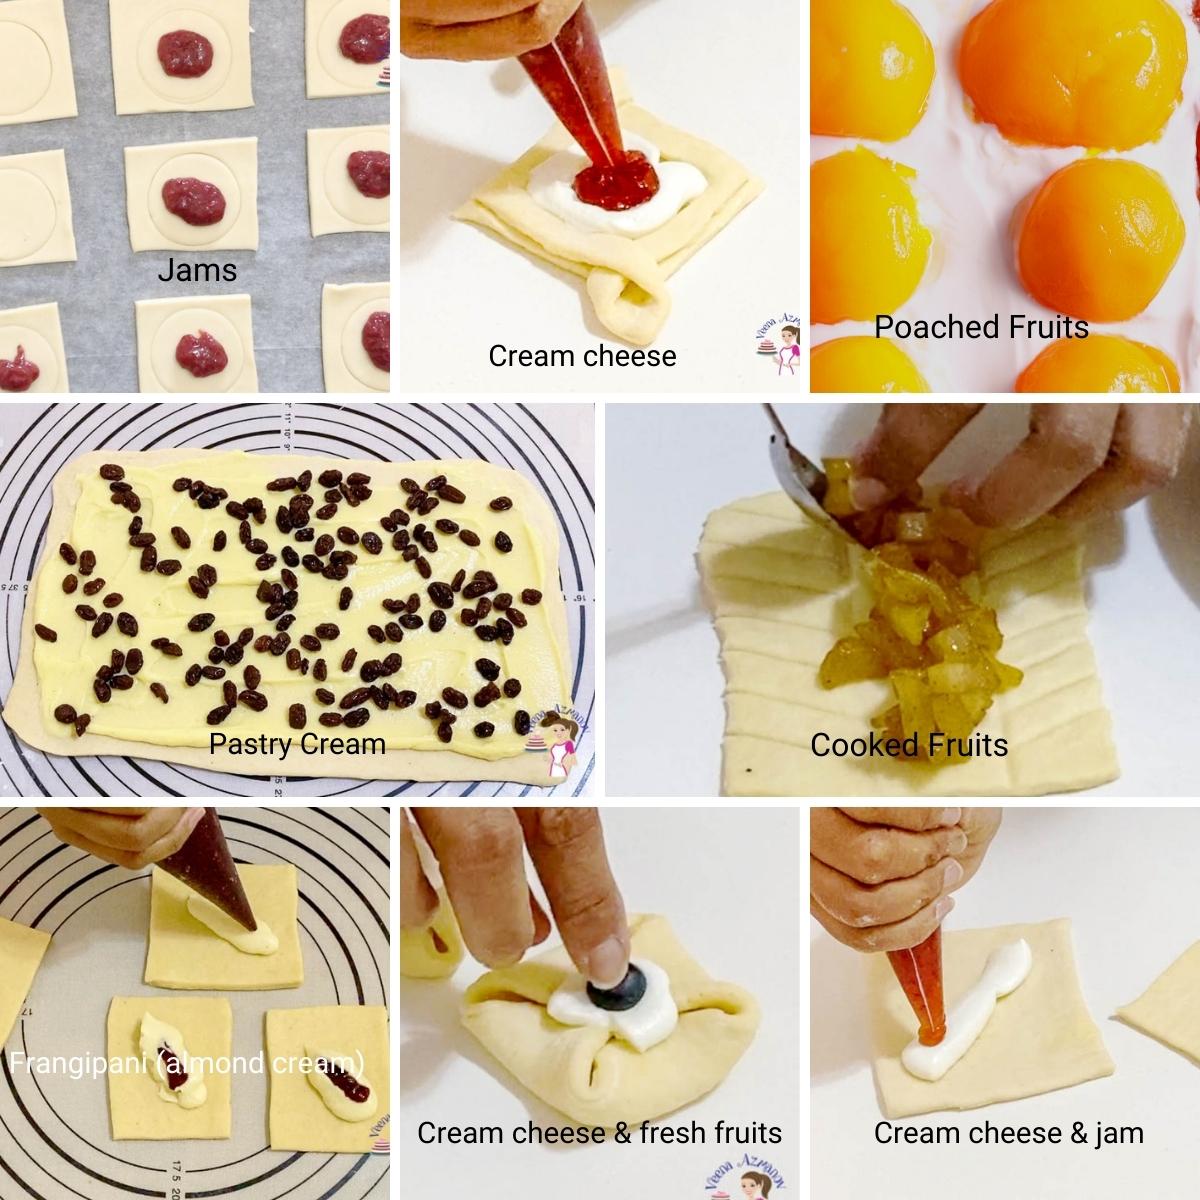
- The fillings – These pastries can be filled with almost anything. For example, try cream cheese, almond cream, pastry cream, jams, and fruit fillings as well as fresh fruits. In fact, the options are endless.
Ingredients and substitutes
- All-purpose flour – Yes, plain flour works perfectly with this pastry dough. So, don’t use bread flour and definitely do not use self-raising flour.
- Sugar – This is a sweet dough, but you can also reduce the sugar by half if you prefer.
- Liquid – This dough is made with milk. Use full-fat milk, not skim or similar.
- Yeast – I am using instant dry yeast today. But, you can also use other varieties, including fresh bakers’ varieties from active-dry yeast to Fresh bakers’ yeast. Read baking with yeast: a beginner’s guide.
- Butter – The best to use is the European variety, which has a high-fat content of unsalted butter. And, high fat means less moisture, which can cause the fat to melt and create steam in the pastry when baking the layer of butter between the pastry. Also, make sure to use softened, room-temperature butter when creaming.

Step-by-step: How to make Danish pastry
Dough
- Dry ingredients – In the bowl of a stand mixer with the dough hook attachment, combine flour and salt. And set aside. You can also use a food processor to make this dough.
- Yeast mixture – In a measuring cup or bowl, combine milk, sugar, yeast, egg, and vanilla.
- Wet to dry – Then, add the yeast to the flour mixture. Combine on medium-high until all flour is incorporated. Knead a minute more.
Pro tip – The dough will be soft and sticky, but do not add any more flour just yet. - Knead – Then, gradually add the room-temperature butter, one tablespoon at a time. Then, knead for 3 minutes on medium. Alternatively, you can knead by hand for 5 to 7 minutes.
- Rest – The dough will be soft and slightly sticky. Remove from the mixer and shape into a ball. Then, place in an oil bowl and chill for 15 minutes.
Pro tip – Unless the dough is too soft and sticky, you do not need to add any more flour. Also, if necessary, add a few tablespoons only.

Butter blocks
- Template – Use a piece of parchment paper to create a template 12 x 6 inches (see video), and set aside.
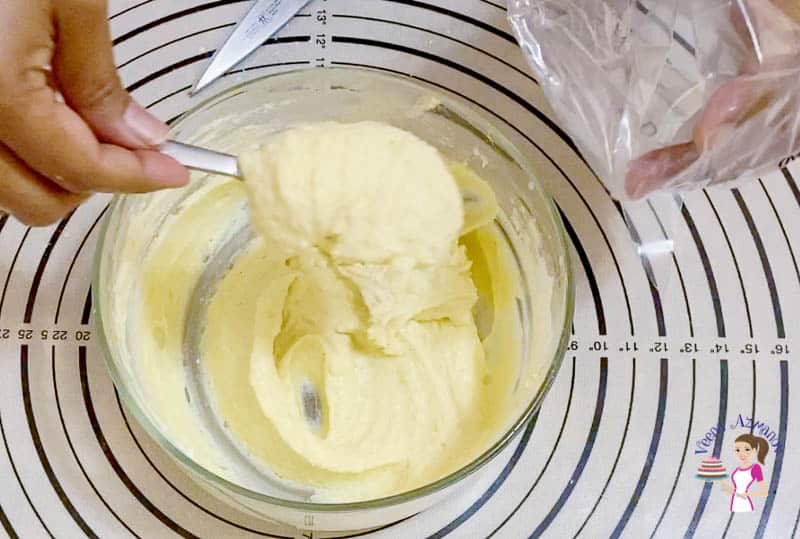
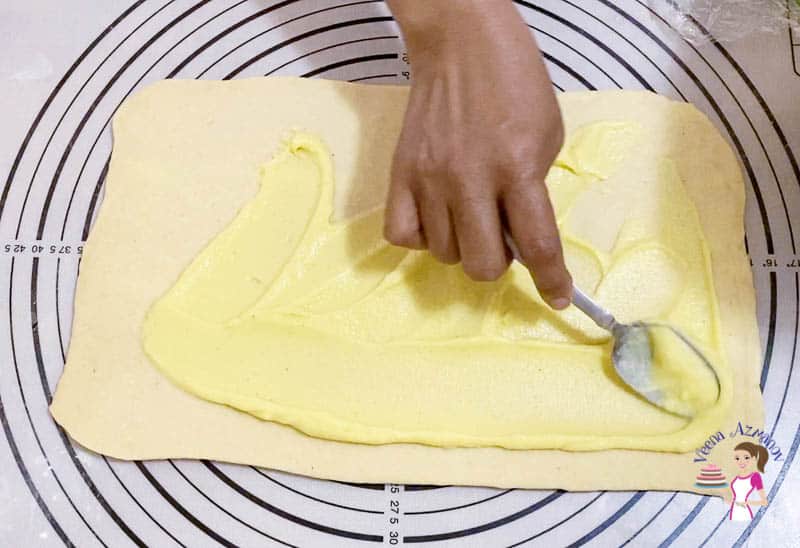
- Cream – In the same bowl of the electric mixer bowl (no need to wash), cream the butter and flour just until combined. Then, transfer to the prepared parchment paper template. Spread evenly with a spatula. Use a rolling pin to guide it inside the template towards the corners (see video).
- Divide – Use a ruler to mark them at 6 inches. So, now this will give you two 6 x 6-inch blocks (see video).
- Chill in the fridge for 15 minutes.
- Pro tip – We want the fat to be cold but still pliable so that, when we roll it will spread. If you chill too long, it will break rather than spread.
- Next, use a piece of parchment paper to create a 12 x 6-inch template (see video) and set it aside.

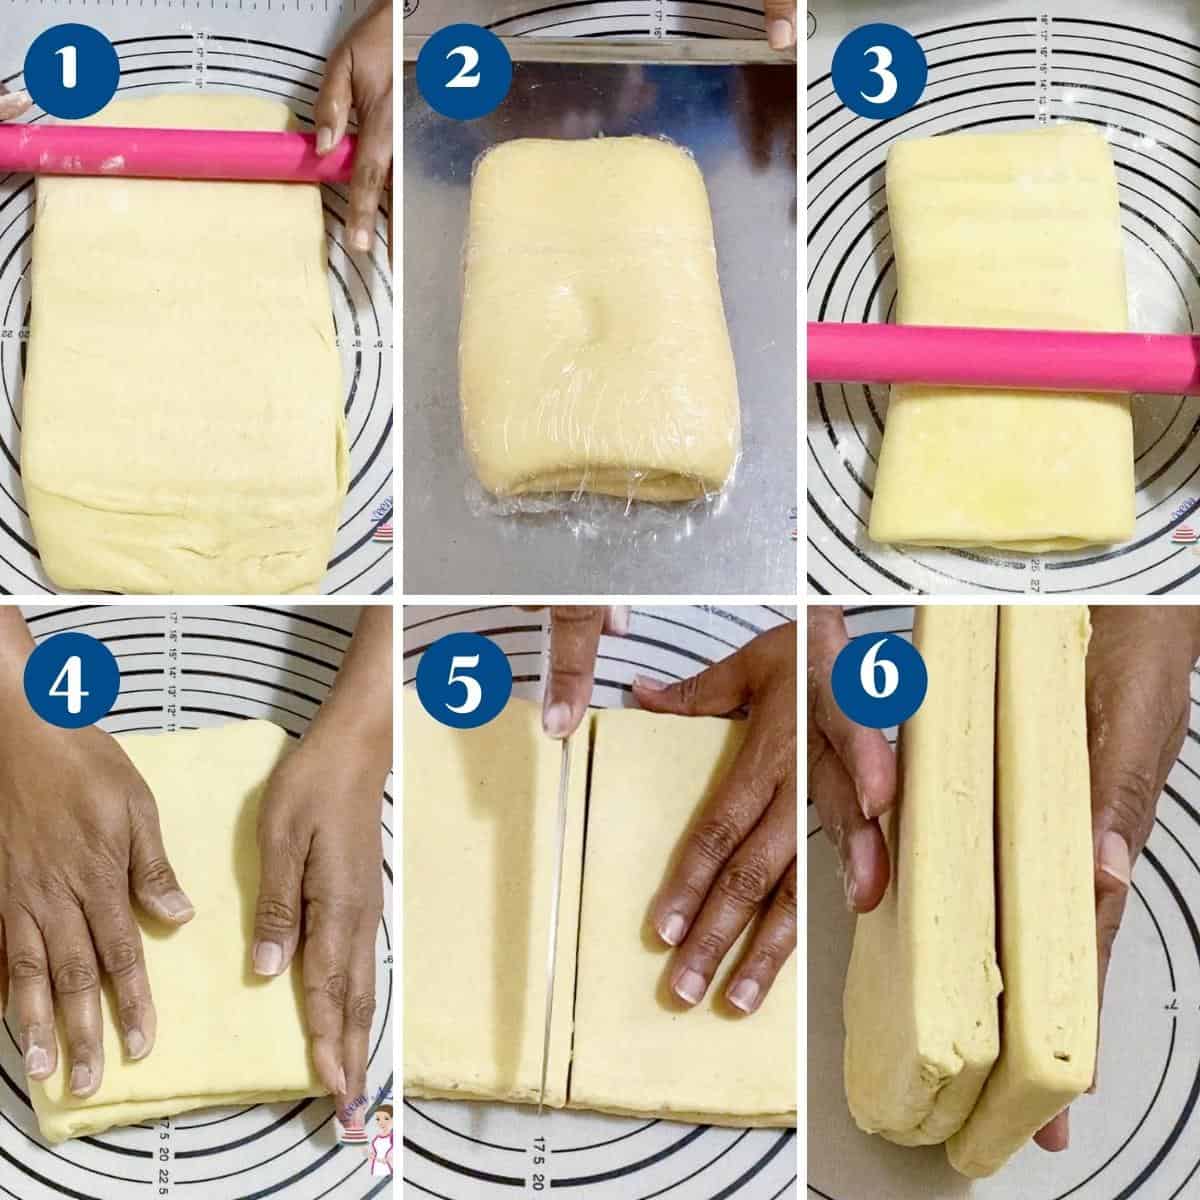
Laminate the dough
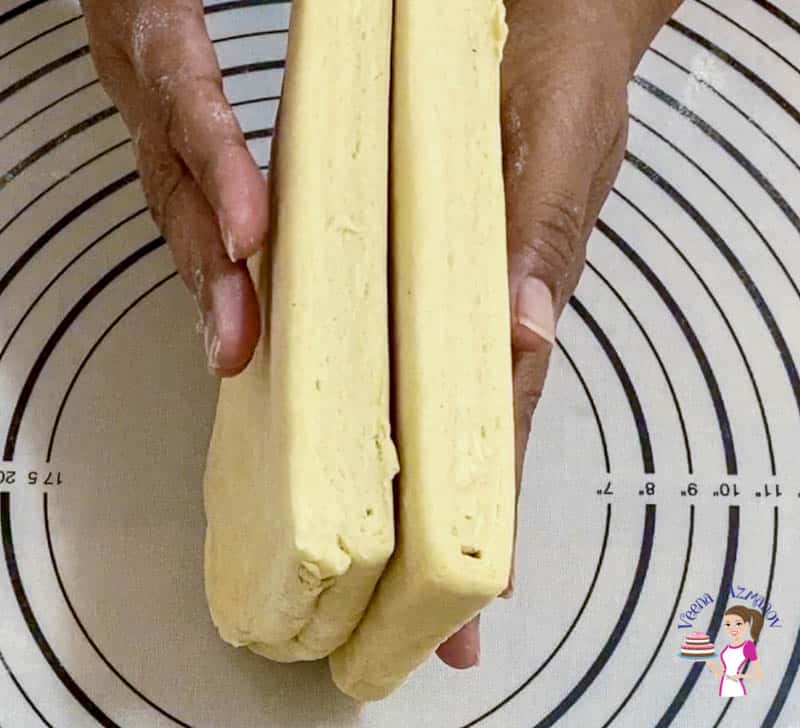
- Roll – Transfer the dough to a lightly floured surface. Then, roll to a long rectangle of 7 x 18 inches.
- Fold – Open the butter block and divide it into 2 at the mark you created. Now you should have two 6-by-6-inch blocks. Place one block over the center. Fold one side over. Then, place the second block on top and fold the other side over.
- Chill – Wrap the dough, place it on a baking sheet, and put it into the refrigerator – chill for 15 minutes.
Pro tip – if the dough and butter are still cold when you wrap, you can continue with the first fold.

Folds/turns
- Turn the dough – Roll the chilled pastry dough into a rectangle, with the short side facing you. Roll to a rectangle approximately 6 x 12 inches.
- First fold – Fold the dough lengthways into thirds like a business letter (see video). Then, wrap in plastic on a baking sheet and place into the fridge to chill for 30 minutes.
- Second fold – Roll the dough lengthways again, with the short side facing you (see video), to about 6 x 12 inches. Next, fold the dough into thirds again like a business letter (see video). Then, place in the fridge for 30 minutes if necessary.
- Third fold – Roll the dough lengthways again, with the short side facing you (see video), to about 6 x 12 inches long. Then, fold the dough into thirds again like a business letter (see video).
- Chill – After the third fold, chill in the fridge for at least two hours or until well chilled. This can be chilled for up to 48 hours.
Pro tip – It is very important that the dough is well chilled before using; otherwise, the layers will blend, ruining all your effort. - Divide – Roll the dough into a 6 x 12-inch rectangle. Then, divide into 2. Place one in the fridge while you work on the second one.
How to shape Danish pastries
- Roll the dough to about a 12 x 12-inch square. Trim edges so you have straight, sharp edges.
Pro tip – I roll to about 13 x 13 so I can trim the edges on all sides and get a 12 x 12-inch square. Trimming will open the folds and give a better rise. - You can use the sheet as a whole or cut it into 3 x 3-inch squares (about 16). Next, mark at 3 inches from either side as shown in the video.
Pro tip – Place the squares in the fridge to keep them cold. Work with a few at a time, especially if you live in hot and humid conditions.
Pinwheels
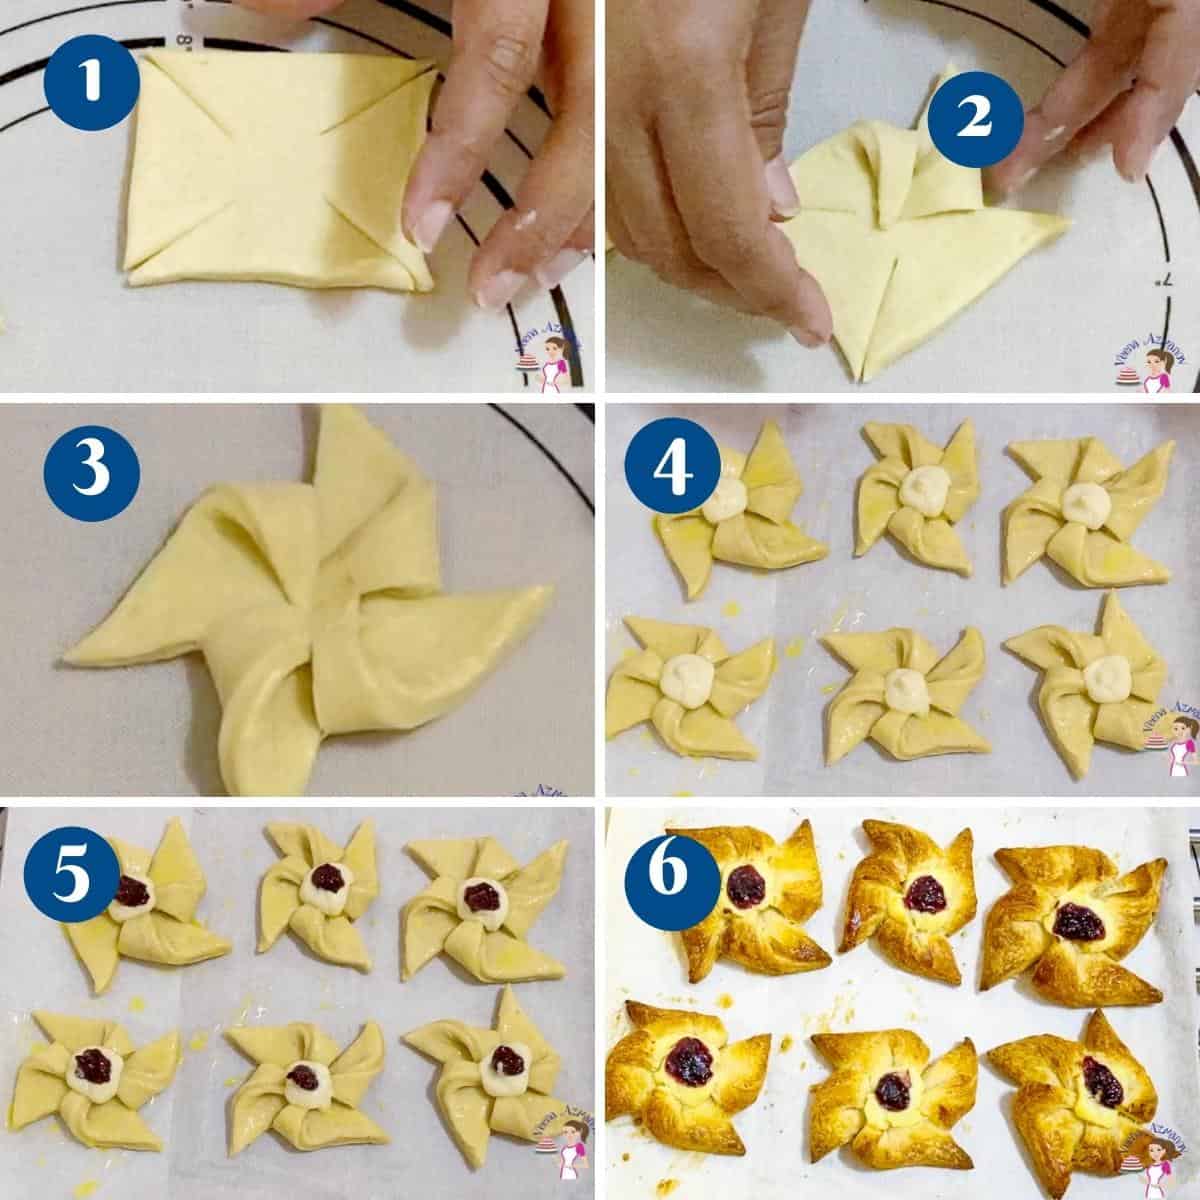
- Cut the corners of the square three-quarters of the way towards the center. Then, fold every other point towards the center.
- Press to seal in the center. Pipe a generous dollop of filling in the center.
Pro tip – These tend to open from the center, so make sure to press firmly in the center. - Place on a baking tray and cover with a clean kitchen cloth. Then, transfer to the refrigerator to cool.
Cylinders or fold over
- Pipe a tablespoon of the filling on the square diagonally.
- Next, fold the two sides over each other diagonally (see video). Then, place it on a baking tray and cover it with a clean kitchen cloth. Transfer to the refrigerator to cool.
Pro tip – Make sure to press firmly to prevent opening.

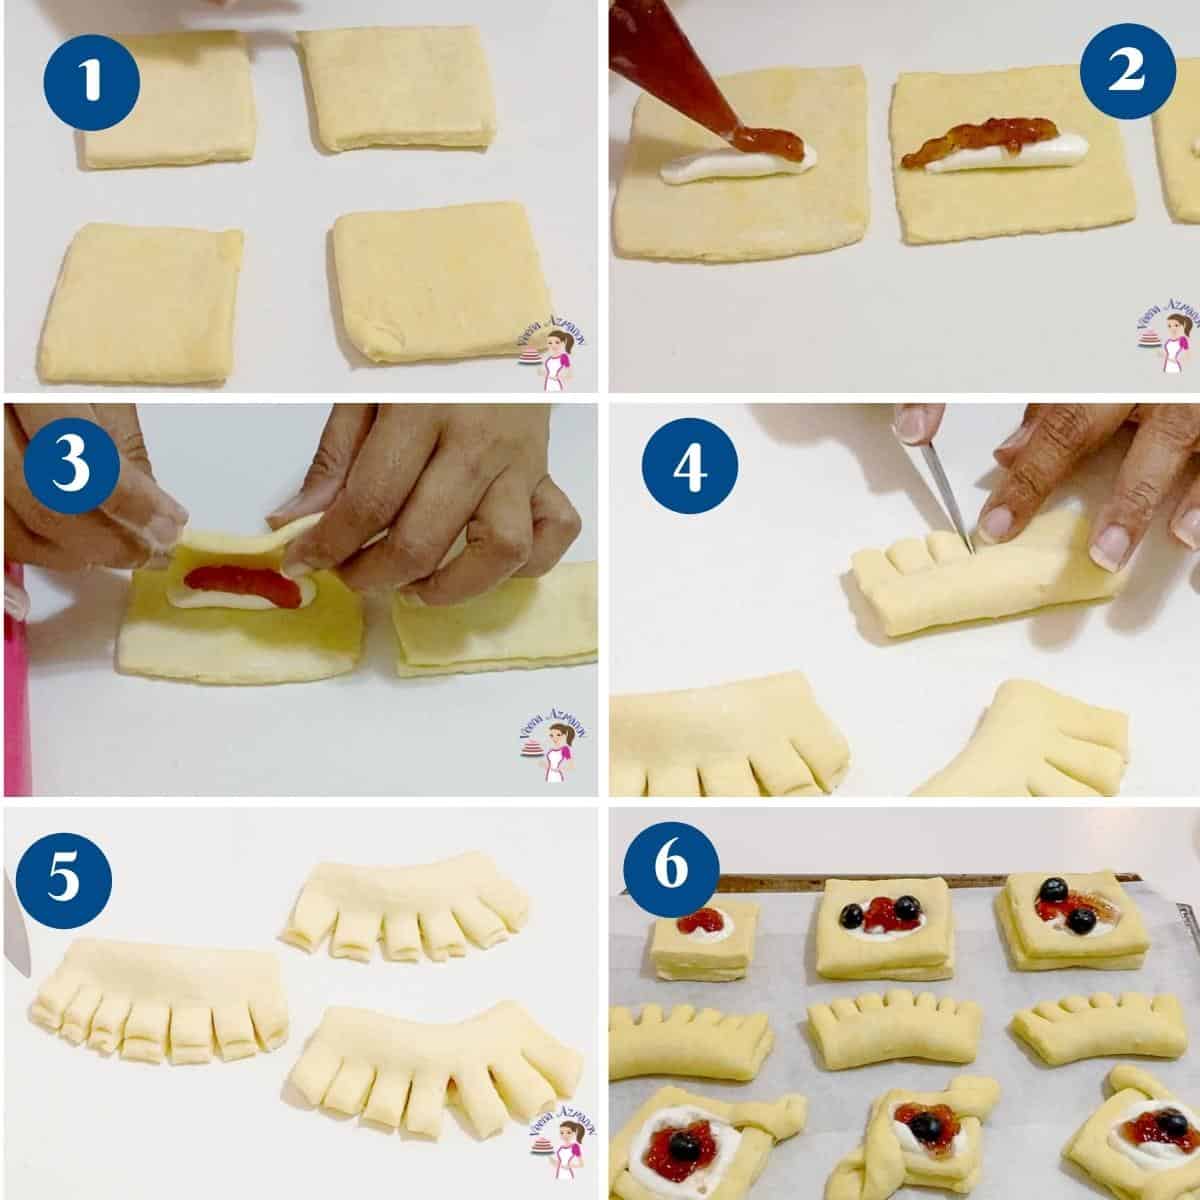
Cockscomb
- Place filling in the top half of the square (see video). Fold the other side over. Use water to stick if necessary.
- Next, cut slits so it looks like a comb, and when flared, it bakes like a cockscomb.
- Place on a baking tray and cover with a clean kitchen cloth.
- Then, transfer to the refrigerator to cool.
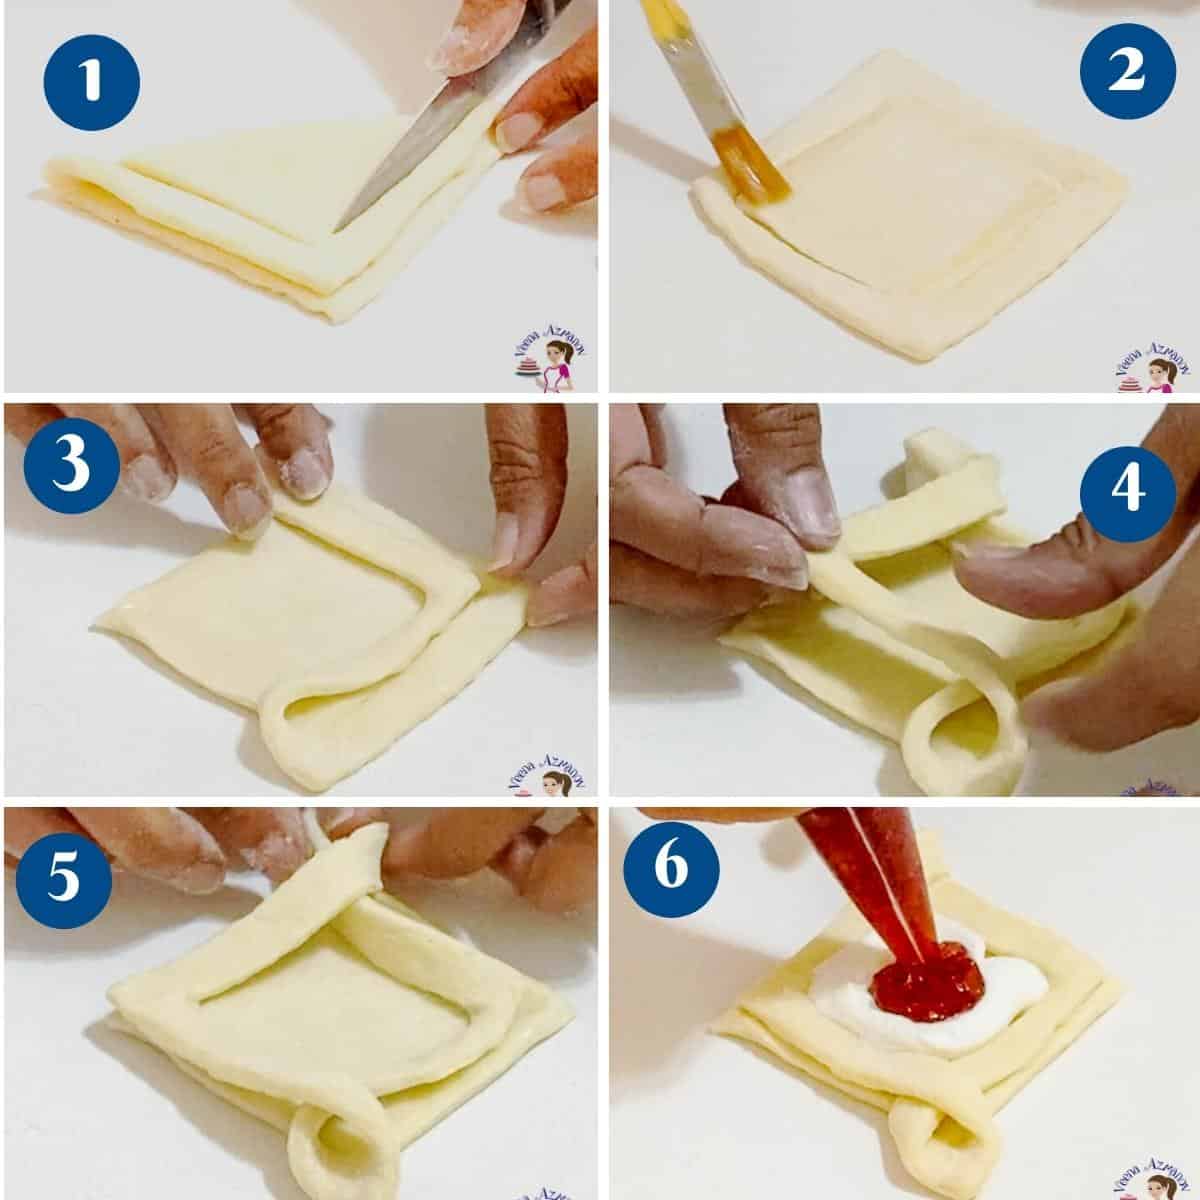
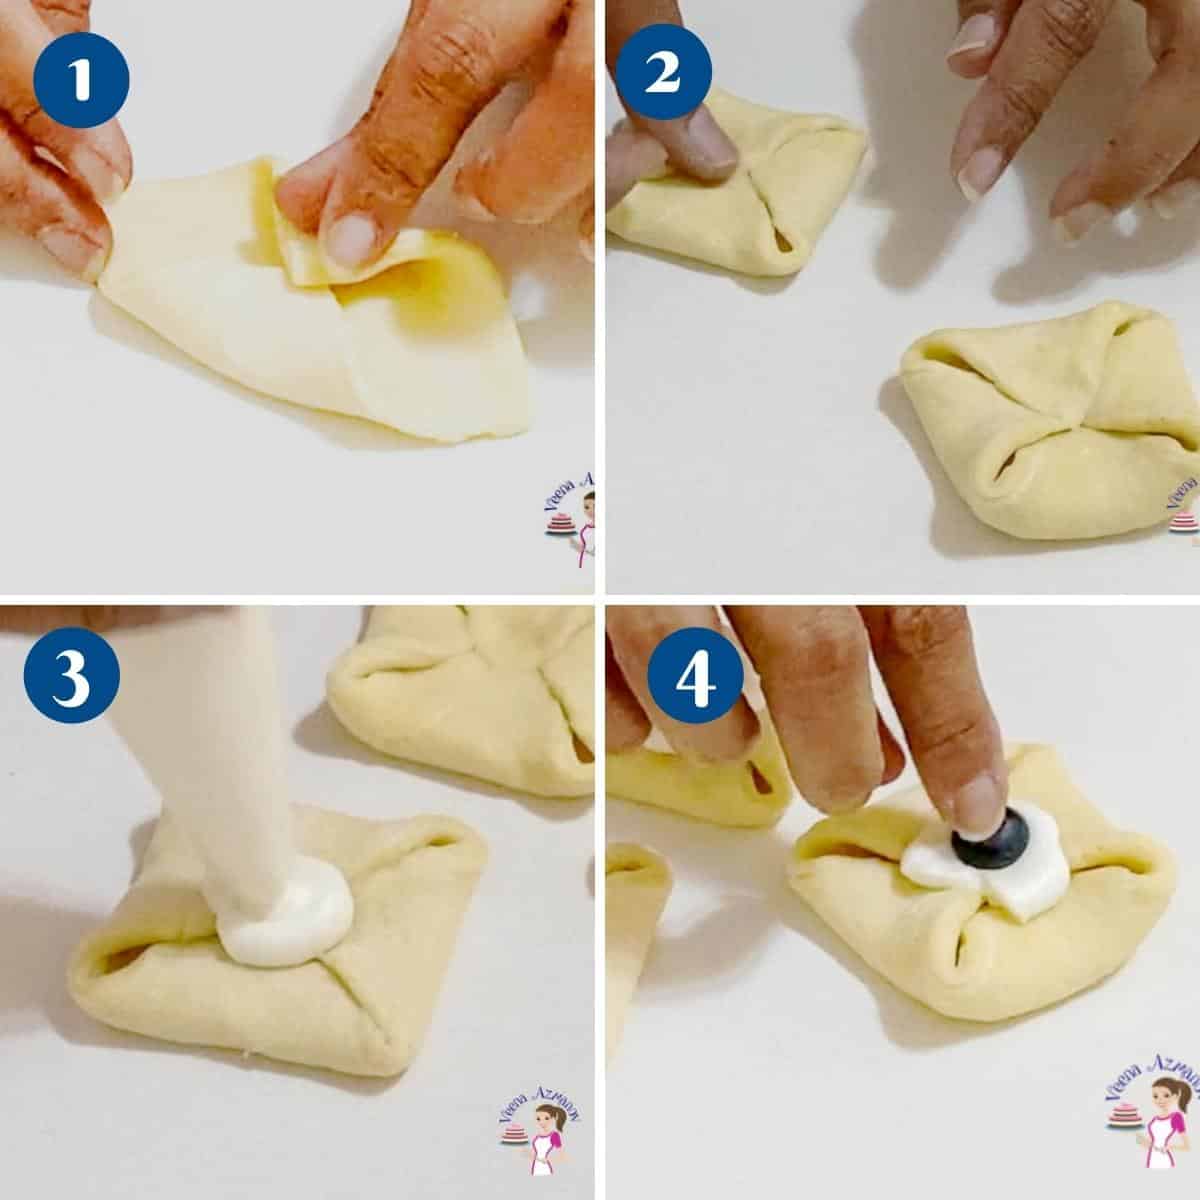
Kite, frame, or envelope
- Fold the square into a triangle. Then, make two cuts on the outside edge, leaving about 1/4 inch from the edge of the triangle. You just created a frame outside an inner square.
- Open the triangle. Take one side of the frame you created and place it on the other side of the inner square. Then take the other side frame and do the same. The two outer frames you created will overlap, creating a kite shape (see the video and progress pictures).
- Pipe a generous amount of filling in the center. I piped cream cheese and jams, topped with blueberries (see video).
- Place on a baking tray and cover with a clean kitchen cloth. Transfer to the refrigerator to cool.
Square
- Bring the four corners of the square to meet in the center. Press down to prevent opening.
- Pipe a generous dollop of filling in the center. (see video).
- Place on a baking tray and cover with a clean kitchen cloth.
- Transfer to the refrigerator to cool.
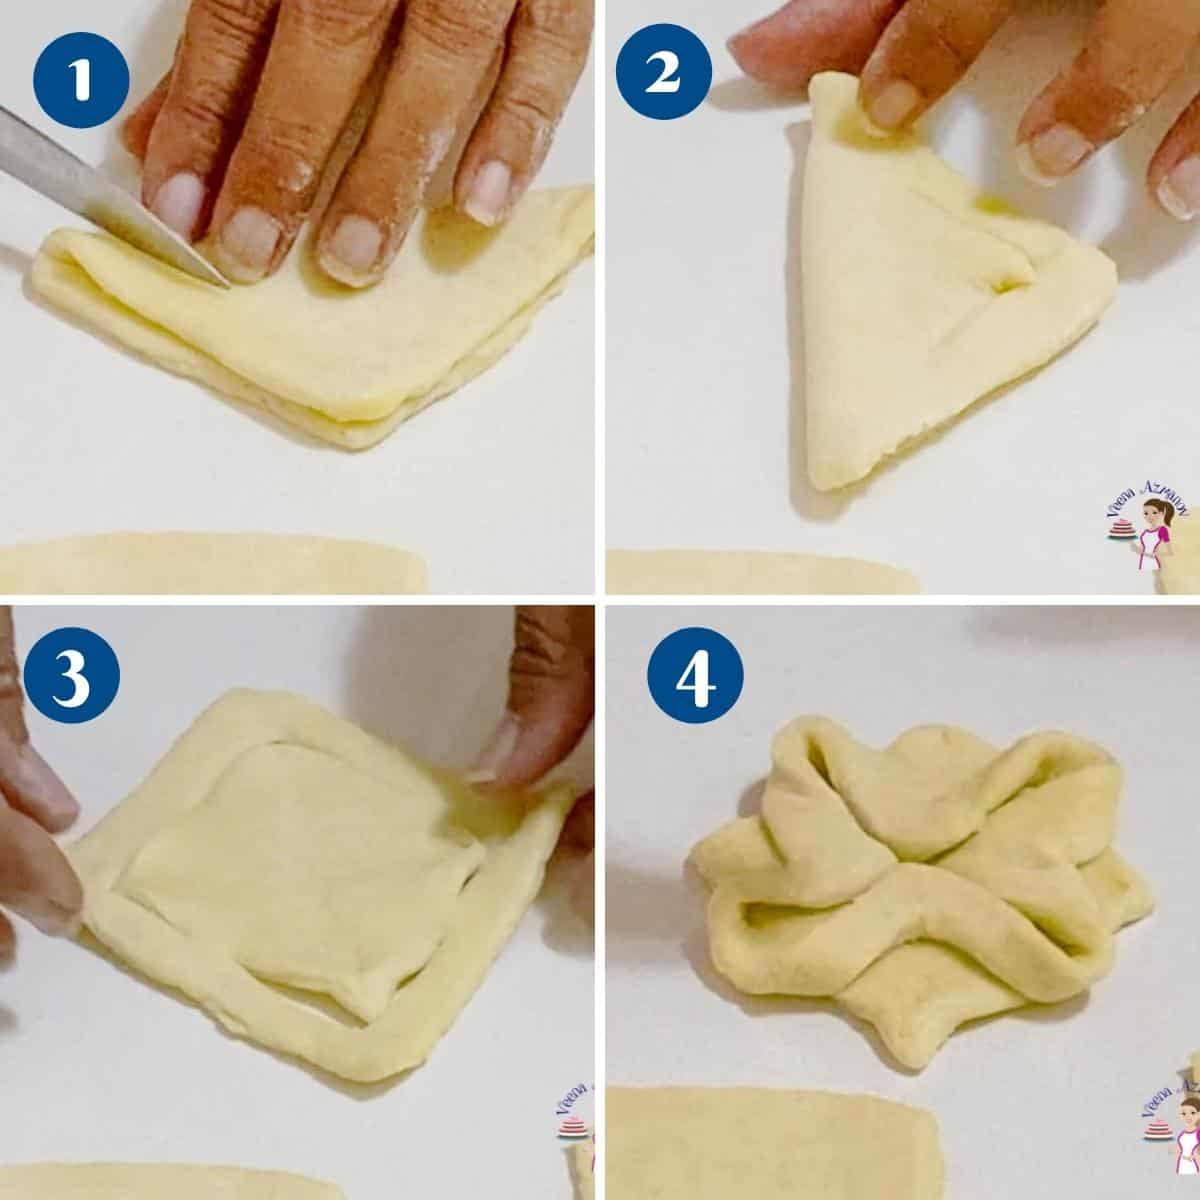
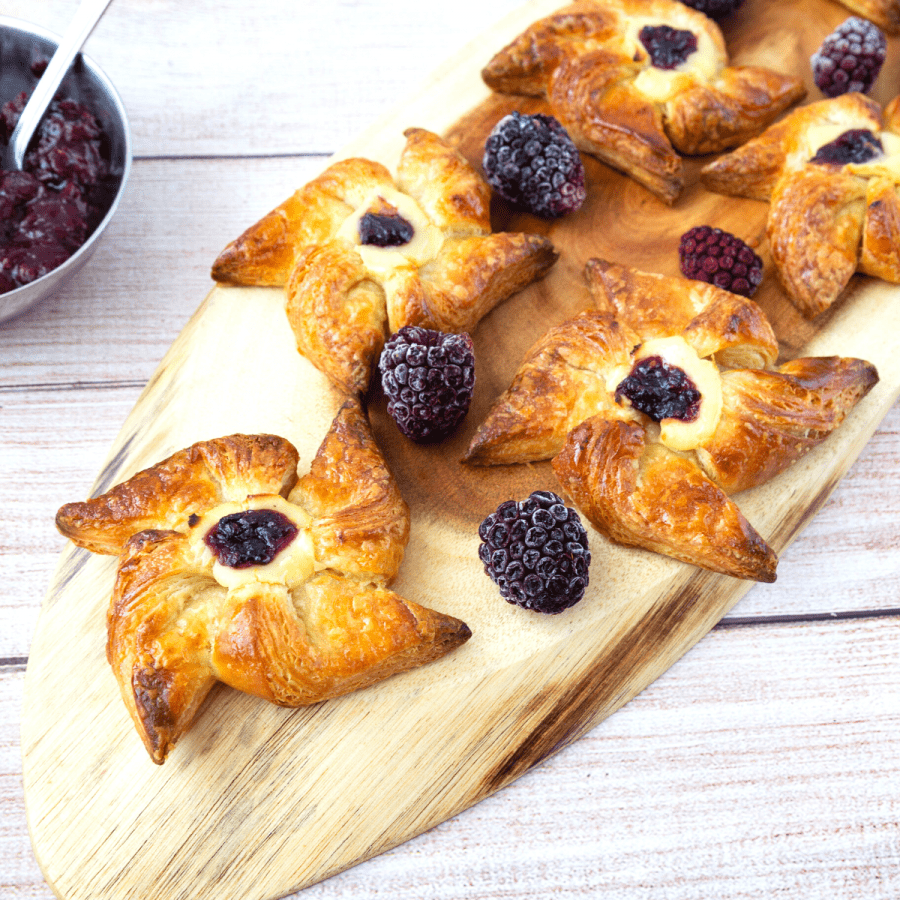
Stars
- Fold the square into a triangle and cut an edge about 1/2 inch towards the center. Open the triangle and fold it again on the other side, and do the same. So now you have cut edges on all four sides of the square.
- Bring the four corners toward the center. Press down so it won’t open. Pipe a generous dollop of filling in the center (see video).
- Place on a baking tray and cover with a clean kitchen cloth.
- Transfer to the refrigerator to cool.
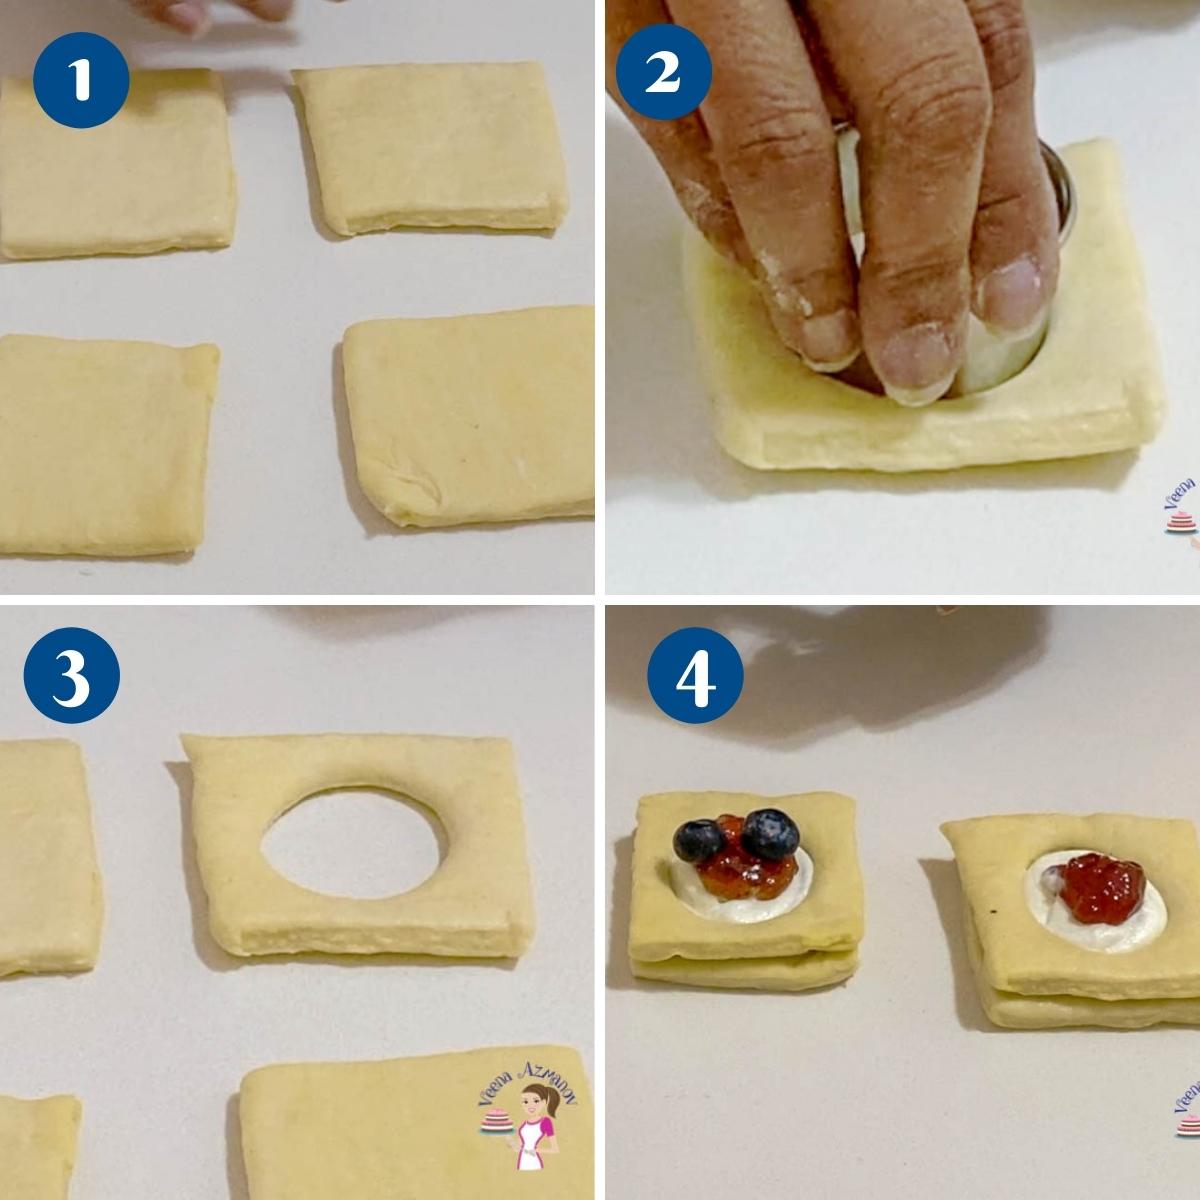
Fruit puffs or Apricot puffs
- Use two 3-squares the same size. Using a 1 1/2-inch cookie cutter, cut a disc from the center out of one of the squares.
- Place the hollowed center square over the first square using water to stick them together. Pipe a generous dollop of filling in the center. (see video).
- Place on a baking tray and cover with a clean kitchen cloth.
- Transfer to the refrigerator to cool.
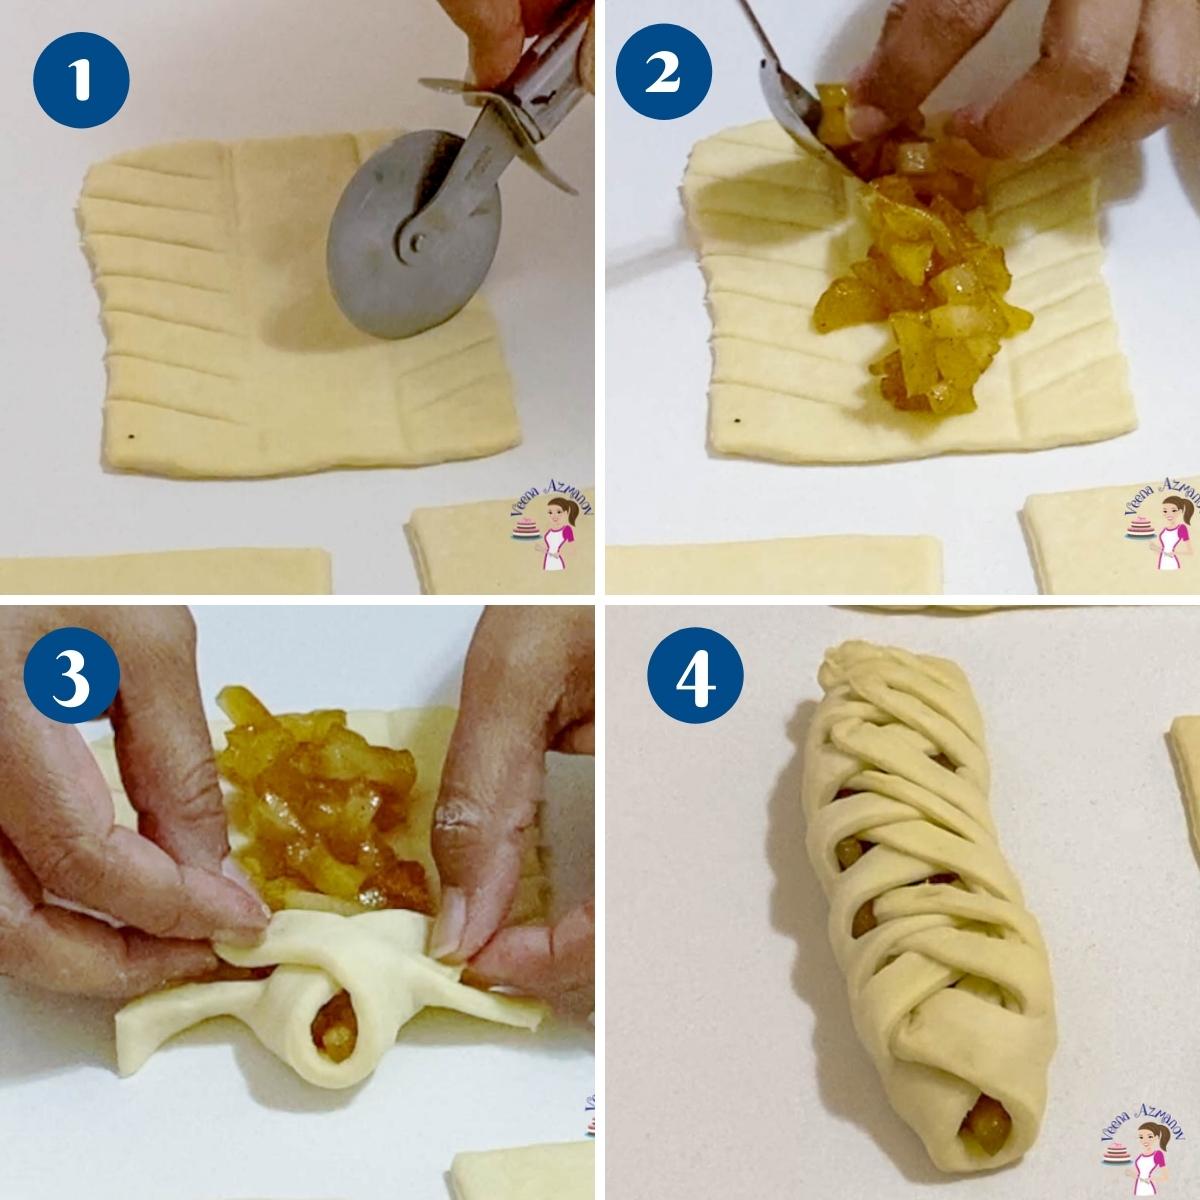
Braid
- Using a utility knife or pizza wheel, cut slanting strips along both sides of the pastry. Leaving the center empty.
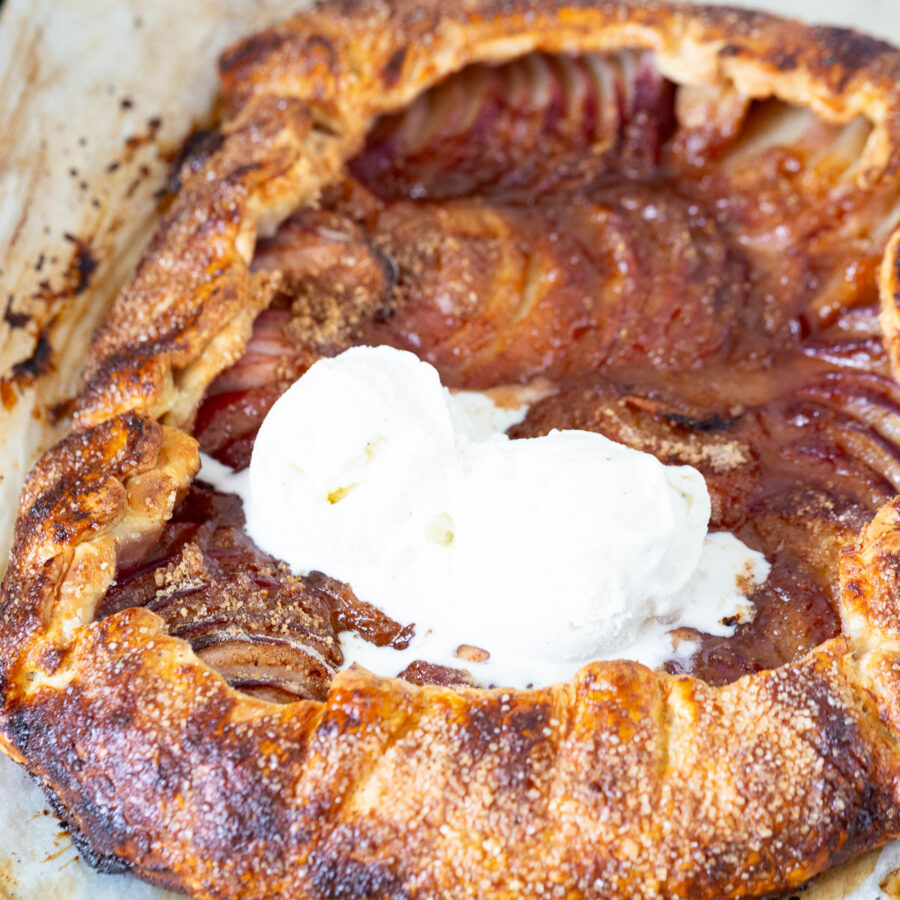
- Pipe a generous amount of filling in the center. I used apple filling (see video).
- Braid the pastry by crossing the strips over the filling, overlapping each other (see video).
- Place on a baking tray and cover with a clean kitchen cloth.
- Transfer to the refrigerator to cool.
Baking the Danish
- Once you’ve created the pastry shapes and filled them with your choice of filling, let them proof for 45 minutes.
- Preheat the oven to 375°F/190 °C/Gas Mark 5. Brush the pastry with a beaten egg.
- Bake in the hot oven for 15 to 20 minutes until rich, golden brown.
- Cool on the tray for 10 minutes. Then, brush them with the prepared apricot glaze. (below)
- These pastries are best enjoyed on the day they are baked. But they also freeze well.

Danish pastry fillings
Cream cheese spread
- Combine all ingredients in a bowl. Keep in the fridge until ready to use.
Pastry Cream
- In a heavy-bottomed saucepan, add the egg yolks, sugar, flour, and vanilla extract. Stir to combine until smooth. Gradually add the milk and cream, stirring with a whisk to prevent lumps.
- Then, place on medium heat – cook, stirring continuously, until thick and coats the back of a wooden spoon. Strain through a sieve or mesh to remove any curdled eggs.
- Cover with plastic wrap, making sure the plastic touches the surface of the pastry cream to prevent skin from forming. Chill in the fridge for 4 to 6 hours.
Pro tip – Pastry cream must be made in advance and cooled thoroughly, otherwise it will warm the dough.
Frangipani almond filling
- Combine all ingredients in a bowl.
- Keep in the refrigerator until ready to use.

Apricot glaze
- In a saucepan, heat the apricot jam and water on low heat until dissolved. Strain through a sieve – set aside until ready to use. If necessary, warm it in the microwave for 10 seconds before using it.
Troubleshooting
- My Danish pastry was baked too dark brown. Some home ovens, especially fan-assisted models, can cause pastries to darken quickly. You can tent the Danishes with parchment paper or foil. Also, for the next batch, brush the pastries with egg white instead of egg yolks.
- My pastry melted, and all the butter had melted in the oven. If the pan has lots of melted butter, it means the oven temperature was too low or the oven was not properly preheated. Ensure your oven is preheated for at least 20 minutes before you put the danishes in.
- My Danish pastries are too big. If you follow the measurements above, you should get standard-sized pastries. Rolling the dough too thick means thicker layers, but the pastry will also look bulky. Conversely, rolling too thin means the layers will be lost, and the layers will be baked thin and crisp.
- Danish Pastry – Cream Cheese Cylinders
- Danish Pastry Pinwheels
- Raisin Danish Pastry – Pain Au Raisin
- Types of Pastry
- Choux Pastry Recipe


Frequently asked questions
These pastries are best enjoyed on the day they are made. But, they do keep well in an airtight container in the refrigerator for up to 3 days. And they also freeze beautifully for months! Mine have stayed well for over 3 months.
The best way to bake laminated pastries is to place them in a hot oven so the folds open up and the fat between the pastry and butter is cooked off instantly, leaving no time for it to melt. But you also want them to continue cooking without becoming too dark on the outside. Hence, the ideal temperature for homemade Danish I find is 190 °C/375°F/ Gas Mark 5 for 20 to 25 minutes. Also, tent the pastries if they are becoming brown quickly.
Both are laminated dough, meaning they all have layers of flour and butter, and yet they are all different from each other.
Puff pastry has no yeast and no eggs. Danish pastry has both.
While puff pastry goes through six folds, a Danish pastry has about three turns.
Lastly, puff pastry has a flaky, crusty quality, while Danish pastry has a chewier texture.
Yes, you can prepare the dough and keep it in the fridge for up to 3 days or freeze it for up to 3 months. If you need to cool longer during the process, just make sure to cool just enough so it is spreadable, not hard. So when you roll it, it breaks into the dough.
Danish Pastry
Make your own Danish pastry (also called breakfast pastry) from scratch with a variety of wonderful fillings and shapes. This flaky, buttery, rich pastry is a laminated dough similar to croissants and puff pastry.
Video
Ingredients
- 4 cups (500 g) All-purpose flour
- 2 tsp Salt
- 1 cup (240 ml) Milk full-fat
- ¼ cup (50 g) Sugar
- 2 ¼ tsp Instant dry yeast (1 packet)
- 1 Egg large
- 1 tsp Vanilla extract
- ¼ cup (4.00 tbsp) Butter unsalted
- 1 ½ cup (340 g) Butter 3 sticks, unsalted, room temperature
- 4 tbsp (30 g) All-purpose flour
- ½ cup (113 g) Cream cheese 35% or more
- 2 tbsp Sugar
- 1 Egg yolk
- ½ tsp Vanilla extract
- ½ tsp Lemon zest
- 1 cup (240 ml) Milk
- ½ cup (120 ml) Whipping cream
- ¼ cup (4 tbsp) Sugar
- 4 Egg yolks large
- 2 tbsp All-purpose flour
- 1 tsp Vanilla bean paste
- ¼ cup (60 g) Butter unsalted, room temperature
- ½ cup (60 g) Almond meal (ground almonds)
- ¼ cup (50 g) Sugar
- 2 tbsp All-purpose flour
- 1 Egg yolk large
- 1 tsp Vanilla extract
- ½ cup (120 g) Apricot jam
- ¼ cup (60 ml) Water
- 1 Egg beaten
- ½ cup (170 g) Jam I used homemade blackberry
Method
- Dry ingredients – In the bowl of a stand mixer with the hook attachment, combine flour and salt. Set aside. You can also use a food processor to make this dough.4 cups All-purpose flour, 2 tsp Salt
- Yeast mixture – In a measuring cup or bowl, combine milk, sugar, yeast, egg, and vanilla.1 cup Milk, 1/4 cup Sugar, 2 1/4 tsp Instant dry yeast, 1 Egg large, 1 tsp Vanilla extract
- Wet to dry – Then, add the yeast mixture to the flour mixture. Combine on medium-high until all flour is incorporated. Knead a minute more.
- Knead – Then, gradually add the room temperature butter, one tablespoon at a time. Then, knead for 3 minutes on medium. Alternatively, you can knead by hand for 5 to 7 minutes.1/4 cup Butter
- Rest – The dough will be soft and slightly sticky. Remove from the mixer, shape into a ball. Place in an oil bowl and chill for 15 minutes.
- Template – Use a parchment paper to create a template 12 x 6 inches (see video) – set aside.
- Cream – In the same bowl of the electric mixer bowl (no need to wash), cream the butter and flour just until combined. Transfer to the prepared parchment paper template. Spread evenly with a spatula.1 1/2 cup Butter, 4 tbsp All-purpose flour
- Divide – Use a rolling pin to guide it inside the template towards the corners (see video). Chill in the fridge for 15 minutes.
- Roll – Transfer the dough to a lightly floured surface. Roll to a long rectangle of 7 x 18 inches.
- Fold – Open the butter block and divide it into 2 at the mark you created. Now you should have two 6 x 6-inch blocks. Place one block over the center. Fold one side over. Then, place the second block on top and fold the other side over.
- Chill – Wrap the dough, place it on a baking sheet, and put it in the refrigerator – chill for 15 minutes.
- Turn the dough – Roll the chilled pastry dough into a rectangle, with the short side facing you. Roll to a rectangle approximately 6 x 12 inches.
- First fold – Fold the dough lengthways into thirds like a business letter (see video). Wrap in plastic on a baking sheet and place into the fridge to chill for 30 minutes.
- Second fold – Roll the dough lengthways again with the short side facing you (see video) to about 6 x 12 inches long again. Fold the dough into thirds again like a business letter (see video). Place in the fridge for 30 minutes if necessary.
- Third fold – Roll the dough lengthways again with the short side facing you – (see video) to about 6 x 12 inches long again. Fold the dough into thirds again like a business letter (see video).
- Chill – After the third fold, chill in the fridge for at least two hours or until well chilled. This can be chilled for up to 48 hours.
- Divide – Roll the dough into a 6 x 12-inch rectangle. Divide into 2. Place one in the fridge while you work on the second one.
- Roll the dough to about a 12 x 12-inch square. Trim edges so you have straight, sharp edges.
- You can use the sheet as a whole or cut it into 3 x 3-inch squares (about 16). Mark at 3 inches from either side as shown in the video.
- Cut the corners of the square three-quarters of the way towards the center. Fold every other point towards the center.
- Press to seal in the center. Pipe a generous dollop of filling in the center.
- Place on a baking tray and cover with a clean kitchen cloth. Transfer to the refrigerator to keep cold.
- Pipe a tablespoon of the filling on the square diagonally.
- Fold the two sides over each other diagonally (see video). Place on a baking tray and cover with a clean kitchen cloth. Transfer to the refrigerator to keep cold.
- Place filling in the top half of the square. Fold the other side over. Use water to stick if necessary.
- Cut slits so it looks like a comb and when flared it bakes like a cockscomb. Place on a baking tray and cover with a clean kitchen cloth. Transfer to the refrigerator to keep cold.
- Fold the square into a triangle. Make two cuts on the outside edge, leaving about 1/4 inch from the edge of the triangle. You just created a frame outside an inner square
- Open the triangle. Take one side of the frame you created and place it on the other side of the inner square. Then take the other side frame and do the same. The two outer frames you created will overlap, creating a kite shape (see the video and progress pictures).
- Pipe a generous amount of filling in the center.
- Place on a baking tray and cover with a clean kitchen cloth. Transfer to the refrigerator to keep cold.
- Bring the four corners of the square to meet in the center. Press down to prevent opening.
- Pipe a generous dollop of filling in the center.
- Place on a baking tray and cover with a clean kitchen cloth. Transfer to the refrigerator to cool.
- Fold the square into a triangle and cut an edge about 1/2 inch towards the center. Open the triangle, fold it again on the other side, and do the same. So now you have cut edges on all four sides of the square.
- Bring the four corners toward the center. Press down so it won't open. Pipe a generous dollop of filling in the center. I piped cheese and jam – (see video).1/2 cup Jam
- Place on a baking tray and cover with a clean kitchen cloth. Transfer to the refrigerator to keep cold.
- Use two 3-squares the same size. Using a 1 1/2-inch cookie cutter, cut a disc from the center out of one of the squares.
- Place the hollowed center square over the first square using water to stick them together. Pipe a generous dollop of filling in the center.
- Place on a baking tray and cover with a clean kitchen cloth. Transfer to the refrigerator to keep cold.
- Using a utility knife or pizza wheel, cut slanting strips along both sides of the pastry. Leaving the center empty.
- Pipe a generous amount of filling in the center. I used apple filling (see video).
- Braid the pastry by crossing the strips over the filling, overlapping each other (see video).
- Place on a baking tray and cover with a clean kitchen cloth. Transfer to the refrigerator to keep cold.
- Proof – Once you've created the shapes and filled them with your choice of filling. Let them proof for 45 minutes.
- Oven – Preheat the oven at 375°F/ 190°C / Gas Mark 5. Brush the pastry with a beaten egg.1 Egg
- Bake – Bake in the hot oven for 15 to 20 minutes until rich, golden brown.
- Glaze- Remove from the oven and let cool on the tray for 10 minutes. Then, glaze them with the prepared apricot glaze. (below)
- Cool – Transfer to a cooling rack and cool them completely before storing. These pastries are best enjoyed on the day they are baked. But they also freeze well for months.
- Combine all ingredients in a bowl. Keep in the fridge until ready to use.1/2 cup Cream cheese, 2 tbsp Sugar, 1 Egg yolk, 1/2 tsp Vanilla extract, 1/2 tsp Lemon zest
- In a heavy-bottomed saucepan, add the egg yolks, sugar, flour, and vanilla. Combine until smooth. Gradually add the milk and cream, stirring with a whisk to prevent lumps.1/2 cup Whipping cream, ¼ cup Sugar, 4 Egg yolks, 2 tbsp All-purpose flour, 1 tsp Vanilla bean paste, 1 cup Milk
- Then, place on medium heat – cook, stirring continuously until thick and coats the back of a wooden spoon. Strain through a sieve or mesh to remove any curdled eggs.
- Cover with plastic wrap, making sure the plastic touches the surface of the pastry cream to prevent skin from forming. Chill in the fridge for 4 to 6 hours.
- Combine all ingredients in a bowl. Keep in the fridge until ready to use.1/4 cup Butter , 1/2 cup Almond meal, 1/4 cup Sugar, 2 tbsp All-purpose flour, 1 Egg yolk, 1 Egg, 1 tsp Vanilla extract
Notes
- Knead the dough to a soft, not firm consistency. This will make it easier to roll. So, avoid adding too much flour.
- Chill the dough well before lamination; this will help the butter in the dough stay chilled and make it easier to roll.
- When laminating the dough, ensure the butter is cold but not hard. Seal the butter properly so it does not come out.
- While chilling the dough is important, overchilling can cause the butter to shatter into pieces when rolling.
- Fold the dough – For home baking, we have used the classic book fold. This is done three times for croissants and Danish pastry. There are other types of folds that we will cover in future recipes.
- It is very important to chill the dough for at least 30 minutes between folds so the butter is cold but still spreadable, not hard.
- When the dough is done, after folding three times, the dough can be kept in the fridge for up to 48 hours.
Alternatively, you can freeze it for up to 3 months. I divide my dough into 2 and use one portion at a time. - Don’t roll the dough too thin. This will give you more pastries, but the folds will be lost. Similarly, don’t roll too thick as the pastry will be bulky and may open easily.
- Make sure your oven is preheated properly before you place a puff pastry to bake. If it is not hot enough, the butter between the folds will melt away, and the layers will fuse together, ruining all your hard work.
- Brushing with an apricot glaze will give you a lovely sheen, but it also makes the pastry sticky and sweeter. (I don’t brush mine with an apricot)
Equipment you will need


Nutrition
Tried this recipe?
Mention @veenaazmanov_kitchen or tag #veenaazmanovkitchen!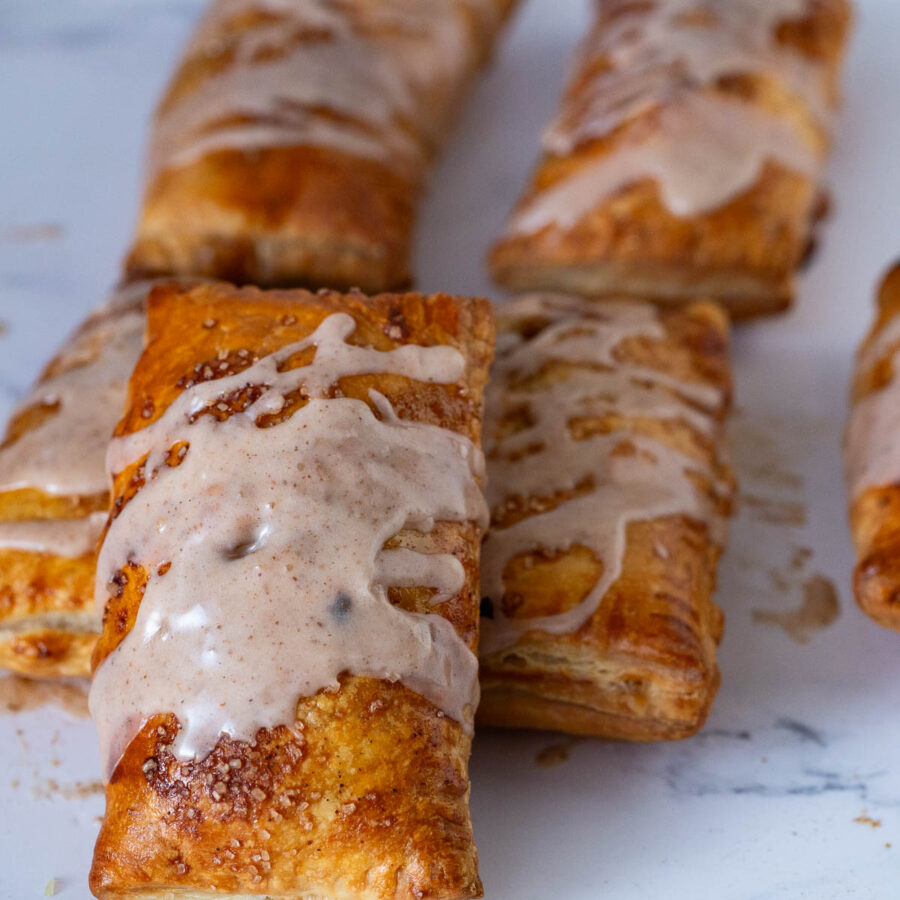
- Cream Puffs – Cheesecake Cream Puffs, Tiramisu Cream Puffs
- Classic Puff Pastry from Scratch – Pate Feuilletée
- Blackberry Braided Puff Pastry, Strawberry Braided Pastry,
- Braided Apple Puff Pastry
Don’t lose this recipe! Save it for Later!
📌 Save this Recipe for later on Pinterest so you can easily find it again.
⭐ Add Veena Azmanov Kitchen to your Google Preferred Sources.
It helps Google show you more of our recipes.
📧 Subscribe for new recipes delivered to your inbox.
🎥 Follow us for more recipes


Pastry Day 16: Danish Pastry- Done
day 16 done
I am curious about the refrigeration process. Is it possible to do the Danish shaping and filling, then keep in the fridge overnight to bake the next morning versus cooling in bulk block form?
Yes, you can definitely shape the pastries and cold-proof them in the fridge. Then, bake when you are ready to serve. Bakeries do it all the time.
Pastry day 16 done
Pastry Day 16 DONE
This is by far the best homemade Danish recipe I have found, and I have tried to make good Danish for 3-4 years now. Thank you so much!!!! I used almond extract instead of vanilla since I love that flavor. And my husband loves the canned almond filling so we used that. Just delicious!
Thank you Wendy for the lovely feedback. Happy you are enjoying my recipe
Pastry Day 16 DONE. Thank you. I will try this new (to me) recipe.
Hi Veena! I tried doing the danish dough and followed each step. My question is if it’s possible to lessen the butter content to lessen the cost. Is it ok to combine it with margarine?
Albert margarine has high water content and it will be difficult to roll the dough. Also, the taste of margarine is not as superior as butter.
Thanks, Veena.
Pastry day 16 done.
PASTRY DAY 16 DONE
This was such a fun and rewarding day-long project! The flaky layers turned out so perfectly I couldn’t believe I’d made them. My only problem is that almost all of mine opened, even though I pinched the dough together very firmly. Any ideas where I might have gone wrong?
Thank you, Ren. Happy you enjoyed these Danish. Sounds like the pastries were rolled too thick or baked at a higher temperature.