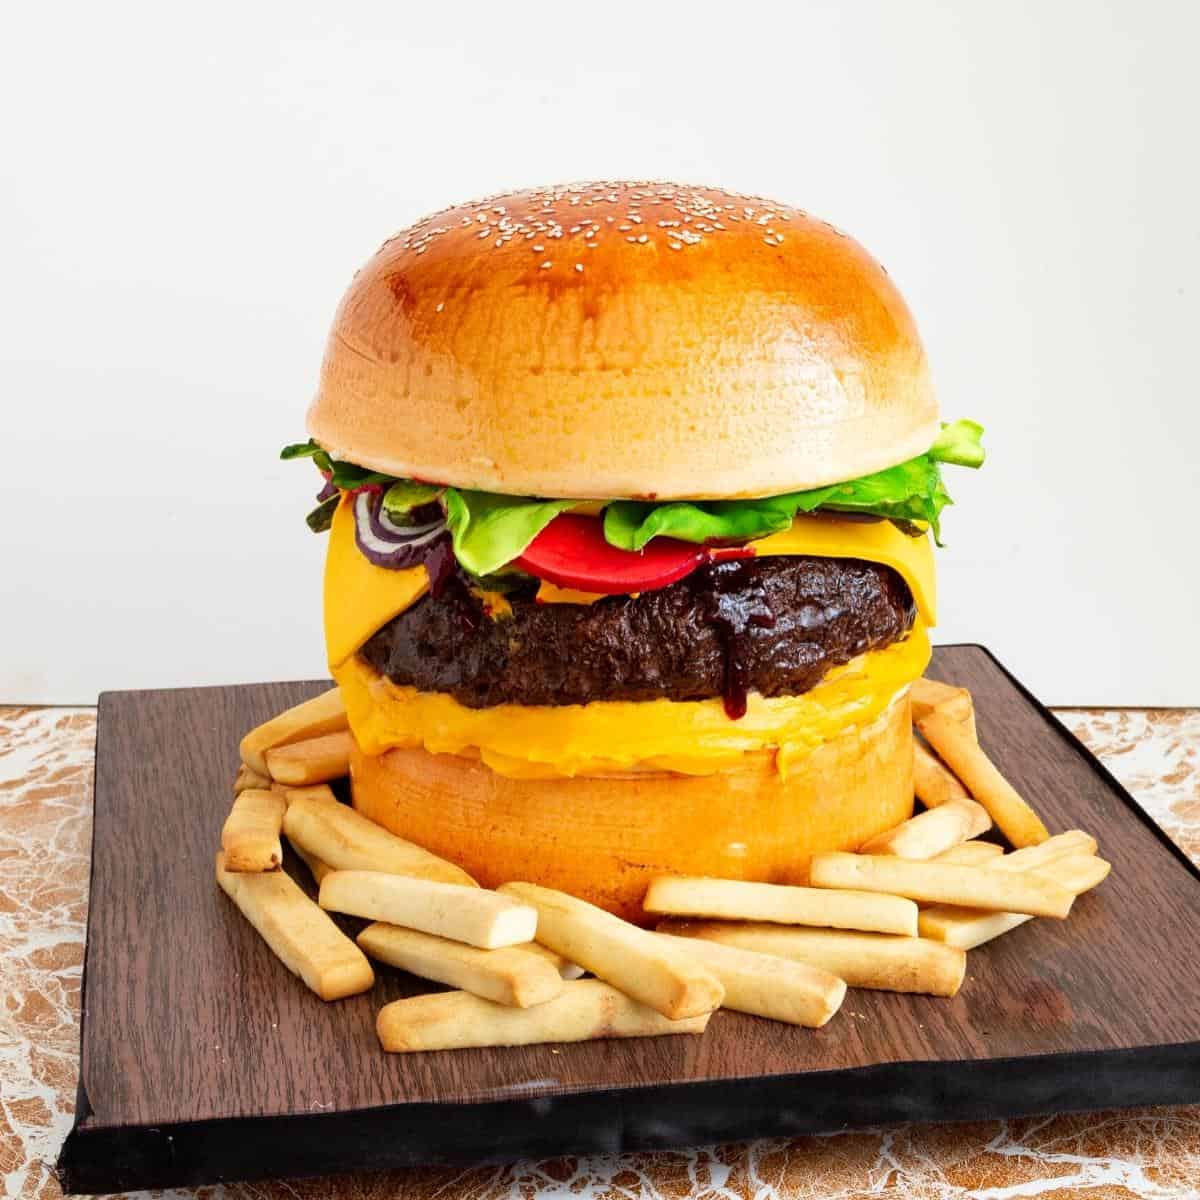
Burger Cake Tutorial
 Prep Time 2 hours Cook Time 1 hour 20 minutes Total Time 5 hours 20 minutes
A burger cake is the perfect celebration cake for any age because no matter what age you are, five or fifty, who doesn’t love a hamburger? Right? This cake decorating tutorial includes recipes, step-by-step instructions, and videos so you can make this cake easily.
Almost everybody loves hamburgers and cheeseburgers, so the idea of making a cake based on this food is not just fun to eat, but also to make.
I made this cake for my daughter Rhea’s birthday. Her favorite food is hamburgers, so it made the perfect theme for her. Of course, everyone in school was thrilled and fascinated with the idea of a food cake.
About this cake
- The cake is very simple and easy to make, and it does not require as many tools and special equipment.
- The cake as a whole looks very intimidating, but when you break it down into sections, you will see that each section is easy to make.
- Like any novelty cake, this is not a cake you make in one day, from start to finish, so plan accordingly. You will need to make a few things in advance and keep enough chilling or drying time in between steps.
Timeline for this burger cake.
- Day 1 – Make veggies and leave them to dry (approx. 1 hour).
- Day 2 – Bake the two cakes. Wrap and chill overnight (approx. 1.40 mins).
- Day 3 – Carve, fill, and frost the cake – chill, then airbrush the cake (2 hours).
- Day 3 or 4 – Assemble the cake (15 minutes).
- The cookie French fries can be made on Day 2, 3, or 4 (1 hour).

You will need
- Cake – You will need 3 x 7-inch round cakes. One for the beef patty and two for the burger buns.
I am using two types of cakes.- The vanilla-based funfetti cake for the burger bun and my chocolate cake for the burger patty.
- Of course, you can use one cake recipe for all three layers of cake because they will be covered with fondant.
- Here are over 50 layer cake recipes that I have on this blog that you may like to try.
- Frosting – I am using a combination of vanilla buttercream, chocolate buttercream, and white chocolate ganache.
But you can also use just one frosting for the whole cake. Here are my other frosting recipes that you may want to check out. - Fondant – I am using my marshmallow fondant for this cake. But any fondant, homemade or commercial, would work just fine.
- We will need ivory fondant for the burger buns
- Chocolate fondant for the burger patty
- Gumpaste – Because I live in hot and humid weather, I chose to use some gumpaste and some fondant with CMC for the veggies. Unless you have similar conditions to mine, I highly recommend using fondant with CMC as well.
- Cookie dough – I think French fry cookies are so much better than fondant French fries. They are delicious and also hold their shape much better. If you choose to use fondant, make sure to add CMC to it so it holds its shape.
Plus
- Food color gels – You can buy pre-colored fondant in ivory, brown, and other colors. I like to make white fondant and then color the amount I need for my project with food color gels. That way, I do not buy big quantities and have too much excess on hand.
- Airbrush colors – I used ivory airbrush colors and a little liquid pearl for that shine on my burger bun.
- Petal dust colors – These are powdered food color dusts that help accent sugar flowers and fondant decorations, such as these leaves and veggies.

Step-by-step instructions
Funfetti cake
- Preheat the oven to 325°F / 165°C / Gas Mark 3.
- Grease and line 2 x 7-inch round cake pans.
- Dry ingredients – Whisk or combine flour, baking powder, baking soda, and salt. Set aside.
- In the bowl of a stand mixer, with the paddle attachment, cream butter and sugar until light and fluffy. Add the eggs, one at a time, followed by the vanilla extract.
Pro tip – Ensure the eggs are at room temperature and add them gradually, one at a time, to prevent the batter from curdling. - Next, add the flour and buttermilk in three batches. Then, fold in the sprinkles with a spatula.
Pro tip – Scrape the bottom and sides of the bowl to ensure you have a smooth batter. Do not overmix at this point to prevent bleeding. - Pour the batter into the prepared baking pan. Bake in the preheated oven for 35 to 45 minutes until a skewer inserted in the center comes out clean.
- Cool in the baking pan for 10 minutes. Then, invert onto a cooling rack until completely cold.
Pro tip – Chilling the cake in the fridge overnight or in the freezer for an hour will make it easier to carve.

Chocolate cake
- Preheat the oven to 325°F / 165°C / Gas Mark 3.
- Grease and line a 7-inch round cake pan.
- Dry ingredients – Whisk or combine flour, cocoa powder, baking powder, baking soda, and salt. Set aside.
- In the bowl of a stand mixer, with the paddle attachment, cream butter and sugar until light and fluffy. Add the eggs, one at a time, followed by the vanilla extract.
Pro tip – Ensure the eggs are at room temperature and add them gradually, one at a time, to prevent the batter from curdling. - Next, add the flour and buttermilk in three batches. Then, fold in the sprinkles with a spatula.
Pro tip – Scrape the bottom and sides of the bowl to ensure you have a smooth batter. Do not overmix at this point to prevent bleeding. - Pour the batter into the prepared baking pan. Bake in the preheated oven for 35 to 45 minutes until a skewer inserted in the center comes out clean.
- Cool in the baking pan for 10 minutes. Then, invert onto a cooling rack until completely cold.

Frosting
- Vanilla buttercream – In the bowl of a stand mixer, with the paddle attachment, cream the butter for a minute, then add the powdered sugar, whipping cream, and vanilla extract. Whip until light and fluffy.
Pro tip – You must whip the buttercream until it’s light and airy, about 2 to 3 minutes. - Chocolate buttercream – Take 3 cups of vanilla buttercream and fold in the melted chocolate until smooth and well combined.
Pro tip – Make sure the melted chocolate is cooled before you fold it into the buttercream to prevent the chocolate from seizing. - Chocolate ganache – Add the chocolate and whipping cream to a microwave-safe bowl. Heat in the microwave for a minute or two, stirring every 30 seconds until smooth. Set aside to cool until it thickens to a peanut butter consistency.
Veggies – using fondant with CMC
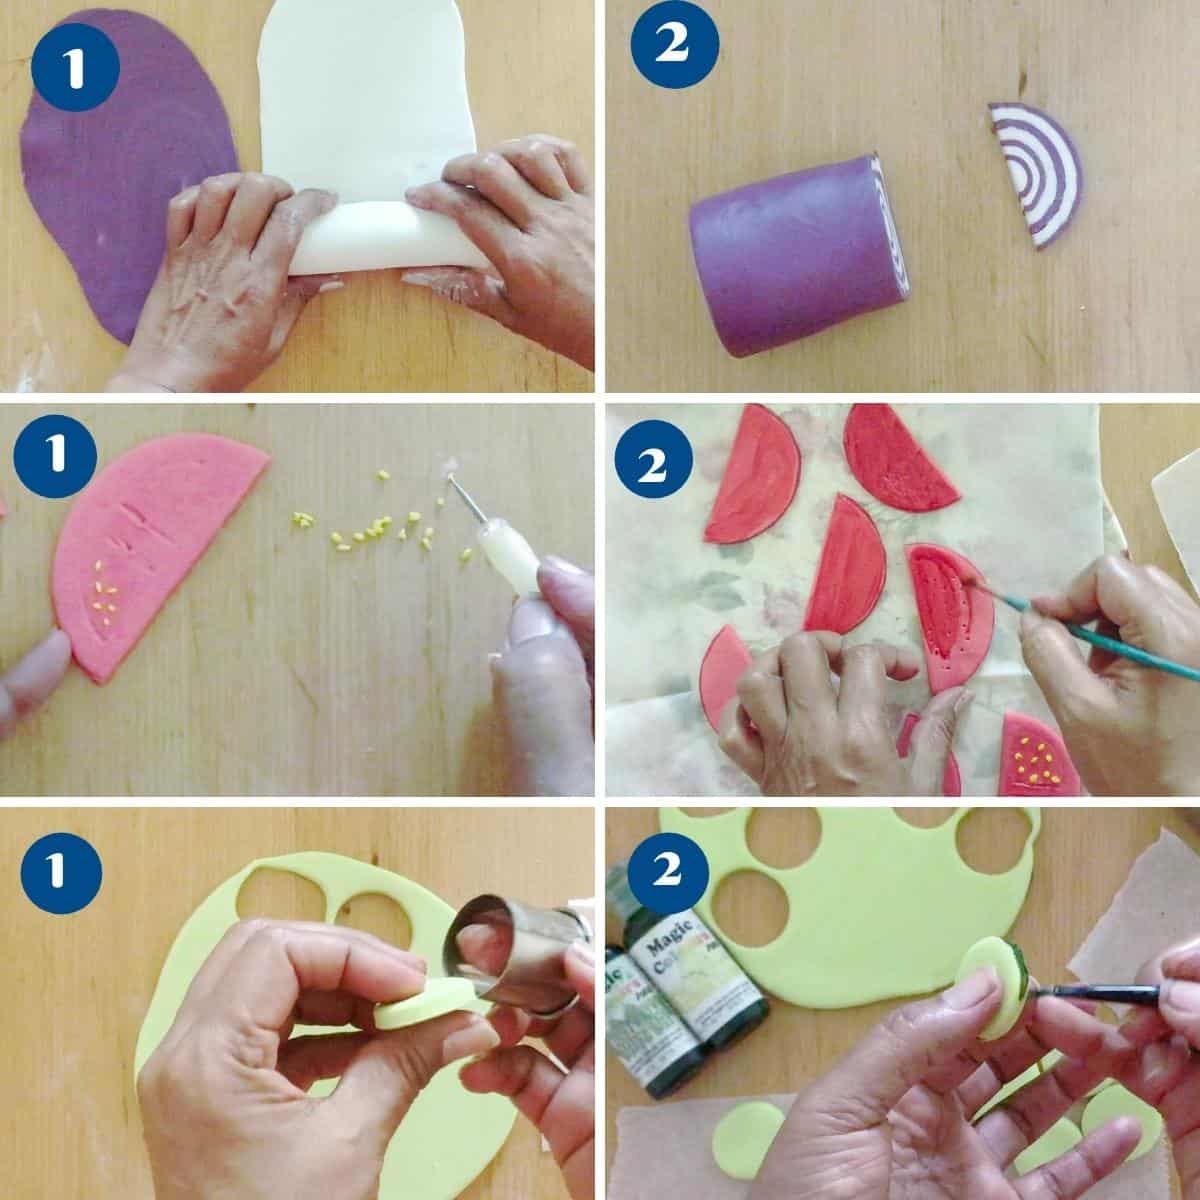
- Onions – I rolled sheets of violet and white, as shown in the video. Then, rolled them like a jelly roll until I had a 3-inch log. Freeze the log for 30 minutes, so it becomes firm. Then, slice into thin slices.
Pro tip – Freezing will harden the fondant and make it easier to cut. Otherwise, onion slices will be misshapen. - Tomatoes – Roll red fondant to ¼ inch thickness. Then, cut 3-inch circles and each circle in half. I made a few tomato seeds using yellow fondant. And painted the edges with a deeper red.
Pro tip – I made only two slices that were visible with tomato seeds; I kept the rest plain with painted edges. - Pickles – Roll lime green fondant into 1/4 inch thickness. Then, cut small circles. Use a thin ball tool to make holes and paint the edges with olive green food gel color.

- Lettuce – Roll light green fondant as thin as possible. Cut into quarters, and use a flower veiner to make a leaf impression. Use a ball tool to think and frill the edges. Place the pieces on crumpled aluminum foil to dry.
Pro tip – Do not dry them too hard, just enough so they hold their shape. Otherwise, they can crack under the weight of the top burger bun cake.
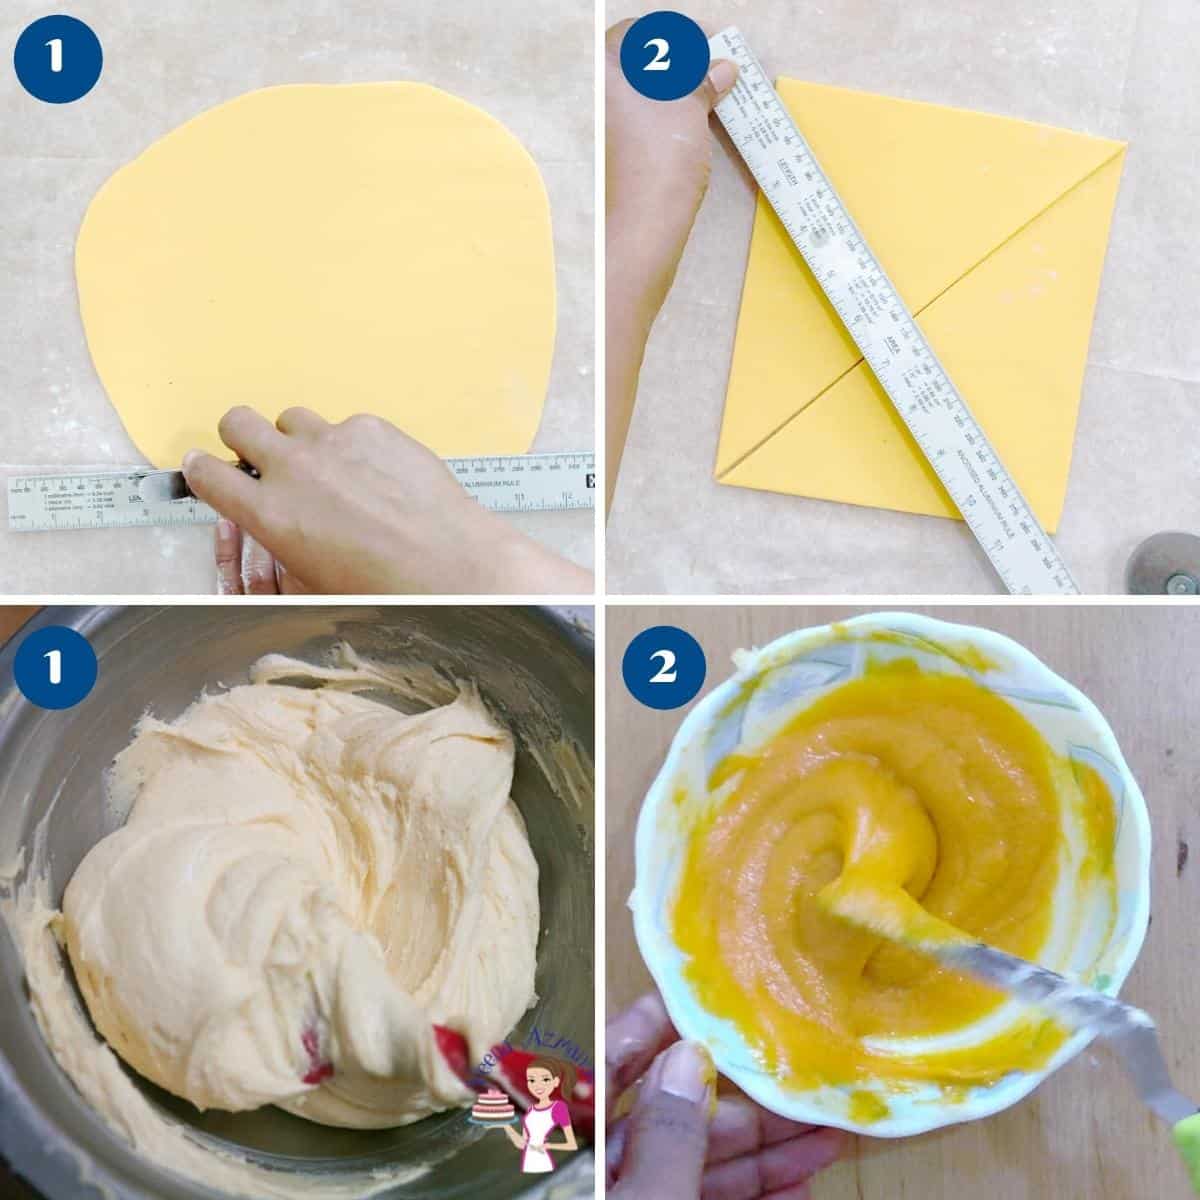
- Cheese slice – I rolled orange-colored fondant into a square. Then, cut that square diagonally to get four triangles.
- Mustard paste – I colored some white chocolate ganache with orange gel food color to make a mustard paste.
- Ketchup – And I added a few drops of red color to the strawberry jelly to make ketchup.

Beef patty
- Carve the chocolate cake as shown in the video using a sharp pairing or serrated knife. Then, frost it on both sides with chocolate frosting. Chill the cake for an hour or until firm.
Pro tip – Chill the cake until the frosting is firm so it is easier to cover with fondant. - Cover the cake with brown (chocolate) fondant, as shown in the video. Then, take a piece of aluminum foil and crunch it into a tight ball. Roll the foil over the brown fondant to create an impression.
- Using a thick paintbrush and brown food color gel, paint the burger patty as shown in the video. Set aside until ready to assemble.
Burger bun – top
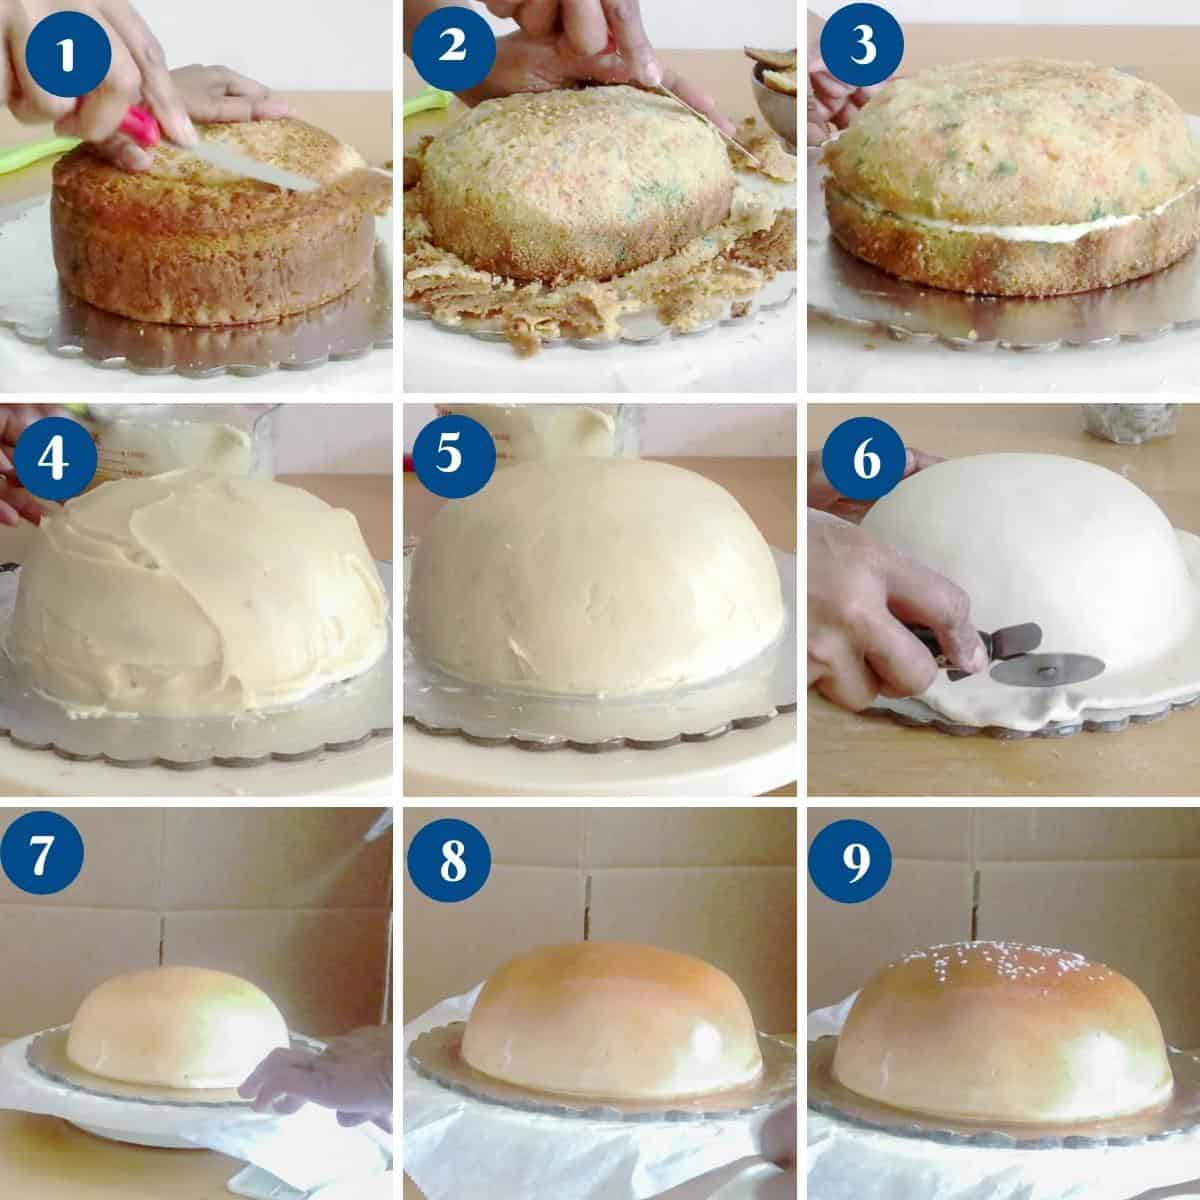
- Take one of the 7-inch layer cakes. Carve a dome, as shown in the video. I torted the layer in half and frosted it with vanilla buttercream. Alternatively, you can leave the dome without layering it.
- Frost the outside of the dome with white chocolate ganache. Use a soft plastic smoother to smooth as much as possible. Chill the cake in the fridge until the ganache is firm.
Pro tip – Chill the cake until the ganache is firm so it is easier to cover with fondant. I like to leave it in the fridge for a few hours. - Then, cover the cake with ivory fondant. Airbrush the cake as shown in the video using shades of Ivory airbrush colors. While still wet, sprinkle some sesame seeds. Set aside until ready to assemble.
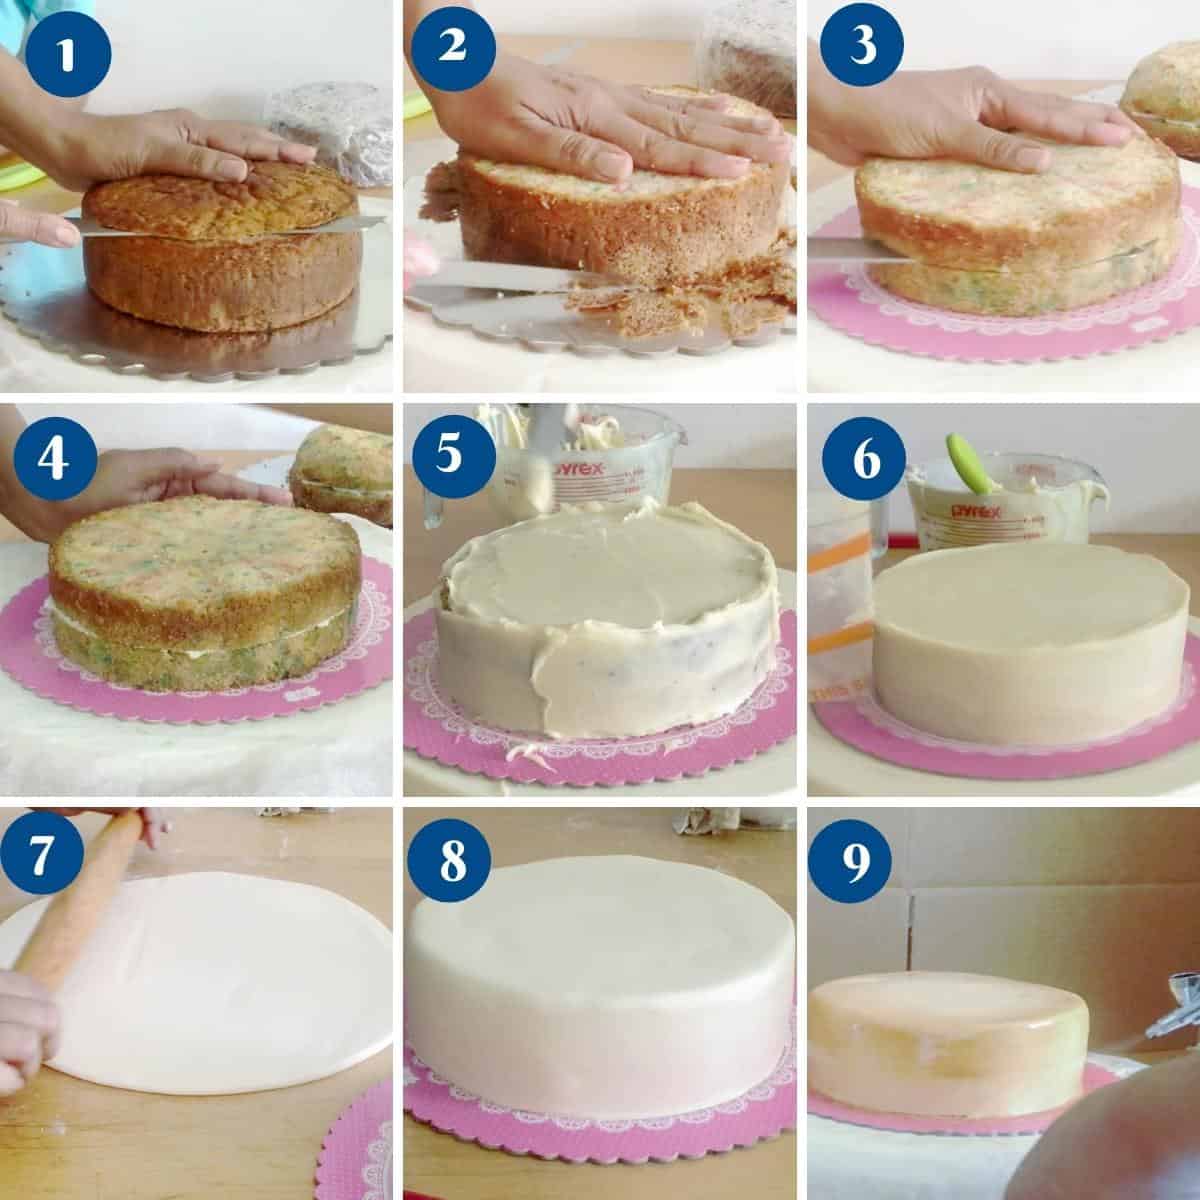
Burger bun – bottom
- Carve the second 7-inch layer cake, as shown in the video. Torte into two and frost it with vanilla buttercream in between layers.
- Frost the outside with white chocolate ganache and chill in the fridge until firm. Then, cover the cake with ivory fondant, as shown in the video.
- Airbrush the cake as shown in the video using shades of Ivory food color gel. Set aside until ready to assemble.

French fries
- In the bowl of a stand mixer, with the paddle attachment, cream the butter and sugar until light and airy. Add a few drops of ivory gel food color.
Pro tip – It is important that the sugar is completely melted during the creaming process; otherwise, the dough will look grainy. - Then, add the egg, followed by the flour and vanilla extract. Transfer the dough to a work surface and divide it into two. Wrap each disc in plastic wrap and chill until firm enough to roll.
- Once chilled, roll the dough to about ½ inch thickness. Cut the French fries as shown in the video and chill again in the fridge for 30 minutes.
- Preheat the oven to 30°F /177°C/ Gas Mark 4. Bake the cookies for 10 to 12 minutes. Let cool in the pan for 10 minutes, then on a cooling rack until it is completely cooled.
- When cooled, dust the fries with a combination of red, brown, and gold dust (powdered colors), as shown in the video.
Pro tip – It is easy to get carried away with dust colors. So, use a soft, thick brush with very few colors at first. Add more if necessary.

Assemble the hamburger
- On a 16-inch square cake board, place the bottom burger bun, as shown in the video.
Pro tip – Use a little frosting on the board to prevent the cake from moving. - Pipe some orange-colored ganache (mustard paste) around the edges and fill the center with vanilla buttercream, as shown in the video.
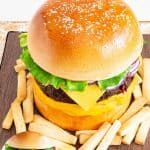
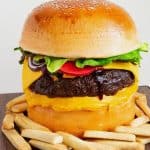
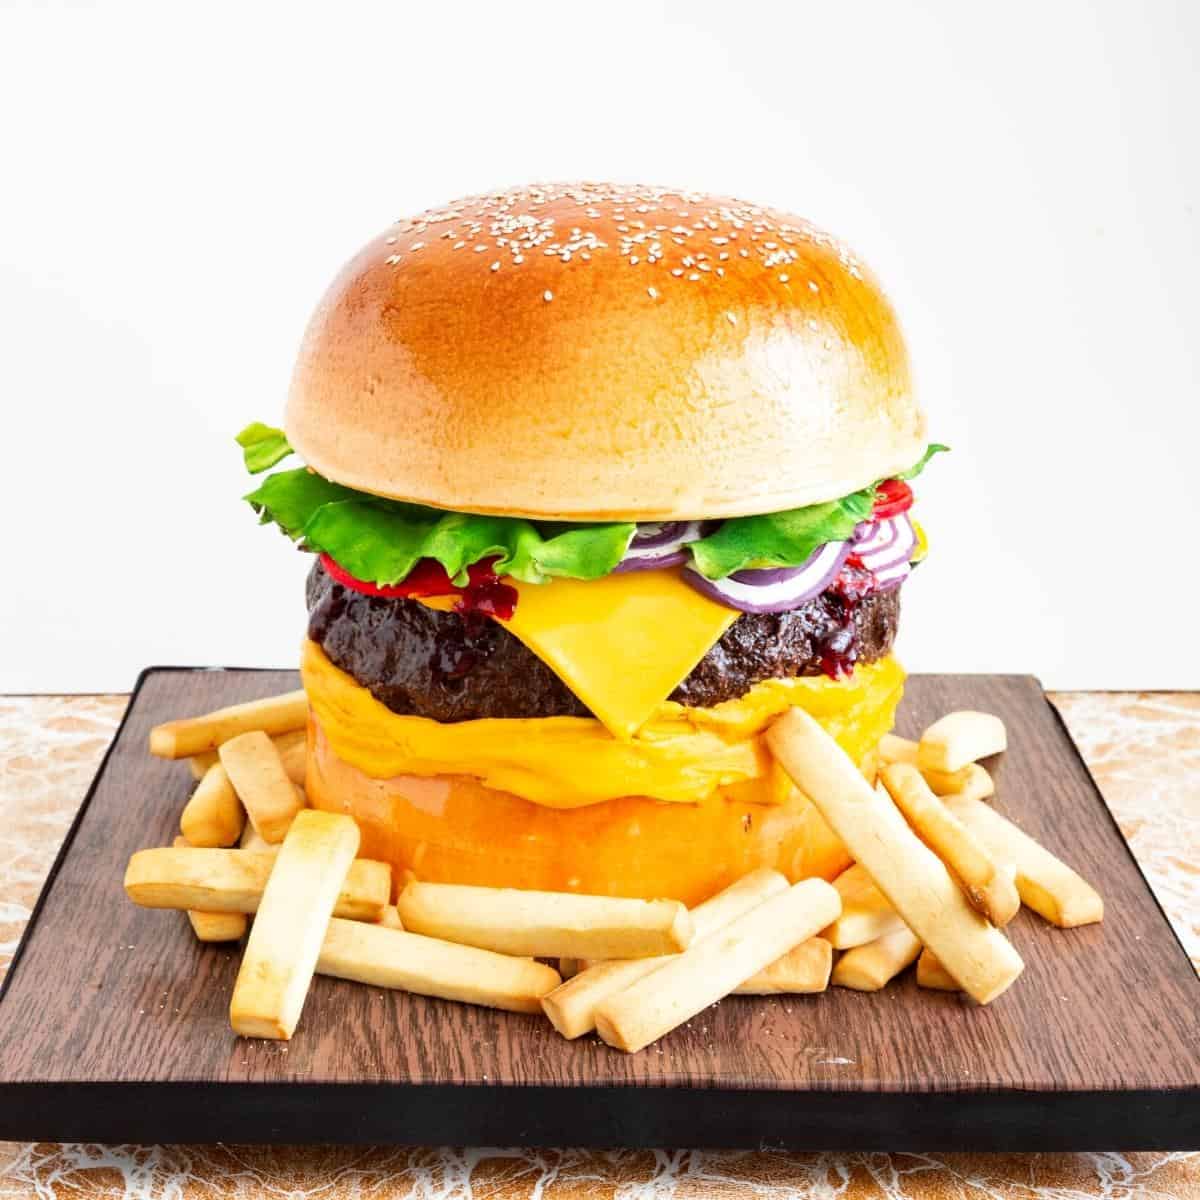
- Place the burger patty on top. Top the patty with fondant cheese slices and veggies – onion slices, tomato, pickles, and lettuce.
- Finally, place the top burger bun on top. I used a dowel to ensure the top does not move around. Pipe the ganache, mustard paste, and strawberry jelly ketchup as needed.
Pro tip – It is best to use straws as the wooden dowels can hurt someone if not taken care of. - Arrange the French fries around the cake.
Enjoy!

Frequently asked questions
It really depends on the frosting you use. If you use perishable frosting, then make sure to keep the cake in the fridge for no more than 2 to 3 days. I am using non-perishable frosting so my cake can stay at room temperature for 2 to 3 days and up to 5 or 6 days in the fridge.
You would use a similar process to the one I have here.
Color the fondant with ivory food color gel and condition it with CMC so it is not too soft.
Roll the fondant to about 1/4 inch thickness and cut the fries, as shown in the video.
Let the fries air dry until firm, then dust them with petal dust colors to give them that French fries appeal.
As you can see, it is a large cake, and cutting it as a whole might be quite a messy job. So I like to view it as three separate layers – the burger top, the beef patty, and then the burger bun bottom. Since we frosted each cake separately, we can be sure that every slice will have a fair amount of frosting.
Burger Cake
A burger cake is the perfect celebration cake at any age because no matter what age you are, five or fifty, who doesn't love a hamburger? Right? This cake decorating tutorial includes recipes, step-by-step instructions, and videos so you can make this cake easily.
Video
Ingredients
- 2½ cups (310 g) All purpose flour
- 1 tsp Baking Soda
- 1 ½ tsp Baking powder
- ½ tsp Salt
- 8 oz (226 g) Unsalted Butter
- 2 cups (400 g) Sugar
- 4 Eggs
- 2 tsp Vanilla extract
- 1 cup (240 ml) Buttermilk
- 1 cup (160 g) Sprinkles
- 1¼ cup (156 g) All-Purpose flour
- ½ cup (43 g) Cocoa powder
- 1 tsp Baking powder
- ¾ tsp Baking soda
- ½ tsp Salt
- 4 oz (113 g) Unsalted Butter room temperature
- 1 cup (200 g) Sugar
- 2 Eggs large
- ½ cup (120 ml) Buttermilk
- 1 tsp Vanilla extract
- 8 oz (226 g) Butter unsalted
- 3 cup (360 g) Powdered sugar
- ¼ cup (60 ml) Whipping cream (38%)
- 1 tsp Vanilla extract
- ½ tsp Salt
- 4 oz (113 g) Chocolate melted
- 8 oz (226 g) White chocolate
- ½ cup (120 ml) Whipping cream (38% – hot)
- 1 cup (227 g) Butter
- 1 cup (200 g) Sugar
- 1 egg large
- 2 cups (250 g) Flour
- ½ tsp Salt
- 1 tsp Vanilla extract
- 1½ lb (680 g) White fondant white
- ½ lb (226 g) Fondant with CMC various colors
- ¾ lb (340 g) Chocolate fondant
- 4 oz (113 g) Gumpaste or(fondant with CMC)
- 1 cup (240 ml) White chocolate ganache with orange gel food color for mustard
- ¼ cup (60 ml) Strawberry jelly with red gel food color for ketchup
- Powdered dusts various colors
Method
- Preheat the oven to 325°F / 165°C / Gas Mark 3.
- Grease and line 2 x 7-inch round cake pans.
- Dry ingredients – Whisk or combine flour, baking powder, baking soda, and salt. Set aside.
- In the bowl of a stand mixer, with the paddle attachment, cream butter and sugar until light and fluffy. Add the eggs one at a time, followed by the vanilla extract.
- Next, add the flour and buttermilk in three batches. Then, fold in the sprinkles with a spatula.
- Pour the batter into the prepared baking pan. Bake in the preheated oven for 35 to 45 minutes until a skewer inserted in the center comes out clean.
- Cool in the baking pan for 10 minutes. Then, invert onto a cooling rack until completely cold.
- Preheat the oven to 325°F / 165°C / Gas Mark 3.
- Grease and line a 7-inch round cake pan..
- Dry ingredients – Whisk or combine flour, cocoa powder, baking powder, baking soda, and salt. Set aside.
- In the bowl of a stand mixer, with the paddle attachment, cream butter and sugar until light and fluffy. Add the eggs, one at a time, followed by the vanilla extract.
- Next, add the flour and buttermilk in three batches.
- Pour the batter into the prepared baking pan. Bake in the preheated oven for 35 to 45 minutes until a skewer inserted in the center comes out clean.
- Cool in the baking pan for 10 minutes. Then, invert onto a cooling rack until completely cold.
- Vanilla buttercream – In the bowl of a stand mixer, with the paddle attachment, cream the butter for a minute, then add the powdered sugar, whipping cream, and vanilla extract. Whip until light and fluffy.
- Chocolate buttercream – Take 3 cups of vanilla buttercream and fold in the melted chocolate until smooth and well combined.
- Chocolate ganache – Add the chocolate and whipping cream to a microwave-safe bowl. Heat in the microwave for a minute or two, stirring every 30 seconds until smooth. Set aside to cool until it thickens to a peanut butter consistency.
- Onions – I rolled sheets of violet and white as shown in the video. Then, rolled them like a jelly roll until I had a 3-inch log. Freeze the log for 30 minutes so it becomes firm. Then, slice into thin slices.
- Tomatoes – Roll red fondant to ¼ inch thickness. Then, cut 3-inch circles and each circle into half. I made a few tomato seeds using yellow fondant. And painted the edges with a deeper red.
- Pickles – Roll lime green fondant into 1/4 inch thickness then cut small circles. Use a thin ball tool to make holes and paint the edges with olive green food gel color.
- Lettuce – Roll light green fondant as thin as possible. Cut into quarters, and use a flower veiner to make a leaf impression. Use a ball tool to think and frill the edges. Place the pieces on crumpled foil to dry.
- Cheese slice – I rolled orange-colored fondant into a square. Then, cut that square diagonally to get four triangles.
- Mustard paste – I colored some white chocolate ganache with orange gel food color to make a mustard paste.
- Carve the chocolate cake as shown in the video using a sharp paring knife. Then, frost it on both sides with chocolate frosting. Chill the cake for an hour or until firm.
- Cover the cake with brown fondant as shown in the video. Then, crumple a piece of aluminum foil into a tight ball. Roll the foil over the brown fondant to create an impression.
- Using a thick paint brush and brown food gel, paint the burger patties as shown in the video. Set aside until ready to assemble.
- Take one of the 7-inch layer cakes. Carve a dome as shown in the video. I torted the layer in half and frosted it with vanilla buttercream. Alternatively, you can leave the dome without layering it.
- Frost the outside of the dome with white chocolate ganache. Use a soft plastic smoother to smooth as much as possible. Chill the cake in the fridge until the ganache is firm.
- Then, cover the cake with ivory fondant. Airbrush the cake as shown in the video using shades of Ivory airbrush colors. While still wet, sprinkle some sesame seeds. Set aside until ready to assemble.
- Carve the second 7-inch layer cake as shown in the video. Torte into two and frost it with vanilla buttercream in between layers.
- Frost the outside with white chocolate ganache and chill in the fridge until firm. Then, cover the cake with ivory fondant as shown in the video.
- Airbrush the cake as shown in the video using shades of Ivory food gel color. Set aside until ready to assemble.
- In the bowl of a stand mixer, with the paddle attachment, cream the butter and sugar until light and airy. Add a few drops of ivory food color gel.
- Then, add the egg, followed by the flour and vanilla extract. Transfer the dough to a work surface and divide into two. Wrap each disc in plastic wrap and chill until firm enough to roll.
- Once chilled, roll the dough to about ½ inch thickness. Cut the French fries as shown in the video and chill again in the fridge for 30 minutes.
- Preheat the oven to 30°F /177°C/ Gas Mark 4. Bake the cookies for 10 to 12 minutes. Let cool in the pan for 10 minutes, then on a cooling rack until cooled completely.
- When cooled, dust the fries with a combination of red, brown, and gold dust (powdered colors) as shown in the video.
- On a 16-inch square cake board, place the burger bun bottom as shown in the video.
- Pipe some orange colored ganache (mustard paste) around the edges and fill the center with vanilla buttercream as shown in the video.
- Place the burger patty on top. Top the patty with fondant cheese slices and veggies – onion slices, tomato, pickles, and lettuce.
- Finally, place the burger bun top. I used a dowel to ensure the top does not move around. Pipe the ganache, mustard paste, and strawberry jelly ketchup as needed.
- Arrange the French fries around the cake. Enjoy!
Notes
- When planning your cake, keep the taste as much as the design of the cake in mind. While you can use just one cake and frosting, using more than one will give your guests more variety.
- Use butter-based cakes as these are easier to carve and don’t fall apart as easily.
- The cakes can be baked up to a month in advance and kept in the freezer. Thaw in the fridge overnight before carving.
- If using fresh cake, make sure to chill the cake overnight or for an hour in the fridge. This will make fewer crumbs when carving.
- Use a small serrated knife for carving – this will keep you in control of how much cake you cut.
- The veggies can be made up to a month in advance and kept in an airtight container.
- Make sure the lettuce does not dry too hard, as it can break under the weight of the top cake.
- I used a dowel in the center of the cake to ensure all the different elements of the cake stay in place.


Hi Veena. II would like to ask you two things:
1. Can I make the cookie dough (for the French Fries) earlier and freeze them?
2. Can I use gum paste only for the veggies?
Thanks.
Yes Neve, you can bake the fries and freeze them. Ensure they are completely thawed and dry before dusting or air brushing them.
If you use gumpaste they will become hard and brittle. This can cause breakage with things like lettuce especially when you place the top bun cake.
I suggest half gumpaste and half fondant
Thank you Veena for the tips. The cakes were tasty, my family loved them. I followed your advice and recipe but i had some minor setbacks:
1. The cookie dough was very soft even after I had chilled it for 1 hour. Is it because the butter was too soft?
2. For the lettuce, i followed ur suggestion to use half fondant ( i used ur marshmallow fondant) and gumpaste, the texture was nice and easy to work with; neither soft nor hard, but when i used the ball tool to shape the edges, it was not pretty like yours.
Thanks Neve, Happy you enjoyed making this cake.
yes, you want the butter to be room temperature, not too soft. Otherwise, the dough will spread during baking.
And, I’m sure the cake and lettuce looked pretty too.
You can share the cake pictures with us on our Facebook page or Facebook group – we’d love to see it.
Hi Veena….I plan on making this cake for my brother’s birthday. In your recipe, you have used 7″ round tins to bake the cakes for the buns and patty. Can I use the same recipe for 6″ round tins?
You can Neve but I think they will be too much batter and the cakes will be too tall
Thanks Veena for the feedback.
Had so much fun making this Hamburger Cake for my 4 year old granddaughter’s birthday. Everyone loved it. Your step by step/timeline/video instructions were spot on! Thanks! I wish there was a way to post a pic – I was quite pleased with how it turned out!
Thank you, Susan. I am so happy to hear it. Yes, you can share it with me in our Facebook group. Many share the recipes they try or even ask questions and help for recipes they need help.
Hello,
My good friend gave me your site and asked if I could make the cheese burger cake. I did and it turned out great. You inspired to buy a air brush set up. Thank you for sharing your talents!
Thank you, so much for the lovely feedback, George. The airbrush is a game changer and you will definitely find yourself looking for more opportunities to use it.
Thank you. This is awesome. I am going to try for my husband’s birthday. I will tag you.
This is just so adorable! What a super fun idea for a birthday party or something. This will be fun to try!
This is the most adorable cake. I’m saving this burger cake recipe to try next week. Thanks so much for posting this!
I just can’t wait to make it! This burger cake is fantastic and it certainly looks like a boss! I may need some help with finishing it though 🙂
Oh wow, this is such an incredible cake. It looks like a real burger!