Sufganiyot – Hanukkah Doughnuts
 Prep Time 20 minutes Cook Time 20 minutes Total Time 2 hours 10 minutes


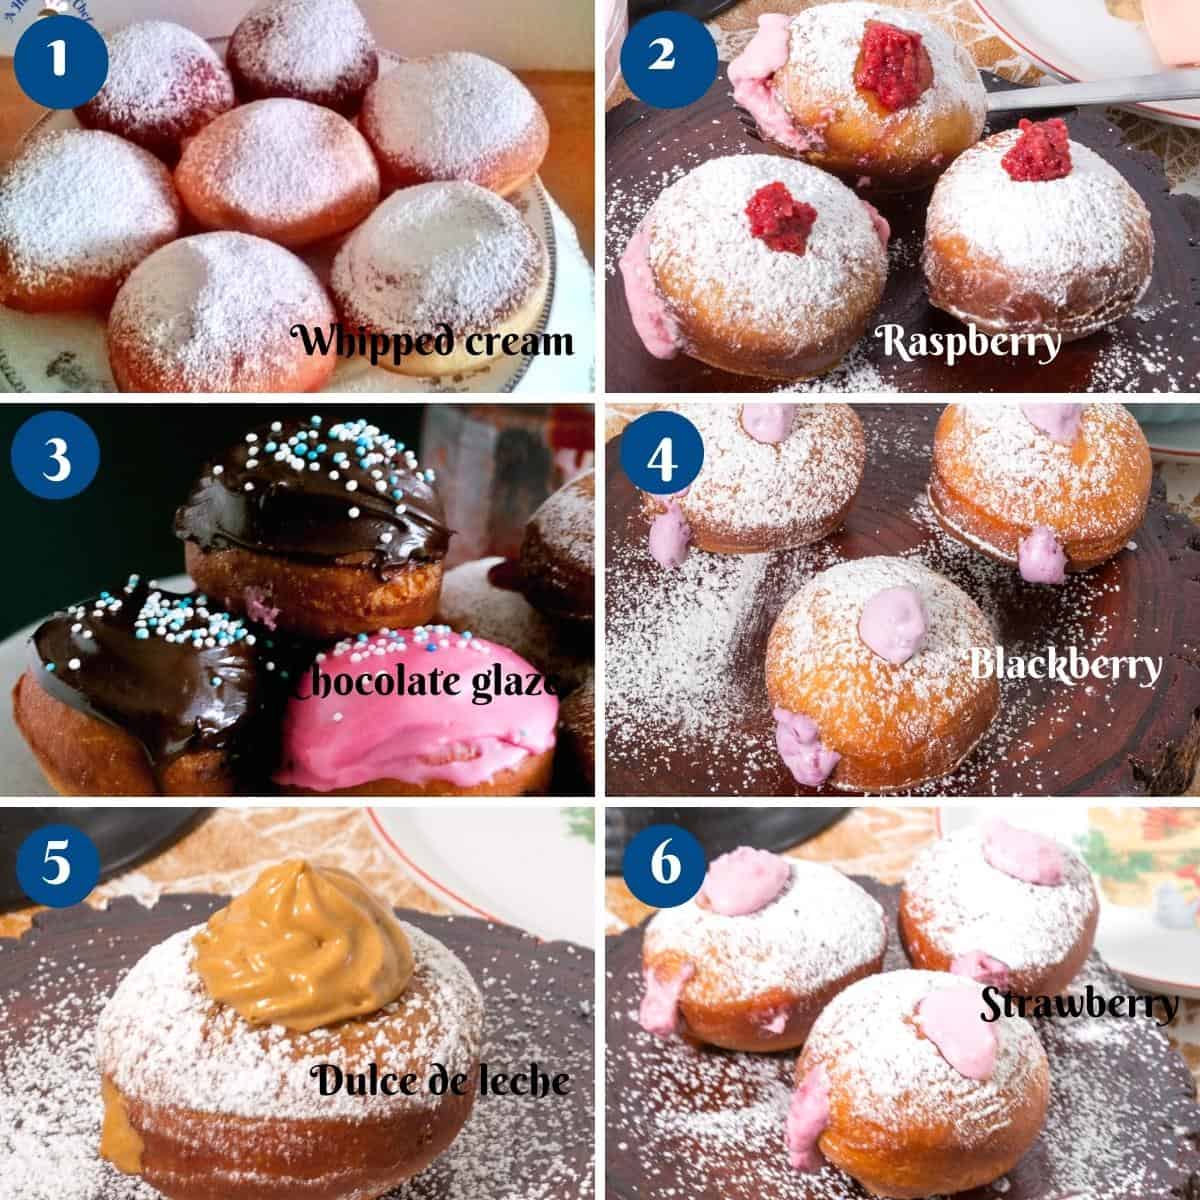
Sufganiyot are doughnuts made to celebrate Hanukkah by the Jewish people. The classic is filled with jam but the options for fillings are endless from simple fruit fillings to chocolate, tiramisu, and dulce de leche too. Here are 10, yes 10 different filling options for you to try.
These doughnuts are made during the festival of Hanukah which celebrated the miracle of the burning lamp in the ancient holy temple of Jerusalem. Hence the deep-fried not baked. Read more about the history of sufganiyot here
Hanukah comes very close to Christmas and we usually have an overlap of festive treats in our home. So while I have gingerbread, marzipan, and fruitcakes to celebrate Christmas. I also make these sufganiyot and latkes to celebrate Hanukkah.
Why make these sufganiyot
- If you have then you know that these are very very expensive. Making your own means your kids can enjoy more and you spend less.
- These are yeast-risen and deep-fried in the shape of large buns unlike the donuts with a hole.
- All the ingredients are simple and easy to find or pantry staples.
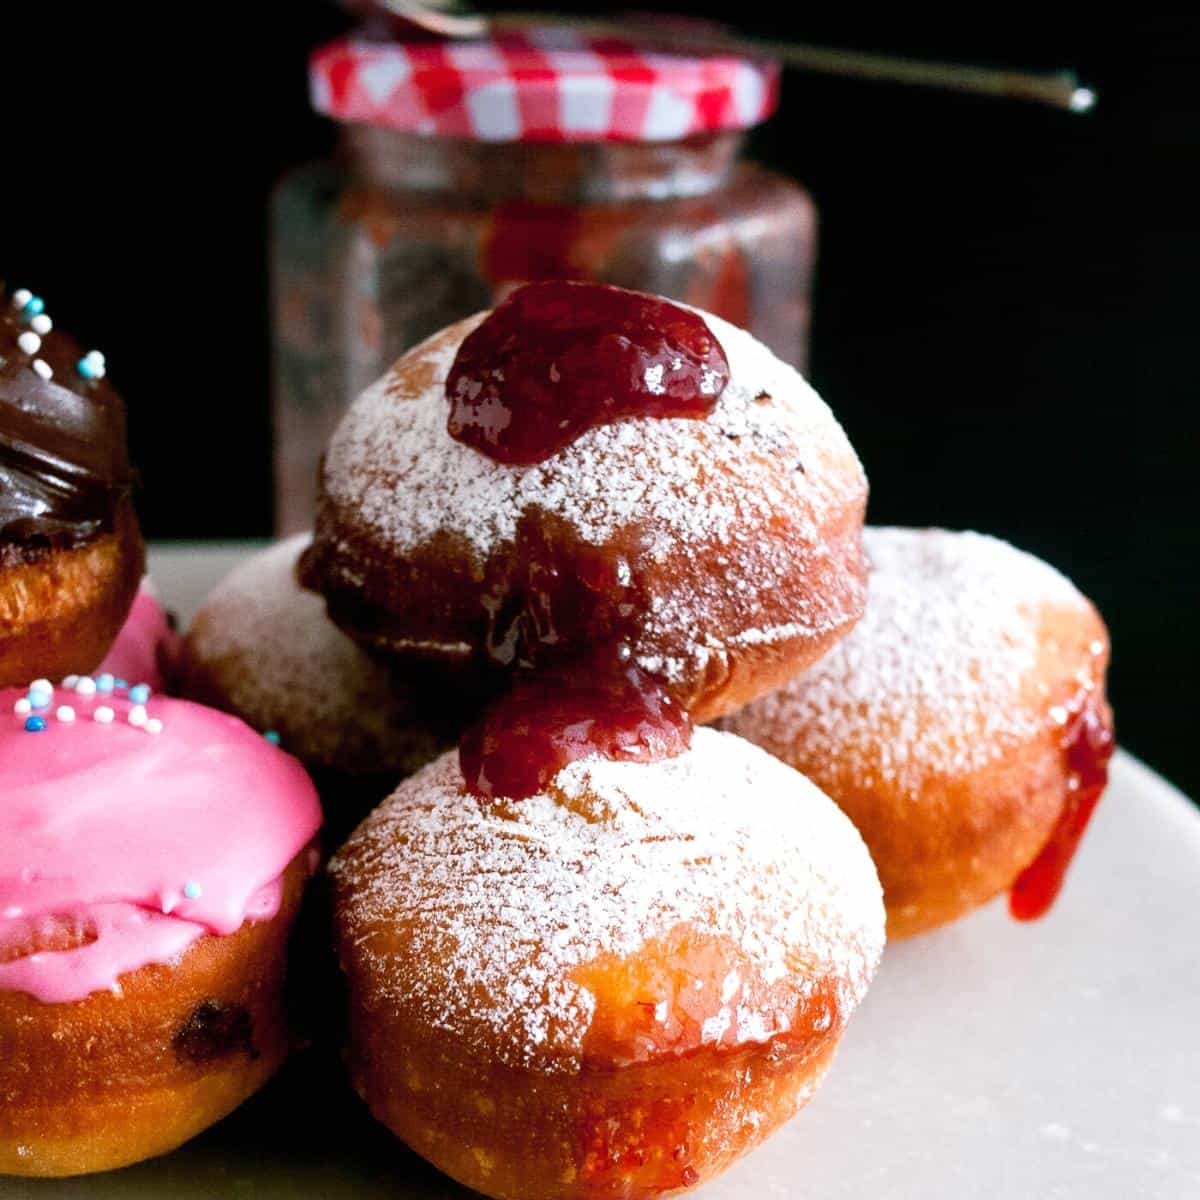
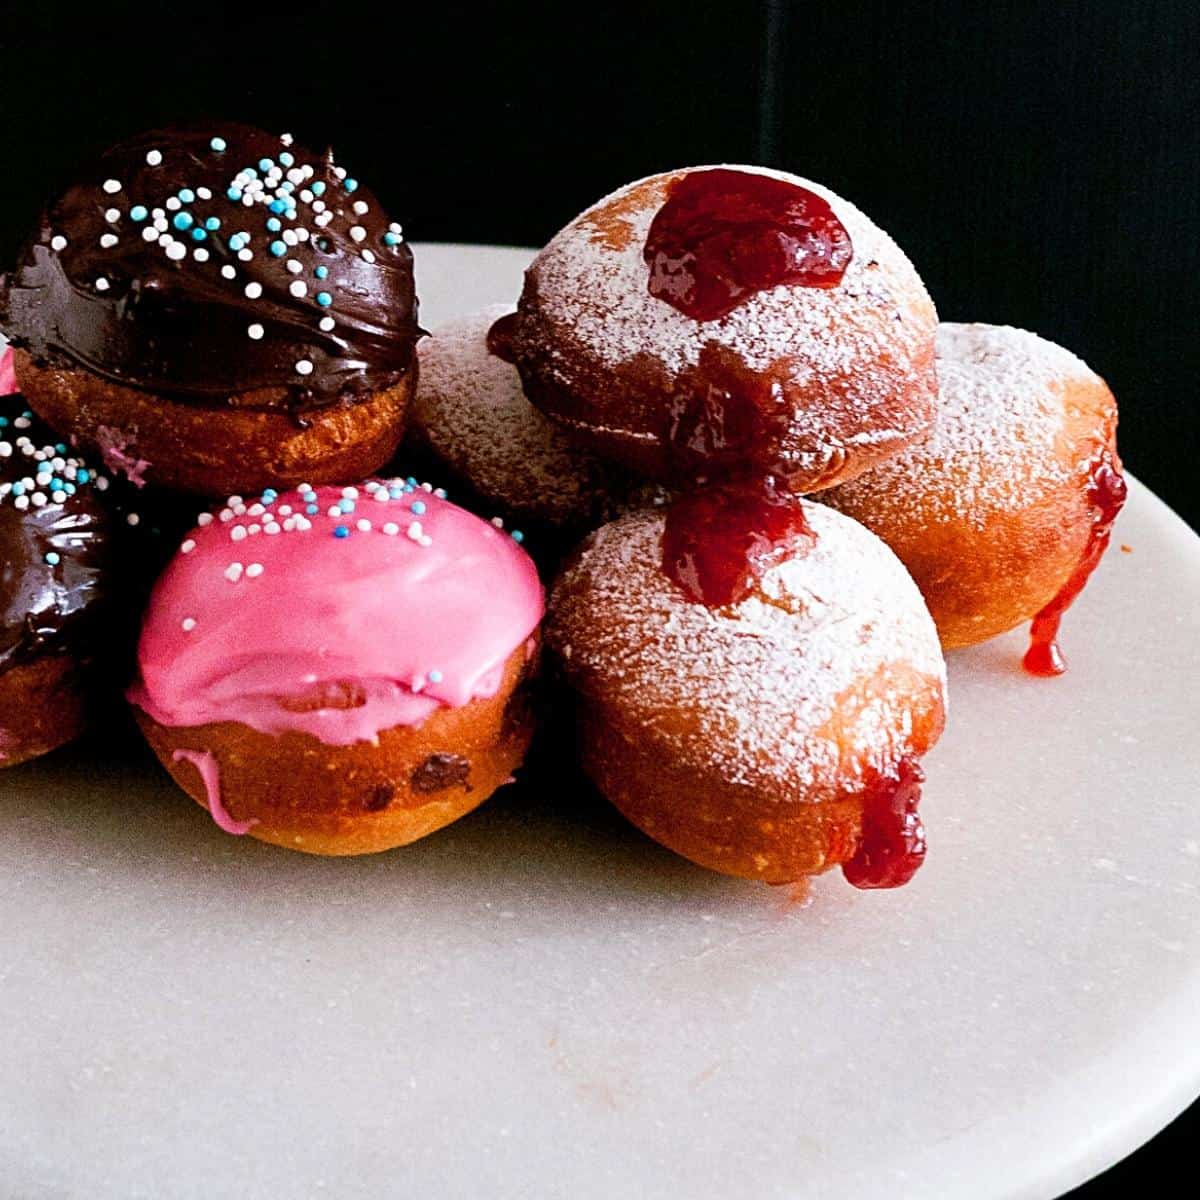
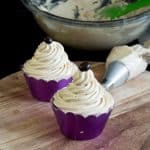
- These sufganiyot are traditionally filled with strawberry jam and dusted with powdered sugar. But, over the years you will find some fun variations and modern flavors in the bakeries. From classic jam-filled doughnuts to fruit-filled such as strawberry, raspberry, and blackberry, as well as unique ones such as tiramisu, and dulce de leche.

Ingredients and substitutes
- Yeast – I like to use instant dry yeast because I’ve always had great success with it. And yet, you can certainly use active dry yeast in the same quantity. If you use fresh yeast, you will need about 21 grams for every 2 1/4 tsp (one packet) of dry yeast.
- Butter – This adds richness to the dough. Do not add more butter as they will become very dark when frying.
- Milk – I love adding a bit of richness to the dough and milk works great in this recipe. Water will also work well. And if you do use water, you may need a little more flour in this recipe.
- Sugar – White sugar works excellently in this recipe. You can undoubtedly try brown or any other sugar.
- Flour – Bread flour makes light and airy donuts with a soft and chewy texture. Of course, you can use all-purpose flour but, if possible, at least use 50% bread and 50% all-purpose.
- Spices– I just love the flavor of nutmeg in my doughnuts but you are free to omit it. You can even add 1/2 teaspoon of cinnamon.

Step-by-step: Sufganiyot (Jewish Donuts with a modern fillings)
Sufganiyah Dough
- Dry ingredients – In a bowl combine flour, salt, and grated nutmeg.
- Yeast – In a bowl of a stand mixer with the dough hook attachment, combine warm milk, sugar, yeast, egg, and vanilla.
- Knead – Add the flour mixture to the yeast mixture and combine on medium-high speed until all the flour is well incorporated making sure to scrape the bottom and sides of the bowl. Then knead for 8 to 10 minutes on medium speed.
- Butter – Next, add the butter and continue to knead for 8 to 10 minutes more or until you have a smooth elastic dough.

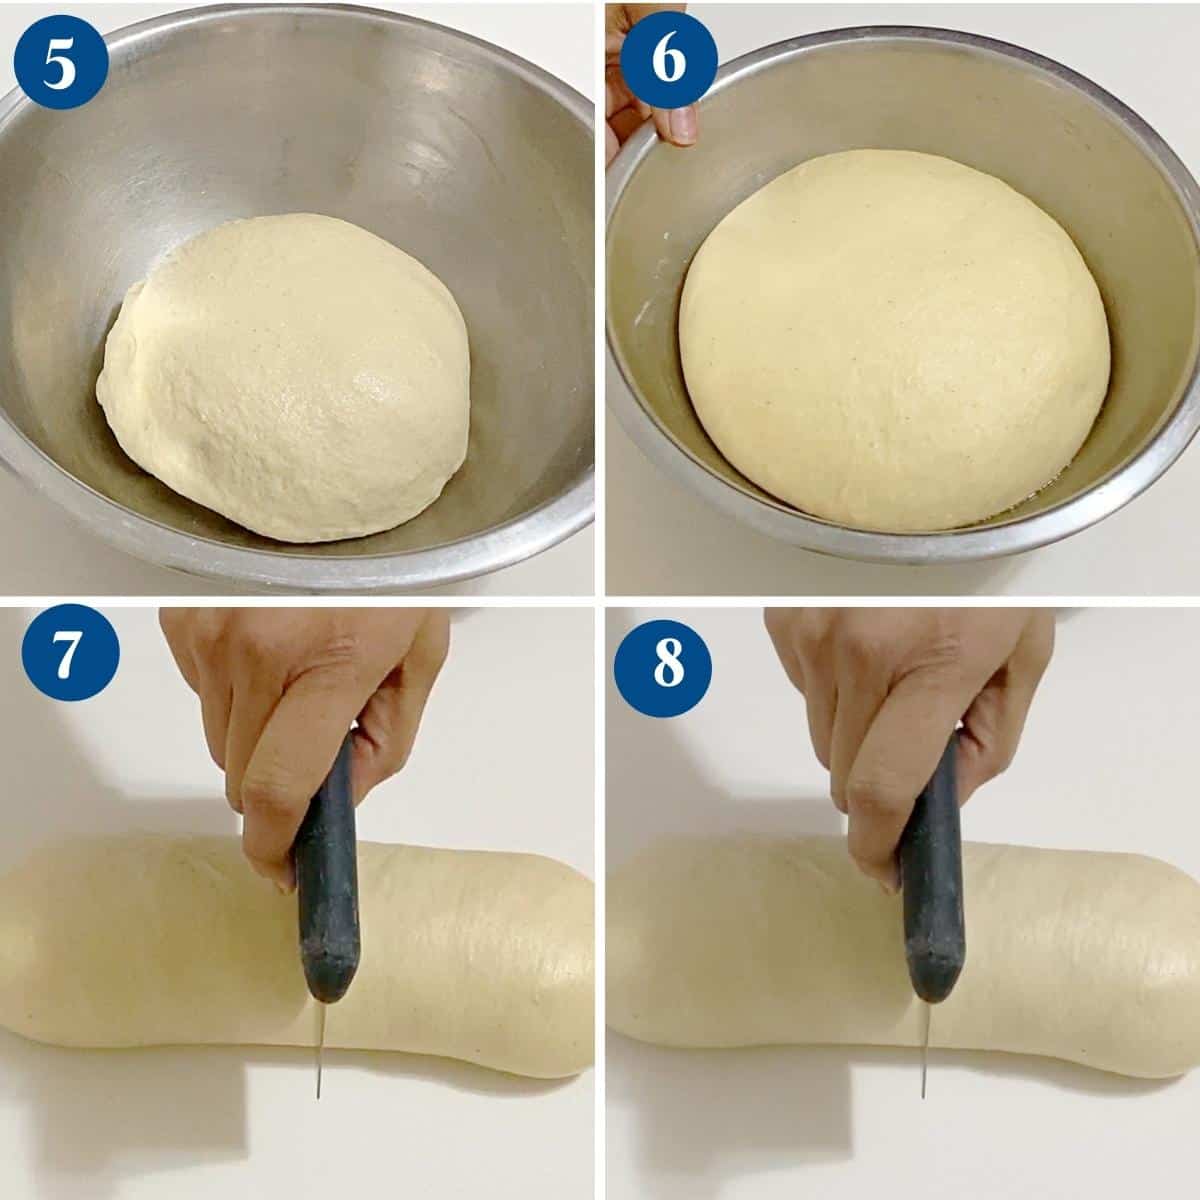
- Bowl – Place the dough in a large greased bowl, cover it with plastic wrap and let rise for 60 to 90 minutes or until double in volume.
- Divide – Once double in volume – invert on a floured surface. Divide the dough into half and each half into 4 or 6 portions – making 12 small or 8 medium donuts.
Shaping
- Shape – Roll each portion into a smooth ball and place it on a baking tray lined with parchment paper dusted with flour to prevent sticking. You can also place them on individual pieces of parchment paper for easy handling.
Pro tip – Roll each piece into a smooth ball. Gather the seams and roll between your palms until you have a smooth ball. If the balls are not smooth, your doughnuts will look cracked. - Tray – Once all the balls are rolled, flatten them slightly. Cover the baking tray with a clean kitchen cloth or plastic wrap to prevent the donuts from drying.
Pro tip – Flattening will ensure you have a doughnut shape when it rises and deep-fries as compared to a ball - Proof – You can proof the donuts on the counter for 30 to 45 minutes, or place them in the fridge for 60 to 90 minutes, until they’re almost double in volume.

Deep-fry
- Deep fry – Heat oil to about 350°F. Deep-fry each donut on both sides for about 3 to 5 minutes per donut, until it’s a beautiful golden brown. Keep the heat between 350°F to 360°F
Pro tip – Do not crowd the pan, as the oil’s temperature will drop too quickly. - Remove – Use a slotted spoon to remove them onto a paper towel and let them cool for 20 minutes before you fill and serve.

Classic Israeli filling
- Jam filling – Add your jam filling in a piping bag with a bismark piping tip or similar. Fill about one to two teaspoons of jam in each doughnut. Dust with powdered sugar
Pro tip – Depending on your filling let the donuts cool for at least 10 minutes before you fill them or the filling will melt.

Other modern fillings for sufganiyot
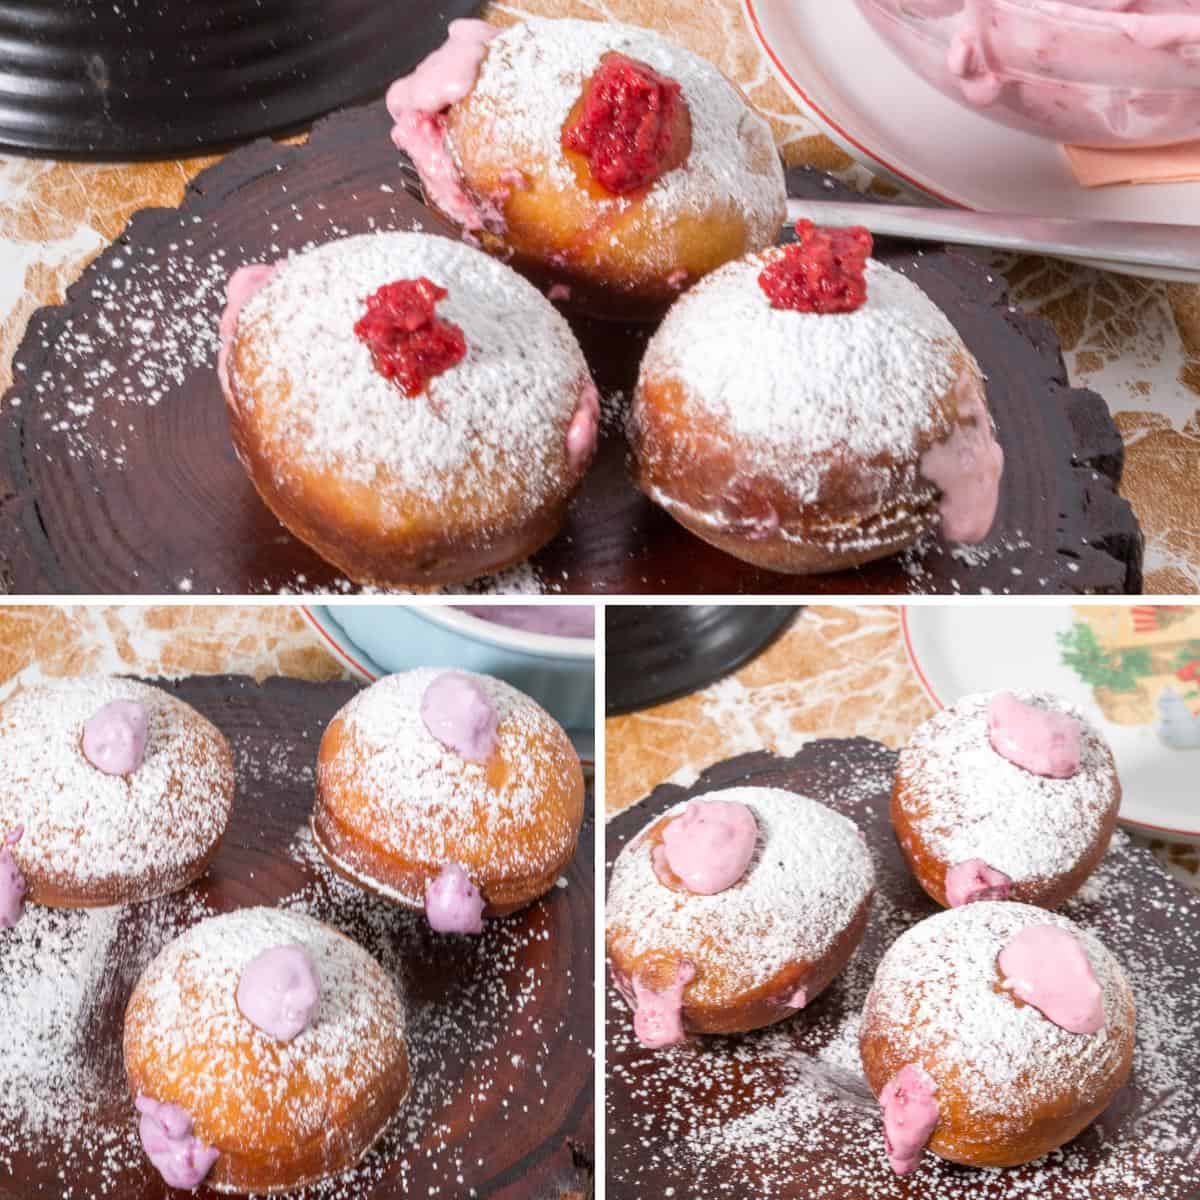
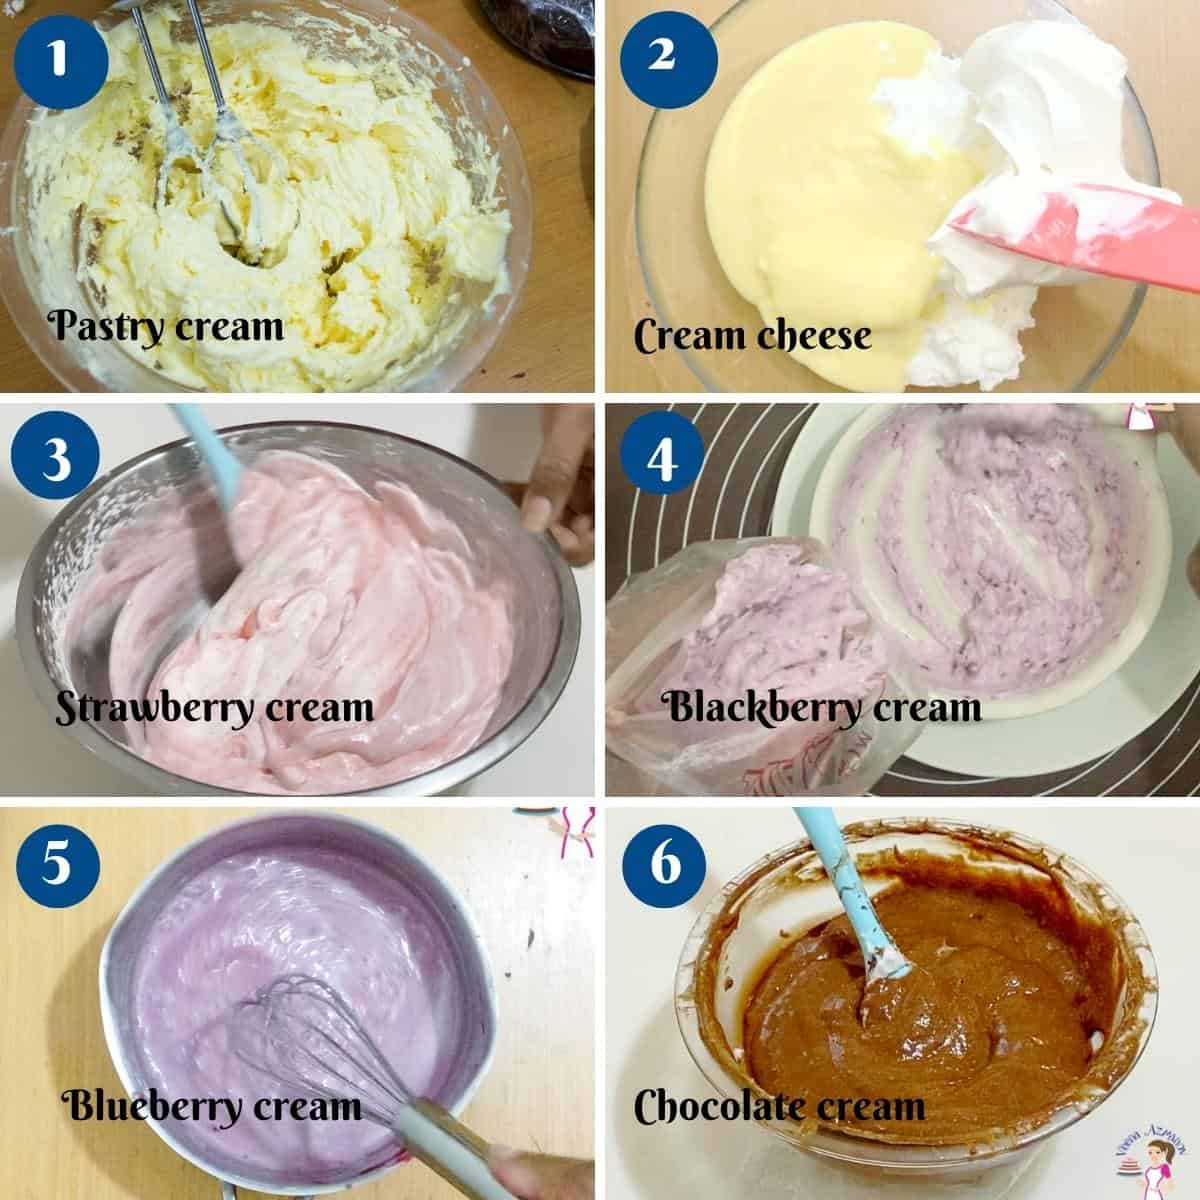
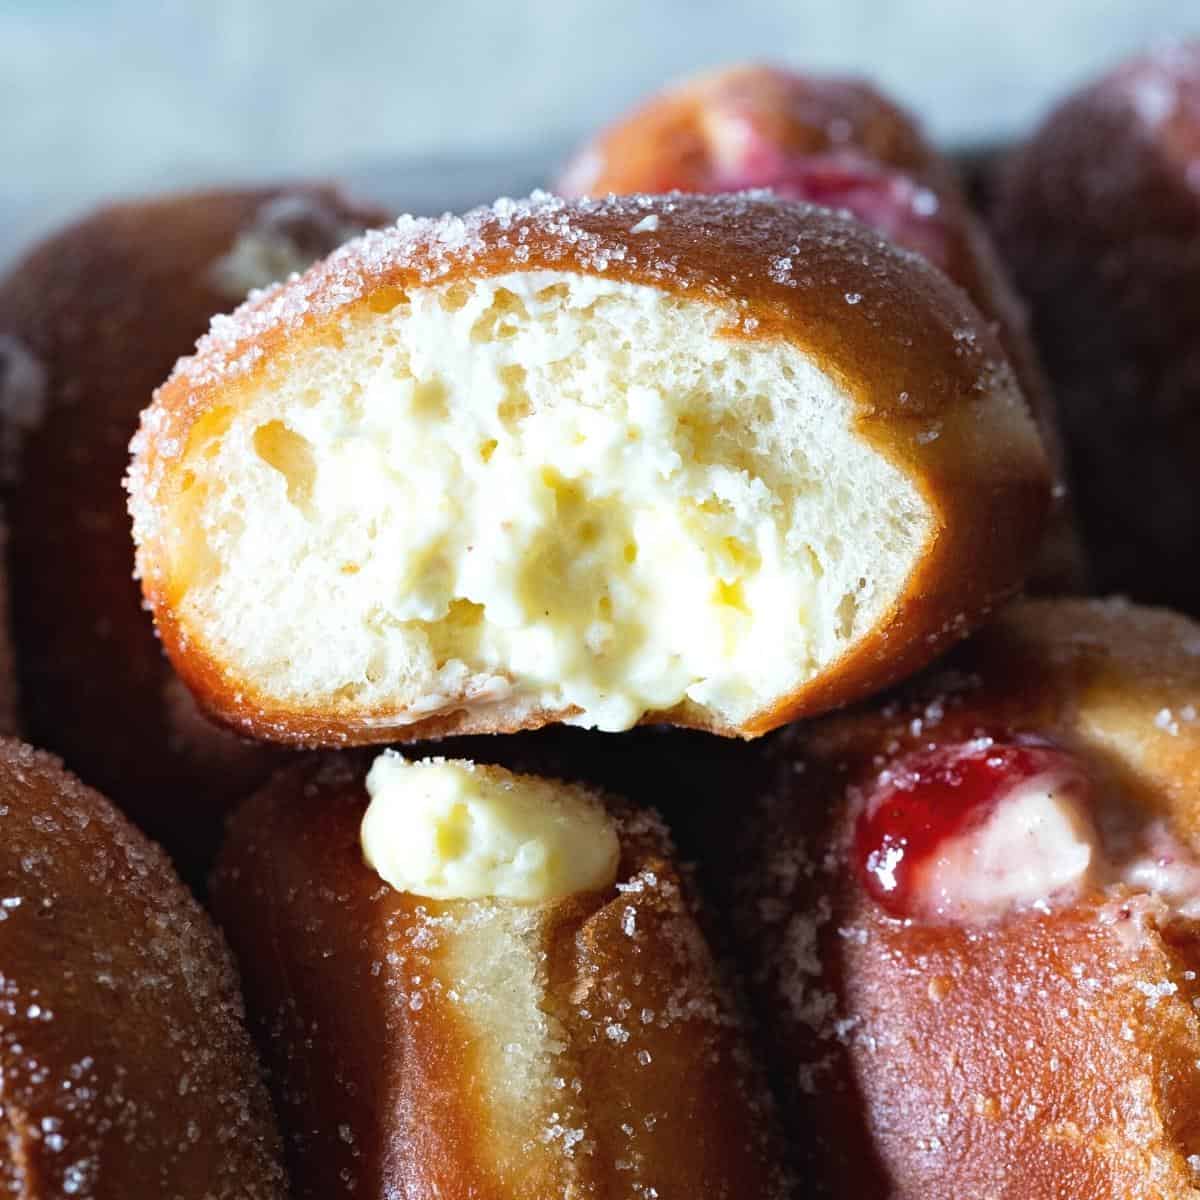
- Fruit cream filling – In the bowl of a stand mixer with a whisk attachment, whip the heavy cream to stiff peaks then add the strawberry/ raspberry/ blackberry, or blueberry jam. Transfer to the piping bag with a large round piping tip.
- Cream cheese – In the bowl of a stand mixer with a whisk attachment, whip the cream cheese until smooth, then add the heavy cream, powdered sugar, and vanilla extract. Continue to whip to stiff peaks.
- Tiramisu – In the bowl of a stand mixer with a whisk attachment, whip the mascarpone cream cheese until smooth then add the heavy cream, powdered sugar, instant coffee, and vanilla extract. Continue to whip to stiff peaks.
- Chocolate cream – In a microwave-safe bowl melt the chocolate, butter, and heavy cream until smooth. Chill in the fridge until set. Transfer to a stand mixer with the paddle attachment and whip until fluffy.
- Chocolate glaze – In a microwave-safe bowl combine the dark chocolate, heavy cream, light corn syrup, and vanilla extract until smooth. Cool until barely warm. Dip the donuts into the glaze and let the excess drip. Let cool until set.
- Dulce de leche cream – Whip the heavy cream until stiff peaks then add the dulce de leche and vanilla extract.
- Pastry cream – Prepare vanilla pastry cream and let cool completely. Then, whip 1/2 cup of heavy cream and combine well. Fill into cooled donuts.
- Bavarian cream donuts – Once cooled, fill the donuts with vanilla Bavarian cream or strawberry Bavarian cream.
- Chocolate glaze donuts – Dip the top of the chocolate in a chocolate ganache glaze.
- Cinnamon sugar – Instead of just sugar, dust the fresh donuts with a mixture of cinnamon and sugar.
- Whipped cream – If you’ve never tried donuts with whipped cream, you must! In fact, make it strawberry and cream.
Tips for Success
- The temperature of milk – It is very important to make sure the milk is warm, not hot or cold. You don’t need a thermometer to check – that’s just a guide.
- The temperature of the oil – I know I said the oil has to be around 350° F to 360 ° F. Too hot and the donuts will become too brown, too low and they will soak up oil.
- How to test oil – Add a mini doughnut to test the oil. The doughnut should rise in about 30 secs. If it rises too soon means the oil is too hot and if it takes too long means the oil is not yet hot. Adjust accordingly. Keep an eye on oil temperature as it rises and cools between donuts batches. Adding doughnuts to the oil will cool the oil. So find a balance on how many doughnuts per batch works with your settings.
- Keep the dough soft, elastic, and slightly sticky. The softness in the mixture (not extra butter) will produce melt-in-your-mouth donuts when fried.

Troubleshooting
- My dough did not rise – This could have two reasons. First, check the yeast expiry date. Second, the liquid ingredients in the dough were too hot.
- Why are my donuts flat? The most common reason for this is when you use the roll and cut method. Keep the dough thick about 1/4 inch thick at least. Otherwise, they will be quite flat.
- My filling is spilling out of the donut – If you fill the donuts while they are still warm, the heat will melt the filling. This will make the filling ooze out of the filling. It can be quite messy. Also, cooled pastry cream is more delicious. So, wait for the donuts to cool completely.
- Greek Yogurt Donuts
- Filled donuts – raspberry, strawberry, blackberry
- Dulce De Leche Donuts
- Tiramisu Doughnuts Sufganiyot or Fried Tiramisu Donuts
- Chocolate Glazed Donuts


Frequently asked questions
Donuts are best eaten fresh the day they are made, but you can keep them for a day or two. It is best to keep them in a paper bag rather than plastic as plastic makes them soggy. You can freeze cooled donuts for months in the freezer.
Traditional doughnuts are made with yeast-raised dough and are fried. If you bake them they will be just bread. You can make baked donuts, which are cake batter-based like I have done here in my baked pumpkin donuts.
I use canola oil. It has a neutral flavor and a high smoke point. Also, it works best when deep-frying bread and sweet treats like churros and doughnuts.
Yes, just let the dough rise in the fridge. It will continue to prove but at a slower pace. Remove it an hour or two before you plan to shape the doughnuts, so it comes to room temperature. Shape and proof as directed in the recipe below.
Sufganiyot – Hanukkah Doughnuts with Modern Filllings
Sufganiyot are jam doughnuts made to celebrate Hanukkah by the Jewish people. This simple and easy recipe will have your kids asking for them all year round. These are filled with strawberry jam, but try chocolate, jelly, or other variety too
Video
Ingredients
- 500 g (4 cups) Bread flour or all purpose flour
- ¼ tsp Nutmeg
- 7 g (1 tsp) Salt
- 240 g (1 cups) Warm milk 110 F
- 100 g (2 large) Eggs
- 7 g (2¼ tsp) Instant dry yeast (1 envelope)
- 30 g (2 tbsp) Sugar
- 30 g (2 tbsp) Butter
- 1 tsp Vanilla extract
- 4 cups (1 ltr) Vegetable oil
- ½ cup Strawberry jam or other jam
- 2 tbsp Powdered sugar for dusting
- ½ cup Heavy cream whipped to stiff peaks
- ½ cup Strawberry Jam
- ½ cup Heavy cream whipped to stiff peaks
- ½ cup Raspberry jam
- ½ cup Heavy cream whipped to stiff peaks
- ½ cup Blackberry preserve
- ½ cup Heavy cream whipped to stiff peaks
- ½ cup Blueberry preserve
- ½ cup Cream cheese 35% +
- ½ cup Heavy cream whipped to stiff peaks
- 1 tsp Vanilla extract
- 3 tbsp Powdered sugar
- ½ cup Mascarpone cream cheese
- ½ cup Heavy cream
- 1 tsp Instant coffee
- 3 tbsp Powdered sugar
- 1 tsp Vanilla extract
- 1 tsp Cocao powder for dusting
- ½ cup Melted chocolate for the glaze
- ½ cup Chocolate
- ½ cup Heavy cream
- 2 tbsp Unsalted butter
- 1 tsp Vanilla extract
- ½ cup Dark chocolate
- ½ cup Heavy cream
- 2 tbsp Light corn syrup or honey
- 1 tsp Vanilla extract
- ½ cup Heavy cream
- ½ cup Dulce de le che
- 1 tsp Vanilla extract
Method
- Dry ingredients – In a bowl combine flour, salt, and grated nutmeg.500 g Bread flour , ¼ tsp Nutmeg, 7 g Salt
- Yeast – In a bowl of a stand mixer with the dough hook attachment, combine warm milk, sugar, yeast, egg, and vanilla.240 g Warm milk , 100 g Eggs, 7 g Instant dry yeast , 30 g Sugar, 30 g Butter , 1 tsp Vanilla extract
- Knead – Add the flour mixture to the yeast mixture and combine on medium-high speed until all the flour is well incorporated making sure to scrape the bottom and sides of the bowl. Then knead for 8 to 10 minutes on medium speed.
- Butter – Next, add the butter and continue to knead for 8 to 10 minutes more, or until you have a smooth, elastic dough.
- Bowl – Place the dough in a large greased bowl, cover it with plastic wrap and let rise for 60 to 90 minutes or until double in volume.
- Divide – Once doubled in volume – invert on a floured surface. Divide the dough into half and each half into 4 or 6 portions – making 12 small or 8 medium donuts.
- Shape – Roll each portion into a smooth ball and place it on a baking tray lined with parchment paper dusted with flour to prevent sticking. You can also place them on individual pieces of parchment paper for easy handling.
- Tray – Once all the balls are rolled, flatten them slightly. Cover the baking tray with a clean kitchen cloth or plastic wrap to prevent the donuts from drying.
- Proof – You can proof the donuts on the counter for 30 to 45 minutes or place them in the fridge for 60 to 90 minutes until they are almost double in volume.
- Oil – Heat vegetable oil in a large pot or deep fryer to about 350°F to 360° F.4 cups Vegetable oil
- Deep fry – Deep-fry the sufganiyots in oil for about 3 to 5 minutes per donut, turning them as necessary until lightly golden Use a slotted spoon to remove them onto a paper towel and let them cool for 20 minutes before you fill and serve.
- Jam filling – Add your jam filling in a piping bag with a bismark piping tip or similar. Fill about one to two teaspoons of jam in each doughnut. Dust with powdered sugar½ cup Strawberry jam, 2 tbsp Powdered sugar
- Fruit cream filling – Whip the heavy cream to stiff peaks then add the strawberry/ raspberry/ blackberry, or blueberry jam. Transfer to the piping bag with a large round piping tip.½ cup Heavy cream, ½ cup Strawberry Jam , ½ cup Heavy cream, ½ cup Raspberry jam, ½ cup Heavy cream, ½ cup Blackberry preserve, ½ cup Heavy cream, ½ cup Blueberry preserve
- Cream cheese – Whip the cream cheese until smooth then add the heavy cream, powdered sugar, and vanilla extract. Continue to whip to stiff peaks. Transfer to the piping bag with a large round piping tip. Fill into donuts.½ cup Cream cheese, ½ cup Heavy cream, 1 tsp Vanilla extract, 3 tbsp Powdered sugar
- Tiramisu – Whip the mascarpone cream cheese until smooth then add the heavy cream, powdered sugar, instant coffee, and vanilla extract. Continue to whip to stiff peaks. – Transfer to the piping bag with a large round piping tip. – Fill donuts when cooled. – Dip the top of the donuts with melted chocolate and dust one side with powdered sugar.½ cup Mascarpone cream cheese, ½ cup Heavy cream, 1 tsp Instant coffee, 3 tbsp Powdered sugar, 1 tsp Vanilla extract, 1 tsp Cocao powder for dusting , ½ cup Melted chocolate for the glaze
- Chocolate cream – In a microwave-safe bowl melt the chocolate, butter, and heavy cream until smooth. – Chill in the fridge until set. Transfer to a stand mixer with the paddle attachment and whip until fluffy. – Transfer to the piping bag with a large round piping tip. Fill into donuts.½ cup Chocolate, ½ cup Heavy cream, 2 tbsp Unsalted butter, 1 tsp Vanilla extract
- Chocolate glaze – In a microwave-safe bowl combine the dark chocolate, heavy cream, light corn syrup, and vanilla extract until smooth. Cool until barely warm. Dip the donuts into the glaze and let the excess drip. Let cool until set.½ cup Dark chocolate, ½ cup Heavy cream, 2 tbsp Light corn syrup , 1 tsp Vanilla extract
- Dulce de leche cream – Whip the heavy cream until stiff peaks then add the dulce de leche and vanilla extract. Transfer to the piping bag with a large round piping tip. Fill into donuts.½ cup Heavy cream, ½ cup Dulce de le che, 1 tsp Vanilla extract
Notes
- The temperature of milk – It is very important to make sure the milk is warm, not hot neither cold. About 110F.
- The temperature of the oil – I know I said the oil has to be around 350°F to 360°F. Too hot and the donuts will become too brown and too low, they will soak up oil.
- Keep the dough soft, elastic, and slightly sticky. The softness in the mixture (not extra butter) will produce a melt-in-your-mouth donut when fried.
Equipment you will need


Nutrition
Tried this recipe?
Mention @veenaazmanov_kitchen or tag #veenaazmanovkitchen!- Classic Jelly Donuts
- Best Fried Cinnamon Sugar Donuts or
- Cinnamon Sugar Pumpkin Donuts
- See all donut and doughnut recipes


Don’t lose this recipe! Save it for Later!
📌 Save this Recipe for later on Pinterest so you can easily find it again.
⭐ Add Veena Azmanov Kitchen to your Google Preferred Sources.
It helps Google show you more of our recipes.
📧 Subscribe for new recipes delivered to your inbox.
🎥 Follow us for more recipes


For the frying, the intructions say 30 seconds on one side then flip and do another 30 seconds on the other side, but rhen the instructions say it needs 2-3 minand the video says the doughnuts need 4-5 minutes to cook so do you just keep flipping every 30 seconds for 4-5 minutes?
Hey Carly – depending on the size of the donuts it will take from 3 to 5 minutes. The filling every 30 seconds helps to keep the color even.
Awesome thank you! looking forward to frying these tomorrow! I know the sugar is needed for the yeast, could you use 2 tbsp honey instead of 1/4 sugar to reduce the sugar? or use 2 tbsp sugar and 2 tbsp splenda or sweetner?
Yes, honey works in place of sugar too. And yes, you can use less sugar or honey too.
I love the detailed tutorial. I will try it out. Thank you!
Thank you, Adetola
I always loved having these during the holiday season in NYC, now that I’m in SF i’ll have to try making my own this year!
Thanks, Michelle. Me too love these.
I was unaware that milk would make these darker when you fried them, so I am happy to learn a new tip! These donuts look a treat!
Yes, Jenni. The milk solid get darker when fried. This is even when baking. That why dulce de leche is almost brown, not white.
The donuts look delicious and I do prefer the fried donuts. Plus they are filled!! So yummy just thinking of them. I’ve made cream puffs but I’ve never made fried donuts. I’ve got to make some — especially for the grandsons.
Thank you, Marisa. You must try these.
love your recipes!! we have celiac in the family. could you use gluten free flour to make gluten free
Hey Carly. I have not tried this recipe with gluten-free flour so not sure if it will work.