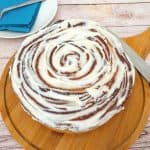
Cream Filled Donuts – 2 Methods, 6 Fillings


Cream-filled donuts are an amazing way to add variety to your baking repertoire. This is the easiest recipe for homemade donuts. And it comes together in no time. With 2 methods to shape and 6 cream fillings, this will soon become your favorite treat.
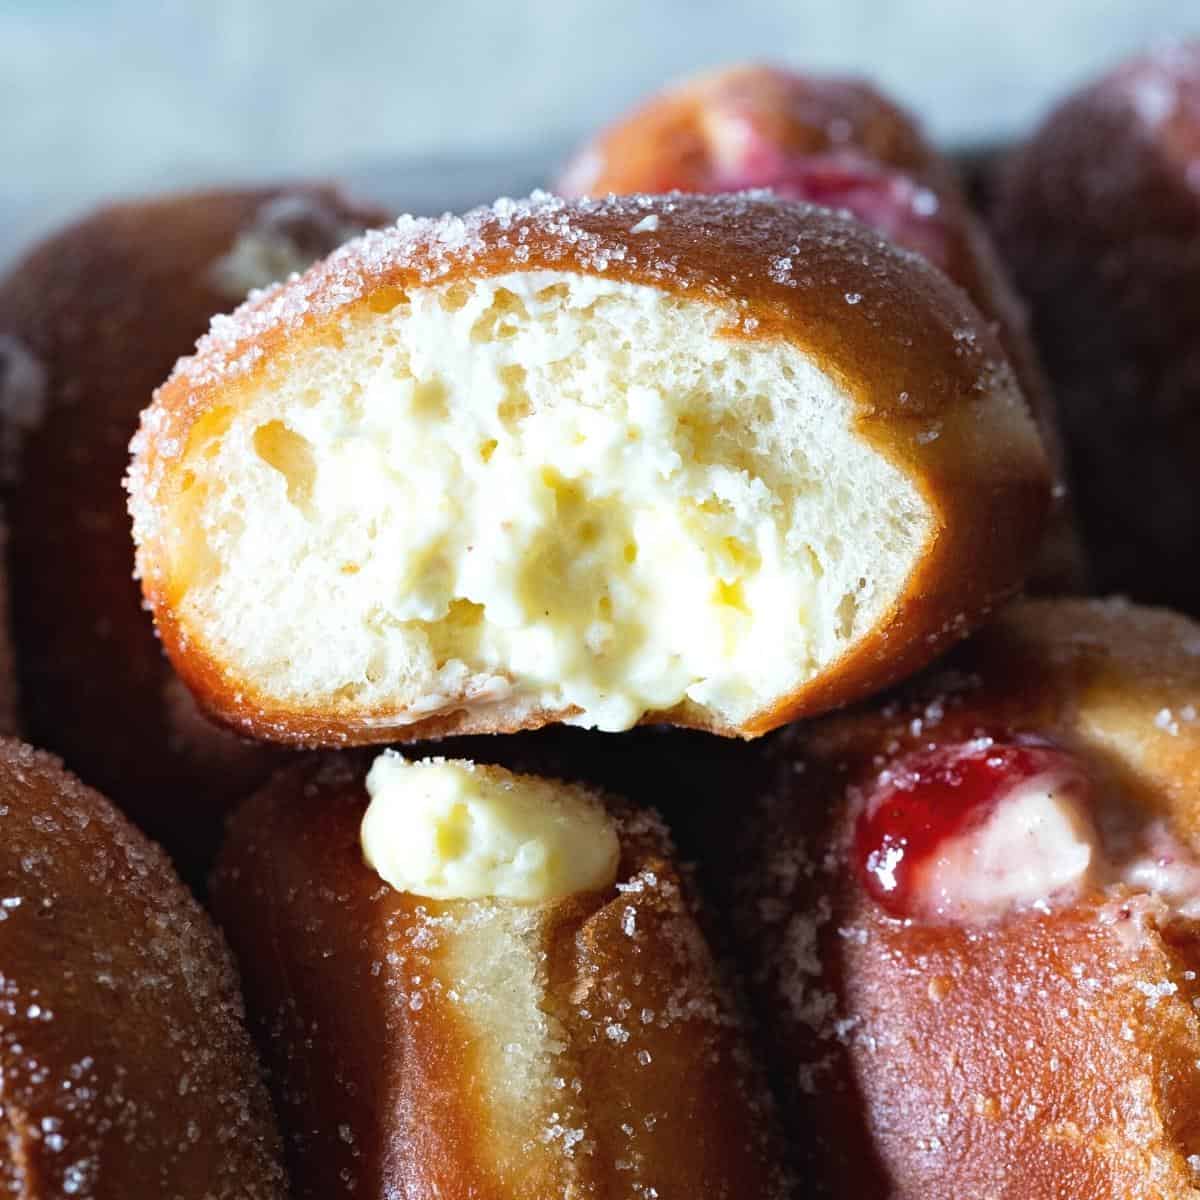
It’s hard to resist the cream-filled donuts. In fact, the cream-filled doughnut recipe is one of the most popular across the Internet for a good reason: it’s delicious. These are light, moist, and delicious desserts that no one can resist!
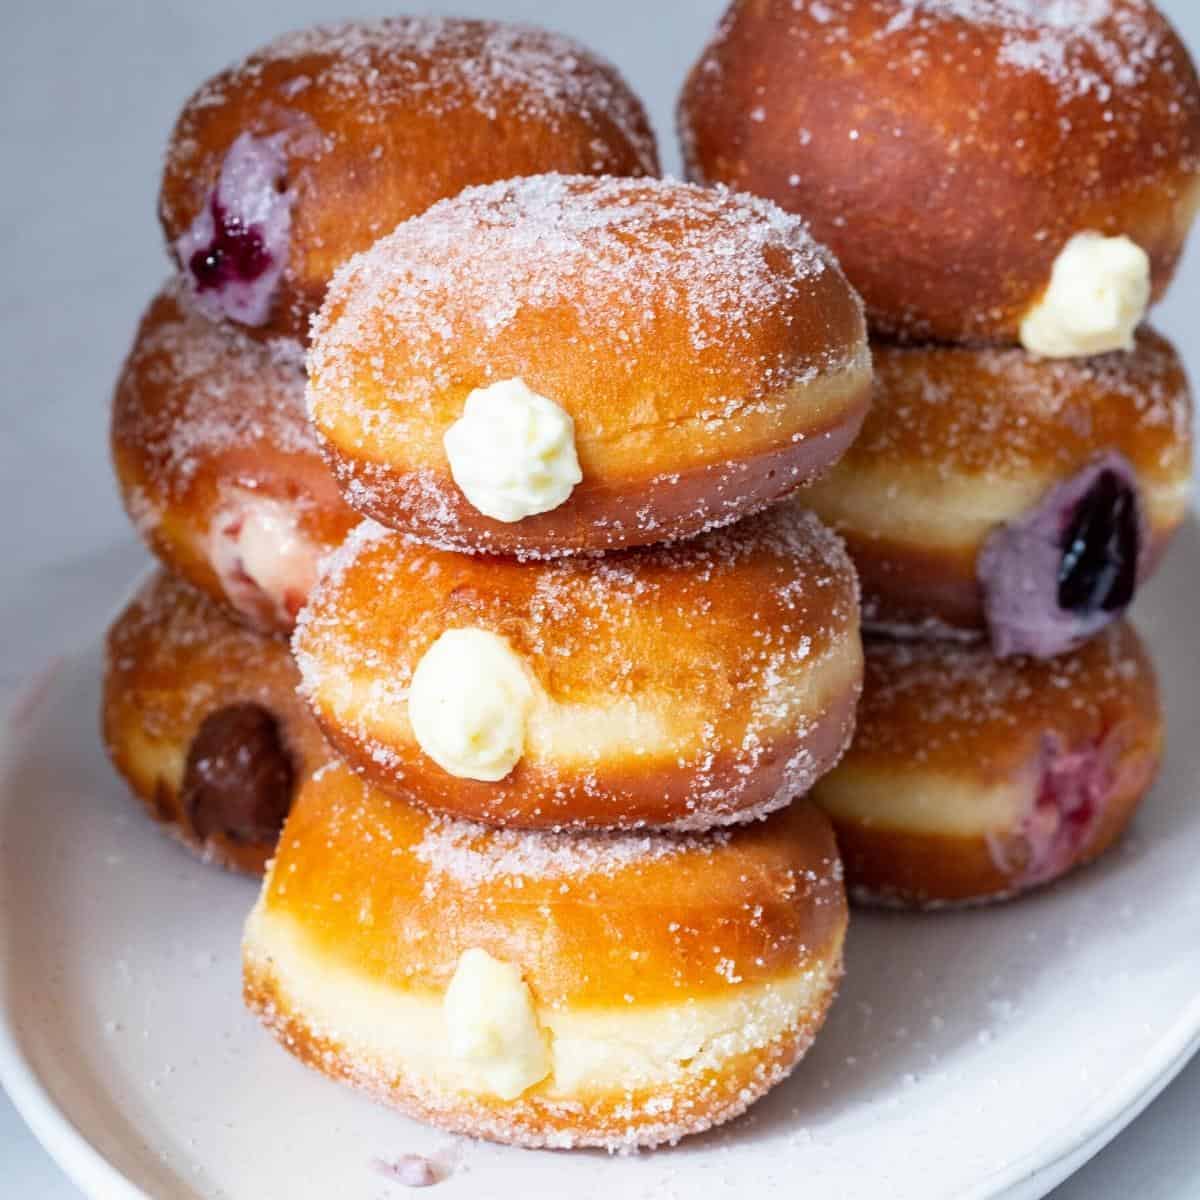
In our home, donuts are always in demand. Of course, they have to be deep-fried and filled with creamy goodness. During the festival of Hanukkah, we make the classic jam and jelly donuts. But the rest of the year, I make a variety of pastry cream-based fillings, also called Boston cream filling.
Why make these donuts?
- While making donuts may seem daunting, it starts with a simple process of making bread dough.
- Also, they are definitely more affordable to make at home than to buy them. And if you have kids, then you know one donut is just never enough!
- There are a few ways to make these, and today I have shown you two easy methods. One is similar to making buns, and the other is the roll-and-cut method.
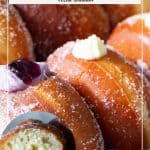
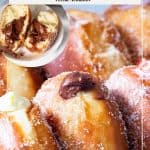
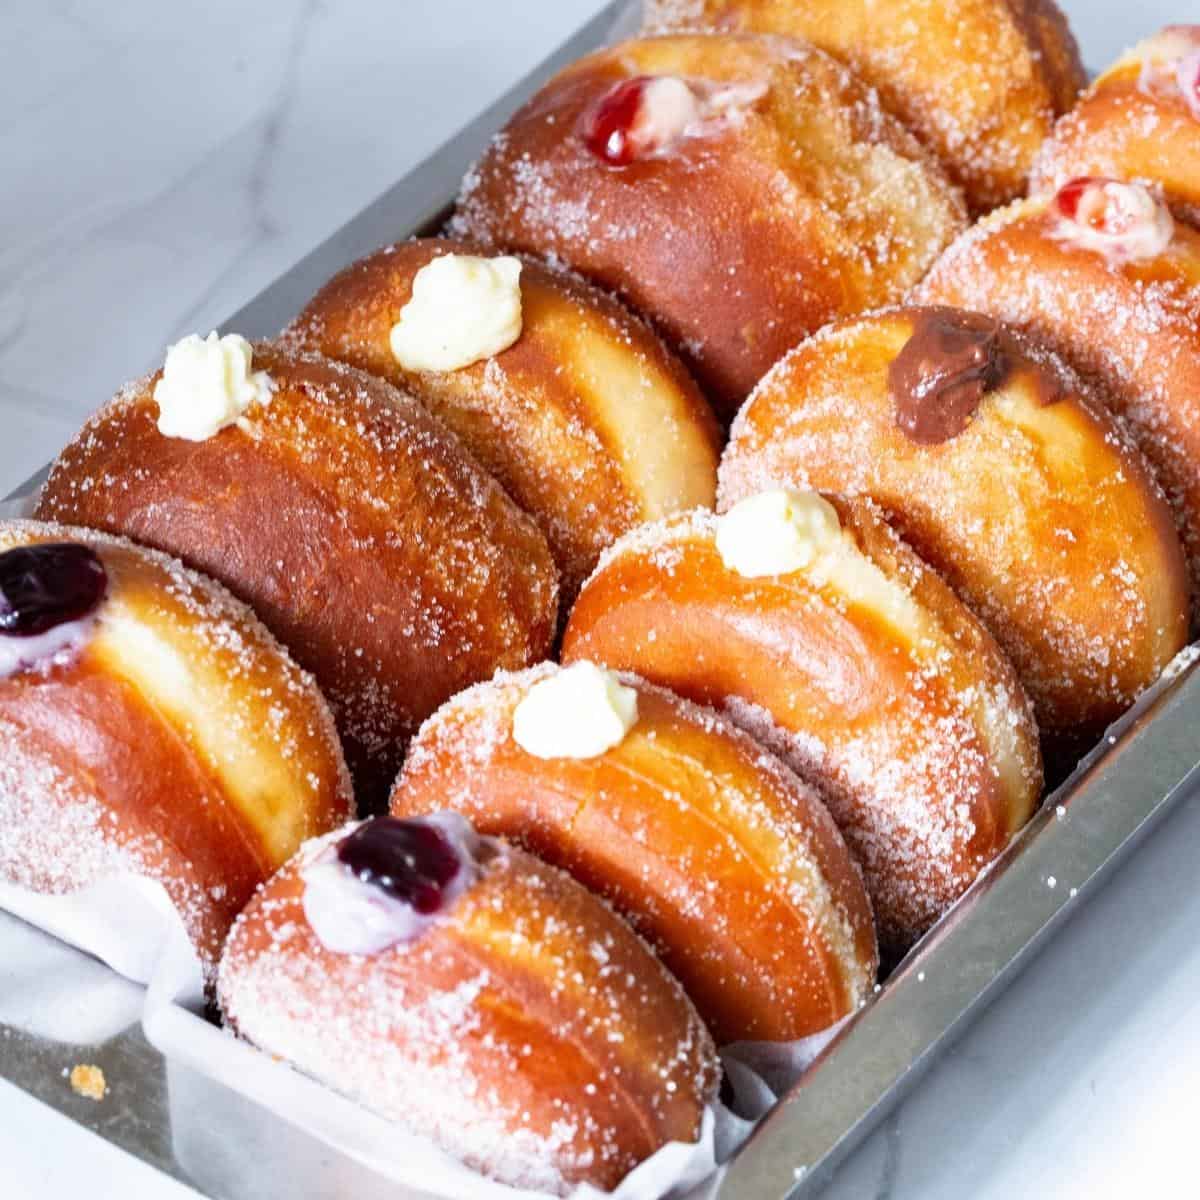
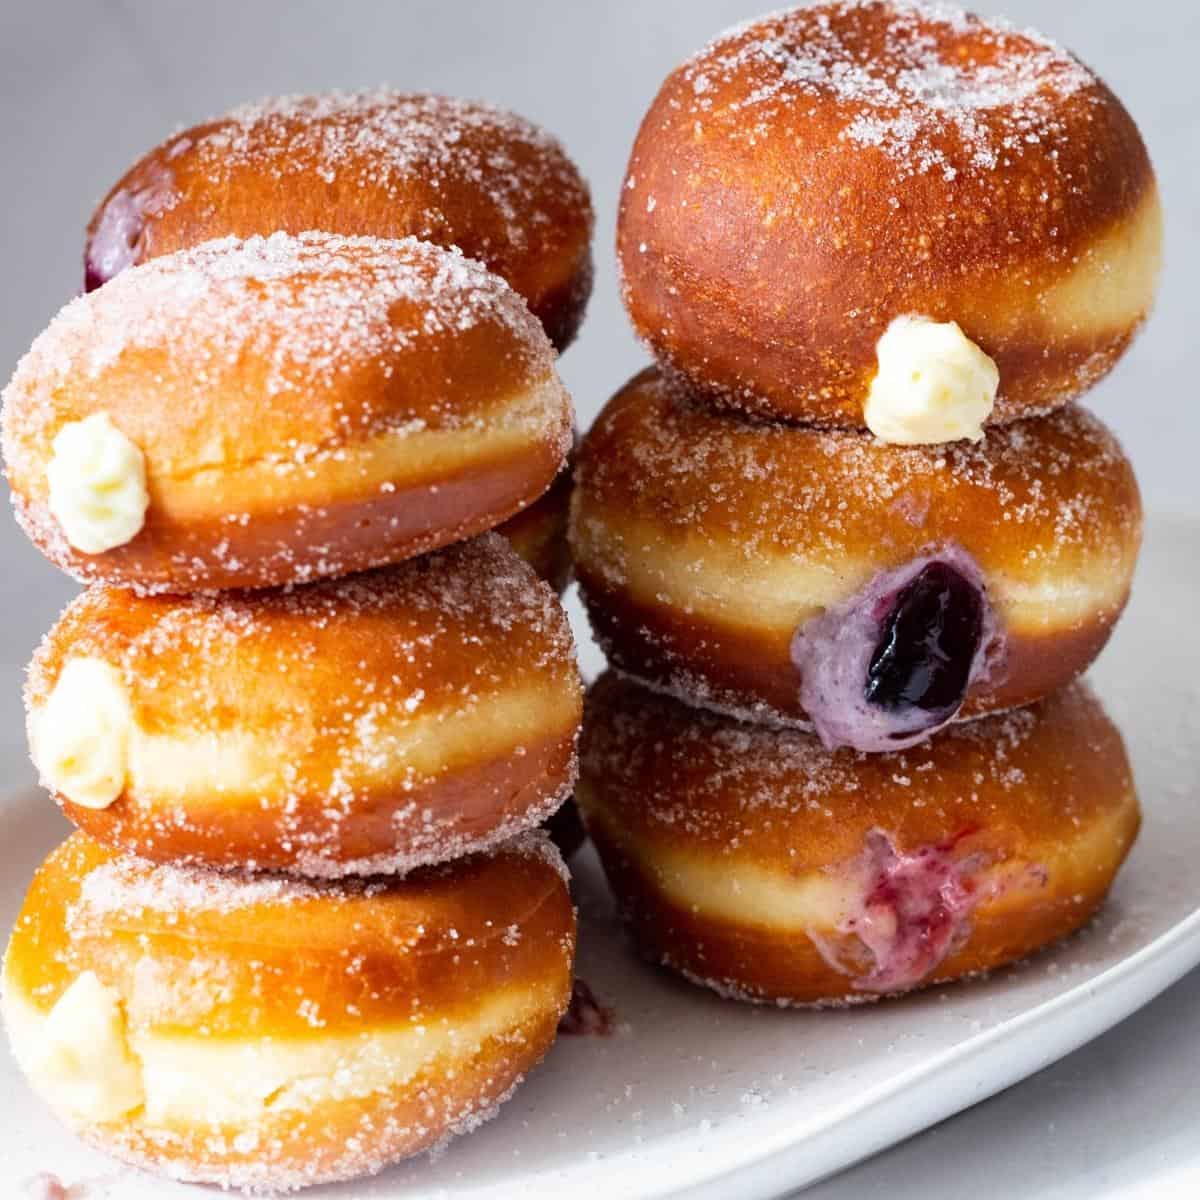
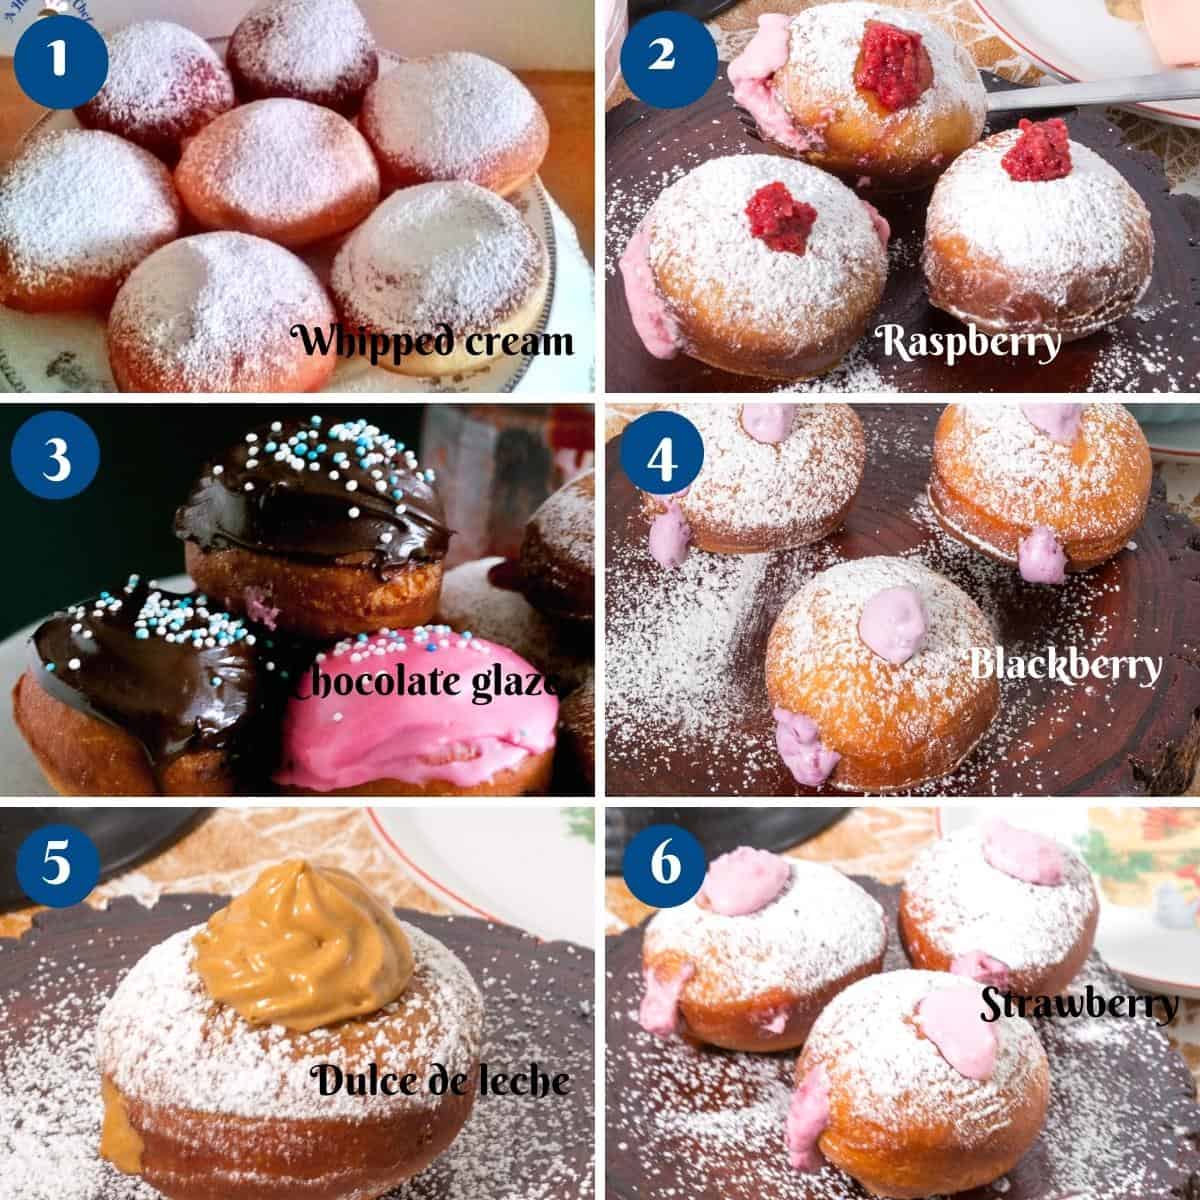
- Also, these deep-fried cream-filled donuts are made with a variety of fillings from pastry cream, strawberry cream, raspberry cream, and blackberry, as well as cream cheese and chocolate cream.
Ingredients and substitutes
- Flour – Bread flour makes light and airy donuts with a soft and chewy texture. Of course, you can use all-purpose flour, but if possible, at least use 50% bread and 50% all-purpose.
- Yeast – I am using active dry yeast, but you can also use the same amount of instant dry yeast. Alternatively, you can also use 21 grams of fresh baker’s yeast.
- Sugar – This is a sweet dough, so I’ve used sugar, but you can also use honey.
- Milk – Makes a rich dough, but it also gives a deep golden color to the donuts when deep frying. If you like light-colored, deep-fried donuts, use water instead of milk.
- Eggs – Add stability to the dough and make it easy to work with. If you want to make these eggless, use 1/2 cup of milk instead of eggs.
- Oil – I use canola oil. It has a neutral flavor and a high smoke point. Also, it works best when deep-frying bread and sweet treats like churros and doughnuts.

Step-by-step: Cream-filled doughnuts
Donut dough
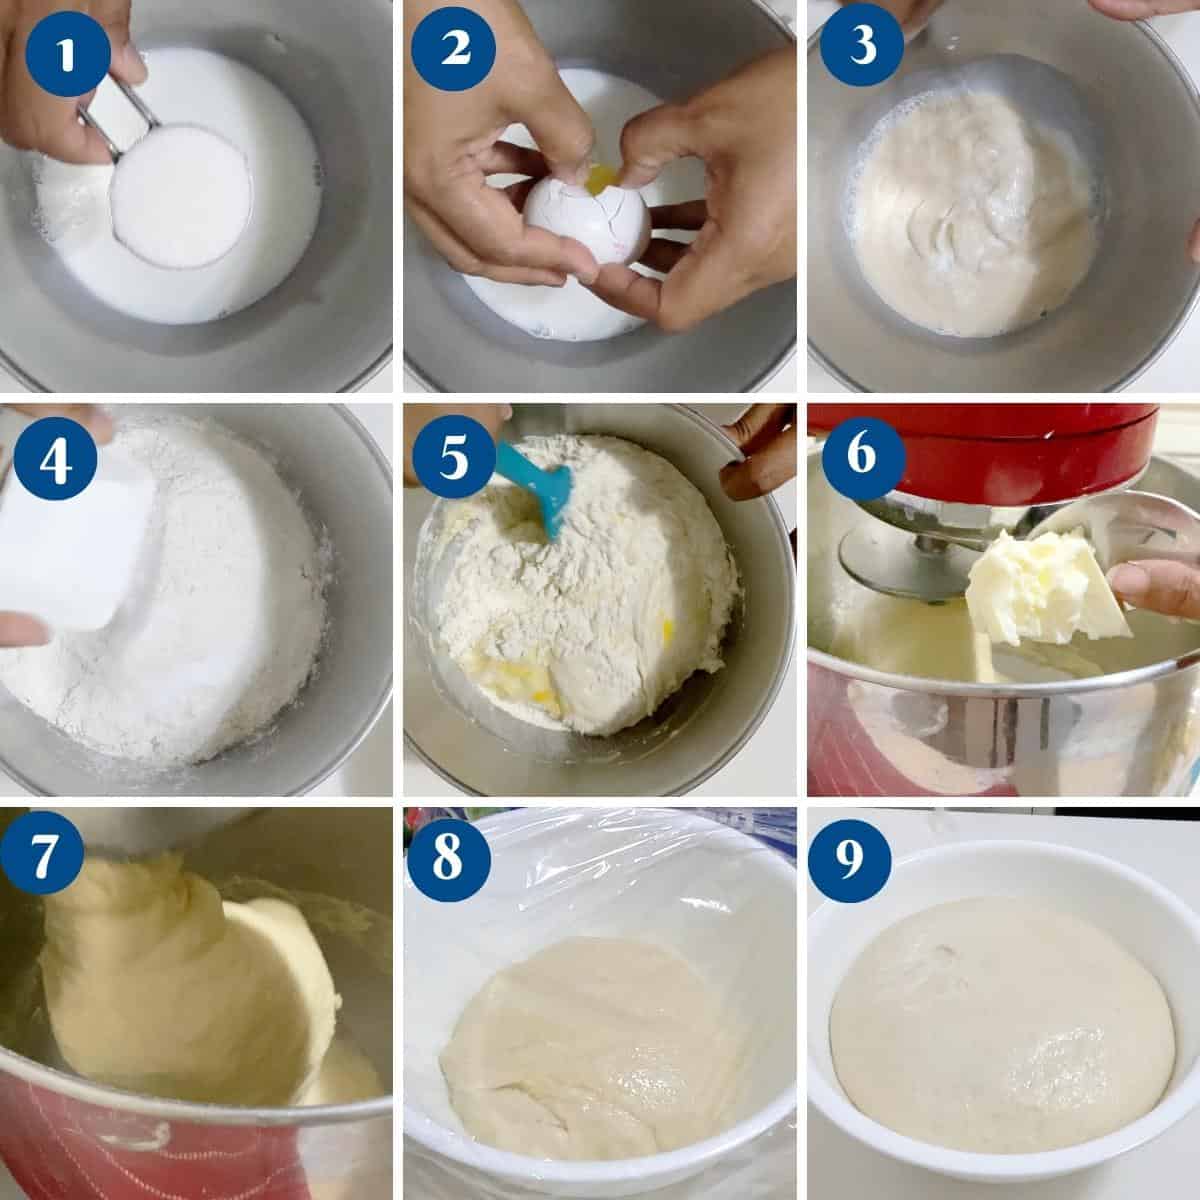
- Dry ingredients – In a bowl, combine flour and salt.
Pro tip – You can add spices like cinnamon, ground ginger, nutmeg, or pumpkin spice to add some fall flavor. - Wet ingredients – In a large mixing bowl of a stand mixer, with the dough hook attachment, combine warm milk, sugar, yeast, egg, and vanilla extract. Stir to combine.
- Wet to dry – Add the flour mixture to the yeast egg mixture and combine on medium-high until all the flour is incorporated. Then, knead on medium speed for 8 to 10 minutes.
Pro tip – Avoid adding too much extra flour when kneading. We want a soft, elastic, slightly sticky dough. - Butter – Add the room-temperature butter and continue kneading on medium-low speed for 8 to 10 minutes more, until smooth, elastic, and slightly sticky.
- Bowl – Place the dough in a large greased bowl, cover it with plastic wrap, and let it rise on the counter for 60 to 90 minutes or until doubled in volume.
Pro tip – You can also leave the dough in the fridge to slowly rise for up to 24 hours. Thaw on the counter for an hour.
Pastry cream
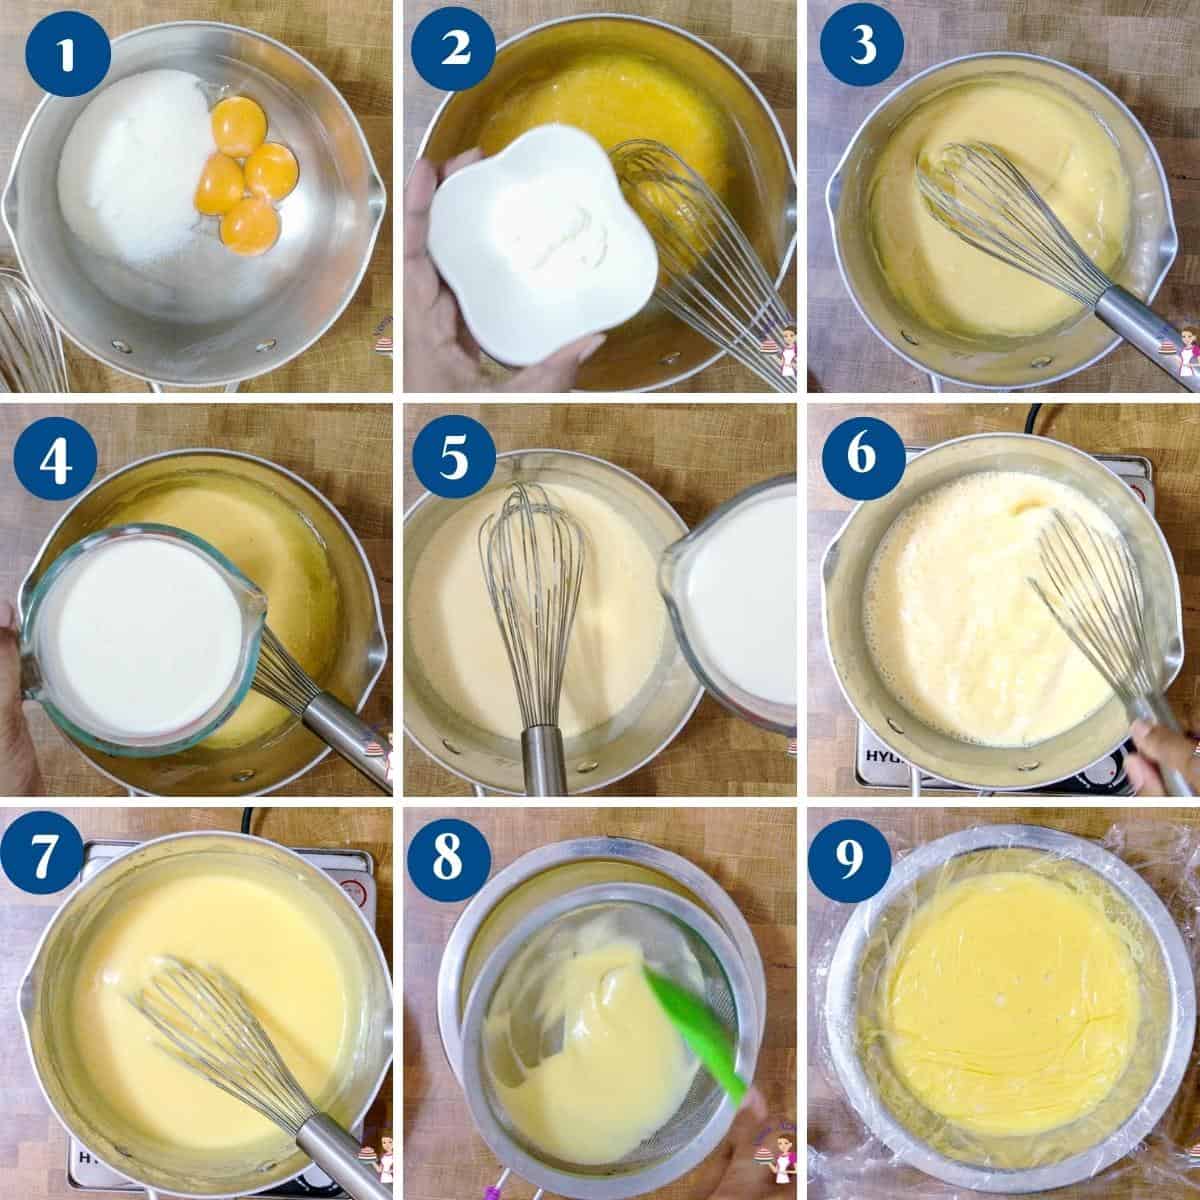
- Combine – In a heavy-bottomed saucepan, combine egg yolks and sugar. Add the cornstarch – combine well with a whisk. Then, add the salt and vanilla extract. Followed by milk and heavy cream. Stirring constantly to avoid lumps.
Pro tip – Gradually, add the milk a little at a time to prevent lumps. - Simmer – Then, place the pan on medium-low heat and continue to cook the pastry cream, stirring all the time. When the pastry cream is thick and coats the back of a wooden spoon or spatula, add the butter and take it off the heat.
Pro tip – The liquid must come to a low boil, which will transform from a foamy liquid to a thick custard with no foam at all. - Strain – Strain through a mesh or sieve – discard the vanilla pod as well as any curdled eggs. Then, cover the surface of the pastry cream with plastic wrap.
Pro tip – Straining will ensure a smooth texture and remove any curdled or thickened milk solids. - Cool – Let it cool completely before you store it in the fridge. Once cooled, whip vigorously with a whisk until smooth.
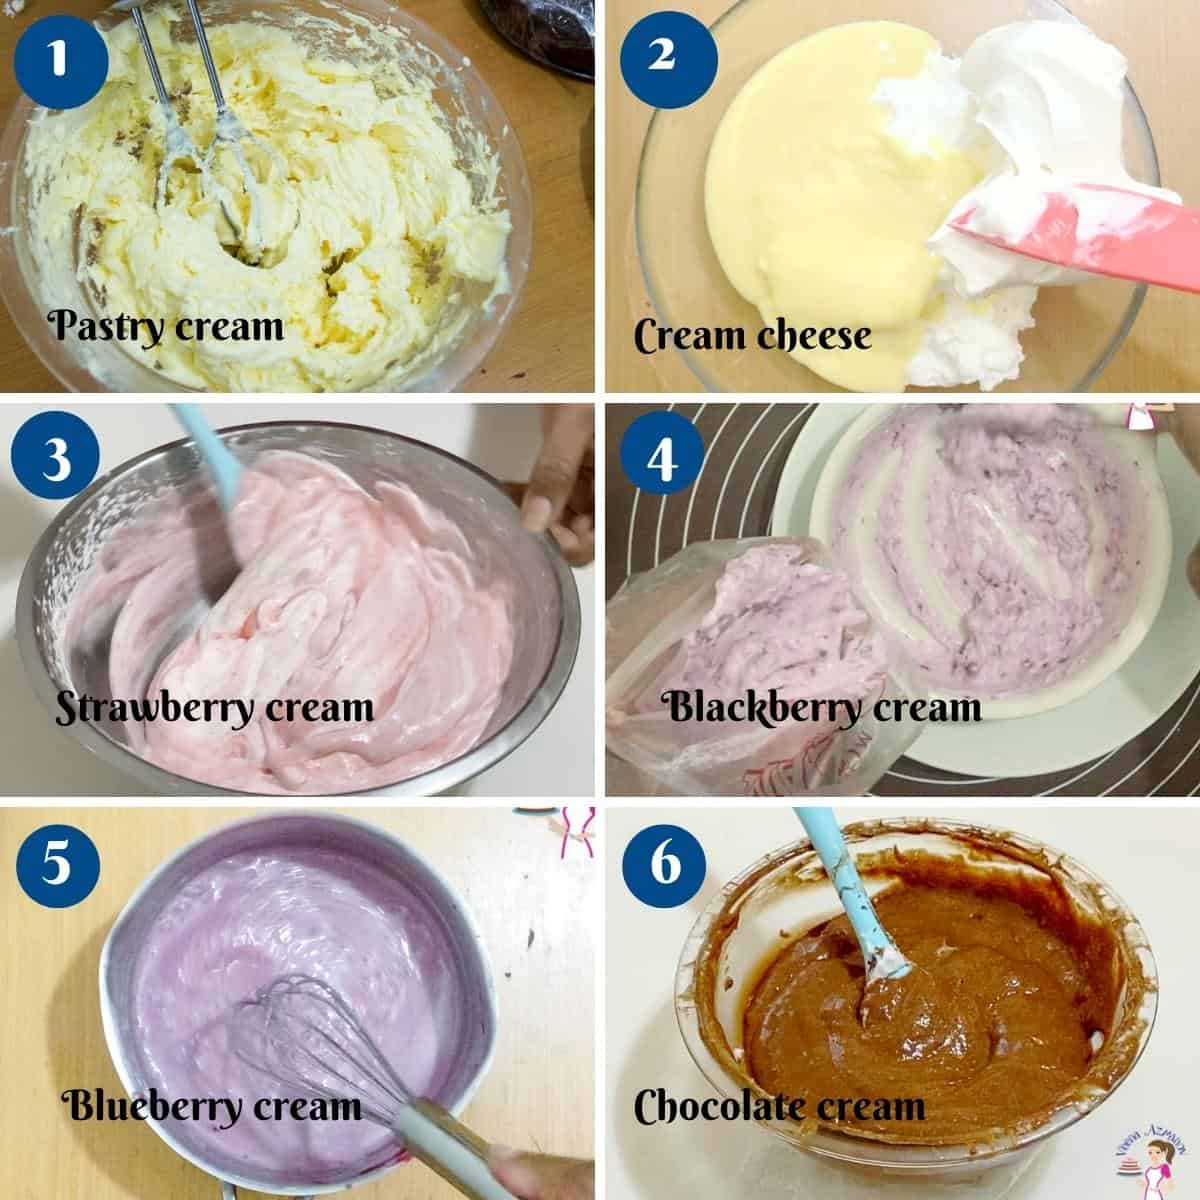
- Pastry cream filling – Add the pastry cream to the piping bag with a round or Bismarck piping tip.
- Strawberry cream filling – In a small bowl, combine the pastry cream, strawberry puree, and strawberry extract. Use a whisk to ensure it is smooth. Then, transfer to a piping bag with a round or bismarck piping tip.
- Raspberry cream filling – In a small bowl, combine the pastry cream, raspberry puree, and raspberry extract. Use a whisk to ensure it is smooth. Then, transfer to a piping bag with a round or bismarck piping tip.
- Blackberry cream filling – In a small bowl, combine the pastry cream, blackberry puree, and blackberry extract. Use a whisk to ensure it is smooth. Transfer to a piping bag with a round or bismarck piping tip.
- Blueberry cream filling – In a small bowl, combine the pastry cream, blueberry puree, and blueberry extract. Use a whisk to ensure it is smooth.
- Cream cheese/Cheesecake filling – In a bowl, combine the pastry cream and cream cheese until smooth. Then, transfer to a piping bag with a round or bismarck piping tip.
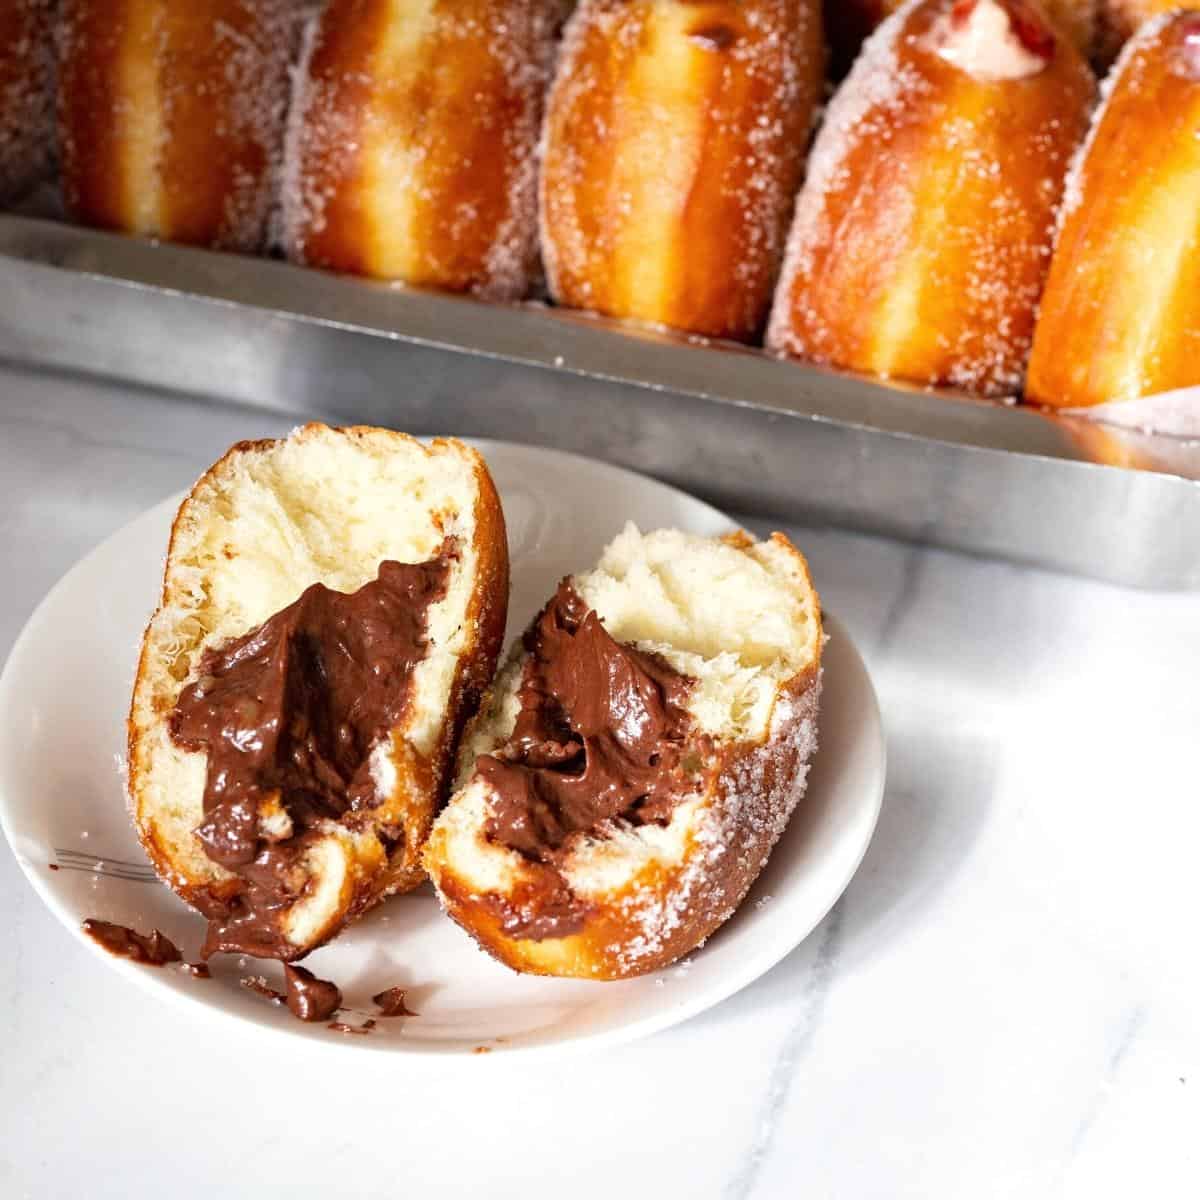
Pro tip – Make sure the cream cheese is well-thawed; otherwise, it will be very lumpy. - Chocolate cream filling – In a microwave-safe bowl, melt the chocolate and let it cool slightly. Then, add the pastry cream and combine well. Transfer to a piping bag with a round or bismarck piping tip.
Shaping the donuts
- Once doubled in volume, invert on a floured surface. Press down and reshape into a ball.
Pro tip – Press down and remove all air pockets. Otherwise, you will have big air pockets, which will collapse during deep frying.
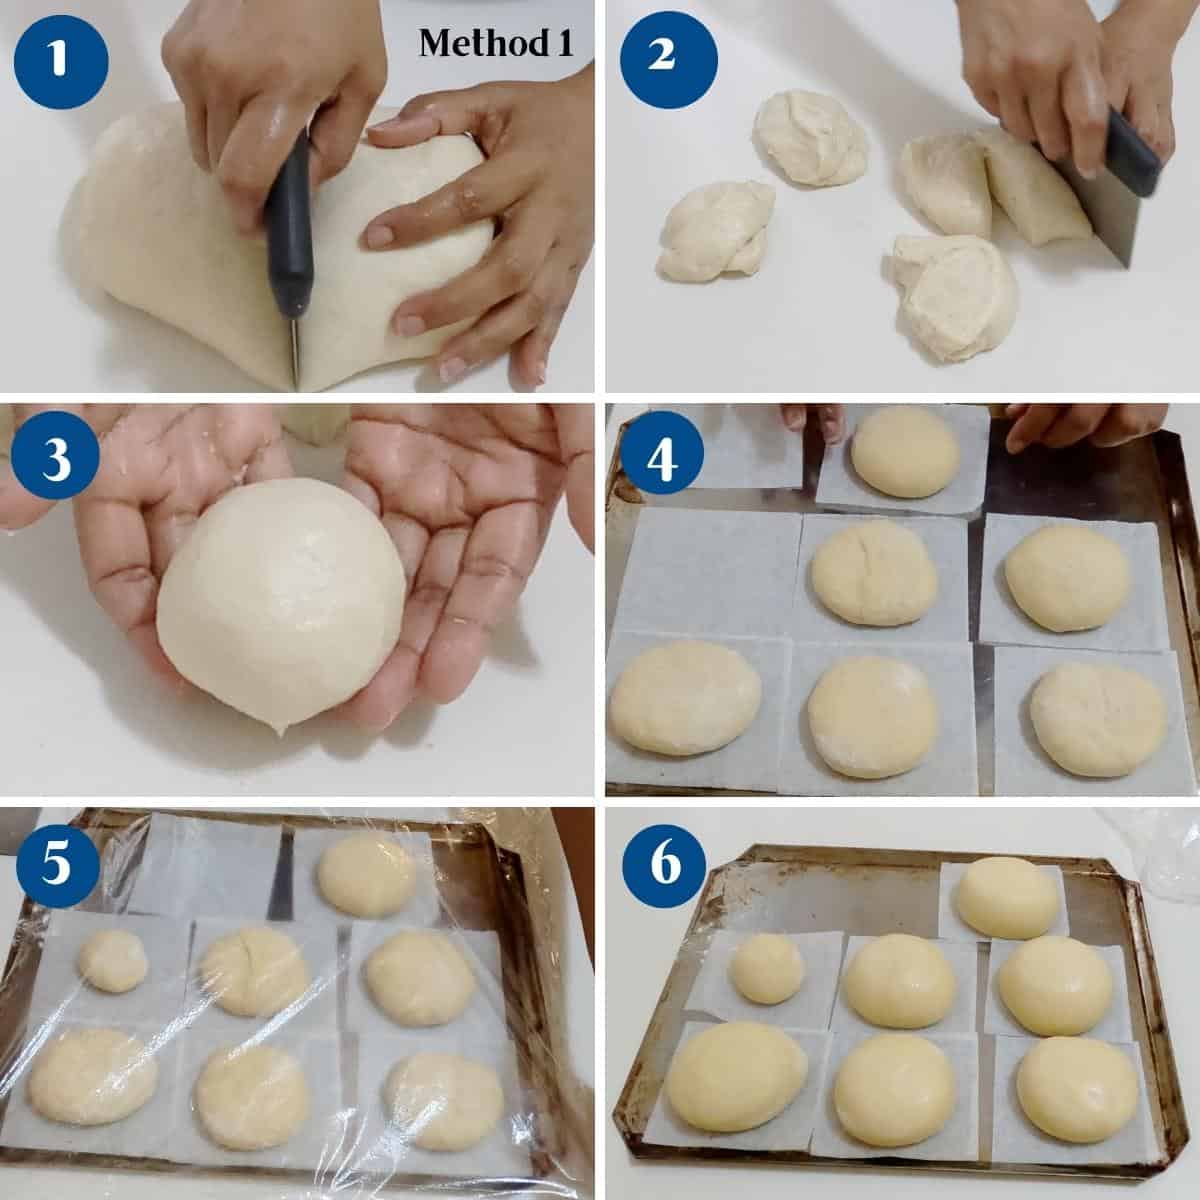
- Method 1 – Divide the dough into two halves and each half into 6 portions. Shape each portion into a smooth ball. Then, flatten it with your fingers.
Pro tip – Always make one or two mini doughnuts for the purpose of testing the oil temperature.
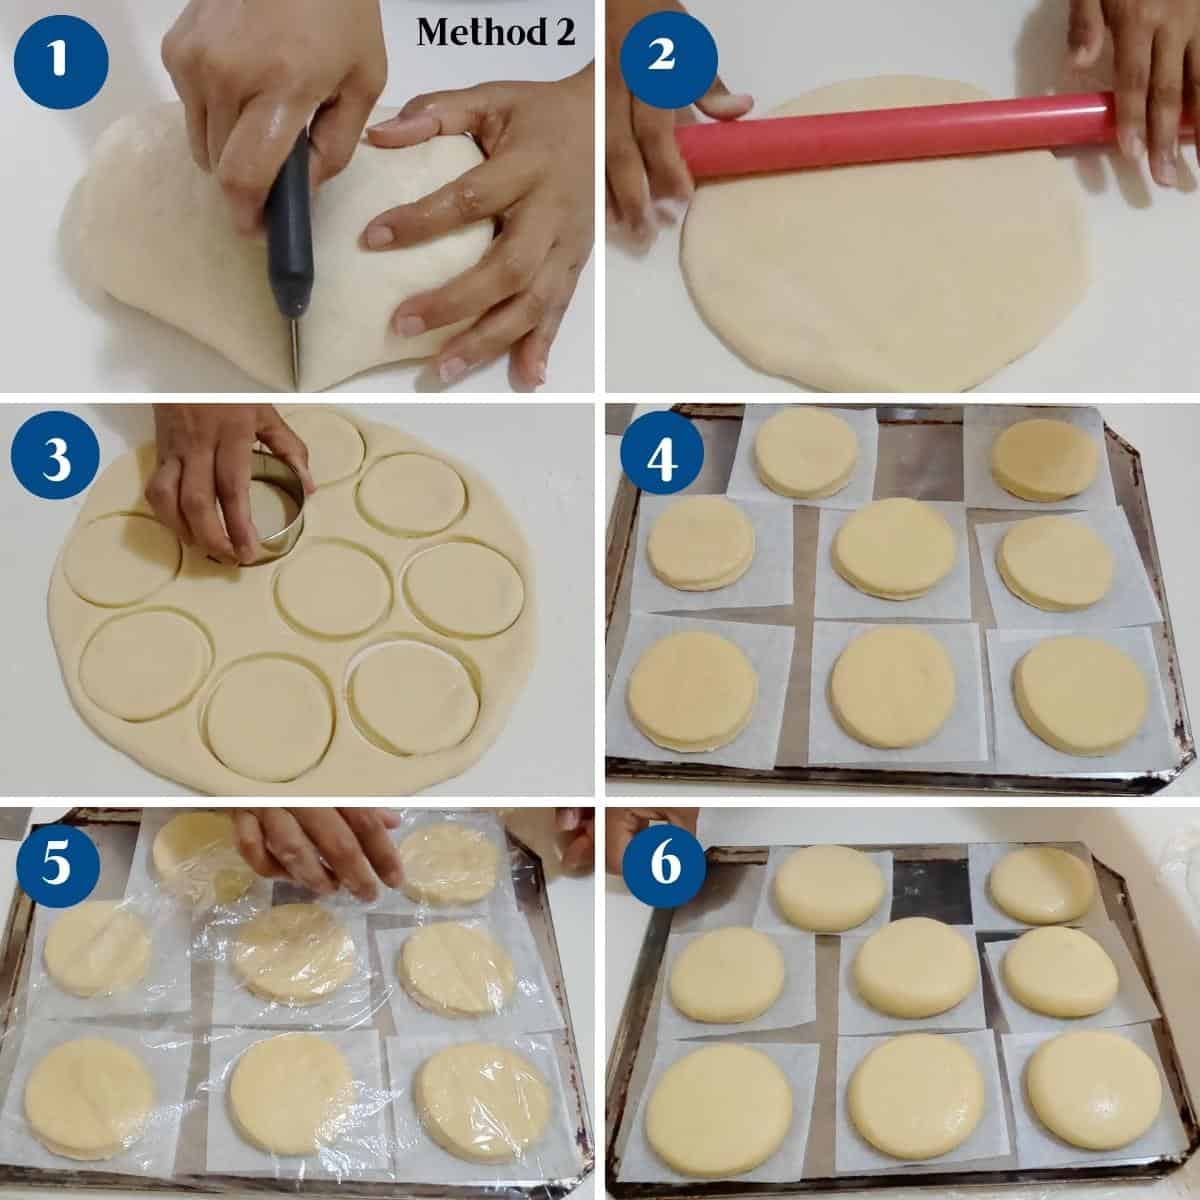
- Method 2 – Transfer to a well-dusted work surface. Using a rolling pin, roll to about 1/4 inch thickness. Using a 3-inch cookie or biscuit cutter, cut out as many discs as you can.
Pro tip – If you roll the dough too thin, the donuts will not be fluffy. It is best to make fewer yet light and fluffy donuts than many flat, hard donuts.
Proof and deep fry
- Proof – Place each donut on a baking sheet on parchment paper squares. Cover with plastic wrap and leave to rise on the counter for 45 to 60 minutes or until doubled in volume.
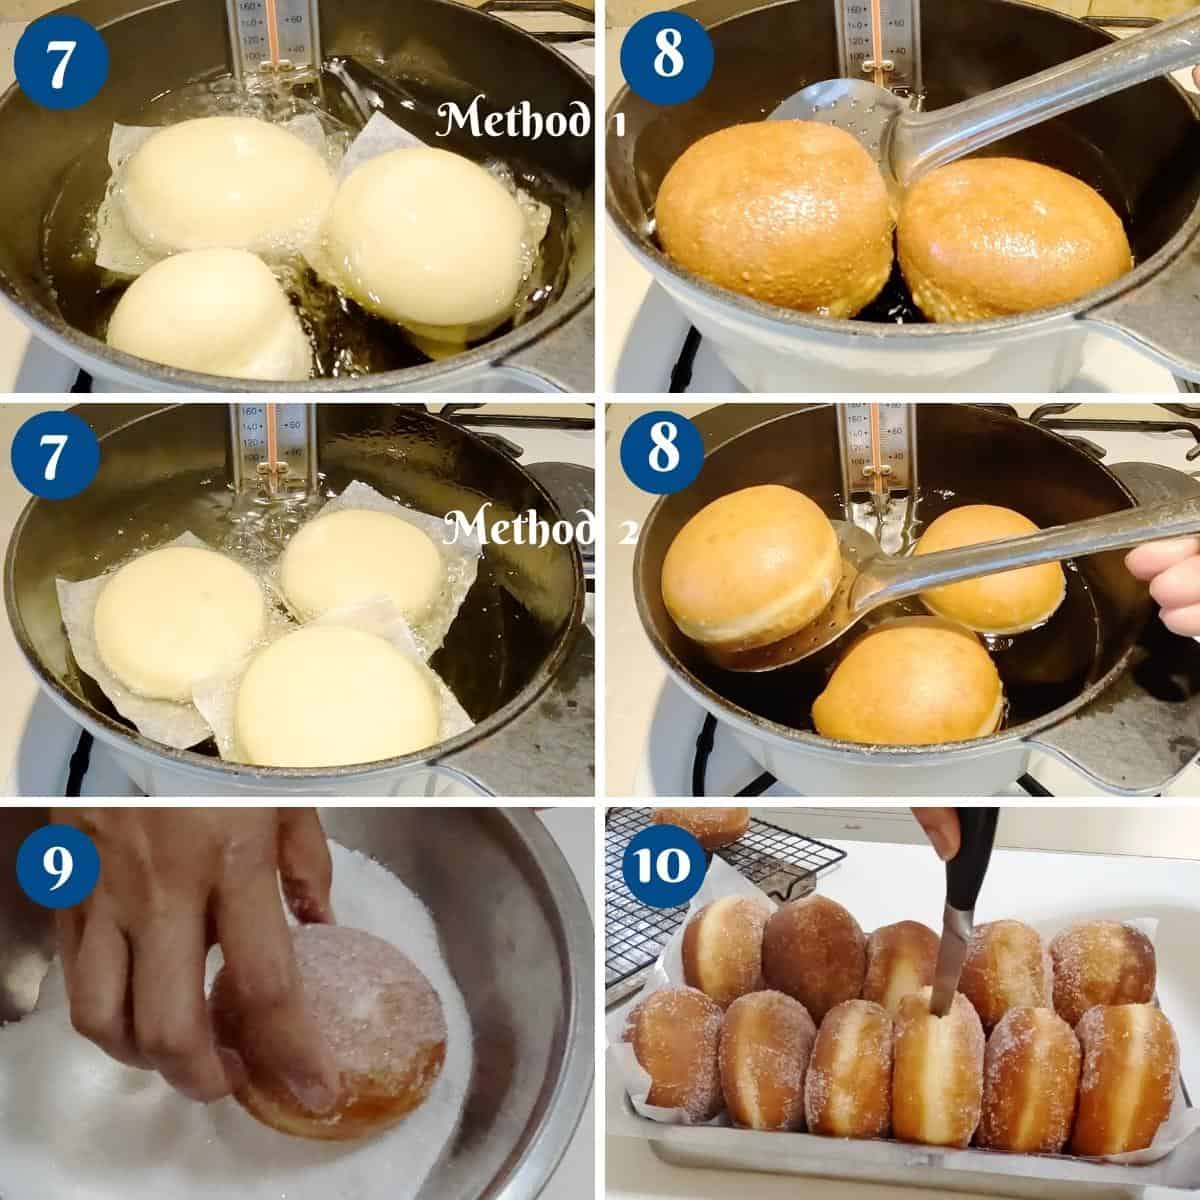
Pro tip – Alternatively, you can also leave the donuts to slowly rise in the fridge overnight. Thaw on the counter for 30 minutes before deep frying. - Deep fry – Pour oil into a heavy pot or deep fryer and bring to about 350°F. I like to use my Dutch oven pan.
- Cook the donuts on each side for 2 to 3 minutes until golden brown. Use a slotted spoon to remove the donuts from the oil onto a cooling rack or drop them on paper towels to absorb excess oil.
Tip 1 – Make sure you have enough oil so the donuts will be at least half immersed in oil when puffed.
Tip 2– You want the oil hot, but not too hot, otherwise the donuts will become too dark. Adjust accordingly.
- Cook the donuts on each side for 2 to 3 minutes until golden brown. Use a slotted spoon to remove the donuts from the oil onto a cooling rack or drop them on paper towels to absorb excess oil.
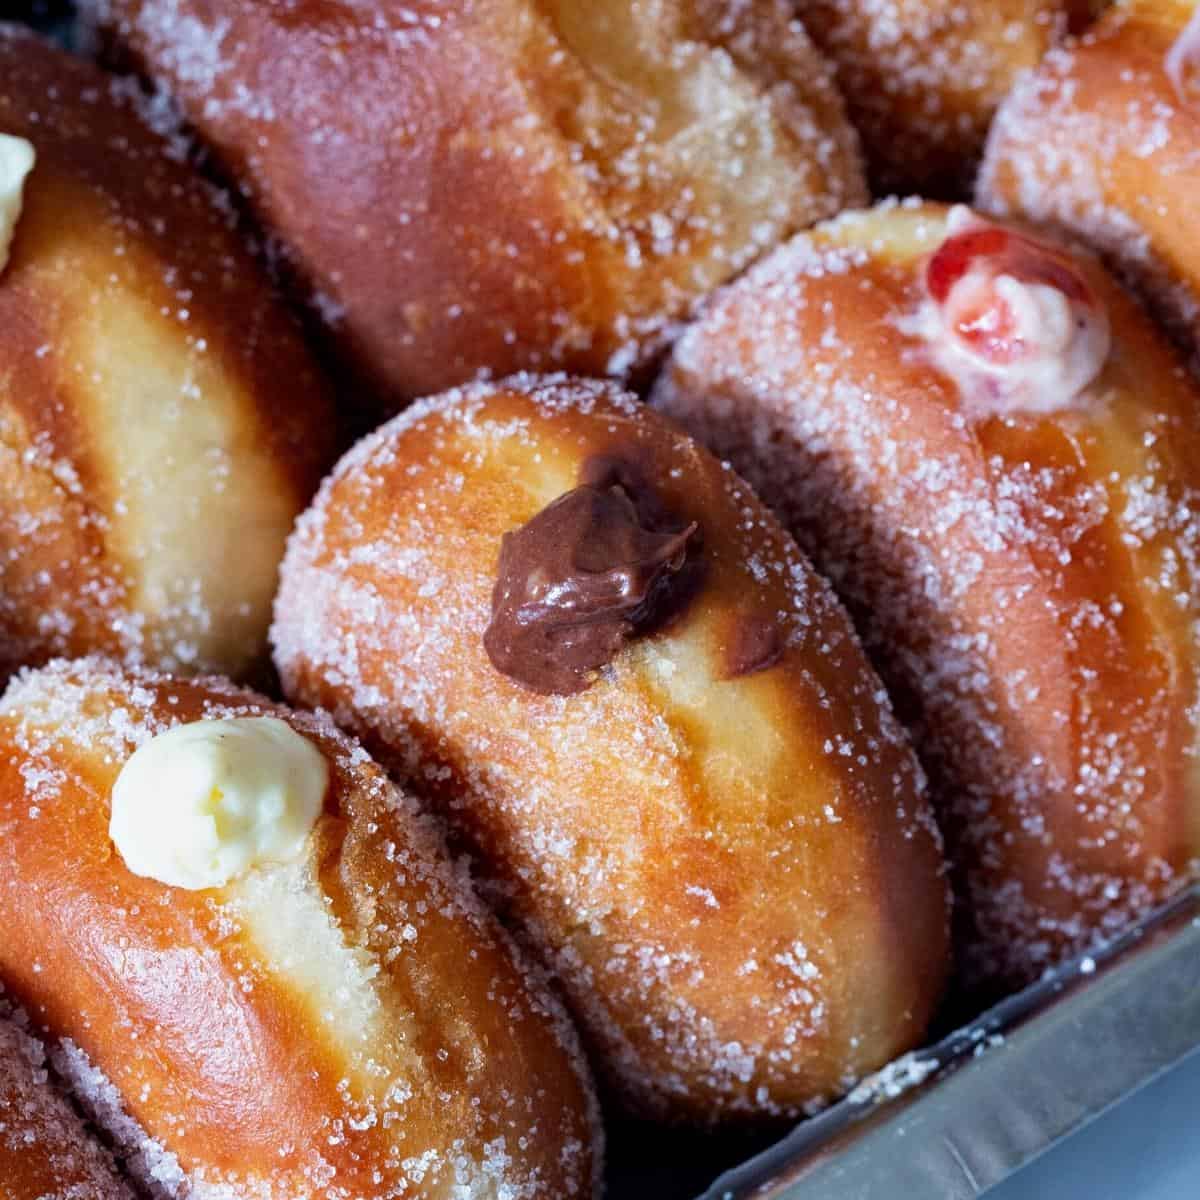
- Dust – Place the sugar in a bowl and coat each donut in the sugar as soon as it is hot out of the oil.

Filling
- Place the donuts vertically in a tray and poke a hole with a knife.
Pro tip – Keeping the donuts in a tray vertically helps so you don’t have to hold the sugary donuts in your hands. Can be messy! - Poke the piping tip deep into the donuts and squeeze as much filling into the donuts as possible.
Pro tip – I piped a little jam to help identify the donuts. As you fill each donut, it will become heavy.
How to fill donuts?
I like to add a little bit of jam on the top so you can identify the donuts. Having said that, there is so much you can do with these donuts. Here are a few ways I have made these over the years.
Creative filling variations
- Bavarian cream donuts – Once cooled, fill the donuts with vanilla Bavarian cream or strawberry Bavarian cream.
- Chocolate-glazed donuts – Dip the tops of the donuts in chocolate ganache.
- Cinnamon sugar – Instead of just sugar, dust the fresh donuts with a mixture of cinnamon and sugar.
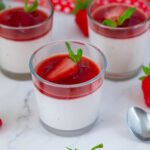
- Whipped cream – If you’ve never tried donuts with whipped cream, you must! In fact, make it strawberry and cream.
Cream Filled Donuts
Cream-filled donuts are an amazing way to add variety to your baking repertoire. This is the easiest recipe for homemade donuts. And it comes together in no time. With two methods to shape and six cream fillings, this will soon become your favorite treat.
Video
Ingredients
- 240 g (1 cups) Whole milk
- 100 g (2 large) Eggs
- 7 g (2¼ tsp) Active dry yeast
- 50 g (¼ cup) Sugar
- 1 tsp Vanilla extract
- 500 g (4 cups) Bread flour or All-purpose flour
- ½ tsp Kosher salt
- 113 g (½ cups) Unsalted butter room temperature
- 480 ml (2 cups) Whole milk
- 250 ml (1 cups) Heavy cream 32 – 38% fat
- 6 large Egg yolks
- 100 g (½ cup) Sugar
- 6 tbsp (⅓ cup) Cornstarch or tapioca starch
- 2 tsp Vanilla bean paste or vanilla extract
- 2 tbsp Unsalted butter room temperature
- ½ tsp Kosher salt
- 1 cup (280 g) Pastry cream
- ½ cup (115 g) Strawberry puree
- ¼ tsp Strawberry extract optional
- 1 cup (280 g) Pastry cream
- ½ cup (130 g) Raspberry puree
- ¼ tsp Raspberry extract optional
- 1 cup (280 g) Pastry cream
- ½ cup (70 g) Blackberry puree
- ¼ tsp Blackberry extract optional
- ½ cup (75 g) Blueberry puree
- 1 cup (280 g) Pastry cream
- ¼ tsp Blueberry extract optional
- 1 cup (280 g) Pastry cream
- ½ cup (115 g) Cream cheese I used 40% mascarpone
- 1 cup (280 g) Pastry cream
- 100 g (3.5 oz) Dark chocolate or semi sweet, bittersweet
- 1 cup (200 g) Sugar for dusting
- 4 cups (1 liter) Vegetable oil for deep frying
Method
- Dry ingredients – In a bowl, combine flour and salt.500 g Bread flour, ½ tsp Kosher salt
- Wet ingredients – In a large mixing bowl of a stand mixer, with the dough hook attachment, combine warm milk, sugar, yeast, egg, and vanilla extract. Stir to combine.100 g Eggs , 7 g Active dry yeast, 50 g Sugar, 1 tsp Vanilla extract, 240 g Whole milk
- Wet to dry – Add the flour mixture to the yeast egg mixture and combine on medium-high until all the flour is incorporated. Knead on medium speed for 8 to 10 minutes.
- Butter – Add the room temperature butter and continue to knead at medium-low speed for 8 to 10 minutes until smooth, elastic, and slightly sticky.113 g Unsalted butter
- Bowl – Place the dough in a large greased bowl, cover it with plastic wrap, and let rise on the counter for 60 to 90 minutes or until doubled in volume.
- Combine – In a heavy-bottomed saucepan, combine egg yolks and sugar. Add the cornstarch and mix well with a whisk. Then, add the salt and vanilla extract. Followed by milk and cream. Stirring constantly to avoid lumps.480 ml Whole milk , 250 ml Heavy cream, 6 large Egg yolks, 100 g Sugar, 6 tbsp Cornstarch, 2 tsp Vanilla bean paste, ½ tsp Kosher salt
- Simmer – Then, place the pan on medium-low heat and continue to cook the pastry cream, stirring constantly. When the pastry cream is thick and coats the back of a wooden spoon or spatula, add the butter and take it off the heat.2 tbsp Unsalted butter
- Strain – Strain through a mesh or sieve – discard the vanilla pod as well as any curdled eggs. Cover the surface of the pastry cream with plastic wrap.
- Cool – Let it cool completely before you store it in the fridge. Once cooled, whip vigorously with a whisk until smooth.
- Pastry cream filling – Add the pastry cream to the piping bag with a round or bismarck piping tip.
- Strawberry cream filling – In a small bowl, combine the pastry cream, strawberry puree, and strawberry extract. Use a whisk to ensure it is smooth. Transfer to a piping bag with a round or bismarck piping tip.1 cup Pastry cream , ½ cup Strawberry puree, ¼ tsp Strawberry extract
- Raspberry cream filling – In a small bowl, combine the pastry cream, raspberry puree, and raspberry extract. Use a whisk to ensure it is smooth. Transfer to a piping bag with a round or bismarck piping tip.1 cup Pastry cream, ½ cup Raspberry puree , ¼ tsp Raspberry extract
- Blackberry cream filling – In a small bowl, combine the pastry cream, blackberry puree, and blackberry extract. Use a whisk to ensure it is smooth. Transfer to a piping bag with a round or bismarck piping tip.1 cup Pastry cream, ½ cup Blackberry puree , ¼ tsp Blackberry extract
- Blueberry cream filling – In a small bowl, combine the pastry cream, blueberry puree, and blueberry extract. Use a whisk to ensure it is smooth. Transfer to a piping bag with a round or bismarck piping tip.½ cup Blueberry puree, 1 cup Pastry cream , ¼ tsp Blueberry extract
- Cream cheese/Cheesecake filling – In a bowl, combine the pastry cream and cream cheese until smooth. Transfer to a piping bag with a round or bismarck piping tip.1 cup Pastry cream, ½ cup Cream cheese
- Chocolate cream filling – In a microwave-safe bowl, melt the chocolate and let it cool slightly. Then, add the pastry cream and combine well. Transfer to a piping bag with a round or bismarck piping tip.1 cup Pastry cream, 100 g Dark chocolate
- Once doubled in volume, invert on a floured surface. Press down and reshape into a ball.
- Method 1 – Divide the dough into half and each half into six portions. Shape each portion into a smooth ball. Flatten it with your fingers.
- Method 2 – Transfer to a well-dusted work surface. Using a rolling pin, roll to about 1/4 inch thickness. Using a 3-inch cookie or biscuit cutter, cut out as many discs as you can.
- Proof – Place each donut on a baking sheet on parchment paper squares. Cover with plastic wrap and leave to rise on the counter for 45 to 60 minutes or until doubled in volume.
- Deep fry – Pour oil into a heavy pot or deep fryer and bring to about 350°F. I like to use my Dutch oven pan. Cook the donuts on each side for 2 to 3 minutes until golden brown. Use a slotted spoon to remove the donuts from the oil onto a cooling rack or drop them on paper towels to absorb excess oil. Tip 1 – Make sure you have enough oil so the donuts will be at least half immersed in oil when puffed.Tip 2 – You want the oil hot, but not too hot; otherwise, the donuts will become too dark. Adjust accordingly.4 cups Vegetable oil
- Dust – Place the sugar in a bowl and coat each donut in the sugar as soon as it is hot out of the oil.1 cup Sugar
- Place the donuts vertically in a tray and poke a hole with a knife. Poke the piping tip deep into the donuts and squeeze as much filling into the donuts as possible.
Notes
- The milk temperature – It is very important to ensure the milk is warm, not hot or cold.
- Rise and proof – don’t make haste, give the dough enough time to rise before you shape or cut the donuts. Similarly, don’t make haste to fry them until they are doubled in size.
- Method 1 – shape the dough into smooth balls; otherwise, you will have donuts with lots of cracks.
- Method 2 – roll the dough thick so they puff nicely. If the dough is too thin, you will have flat donuts.
- The temperature of the oil – The temperature of 325°F is a guide. The heat should be enough to have a slight simmer, but not too hot, so the donuts become very dark brown.
- How to test oil – Add a mini doughnut to test the oil. The doughnut should rise in about 30 seconds. If it rises too soon, it means the oil is too hot, and if it takes too long, it means the oil is not yet hot. Adjust accordingly. Keep an eye on oil temperature as it rises and cools between donut batches. Adding doughnuts to the oil will cool the oil. So, find a balance on how many doughnuts per batch works with your settings.
- Fill the donuts only after they are cooled completely; otherwise, the pastry cream filling will melt, making a very messy donut.
Nutrition
Tried this recipe?
Mention @veenaazmanov_kitchen or tag #veenaazmanovkitchen!Troubleshooting
- My dough did not rise – This could have two reasons. First, check the yeast expiry date. Second, the liquid ingredients in the dough were too hot.
- Why are my donuts flat? The most common reason for this is when you use the roll and cut method. Keep the dough thick, at least about 1/4 inch thick. Otherwise, they will be quite flat.
- My donuts are very dark brown. Often, the oil’s temperature is the main culprit. Keep the heat to medium and adjust it from medium to medium-low as necessary. Remember, the donuts need to be cooked inside as well, which means the oil outside must not be too hot. I use 325°F as a guide for my donuts.
- My filling is spilling out of the donut. If you fill the donuts while they are still warm, the heat will melt the filling. This will make the filling ooze out. It can be quite messy. Also, cooled pastry cream is more delicious. So, wait for the donuts to cool completely.


Frequently asked questions
Donuts are best eaten fresh, the day they are made. But you can keep them for a day or two. It is best to keep them in a paper bag rather than plastic, as plastic makes them soggy. You can also freeze cooled donuts for months in the freezer.
Yes, pastry cream is made with milk and eggs, which are perishable ingredients and need to be kept refrigerated once they have cooled.
Well, baking these will be the same as making buns. The deep frying in oil is what makes these absolutely delicious. If you still decide to bake these once proofed, brush them with egg wash and bake them in a preheated oven at 375°F/190 °C/Gas Mark 5 on the middle rack for 20 to 25 minutes. Once cooled, fill them with your choice of filling.
I have given you two easy methods.
– One is similar to making burger buns and results in lovely ball-shaped donuts, which have a fuller look to them.
– The other is the roll and cut with a biscuit cutter. The secret to getting these done well is to make sure you roll the dough thick!! Otherwise, your donuts will look flat.
This is a personal preference, and yet, make sure that each donut has at least 1/4 cup filling. Having said that, the donuts, on their own, dusted with sugar, are delicious too.


Don’t lose this recipe! Save it for Later!
📌 Save this Recipe for later on Pinterest so you can easily find it again.
⭐ Add Veena Azmanov Kitchen to your Google Preferred Sources.
It helps Google show you more of our recipes.
📧 Subscribe for new recipes delivered to your inbox.
🎥 Follow us for more recipes

When do you whip the pastry cream in order to make it pipable? The last thing the instructions say is to wisk it until “smooth”. “Smooth” wo not pipe.
Hi Stephanie! The pastry cream itself should be cooked until it’s quite thick before it’s chilled. The final whisking is simply to smooth it out after refrigeration—it isn’t meant to whip it into a lighter consistency. If your pastry cream seems too soft to pipe, it most likely needed to cook a little longer on the stove until it reached a thick pudding consistency. It should hold its shape on a spoon before you transfer it to chill. I hope that helps, and please let me know if you have any other questions! 😊
My lack of a fryer has always deterred me from trying to make my own donuts, even though I REALLY want to. I’m going to give this a try because your post showed that you can use a big pan of oil. Thank you!!
Roger, I never had a fryer! I always use a big pot of oil. I’m sure you will enjoy this recipe.