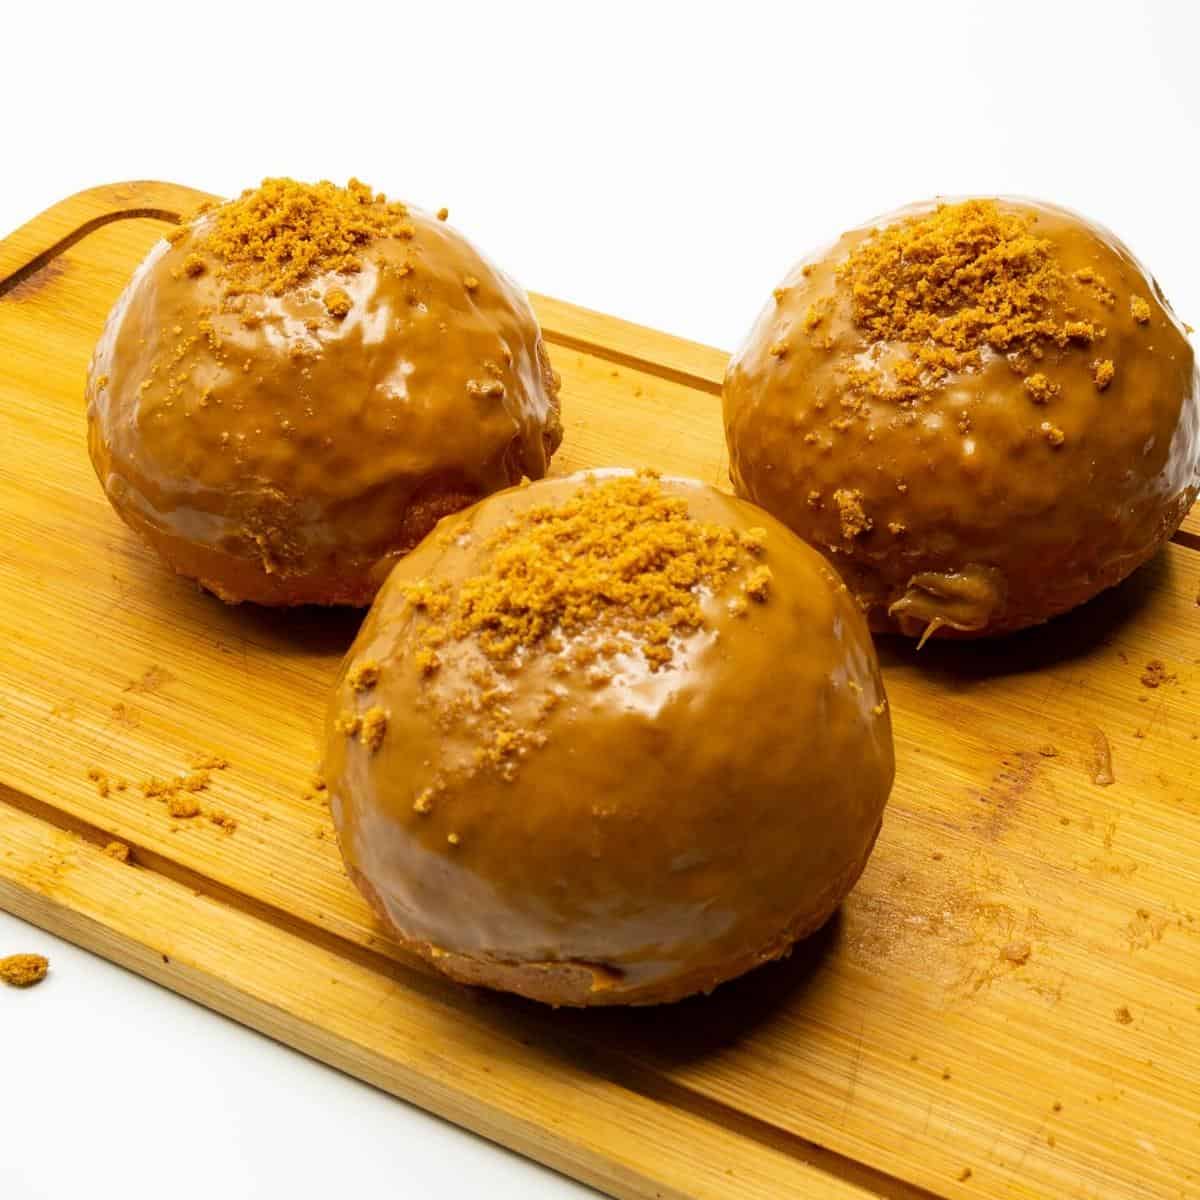
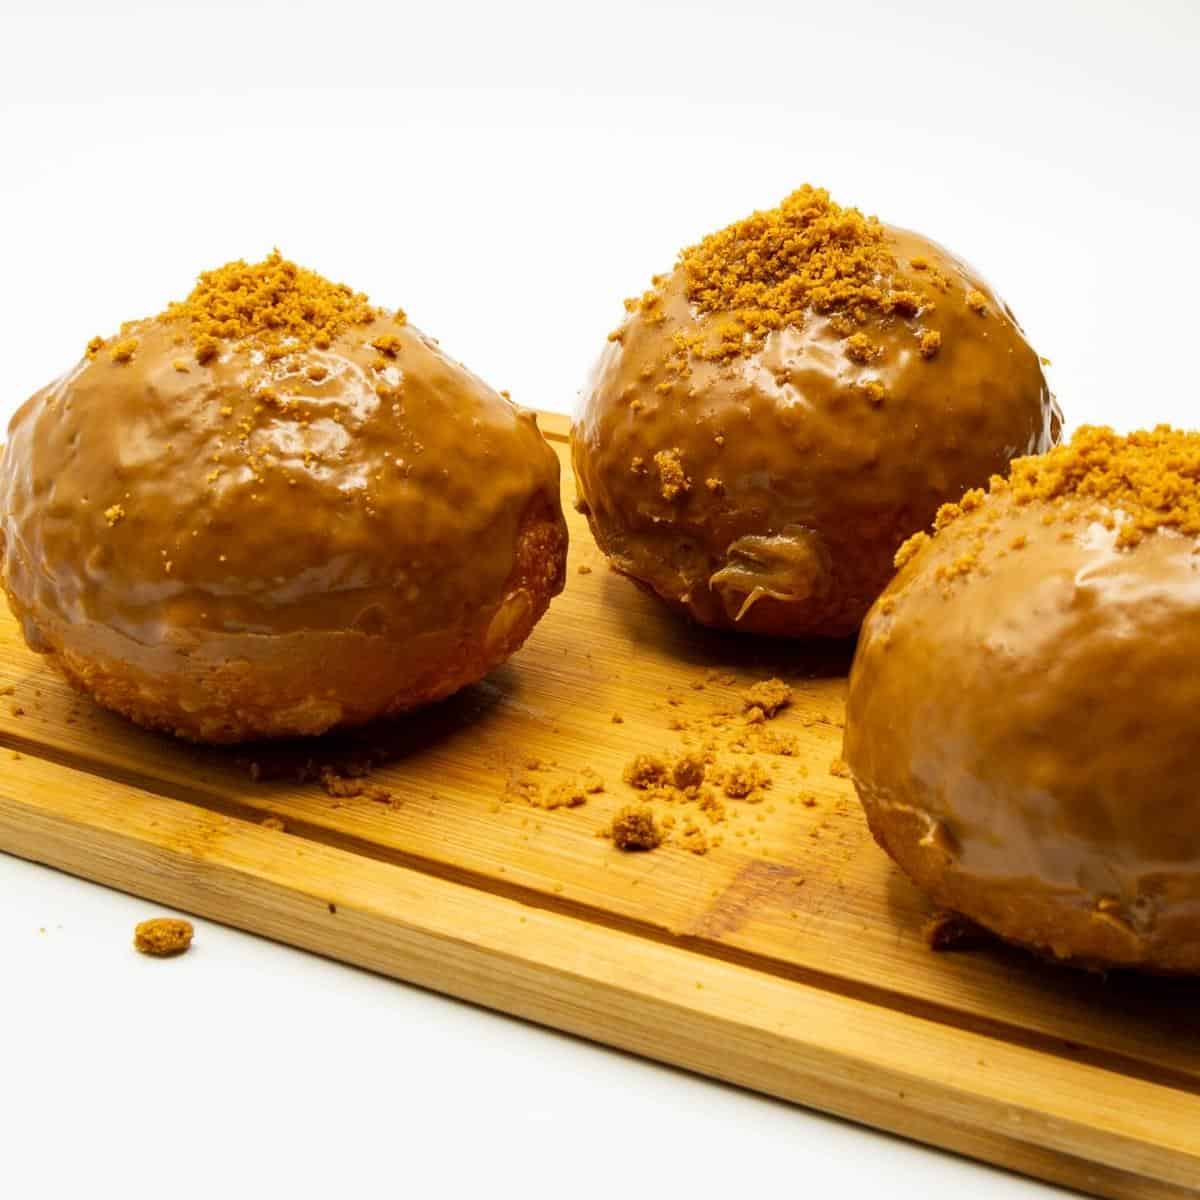
Biscoff Doughnuts – Lotus Filling and Glaze
 Prep Time 20 minutes Cook Time 20 minutes Total Time 2 hours 10 minutes


If you haven’t had the sweet Biscoff cookies slathered inside a doughnut, have you ever really eaten a doughnut? We’ve got you covered with this easy recipe. With some store-bought ingredients and a few easy steps, you can become a pro at making your own Lotus Biscoff doughnuts at home.
A smooth Biscoff doughnut is like eating a hybrid cookie doughnut. And if you’re craving some homemade Biscoff treats, here’s the perfect treat for you. Try these homemade doughnuts and you’ll be surprised how easy they are to make.
Why make these cookies
- Perfectly Soft and Fluffy Texture – The dough has the right balance of ingredients to create donuts that are light, airy, and melt in your mouth every time.
- Rich and Flavorful Filling – You must love biscoff spread because we do have a wonderfully light cream cheese biscoff filling and glaze.
- Foolproof Techniques for Beginners and Pros – From kneading the dough to frying at the perfect temperature, this recipe includes step-by-step instructions and tips to ensure success, even if it’s your first time making donuts.
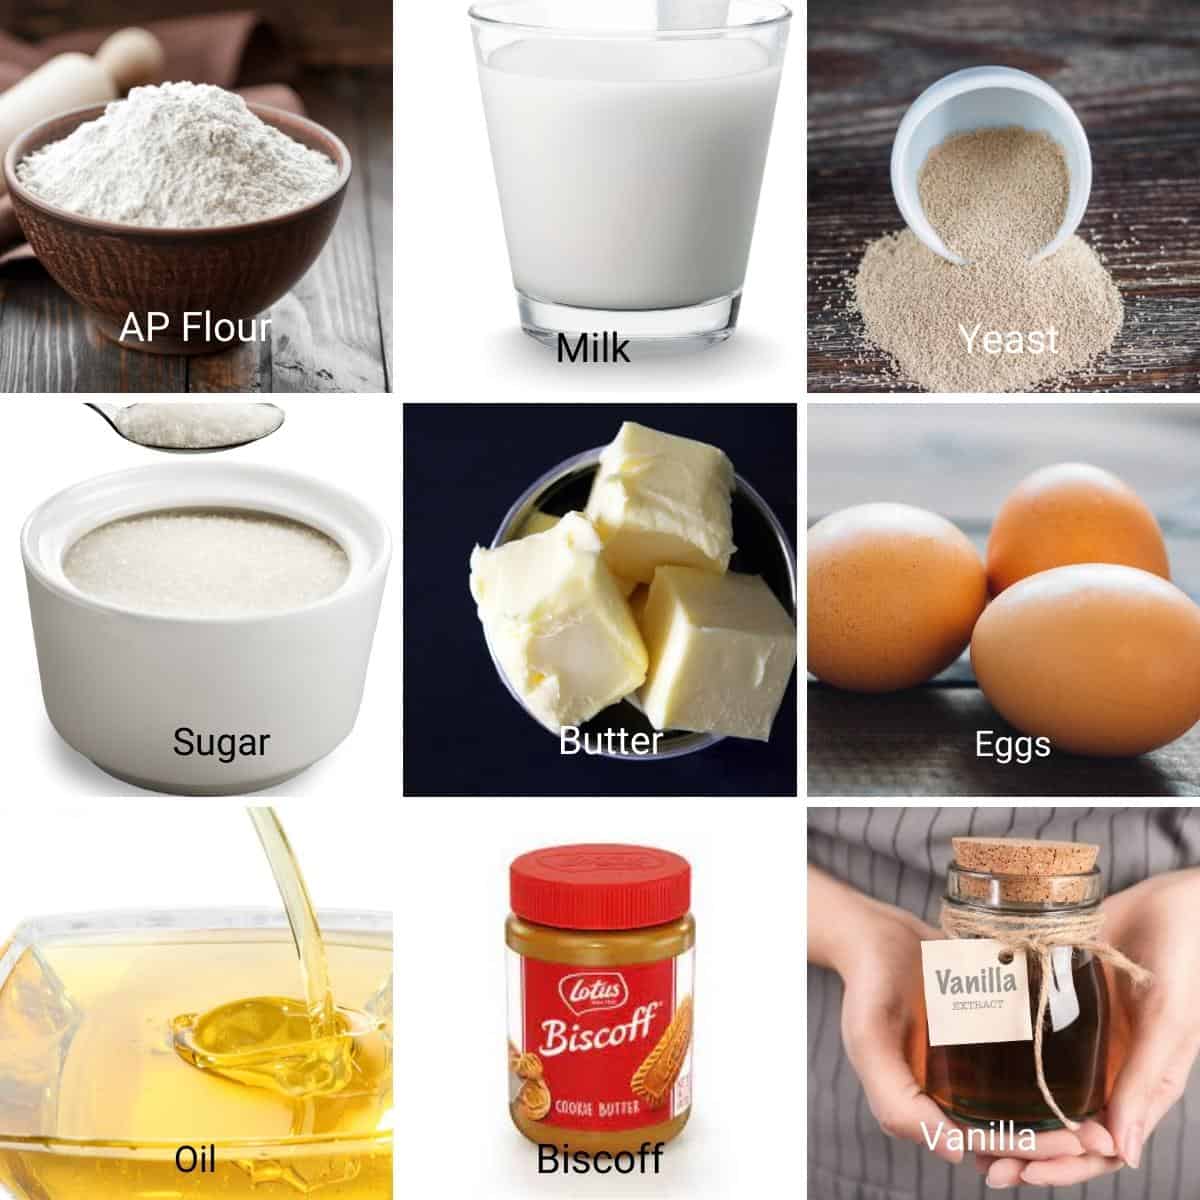
Ingredients and substitutions
- Yeast – I like to use instant dry yeast because I’ve always had great success with it. And yet, you can certainly use active dry yeast in the same quantity. And if you use fresh yeast, you will need about 21 grams for every 2 ¼ teaspoons (one packet) of dry yeast.
- Butter – This adds richness to the dough. However, do not add more butter, as they will become very dark when frying.
- Milk – I love adding a bit of richness to the dough, and milk works great in this recipe. Water will also work well. And if you do use water, you may need a little more flour in this recipe.
- Sugar – White sugar works excellently in this recipe. And yet, you can undoubtedly try brown sugar for that slight caramel-like flavor. I think the amount here is just enough for both the inside and out. But feel free to add or reduce if you want.
- Flour – Bread flour makes light and airy donuts with a soft and chewy texture. Of course, you can use all-purpose flour but, if possible, at least use 50% bread and 50% all-purpose.
- Nutmeg – I just love the flavor of nutmeg in my doughnuts but you are free to omit it.
Step-by-step: How to Make Biscoff Doughnuts
Dough
- Dry ingredients – In a bowl, combine flour, salt, and grated nutmeg.
- Yeast – In a bowl of a stand mixer with the hook attachment, combine warm milk, sugar, yeast, egg, and vanilla.
- Knead – Add the flour mixture to the yeast mixture and combine on medium-high speed until all the flour is well incorporated, making sure to scrape the bottom and sides of the bowl. Then knead for 4 to 5 minutes on medium speed.
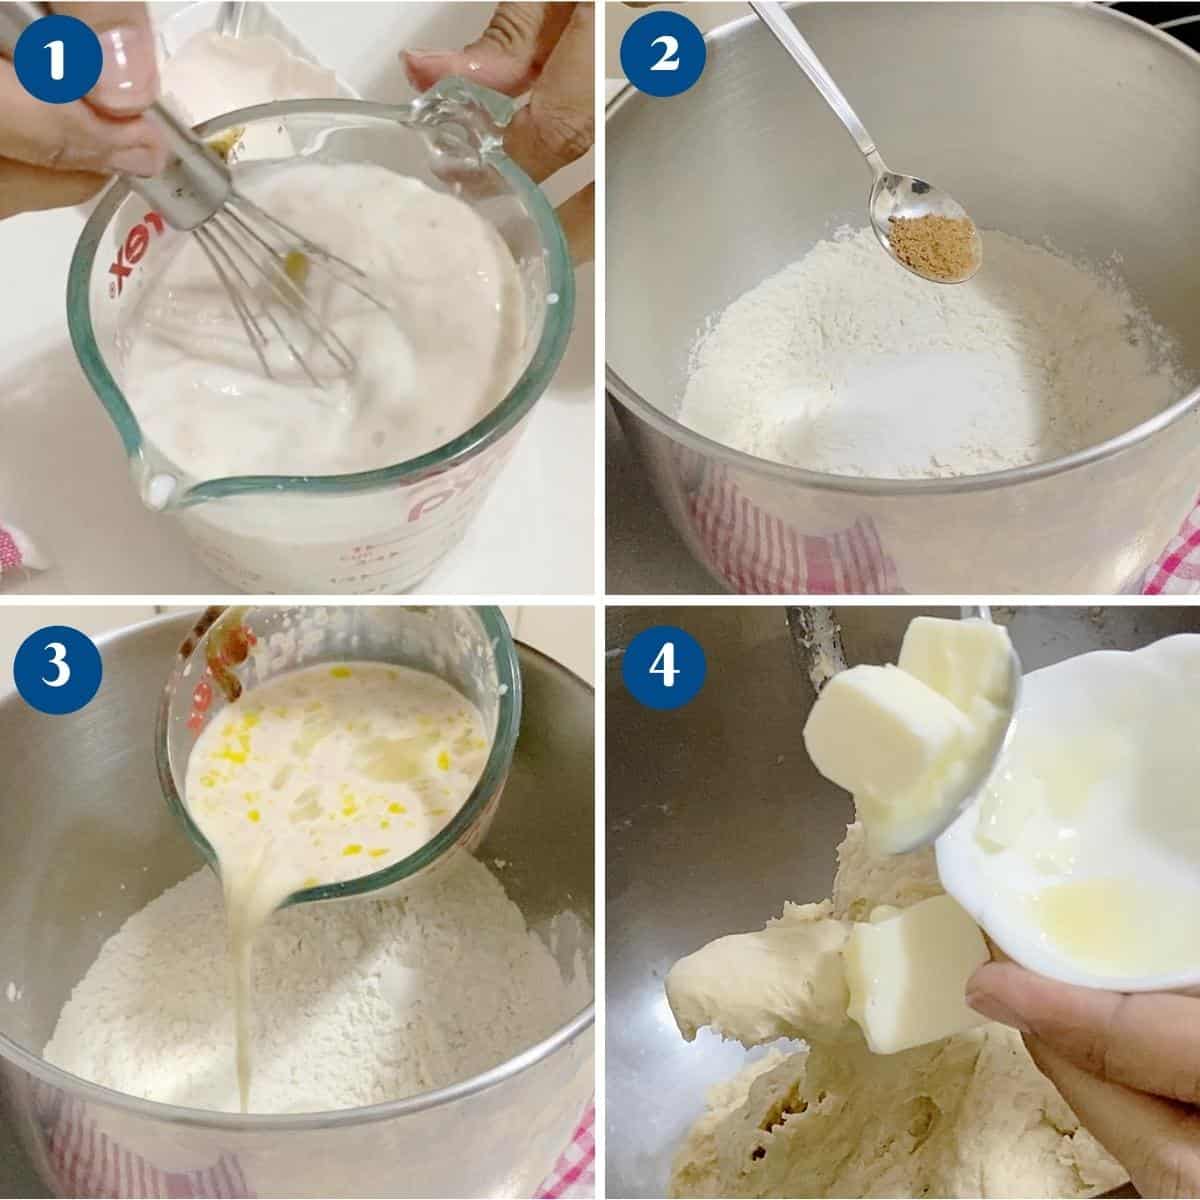
- Butter – Next, add the butter and continue to knead for 3 to 4 minutes more or until you have a smooth, elastic dough.
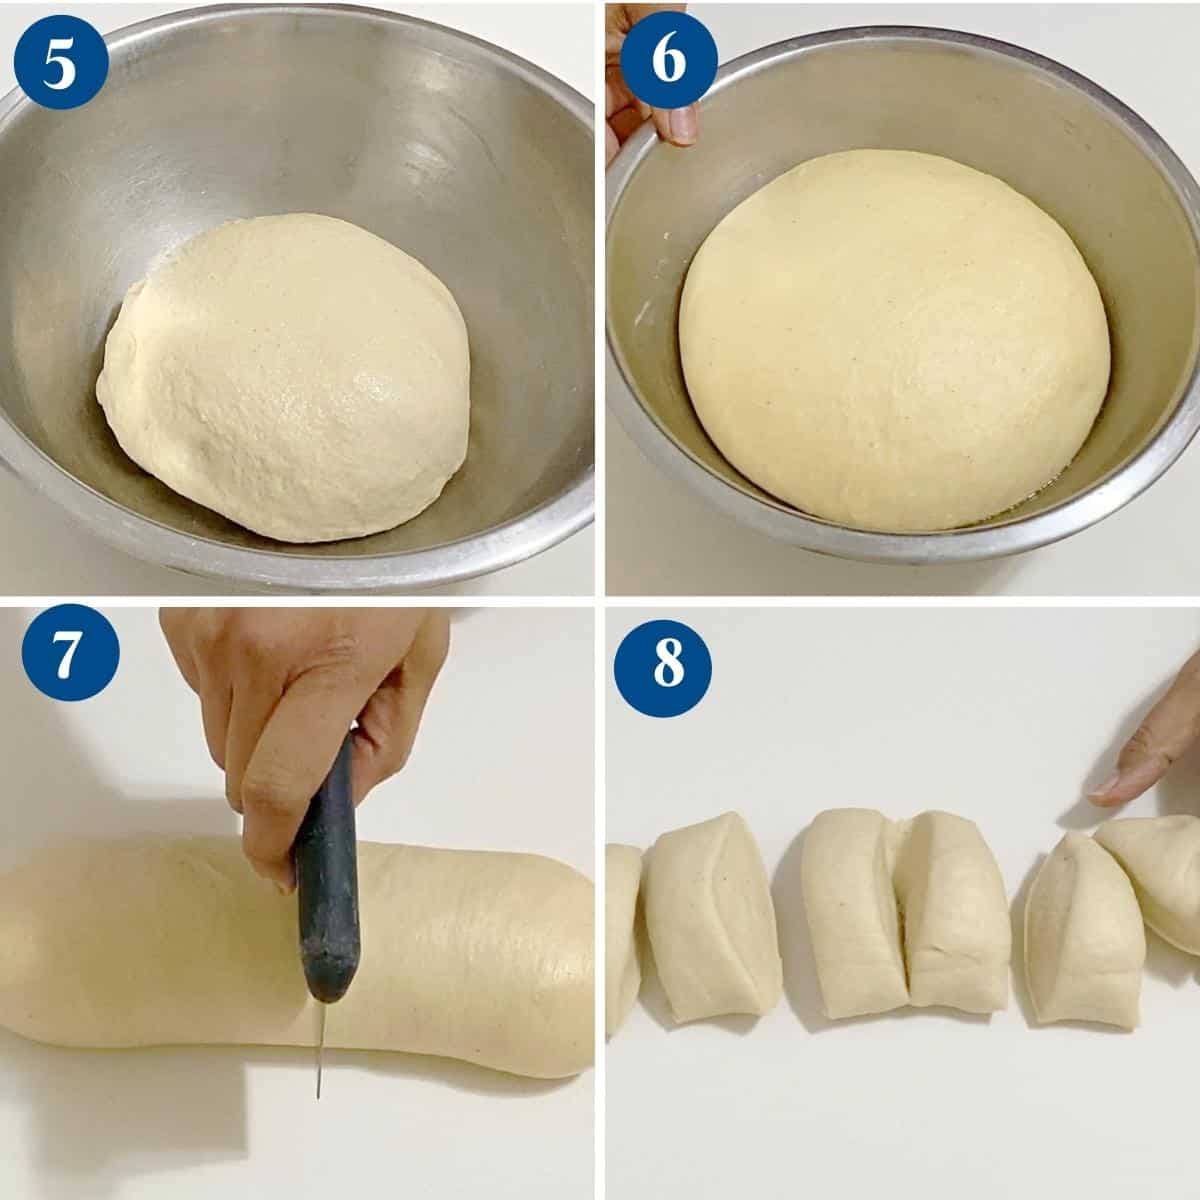
- Bowl – Place the dough in a large greased bowl, cover it with plastic wrap and let rise for 60 to 90 minutes or until double in volume.
Shaping
- Divide – Once doubled in volume – invert on a floured surface. Divide the dough into half and each half into 4 or 6 portions – making 12 small or 8 medium donuts.
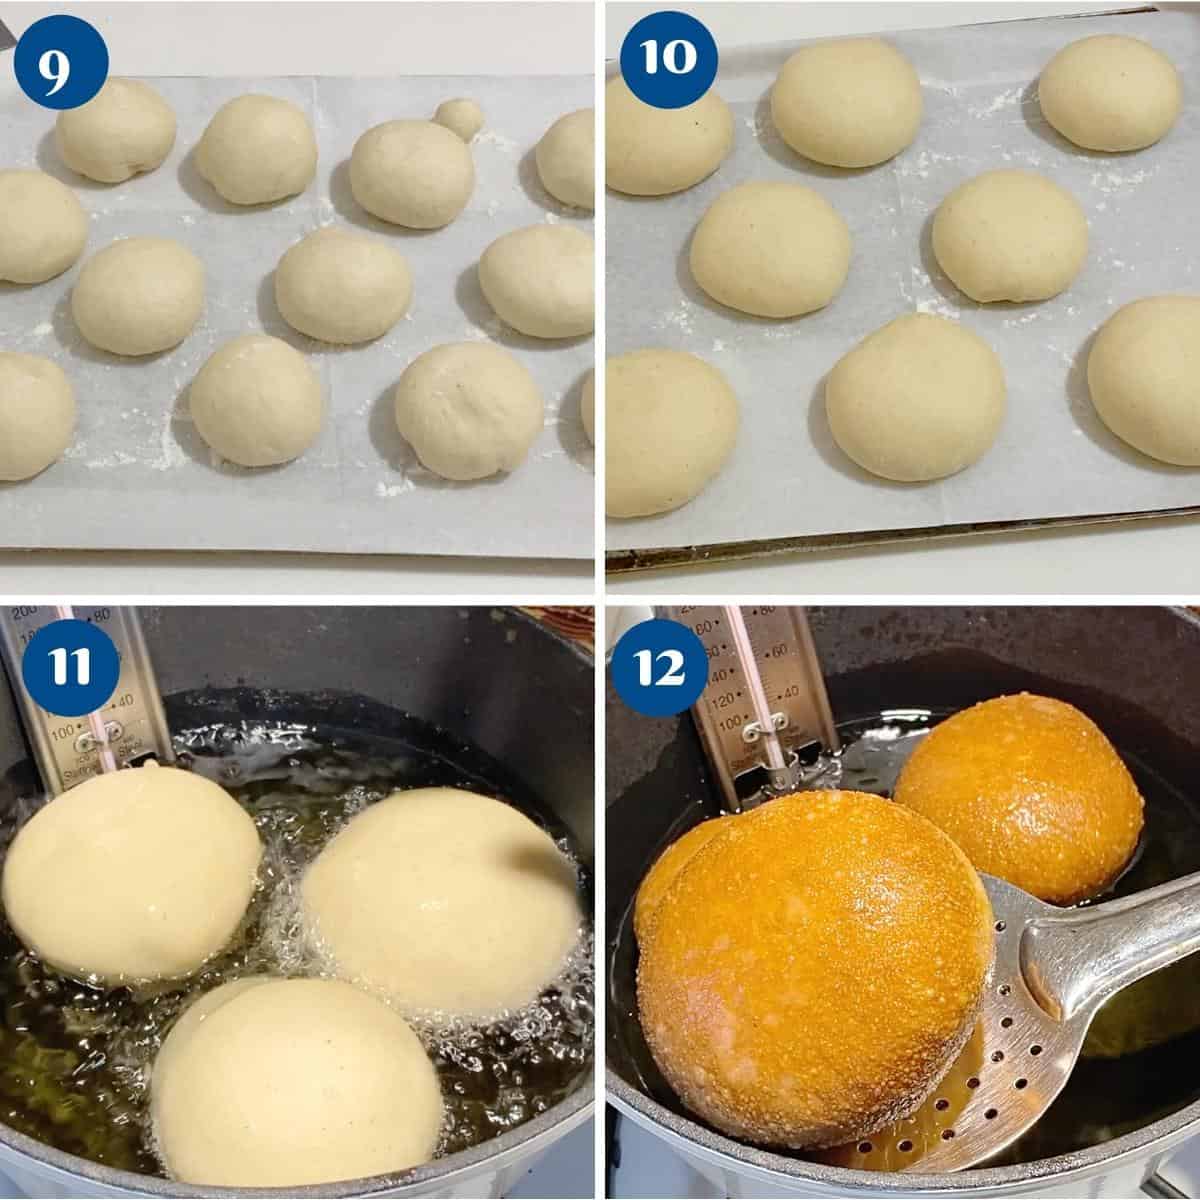
- Shape – Roll each portion into a smooth ball and place it on a baking tray lined with parchment paper dusted with flour to prevent sticking. You can also place them on individual pieces of parchment paper for easy handling.
Pro tip – Roll each piece into a smooth ball. Gather the seams and roll between your palms until you have a smooth ball. If the balls are not smooth, your doughnuts will look cracked. - Tray – Once all the balls are rolled, flatten them slightly. Cover the baking tray with a clean kitchen cloth or plastic wrap to prevent the donuts from drying.
Pro tip – Flattening will ensure you have a doughnut shape when it rises and deep-fries as compared to a ball - Proof – You can proof the donuts on the counter for 30 to 45 minutes or until they almost double in volume.
Deep-fry
- Oil – Heat vegetable oil in a large pot or deep fryer to about 350 °F to 360 ° F.
Pro tip – You don’t want the oil too hot. I like to use a Dutch oven because it keeps the heat even. They need to be cooked inside before they brown on the outside. If the oil is too hot the donuts will get too dark or stay uncooked inside. - Test oil – Add a mini doughnut to test the oil. They should rise up in 30 seconds. Once the oil is ready – add two or three doughnuts at a time.
- Deep fry – Cook for 30 seconds on one side, then flip and let cook another 30 seconds on the other side. You will need about 3 to 5 minutes per donut to cook it to a beautiful golden brown.
- Remove – Use a slotted spoon to remove them onto a paper towel and let them cool for 20 minutes before you fill and serve.
Fill, glaze and top
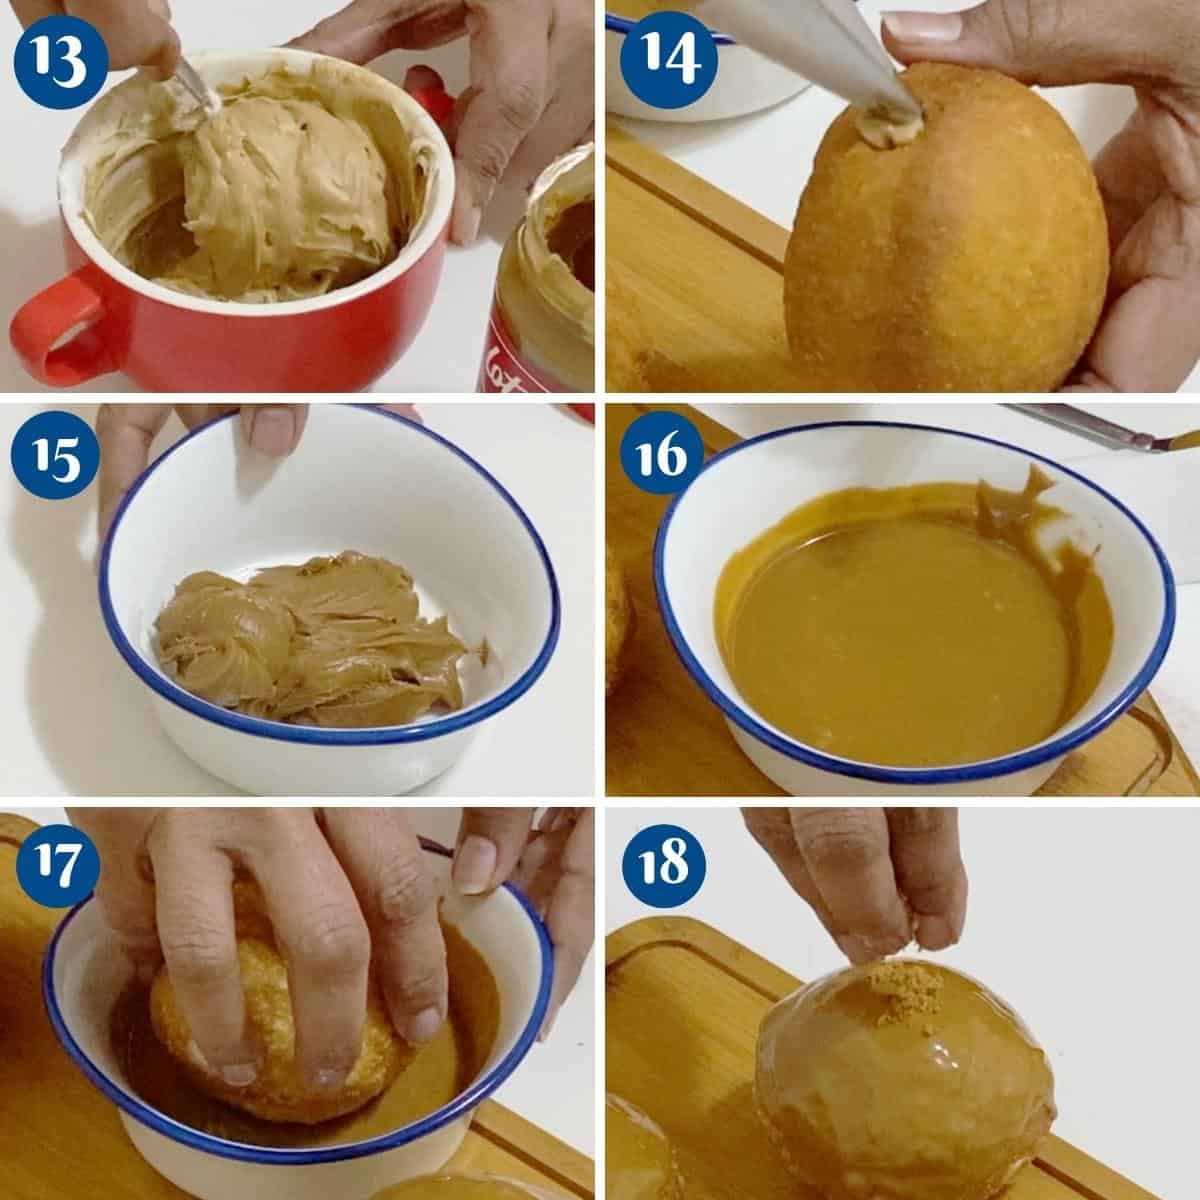
- Biscoff filling – In a small bowl, combine the cream cheese and Biscoff spread. Then, transfer the spread to a piping bag with a bismarck piping tip or similar. Fill each doughnut with about 1 to 2 tablespoons of paste.
- Biscoff glaze – In a microwave-safe bowl, melt the Biscoff spread until you have a smooth glaze consistency. Dip each doughnut in the glaze and top with some crushed biscuits.
Pro tip – Add the biscoff crumbs when the glaze is still wet so it sticks.

Biscoff Doughnuts
If you haven’t had the sweet Biscoff cookies slathered inside a doughnut, have you ever really eaten a doughnut? We’ve got you covered with this easy recipe. With some store-bought ingredients and a few easy steps, you can become a pro at making your own louts Biscoff doughnuts at home.
Video
Ingredients
- 500 g (4 cups) Bread flour or 50% bread and 50% all-purpose flour
- ¼ tsp Nutmeg
- ½ tsp Salt
- 250 g (1 cup) Warm milk about 110 F
- 100 g (2 large) Eggs
- 7 g (2¼ tsp) Instant dry yeast
- 60 g (4 tbsp) Sugar
- 60 g (4 tbsp) Butter unsalted, room temperature
- 1 tsp Vanilla extract
- 1 ltf (4 cups) Vegetable oil
- 113 g (½ cup) Cream cheese
- 113 g (½ cup) Lotus biscoff spread
- 226 g (1 cup) Lotus biscoff spread
- 60 g (¼ cup) Biscoff biscuits crushed
Method
- Dry ingredients – In a bowl, combine flour, salt, and grated nutmeg.500 g Bread flour, ¼ tsp Nutmeg, ½ tsp Salt
- Yeast – In a bowl of a stand mixer with the hook attachment, combine warm milk, sugar, yeast, egg, and vanilla.250 g Warm milk , 100 g Eggs, 7 g Instant dry yeast , 60 g Sugar, 1 tsp Vanilla extract
- Knead – Add the flour mixture to the yeast mixture and combine on medium-high speed until all the flour is well incorporated making sure to scrape the bottom and sides of the bowl. Then knead for 4 to 5 minutes on medium speed.
- Butter – Next, add the butter and continue to knead for 3 to 4 minutes or until you have a smooth, elastic dough.60 g Butter
- Bowl – Place the dough in a large greased bowl, cover it with plastic wrap and let rise for 60 to 90 minutes or until double in volume.
- Divide – Once double in volume – invert on a floured surface. Divide the dough into half and each half into 4 or 6 portions – making 12 small or 8 medium donuts.
- Shape – Roll each portion into a smooth ball and place it on a baking tray lined with parchment paper dusted with flour to prevent sticking. You can also place them on individual pieces of parchment paper for easy handling.
- Tray – Once all the balls are rolled, flatten them slightly. Cover the baking tray with a clean kitchen cloth or plastic wrap to prevent the donuts from drying.
- Proof – You can proof the donuts on the counter for 30 to 45 minutes or place them in the fridge for about 60 to 90 minutes until they almost double in volume.
- Oil – Heat vegetable oil in a large pot or deep fryer to about 350 °F to 360 ° F.1 ltf Vegetable oil
- Test oil – Add a mini doughnut to test the oil. They should rise up in 30 seconds. Once the oil is ready – add two or three doughnuts at a time.
- Deep fry – Cook for 30 seconds on one side then flip and let cook another 30 seconds on the other side. You will need about 3 to 5 minutes for each donut to cook and be beautifully golden brown.
- Remove – Use a slotted spoon to remove them onto a paper towel and let them cool for 20 minutes before you fill and serve.
- Biscoff filling – In a small bowl, combine the cream cheese and Biscoff spread. Transfer the spread to a piping bag with a bismark piping tip or similar. Fill about one to two teaspoons of paste in each doughnut.113 g Cream cheese, 113 g Lotus biscoff spread
- Biscoff glaze – In a microwave-safe bowl, melt the biscoff spread until you have a smooth glaze consistency. Dip each doughnut in the glaze and top with some crushed biscuits.226 g Lotus biscoff spread, 60 g Biscoff biscuits
Notes
- Keep the dough soft and slightly sticky; avoid adding too much flour.
- Make sure the milk is warm, not hot, before adding the yeast.
- Let the dough rise until doubled for the lightest donuts.
- Chill shaped donuts before frying so they are easier to handle.
- Maintain a steady oil temperature and adjust the heat between batches.
- Fill and decorate the donuts after they have cooled.
Equipment you will need


Nutrition
Tried this recipe?
Mention @veenaazmanov_kitchen or tag #veenaazmanovkitchen!Tips for Success
- Use warm milk, not hot milk – The milk should feel comfortably warm to the touch. If it’s too hot, it can kill the yeast; if it’s too cold, the dough will take longer to rise.
- Keep the dough soft – Avoid adding too much extra flour. A slightly sticky, elastic dough creates softer, lighter donuts after frying.
- Chill before frying – After shaping and proofing, chill the donuts briefly. This firms the dough, making them easier to lift and helping them hold their shape.
- Watch the oil temperature – Oil that is too hot will brown the donuts before the inside cooks, while oil that is too cool will make them absorb more oil.
- Test the oil first – Fry a small piece of dough before starting. It should rise to the surface within about 30 seconds and bubble gently.
- Fry in small batches – Adding too many donuts at once lowers the oil temperature and can affect the texture.
easy donut recipes


Frequently asked questions
Donuts are best eaten fresh the day they are made, but you can keep them for a day or two. It is best to keep them in a paper bag rather than plastic as plastic makes them soggy. Also, you can freeze cooled donuts for months in the freezer.
I use canola oil. It has a neutral flavor and a high smoke point. Also, it works best when deep-frying bread and sweet treats like churros and doughnuts.
Yes, just let the dough rise in the fridge. It will continue to prove but at a slower pace. Remove it an hour or two before you plan to shape the doughnuts, so it comes to room temperature. Shape and proof as directed in the recipe below.
more donuts recipes
- Dulce De Leche Donuts
- Loukoumades Greek Honey Donuts
- Mini Pumpkin Cake Donuts
- Baked Doughnuts (Jam Donuts)
- Sourdough Donuts • 3 Glazes
- Cinnamon Sugar Pumpkin Donuts • (Deep Fried)
- Cream Filled Donuts • 2 Methods, 6 Fillings


Don’t lose this recipe! Save it for Later!
📌 Save this Recipe for later on Pinterest so you can easily find it again.
⭐ Add Veena Azmanov Kitchen to your Google Preferred Sources.
It helps Google show you more of our recipes.
📧 Subscribe for new recipes delivered to your inbox.
🎥 Follow us for more recipes


These doughnuts are very easy to make and taste amazing, however they need a lot more sugar than the recipe says.
You can definitely add more sugar JedM.
Made these for breakfast this morning and they did not disappoint! The perfect sweet treat to start my day; my whole family loved them!
Thank you for the feedback, Sara. Happy you enjoyed these doughnuts.
THESE DONUTS LOOK AMAZING!
I am drooling over these dougnuts. I wish I could grab one. Pinned to try this soon.