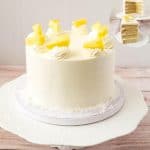
Baked Doughnuts (Jam Donuts)
 Prep Time 30 minutes Cook Time 20 minutes Total Time 2 hours 50 minutes


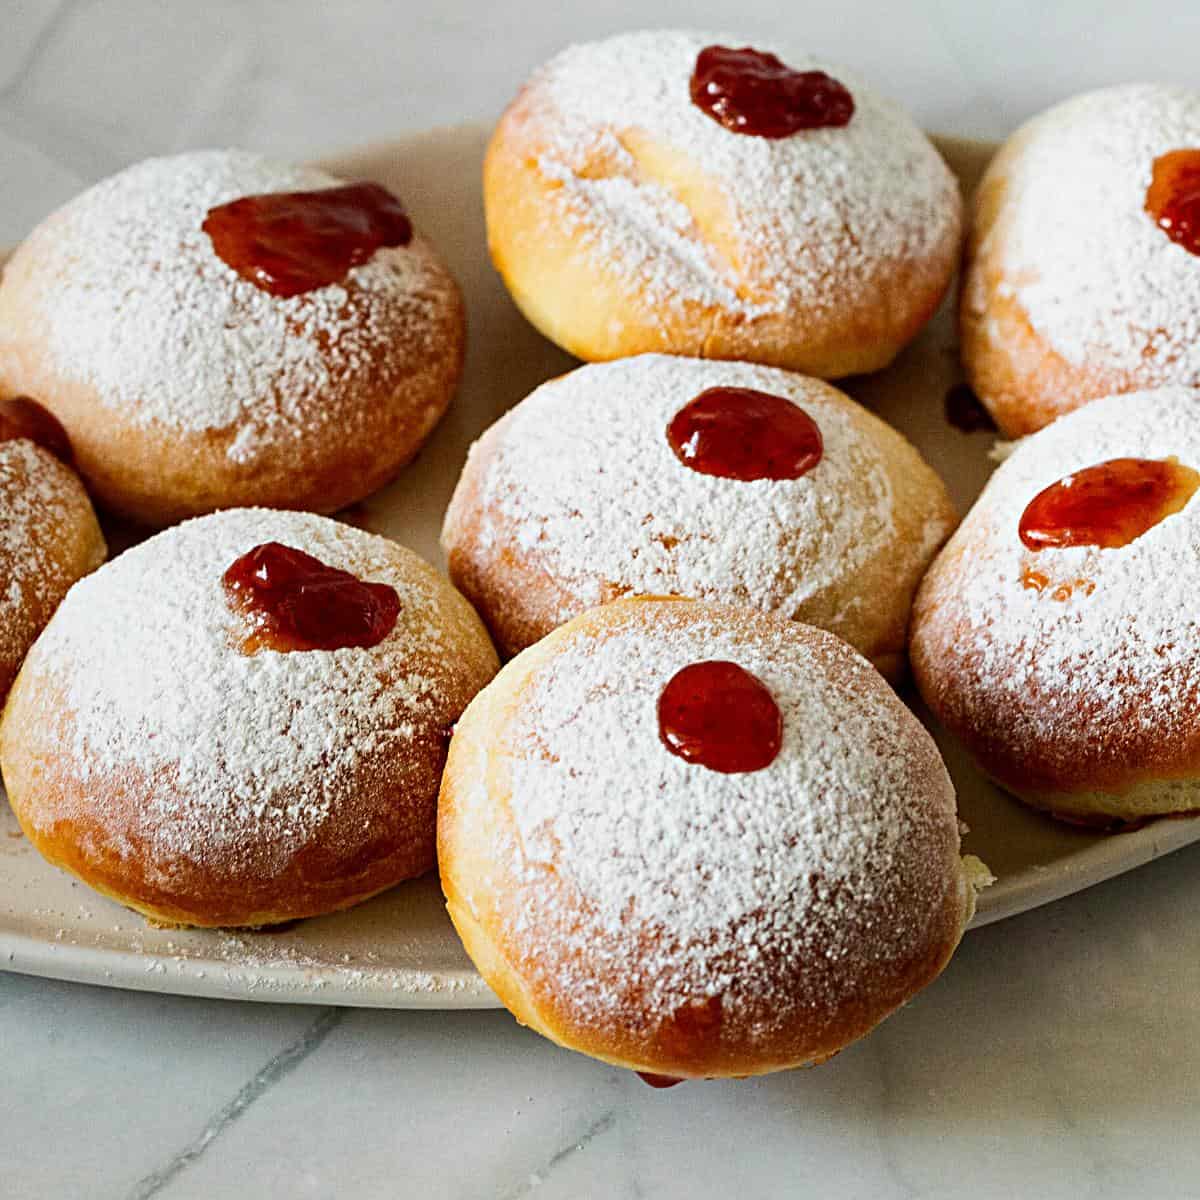
These baked doughnuts are a healthier version of the Israeli sufganiyot or jam donuts. Made with brioche dough stuffed with jam, and then baked, not deep-fried.
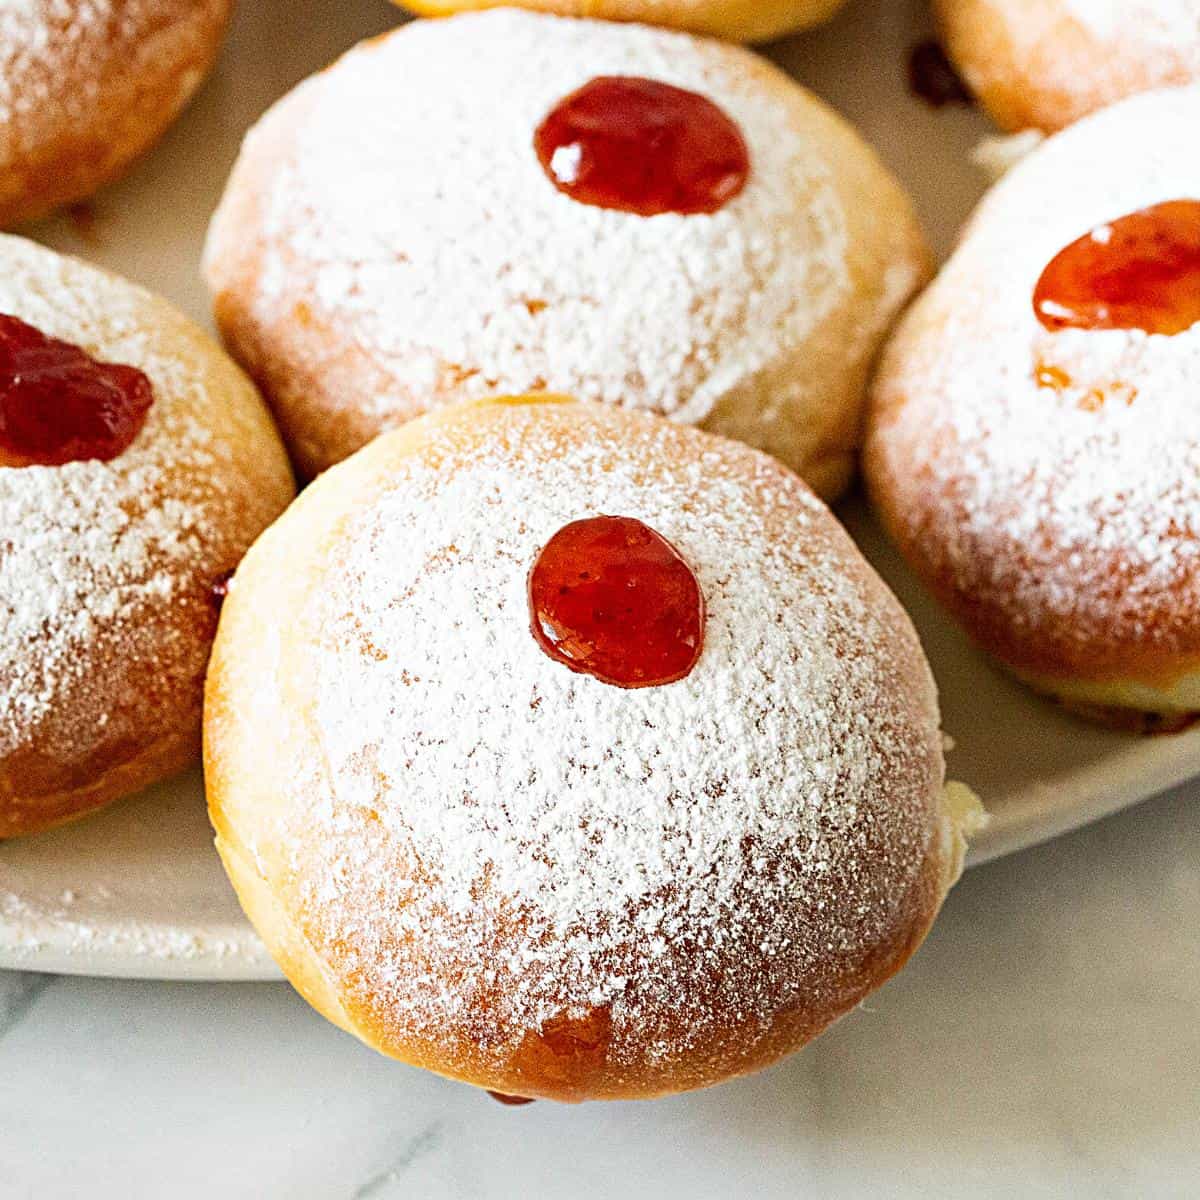
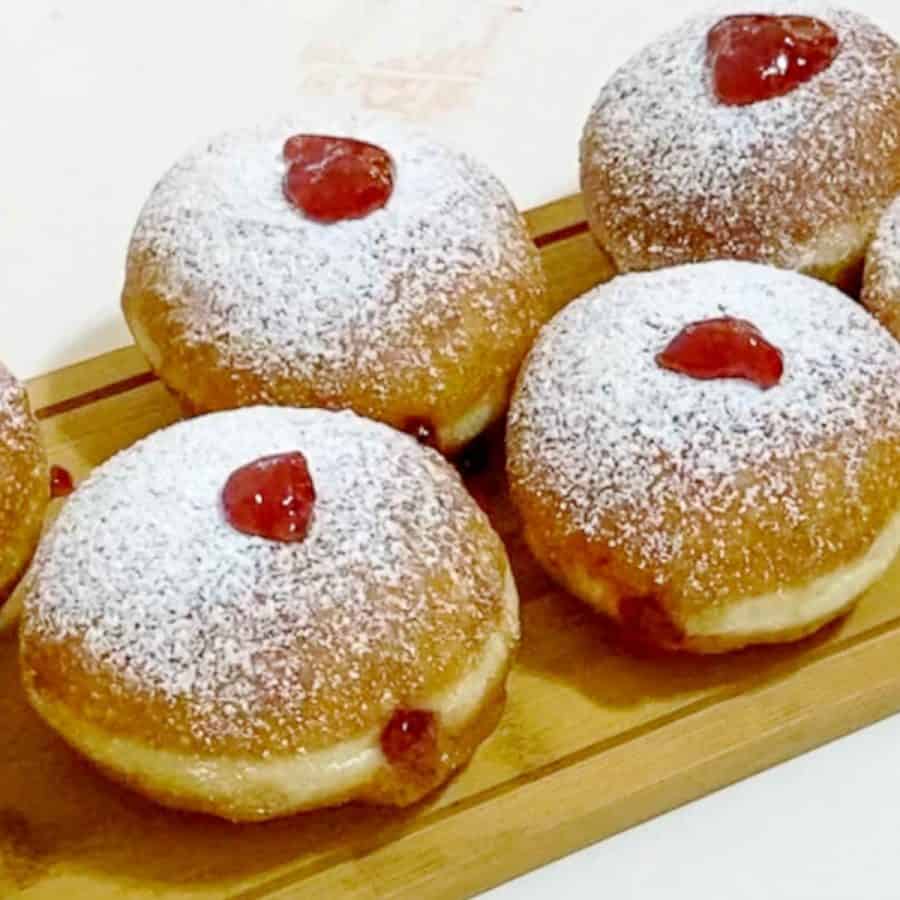
Look how pretty these are. And while they look like the classic deep-fried pastry, guess what? These are baked!!
Well, every Hanukkah, we go through a few batches of donuts. So, it is simply fair that I substitute some of those with these baked versions. Baked doughnuts are healthier than regular fried doughnuts because they avoid most, if not all, of the oil.
Why you’ll love these donuts
- Baked doughnuts are not fried, but they have the same tasty filling and sweet topping.
- Also, because these are beautifully enriched, they are also probably the simplest and easiest to make.
- And the process is easier than ring donuts because we don’t roll and cut the donuts with cutters. Instead, we shape them into buns.
- And, of course, these are so much more affordable and healthier, so your kids can eat as many as they want.
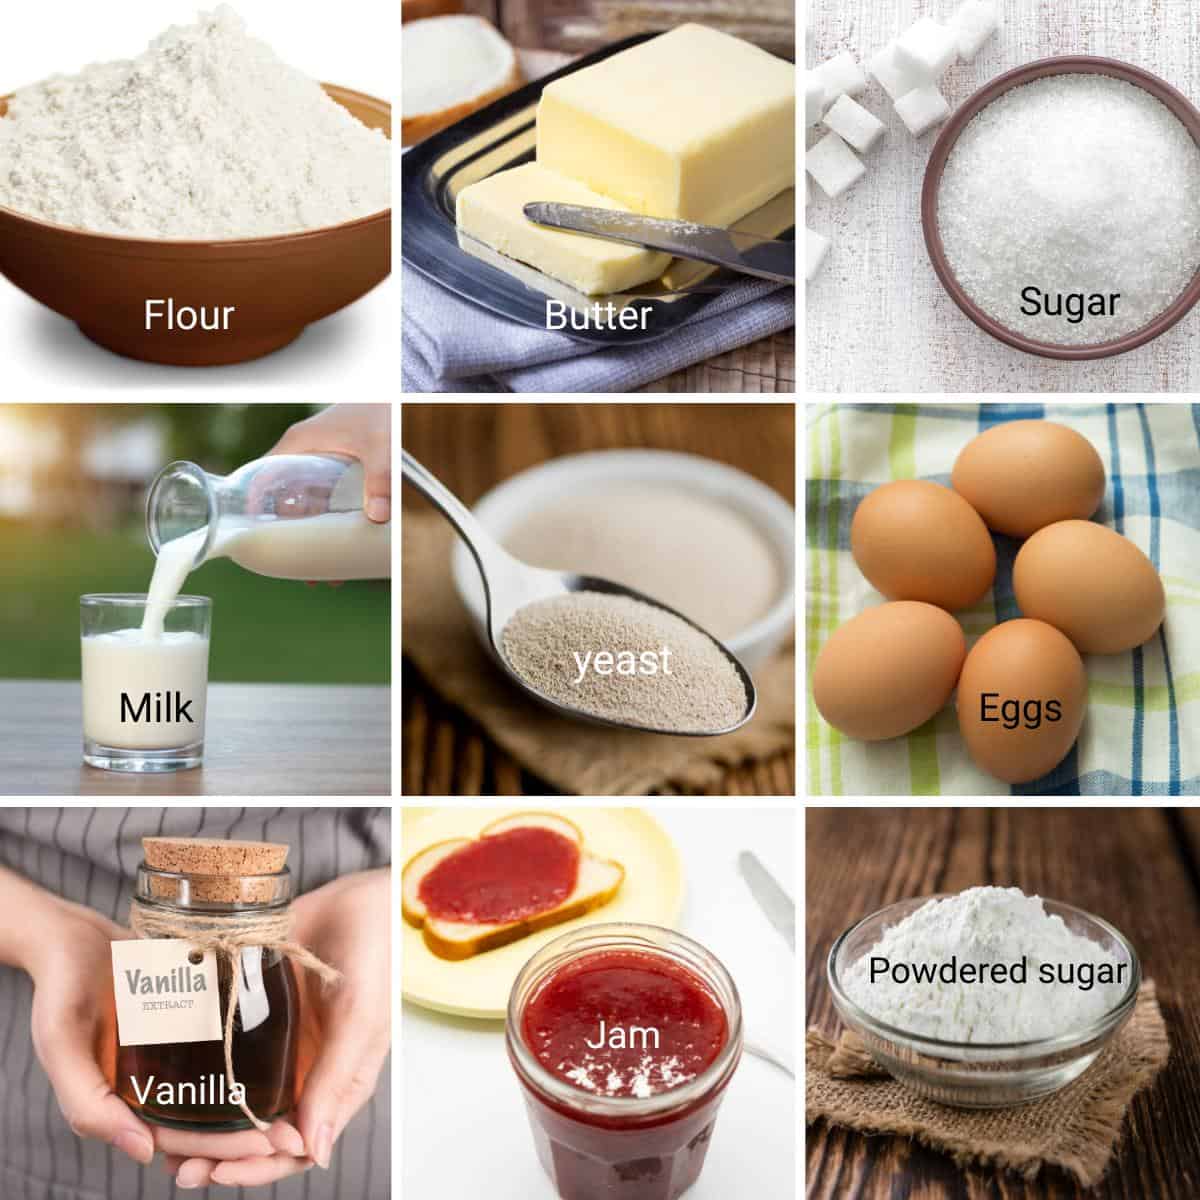
Ingredients and substitutes
- Flour – Bread flour is recommended for making homemade bread because it is high in protein. But you can certainly use all-purpose flour with a bit more kneading.
- Instant dry yeast – I like to use instant dry because I’ve always had great success with it. And if you have to, use the same amount of active dry yeast or 21 grams of fresh or baker’s yeast.
- Sugar – Brioche is a slightly sweeter dough than most everyday bread. But it enriches the dough and makes it so much more wonderful, soft, and rich.
- Butter – This is a rich dough with a large amount of room-temperature unsalted butter. That’s what makes these so buttery, soft, and delicious.
- Egg – I like my buns richer. So, instead of whole eggs, I prefer to use all yolks. But you can certainly use whole eggs.
- Milk – Use whole milk. It enhances the flavor and tenderizes the dough, giving it a soft texture.
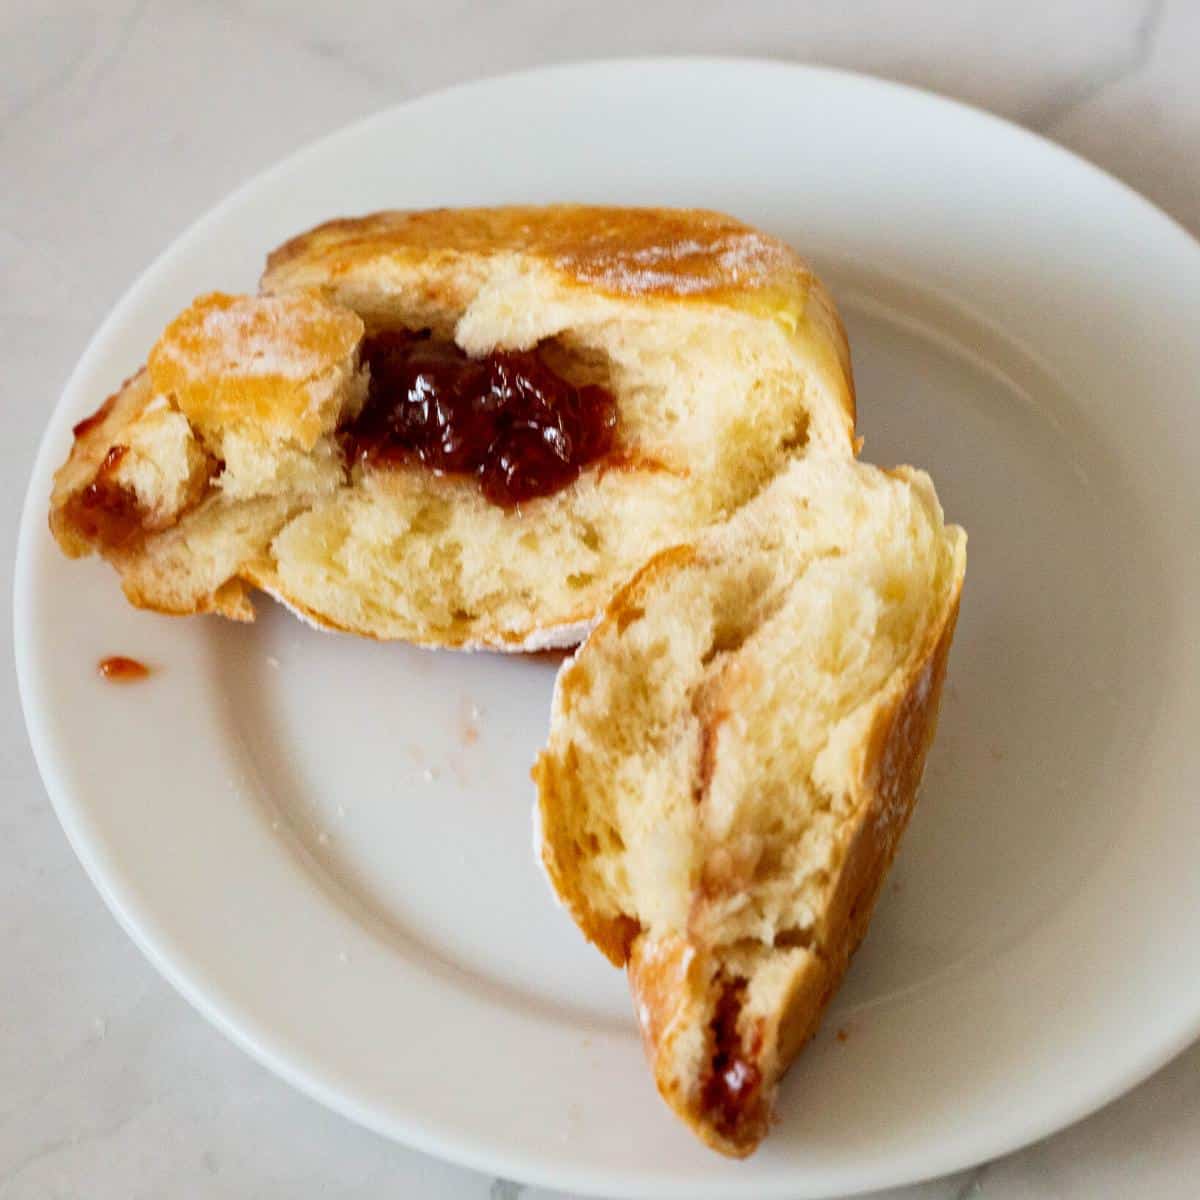
- Filling – I am using strawberry and blueberry jam today, but you can also use a chocolate square, Nutella, dulce de leche, Bischoff, etc, instead of jam.
Step-by-step: Baked doughnuts (Filled with jam or glazed)
Doughnut dough
- Yeast mixture – In the bowl of a stand mixer with the hook attachment, on medium speed, combine the warm milk, yeast, sugar, and eggs.
Pro tip – While most doughs can be kneaded by hand, a brioche is rich in butter. So, it is best to use a stand mixer for kneading. - Flour – Combine salt with the flour, then add it to the mixer as well. Combine on medium-high speed for about a minute or two, scraping the sides of the bowl.
- Knead – Once all the flour is incorporated, knead the dough on medium speed for 4 to 5 minutes until smooth. The dough will be soft and sticky but quite elastic.
Pro tip – It is best to knead the dough on medium to low speed, not too high.

- Butter – Next, add the soft room-temperature butter and continue to knead again for 3 to 4 minutes on medium-low until smooth, elastic, and soft.
Pro tip – This is a very soft and loose dough, so resist the temptation to add more flour. - Bowl – Remove the dough from the mixer bowl onto a lightly floured work surface. Shape into a smooth ball.
- Rise – Place in an oiled bowl and cover with plastic wrap or a damp kitchen cloth. Leave to rise in a warm place for 60 to 90 minutes.
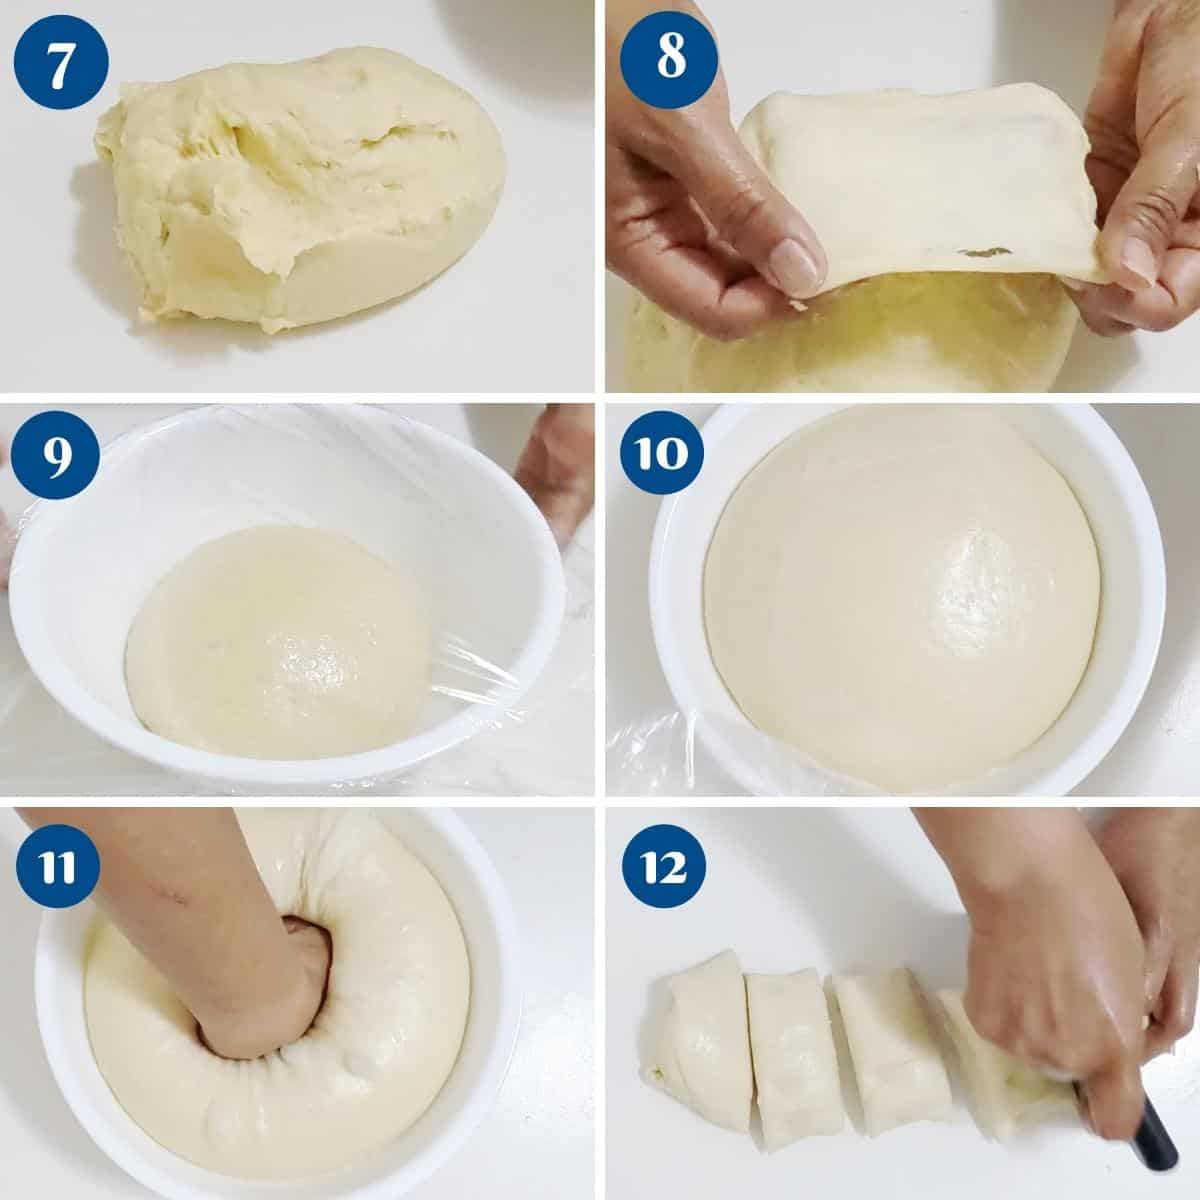
Divide and Shape
- Divide – Transfer the dough to a clean, floured work surface. Divide the dough into two portions, and then each portion into six to make a total of 12 donuts. Shape into a ball and set aside.
Pro tip – You can also make 16 smaller buns of about 60 grams each. - Fill and shape – Flatten each ball of dough and place a tablespoon of jam in the middle. Bring all the sides together and pinch them all together into a tight seam. Shape them into a smooth ball.
Pro tip – Do not over-stuff the donuts. Otherwise, they will burst during baking.
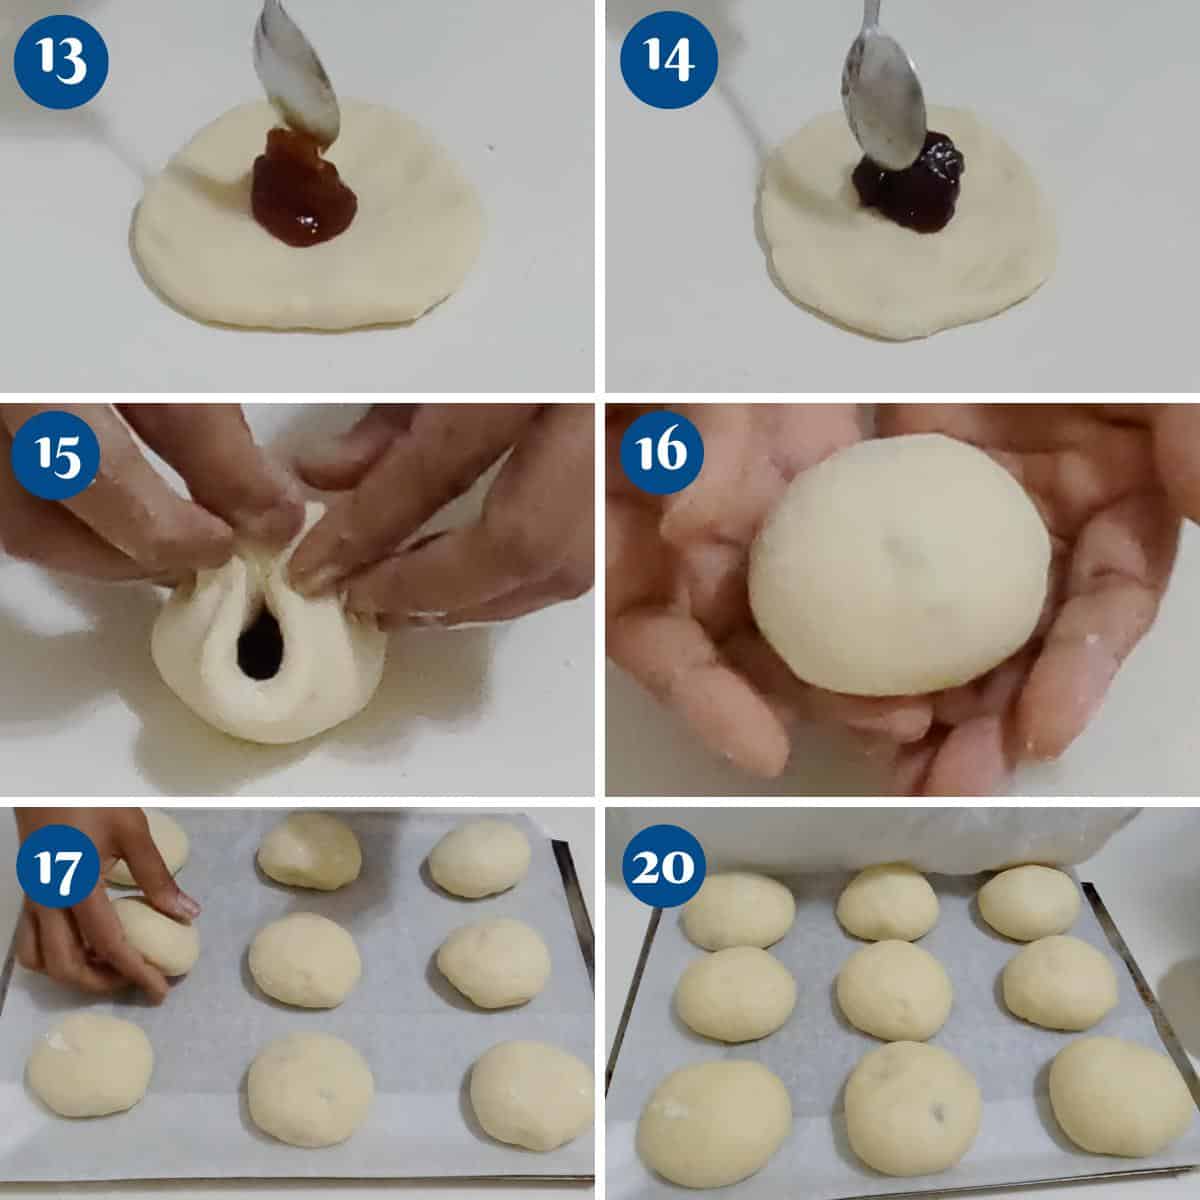
- Tray – Place the buns, seam side down, on a baking tray lined with parchment paper or silicone mat, leaving enough room for them to rise.
Pro tip – Make sure the top surface is smooth, and all the seams are well tucked under. - Proof – Cover with plastic wrap or clean kitchen cloth and let them proof for 60 to 90 minutes on the counter or until doubled in size.
Pro tip – Spray the plastic wrap with oil to prevent it from sticking to the rolls.
Bake
- Preheat oven – Preheat the oven to 190°C / 375°F / Gas mark 5.
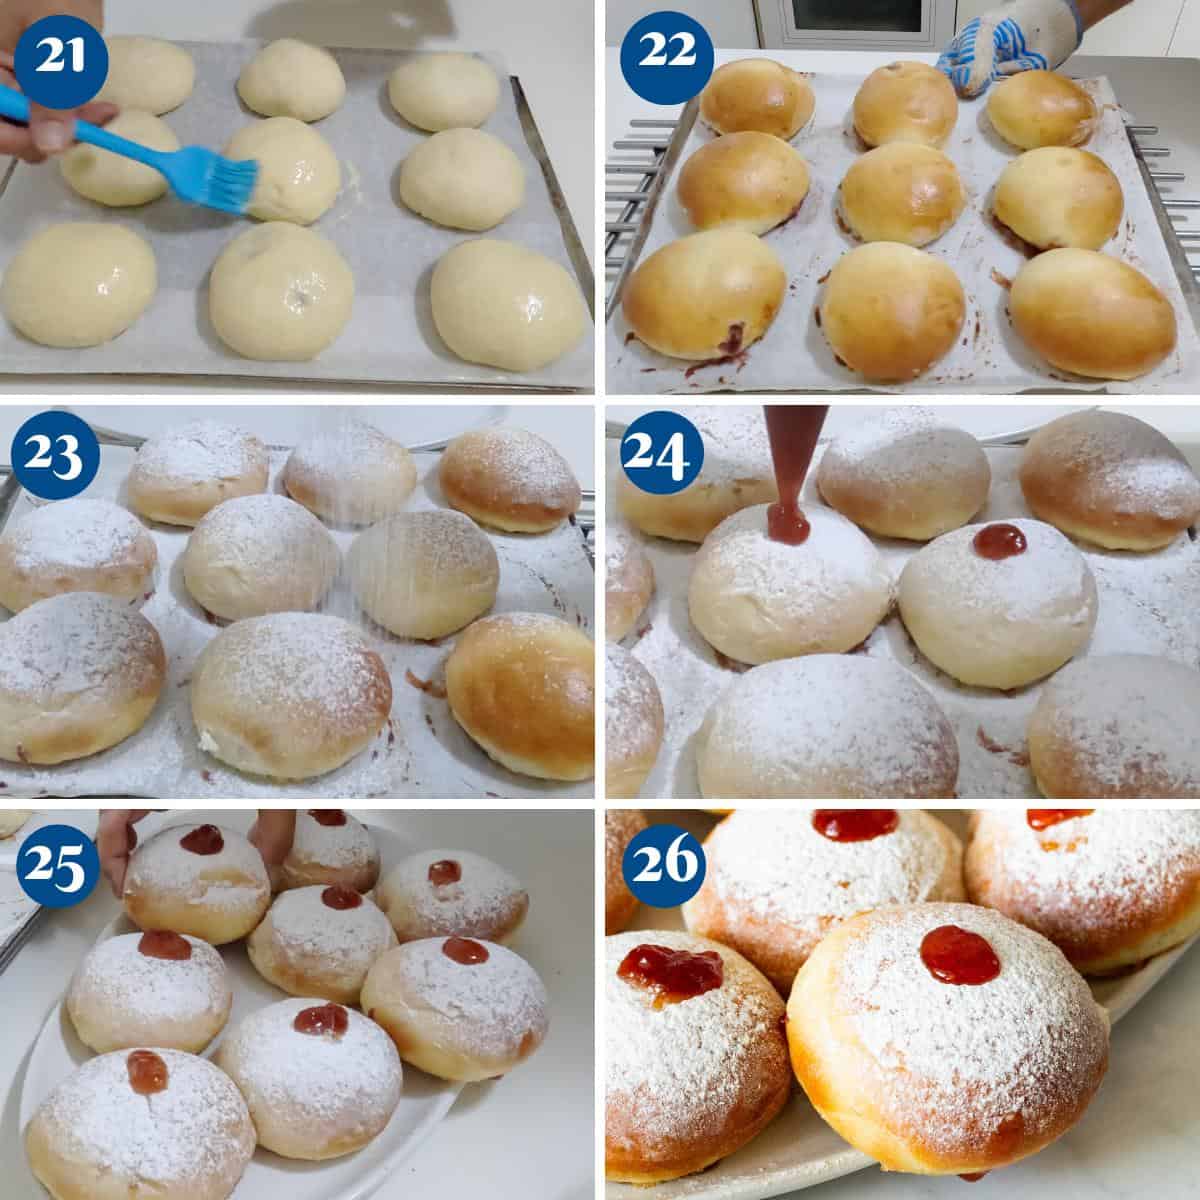
- Bake – Brush each bun with an egg wash and bake in the preheated oven for 18 to 20 minutes. When baked, let cool on the counter for 10 minutes.
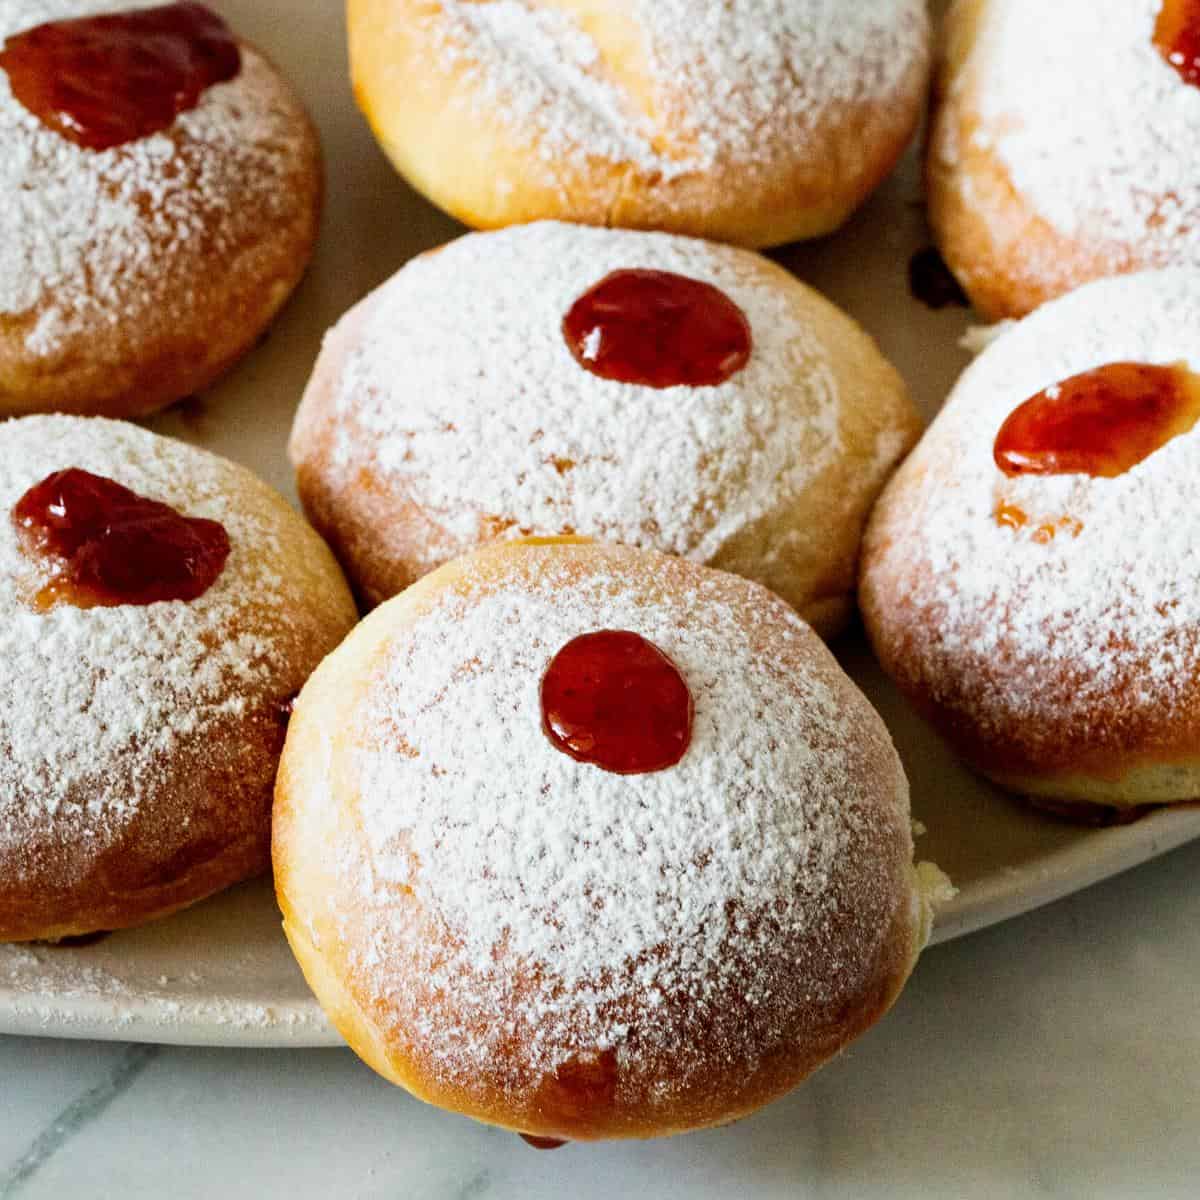
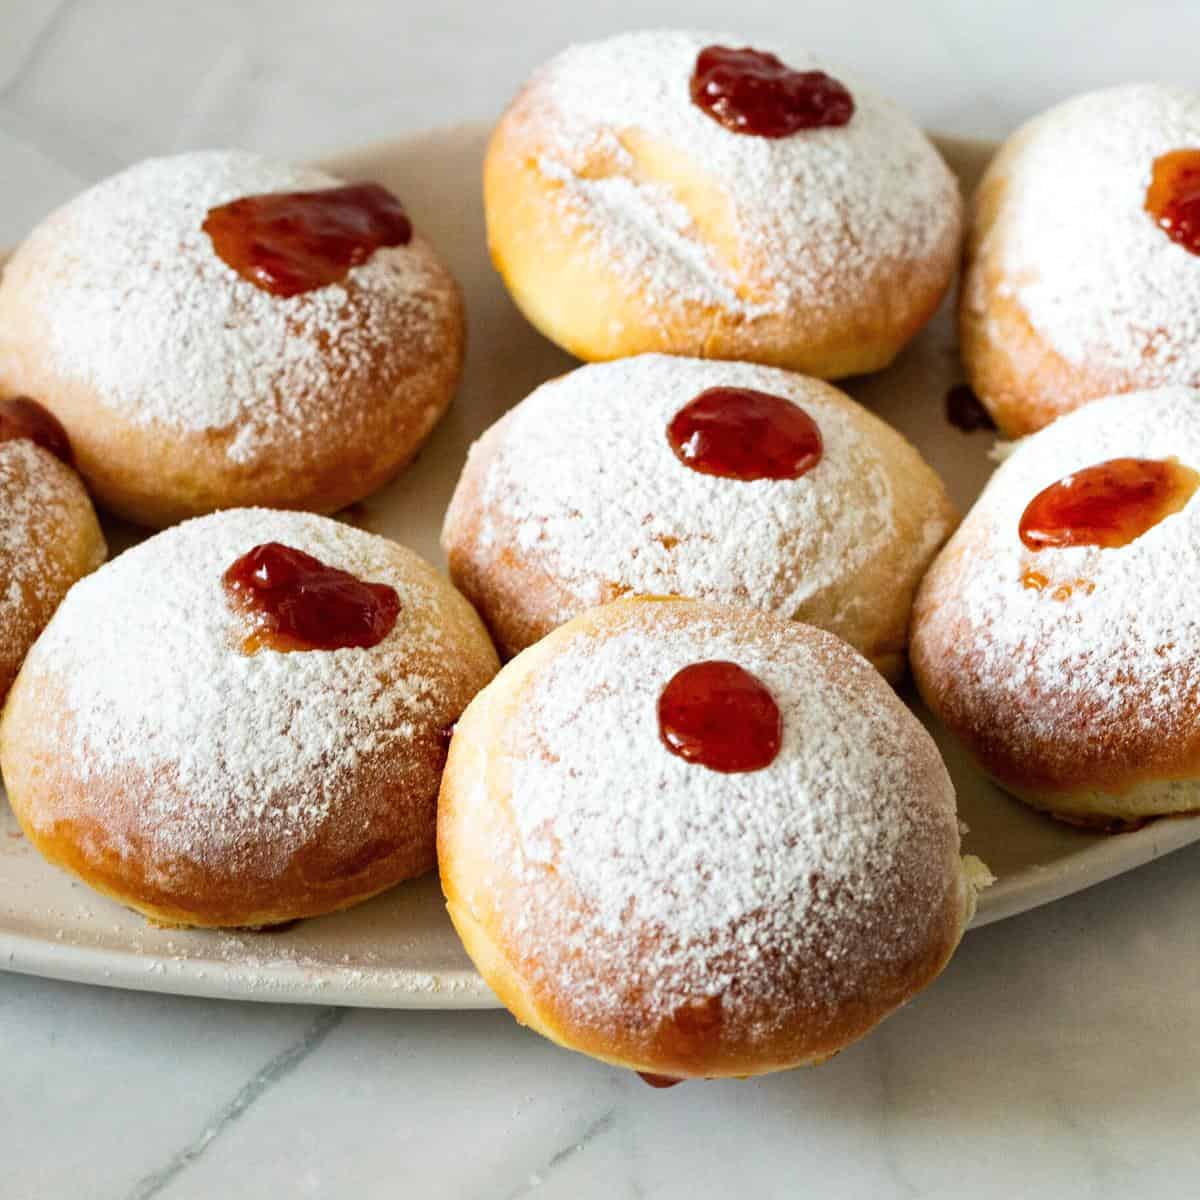
- Dust – Let the donuts cool completely. Then, dust them with powdered sugar and top each with a teaspoon of jam.
Pro tip – Let the donuts cool completely before you dust and top. Otherwise, the sugar and jam will melt.
Tips for success
- For accuracy, use a weight scale for the ingredients because every cup of flour can weigh differently depending on how you fill it.
- The milk temperature – It is very important to ensure the milk is warm, not hot or cold. You don’t need a thermometer to check – that’s just a guide.
- To check if the milk is at the right temperature, just stick your clean little finger in. You should be able to hold it in for a minute; if not, it’s too hot. Best to wait until it’s just warm.
- Keep the dough soft, elastic, and slightly sticky. The softness in the dough (not extra butter) will produce melt-in-your-mouth donuts when fried. I admit that soft dough is more difficult to handle. So that’s why I have a second tip for you.
- Kneading is key to making good bread. While kneading by hand can be therapeutic, using a stand mixer is easier and quicker.
- Greek Yogurt Donuts
- Cream-filled donuts – raspberry, strawberry, blackberry
- Dulce De Leche Donuts
- Fried Tiramisu Donuts
- Chocolate Glazed Donuts


Frequently asked questions
Unlike deep-fried donuts, these baked ones have a longer shelf life. They will stay fresh on the counter for up to 3 days. You can even freeze them for a month or more.
Yes, just let the dough rise in the fridge. It will continue to prove, but at a slower pace. Remove it an hour or two before you plan to shape the doughnuts, so it comes to room temperature. Shape and proof as directed in the recipe below.
Baked doughnuts can be topped with a variety of glazes, such as chocolate, vanilla, maple, or fruit-flavored glazes. You can also add sprinkles, chopped nuts, shredded coconut, or even crushed cookies for texture and flavor.
Yes, you can make gluten-free baked doughnuts by using gluten-free flour blends, and you can make vegan versions by substituting ingredients like non-dairy milk and egg replacers in the recipe.
Store leftover baked doughnuts in an airtight container at room temperature for up to two days. For longer storage, freeze them in an airtight container or freezer bag.
Baked Doughnuts – Baked Sufganiyot with Jam
These baked doughnuts are a healthier version of the Israeli sufganiyot or jam donuts. Made with brioche dough stuffed with jam and then baked, not deep-fried.
Video
Ingredients
- ½ Egg yolk + 2 tbsp milk for eggwash
- ½ tsp Jam I used strawberry and blueberry
- 2 tbsp Powdered sugar
Method
- Yeast mixture – In the bowl of a stand mixer with the hook attachment, on medium speed, combine the warm milk, yeast, sugar, and eggs.240 g Milk, 75 g Sugar, 150 g Eggs, 12 g Active dry yeast
- Flour – Combine salt with the flour, then add it to the mixer. Combine on medium-high speed for about a minute or two, scraping the sides of the bowl.620 g Bread flour, 10 g Salt
- Knead – Once all the flour is incorporated, knead the dough on medium speed for 4 to 5 minutes until smooth. The dough will be soft and sticky but quite elastic.
- Butter – Next, add the soft room-temperature butter and continue to knead for 3 to 4 minutes on medium-low until smooth, elastic, and soft.170 g Butter
- Bowl – Remove the dough from the mixer bowl onto a lightly floured work surface. Shape into a smooth ball.
- Rise – Place in an oiled bowl and cover with plastic wrap or a damp kitchen cloth. Leave to rise in a warm place for 60 to 90 minutes.
- Divide – Transfer the dough to a clean, floured work surface. Divide the dough into two portions, and then each portion into six to make 12 donuts. Shape into a ball and set aside.
- Fill and shape – Flatten each dough ball and place a tablespoon of jam in the middle. Bring all the sides together and pin them into a tight seam. Shape them into a smooth ball.½ tsp Jam
- Tray – Place the buns, seam side down, on a baking tray lined with parchment paper or silicone mat, leaving enough room for them to rise.
- Proof – Cover with plastic wrap or clean kitchen cloth and let them proof for 60 to 90 minutes on the counter or until doubled in size.
- Preheat oven – Preheat the oven to 190°C / 375°F / Gas mark 5.
- Bake – Brush each bun with an egg wash and bake in the oven for 18 to 20 minutes. When baked, let cool on the counter for 10 minutes.1/2 Egg yolk + 2 tbsp milk
- Dust – Let the donuts cool completely. Then, dust them with powdered sugar and top each with a teaspoon of jam.2 tbsp Powdered sugar
Notes
-
- Measure all ingredients beforehand so you don’t forget anything at the last minute.
-
- For accuracy, use a weight scale for the ingredients because every cup of flour can weigh differently depending on how you fill it.
-
- The milk temperature – It is very important to ensure the milk is warm, not hot or cold. You don’t need a thermometer to check – that’s just a guide.
-
- To check if the milk is at the right temperature, just stick your clean little finger in. You should be able to hold it in for a minute; if not, it’s too hot. Best to wait until it’s just warm.
-
- Keep the dough soft, elastic, and slightly sticky. The softness in the dough (not extra butter) will produce melt-in-your-mouth donuts when fried. I admit that soft dough is more difficult to handle. So that’s why I have a second tip for you.
-
- Kneading is key to making good bread. While kneading by hand can be therapeutic, using a stand mixer is easier and quicker.
-
- Leave the dough at room temperature to rise until it doubles in volume. While not recommended, when in haste, you can place it in a warm (30 C / 75 F- not hotter) oven, which will expedite the rise.
Equipment you will need


Nutrition
Tried this recipe?
Mention @veenaazmanov_kitchen or tag #veenaazmanovkitchen!- Classic Jelly Donuts or Sufganiyot – Hanuka Doughnuts
- Best Fried Cinnamon Sugar Donuts or Cinnamon Sugar Pumpkin Donuts
- See all donut and doughnut recipes


Don’t lose this recipe! Save it for Later!
📌 Save this Recipe for later on Pinterest so you can easily find it again.
⭐ Add Veena Azmanov Kitchen to your Google Preferred Sources.
It helps Google show you more of our recipes.
📧 Subscribe for new recipes delivered to your inbox.
🎥 Follow us for more recipes


Another question….will this recipe double well?
Yes, this recipe doubles beautifully.
I hope you are still addressing this recipe, lol. Is it possible to use lemon curd or a chocolate ganache filling rather than a jam?
Leslie
I always respond to all my recipes, usually, within 24 hours.
Absolutely!! You can put any jam/curd/or cake filling in the donuts. And, yes, the recipe doubles well.
Thank you so much for your quick response…5*****
If I fill with a lemon curd or chocolate filling and freeze, (no time for last minute cooking with a crowd, company and their toddler), will the fillings make the dough soggy? Any recs for those?
Can the filling be inserted after thawing with a pastry bag/tip?
While it has been over 50 years since visiting, (oops, did I just “age” myself, lol), Israel was and still is one of my most memorable trips.
Freezing filled baked donuts absolutely works, but a few types of fillings behave better than others. Thicker fillings like lemon curd, pastry cream, chocolate ganache, Nutella, or a firm fruit jam freeze and thaw really well without making the dough soggy. Very loose or runny fillings tend to soak in a bit more, so I’d avoid anything too liquid.
If you’re planning ahead for a busy day with guests (and toddlers running around!), you can do it two ways:
1. Fill before freezing:
Just make sure the filling is thick.
Freeze the donuts on a tray first, then move to a container once firm.
Thaw in the fridge overnight. They stay surprisingly good!
2. Fill after thawing:
Yes — totally fine.
Let them thaw completely, then pipe in your lemon curd or chocolate with a pastry tip. This keeps the donuts soft and the filling fresh.
And I love that you mentioned Israel — it still feels like home to me, so it makes me smile when someone has fond memories of visiting. ❤️
I hope these donuts bring a little bit of that same joy back into your kitchen!
Dough was OK for bread, but definitely NOT for doughnuts. The dough making process was fine until adding in the butter, which was a disaster. Dough turned out fine, but it made a mess. The bread tastes decent, but definitely not a doughnut.
This is a brioche dough!! it has lots of butter. You must knead until all the butter is incorporated and the dough becomes shiny!
Brioche is the richest of bread doughs and is often used to make donuts – the only difference is the baked vs deep fried.
So if you don’t like this baked version, go for the deep-fried donuts.
Such a great option for when you’re trying to stay away from fried foods! Definitely up there as a favorite along with baked donuts!