Sourdough Loaf 80% Hydration
 Prep Time 1 hour Cook Time 40 minutes Total Time 19 hours 40 minutes


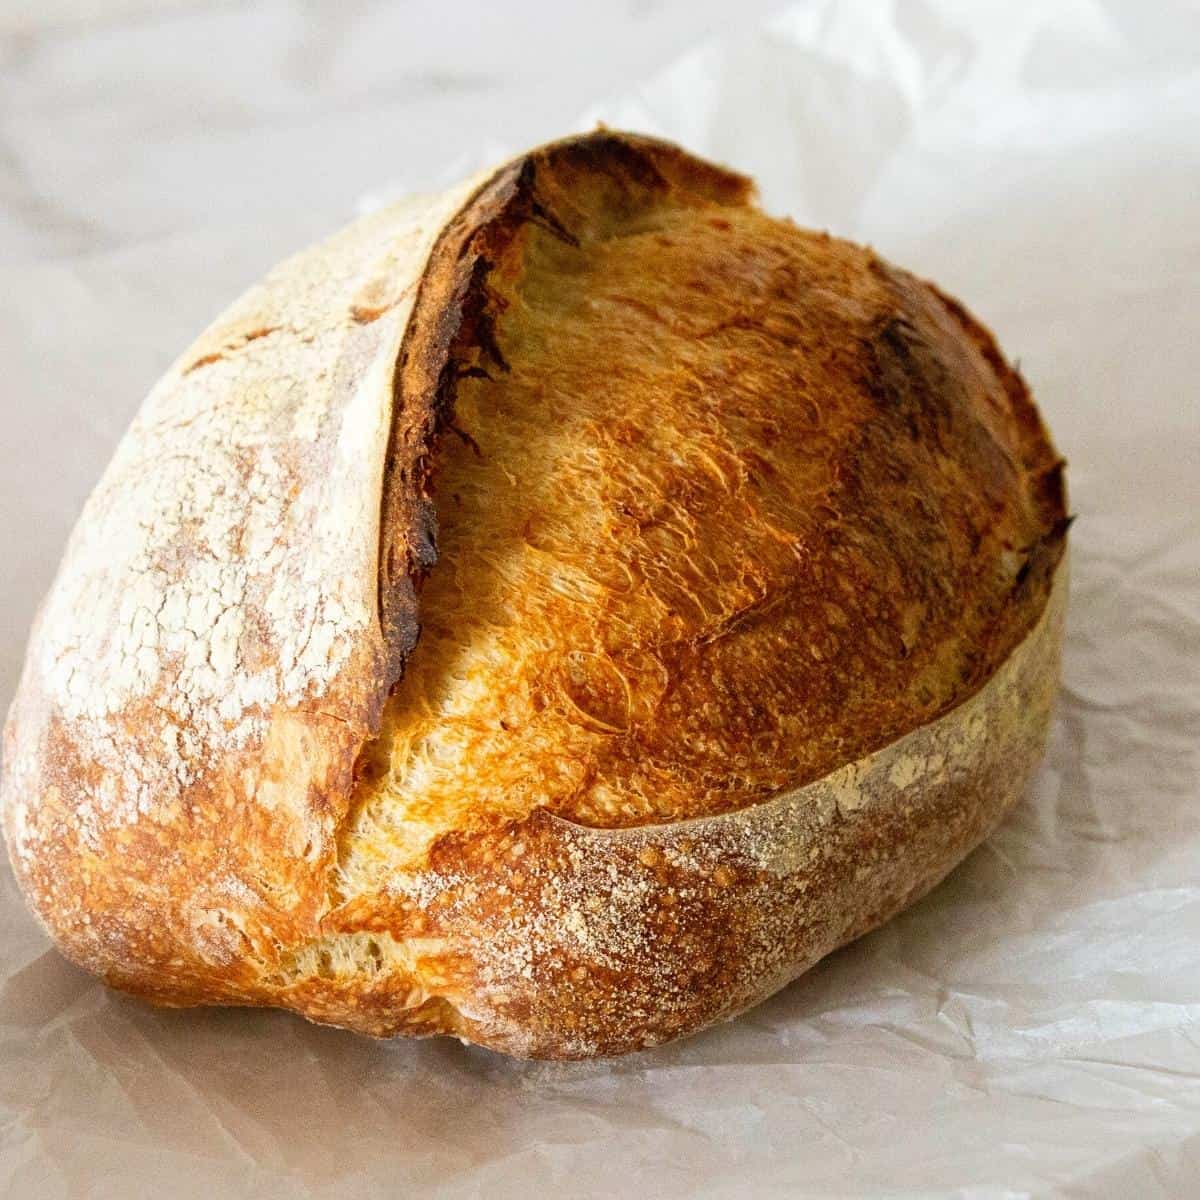
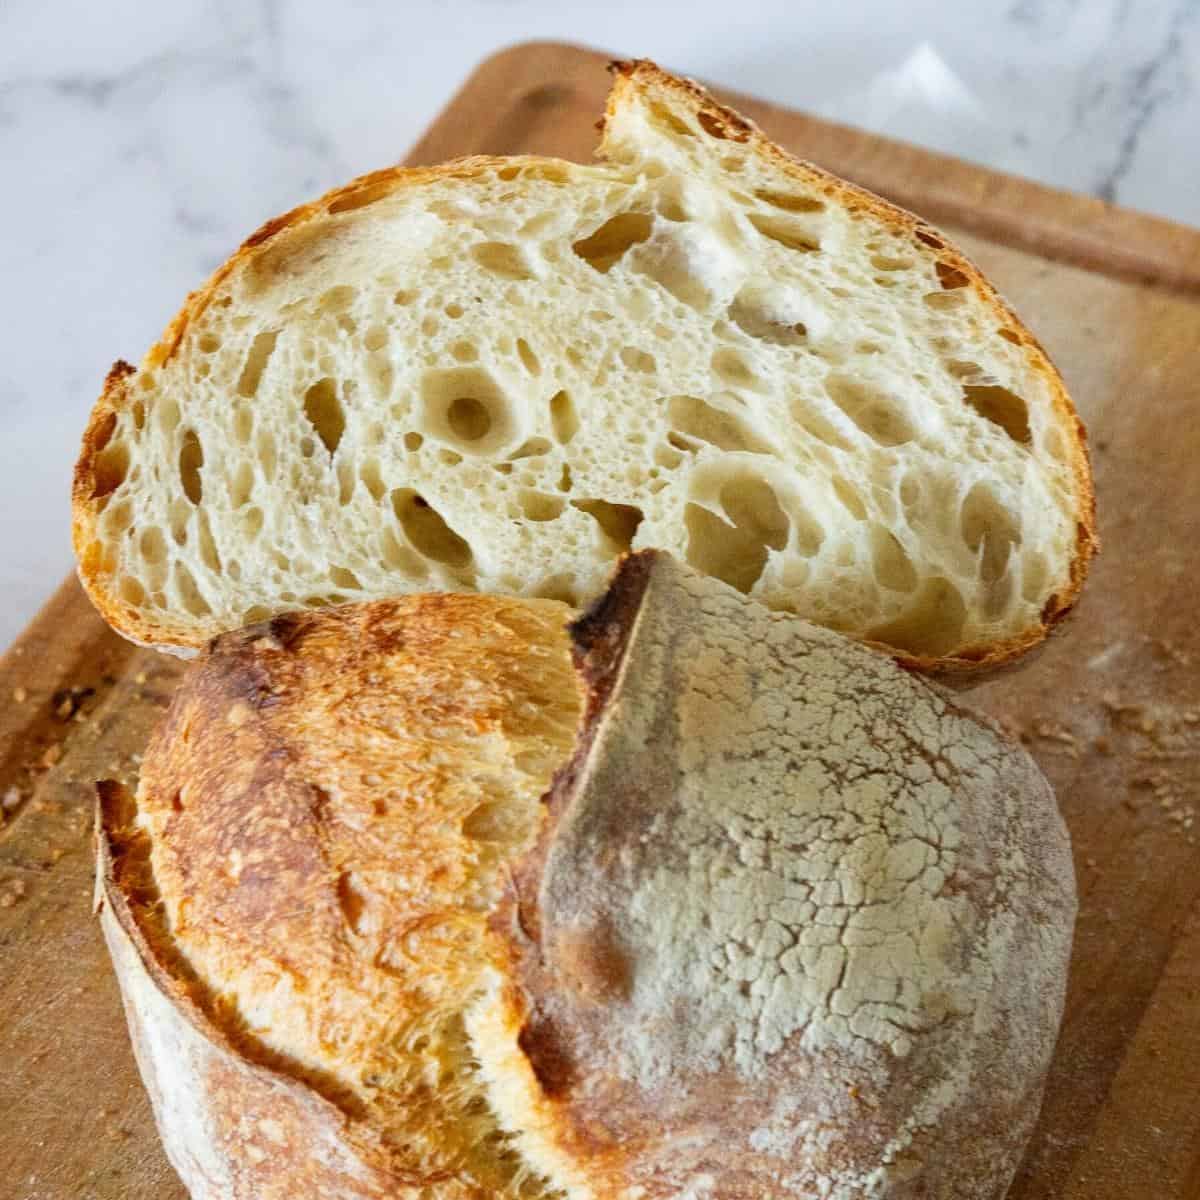
This 80% hydration sourdough loaf has a light, airy crumb and a crisp, golden crust. The overnight cold proof deepens the flavor while making the dough easier to handle. With just flour, water, salt, and patience, you’ll get a beautifully rustic loaf that’s worth every bite.
When I first started baking sourdough, I stuck to lower-hydration doughs because I was afraid of sticky, unmanageable dough. The first time I tried 80% hydration, I thought I had made a mistake—the dough felt soft and wet, and shaping it was tricky. But when I pulled that loaf out of the oven, with its deep golden crust and beautiful open crumb, I knew I was onto something.
Now, this is my go-to recipe. It’s a little sticky, sure, but once you get used to it, you’ll love the results. I love that I can mix it in the evening, let it rest overnight in the fridge, and bake it the next day with minimal effort. Every loaf feels like a small win, and no matter how many times I bake it, the smell of fresh sourdough filling my kitchen never gets old.
If you’re hesitant about trying a higher hydration dough, trust me—it’s worth it. The key is to work with wet hands, be gentle with the dough, and enjoy the process. You’ll love the soft, airy crumb and that perfect crackling crust. Happy baking!
Why This 80% Sourdough Recipe is the Best?
- Perfect Balance of Hydration for an Open Crumb: The 80% hydration level creates a light, airy crumb with an open structure while remaining manageable for shaping and handling. Higher hydration enhances the dough’s extensibility, leading to a thin, crispy crust and a flavorful, chewy texture.
- Overnight Cold Proofing for Better Flavor & Structure: Slow fermentation in the fridge allows flavors to develop more deeply while strengthening the dough. Baking the loaf straight from the fridge makes scoring easier, ensures a well-defined crust, and promotes a more dramatic oven spring.
- Stretch & Fold Method for Gluten Development: Instead of intensive kneading, this recipe relies on stretch and folds to build gluten gradually. This technique allows the dough to develop structure over time while keeping it easy to handle, making it perfect for bakers of all skill levels.
- Versatile & Adaptable to Your Schedule: The bulk fermentation time can be adjusted based on room temperature, making the process flexible for different environments. Whether baked as a boule or batard, on a pizza stone or in a Dutch oven, this recipe produces consistently excellent results with minimal equipment.

Ingredients and substitutes
- Bread Flour: Provides the necessary gluten strength for structure and oven spring. You can substitute with a mix of all-purpose flour and whole wheat flour, but this may require adjusting hydration.
- Water: Hydrates the flour and activates gluten development. If you want extra flavor, you can substitute a small portion with milk or buttermilk, but this will change the texture slightly.
- Sourdough Starter: Acts as the natural leavening and provides flavor. If you don’t have an active starter, you can use a poolish or biga as an alternative, though it will not have the same sourdough complexity.
- Salt: Enhances flavor and strengthens the gluten network. If reducing salt for dietary reasons, be aware that the dough may ferment faster and feel weaker.

Activate the sourdough starter
- Refresh your sourdough starter: Begin by refreshing your starter, ensuring its liveliness and readiness for the bread-making process. This involves discarding a portion of the starter and feeding it with equal parts of flour and water. Allow it to sit at room temperature for at least a few hours or until it becomes bubbly and active.
How to make an 80% sourdough loaf of bread
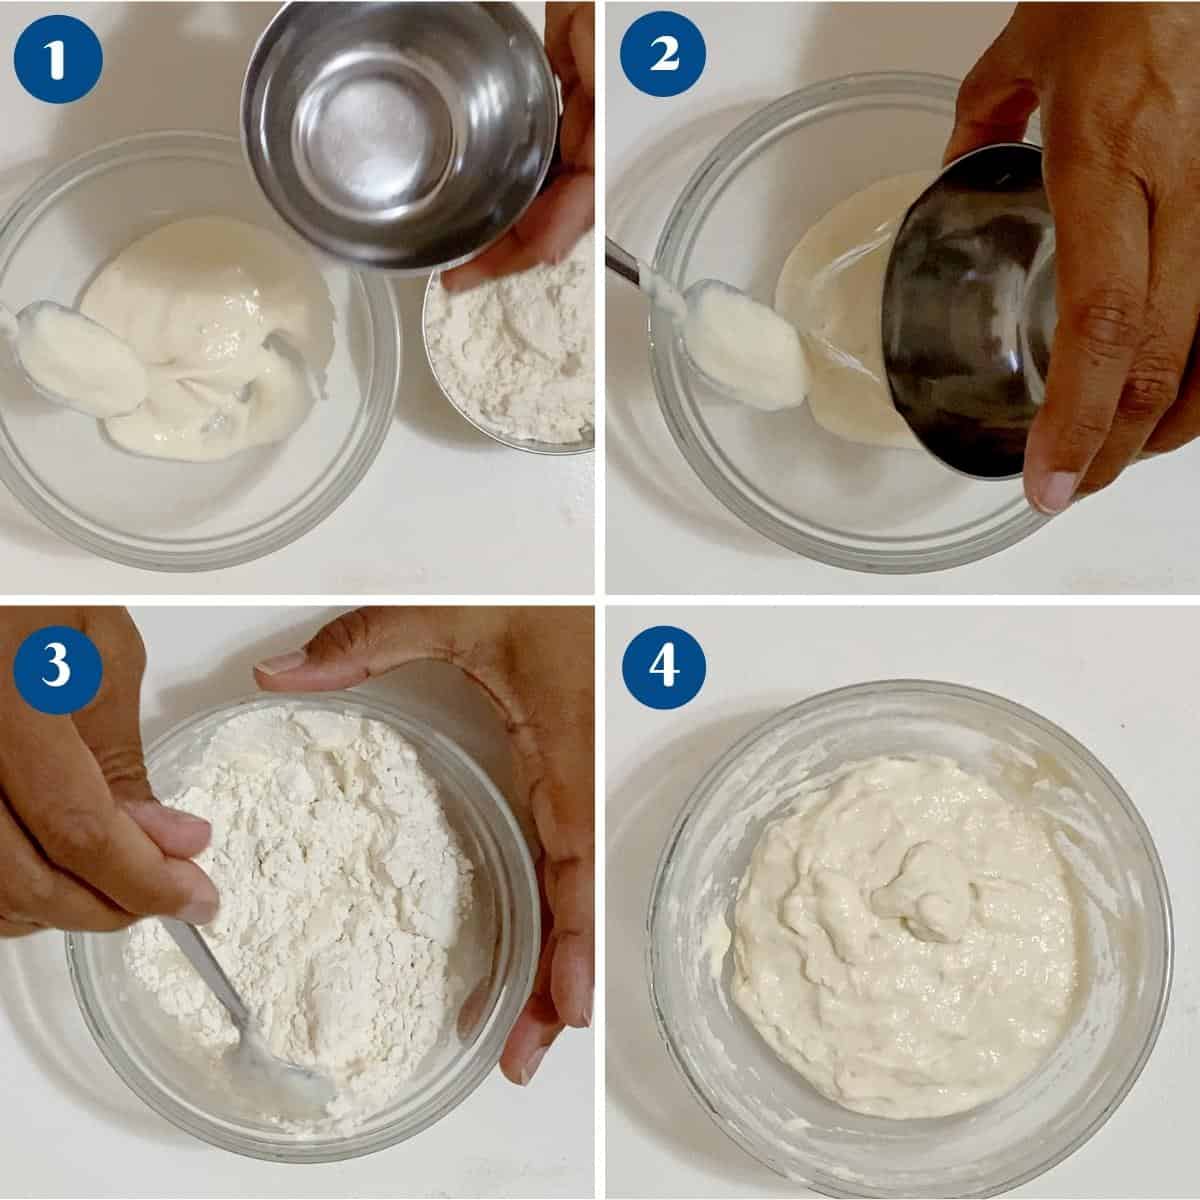
- Mix & Autolyze (Rest the Dough 60 Mins) – In a large bowl, mix the flour and water. Stir until no dry flour remains. Cover and let rest for an hour.
- Add Starter & Salt( 2 Mins) – Add the sourdough starter and mix well. Sprinkle the salt and use the stretch & folds method until well incorporated.
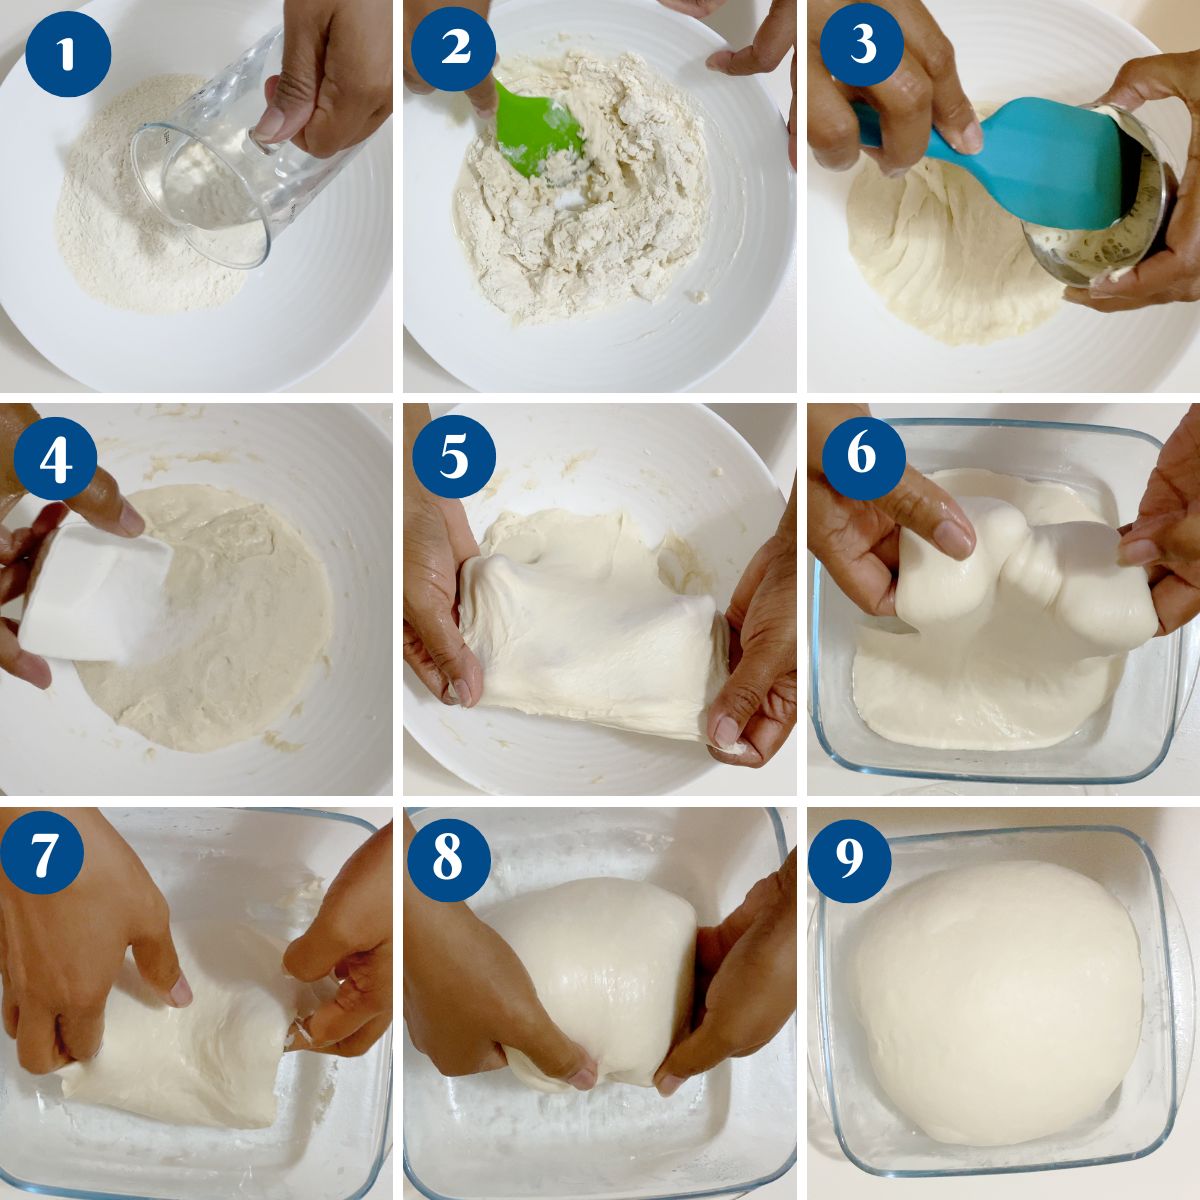
- Stretch & Fold Schedule (2 Hours) – Every 30 minutes for the first 2 hours, do stretch & folds.
- Bulk Fermentation 4 hours) – After the last stretch and fold, let the dough rest and continue to ferment undisturbed at room temperature until it rises 50-75% in volume, about 4 hours more.
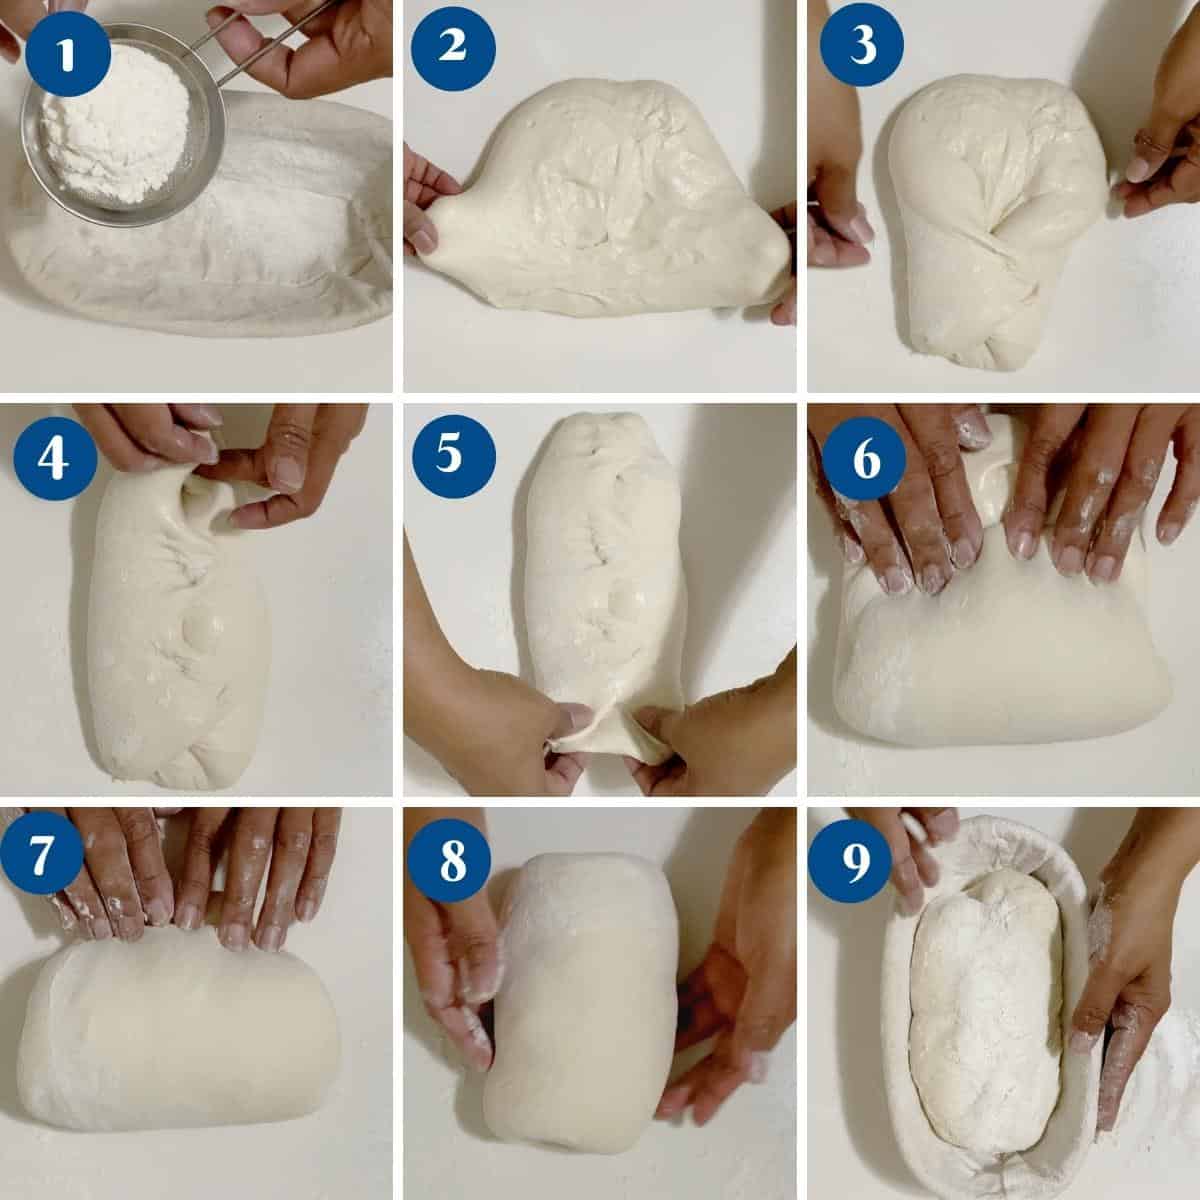
- Pre-Shape & Bench Rest (30 Mins) – Lightly flour your work surface. Turn out the dough gently and pre-shape it into a round or oval. Let it rest uncovered for 20-30 minutes.
- Final Shaping & Cold Proofing (8 – 16 hours) – Shape the dough into a tight boule or batard. Place it into a floured banneton or a towel-lined bowl. Cover and place in the fridge overnight for 8-16 hours.
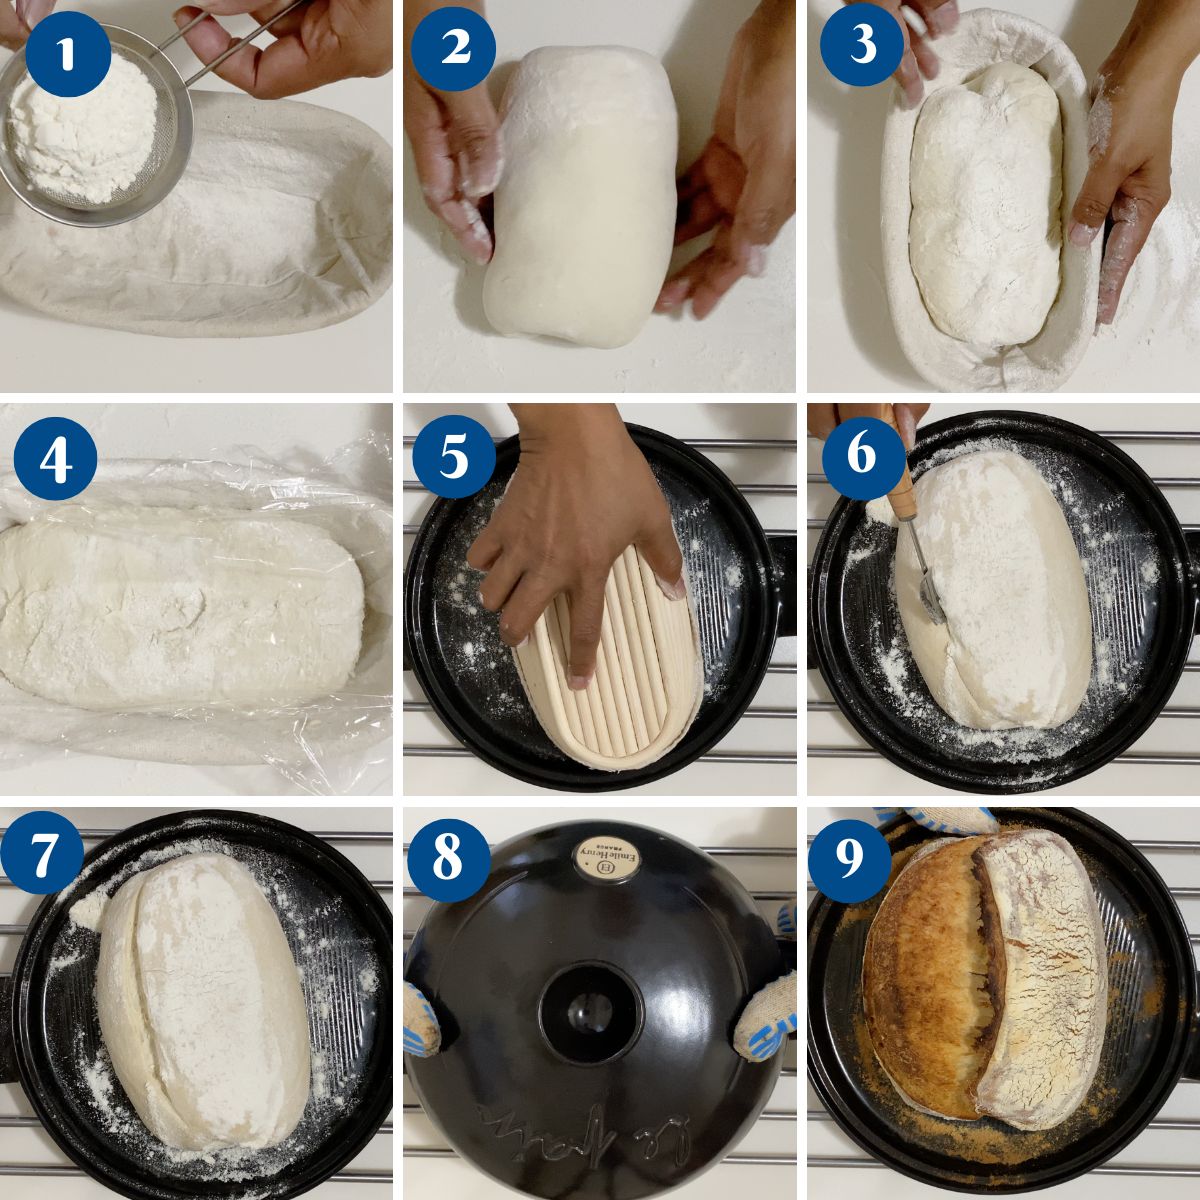
- Bake the Next Day (60 Mins) – Preheat oven to 475°F (245°C) for at least 45-60 minutes. If using a Dutch oven, place it inside the oven. Flip the dough onto parchment paper, score deeply (½ inch at a 30-45° angle)
- Bake with steam: (45 Mins)
- With a Dutch oven: Bake covered for 20-25 minutes, then uncovered for 15-20 minutes.
- Or bake on a pizza stone: Add a tray with ice cubes for steam. Bake for 40-45 minutes total, rotating halfway. Let cool at least 1 hour before slicing.


Frequently asked questions
This sourdough bread stays fresh for 2-3 days at room temperature before it starts to dry out. The crust may harden slightly over time, but the inside will remain soft if stored properly.
Store the bread at room temperature, wrapped in a clean kitchen towel or in a paper bag to maintain the crust while keeping the inside soft. Avoid plastic bags unless you prefer a softer crust. A bread box also helps regulate moisture and keeps bread fresh longer.
Yes! Sourdough freezes well. To freeze, slice the bread and place it in an airtight bag or wrap it tightly in plastic wrap and foil. Freeze for up to 3 months. When ready to eat, toast slices straight from the freezer or let the whole loaf thaw at room temperature before reheating in the oven at 325°F (165°C) for 10-15 minutes.
Underproofed: The dough feels dense, tight, and doesn’t hold an indentation when gently poked. If baked, it may have a dense crumb with few air pockets and poor oven spring.
Properly Proofed: The dough has risen about 50-75%, feels slightly puffy, and springs back slowly when pressed with a finger. This gives the best oven spring and an airy crumb.
Overproofed: The dough looks very bubbly and deflates easily when touched. If baked, it may spread too much, resulting in a flat loaf with a tight crumb and little oven spring.
A hard crust forms due to long baking times, high temperatures, or a lack of steam in the oven. If your crust is too thick, try baking with steam for the first 20 minutes, reducing the baking time slightly, or wrapping the loaf in a kitchen towel after baking to soften the crust. Using all-purpose flour instead of bread flour can also result in a slightly thinner crust.
The sourness in sourdough comes from lactic acid and acetic acid, which develop during fermentation. If your bread isn’t sour, it may be because the dough fermented too quickly, didn’t have enough time to develop complex flavors, or the starter wasn’t acidic enough.
Use a longer, colder fermentation – Let the dough ferment in the fridge for 12-24 hours to develop more acetic acid, which gives a tangier flavor.
Feed your starter less often or with whole wheat/rye flour – A hungry starter produces more acidity, while whole grains promote more fermentation activity.
Let the bulk fermentation go longer – Extending bulk fermentation at room temperature (but not overproofing) allows for more flavor development.
Use less starter – A smaller amount of starter slows down fermentation, allowing more acids to develop over time.
Sourdough Loaf Bread – 80% Hydration
Here’s an easy recipe for sourdough loaf bread that you can make from your own sourdough starter. This is a slow-rising bread with 80% hydration and a simple and easier method. This loaf is perfect for toast, sandwiches, and French toast.
Video
Ingredients
- 500 grams (4 cups) Bread flour (at least 12-13% protein)
- 400 grams (1⅔ cups) Water (warm or room temp, about 80-85°F/26-29°C)
- 100 grams (½ cups) Active sourdough starter (100% hydration, active & bubbly)
- 10 grams (1½ tsp) Kosher salt (2% of flour weight)
- Extra flour for shaping and dusting on work surface
Method
- Mix & Autolyze (Rest the Dough 60 Mins) – In a large bowl, mix the flour and water. Stir until no dry flour remains. Cover and let rest for an hour.500 grams Bread flour, 400 grams Water
- Add Starter & Salt( 2 Mins) – Add the sourdough starter and mix well. Sprinkle the salt and use the stretch & folds method until well incorporated.10 grams Kosher salt, 100 grams Active sourdough starter
- Stretch & Fold Schedule (2 Hours) – Every 30 minutes for the first 2 hours, do stretch & folds.
- Bulk Fermentation 4 hours) – After the last stretch and fold, let the dough rest and continue to ferment undisturbed at room temperature until it rises 50-75% in volume, about 4 hours more.
- Pre-Shape & Bench Rest (30 Mins) – Lightly flour your work surface. Turn out the dough gently and pre-shape into a round or oval. Let it rest uncovered for 20-30 minutes.Extra flour for shaping and dusting on work surface
- Final Shaping & Cold Proofing (8 – 16 hours) – Shape the dough into a tight boule or batard. Place it into a floured banneton or a towel-lined bowl. Cover and place in the fridge overnight for 8-16 hours.
- Bake the Next Day (60 Mins) – Preheat oven to 475°F (245°C) for at least 45-60 minutes. If using a Dutch oven, place it inside the oven. Flip the dough onto parchment paper, score deeply (½ inch at 30-45° angle)
- Bake with steam: (45 Mins)With a Dutch oven: Bake covered for 20-25 min, then uncovered for 15-20 min. Or bake on a pizza stone: Add a tray with ice cubes for steam. Bake for 40-45 min total, rotating halfway. Let cool at least 1 hour before slicing.
Notes
- Handling the Dough: Using wet hands prevents sticking, making it easier to work with the high-hydration dough. Stretch and folds should be done gently to strengthen the gluten without deflating the dough. Avoid over-handling, as too much manipulation can break down the gluten structure instead of helping it develop naturally.
- Shaping for Better Structure: Lightly flouring the work surface helps prevent sticking, but too much flour can weaken surface tension. Creating good tension by gently pulling the dough tight during shaping ensures the loaf holds its shape instead of spreading. If the dough feels too slack, a short rest in the fridge before final shaping can firm it up for better handling.
- Fermentation & Proofing: The dough should increase by about 50-75% during bulk fermentation rather than doubling. Checking with the poke test—where a light press of the finger springs back slowly—can help determine if it’s ready to bake. Cold proofing overnight enhances flavor, strengthens structure, and makes scoring easier.
- Scoring & Baking: Using a sharp razor blade or knife ensures clean cuts, and scoring at a 30-45° angle about ½ inch deep helps create a pronounced “ear.” Baking the loaf straight from the fridge improves oven spring, while adding steam in the first 20 minutes (if using a pizza stone) allows the crust to form properly before hardening.
- Cooling & Storing: Allowing the bread to cool completely before slicing prevents the crumb from becoming gummy. Storing it wrapped in a towel or paper bag maintains freshness for up to three days, while freezing slices ensures longer storage with easy reheating for a fresh-baked texture.
Troubleshooting 80% Hydration Sourdough
- Dough is too sticky and hard to handle: High-hydration dough is naturally sticky, but if it feels unmanageable, try working with wet hands instead of adding extra flour. Chilling the dough for 15-20 minutes before shaping can also make it firmer and easier to handle.
- Dough spreads too much after shaping: This usually happens due to weak gluten development or insufficient surface tension. Make sure to do strong stretch and folds during bulk fermentation and create a tight shape by pulling the dough taut before placing it in the banneton. If needed, place the shaped dough in the fridge for 15 minutes before baking to firm it up.
- Loaf doesn’t rise well in the oven (poor oven spring): Weak shaping, overproofing, or not preheating the oven properly can cause a flat loaf. Ensure the dough is shaped with good tension, proofed just until slightly puffy but not overly soft, and baked in a fully preheated oven with steam for the first 20 minutes.
- Crust is too thick and hard: Baking at too low a temperature or without enough steam can cause the crust to become overly thick. Ensure the oven is preheated to at least 475°F (245°C) and use a Dutch oven or steam tray to allow the crust to form gradually before hardening.
- Scoring disappears when baking: If the cut seals up during baking, the dough may be overproofed or not shaped tightly enough. Try scoring at a deeper angle (about ½ inch) and baking straight from the fridge for better definition.
- Loaf has a dense or gummy crumb: Underproofing, slicing too soon, or excess moisture can cause a dense texture. Allow the dough to ferment until it has increased by 50-75% in volume and let the bread cool completely for at least an hour before slicing to allow the crumb to set properly.
- Loaf has large air pockets at the top and dense bottom: This is usually caused by underfermented dough or shaping that traps too much air at the top. Make sure bulk fermentation is fully developed before shaping, and degas the dough slightly while shaping for a more even crumb.
Equipment you will need


Nutrition
Tried this recipe?
Mention @veenaazmanov_kitchen or tag #veenaazmanovkitchen!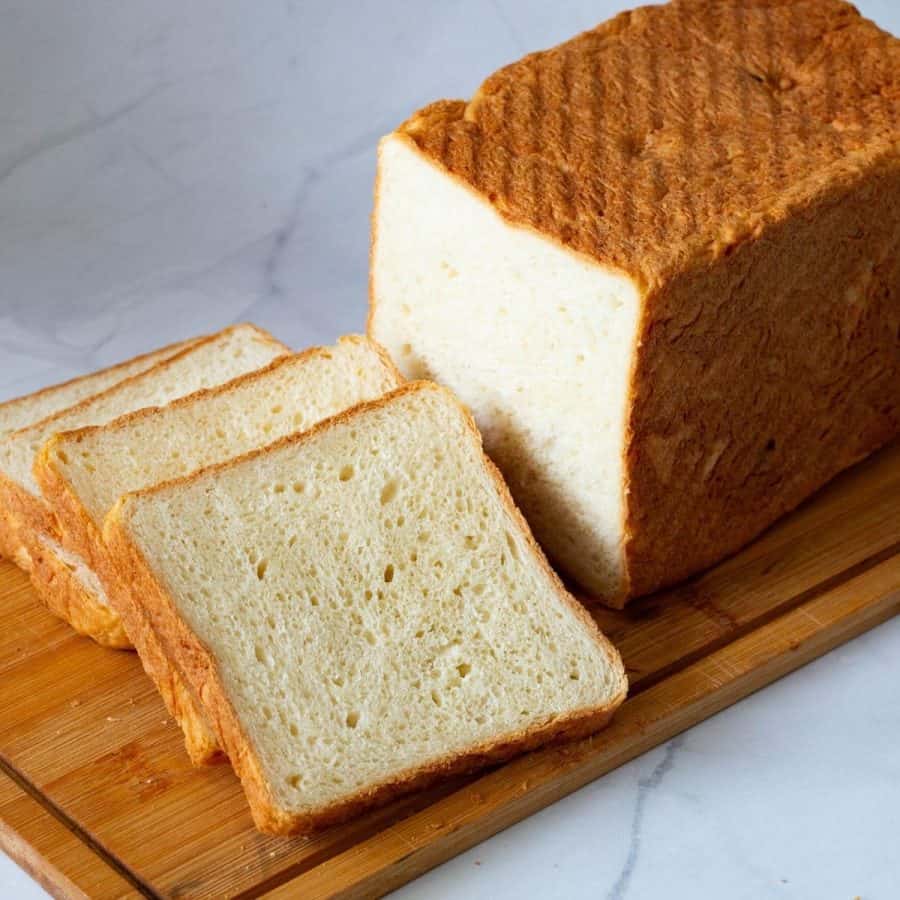


Don’t lose this recipe! Save it for Later!
📌 Save this Recipe for later on Pinterest so you can easily find it again.
⭐ Add Veena Azmanov Kitchen to your Google Preferred Sources.
It helps Google show you more of our recipes.
📧 Subscribe for new recipes delivered to your inbox.
🎥 Follow us for more recipes


I was excited to try this but the hydration is way too low. The instructions above says 500g . I don’t go by cups I go by weight. It’s such a dry loaf that it won’t build strength. Bummed.
Have you tried the recipe, Dani? This hydration is not low!
Total water content = 275 grams (from the recipe) + 75 grams (from the starter) = 350 grams
Total hydration = (350 / 500) x 100% = 70%
Hi Veena,
I am dying to try this recipe but I have a question about the bread flour. Four cups of bread flour is 500g instead of 400g. Is this supposed to be 500g? I don’t want to mess it up, so I wanted to be sure!
Hey Cindy. it is 400 grams of bread flour (with an additional 1/2 cup if necessary to use during the process) Thanks
I’ve always wanted to make homemade sourdough, your tutorial looks easy to follow and the steps are very approachable!
I love how comprehensive your steps are to show me how to make this bread! It looks delicious, perfect for dunking in soup also. Can’t wait to give it a go!
Have been wanting to try making my own sourdough bread but have to admit it’s a bit intimidating. Have been looking for a recipe I felt I could follow and yours was fantastic! Turned out great and now I wondered why it has taken me so long to try it.
Thank you, Amy. So happy to get your feedback.
This is the most informative sourdough post I’ve come across and it paid off – this makes the best sourdough ever..thank you!!
Aww, thank you for the lovely feedback, Kristen.
This bread looks delicious! Will be great served with some warm soup.