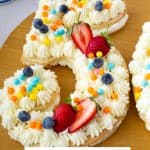
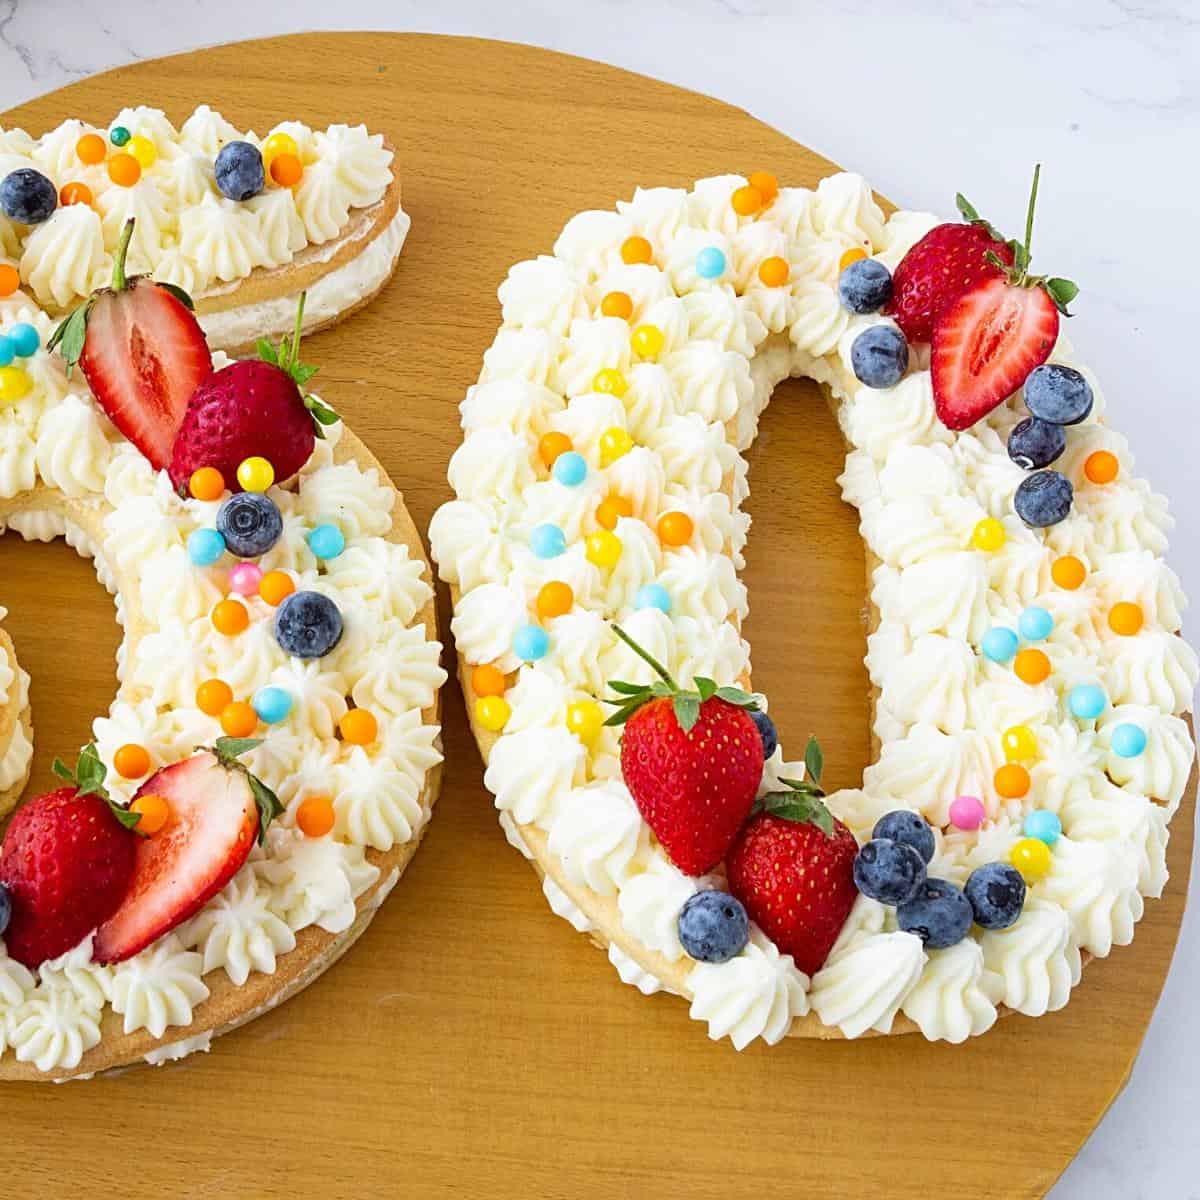
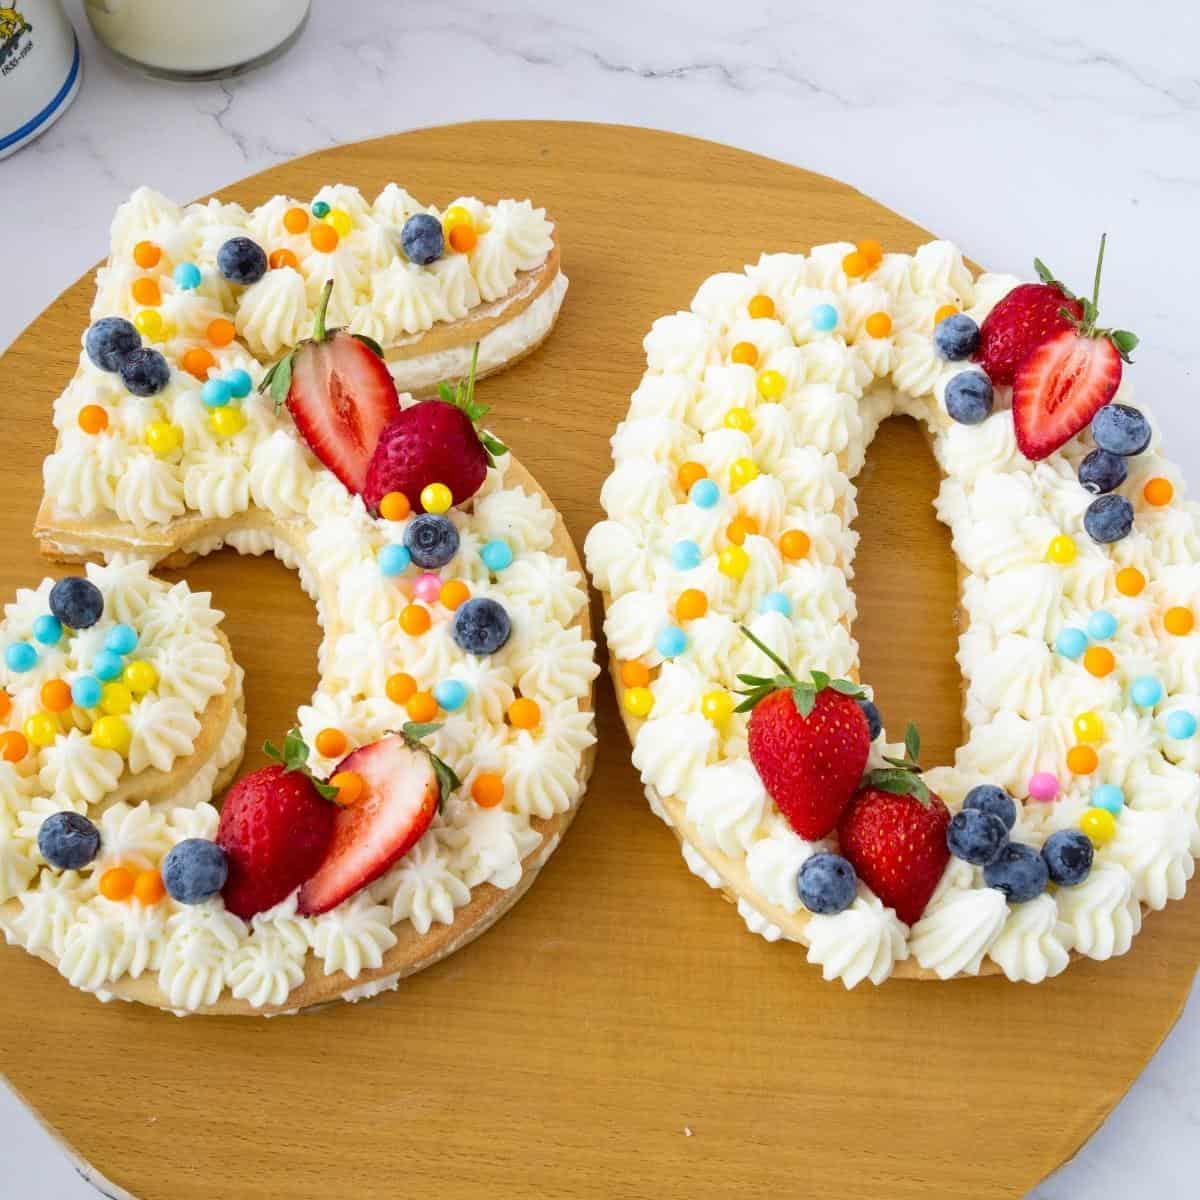
Number Cakes – 50


Number cakes weren’t something we made often because buying a pan for one use becomes rather a waste, right? Here’s a simple and easy method to carve numbers, alphabets, or shapes whether you use cake or cookie dough.
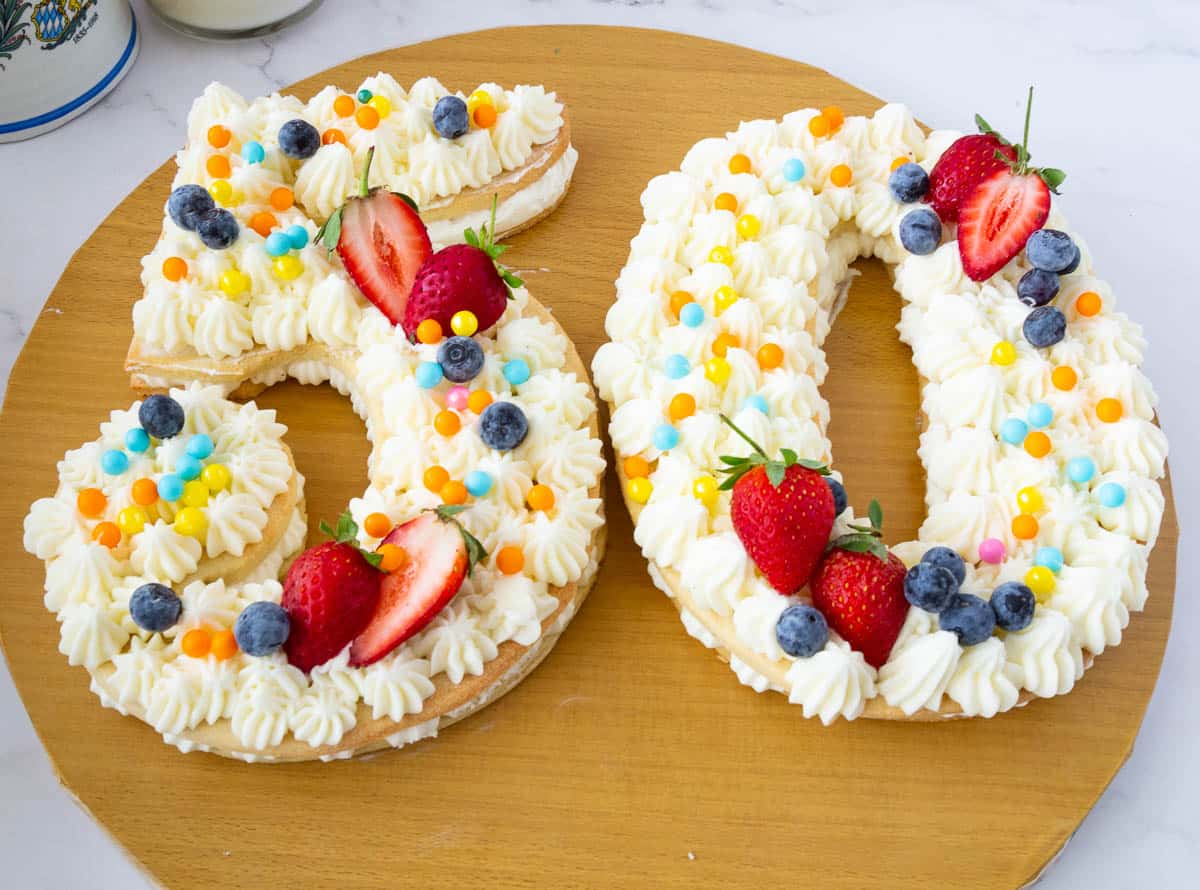
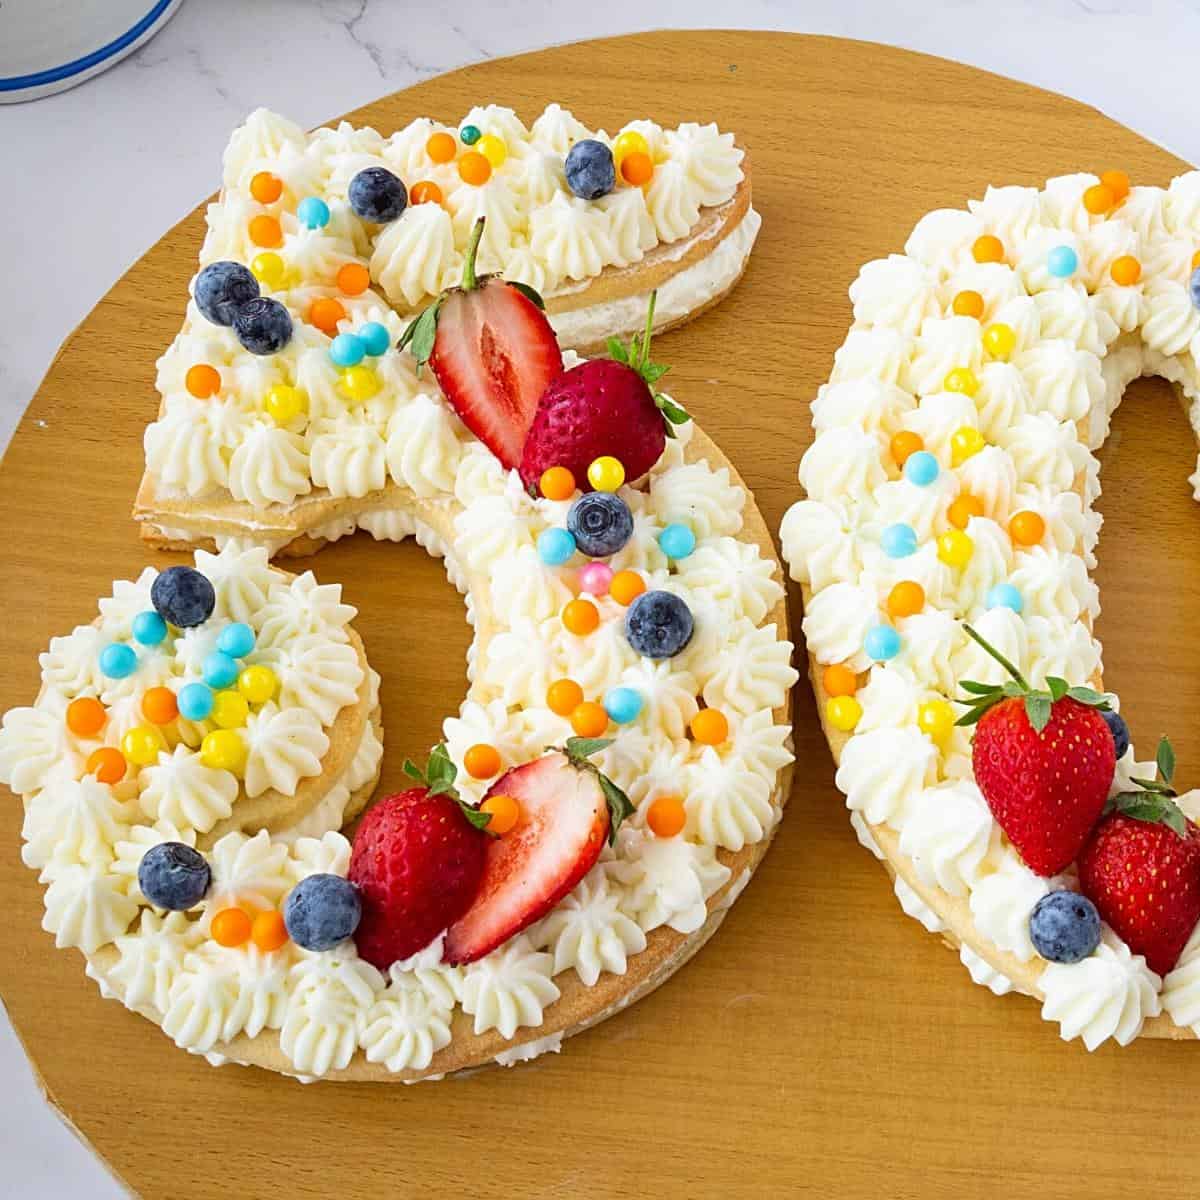
Number and alphabet cakes are a trendy way to celebrate birthdays these days, no matter what age. I made this cake for a 50th birthday celebration. But, of course, you can make a number 5 cake for a five-year-old, too!
And you can make them in two ways: a cake base as we did in our letter cake, or cookie-based (icebox cookie style) as we are doing here today. These are sometimes also called cream tart cakes because the base is made with shortcrust dough similar to what we use to make a tart.
Of course, you can buy a cake pan shaped in the number or letter you want. But then you are stuck with a pan you probably won’t use again. The other simplest way is to use a number template and just trace around to get a full number.
Why make this number cake?
- This is taking monogram cakes to the next level!
- It’s trendier to make this crisp, shortbread-almond-based dough than a cake batter.
- The dough is similar to making a tart crust using a food processor, but you can also make a rich shortcrust pastry with creamed butter.
- You don’t need to buy a specific number cake pan or alphabet cake pan. All you need to do is find the shape you want. You can even draw a letter or number on a piece of paper and cut the shape.
- There is almost no waste! You cut the cookie into the number, alphabet, or shape you want. Then, you can gather the excess dough into a ball and reuse it or store it in the freezer for another time.
- I am making a number 50 cake, but you can make any abstract shape or size. Make a small or big number cake because you are not restricted by the size of your pan! Try a clock cake for the new year!
Ingredients and substitutes
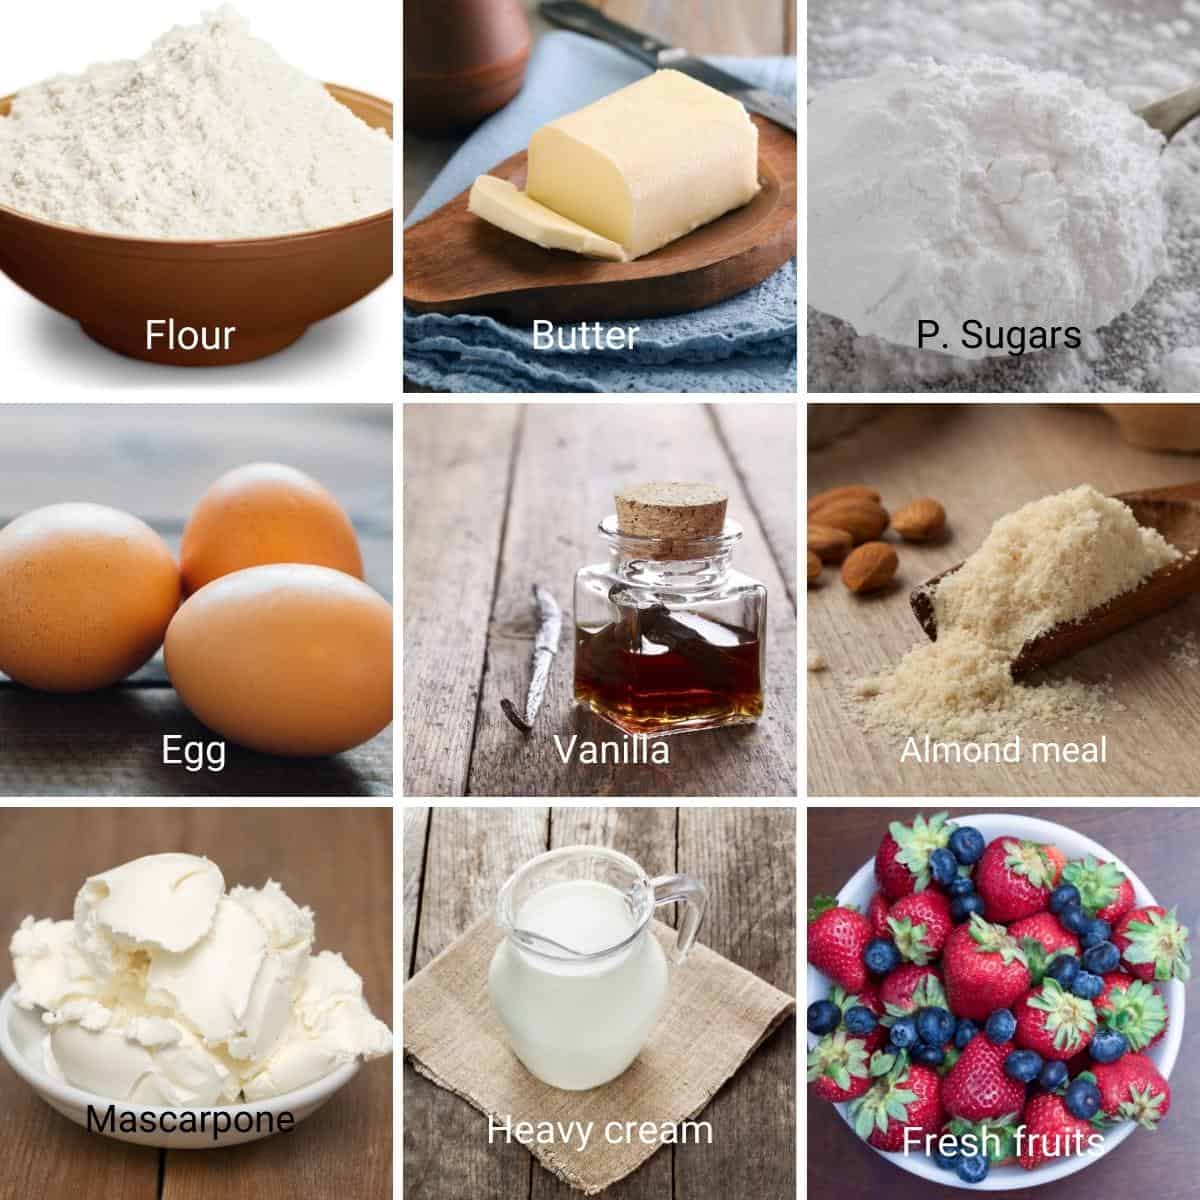
- Flour – I am using a combination of all-purpose and almond flour. Almond flour gives the cookie that sandy, crumbly texture. You can replace the almond meal with other nut meals or use more all-purpose flour to make a nut-free cookie.
- Butter – It is important that you do not use soft butter. The cookie’s texture comes from using chilled butter that cuts into the flour, giving it a crumbly, flaky texture.
- Sugar – We use powdered sugar, or icing sugar, in the cookies and frosting because it is easier to incorporate into them.
- Egg – We use one large egg to help bind the ingredients together. If you prefer an eggless version, replace the egg with milk or cream.
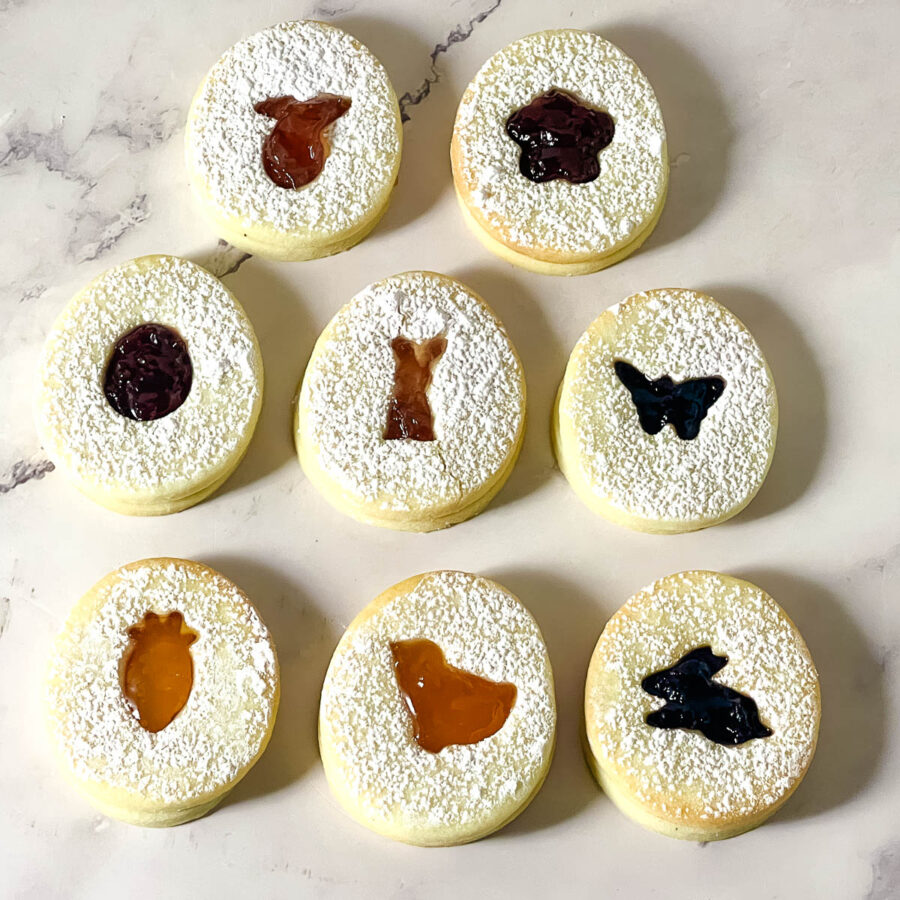
- Decorations – Fresh fruits such as strawberries and blueberries. You can also use Oreos, macarons, sprinkles, meringues, and marshmallows.
Step-by-step: How to make number cakes
Cookie crust (up to 2 days in advance)
- Food processor – Add the flour, almond meal, salt, and powdered sugar to the food processor. Pulse for 30 seconds. Then, add the chilled cubed butter. Pulse for 30 seconds at a time until you have a breadcrumb consistency. Add the egg and combine well, but do not overmix.
- Pour the crumbly mixture on a floured surface and gather it all into a ball. Divide the dough into two, flatten each portion into a disc and wrap in plastic wrap. Chill in the refrigerator for 30 minutes.
Pro tip – We need to chill just until it is firm enough to roll. This dough can be kept in the fridge for 2 days, thaw a few minutes if it is too hard to roll.
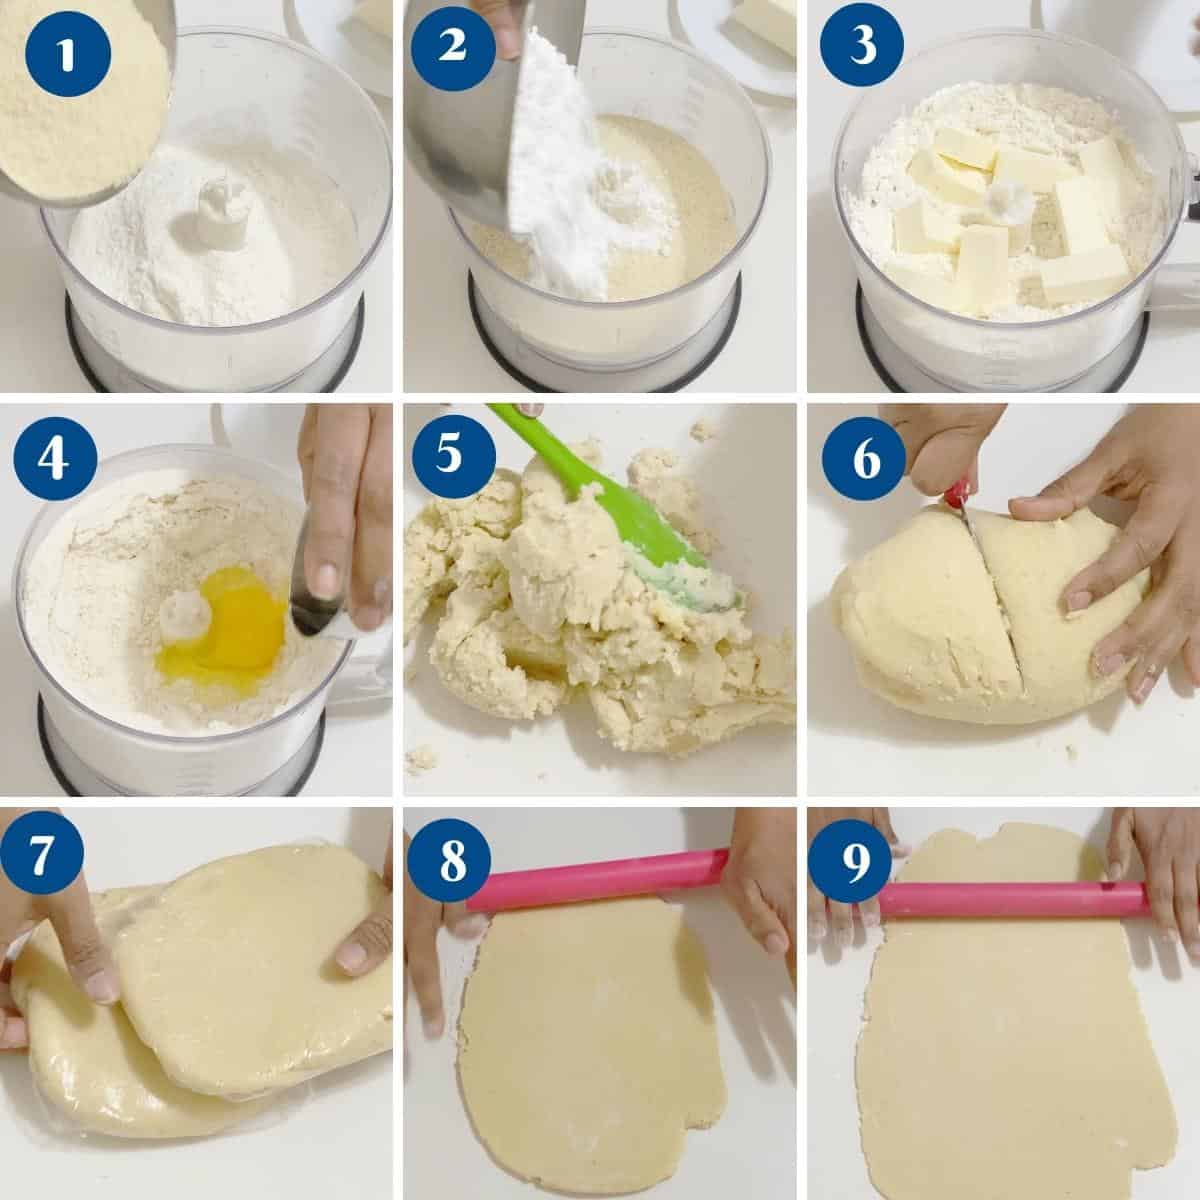
- Preheat the oven to 375°F / 190°C / Gas Mark 5
- Using a rolling pin, roll the chilled dough on a lightly floured parchment paper to about ¼-inch thickness. If the dough is too soft to cut, chill it in the fridge for a few minutes again.
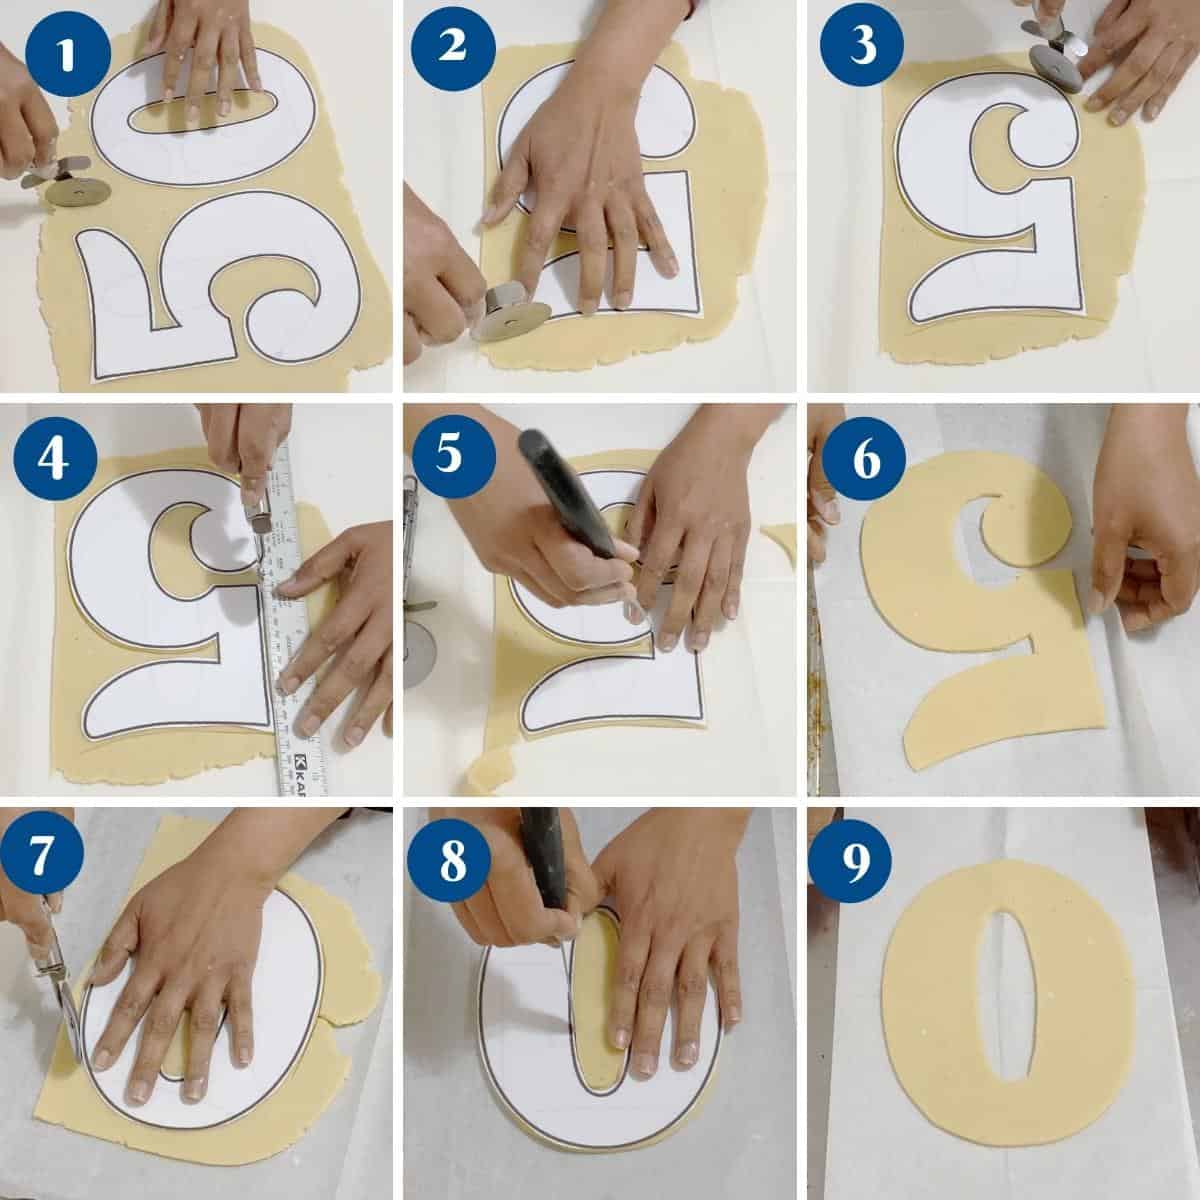
Pro tip – Cut the dough when it is well chilled. This way, you will get clean edges. Otherwise, you will need to scrape the raw edges after baking. - Using your template, cut out the number, letter, or shape you desire and place them on the sheet pan. Gather the excess dough and re-roll to make more shapes. If necessary, chill the dough in between rolling and cutting.
- Then, bake on the baking sheet for 13 to 15 minutes or until they are slightly golden around the edges. Cool the pan for 10 minutes. Then, transfer to the wire rack to cool completely.
Pro tip – The baking time will depend on the thickness of the cookies. So, keep an eye out starting at about 12 minutes. These are very delicate and can break easily. So, use cardboard to transfer them.
Assemble ( up to 8 to 10 hours ahead)
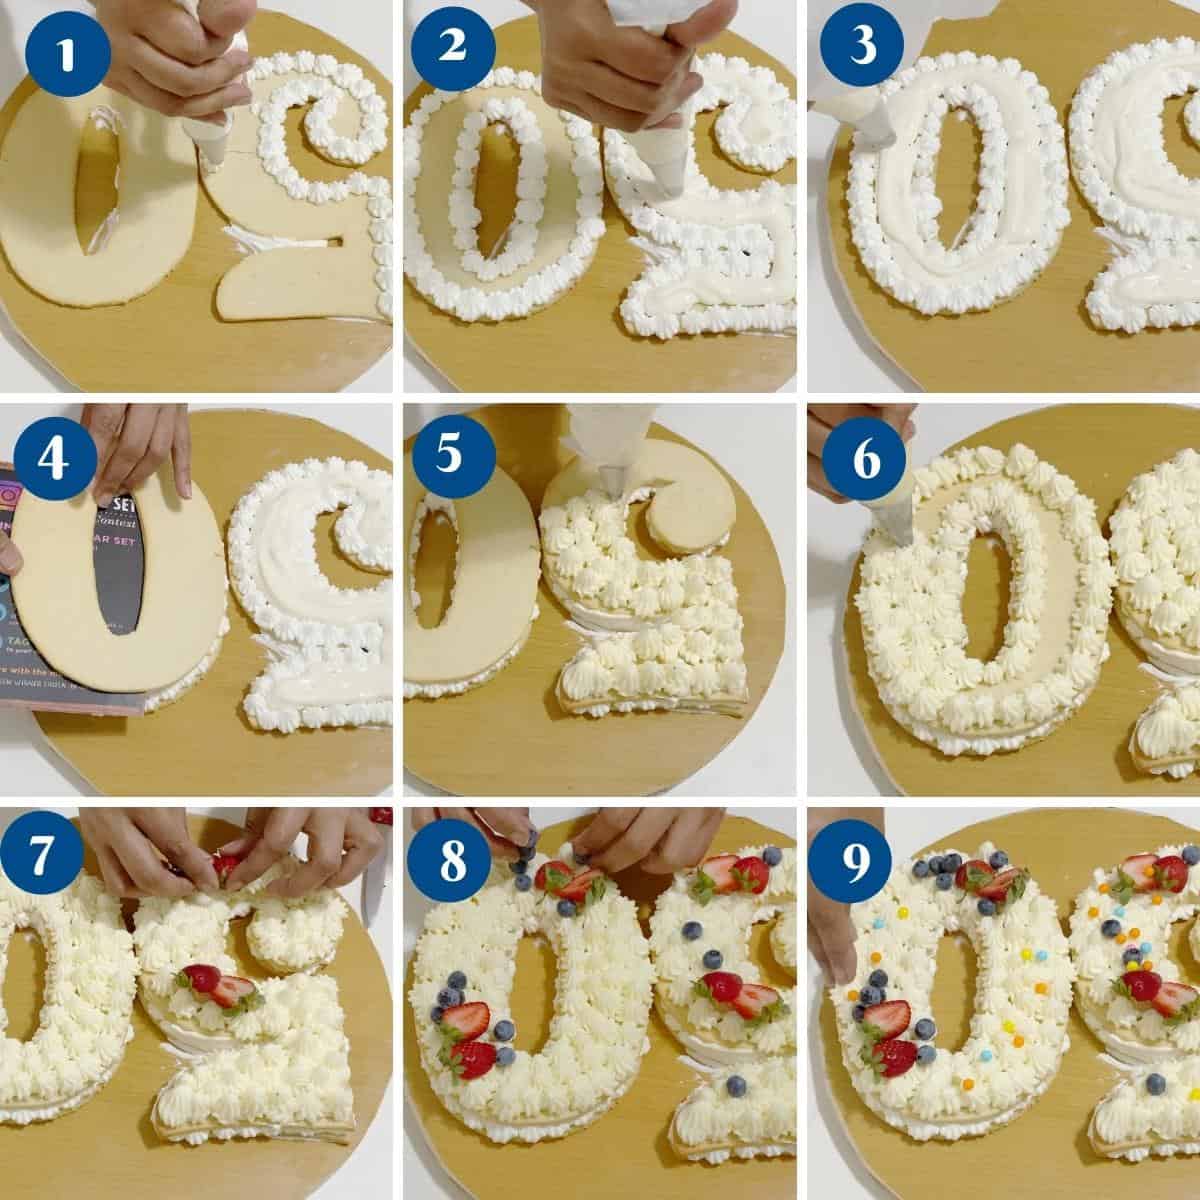
- Whipped cream – Whip the heavy cream in a chilled bowl of a stand mixer with the whisk attachment. Gradually, add half the powdered sugar followed by half the vanilla extract. Continue to whip until stiff peaks form. Transfer half the whipped cream to a piping bag with a star tip (or a large round tip).
Pro tip – We save the other half of the whipped cream to fold into the mascarpone cream. - Mascarpone cream – In the bowl of a stand mixer with the paddle attachment, cream the mascarpone cream with the remaining powdered sugar and vanilla extract. Then, fold in the other half of the whipped cream. Transfer to a pastry bag with a star tip (or a round tip) for piping.
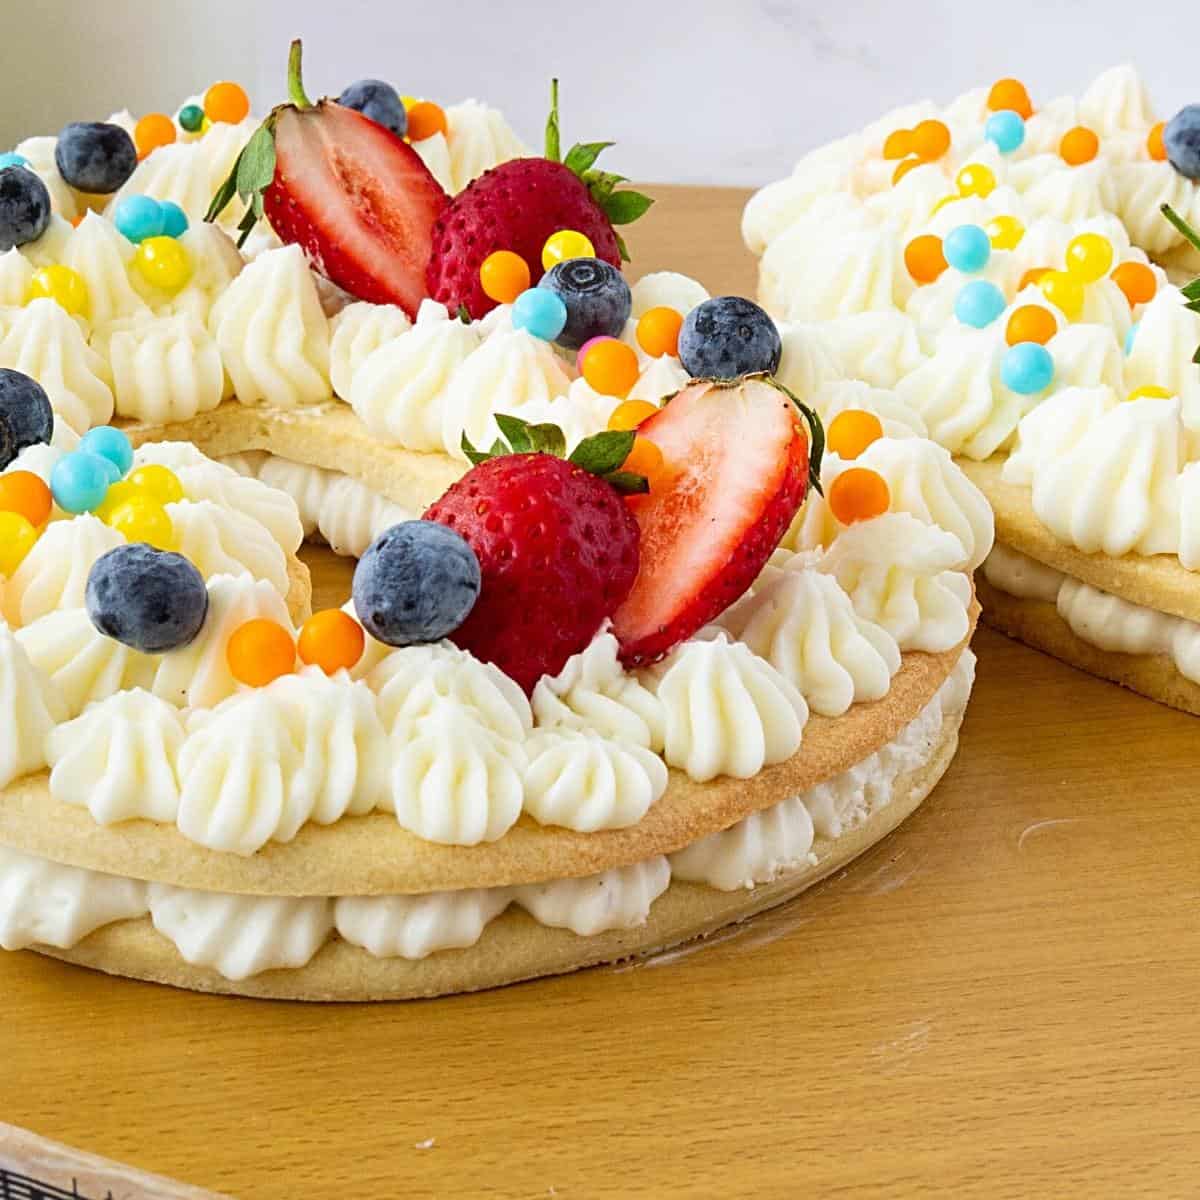
- The first level – Place the first cookie crust on a cake board, cake stand, or serving platter. Pipe the line of whipped cream stars all around the edges of the cookie. Then, pipe or flood the mascarpone cream in the center of the cookie.
Pro tip – You can also pipe the mascarpone cream, but since it won’t be seen, I prefer to flood it. - The second level – Place the second cookie crust on the first layer. Pipe the remaining mascarpone cream all over the cookies.
- Decorate – Decorate as desired. I used strawberries, blueberries, and colored candy.
Creative variations
- Frosting – I’ve used mascarpone and whipped cream, but you can also use chocolate ganache, buttercream, pastry cream, or dollops of ice cream in summer!
- Decoration – Oreos, macarons, sprinkles, meringues, and marshmallows.
- You can also use a stencil for the top of the cake instead of frosting!
- Cake decorators often use gum paste flowers and silicone-molded cutouts for character cakes. A chocolate drip around the cake is now trendy with specks of gold leaf.
- You can also make chocolate sails or chocolate shards by simply pouring melted chocolate on a silicone or parchment mat. Then, cut the chocolate at an angle with a sharp knife.
Tips for success
- Use chilled butter so it crumbles rather than creams into the flour.
- The mixture will appear crumbly, but do not add water. Knead gently to bring it all together. Adding water will cause the dough to spread.
- Chill the dough until it is firm, as it is easier to roll. Also, cut the dough when chilled, as it gives neat edges.
- Cut the circular shape with a pizza cutter and use a ruler to cut straight sides.
- Add the frosting into the pastry bag, as it makes it easier to work.
- The cookie shapes can be made up to 2 days in advance.
- The frosting must be made on the day you are going to assemble the cake.
- Letter Cakes Recipe Tutorial
- Buttercream Mermaid Cake
- Burger Cake Tutorial
- Pancake Cake Tutorial
- See all cake recipes or cake tutorials
Frequently asked questions
This cake will keep in the fridge for up to 2 days. The whipped cream will start to lose volume in about 24 to 36 hours. Alternatively, you can use stabilized whipped cream, which will hold better.
Yes, you do not need to buy any cake tin or baking pan for these cakes. You can either print the shape of the number, alphabet, or abstract shape from the internet, trace it from a book, or draw it freehand with a pencil on paper.
Ideally, when you use whipped cream on cookies, it is best to make the cake a few hours before serving so the cream does not soak into the cookies too much. However, you can make the cookie shapes up to 2 days in advance.
Absolutely, you can bake a cake in a sheet pan as we did in our letter cake recipe and tutorial. You can use that cake recipe and cut the shapes as shown in the video. Then frost and decorate similar to this cake.
The planning and process are simple.
– First, decide what cake you want to make. The cookie-based recipe is below, or cake-based as we did in our letter cake.
– Choose the number and print it to the size you want.
– Read the ingredients and instructions correctly, especially the timeline given above.
– Then bake the cake, frost, and decorate as directed in the timeline.
I printed my numbers on A4-size paper. And rolled the cookie dough to about 1/4 inch thick. You should be able to make 3 layers of thick cookie shapes on A4-sized paper.
Video
Ingredients
- 2½ cups (310 g) All-purpose flour
- 1 cup (110 g) Almond meal or almond flour
- ¾ cup (90 g) Powdered sugar
- 8 oz (226.8 g) Unsalted butter chilled, cubed
- 1 large Egg
- 1 tsp Vanilla extract
- ½ tsp Salt
- 1 cup (225 g) Mascarpone cheese
- 1 cup (240 ml) Heavy cream
- 2 tbsp Powdered sugar
- 2 tsp Vanilla extract
- 6 medium Strawberries
- 12 – 15 Blueberries
- ¼ cup Colored candy
Method
- Food processor – Add the flour, almond meal, salt, and powdered sugar to the food processor. Pulse for 30 seconds. Then, add the chilled cubed butter. Pulse for 30 seconds at a time until you have a breadcrumb consistency. Add the egg and combine well but do not overmix.
- Pour the crumbly mixture on a floured surface and gather it all into a ball. Divide the dough into two, flatten each portion into a disc and wrap in plastic wrap. Chill in the refrigerator for 30 minutes.Pro tip – We need to chill just until it is firm enough to roll. This dough can be kept in the fridge for 2 days, thaw a few minutes if it is too hard to roll.
- Preheat the oven to 375°F / 190°C / Gas Mark 5
- Using a rolling pin, roll the chilled dough on a lightly floured parchment paper to about ¼-inch thickness. If the dough is too soft to cut, chill in the fridge for a few minutes again. Pro tip – Cut the dough when it is well chilled. This way you will get clean edges. Otherwise, you will need to scrape the raw edges after baking.
- Using your template cut out the number, letter, or shape you desire and place them on the sheet pan. Gather the excess dough and re-roll to make more shapes. If necessary, chill the dough in between rolling and cutting.
- Then, bake on the baking sheet for 13 to 15 minutes or until they are slightly golden around the edges. Cool on the pan for 10 minutes. Then, transfer to the wire rack to cool completely.Pro tip – The baking time will depend on the thickness of the cookies. So, keep an eye starting at about 12 minutes. These are very delicate and can break easily so use cardboard to transfer them.
- Whipped cream – Whip the heavy cream in a chilled bowl of a stand mixer with the whisk attachment. Gradually, add half the powdered sugar followed by half the vanilla extract. Continue to whip until stiff peaks form. Transfer half the whipped cream to a piping bag with a star tip (or a large round tip). Pro tip – We save the other half of the whipped cream to fold into the mascarpone cream.
- Mascarpone cream – In the bowl of a stand mixer with the paddle attachment, cream the mascarpone cream with the remaining sugar and vanilla extract. Then, fold in the other half of the whipped cream. Transfer to a pastry bag with a star tip (or a round tip) for piping.
- The first level – Place the first cookie crust on a cake board, cake stand, or serving platter. Pipe the line of whipped cream stars all around the edges of the cookie. Then, pipe or flood the mascarpone cream in the center of the cookie. Pro tip – You can also pipe the mascarpone cream, but since it won't be seen, I prefer to flood it.
- The second level – Place the second cookie crust on the first layer. Pipe with the remaining mascarpone cream all over the cookies.
- Decorate – Decorate as desired. I used strawberries, blueberries, and colored candy.
Notes
- Use chilled butter so it crumbles into pieces and not cream into the flour
- The mixture will appear crumbly but do not add water. Knead gently to bring it all together. Adding water will cause the dough to spread.
- Chill the dough until firm as it is easier to roll. Also, cut the dough when chilled as it gives neat edges.
- Cut the circular shape with a pizza cutter and use a ruler to cut straight sides.
- Add the frosting into the pastry bag as it makes it easier to work.
- The cookie shapes can be made up to 2 days in advance.
- The frosting must be made on the day you are going to assemble the cake.
Nutrition
Tried this recipe?
Mention @veenaazmanov_kitchen or tag #veenaazmanovkitchen!Don’t lose this recipe! Save it for Later!
📌 Save this Recipe for later on Pinterest so you can easily find it again.
⭐ Add Veena Azmanov Kitchen to your Google Preferred Sources.
It helps Google show you more of our recipes.
📧 Subscribe for new recipes delivered to your inbox.
🎥 Follow us for more recipes


Thank you so much for helping out us amateur bakers. Your cakes are amazing! I am almost finished making the number 2 cake, i never could have done it without your photos and directions. I’m putting tractors and a garden on top. My grandson will love it. Your awesome!
You are very welcome Linda. Thank yo so much for your kind words and support
Thank you for this tutorial. I made a number two cake for my friends daughter.
Thank you, Follan. So happy to hear you found this post useful and you made a cake for your friends daughter. Thanks for coming back to write this feedback. Have a lovely day.
Thank you for this tutorial, you saved me from buying an unnecessary pan.
Thank you, Sherry. So happy you have success with this tutorial and enjoyed it. Thank you for coming back to write this feedback too. Have a wonderful day.
Number cakes are and will always be in trend no matter how much cake decorating evolves. I love your take on this. Thanks
PS. Love your blog
Thank you, Joleena. That is true… Number cakes will always be in treand. So happy you hear you find my tutorial helpful. Thank you so much for coming back to write this feedback. Appreciate it very much. Have a wonderful week.
Thanks a lot. Veena
How many servings would the 2 male? Do you use a 9”x9” for the square?
Shimon I used sheet cakes and a round cake.
Dear Veena,
Thank you for the tutorial. You are just amazing. iam making my first 3D number ‘8’ cake for 30 servings. Can u pls suggest the size of pans to be used…
Thanks in advance
Thank you Ruk. A 9 inch cake batter will give you about 32 servings. Dont’ forget to calculate cake scraps when making a novelty cake.
Thank you Veena. Iam planning to make two 8 inch round cakes (two layers each) & join them to minimize the wastage… Do you think it will be enough for 30 servings or will there be too b much leftover. Pls advise
Two layers of 8 inch cake will make 24 servings, plus you will remove the center!! So that’s even lesser!
Thanks Veena… So two layers of one 9 inch & one 8 inch should be enough rt?
Yeah that should work for 28 servings.
Hi I’m making my first number 2 cake for like 15 people what size of pans do I need to use
For 15 people you would need an 8 inch size cake. Splint in two the shapes you require
Hello! I need to make a -#6 for 30 people. What size of pan I need to use?
A 9″ cake would feed 32 people
Hi. Great tutorial. My niece would like me to make a #30 that will feed about 100. Could you help me figure how much cake I would need to make the #30 and still feed 100+. Thanks
A 9 inch round cake 4 inches tall would make about 32 servings so based on that you can then calculate the size and shape.
hi i have come across this which is really helpful, but please can you advise me, i am making my first number one cake and it needs to feed 25-30 what size would you recommend thanks in advance julie
Well, an 8 inch round 4 inch high makes 24 servings and a 9″ round 4 inch high makes 32 servings. SO if you take that batter and make a rectangle cake – may be a sheet cake. You would have the sevings you want. Keep in mind that you will need to consider that when you carve you will loose some cake. So bake a bigger and then carve accordingly <3
Thank you for the tutorial. I am so glad I came across it. Would the half sheet still work for the number 16 cake as well? I am in need of serving about 50-60 people. Thanks