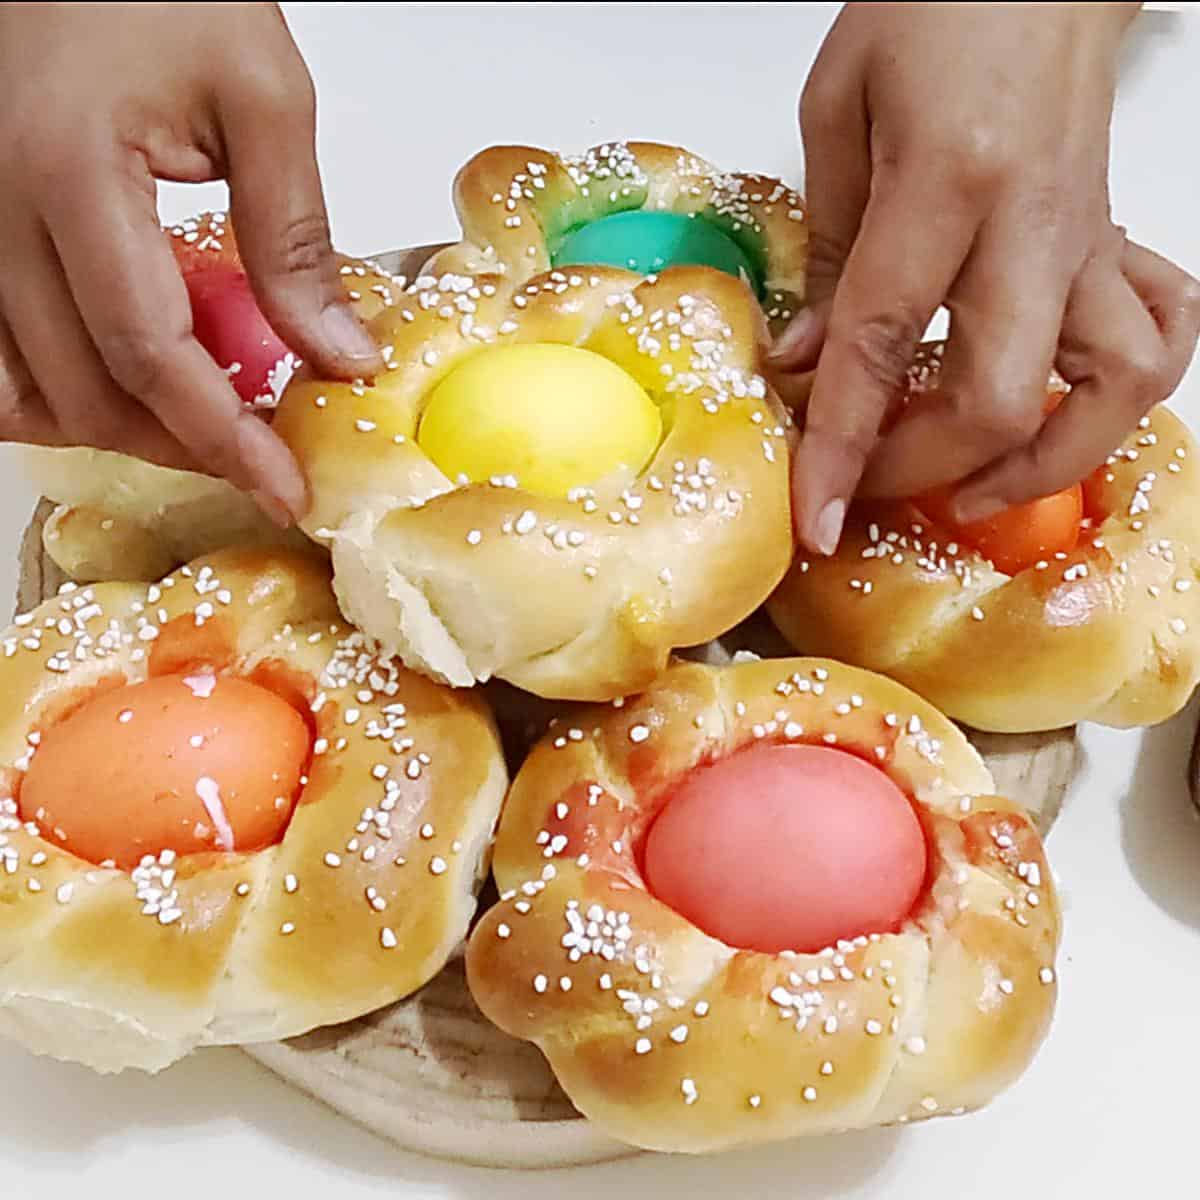
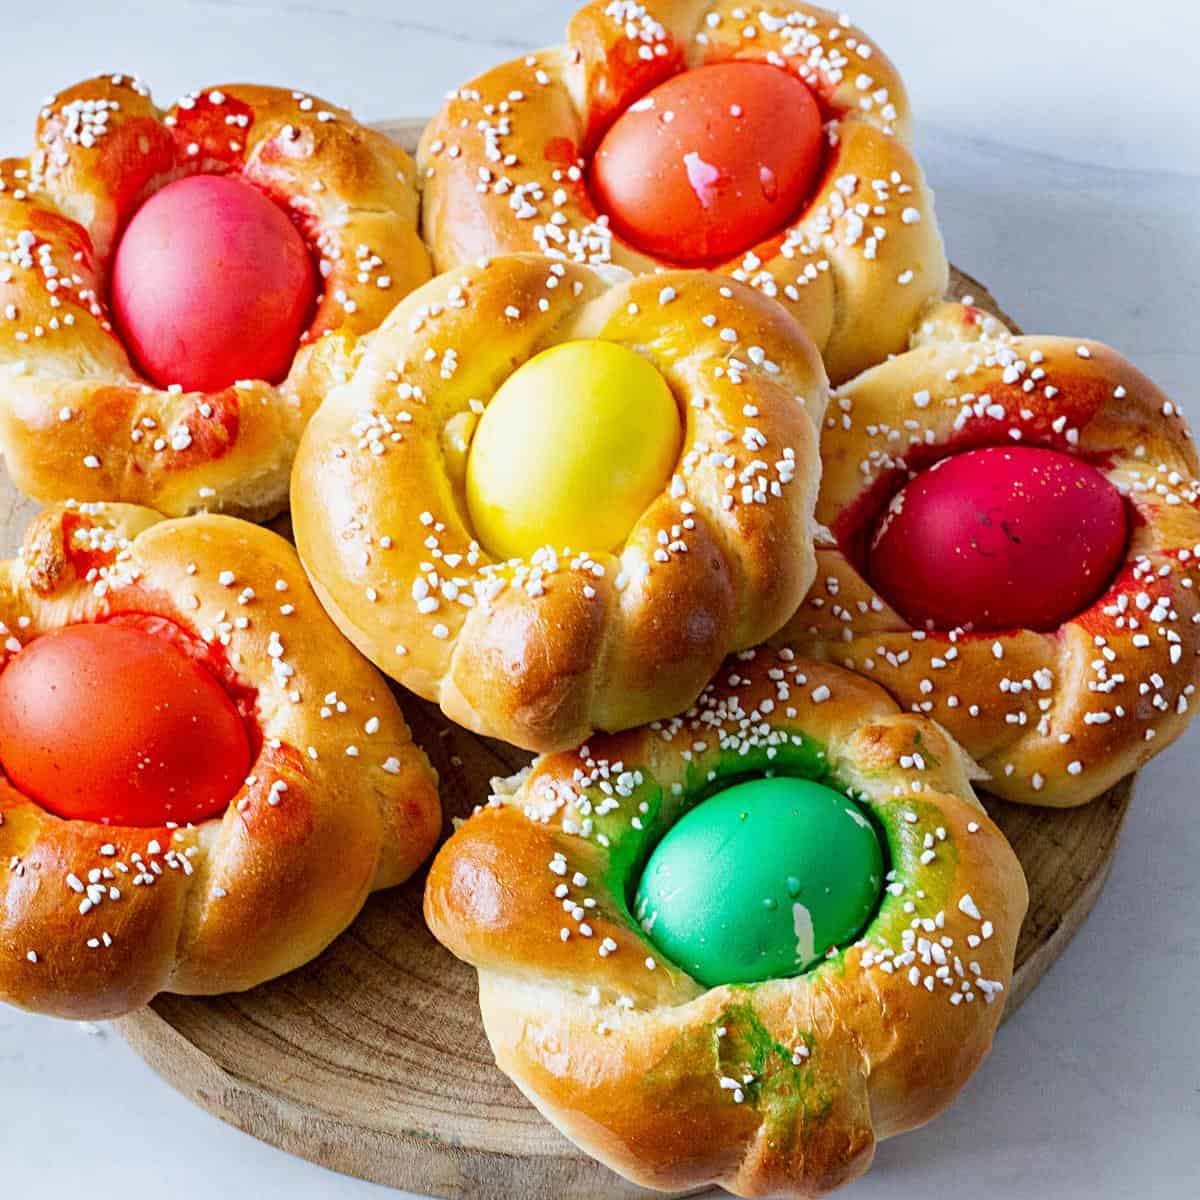
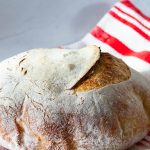
Fluffy Italian Easter Bread with Dyed Eggs
 Prep Time 20 minutes Cook Time 30 minutes Total Time 2 hours 50 minutes


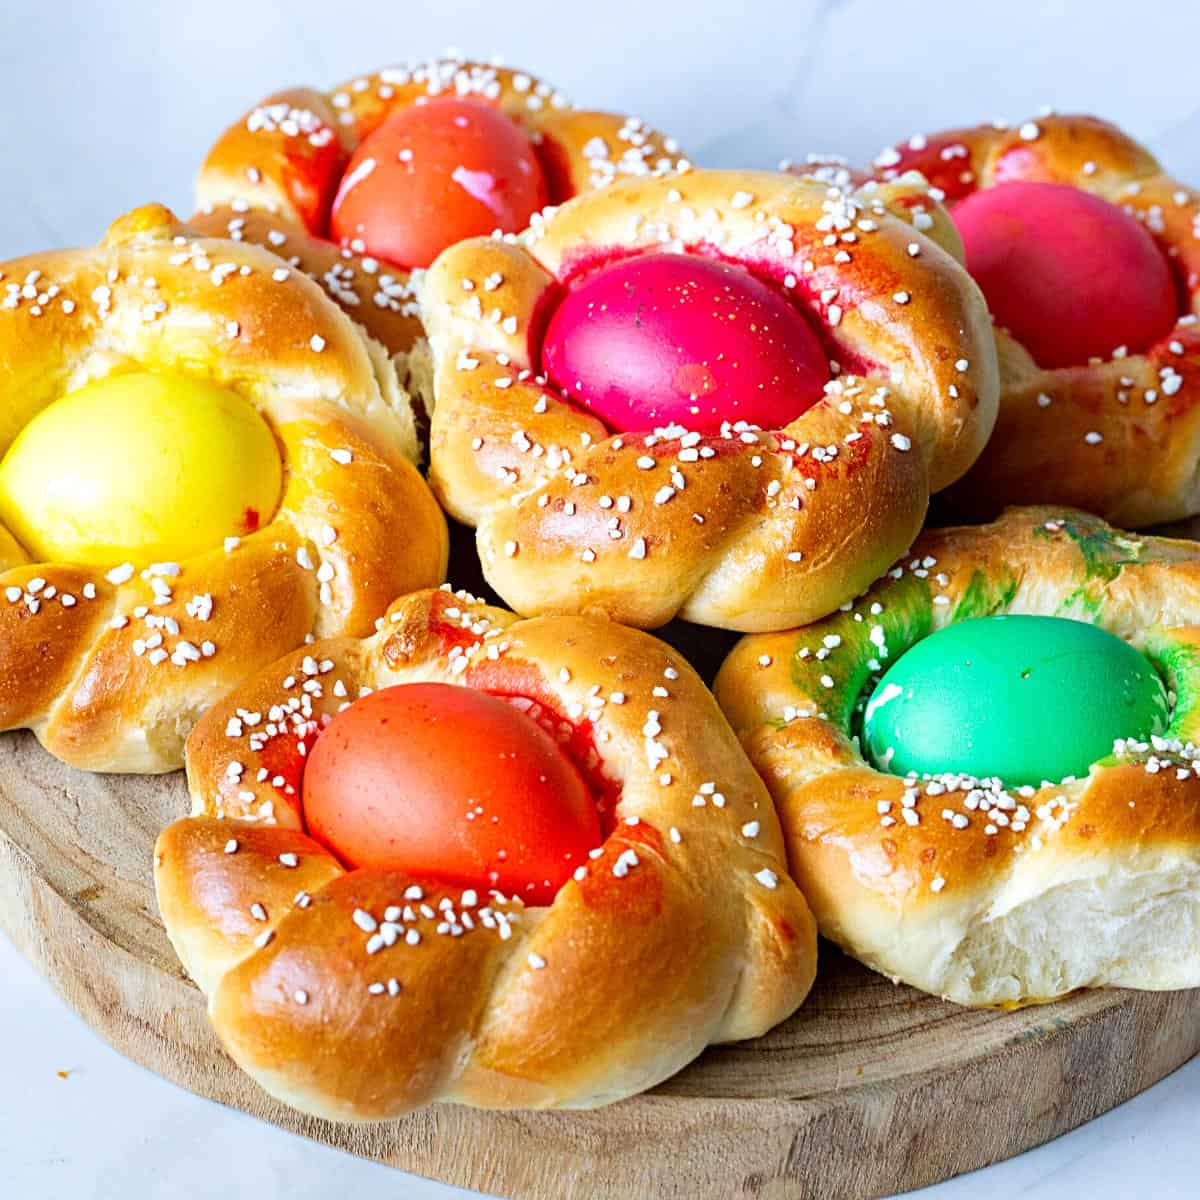
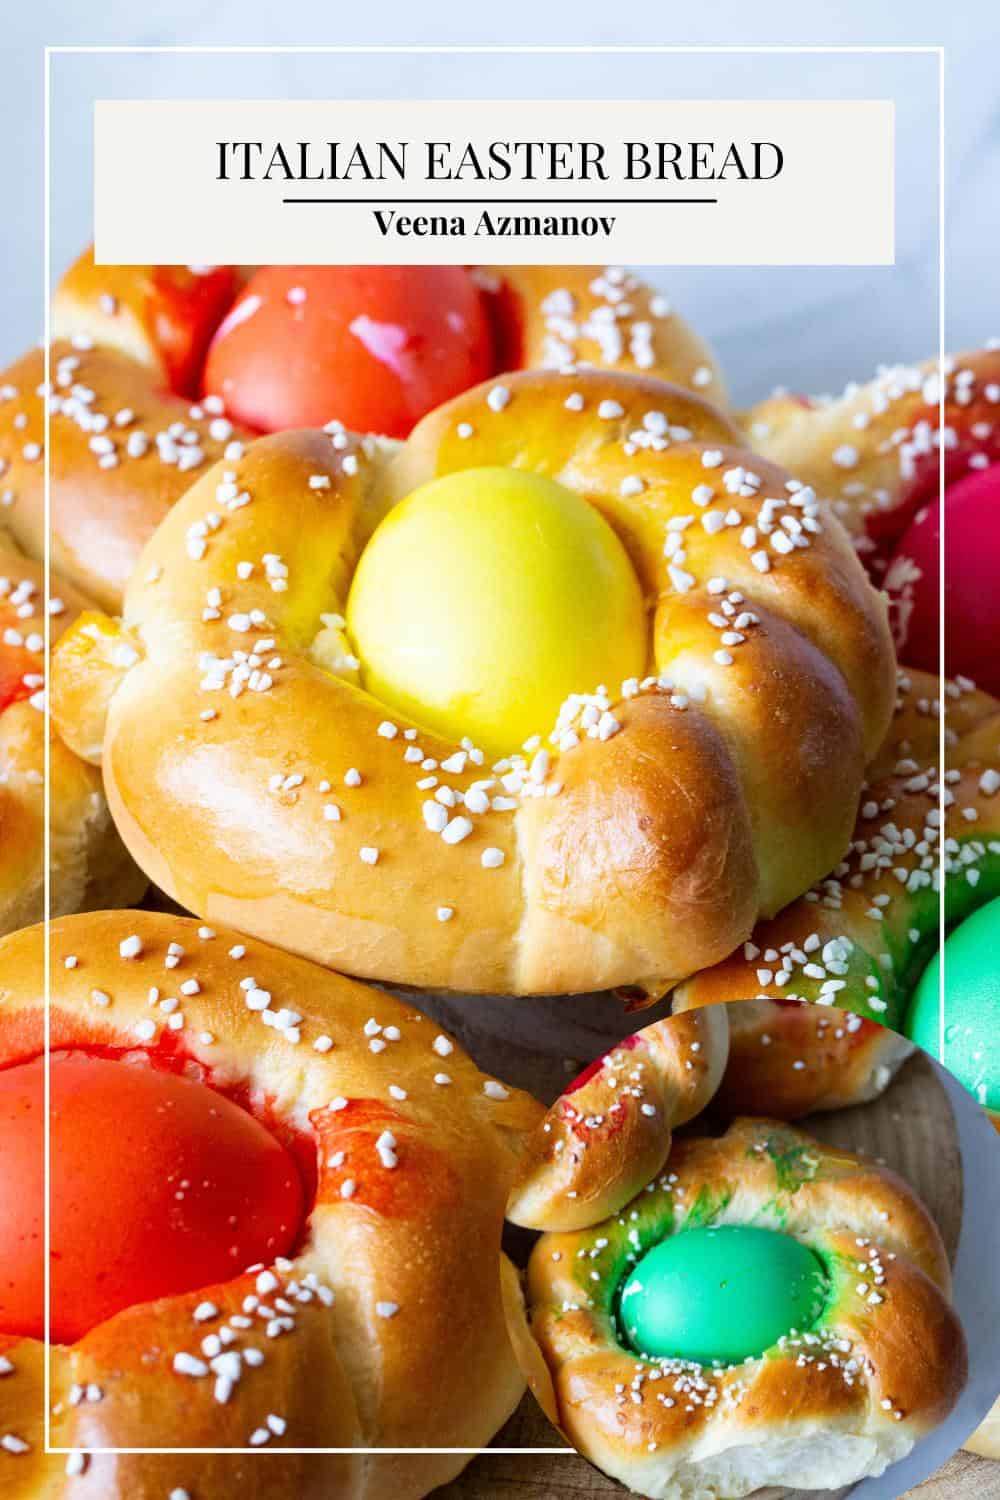
If you’re looking for a special way to start your Easter dinner, look no further. This Italian Easter bread, or Pane di Pasqua, is a must if you celebrate Easter. It’s a light and fluffy, enriched bread with a beautifully dyed egg in the center.
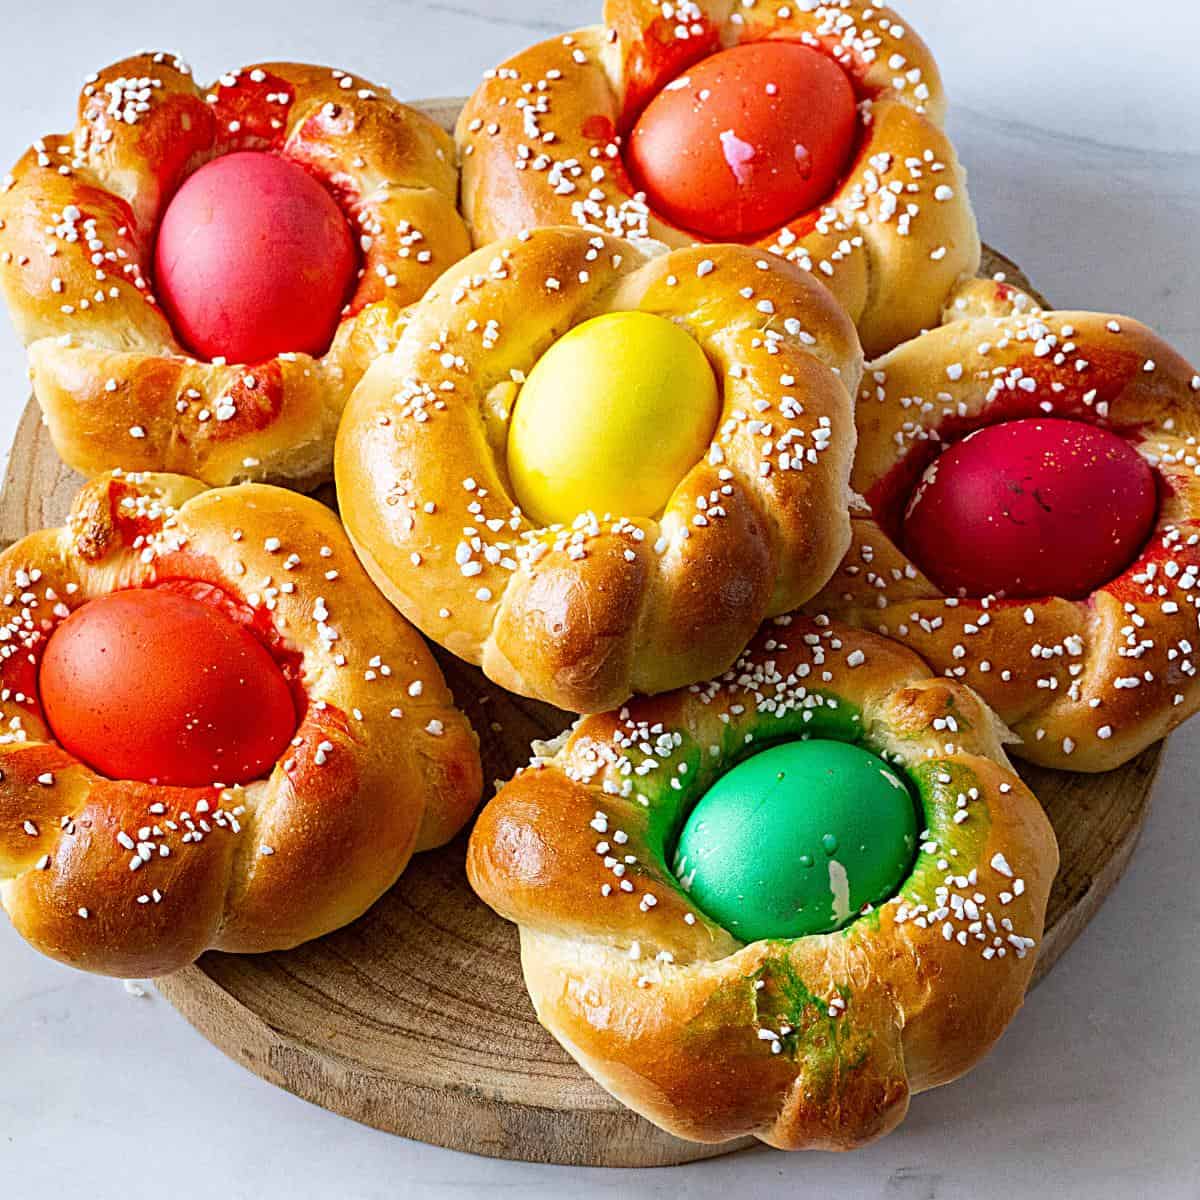
Italian Easter Bread, also known as “Pane di Pasqua” or “Crescia di Pasqua,” is a traditional Easter bread from Italy. It is a sweet, enriched bread that is typically flavored with citrus zest and studded with colorful Easter eggs.
Italian Easter Bread is a popular tradition in many Italian households during Easter and is often enjoyed as a breakfast or dessert. It is also a common gift to bring to Easter gatherings and celebrations.
Why make this bread
- This is a fun and tasty way to celebrate Easter with family and friends.
- And, as you can see in my video and step-by-step progress pictures, the process is simple and easy, just like making any other bread dough with braiding.
- Also, most ingredients are simple pantry staples or easy to find.
- You can customize and make one large braided Easter wreath dotted with eggs or individual loaves like this.
Ingredients and substitutes
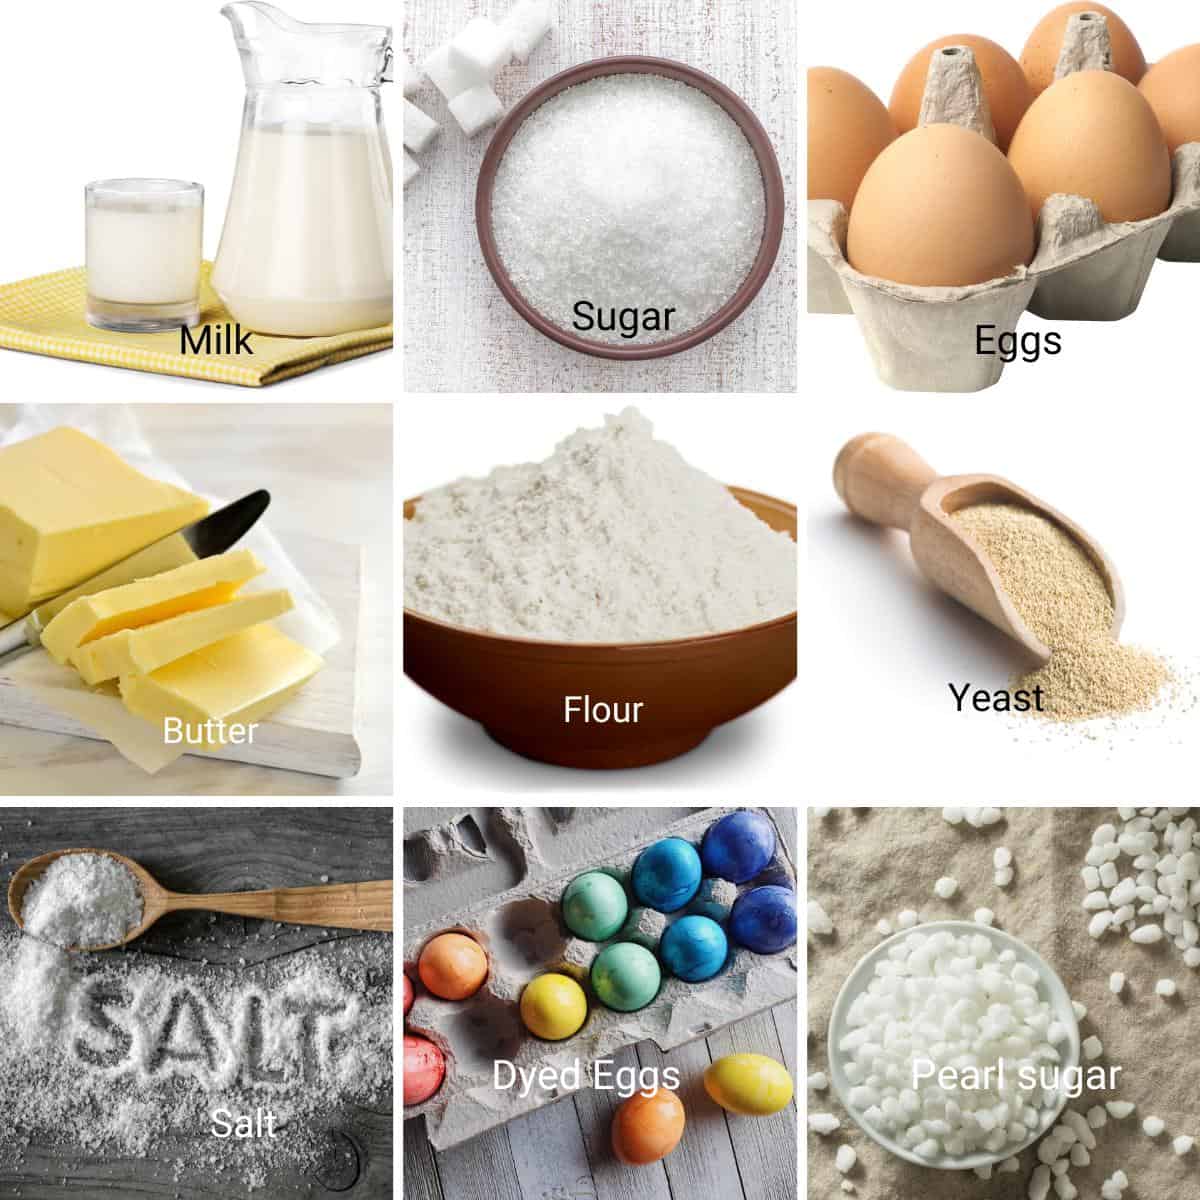
- Flour – I like using bread flour for this bread. It gives a soft chew bread with a tender crust. But, for years, I have made this with all-purpose flour, and it also works wonderfully. So, use either bread or all-purpose flour.
- Milk – Traditionally, this bread is made with water, but in this one, we use milk. You can definitely also use warm water (110°F). It is important that the water is warm, not hot. Hot water will kill the yeast, and cold water will not activate the yeast culture.
- Instant dry yeast – I like to use instant dry because I’ve always had great success with it. If you have to use active dry yeast, you will need 2 ¼ teaspoons or one packet. And if you use fresh yeast, you will need about 21 grams. Also, it’s not necessary to activate the yeast, but I like to take the guesswork out and make sure my dough will rise.
- Sweetener – This is not necessarily a very sweet dough. Traditionally, honey is used, but sugar can be used too.
- Fat – Traditionally, oil is used in this bread. I love to use butter for its rich flavor.
- Egg – Adds a lot of flavor to the bread, gives a tender crumb, and strengthens the texture. The egg is also a leavening agent that helps the bread rise.
- Dyed eggs – You can use dyed eggs or undyed, of course.
Step-by-step: Italian Easter bread
- Wet ingredients – In the bowl of a stand mixer, with the dough hook attachment, combine warm milk (110°F), yeast, sugar, and eggs.300 grams
- Dry ingredients – Add the bread flour, followed by the salt. Combine at medium-high speed for 4 to 5 minutes.
- Butter – Add the room-temperature butter and continue kneading for 3 to 4 minutes at medium to low speed.
Pro tip – The dough will be very soft, but do not add more flour; otherwise, you will have dense bread.

- Rise – When the dough is soft and shiny, but still slightly sticky, shape it into a ball. Then, place the dough in an oiled bowl, seam-side down. Coat the surface with oil to prevent drying. Cover with a clean kitchen cloth or plastic wrap. Leave in a warm place. And let it rise for 60 to 90 minutes until it doubles in volume.
Pro tip – In winter, you may need 90 minutes or more. But in summer, the dough may double in 45 minutes. If you can’t attend to it at that moment, degas, reshape, and let it double in volume again. - Divide – When the dough doubles in volume, transfer it to a well-dusted floured surface. Punch and reshape into a ball. Then shape it into a ball again. Divide the dough into 12 portions.
Pro tip – I like to cut the dough in half, then quarters. Then, divide each portion into 3 to make 12 rolls.
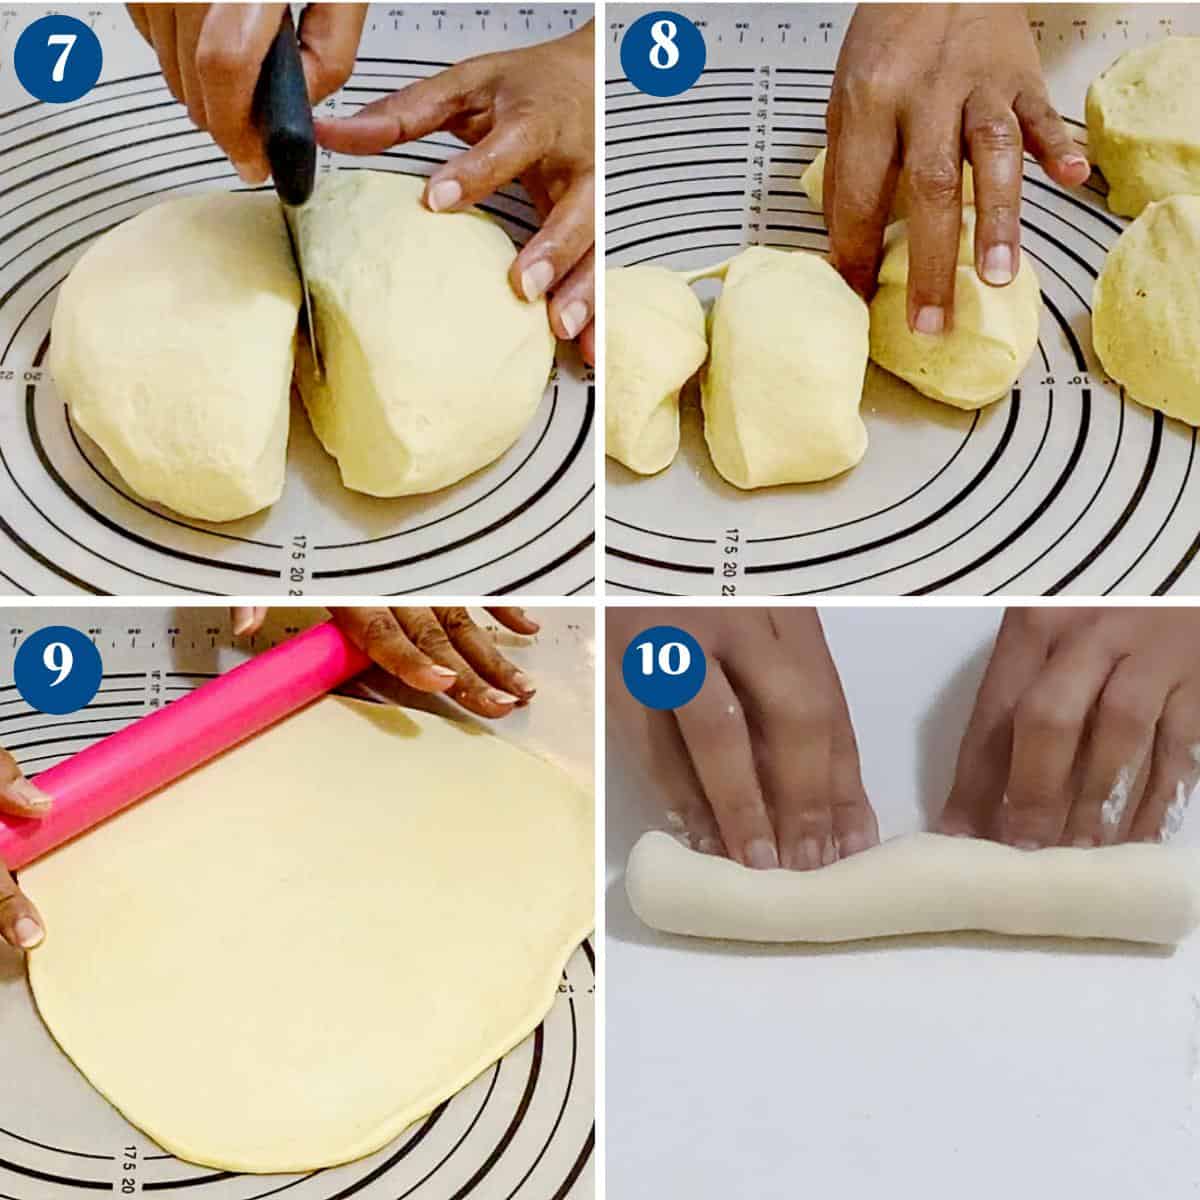
- Rope – Shape each into a ball. Then, roll each ball with a rolling pin on an unfloured work surface (see video). Roll like a jelly roll into a rope about 18 inches long (see video).
Pro tip – If the dough resists stretching, rest it for 5 minutes. Resting the dough between each shaping will help the dough rest and the gluten relax.

- Shape – Braid the rope onto itself as shown in the video or progress pictures. Then, place a raw egg (colored or uncolored) on each piece of bread.
- 1. Simply coil the rope onto itself in a circle. Pinch the two ends together and tuck the joint under.
- 2. Or coil the rope into a double rope, then join the ends to make a circle.
- Proof – Place on a baking tray. Cover with plastic wrap or a clean kitchen cloth and let it proof for 30 to 45 minutes.
Pro tip – Spray the plastic wrap with oil to prevent it from sticking to the rolls.

- Oven – Preheat the oven to 350°F /177°C / Gas Mark 4
- Eggwash – Brush the bread with a beaten egg. Sprinkle with pearl sugar.
Pro tip – Egg wash is a full egg with 2 tbsp of water. An egg wash will give a nice golden color. If you can’t use egg, milk or cream will work just as well. Do not use oil or butter, as it will create a crust. - Bake – Transfer to the oven and bake on the middle rack for 20 to 25 minutes.
- Cool – Remove and let cool on a wire rack for 5 minutes. Then, cover them with a clean kitchen cloth to keep them soft.
Pro tip – Do not leave the loaf on the tray for too long, as the steam will make the bread soggy on the bottom. Covering the bread with a cloth will help the bread retain moisture and prevent it from drying out.

Frequently asked questions
You can keep this bread at room temperature for 2 days. You can even freeze it for up to a month.
You can use both raw and boiled eggs in this bread. I personally prefer to use raw eggs because they cook during baking. I find that boiled eggs tend to overbake in the baking process.
Add a few drops of food coloring to a cup of water with 1 tsp of vinegar. Soak the eggs in the colored water for 5 to 7 minutes. Take it out and use it to dye more eggs. You can do this process with as many eggs or colors as you need.
Italian Easter Bread
If you’re looking for a special way to start your Easter dinner, look no further. This Italian Easter bread, or Pane di Pasqua, is a must if you celebrate Easter. It’s a light and fluffy, enriched bread with a beautiful dyed egg in the center.
Video
Ingredients
- 240 grams (1 cups) Warm milk 110°F
- 100 grams (2 large) Eggs large
- 9 g (2¼ tsp) Instant dry yeast (or 21 g bakers fresh yeast)
- 60 grams (4 tbsp) Sugar or less
- 60 grams (5 tbsp) Butter
- 500 grams (500 g) Bread flour (or all-purpose flour)
- 9 grams (1¼ tsp) Salt
- 10 large Dyed eggs
Method
- Wet ingredients – In the bowl of a stand mixer with the dough hook attachment, combine warm milk (110°F), yeast, sugar, and eggs.240 grams Warm milk, 100 grams Eggs, 9 g Instant dry yeast, 60 grams Sugar
- Dry ingredients – Add the bread flour, followed by the salt. Combine at medium-high speed for 3 to 5 minutes.500 grams Bread flour , 9 grams Salt
- Butter – Add the room temperature butter and continue to knead for 15 to 18 minutes at medium-low speed.60 grams Butter
- Rise – When the dough is soft and shiny, but still slightly sticky, shape it into a ball. Place the dough in an oiled bowl, seam side down. Coat the surface with oil to prevent drying. Cover with a clean kitchen cloth or plastic wrap. Leave in a warm place. Let rise for 60 to 90 minutes until it doubles in volume.
- Divide – When the dough doubles in volume, transfer it to a well-dusted floured surface. Punch and reshape into a ball. Then shape it into a ball again. Divide the dough into 12 portions.
- Rope – Shape each into a ball. Then, roll each ball with a rolling pin on an unfloured work surface (see video). Roll like a jelly roll into a rope about 18 inches long (see video).
- Shape – Braid the rope onto itself as shown in the video or progress pictures. Place a raw egg (colored or uncolored) on each piece of bread. 1. Simply coil the rope onto itself in a circle. Pinch the two ends together and tuck the joint under. 2. Or coil the rope into a double rope, then join the ends to make a circle.10 large Dyed eggs
- Proof – Place on a baking tray. Cover with plastic wrap or clean kitchen cloth and let proof for 30 to 45 minutes.
- Oven – 20 minutes before baking, preheat the oven to 350°F /177°C / Gas Mark 4
- Eggwash – Brush the bread with a beaten egg. Sprinkle with pearl sugar.
- Bake – Transfer to the oven and bake on the middle rack for 20 to 25 minutes.
- Cool – Remove and let cool on a wire rack for 5 minutes. Then, cover them with a clean kitchen cloth to keep them soft.
- Enjoy!
Notes
- Measure all ingredients beforehand, so you don’t forget anything at the last minute.
- For accuracy, use a weight measure for the ingredients because every cup of flour can weigh differently depending on how you fill it.
- The liquid (milk or water) must be warm (not hot) – about 110°F. If the liquid is too hot, it will kill the yeast. Similarly, if the liquid is too cold, it will not activate the yeast.
- Most yeasts have a long shelf life, but they can get ruined. Always check the expiry date on the yeast. If unsure, combine the yeast with water/milk, sugar/honey, and oil/butter from the recipe and let stand for 5 minutes. If it gets foamy, the yeast is good to go. If not, it’s best to buy fresh yeast or check the temperature of the milk.
- Keep salt away from yeast as it can kill the yeast. I like to combine the salt with the flour and then add the yeast mixture.
- A soft, loose, well-hydrated dough is not necessarily a bad thing. Often, it will give you soft, puffy bread. So, don’t be tempted to add more flour than mentioned in the recipe.
- Kneading is key to making good bread. While kneading by hand can be therapeutic, using a stand mixer is easier and quicker.
- Leave the dough at room temperature to rise until it doubles in volume. While not recommended, when in haste, you can place it in a warm (30 C / 75 F- not hotter) oven, this will expedite the rise.
- Bread does not have to be time-consuming. You can leave the dough in the fridge to rise for a few hours (even overnight) while you go about your chores. A slow rise will give more flavor to the bread.
- Always preheat the oven for at least 10 minutes before you place the bread in, or the low temperature will spread the dough too much.
- Overnight Easter bread – The dough can be prepared a day in advance. Proof it for an hour on the counter, then punch down and let the dough rest in the fridge overnight. Overnight proofing is a great way to add flavor to the bagels. The next day, let the dough come to room temperature before you shape and bake it.
- Storing this bread – These loaves do freeze beautifully. Cool the baked loaves, then place them in a freezer-safe storage bag. These can be frozen for up to a month. I like to slice my challah so my kids can use a few slices at a time.
- Kneading the dough – If possible, use an electric mixer because the dough is soft and sticky.
- Bread machine – This dough can be easily made in a bread machine. Pour all ingredients into the pan set to dough or manual. Start and let the dough run its cycle for about 9 to 10 minutes – continue with the recipe as shown above.
Equipment you will need


Nutrition
Tried this recipe?
Mention @veenaazmanov_kitchen or tag #veenaazmanovkitchen!


Don’t lose this recipe! Save it for Later!
📌 Save this Recipe for later on Pinterest so you can easily find it again.
⭐ Add Veena Azmanov Kitchen to your Google Preferred Sources.
It helps Google show you more of our recipes.
📧 Subscribe for new recipes delivered to your inbox.
🎥 Follow us for more recipes


This bread is so festive and the addition of the egg in the middle is so creative.
What pretty bread to bake! I love baking shaped bread and these are perfect for Easter. I have always been scared to bake with eggs in the middle. I am going to brave it this time.
These are so stinkin cute! My family will love these this Easter. Thanks for sharing.
It’s not easter without these for my family! This is my go-to recipe year after year.
I love the look of these! They came out so pretty, especially with the bright eggs in the middle. I’ve been meaning to try Easter bread and you’ve inspired me to give it a go!
I have loved all of your bread recipes, so I am excited to give this one a try too! Love how you added the color for Easter!
This Italian bread looks so cute and delicious for Easter. Thanks for sharing.