Round Challah Recipe
 Prep Time 30 minutes Cook Time 35 minutes Total Time 3 hours 5 minutes
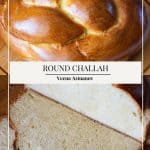
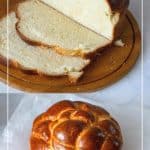
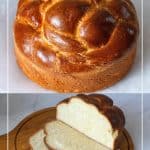
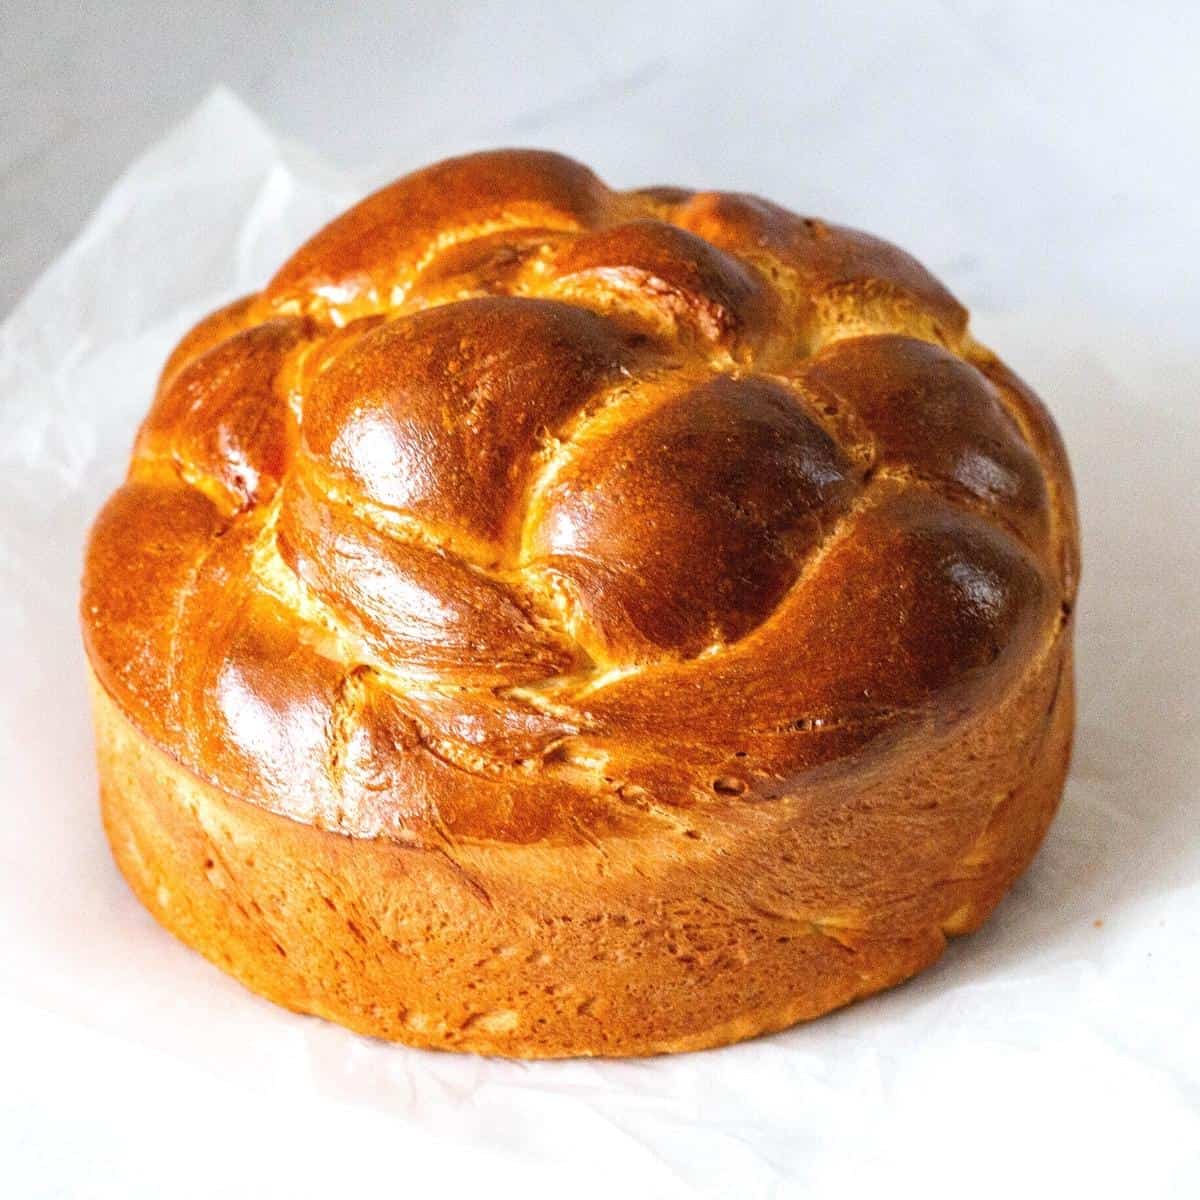
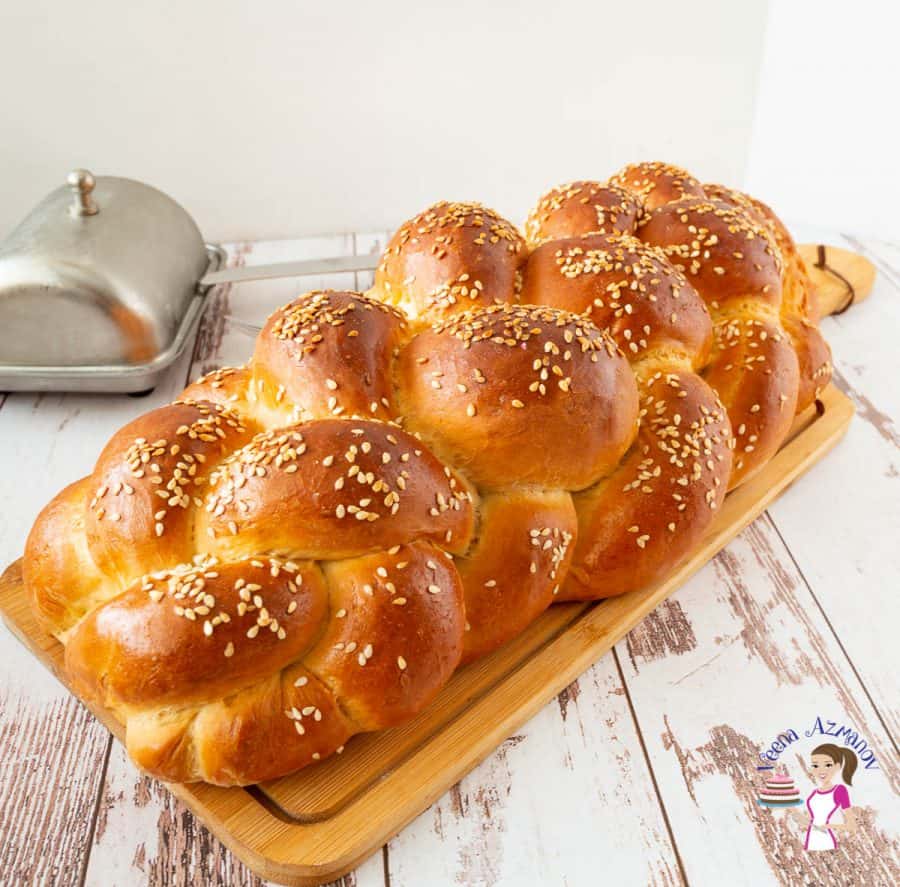
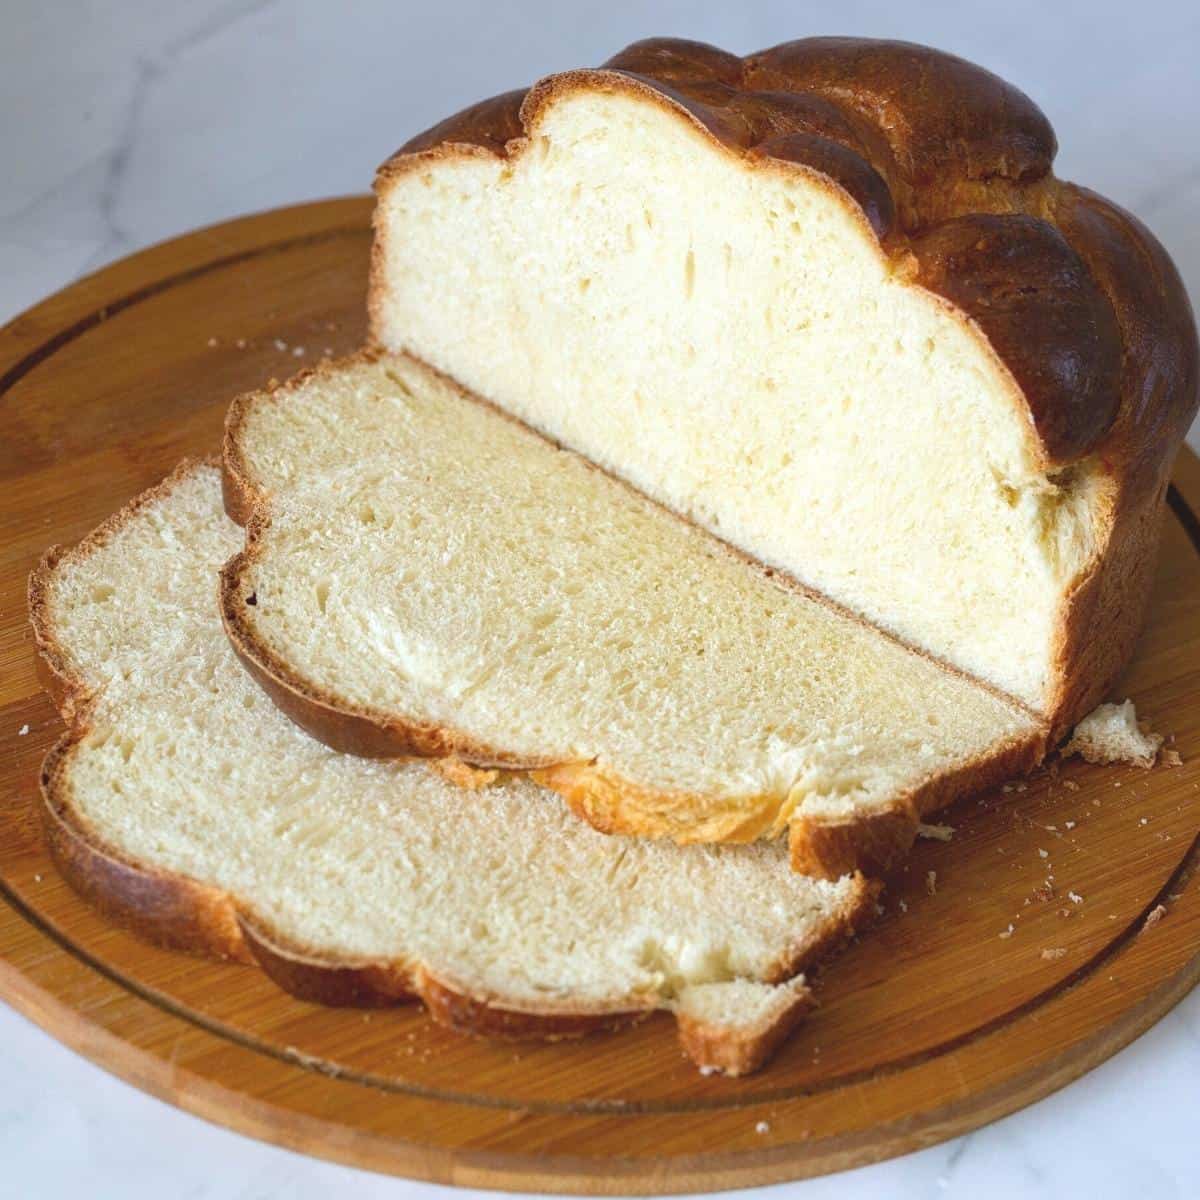
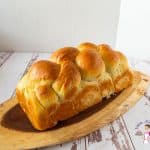
Challah is a Jewish bread usually made for Friday evenings in preparation for Shabbat. The characteristics of a round challah are very different from a regular elongated braided bread, but the method is quite similar.

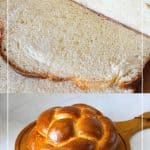
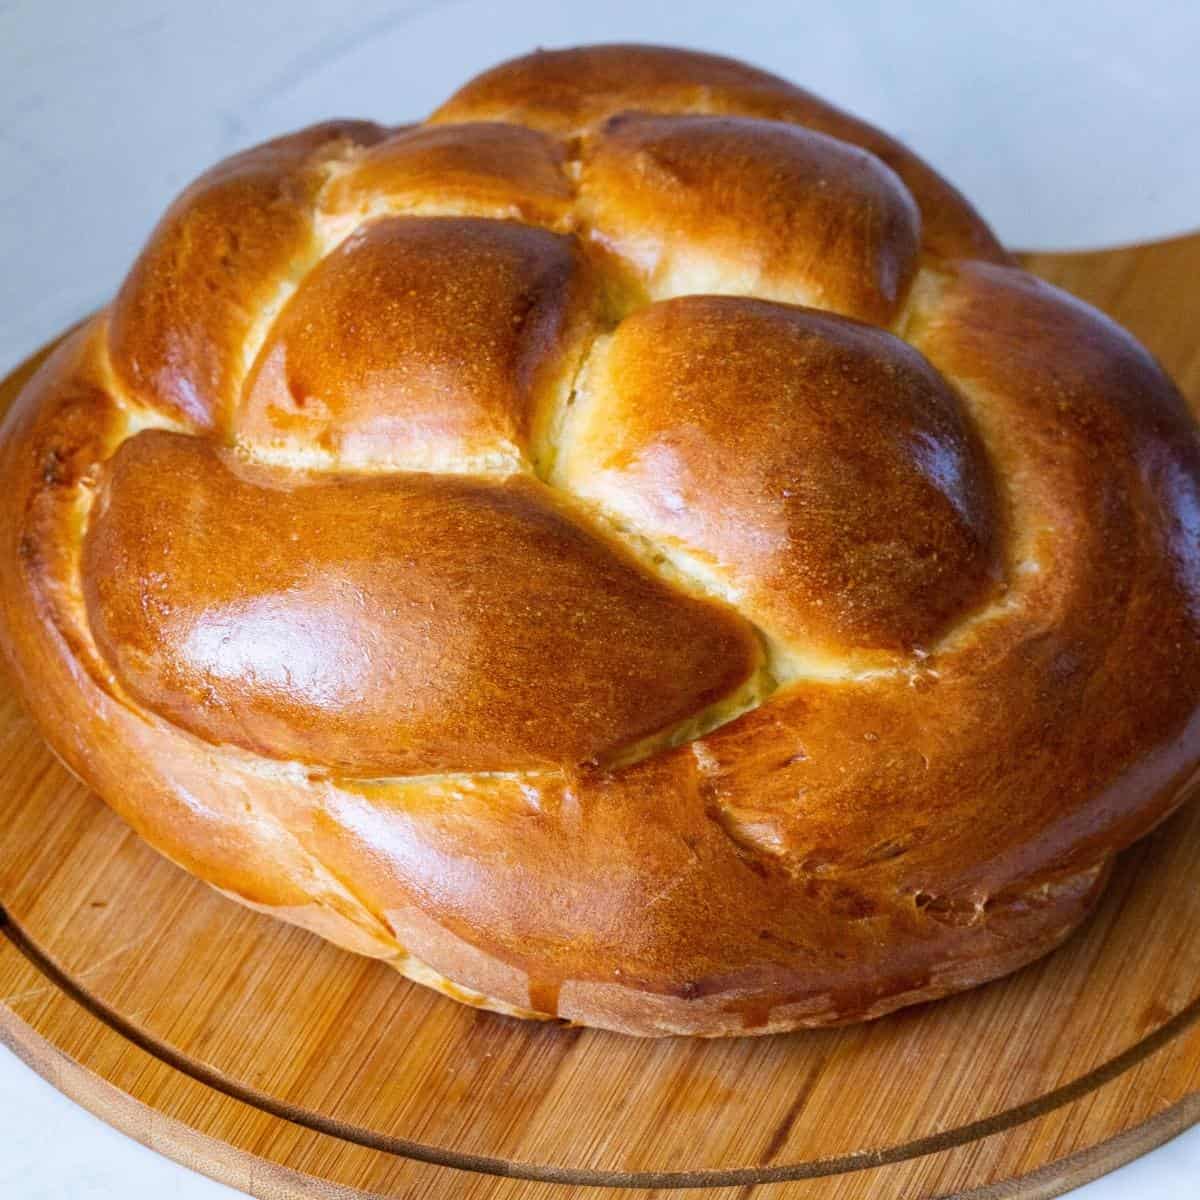
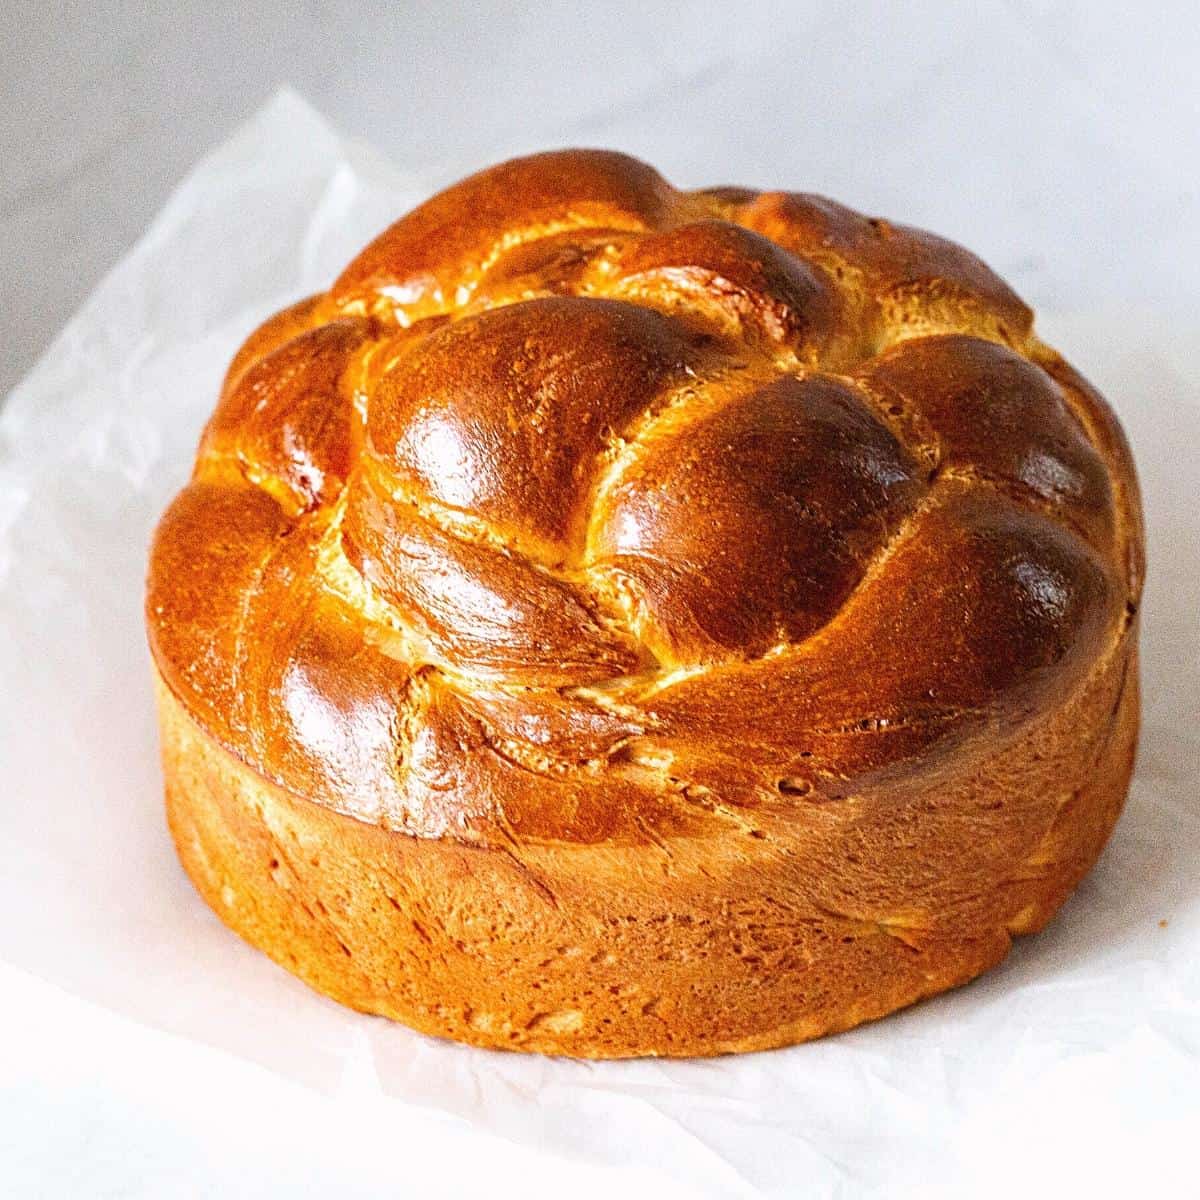
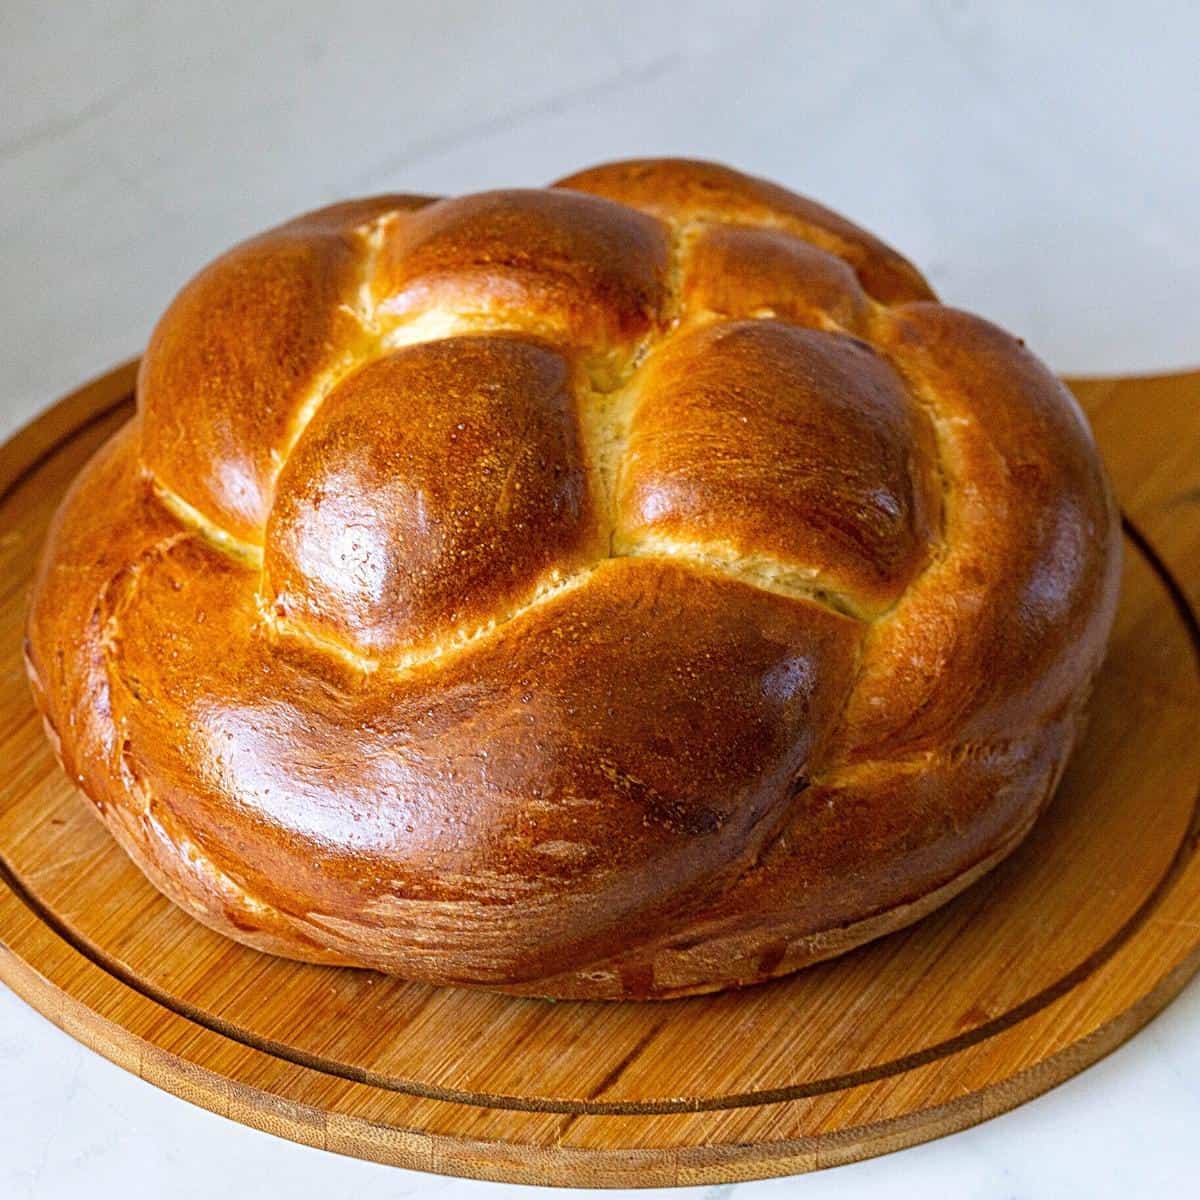
New Year is a time of renewal and hope. Jews celebrate Rosh Hashanah with spiral challah, which symbolizes the cyclical nature of life. While a long braided loaf is made for Shabbat, a round one is reserved for this festive holiday table.
This is often called Rosh Hashanah challah, usually baked in September. It’s one of the most impressive breads that takes center stage on the holiday dinner table.
Why Make a Round Challah for Rosh Hashanah?
The round shape of challah symbolizes:
- The cycle of the year and renewal.
- Eternity and continuity of life.
- A sweet new year, often baked with raisins, apples, or honey.
Why You’ll Love This Recipe
- Includes 3 braiding methods: 3-strand, 4-strand, and single-strand spiral challah.
- Step-by-step instructions + videos for each braid.
- Uses a classic challah dough — soft, slightly sweet, and golden.
- Freezes beautifully, perfect to bake ahead.
Ingredients and substitutes
- Flour – Bread flour makes soft, chewy challah, but all-purpose flour works too.
- Water or Milk – Water is traditional, milk makes richer bread.
- Instant Dry Yeast – 2¼ tsp (or 21 g fresh yeast).
- Sugar or Honey – Adds subtle sweetness and feeds yeast.
- Oil or Butter – Vegetable oil or butter-flavored margarine; butter for richness.
- Eggs – Flavor, structure, and golden color.
- Salt – Balances flavors.

Step-by-Step Round Challah Recipe for Rosh Hashanah
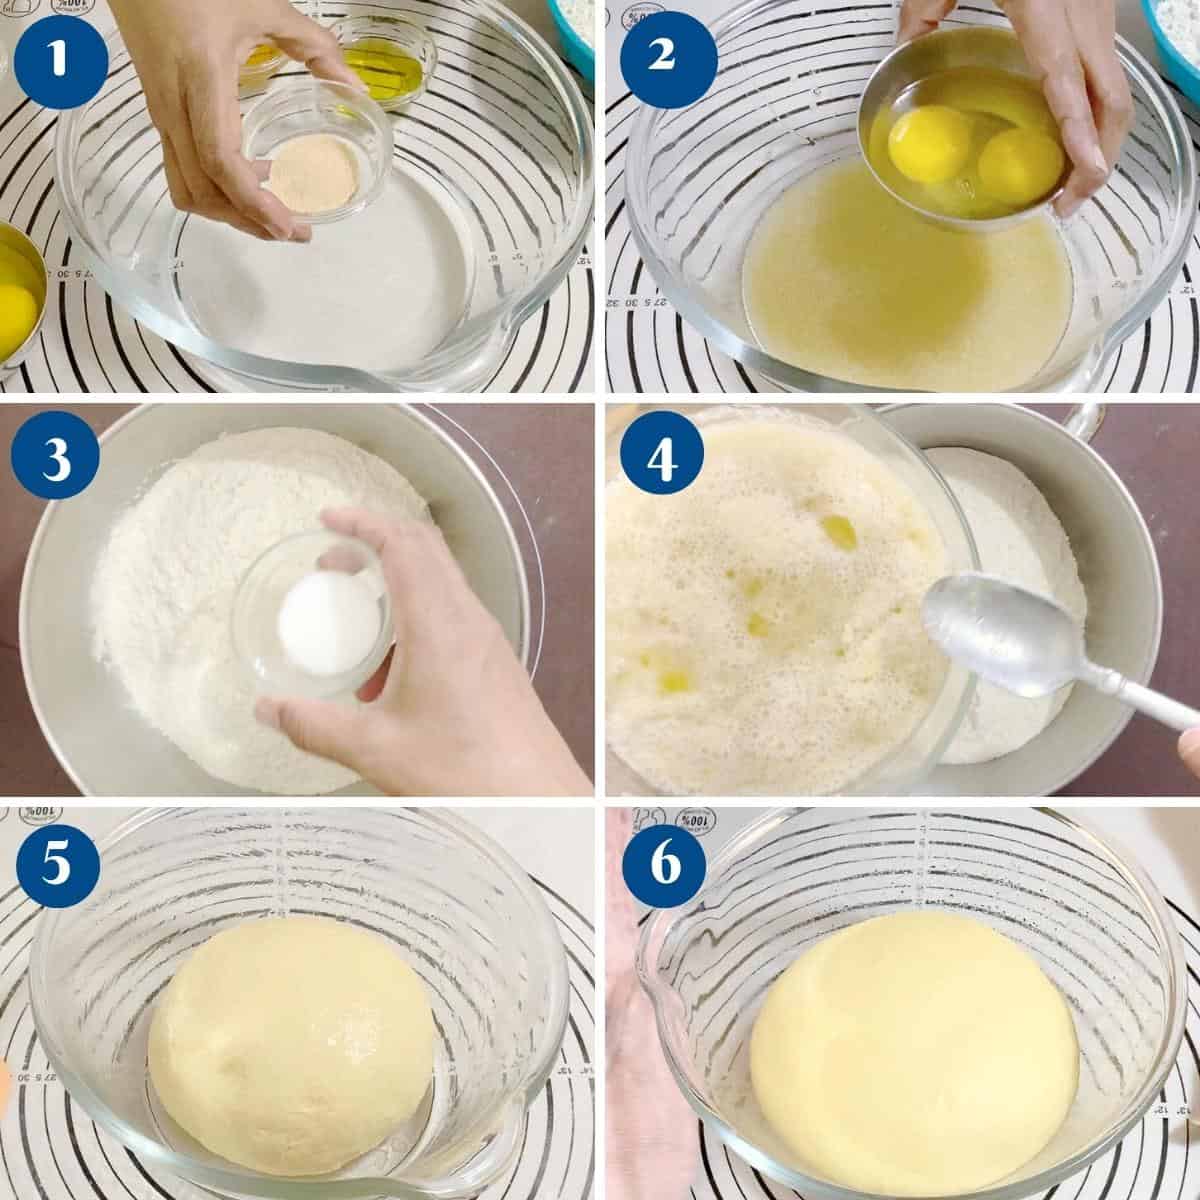
1. Make the Challah Dough
- Mix yeast, warm water (110°F), honey, oil, and eggs in the bowl of a stand mixer. Let foam.
- Add flour + salt → knead 6–8 minutes until smooth and elastic.
- Place in an oiled bowl, cover, and let rise 60–90 minutes until doubled.
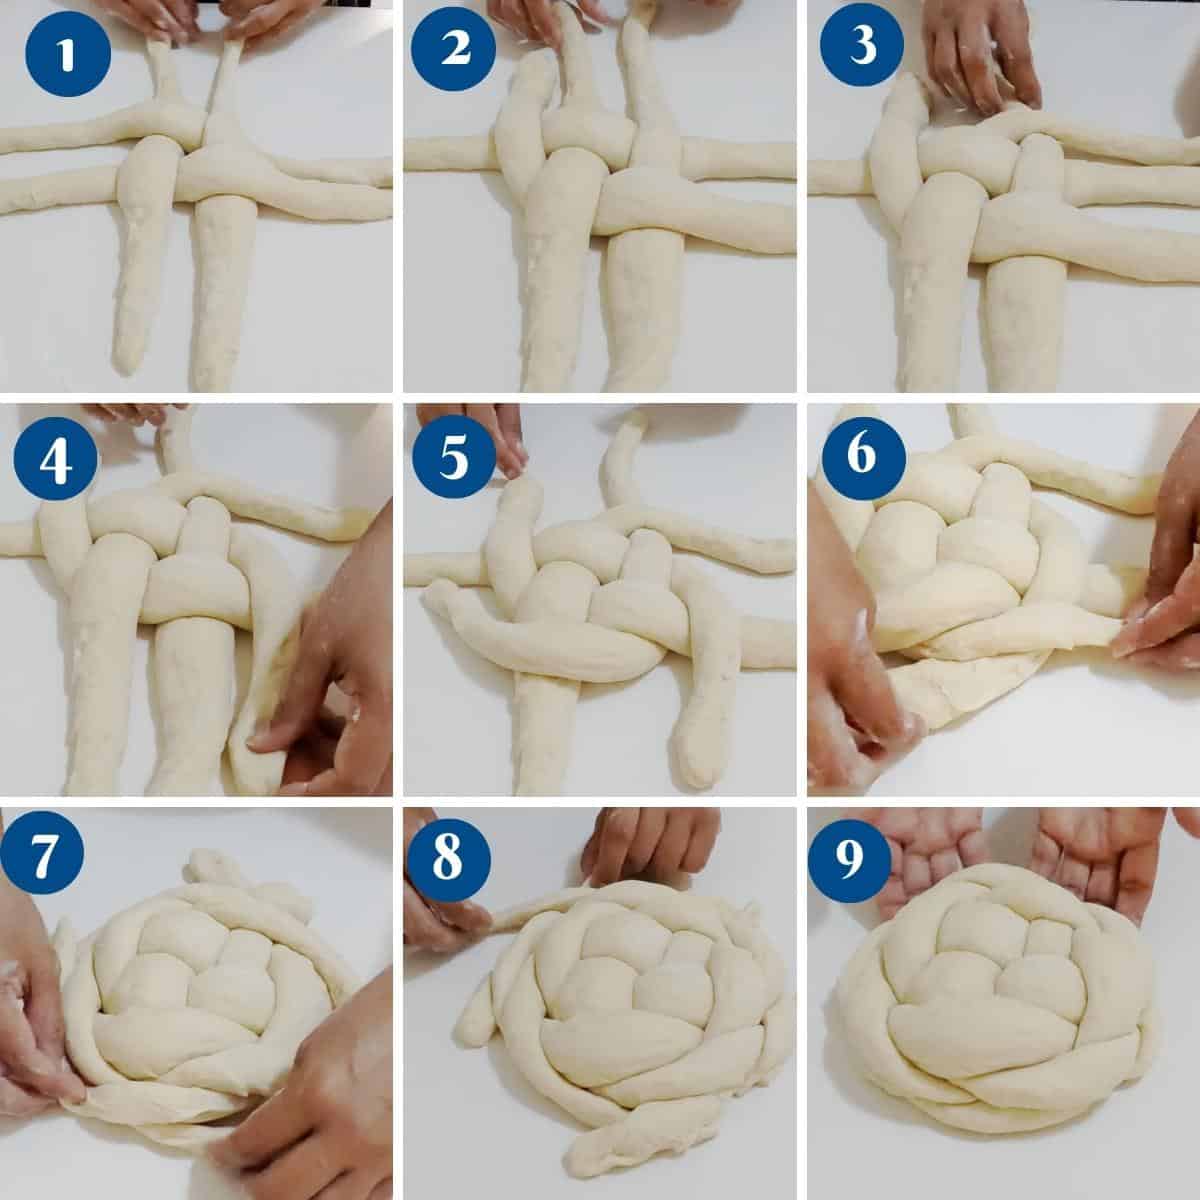
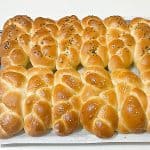
2. Round Challah – 4 Braid
- Divide dough into 4 equal pieces.
- Roll each into 26–28 inch strands.
- Lay 2 strands parallel, 2 across in a cross-shape.
- Braid into a round coil, tucking ends under.
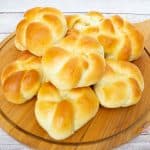
3. Round Challah – 3 Braid
- Divide dough into 3 equal pieces.
- Braid as you would hair.
- Coil into a round spiral, tucking ends under.

4. Round Challah – Single Strand Spiral
- Roll one long rope, coil it tightly into a spiral.
- Tuck the end underneath.

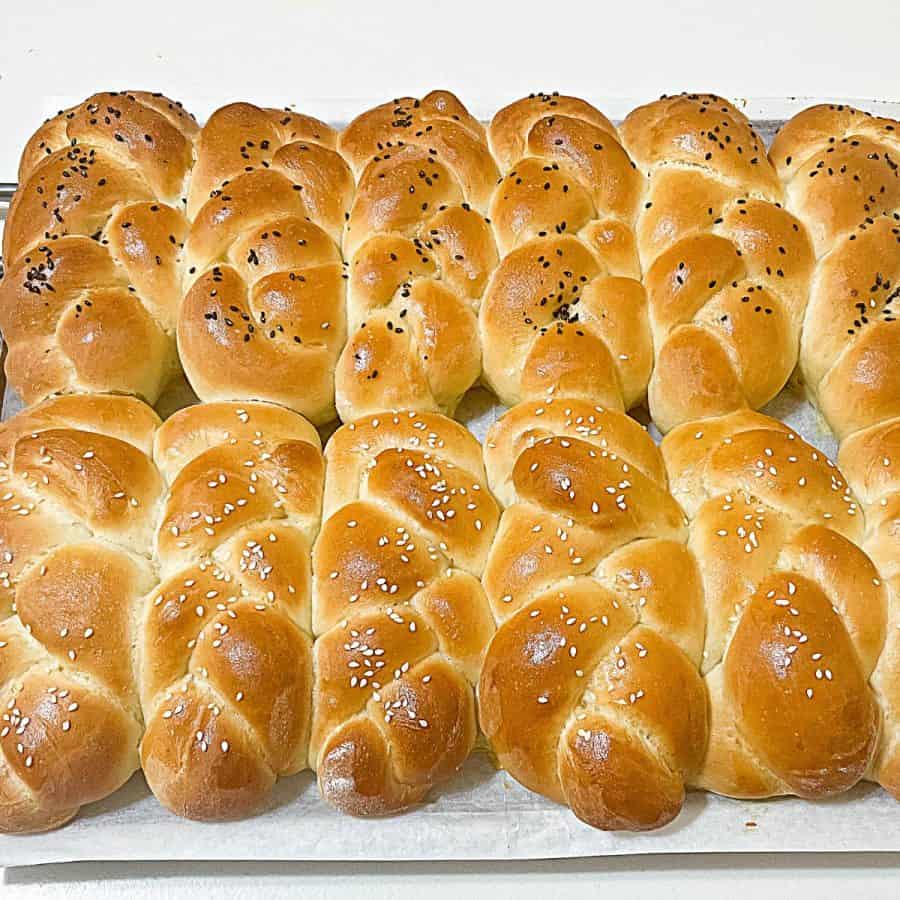
5. Proof and Bake
- Place loaves on lined tray or in an 8-inch round pan.
- Proof 45–60 minutes.
- Brush with egg wash.
- Bake at 350°F (177°C) for 35–40 minutes.
- Cool 5 minutes, cover with cloth to keep soft.

Variations
- Round Raisin Challah – add 1 cup golden raisins to dough.
- Apple & Honey Round Challah – see recipe here.
- Classic Challah – try my straight 6-braid challah.


Tips for Success
- Use a kitchen scale for even strands.
- Roll ropes thin and long → braids hold shape better.
- Always tuck ends under before baking.
- Brush twice with egg wash for deep golden crust.
- Bake on center rack for even browning.
Troubleshooting – rosh hashana challah
| Problem | Cause | Solution |
|---|---|---|
| Bread too dense | Under-kneaded / too much flour | Knead longer, use less flour |
| Loaf split open | Ends not tucked | Pinch and tuck ends under |
| Flat loaf | Over-proofed / dough too soft | Shorter proof, tighter braids |
| Pale crust | Weak egg wash or oven temp | Brush twice, preheat oven well |
| Uneven braids | Strands uneven length/weight | Weigh dough, roll evenly |
No posts
Frequently asked questions
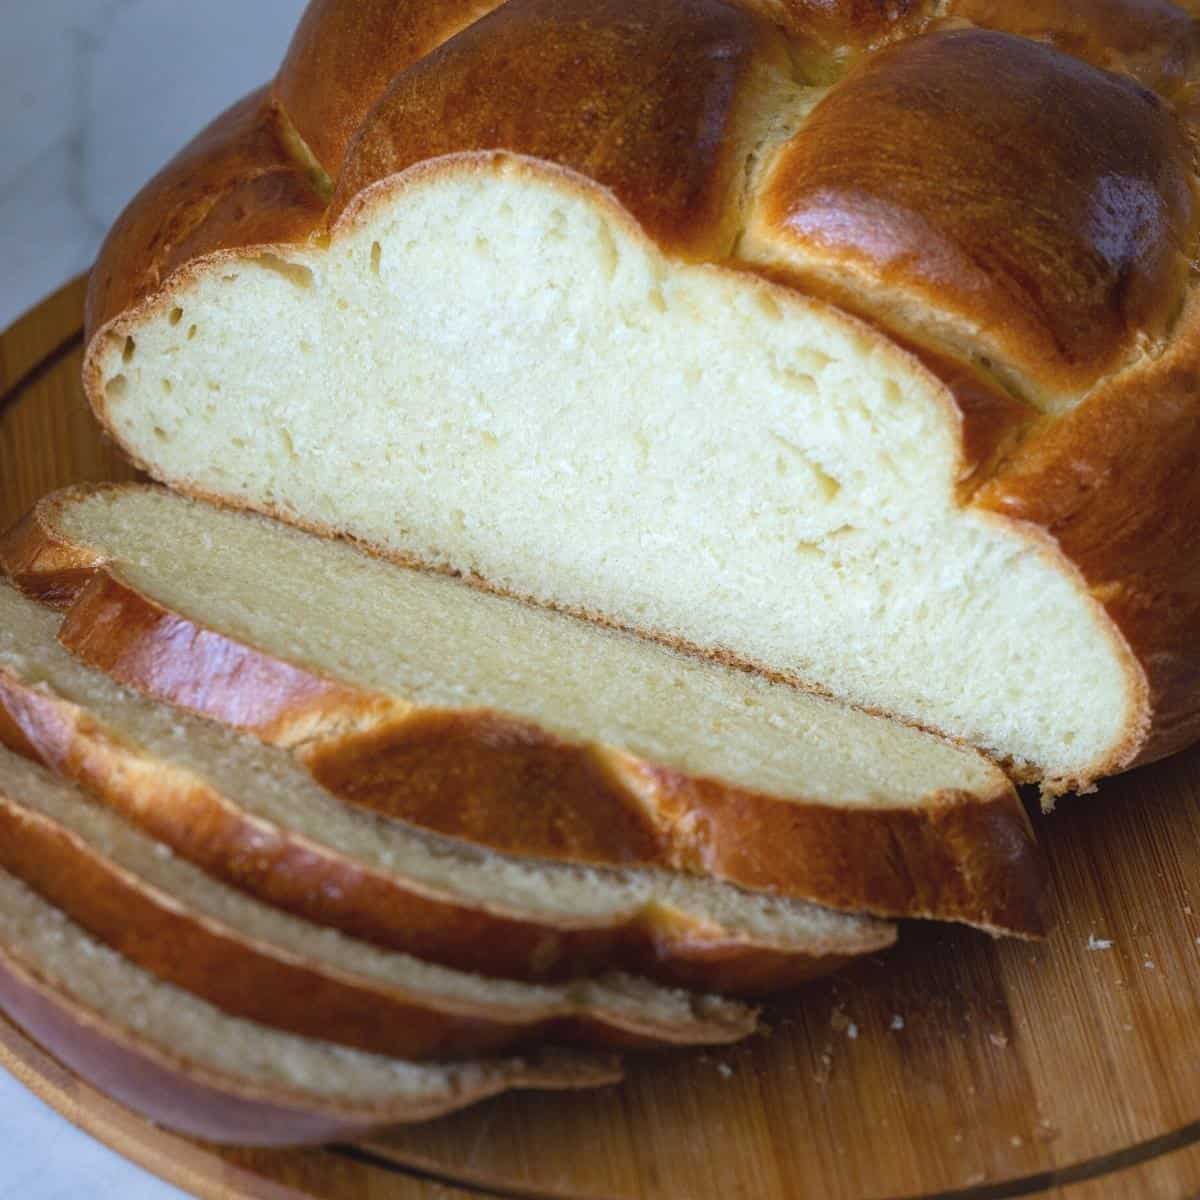
The challah will keep at room temperature for 2 to 3 days. Once cut, make sure to wrap the cut side of the bread well to prevent drying out. Also, leftovers can be used to make French toast and bread pudding.
It represents the cycle of life and the new year’s renewal.
The 3-strand or spiral round challah is the simplest.
Yes, freeze baked loaves up to 1 month. Thaw and warm before serving.
Absolutely, I do it every week. I cut the bread into slices. Place it into a reusable silicone storage bag in the freezer. When I need it, I just thaw slices in the microwave for 15 to 30 seconds.
Yes, raisins, dried cranberries, and almonds are very common in challah and taste delicious. Add raisins or others during mixing.
Round Challah Bread Recipe
Challah is a Jewish bread that is usually made for Friday evening in preparation for Shabbat. The characteristics of a round challah are very different from those of a regular, elongated braided bread, but the method is very similar.
Video
Ingredients
- 250 g (1 cups) Warm water (or milk) about 110F
- 9 g (2¼ tsp) Instant dry yeast
- 40 g (2 tbsp) Honey or sugar
- 40 g (2 tbsp) Oil or Butter cooking or olive
- 100 g (2 large) Eggs
- 500 g (4 cups) Bread flour or all-purpose flour
- 9 g (1 tsp) Salt
Method
- Yeast mixture – In a large bowl or measuring cup, combine warm water (110°F), yeast, honey, oil, and eggs. Stir and set aside to foam for 3 minutes.250 g Warm water (or milk), 9 g Instant dry yeast, 40 g Honey or sugar, 40 g Oil or Butter, 100 g Eggs
- Dry ingredients – Measure the flour and salt in a mixing bowl of a stand mixer with the dough hook attachment on medium speed.500 g Bread flour, 9 g Salt
- Combine – Add the yeast mixture to the flour mixture. Combine well on medium-high speed until the flour is well incorporated.
- Knead – Then, knead on medium speed for 6 to 8 minutes until smooth and elastic.
- Bowl – When the dough is smooth, soft, and elastic. Shape it into a ball. Place the dough in an oiled bowl, seam side down. Coat the surface with oil to prevent drying. Cover with a clean kitchen cloth or plastic wrap.
- Rise – Leave in a warm place. Let rise for 60 to 90 minutes until it doubles in volume.
- Divide – Transfer to a well-dusted work surface. Press down and shape it into a log. Then, divide the dough into three portions for three-braided round challah or divide into four for four-braided round challah.
- Strand – Shape each portion into a ball. Press the ball as flat as you can, then roll like a jelly roll from the top to the bottom. Then, roll each into a 26-28-inch-long thin strand.
- 3 braid round challah – Place the three strands on the table and braid them from the top to the bottom like you braid your hair. Then, shape it into a coil from one end to the other, making sure the end is properly tucked under so it does not open during baking.
- 4 braid round challah – Place two strands parallel to each other on the table and place the other two strands across, overlapping the other two in the center. Then, create a coil starting from one side to the other and vice versa, as shown in the video or progress pictures. Make sure to tuck the ends under.
- Proof – Place the loaves on a baking sheet lined with parchment paper. Cover with a plastic wrap or clean kitchen cloth and let proof for 45 to 60 minutes. Alternatively, you can also place the dough in an 8-inch round baking pan.
- Oven – About 20 minutes before baking, preheat the oven to 350°F /177°C / Gas Mark 4
- Bake – Brush the bread with a beaten egg. Then, bake each loaf on the center rack of the oven for 35 to 40 minutes.
- Cool – Remove from the oven and let cool on a wire rack for 5 minutes. Then, cover it with a clean kitchen cloth to keep it soft.
Notes
Tips when making challah
- Use a kitchen scale for even strands.
- Roll ropes thin and long → braids hold shape better.
- Always tuck ends under before baking.
- Brush twice with egg wash for deep golden crust.
- Bake on center rack for even browning.
Notes
- Overnight challah – The dough can be prepared a day in advance. Proof it on the counter for an hour, then punch down and let the dough rest in the fridge overnight. The next day, let the dough come to room temperature before you shape and bake it.
- Storing challah – These loaves do freeze beautifully. Cool the baked loaves, then place them in a freezer-safe storage bag. These can be frozen for up to a month. I like to slice my challah so my kids can use a few slices at a time.
- Kneading the dough – If possible, use an electric mixer because the dough is soft and sticky.
- Bread machine – This dough can be easily made in a bread machine. Pour all ingredients into the pan and set to dough or manual. Start and let the dough run its cycle for about 9 to 10 minutes – continue with the
Equipment you will need


Nutrition
Tried this recipe?
Mention @veenaazmanov_kitchen or tag #veenaazmanovkitchen!

Don’t lose this recipe! Save it for Later!
📌 Save this Recipe for later on Pinterest so you can easily find it again.
⭐ Add Veena Azmanov Kitchen to your Google Preferred Sources.
It helps Google show you more of our recipes.
📧 Subscribe for new recipes delivered to your inbox.
🎥 Follow us for more recipes


In the photographs of ingredients at the top, there is a picture of sugar. And in the hints, it talks about using a bit more sugar if you want it to be a little sweeter. And then there is no sugar at all in the recipe. This is a little confusing. I went ahead and made it with the ingredients listed, but thought you might want to clear that up.
Dutch you can use honey or sugar for challah. I used honey but sugar works too.
Recipe was easy to follow and it turned out beautiful but the taste was off. It was somewhat bland and not egg-y enough. Might have to add egg yolks instead of whole eggs.
Eva, a classic challah, is made with whole eggs! You may need to increase the amount of salt if you find it bland.
If you want a richer challah, perhaps you can use my milk and honey challah dough or use my brioche dough next time.
I have never had much luck with either the dough or braiding challah. This recipe is awesome. I made it for the 1st night of Rosh Hashanah and it was wonderful. Thank you!
Thank you, Ashley
I will try your round challah techniques. Thank you. But we do not bake challahs on Friday nights. That is the start of Shabbat. They must be made earlier. You might want to correct that
Thank you, Sussan. Yes, I usually make my challah ready on Friday afternoon too.
I’m sorry Aveena. I read your description wrong. I thought you said you made challah Friday night ! You said it was FOR Friday night. Oy. Sorry
Hi Veena, thank you ?? my challah was perfect!! I forgot to take a photo for you!! It was attacked by my wife and grandkids!
Thank you so much for the lovely feedback, Raj
This round challah is so beautiful and delicious! I’ve never tried making it myself and your recipe makes the process so simple.
Braided breads always come out so pretty! Your presentation is beautiful! I need to brush up on my bread braiding skills!
I love challah and yours look fantastic! I need to try this out ASAP!
This challah was perfect!! I am obsessed with this bread, I am so excited to make it over and over again in my house. Thanks so much for sharing 🙂
I just started making bread and I’m trying to figure out which ones I should tackle. This recipe looks pretty amazing!