Homemade Caramels
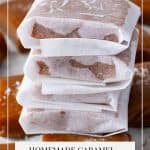
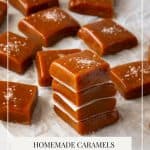
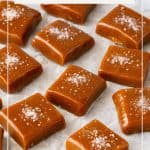
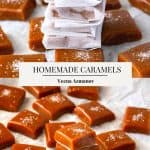

Homemade caramels are the kind of candy that makes everyone’s eyes light up. Soft, chewy, and buttery with just the right amount of sweetness, these little squares are a classic holiday treat — and honestly, better than anything you’ll find in a store. Don’t confuse them with caramel sauce (that’s for drizzling). This recipe is for real caramel candy: the kind you cut into squares, wrap in parchment, and sneak one too many when nobody’s looking.

When I was still running my cake business, caramel was everywhere in my kitchen once fall arrived. It wasn’t just about candy — though I made more than my share of soft, chewy caramels that customers would buy by the bagful. Caramel became the star in so many of my fall orders.
There were layer cakes dripping with caramel sauce, cheesecakes swirled with it, and custom cupcakes filled with gooey centers. And, of course, caramel apples were a must-have around Halloween — kids and adults both loved them.
What I always noticed was that caramel had this magic ability to turn a simple dessert into something extra indulgent. A drizzle here, a filling there, or a wrapped candy square — it always felt festive and a little bit nostalgic. That’s why I keep coming back to it, even now, years later. And while sauces and frostings have their place, nothing beats the satisfaction of unwrapping a homemade soft, chewy caramel candy that you made yourself.
Why You’ll Love This Recipe
- Soft & chewy texture – melts in your mouth without sticking to your teeth.
- Simple pantry ingredients – sugar, butter, cream, corn syrup.
- Perfect for gifting – wrap in parchment or cellophane for the holidays.
- Customizable – make them plain, salted, or dip in chocolate.
- Foolproof method – step-by-step with candy thermometer for consistency.

Ingredients and Substitutes
- Granulated sugar – the base of caramel. Do not substitute.
- Light corn syrup – prevents crystallization. Substitute: honey or golden syrup (flavor will change).
- Unsalted butter – rich flavor and creamy texture. Substitute: salted butter (reduce added salt).
- Heavy cream – for smooth, chewy texture. Substitute: coconut cream (dairy-free option).
- Kosher salt – balances sweetness. Substitute: flaky sea salt for garnish.
- Vanilla extract – classic flavor boost. Optional: almond, rum, or coffee extract for variations.

Step-by-step: Homemade caramel candy
- Prep pan – Line an 8-inch square pan with parchment, leaving overhang. Grease lightly.
- Simmer sugar mixture – In a heavy saucepan, combine water (60 ml / ¼ cup), sugar, and corn syrup. Heat over medium-high without stirring until dissolved.
- Cook to amber – Let the mixture boil until it turns deep golden. Swirl pan gently if needed.

- Add butter + cream – Carefully whisk in butter and cream (it will bubble!). Remove from heat briefly to control splatter.
- Cook to temperature – Return to medium heat. Attach a candy thermometer. Cook to 245°F / 118°C for soft & chewy or 248°F / 120°C for firmer candy.

- Flavor – Stir in vanilla and salt.
- Pour & set – Transfer to prepared pan. Cool at room temp for 2–3 hours or refrigerate until firm.
- Cut & wrap – Lift with parchment, cut into squares, and wrap individually in wax or parchment.

Tips for making homemade caramels
- Use a heavy-bottom saucepan to prevent scorching.
- Do not stir once sugar dissolves — swirl the pan gently instead.
- Thermometer accuracy matters – calibrate if needed.
- If caramels are too soft → cook a little longer.
- If too hard → you’ve cooked too hot; next time stop a few degrees earlier.

Homemade Caramels
Homemade caramels offer the perfect balance of gooeyness and sweetness and are a delicious treat everyone will love. While they may seem daunting to make at home, with the right supplies and guidance, you can whip up a batch of delicious caramels in just a few easy steps.
Video
Ingredients
- 60 ml (¼ cup) Water
- 200 g (1 cup) Granulated sugar
- 80 g (¼ cup) Light corn syrup
- ½ tsp Kosher salt
- 70 g (5 tbsp) Unsalted butter cut into pieces
- 240 g (1 cup) Heavy cream
- ½ tsp Pure vanilla extract
- Coarse Sea salt for garnish Optional
Method
- Prep pan – Line an 8-inch square baking pan with parchment paper, allowing some overhang on the sides for easy removal.
- Simmer – Combine the water, granulated sugar, and corn syrup in a medium heavy-bottom saucepan. Place the saucepan over medium-high heat. Avoid stirring from this point on to prevent crystallization.60 ml Water, 200 g Granulated sugar, 80 g Light corn syrup
- Color – Allow the mixture to boil and cook until it reaches a golden amber color. Once the sugar gets the desired deep amber color, add butter and heavy cream. Be cautious, as the mixture will bubble vigorously and rise in the pan. Take it off the heat and stir gently to help it cool.70 g Unsalted butter, 240 g Heavy cream
- Temperature – Return the saucepan to medium-high heat and insert a candy thermometer. Cook the caramel, without stirring, until it reaches 248°F (120°C) for a firmer caramel or 245°F (118°C) for a softer caramel. Once the caramel reaches the desired temperature, remove it from the heat and carefully stir in the vanilla extract and salt.
- Pan – Once the caramel reaches the desired temperature, remove it from the heat and carefully stir in the vanilla extract and salt. Carefully pour the hot caramel into the prepared baking pan and allow it to cool to room temperature.½ tsp Kosher salt, ½ tsp Pure vanilla extract
- Set – Once the caramel has reached room temperature, place the pan in the refrigerator and chill for at least 2 hours, or leave it at room temperature overnight until the caramel is set.
- Cut – Using the parchment paper overhang, lift the set caramel out of the pan and onto a cutting board. Using a sharp knife, cut the caramel into small squares or rectangles. Wrap each piece in wax paper or parchment paper to prevent sticking. I like to sprinkle some sea salt on each piece.Coarse Sea salt for garnish
- Store the wrapped caramels in an airtight container at room temperature for up to two weeks or in the refrigerator for longer.
Notes
- Use a heavy-bottom saucepan to prevent scorching.
- Do not stir once sugar dissolves — swirl the pan gently instead.
- Thermometer accuracy matters – calibrate if needed.
- If caramels are too soft → cook a little longer.
- If too hard → you’ve cooked too hot; next time stop a few degrees earlier.
Equipment you will need


Nutrition
Tried this recipe?
Mention @veenaazmanov_kitchen or tag #veenaazmanovkitchen!Variations for Caramel Candies
- Salted Caramels – sprinkle flaky sea salt on top before setting.
- No Corn Syrup – replace with honey or golden syrup (slightly different flavor).
- Chocolate Dipped – dip cooled caramels into melted chocolate.
- Nutty Caramels – stir in chopped toasted pecans or almonds before setting.

Troubleshooting – Soft caramels
| Problem | Likely Cause | Fix |
|---|---|---|
| Caramels too soft | Not cooked to high enough temp | Cook to 245–248°F next time |
| Caramels too hard | Overcooked sugar | Reduce final temp by 2–3°F |
| Grainy texture | Stirred after sugar dissolved | Avoid stirring; use corn syrup or honey |
| Sticking to pan | Not enough butter/parchment | Always line and grease pan |
| Sticky when wrapping | Didn’t set long enough | Chill longer or wrap in parchment |
- Creamy Caramel Filling for Cakes Tarts Desserts
- Caramel Cupcake Recipe
- and Caramel Apple Cake Recipe
- Caramel Apple Cake with Caramel Buttercream
- Caramel Cupcakes with Soft Caramel Centers


Frequently asked questions
Store your homemade caramels in an airtight container at room temperature to keep them fresh and delicious. Layer the caramels with parchment or wax paper to prevent them from sticking together. Properly stored, they should last for about two weeks. If you live in a humid climate or during warmer months, keeping them in the refrigerator is advisable to avoid melting or stickiness.
Yes, but use a larger pan and watch cooking times closely.
Chewy caramels depend on temperature control. If you cook the sugar mixture to the soft ball stage (245–248°F / 118–120°C), the caramel sets firm enough to hold its shape but soft enough to stay chewy. Cook it hotter and it turns hard and brittle, like toffee. Always use a candy thermometer for consistent results.
Burning caramel can be a common mishap, but you can avoid this issue with a few tips. First, make sure to use a heavy-bottomed saucepan to distribute heat evenly. Additionally, keep a close eye on the caramel as it cooks, stirring constantly and adjusting the heat if necessary. Lastly, remove the caramel from the heat just before it reaches the desired consistency, as it will continue to cook and thicken off the heat.
Grainy caramel can result from sugar crystals forming during the cooking process. To prevent this, it’s essential to dissolve the sugar completely before boiling it. Stir the sugar and liquid mixture over low heat until the sugar has completely dissolved, and then increase the heat to begin the caramelization process.
Most classic recipes use granulated white sugar because it melts evenly and caramelizes cleanly. You can use brown sugar for deeper flavor and a slightly softer texture, but it can also make the caramels grainier if not cooked carefully. For guaranteed chewy, smooth caramels, stick with regular granulated sugar plus corn syrup or honey to prevent crystallization.
You can, but it’s a risky move. The “soft ball stage” test in cold water works, but a thermometer is a much more reliable method.
❌ Don’t stir after the sugar dissolves — it causes crystals and grainy caramels.
❌ Don’t skip corn syrup or a substitute — it’s what keeps the texture smooth.
❌ Don’t guess the temperature — without a thermometer, you’ll often end up with either too soft or too hard candy. Water is an option but not a reliable one.
❌ Don’t rush the cooling — cutting before the caramel is fully set makes a sticky mess.
❌ Don’t use thin pans — they heat unevenly and burn sugar quickly.
more caramel recipes
- Easy Caramel Apples
- Moist Caramel Cupcakes
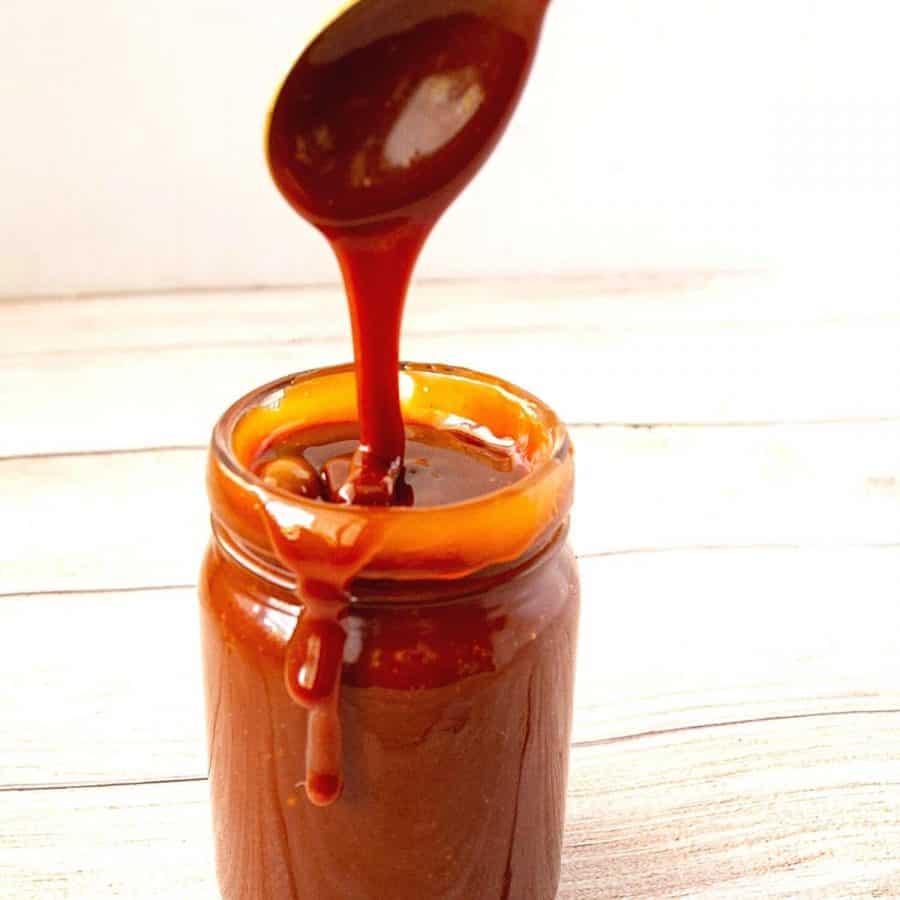
- Homemade Caramel Sauce
- Salted Caramel Tart
- Creamy Caramel Filling
- Caramel Brownies Recipe

Don’t lose this recipe! Save it for Later!
📌 Save this Recipe for later on Pinterest so you can easily find it again.
⭐ Add Veena Azmanov Kitchen to your Google Preferred Sources.
It helps Google show you more of our recipes.
📧 Subscribe for new recipes delivered to your inbox.
🎥 Follow us for more recipes


This is such a great-looking treat that everyone will love and enjoy! This looks so delicious and very tasty! I just love homemade stuff!
I made these with my granddaughter and I don’t know if we had more fun making them or eating them!
The step by step was so helpful here, and the caramels turned out great…even for a novice candy maker. It was a fun project with the kids!
Your caramels look sooo delicious and they would make a great Christmas gift. Thank you for such detailed information on how to make them, on my homemade gift list to try.
I always have such an issue getting my caramels to the perfect hardness. Either they are too soft or way too hard. I live in a high altitude and find that regular recipes rarely work here. Your post contains so many helpful tips and tricks for getting the perfect caramels, I’m ready to give it another try!
I love caramels especially in the fall and winter. This is a great treat this time of year.
Homemade caramel is so much easier to make from scratch than I thought! Can’t wait to make these during the holidays.
Making my own caramel candy at home always seemed like a difficult task but it was such an easy process with your instructions! The added salt on top made it so delicious too! Definitely making these at Christmas to add into my cookie gift boxes.
You never disappoint Veena! These caramels were simply delicious! Another great recipe.
Thank you, Elaine
I always try to make edible gifts for the holidays so I did a test run of these homemade caramels and they’re winners. I can’t wait to impress my friends with them during our annual gift exchange.