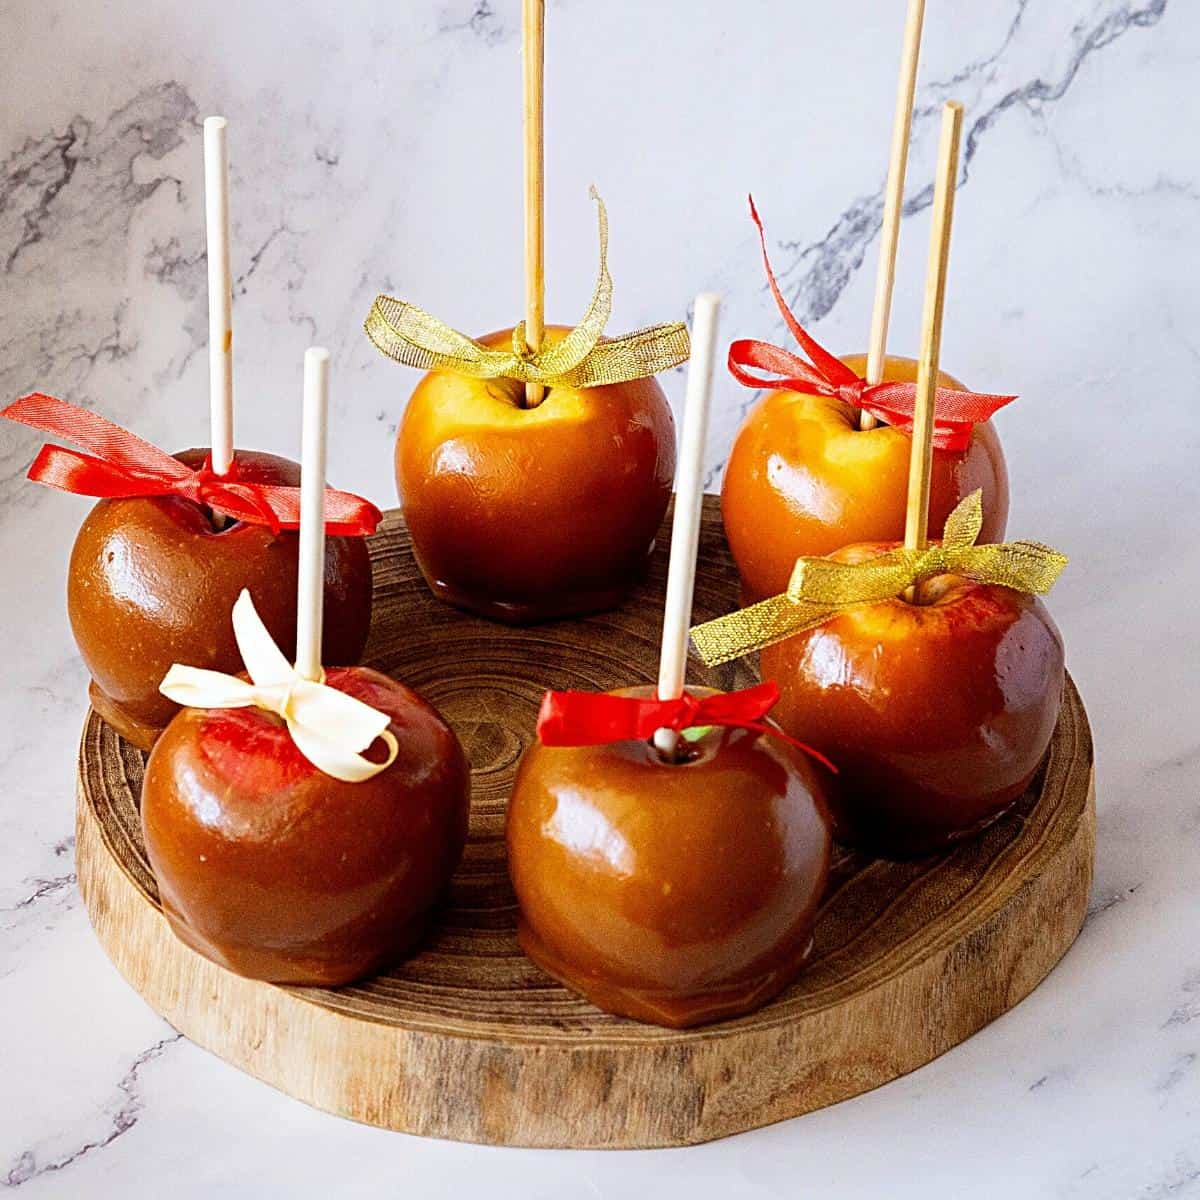
Easy Caramel Apples


What if I told you that making homemade caramel is the secret to perfect, easy caramel apples? Yes, you read that right. With this foolproof recipe, you’ll learn how to achieve the ideal caramel consistency that will awe your family and friends with the best caramel-coated apples.

Gooey caramel coating crisp, juicy apples – a treat that never fails to conjure up memories of fall festivals and cozy evenings by the fire. Caramel-coated apples are one of the most cherished apple desserts in fall. Who doesn’t love caramel and apple on a stick? Right?
Whether you’re a seasoned dessert enthusiast or a novice in the kitchen, this recipe will equip you with all the tips and tricks needed to create irresistible homemade apples. Don’t miss your chance to wow everyone with your culinary prowess.
Why make homemade apples?
- One of the key advantages of making homemade apples is the ability to customize the caramel according to your preferences. Are you a fan of a rich, buttery caramel, or do you prefer a slightly salted version for a delightful contrast of flavors? When making your own caramel, you can adjust the ingredients and proportions to suit your taste buds perfectly. Plus, you can experiment with different sweeteners. For example, honey or maple syrup can add a unique twist to your apples.
- Another reason to opt for homemade caramel-coated apples is the satisfaction of the process. Making caramel from scratch allows you to truly appreciate the art of cooking and the magical transformation of simple ingredients into a glossy, velvety caramel sauce. It’s an experience that engages all your senses, from the enticing aroma of the caramel simmering on the stove to the mesmerizing sight of it cascading over a perfectly ripe apple. Creating homemade apples is not just about the final product—it’s about enjoying the journey of crafting something unique and indulging in the joy of creation.
- Furthermore, homemade apples offer an opportunity for endless creativity. Once you have mastered the art of making caramel, you can experiment with various toppings and coatings to create unique flavor combinations. The possibilities are endless, from crushed nuts and sprinkles to drizzles of chocolate or even a sprinkle of sea salt. With each batch of homemade apples, you can let your imagination run wild and surprise your loved ones with new and exciting variations that will keep them returning for more.
- So, why settle for store-bought caramel-coated apples when you can embark on a culinary adventure right in your kitchen? By making your caramel, you can elevate this beloved autumn treat to new heights of deliciousness.
Ingredients and substitutes
- The ideal apples for caramel coating should balance sweetness and tartness. This provides a delicious contrast to the rich, buttery caramel coating. Apples like Granny Smith and Honeycrisp are popular due to their crisp texture and tangy flavor. The tartness of Granny Smith apples adds a refreshing zing to the caramel’s sweetness, while the Honeycrisp offers a nice balance of sweet and tart flavors.
- To lighten up the recipe, you can choose alternative sweeteners like maple syrup or honey instead of traditional white sugar. These natural sweeteners can lend a subtle depth and richness to the caramel while providing a unique flavor twist.
- For those with dietary restrictions or preferences, non-dairy options are available. Replace the butter with coconut oil or dairy-free margarine to make a vegan-friendly caramel. Almond milk or other non-dairy milk alternatives can be used instead of cream to maintain the creamy texture without sacrificing taste.
- You can experiment with different spices and extracts to add a touch of sophistication or a hint of warmth. A dash of cinnamon or a teaspoon of vanilla extract can elevate the flavors and add a comforting aroma to the caramel. Try incorporating a pinch of nutmeg or a sprinkle of chili powder for a more adventurous twist.
- Furthermore, plenty of ingredient alternatives are available if you have dietary restrictions or allergies. Replace the butter with a lactose-free or vegan butter substitute, and use a non-dairy cream alternative for those who are lactose intolerant or follow a plant-based diet.

Step-by-step: Caramel apples with homemade caramel
- Step 1: Prepare the apples – Start by choosing fresh, crisp apples that are firm and free of bruises or blemishes. Wash each apple thoroughly under cold running water to remove debris. Remove the stems and insert a wooden skewer, popsicle sticks, or caramel apple sticks into each apple’s top, ensuring it is secure. To remove any wax coating, twirl the apples in boiling hot water for 15 to 20 seconds. Pat them dry with a clean towel.

- Step 2: Make the caramel sauce – In a heavy-bottomed saucepan, over medium heat, combine the brown sugar, corn syrup, butter, salt, and heavy cream. Stir continuously until the sugar has completely dissolved and the mixture comes to a gentle boil. Reduce to medium-low heat and let it simmer for 10-15 minutes, stirring occasionally, until the caramel reaches 248°F (120°C) and turns a rich golden brown. Remove from heat and leave the caramel to cool to about 212°F (100°C).

- Step 3: Dip the apples in caramel – Now it’s time for the fun part! Dip each prepared apple into the warm caramel sauce, coating it evenly. Twirl the apple gently to allow any excess caramel to drip off. Then, place it on a parchment-lined baking sheet or silicone mat. Repeat this process with the remaining apples, leaving a small gap between each one to prevent sticking.

- Step 4: Customize and decorate – While the caramel is still warm and sticky, you can get creative with your toppings. Sprinkle chopped nuts, crushed cookies, sprinkles, mini M&M, crushed Oreos, peanuts, or even a drizzle of melted dark or white chocolate over the caramel-coated apples. The possibilities are endless, so feel free to experiment and let your imagination run wild!
- Step 5: Let them set – Allow the apples to cool and set completely at room temperature. This typically takes about 1-2 hours, but you can also speed up the process by refrigerating them for 30 minutes. Once the caramel has hardened, they’re ready to be enjoyed!
Caramel-coated apples with store-bought caramels
- To start, gather your ingredients. You will need a bag of store-bought caramels, typically in your local grocery store’s baking or candy aisle. Additionally, you’ll need a package of wooden popsicle sticks or skewers and your favorite variety of apples.
- Begin by prepping your apples the same way we did above. Wash them thoroughly and remove any stickers or residue. Twirl them in hot water to remove any wax. This step is crucial to ensure the caramel adheres properly to the apple’s surface. Dry the apples entirely before moving on to the next step. Insert the wooden sticks into the stem end of each apple. This will create a convenient handle for eating and help the caramel adhere to the apple.
- Next, unwrap the caramels and place them in a microwave-safe bowl. Follow the instructions on the package to determine the appropriate melting time. Typically, you’ll microwave the caramels in short intervals, stirring between them until they are fully melted and smooth. Be cautious to avoid overheating them, which can result in a burnt or grainy caramel.
- Once your caramels are melted and smooth, carefully dip each apple into the melted caramel, using a swirling motion to ensure even coverage. Hold the apple over the bowl for a few seconds to allow any excess caramel to drip off. You can also roll the caramel-coated apple in toppings such as chopped nuts, sprinkles, or crushed cookies if desired.
- Once your apples are decorated to your liking, place them on a lined baking sheet or a piece of parchment paper to allow the caramel to cool and harden. You can expedite the process by placing them in the refrigerator for about 30 minutes.

Tips for Success
- First, ensure you have all your ingredients and equipment ready before you begin. This will save you time and prevent any unnecessary stress during the process.
- When selecting apples for caramel dipping, go for firm and crisp varieties like Granny Smith or Fuji. Their tartness beautifully complements the caramel’s sweetness. Remember to wash and dry the apples thoroughly to remove any residue or wax that could prevent caramel from adhering to the surface.
- A crucial step in making perfect caramel-coated apples is inserting the sticks. Use sturdy wooden popsicle sticks or lollipop sticks, ensuring they are firmly embedded in the apple’s core. This will prevent the sticks from coming loose during the dipping process.
- Before you start dipping the apples into the caramel, it’s essential to have your workstation prepared. Line a baking sheet with parchment paper or a silicone mat to place the dipped apples on for easy removal. This will also prevent them from sticking to the surface or each other.
- When making the caramel, use a heavy-bottomed saucepan to prevent scorching. Stir the caramel constantly over low heat until it reaches a smooth and velvety consistency. Avoid overheating, as this can cause the caramel to become grainy. If necessary, add a teaspoon of water to the caramel to help thin it out slightly.
- To ensure even coverage, hold the apple by the stick and dip it into the melted caramel, tilting the pan or using a spoon to coat the apple thoroughly. Allow excess caramel to drip off before placing the apple onto the prepared baking sheet. For added flavor and decoration, you can also drizzle melted chocolate over the caramel-coated apples or sprinkle crushed nuts or sprinkles over them.
- Allow the apples to cool and set completely at room temperature. This typically takes about 1-2 hours, but you can also speed up the process by placing them in the refrigerator for 30 minutes. Once the caramel has hardened, they’re ready to be enjoyed!

- Caramel Apple Cake Recipe
- Caramel Apple Cake with Caramel Buttercream
- and Caramel Apple Cupcakes
- Creamy Caramel Filling for Cakes Tarts, and Desserts
- Recipe for Caramel Apple Pie

Frequently asked questions
Certainly! While making caramel from scratch can be pretty rewarding, using store-bought caramel is a convenient alternative. Look for a high-quality caramel sauce or caramel candies that are designed for melting. Just make sure to follow the instructions on the packaging for the best results.
The ideal apple for caramel-coated apples should balance sweetness and tartness, providing a delicious contrast to the rich, buttery caramel coating. Apples like Granny Smith and Honeycrisp are popular due to their crisp texture and tangy flavor. The tartness of Granny Smith apples adds a refreshing zing to the caramel’s sweetness, while the Honeycrisp offers a nice balance of sweet and tart flavors.
When selecting apples, it’s also essential to consider their size and shape. Look for apples that are large enough to hold the caramel coating but are not overly huge, as they may be challenging to eat. Apples with a round shape are easier to dip and coat evenly with caramel, ensuring a uniform and appetizing appearance.
Additionally, make sure the apples are fresh and firm. Avoid apples that are bruised, soft, or have any signs of decay. Fresh apples taste better and hold up better when coated with caramel.
To prevent the caramel from sliding off the apples, it’s essential to dry the apples thoroughly before dipping them. After washing the apples, pat them dry with a clean kitchen towel or paper towels. Removing excess moisture will help the caramel adhere better to the apple’s surface.
Homemade apples are best enjoyed fresh, but if you have leftovers, proper storage can help keep them delicious for longer. Place them on a parchment-lined baking sheet and refrigerate. Make sure they are covered or sealed tightly with plastic wrap to prevent them from drying out. They should stay fresh for up to 3-4 days.
Absolutely! If you plan for a special occasion or want to save time, you can make them in advance. Once you’ve dipped the apples in caramel and added any desired toppings, place them in the refrigerator to set. Once the caramel has hardened, wrap each apple individually in plastic wrap and store them in an airtight container in the fridge. They should remain delicious for up to 2 days.
Absolutely! While nuts and sprinkles are classic choices for topping them, the possibilities are endless. Get creative and experiment with crushed cookies, mini chocolate chips, shredded coconut, crushed candies, or even melted chocolate or caramel drizzles for an extra indulgence.
One of the simplest ways to prevent crystallization in homemade caramel is to use a candy thermometer. This device accurately reads the temperature of the caramel mixture, ensuring that it doesn’t get too hot and cause the sugar to crystallize. You can add a bit of lemon juice or cream of tartar to the mixture to inhibit sugar from crystallizing. It’s important to note, however, that too much of either ingredient can ruin the caramel’s texture, so be sure to use just a pinch. Lastly, avoid stirring the mixture while it’s boiling, as this can also bring on crystallization. You can use a lid to create a stem that washes the pan’s sides, or use a pastry brush dipped in water to clean the sides of the pan.
With these small steps, you can ensure your homemade caramel stays soft and smooth.
Caramel Apples
What if I told you that the secret to perfect, easy caramel apples is making your own homemade caramel? Yes, you read that right. With this foolproof recipe, you'll learn how to achieve the ideal caramel consistency that will awe your family and friends.
Video
Ingredients
- 12 med Apples (Granny Smith or another tart variety)
- 12 large Wooden sticks or skewers
- 2 cups (440 g) Brown sugar or granulated sugar
- 1 cup (240 ml) Heavy cream
- ½ cup (115 g) Unsalted butter (1 stick)
- ¼ cup (60 ml) Light corn syrup
- ½ tsp Vanilla extract
- ¼ tsp Salt
- Chopped nuts
- Sprinkles
- Crushed cookies
- Shredded coconut
Method
- Prep apples – Wash the apples thoroughly to remove any wax, and dry them well. This will help the caramel to stick better. Insert a wooden stick or skewer into the stem end of each apple.12 med Apples , 12 large Wooden sticks or skewers
- Heat Ingredients – Combine the sugar, heavy cream, butter, and corn syrup in a medium-heavy saucepan. Cook over medium heat, stirring constantly until the sugar has dissolved.2 cups Brown sugar, 1 cup Heavy cream, ½ cup Unsalted butter (1 stick), ¼ cup Light corn syrup, ½ tsp Vanilla extract, 1/4 tsp Salt
- Boil to Temperature – Once the sugar has dissolved, increase the heat to bring the mixture to a boil. Continue to cook, without stirring, until the mixture reaches 245°F (firm-ball stage) on a candy thermometer.
- Cool – Remove the pan from the heat and carefully stir the vanilla extract. Let the caramel cool for about 5 minutes to thicken slightly, making it easier to coat the apples.
- Dip Apples – Holding an apple by the stick, dip it into the caramel, tilting the pan and turning the apple as needed to coat it evenly. Allow any excess caramel to drip back into the pan.
- Add Toppings (Optional): Roll the caramel-coated apples in any optional toppings while the caramel is still warm and sticky.Chopped nuts, Sprinkles, Crushed cookies, Shredded coconut
- Set – Place the coated apples on a parchment-lined baking sheet to cool and set.
- Serve – Once the caramel has set, the apples are ready to be served. Enjoy them immediately, or store them in the refrigerator for up to a week.
- Note – Be cautious when making and handling caramel, as it gets boiling. Keep children away from the stove when making caramel, and use oven mitts to take the saucepan.
Notes
- First, ensure you have all your ingredients and equipment ready before you begin. This will save you time and prevent any unnecessary stress during the process.
- When selecting apples for caramel dipping, go for firm and crisp varieties like Granny Smith or Fuji. Their tartness complements the sweetness of the caramel beautifully. Remember to wash and dry the apples thoroughly to remove any residue or wax that could interfere with the caramel adhering to the surface.
- A crucial step in making perfect caramel apples is inserting the sticks. Use sturdy wooden popsicle sticks or lollipop sticks, ensuring they are firmly embedded in the apple’s core. This will prevent the sticks from coming loose during the dipping process.
- Before you start dipping the apples into the caramel, it’s essential to have your workstation prepared. Line a baking sheet with parchment paper or a silicone mat to place the dipped apples on for easy removal. This will also prevent them from sticking to the surface or each other.
- When it comes to making the caramel, use a heavy-bottomed saucepan to prevent scorching. Stir the caramel constantly over low heat until it reaches a smooth and velvety consistency. Avoid overheating, as this can cause the caramel to become grainy. If necessary, you can add a teaspoon of water to the caramel to help thin it out slightly.
- To ensure even coverage, hold the apple by the stick and dip it into the melted caramel, tilting the pan or using a spoon to coat the apple completely. Allow any excess caramel to drip off before placing the apple onto the prepared baking sheet. If desired, you can also drizzle melted chocolate, crushed nuts, or sprinkles over the caramel-coated apples for added flavor and decoration.
- Allow the apples to cool and set completely at room temperature. This typically takes about 1-2 hours, but you can also speed up the process by placing them in the refrigerator for 30 minutes. Once the caramel has hardened, they’re ready to be enjoyed!
Nutrition
Tried this recipe?
Mention @veenaazmanov_kitchen or tag #veenaazmanovkitchen!How to make caramel apples for Halloween?
Halloween is the perfect time to get creative with your caramel apples. You can transform them into ghoulish creatures, eerie monsters, or anything your imagination desires. The possibilities are endless!
- To add an extra touch of Halloween magic, consider rolling your caramel-coated apples in festive toppings. Crushed chocolate cookies can resemble dirt, while orange and black sprinkles will give your apples a playful touch. You can also dip them into melted chocolate and then coat them with crushed candy corn or chopped nuts for added texture and flavor.
- Once your apples are decorated and the caramel has cooled and hardened, they are ready to be enjoyed. Wrap them individually in cellophane or clear treat bags and tie them off with colorful ribbons for an extra special presentation.


Don’t lose this recipe! Save it for Later!
📌 Save this Recipe for later on Pinterest so you can easily find it again.
⭐ Add Veena Azmanov Kitchen to your Google Preferred Sources.
It helps Google show you more of our recipes.
📧 Subscribe for new recipes delivered to your inbox.
🎥 Follow us for more recipes


Wow! This Caramel Apple looks incredibly delicious and very tasty! Kids will definitely gonna love this! A perfect treat for this Fall season! Loved it!
There is nothing better than the first bite of a caramel apple. So fun to make with kids too!