Best Caramel Apple Pie


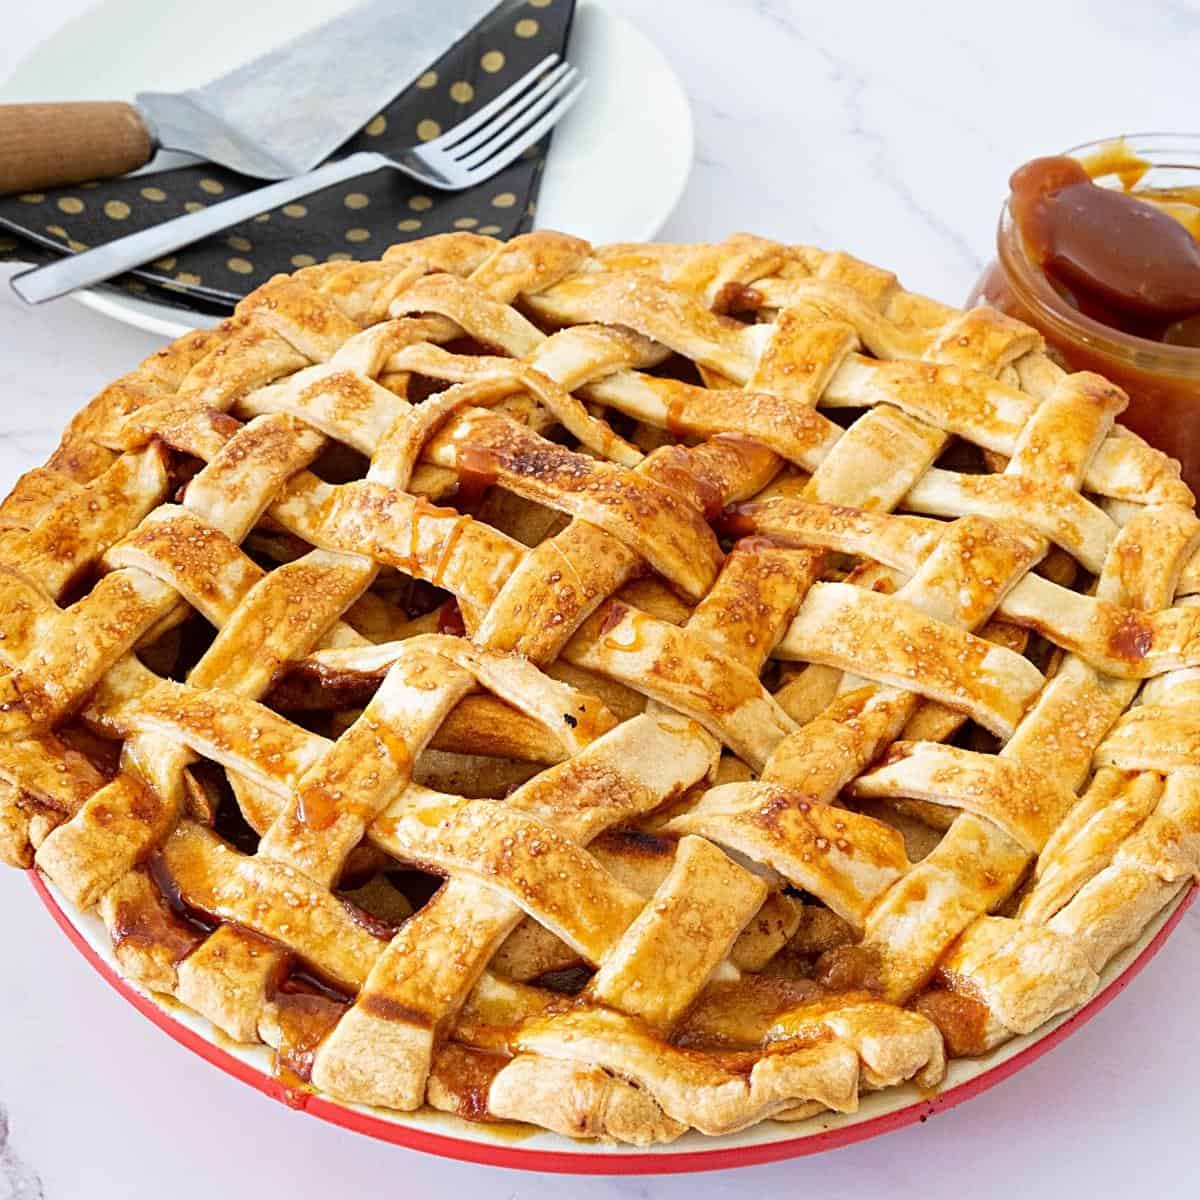
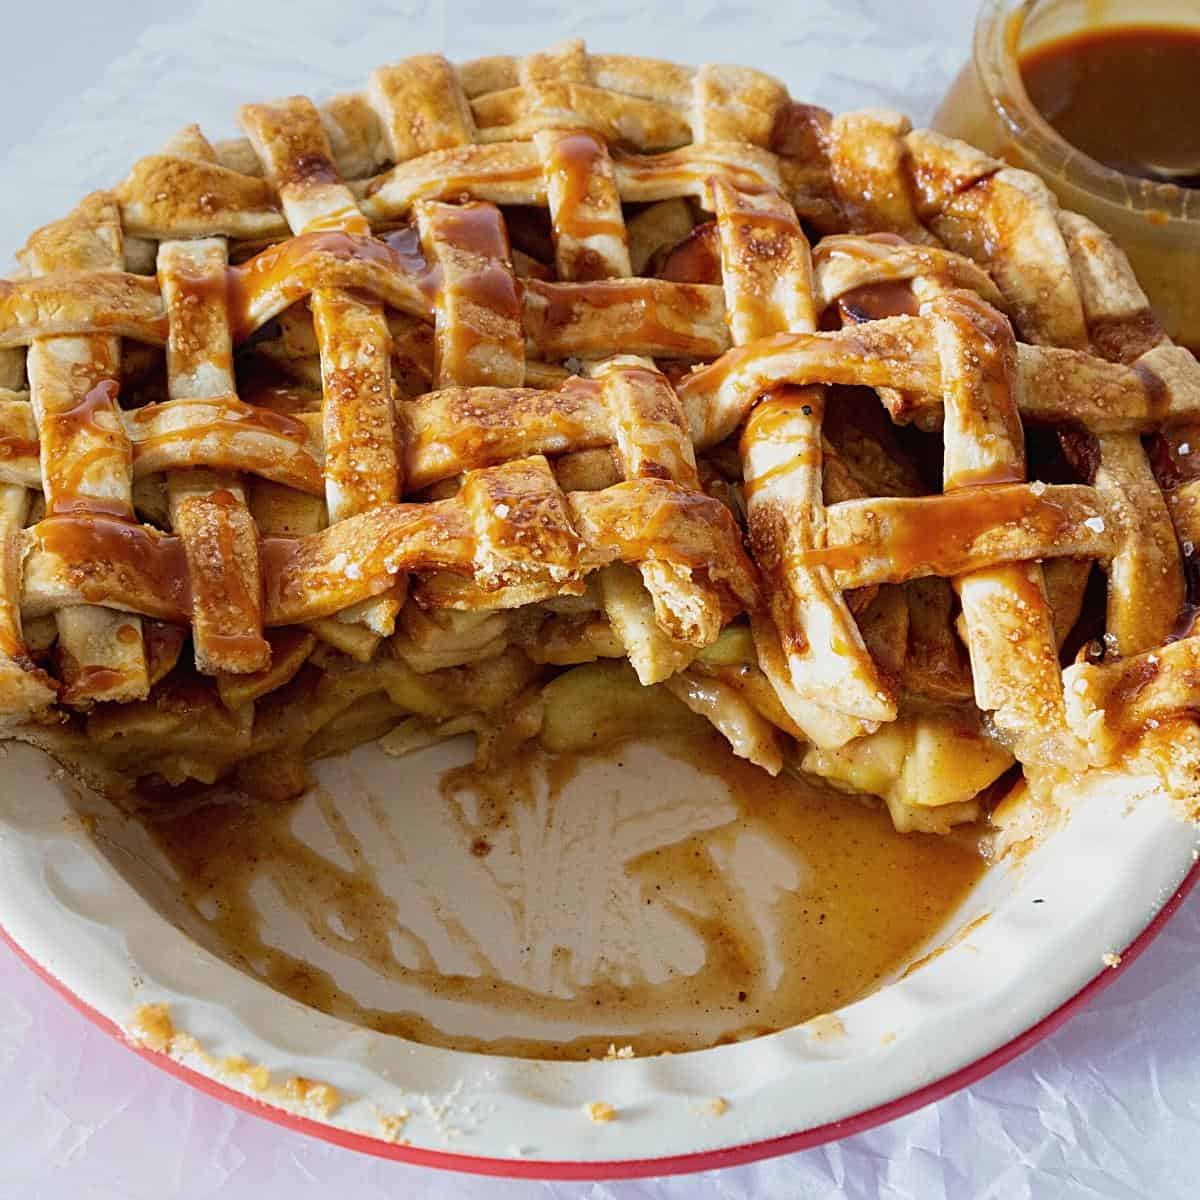
If classic apple pie is comfort food, caramel apple pie is comfort plus indulgence. Sweet-tart apples are layered with rich, buttery caramel sauce, all wrapped in a flaky lattice crust that turns golden in the oven. The smell alone will have everyone hovering in the kitchen.
This recipe keeps things simple — a homemade pie crust, fresh apples, and an easy caramel sauce you can make in minutes. It’s perfect for Thanksgiving, Christmas, or any time you want a dessert that’s both beautiful and unforgettable.
There’s nothing quite like the comforting aroma of a freshly baked apple pie filling your kitchen. Homemade Caramel Apple Pie takes this classic dessert to the next level by adding a rich, buttery caramel sauce that perfectly complements the tartness of crisp, juicy apples. This pie is a celebration of autumn flavors, wrapped in a flaky, golden crust that’s as satisfying to make as it is to eat.
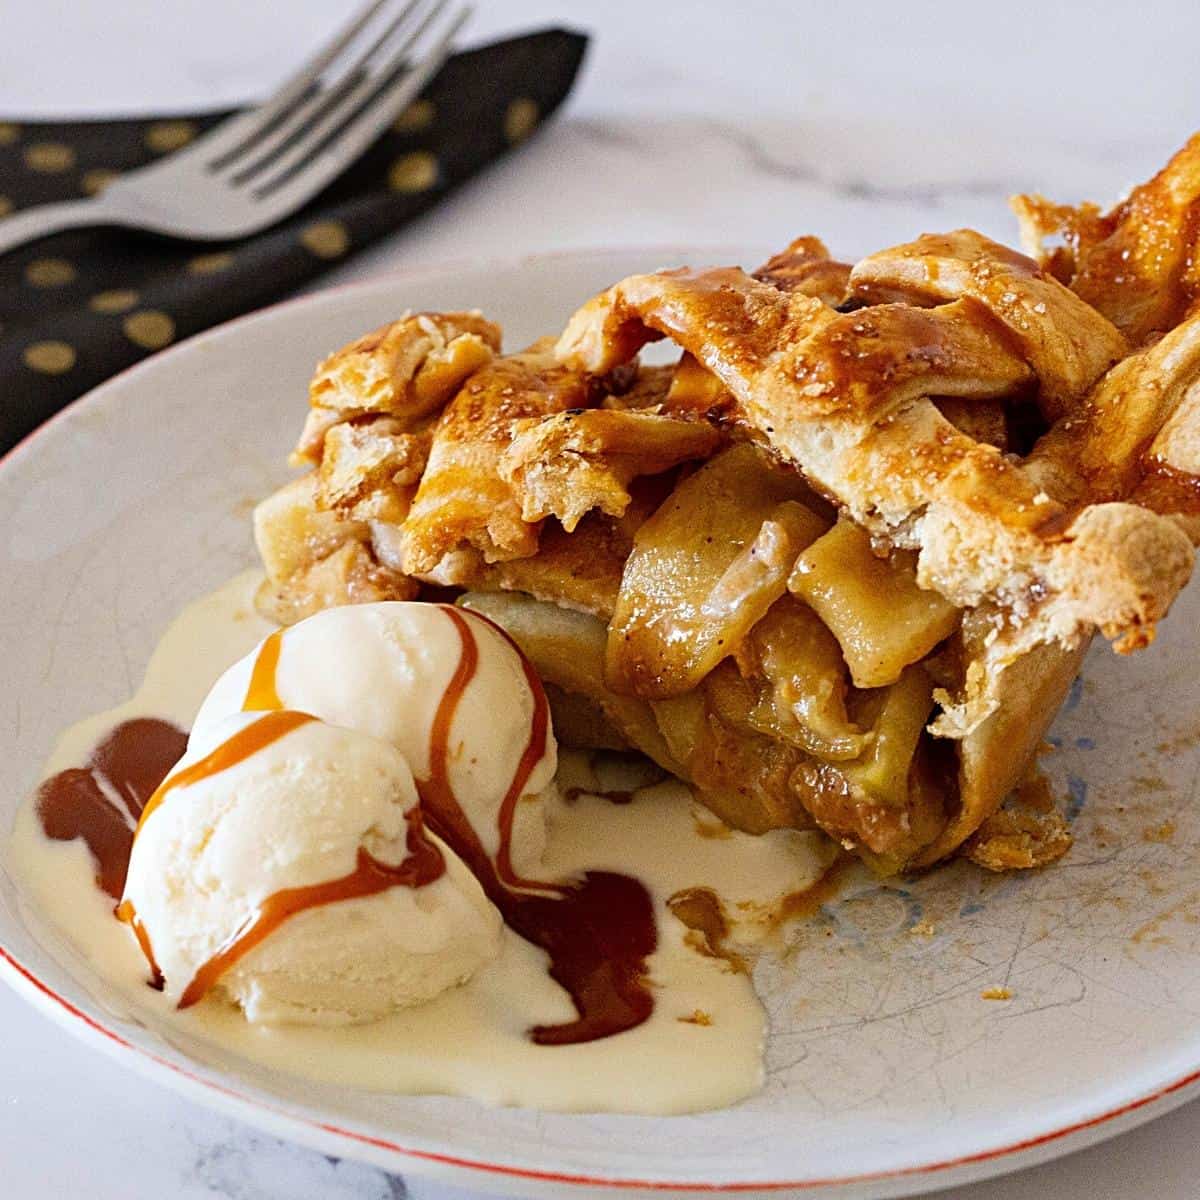
Perfect for family gatherings, festive holidays, or simply as a treat for yourself, this pie is a showstopper that never fails to impress. Almost every year, we make apple pie for Thanksgiving and serve it with vanilla ice cream and caramel topping.
Why You’ll Love This Recipe
- Caramel in every bite – layers of sauce baked right into the filling.
- Flaky lattice crust – crisp, buttery, and perfect for presentation.
- Balanced flavor – tart apples meet sweet caramel for a pie that’s never cloying.
- Make-ahead friendly – caramel sauce and crust can be prepped days ahead.
Best Apples for Caramel Apple Pie
A mix of apple varieties gives the best flavor and texture.
- Tart: Granny Smith – firm, tangy, holds shape.
- Sweet: Honeycrisp, Braeburn, or Pink Lady – juicy and crisp.
Using two types balances the caramel’s sweetness and prevents a mushy filling.
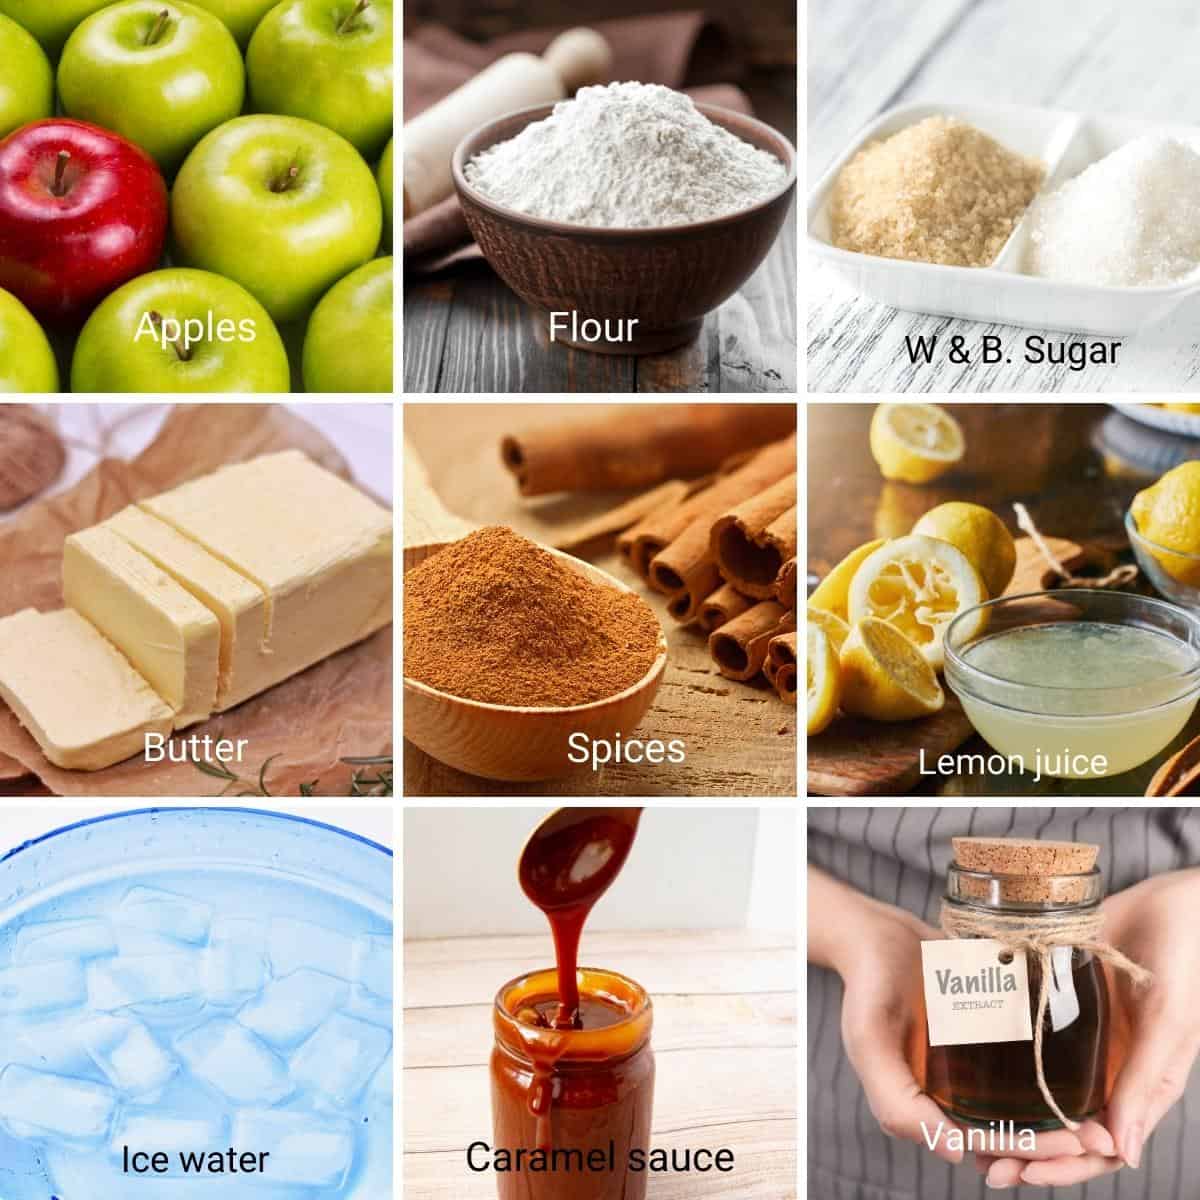
Ingredients and Substitutes
- Caramel Sauce
- White sugar – melts into a rich amber base.
- Corn syrup (or honey) – helps prevent crystallization.
- Butter & heavy cream – create silky texture and richness.
- Vanilla & salt – balance the sweetness.
- Pie Crust
- All-purpose flour – sturdy yet tender structure.
- Unsalted butter – chilled, for flaky layers.
- Salt – enhances flavor.
- Ice water – keeps butter from melting too soon.
- Apple Filling
- Apples – tart + sweet mix recommended.
- Brown sugar – adds molasses depth.
- Lemon juice – prevents browning and brightens flavor.
- Cinnamon, nutmeg, ginger – warm spice blend.
- Flour – thickens the juices.
- Butter – dotted over apples for richness.
- Finish
- Egg wash – golden, glossy finish.
- Sugar – optional crunch.
Step-by-step: How to make caramel apple pie
Step 1 – Make the caramel sauce
In a saucepan over medium heat, combine sugar, water, and corn syrup. Cook without stirring until deep amber. Off heat, whisk in butter, then cream. Add vanilla and salt. Cool in a jar — sauce thickens as it cools.

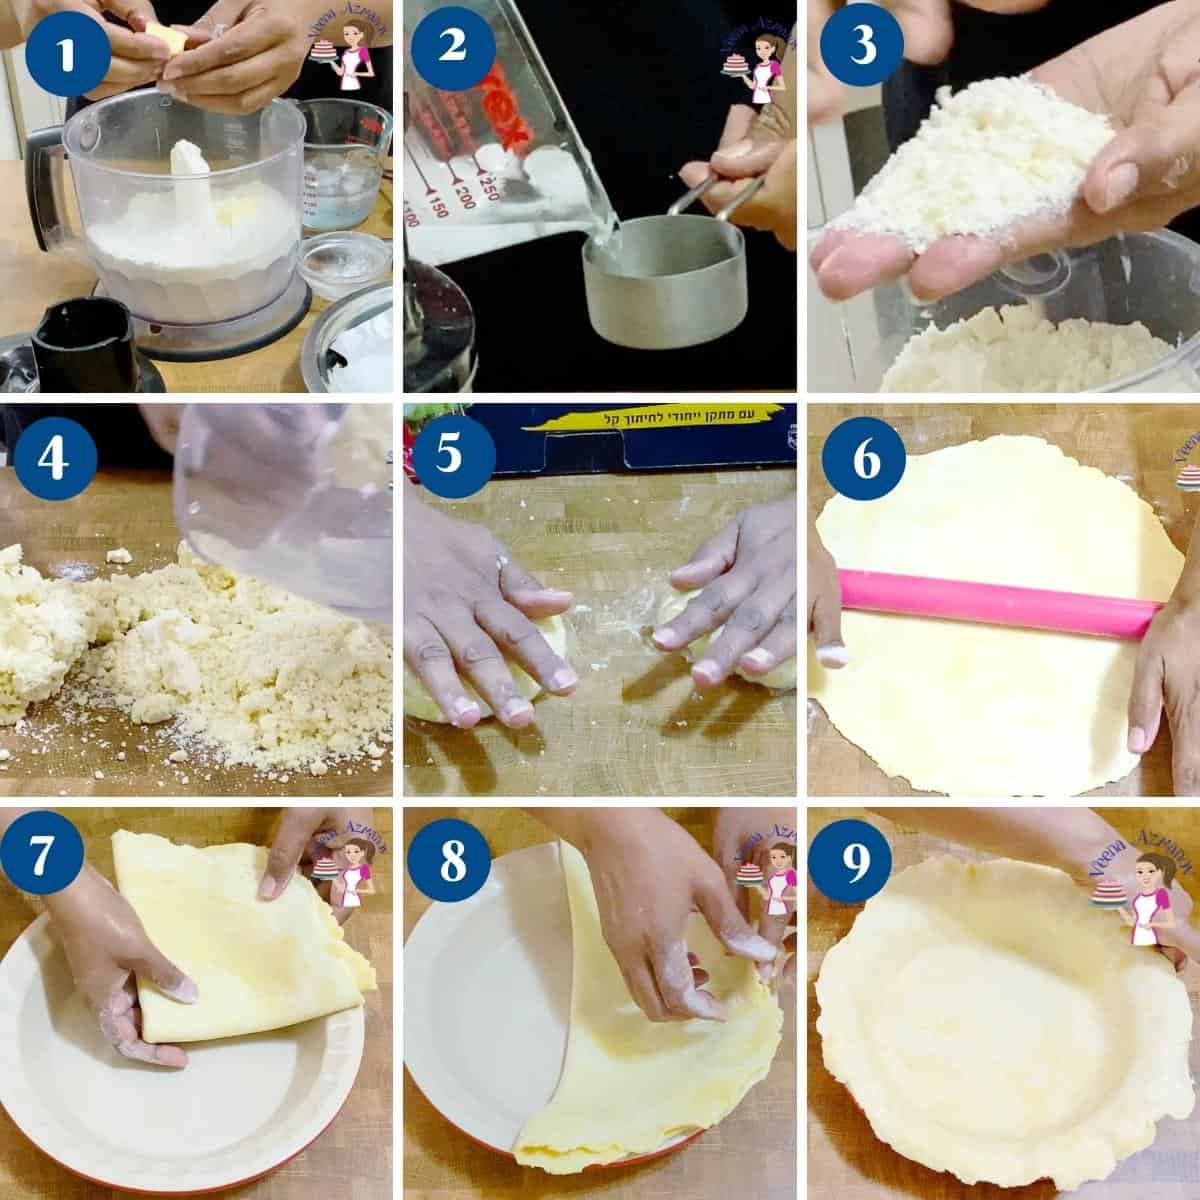
Step 2 – Make the pie crust
Pulse flour, salt, and butter in a food processor until crumbly. Add ice water until dough just holds together. Divide into two discs (one slightly larger), wrap, and chill for 1 hour or up to 3 days.
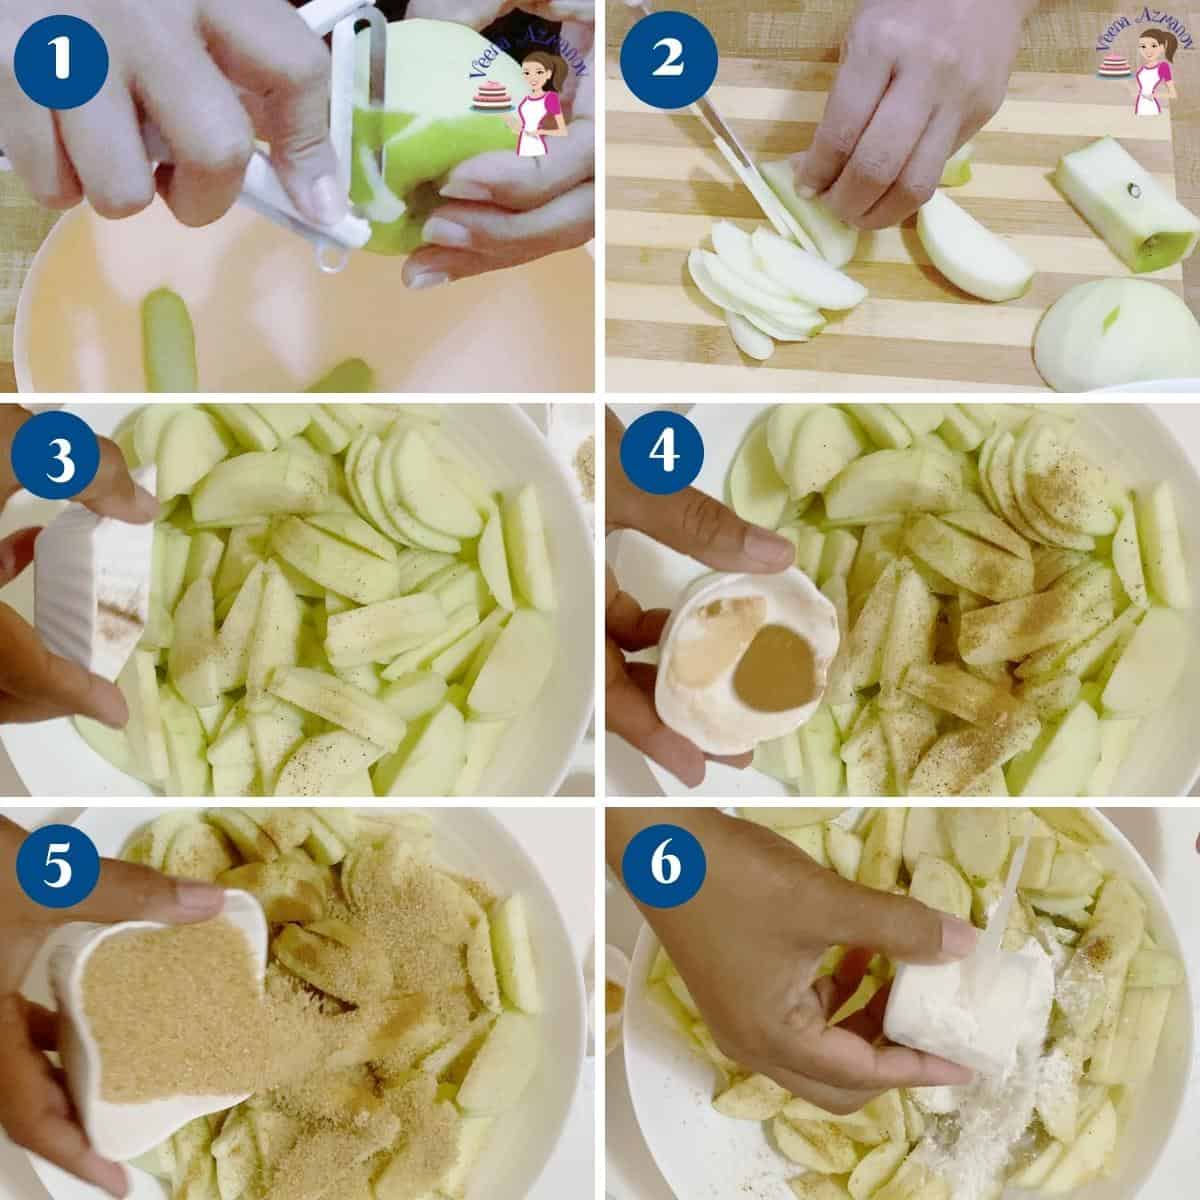
Step 3 – Prepare the filling
Preheat oven to 400°F / 200°C. Peel, core, and slice apples thinly. Toss with lemon juice, sugars, spices, salt, and flour.
Step 4 – Assemble the pie
Line pie pan with the larger crust. Add half the filling, drizzle ¼ cup caramel, then remaining filling, then another ¼ cup caramel. Save extra caramel for serving.
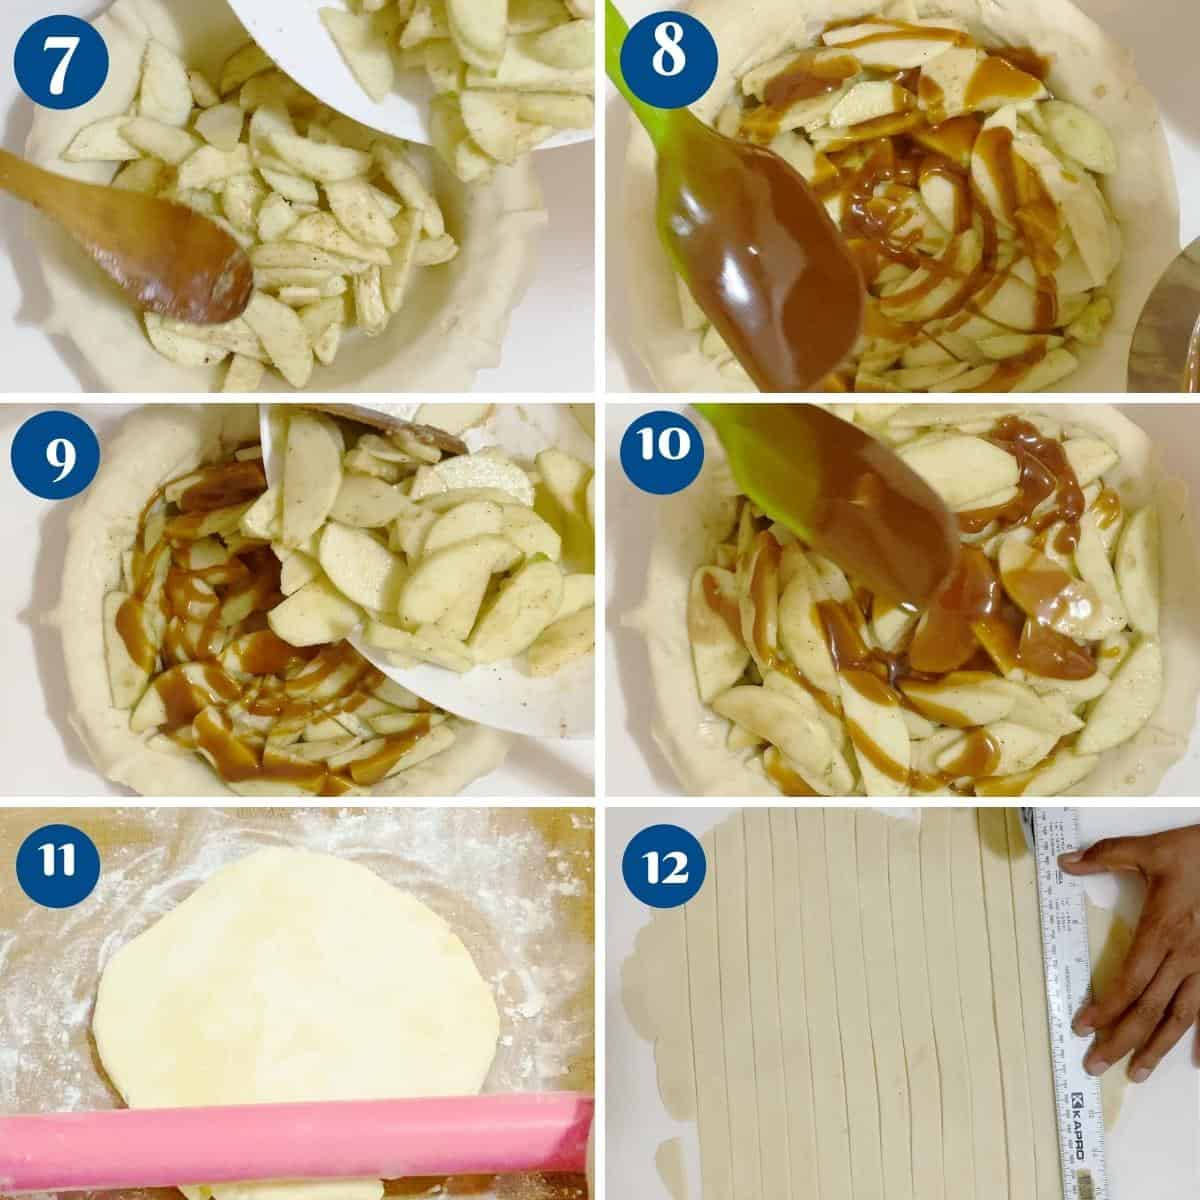
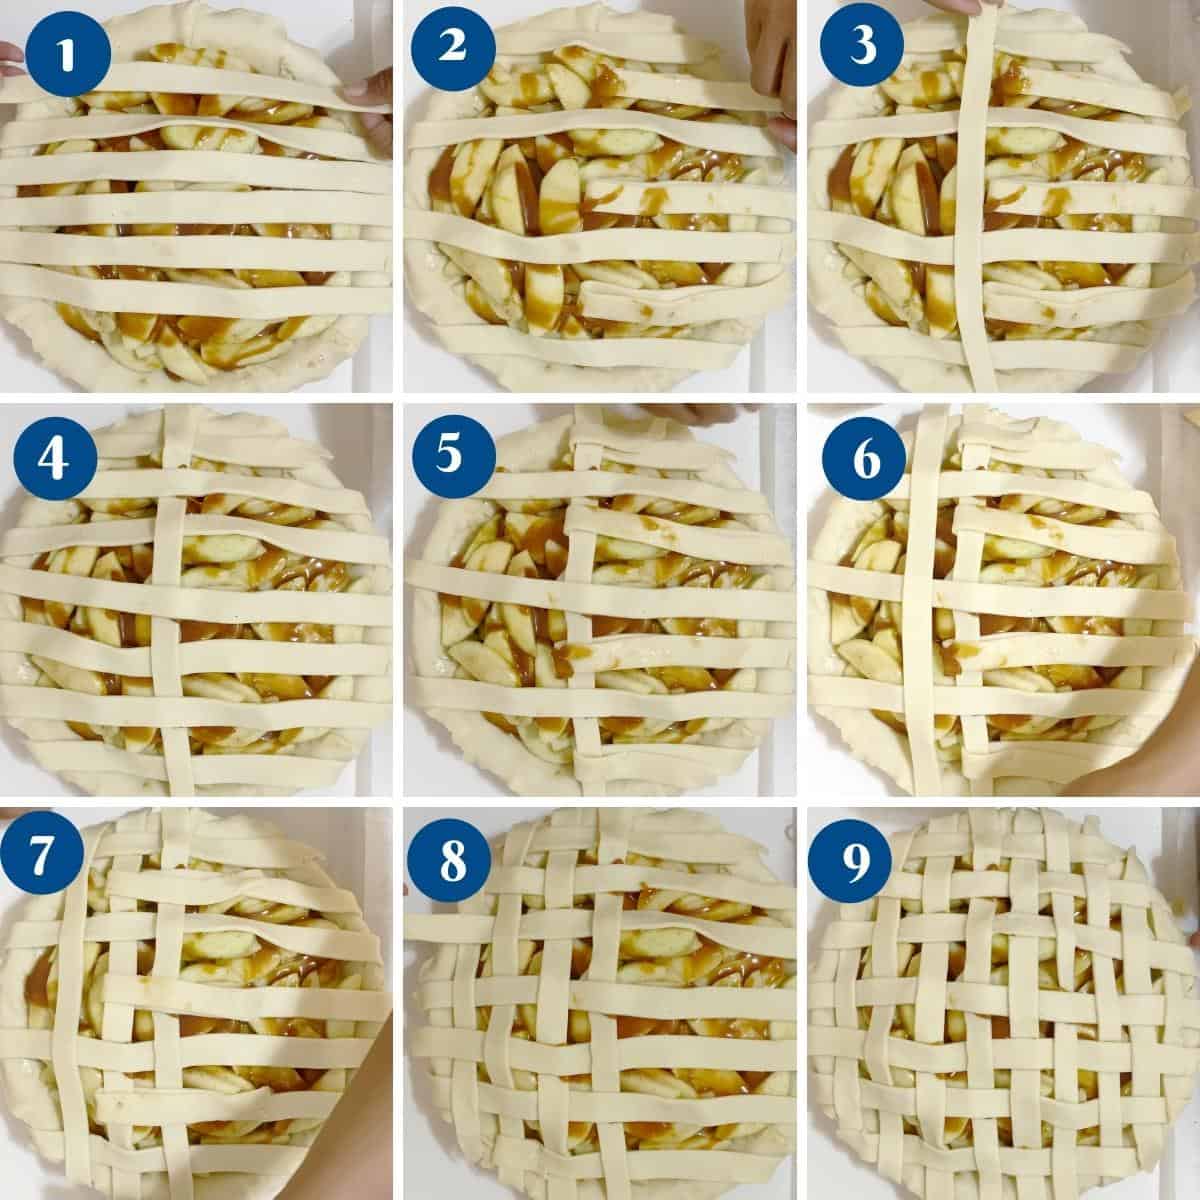
Step 5 – Lattice top crust
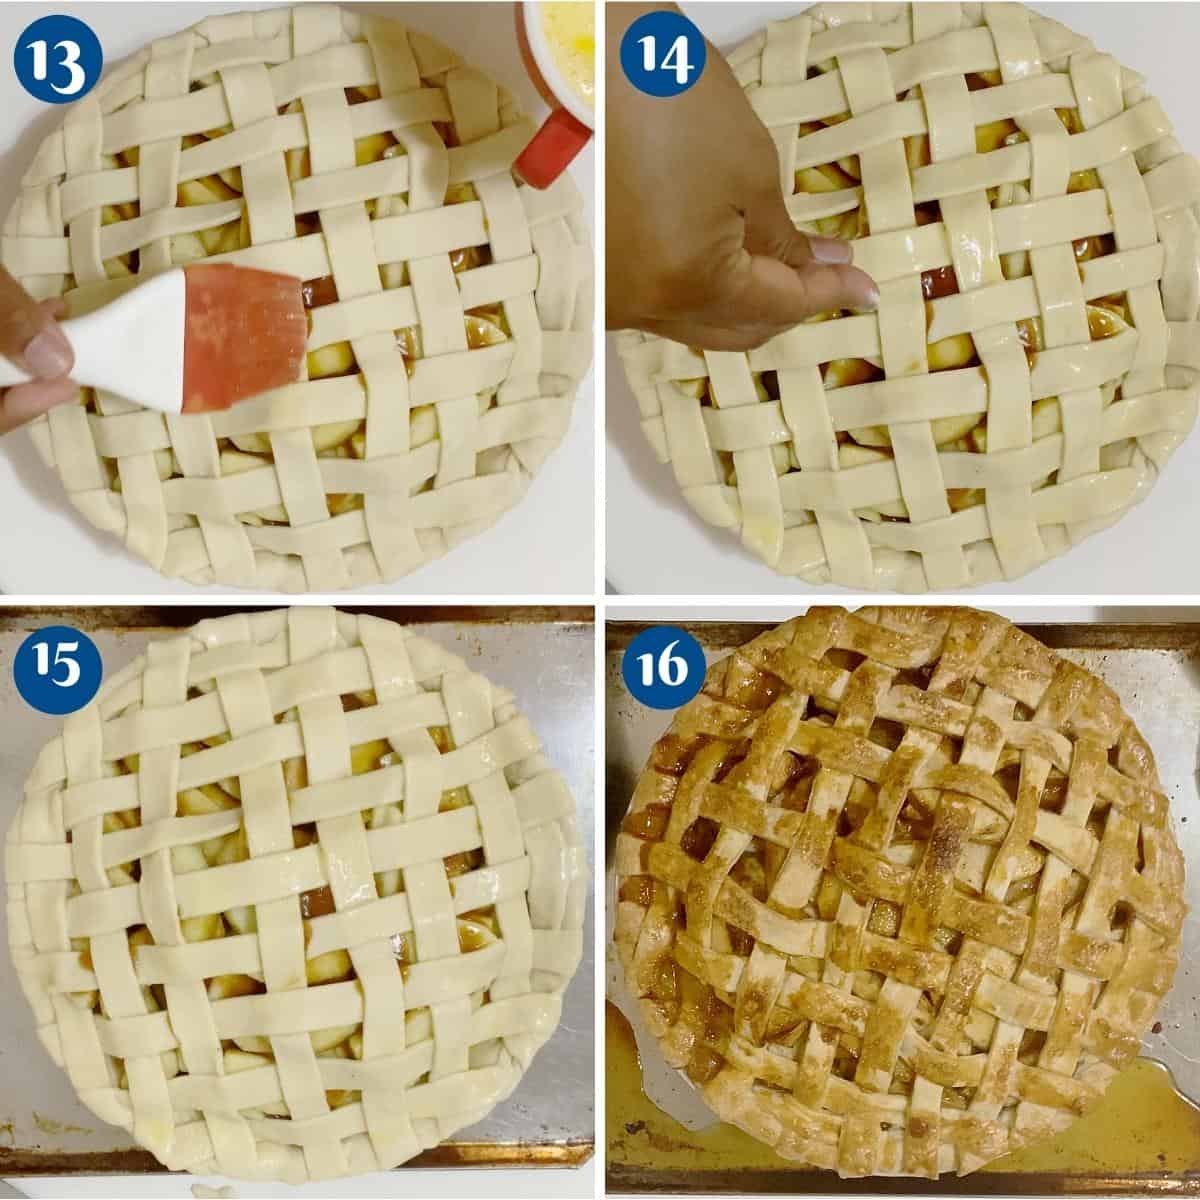
Roll out the second crust and cut into strips. Lay half the strips across the pie, then weave the remaining strips perpendicular to form a lattice. Trim, fold under, and crimp edges. Brush with egg wash and sprinkle sugar.
Step 6 – Bake
Place pie on baking sheet. Bake 20 minutes at 400°F / 200°C, then reduce to 350°F / 177°C for 40–50 minutes. Cover edges if browning too quickly. Cool at least 3 hours before slicing.
Tips for Success
- Keep crust ingredients cold for maximum flakiness.
- Make caramel a day ahead for easier assembly.
- Slice apples evenly so they bake at the same rate.
- Let pie cool fully to avoid excess juices pooling.
Storage & Make Ahead
- Fridge: Cover and store up to 4 days.
- Freezer: Wrap well and freeze up to 3 months. Thaw in fridge before serving.
- Make Ahead: Caramel sauce and crust can be made 3 days in advance.
Troubleshooting
| Problem | Cause | Fix |
|---|---|---|
| Soggy crust | Filling sat too long | Make filling right before baking |
| Runny filling | Not enough thickener | Use correct flour/cornstarch amount |
| Overbrowned crust | High heat too long | Cover with foil halfway through |
| Breaking lattice | Dough too cold/warm | Rest before rolling; chill if soft |
No posts
Frequently asked questions
This pie will keep at room temperature for about 2 days. You can also keep it in the fridge for up to a week if wrapped well.
You want a moist apple pie with slices of apples, not apple sauce. Of course, that means that you want to use nice juicy apples. Some apples, like MacIntosh apples, become mushy when cooked and turn into apple sauce. Granny Smith apples stay firm even after they have been cooked. The added advantage with Granny Smith is that they are sour and work best to cut into the sugar. So use nice, firm apples.
Yes — the apples bake perfectly in the crust with this method.
Yes, but homemade gives better flavor and control over sweetness.
Yes — use a full crust with steam vents, or a crumble topping.
Caramel Apple Pie
Making a delicious, homemade caramel apple pie can be surprisingly easy. It's almost easier than picking one up from the corner bakery. With the right technique, even beginners can bake their own delicious apple pie with homemade pie crust and caramel sauce.
Video
Ingredients
- 1 cup (200 g) Sugar white
- 3 tbsp (45 ml) Water
- 2 tbsp Corn syrup or honey
- 4 tbsp (56 g) Butter
- ½ cup (120 ml) Whipping cream 32 to 38% fat
- 1 tsp Vanilla extract
- ½ tsp Salt
- 3 cups (375 g) All-purpose four
- 1 cup (227 g) Butter unsalted, chilled, cubed
- ½ tsp Salt
- 6 tbsp (90 ml) Water chilled
- 2 lb (900 g) Apples peel, cored, and sliced about 1/8 inch (see video).
- ½ cup (110 g) Brown sugar
- 2 tbsp Lemon juice
- 1 – 2 tsp Cinnamon Powder
- ½ tsp Ground ginger
- ¼ tsp Nutmeg fresh grated
- ¼ tsp Salt
- 4 tbsp (60 g) All-purpose flour
- 2 tbsp (30 g) Butter unsalted – chilled and cubed
- 1 Egg white
- 2 tbsp Water
- 2 tbsp Sugar for sprinkling (optional)
Method
- Step 1 – Make the caramel sauce – In a saucepan over medium heat, combine sugar, water, and corn syrup. Cook without stirring until deep amber. Off heat, whisk in butter, then cream. Add vanilla and salt. Cool in a jar — sauce thickens as it cools.1 cup Sugar, 3 tbsp Water, 2 tbsp Corn syrup , 4 tbsp Butter, ½ cup Whipping cream, 1 tsp Vanilla extract, ½ tsp Salt
- Step 2 – Make the pie crust – Pulse flour, salt, and butter in a food processor until crumbly. Add ice water until dough just holds together. Divide into two discs (one slightly larger), wrap, and chill for 1 hour or up to 3 days.3 cups All-purpose four, 1 cup Butter, ½ tsp Salt, 6 tbsp Water
- Step 3 – Prepare the filling – Preheat oven to 400°F / 200°C. Peel, core, and slice apples thinly. Toss with lemon juice, sugars, spices, salt, and flour.2 lb Apples, ½ cup Brown sugar, 2 tbsp Lemon juice, 1 – 2 tsp Cinnamon Powder, ½ tsp Ground ginger, ¼ tsp Nutmeg , ¼ tsp Salt, 4 tbsp All-purpose flour, 2 tbsp Butter
- Step 4 – Assemble the pie – Line the pie pan with the larger crust. Add half the filling, drizzle ¼ cup caramel, then the remaining filling, then another ¼ cup caramel. Save extra caramel for serving.
- Step 5 – Lattice top crust – Roll out the second crust and cut into strips. Lay half the strips across the pie, then weave the remaining strips perpendicular to form a lattice. Trim, fold under, and crimp edges. Brush with egg wash and sprinkle sugar.1 Egg white, 2 tbsp Water, 2 tbsp Sugar
- Step 6 – Bake – Place pie on baking sheet. Bake 20 minutes at 400°F / 200°C, then reduce to 350°F / 177°C for 40–50 minutes. Cover edges if browning too quickly. Cool at least 3 hours before slicing.
Notes
Tips for Success
- Keep crust ingredients cold for maximum flakiness.
- Make caramel a day ahead for easier assembly.
- Slice apples evenly so they bake at the same rate.
- Let pie cool fully to avoid excess juices pooling.
Equipment you will need


Nutrition
Tried this recipe?
Mention @veenaazmanov_kitchen or tag #veenaazmanovkitchen!- Cinnamon Apple Bread Recipe
- Apple Strudel with Puff Pastry
- Apple Pie Filling Recipe
- Apple Crumble Tart
- Apple Pie Hamantaschen
No posts
Don’t lose this recipe! Save it for Later!
📌 Save this Recipe for later on Pinterest so you can easily find it again.
⭐ Add Veena Azmanov Kitchen to your Google Preferred Sources.
It helps Google show you more of our recipes.
📧 Subscribe for new recipes delivered to your inbox.
🎥 Follow us for more recipes


Sounds great but before I make the pie, every time I make an all butter crust, the butter oozes out and I’m left with yuck. I follow the directions but it still happens. Please advise.
Sha
Hey Sha! Ah yes — the butter-ooze struggle! It usually means the butter pieces were a bit too warm or the dough wasn’t chilled long enough before baking.
Try popping your rolled-out crust into the fridge (or even freezer) for about 15–20 minutes before it hits the oven.
That helps the butter firm up so it steams inside the dough instead of melting out.
Also, make sure your oven is fully preheated — if it’s too cool, the butter melts before the crust sets.
You’ll get those lovely flaky layers instead of the puddle.
See my detailed recipe for – how to make a pie crust from scratch
Absolutely delicious! The caramel really makes the pie! I’m not even a huge apple pie fan and I’m making this for the 2nd time today. I use store bought crusts because I’m lazy, but follow the recipe to the T otherwise. Thank you!
Thank you so much for the lovely feedback, Megan.
What a delicious food blog to stumble upon!!! Your recipes look divine! I will be trying some of them soon! Thank-you!!!
delicious – thanks so much for all the instructions and notes on the pie crust – i’ve never made my own but I decided to take the leap – so good!!!
Thank you, Heather. Happy you enjoyed these.
My husband and I were just talking about making apple pie for Thanksgiving this year! Such a gem of a recipe for the holidays! Thanks for sharing!
This pie turned out amazing! Loved all of your “pro tips” and followed them as I baked. I’m using this pie crust for other pies too from now on!
Thank you, MJ. Happy to hear you are enjoying my recipes. This one is my kids’ favorite.
This pie is always a favourite of ours at Thanksgiving.
I’ve always been nervous about making my own pie crust but your step-by-step directions walked me right through it!
Aww, I am so happy to hear that, Jess. Thanks for the lovely feedback.