How to Start Your Own Blog


Creating your own blog can be a fun and rewarding experience. By following these steps, you can create a blog that reflects your interests and passions, and connect with others who share your enthusiasm. Start your blogging journey today!

In today’s digital age, blogging has become increasingly popular as a way to share ideas, connect with others, and even make a living. Whether you’re a seasoned writer or just starting out, creating your own blog can be a rewarding experience. In this guide, we’ll cover everything you need to know to start your own blog, from what a blog is to the best platforms to use.
A blog is a regularly updated website or online platform where an individual or a group of individuals share their thoughts, opinions, and expertise on a particular topic. Blogs typically consist of written posts, but they can also include images, videos, and other multimedia content.
People start blogging for various reasons. Some blog to share their knowledge and expertise on a particular subject, while others use it as a platform to express their creativity or share their personal experiences. Blogging can also be a way to connect with like-minded individuals and build a community around a shared interest.
Starting a blog has never been easier, thanks to the availability of user-friendly blogging platforms like WordPress, Blogger, and Medium. These platforms offer a range of tools and templates that make it easy to create and customize your blog without any technical knowledge. However, while starting a blog is easy, maintaining it can be challenging. Consistently creating high-quality content and engaging with your audience requires time and effort.
The best platform for your blog depends on your specific needs and goals. WordPress is one of the most popular blogging platforms, known for its flexibility and customization options. Blogger, owned by Google, is another popular choice, especially for beginners, as it is easy to use and offers integration with other Google services. Medium is a platform that focuses on writing and reading, making it ideal for those who want to reach a wider audience.
Starting your own blog can be a fulfilling endeavor, whether you’re doing it for personal enjoyment or as a way to grow your business. By following the steps outlined in this guide and choosing the right platform for your needs, you’ll be well on your way to creating a successful blog.
The 5 step process
Step 1: Choose a Blogging Platform
The first step in creating your own blog is to choose a blogging platform. There are many platforms available, each with its own features and benefits. Some popular options include WordPress, Blogger, and Medium. Consider your needs and goals for your blog when choosing a platform.
Step 2: Select a Domain Name
Once you’ve chosen a platform, you’ll need to select a domain name for your blog. Your domain name is your blog’s address on the internet (e.g., www.yourblogname.com). Choose a domain name that is relevant to your blog’s content and easy to remember.
Step 3: Set Up Your Blog
After selecting a domain name, you can set up your blog on your chosen platform. This typically involves creating an account, choosing a theme or template for your blog, and customizing the design to fit your style.
Step 4: Create Compelling Content
With your blog set up, it’s time to start creating content. Think about your target audience and what type of content will resonate with them. Consider including a mix of written posts, images, videos, and other multimedia to keep your blog engaging and interesting.
Step 5: Promote Your Blog
Once you’ve started creating content, it’s important to promote your blog to attract readers. Share your posts on social media, participate in online communities related to your blog’s topic, and engage with your audience to build a following.
Step 6: Monetize Your Blog (Optional)
If you’re interested in making money from your blog, there are several ways to monetize it. You can display ads, offer sponsored content, or sell products or services related to your blog’s niche. Explore different monetization options to find what works best for you.
Blogging task
If I had the support I have today when I first started blogging, my blogging journey would have been much less stressful and far more enjoyable. But what does that mean? For many of us, hiring professional website developers is simply too expensive. Trying to do everything ourselves can be overwhelming and, in the long run, even more costly (fixing mistakes can be quite expensive). However, there is a third option, and that’s what I want to share with you today.
We can break down the task of creating a website into two main parts:
- Designing and Developing the Site: For this, there are many excellent tools and platforms that offer free, generic website designs. You can get your site up and running quickly, easily, and without needing any technical skills. That’s exactly what I did when I started my blog.
- Ongoing Operation and Maintenance: This is where things get more challenging. It requires technical skills and experience that most of us don’t have. While we could try to handle it ourselves and learn through trial and error, in my experience, that’s not a wise choice. It often leads to costly mistakes in terms of both time and money. Moreover, when your site is down, it can significantly impact your business, resulting in the loss of customers, advertisers, and followers, which can add up to hundreds of dollars for every day your site is offline.
What are managed hosting?
Managed hosting is a type of hosting service where the hosting provider takes care of the day-to-day management of the server for you. This includes tasks such as hardware and software setup, maintenance, security patches, technical support, and monitoring.
With managed hosting, you don’t need to have advanced technical skills or knowledge to run your website or application. The hosting provider handles all the technical aspects, allowing you to focus on your website’s content and other important aspects of your business.
Managed hosting is often more expensive than unmanaged hosting, but it can save you time and effort by offloading the technical responsibilities to the hosting provider. It is a good option for businesses and individuals who want a hassle-free hosting experience and value the peace of mind that comes with knowing their website is being taken care of by professionals.
Managed hosting is often recommended for novice bloggers who do not have technical knowledge for several reasons:
- Easy Setup: Managed hosting providers handle the setup and configuration of the server, making it easy for beginners to get started without dealing with complex technical details.
- Security: Managed hosting companies often provide enhanced security measures, such as regular security updates and malware scans, to protect your website from cyber threats. This can be reassuring for novice bloggers who may not be familiar with how to secure a website.
- Technical Support: Managed hosting plans typically include 24/7 technical support from experts who can help you with any issues or questions you may have. This can be invaluable for beginners who are not familiar with troubleshooting technical issues.
- Performance Optimization: Managed hosting providers often optimize server performance for you, ensuring that your website loads quickly and performs well, even during traffic spikes. This can improve user experience and SEO rankings.
- Automatic Backups: Managed hosting plans often include automatic backups of your website, so you don’t have to worry about losing your content in case of a server failure or other issue.
Overall, managed hosting can provide a more user-friendly experience for novice bloggers, allowing them to focus on creating content and growing their blog without getting bogged down by technical issues.

How much does it cost to blog?
Free – Starting a blog can be done for free, but there are trade-offs. When you opt for a free blog platform, such as WordPress.com or Blogspot.com, your blog URL will reflect this choice, like yourblogname.wordpress.com or yourblogname.blogspot.com, rather than a personalized yourblogname.com. However, this can be a reasonable compromise for those looking to start quickly and with minimal expenses.
Using a free platform is a quick and inexpensive way to test your ideas and see if blogging is right for you. Once you’re ready to commit your time, energy, and money to your blog, you can purchase your own domain name and select a hosting company to host your website.
Managed Hosting – There are many hosting companies offering services to start a blog. Personally, I have used a few, but my current blogs are hosted by WPOven, which has been a lifesaver for me. They provide managed hosting services for WordPress websites and have helped me with technical work whenever I needed it, no questions asked.
While their monthly fee can be as low as $20, there are other hosting companies offering lower-cost options, some as low as $5 a month. However, it’s important to consider that you get what you pay for. Personally, I prefer to pay $20 for quality service and peace of mind rather than risking website “blackouts” (extended downtime) with cheaper providers.
For me, it’s simple math. Every day my site is down costs me $200, so the investment in reliable hosting is worth every penny. Another advantage of using a hosting company like WPOven is that you get your own dedicated VPS server, rather than a shared server with multiple clients, which contributes to their slightly higher fees.
What does WPOven offer?
The guys at WPOven believe that you should spend your valuable time developing content for your website and not maintaining it. They manage the technical support of your site, so you can manage your business. Let them handle all your WordPress website maintenance so that you do not have to worry about any of that.
Also, WPOven provides all the tools that you need to run a successful business website. Here’s what they offer.
We will take care of:
- Your server and site’s security. We provide free SSL certificates, free CDN support, daily malware scans, free malware clean-ups, and daily off-site backups across all plans.
- Daily advanced site analytics for all sites.
- Manage your clients. If you are a web developer or a web agency, you can manage and bill all your clients and their sites using our client Manager.
- WPOven is a CloudFlare-certified partner. This means you can integrate and use CloudFlare directly from your WPOven dashboard.
- We provide one free email with all servers across all plans.
- Use the inbuilt recipe builder to create great-looking WordPress sites in minutes. The recipe builder has a number of premium themes and plugins to choose from at no added cost.
- WPOven also provides add-on packages for any custom development work that you might need, site speed optimization, and SEO optimization.
- Get our highly experienced WordPress support staff to resolve any issue with your WordPress site quickly and efficiently.
You see what I mean by – you get what you pay for? At $5 a month, you get nothing other than an account to build your site. You will need to do all of the above on your own. I bet some of the things above sound scary, like CloudFlare. Guess what? With a WPOven it’s ok, they take care of it for you. This is why I think paying a little extra for peace of mind is worth every penny for me.
Step-by-step: Create your blog – The Tech stuff!
Step 1: Sign up with WPOven from here.
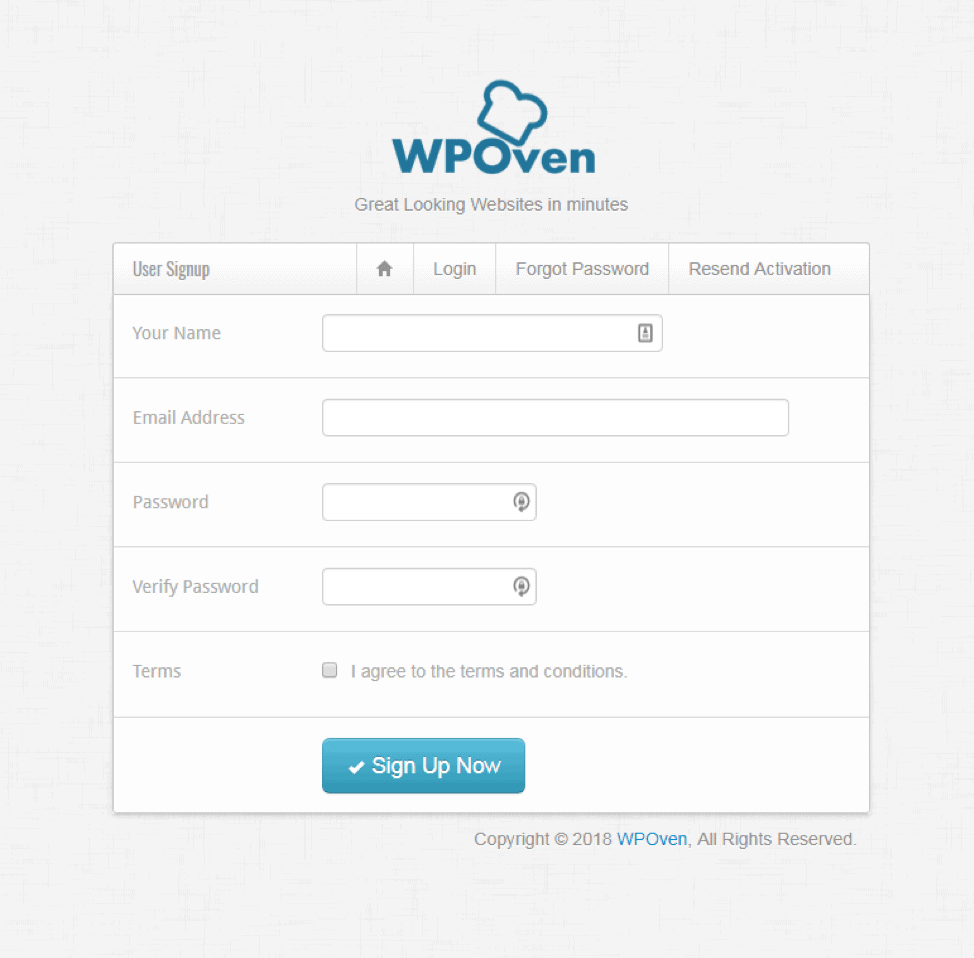
Step 2: Select a plan
Once you have signed up with WPOven, you can create a SuperFast and optimized server for your sites. Before creating a server you need to select a plan. You can find all the details for the plans on the Plans and Features page.

Step 3: Select the server
Once you have selected the plan that best suits your requirements, you need to select the server location. If your site targets users from a particular geographic location, for example, Australia, then you can select Sydney as your data center location. And, if your site targets visitors globally, then we would suggest our Dallas or New York data center.
So, if you are based in the US then you want to choose a location in the US so your website will load quickly.
Here is the list of the available Data center locations:
- Australia datacenters: Sydney
- US datacenters: New York, Texas, Newark, Fremont, Atlanta,
- Europe datacenters: Netherlands, London, Frankfort,
- Asia datacenters: Japan, Singapore, India
Step 4: Select the payment method
You have an option of either :
- Creating a monthly subscription via PayPal, or
- Use your credit or debit card
Step 5: Create your server
After you have selected all the options, simply click on the ‘Create Hosting’ button and your server will be created.

Step 6: WPOven dashboard
You can manage and view various stats for your newly created WPOven server from the WPOven dashboard from the ‘Servers’ tab.
Step 7: Adding your domain to the WPOven dashboard
Now that you have created your server with WPOven, you can start by adding your domain to the WPOven dashboard. To add a domain/site to your WPOven server, simply log in to the WPOven dashboard and navigate to the ‘Sites’ tab. You will now see a form to add a new site. Fill in the form and your site will be installed on your WPOven server, with the latest WordPress version installed on it.

Have a site with another host?
But what if you already have a website that is hosted by another hosting company? As I previously mentioned, I had my sites at another hosting company and I had no clue how to transfer them to WPOven. No problem. WPOven will help you transfer your site for free. Yup, they do it for free!
Step 8: Migrating your site
If you wish to migrate your site from your previous hosting, simply click on the ‘Request Migration’ button and fill in the migration form. WPOven offers free migrations for all your sites.
Step 9: Update your DNS records
Once your site has been added to your WPOven dashboard, you can then update the domain’s DNS records as mentioned here. This was new to me too but WPOven has it all detailed very well. And they helped me with mine.
Log in to your WordPress site
All WordPress site log-ins are usually: yoursitename/wp-admin. So just go to google.com and type your domain name followed by wp-admin.
For example: if your site is happy cakes, you would type https://happycakes.com/wp-admin. Bookmark that page for future use so you always have it ready to log in.
Use the username and password you just created to install the WordPress Site.

This is your WordPress dashboard
From now on you will be working out of this dashboard. This is where you will work on your blog/site on a regular basis. Installing your theme, plugins, back-ups, writing your post etc. It all happens right here.
Congratulations on your new blog!!

Design your blog – the fun stuff!
Remember that I suggested putting a little of your personality into your blog? Well, it starts here. Your blog’s design and content say a lot about you. Just as when you go to someone’s home. It kinda tells you about the person. Doesn’t it? Similarly, you want your blog to reflect you and the image of your company.
In WordPress, we use themes to design our blogs. Themes come with everything designed for you. You just customize it to your own preferences. There are FREE and paid themes. And here too “ you get what you pay for”.
Most premium themes cost between $45 to $60. Some can go over $200. I think that there are many good themes for under $50. So spend wisely.
The disadvantages of free themes
- Your blog looks like all other blogs instead of being unique or one of a kind.
- The functionality you get for free is pretty basic. So you need to add plugins for other useful functions. More plugins can slow your site. That is very undesired by your target customers/readers.
- There is no customer support with free themes.
- A free theme is very rarely updated. In fact, often they are abandoned by their developers.
- Free themes are less secure. This can lead to malware and spam on your website.
Following are some recommended themes from Theme Forest.
- Foodie -A Whimsical Food Blogging Theme
- This Foodie PRO – StudioPress Themes for WordPress (This is the one I am currently using on this blog)
- I Cook – another food blogging Theme
Useful plugins you need for your blog
Once you start your blog these are some of the first few plugins you want to install. Most of these are free to download from your WordPress dashboard. Of course, some of these have more features when you upgrade.
- Akismet – It’s a free plugin against spam comments on your blog. Here is a simple video on how to set it up – Akismet Plugin setup.
- SEO by Yoast – The best free and paid plugin for your blog SEO.
This a great video showing you how to set it up – How to install and set up WordPress plugin SEO by Yoast. - WordPress Backup to Dropbox – This is a free plugin to back up your site in Dropbox. There is a video on how to set it up
- Comment Luv or Disqus – These are two different comment plugins – both are good therefore you can go with either one. I use Comment Luv
- Finally, If your site has recipes use a recipe plugin – you must use the best WP Recipe Maker. They do have a free version but the paid is better and affordable.
- Google Analytics – A very useful analytics tool, which gives you insight into your visitors. Demographic, location, age, device, etc. Setting up takes a little effort but once done it is very valuable. I strongly suggest you set it up. Here is a video that can help you set up your Google Analytics.
- Social share plugins – Is found in the plugin section; helps share your social network connections so your visitors can share your posts on different social networks. I used the Grow plugin.
- Contact Form – Found in the plugin section as well. The contact form is a better way to let visitors contact you rather than making your email address public.
Frequently asked questions
A blog is a regularly updated website or online platform where an individual or a group of individuals share their thoughts, opinions, and expertise on a particular topic. Blogs typically consist of written posts, but they can also include images, videos, and other multimedia content.
Blogging involves writing and publishing articles or posts on a website, often accompanied by images or videos. Vlogging, on the other hand, is the act of creating and posting video content on platforms like YouTube. While both mediums can be used to share information and connect with an audience, vlogs are typically more engaging and personal due to the visual and auditory elements, whereas blogs are often more text-based and allow for longer-form content.
There are many reasons to start a blog, including sharing your knowledge and expertise on a particular subject, expressing your creativity, building a personal brand, or even making money.
Yes, it’s relatively easy to start a blog, especially with the availability of user-friendly blogging platforms like WordPress, Blogger, and Medium. These platforms offer tools and templates that make it easy to create and customize your blog without any technical knowledge.
While technical skills can be helpful, they are not necessary to start a blog. Many blogging platforms offer simple, drag-and-drop interfaces that allow you to create and customize your blog without any coding knowledge.
The cost of starting a blog can vary depending on your needs and goals. In general, you can start a blog for free using platforms like WordPress.com or Blogger. However, if you want to use your own domain name or access additional features, you may need to purchase a domain name and pay for hosting, which can cost anywhere from a few dollars to a few hundred dollars per year.
There are several ways to monetize your blog, including displaying ads, offering sponsored content, selling products or services, and more. The key is to create high-quality content that attracts a loyal audience, as monetization methods often rely on having a significant amount of traffic.
The frequency of publishing new content on your blog depends on your goals and availability. Some bloggers post new content daily, while others post weekly or even less frequently. The key is to be consistent and provide valuable content to your audience.
There are many ways to promote your blog, including sharing your posts on social media, participating in online communities related to your blog’s topic, engaging with your audience, and more. Experiment with different promotion strategies to see what works best for you.


Don’t lose this recipe! Save it for Later!
📌 Save this Recipe for later on Pinterest so you can easily find it again.
⭐ Add Veena Azmanov Kitchen to your Google Preferred Sources.
It helps Google show you more of our recipes.
📧 Subscribe for new recipes delivered to your inbox.
🎥 Follow us for more recipes


Great points covered in the topic. I will surely try to implement your ideas and bring them into reality!
“Anyone can start a blog, but the real test is getting readers.” Thanks for sharing your experience.