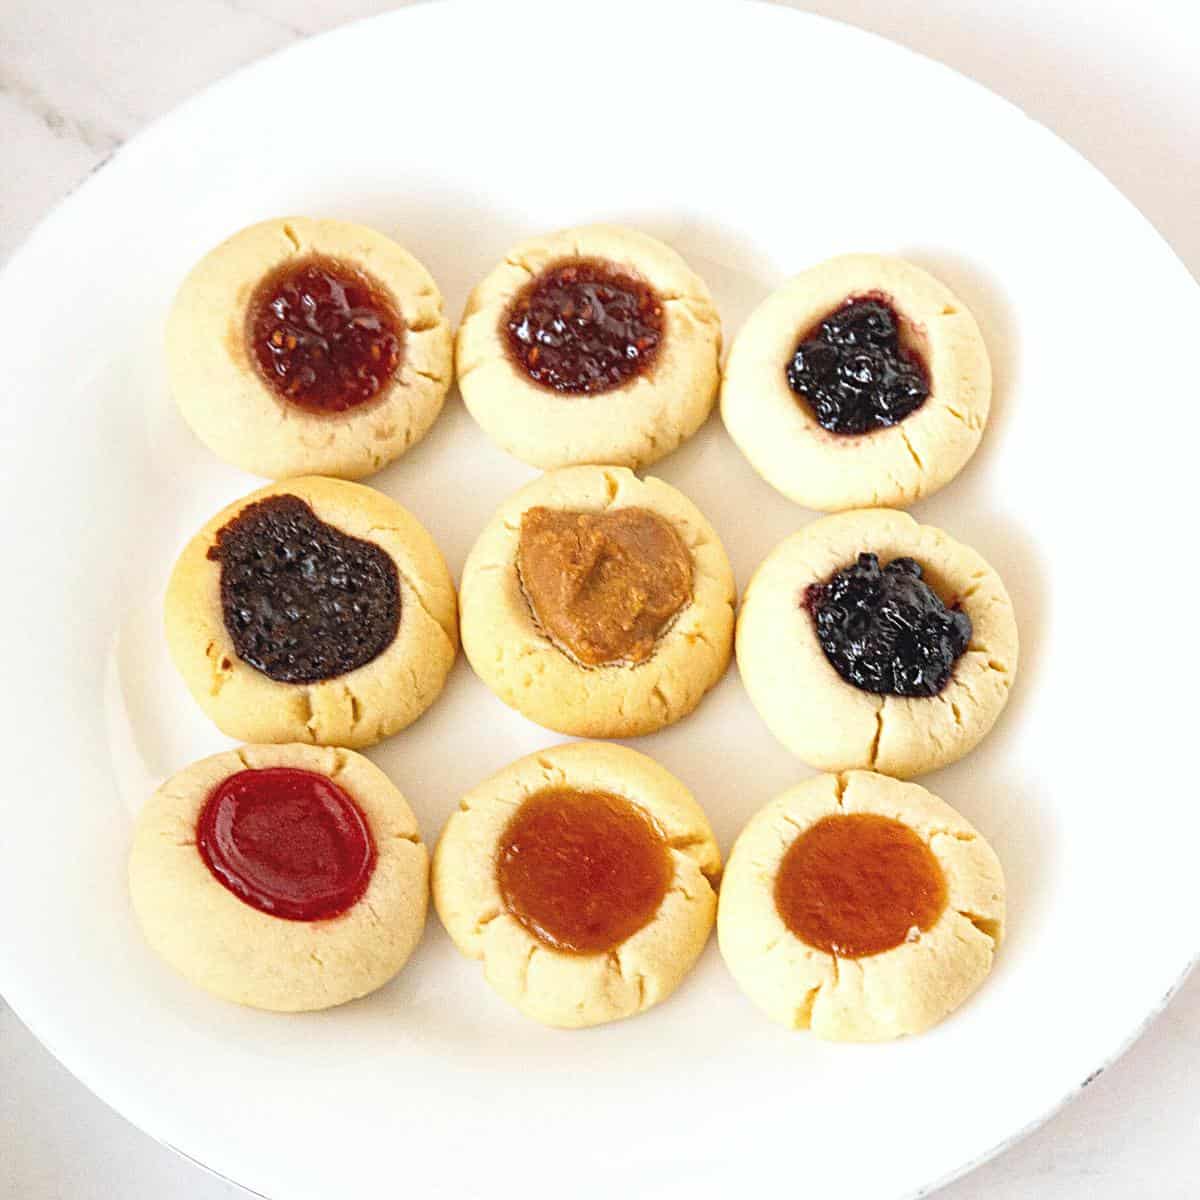
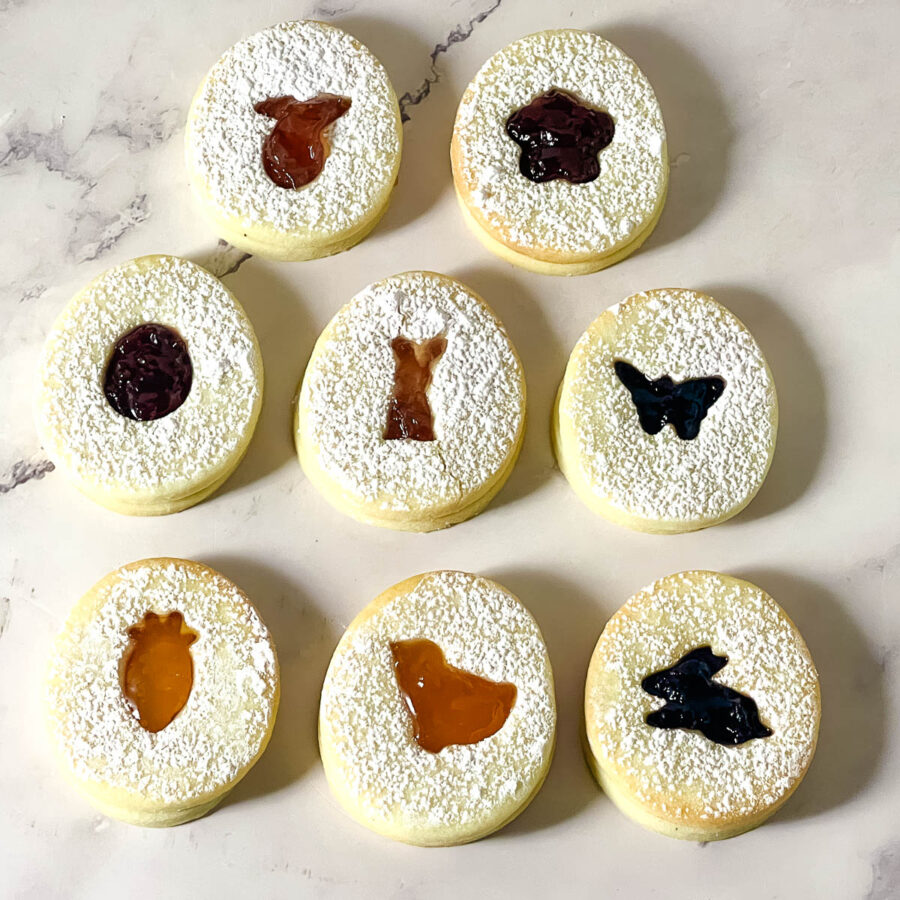
Eggless Thumbprint Cookies


Imagine sinking your teeth into a soft, buttery cookie with a sweet, jam-filled center. The gentle crunch of the outer crust gives way to a burst of flavor that delights your senses. With just the right balance of ingredients and a hint of creativity, these eggless thumbprint cookies are the epitome of indulgence.

Thumbprint cookies are a beloved treat that never fails to bring joy and happiness to anyone who indulges in them. These delightful morsels are characterized by their soft, buttery texture and the signature thumbprint indentation in the center, which is the perfect vessel for a spoonful of sweet jam or other delectable fillings.
What sets thumbprint cookies apart from other types of cookies is their unique appearance and the versatility they offer in terms of flavor and filling options. While the classic version features a simple vanilla or almond-flavored cookie dough filled with fruit jam, the possibilities for creativity are endless. From chocolate ganache to caramel, nut butter to lemon curd, you can let your imagination run wild and customize your thumbprint cookies to suit your taste preferences and the occasion.
But what makes these eggless thumbprint cookies the best recipe out there? Well, it’s all in the details. Combining a perfectly balanced cookie dough, a methodical thumbprint technique, and carefully chosen fillings ensures that each bite is a harmonious explosion of flavors and textures. The eggless aspect of the recipe adds an extra layer of accessibility, making these cookies suitable for those with dietary restrictions or allergies.

Why is this the best recipe
- The secret behind this foolproof thumbprint cookie recipe lies in its perfect balance of ingredients. Each element is thoughtfully selected and measured to ensure the desired results – buttery, tender cookies with a delicate crumb and a burst of flavor from the filling. Using a combination of flour, butter, egg yolk, powdered sugar, and vanilla, this recipe creates a cookie dough that is easy to work with and yields consistently delicious results.
- The proportions of these key ingredients are carefully calculated to strike the ideal balance between richness and tenderness. The butter provides a luscious base, while the flour adds structure and contributes to the cookie’s soft texture. Adding the egg yolk enhances the dough’s richness and provides moisture, ensuring the cookies stay soft and melt in your mouth.
- Powdered sugar is used instead of granulated sugar to give the cookies a delicate crumb and a subtle sweetness. Its fine texture blends smoothly into the dough, leaving no graininess behind. Finally, a hint of vanilla extract ties all the flavors together, adding a warm and comforting aroma that fills your kitchen as the cookies bake.
Ingredients and substitutes
- Flour is the foundation of any cookie recipe, providing structure and texture. All-purpose flour creates a tender and crumbly cookie in this eggless thumbprint cookie recipe. However, if you prefer a slightly lighter texture, you can experiment with using cake flour or a combination of all-purpose and cake flour.
- Butter is another crucial ingredient that adds richness and flavor to these cookies. While this recipe calls for unsalted butter, you can also use margarine or vegan butter substitutes for a dairy-free option. Just be sure to adjust the amount of salt in the recipe accordingly if you opt for salted butter.
- Sugar brings a touch of sweetness and a hint of caramelization to the cookie. The amount of sugar can be adjusted according to personal preference – a little less for a less sweet shortbread and a little more for those with a sweet tooth. Remember that fine granulated sugar will dissolve more easily into the dough, resulting in a smoother texture.
- Vanilla extract adds a warm and comforting aroma to these thumbprint cookies. If you don’t have vanilla extract, you can use other extracts like almond or coconut to infuse unique flavors into your cookies. Just be mindful of the intensity of these extracts and adjust the amount accordingly.
- I always use my homemade jam of various flavors, from strawberry, blueberry, and raspberry to apricot jam. And yet, store-bought works just as well. Of course, you can also use Biscoff spread, Nutella, Chocolate ganache, etc. The choice of fillings is endless for these cookies.

Step-by-step: Eggless thumbprint cookies
- Once your ingredients are ready, preheat your oven to 350°F / 180°C/ Gas Mark 4 and line a baking sheet with parchment paper. This will prevent the cookies from sticking and ensure even baking.

- Cream the butter and powdered sugar until light and fluffy, then gradually incorporate the vanilla extract, salt, and flour. Mix until just combined, being careful not to overwork the dough.
- Now comes the fun part – shaping the dough into bite-sized mounds. Take about a tablespoon of dough and roll it into a smooth ball between your palms.
- Place the balls onto the prepared baking sheet, leaving enough space between them for spreading. Once all the dough has been shaped, it’s time to make the thumbprint indentation. Gently press your thumb or the back of a spoon into the center of each cookie, creating a small cavity.

- Fill each cavity with a teaspoon of your chosen jam or preserves. Be creative with your selection – anything from raspberry and apricot to strawberry or chocolate spread can work beautifully. The jam adds color and a delightfully gooey center to these cookies.
- Now that your cookies are prepared, it’s time to bake. Slide the baking sheet into the oven and let it bake until the edges turn golden brown. Keep an eye on them, as the baking time may vary depending on your oven and the thickness of the cookies. Remember, we’re aiming for a slightly crumbly texture. So, it’s better to slightly underbake them than to risk drying them out.
- Once the cookies are baked to perfection, remove them from the oven and let them cool on the baking sheet for a few minutes. Then, transfer them to a wire rack to cool completely. The cookies will firm up slightly as they cool, so be patient before indulging in their irresistible deliciousness.

Tips for Success
- Chill the dough: After mixing all the ingredients, it’s crucial to refrigerate the dough for at least 30 minutes. Chilling the dough helps it firm up and allows the flavors to meld together, resulting in a more delicious cookie.
- Use the right thumbprint size: When creating the indentations for the filling, use your thumb or a small spoon to create a well that is just the right size. Too small, and the filling won’t hold its shape; too large, and the cookies might spread too much, losing their distinct thumbprint appearance.
- Don’t overfill the thumbprints: While having fun with the filling may be tempting, be mindful not to overfill the thumbprints. A spoonful of jam, chocolate, or any other filling is sufficient. Overfilling can cause the cookies to spread or the filling to overflow, resulting in a mess.
- Experiment with different fillings: While the classic thumbprint filling is often fruit jam, don’t hesitate to get creative. You can try using Nutella, caramel, lemon curd, peanut butter, or a combination of different fillings. Ensure that the fillings you choose have a thick consistency to prevent them from spreading too much during baking.
- Bake in batches: To ensure even baking and consistent results, it’s best to bake the cookie dough in batches. This allows each batch to bake at the right temperature without overcrowding the oven or causing the cookies to bake unevenly.


Frequently asked questions
These thumbprint cookies have a good shelf life as dough and cookies. The dough can stay in the fridge for four days before shaping and baking if wrapped well.
Yes, you can! If you want to save time, you can prepare the dough in advance and store it in the refrigerator for up to three days before baking. When you’re ready to bake, take it out, let it come to room temperature, and proceed with the recipe as instructed.
Absolutely! The beauty of thumbprint cookies is that you can experiment with different flavors. While this recipe suggests using raspberry jam, you can easily swap it with strawberry, apricot, or any other fruit jam you prefer. Get creative and have fun exploring different combinations!
To keep your eggless thumbprint cookies fresh, store them in an airtight container at room temperature for up to five days. If you want to extend their shelf life, you can refrigerate them for up to two weeks or freeze them for up to three months. Just make sure to thaw them before enjoying them.
I have tested and tried these cookies. If you follow the recipe and bake them at the right temperature, they will not spread.
You can, but it is not necessary. If the dough is chilled well, then these will not lose shape.
Eggless Thumbprint Cookies
Imagine sinking your teeth into a soft, buttery cookie with a sweet, jam-filled center. The gentle crunch of the outer crust gives way to a burst of flavor that delights your senses. With just the right balance of ingredients and a hint of creativity, these eggless thumbprint cookies are the epitome of indulgence.
Video
Ingredients
- 1 cup (227 g) Butter
- ½ cup (100 g) Granulated sugar or powdered sugar
- 1 tsp Vanilla extract
- ¼ tsp Salt
- 2 cup (250 g) All purpose flour
- 1 cup Strawberry jam or other fillings of your choice
Method
- Prep: Preheat your oven to 350°F /180°C/Gas Mark 4. Line a baking pan with parchment paper.
- Cream the Butter and Sugar: Cream the softened butter and granulated sugar in a large mixing bowl until the mixture becomes light and fluffy. You can use an electric mixer or a wooden spoon for this step. Mix in the vanilla extract and salt until well incorporated into the butter-sugar mixture.1 cup Butter, ½ cup Granulated sugar, 1 tsp Vanilla extract, ¼ tsp Salt
- Gradually Add Flour: Add the all-purpose flour to the butter mixture, a little at a time, and mix until a crumbly dough forms. You can use your hands or a spatula to help combine the ingredients.2 cup All purpose flour
- Knead the Dough: Turn the dough onto a lightly floured surface and gently knead it until it comes together into a smooth ball. Be careful not to overwork the dough; knead until it's no longer crumbly.
- Shape – Take about a tablespoon of dough and roll it into a smooth ball between your palms. Place the balls onto the prepared baking sheet, leaving enough space between them for spreading.
- Wells – Once all the dough has been shaped, it’s time to make the thumbprint indentation. Gently press your thumb or the back of a spoon into the center of each cookie, creating a small cavity.
- Filling – Fill each cavity with a teaspoon of your chosen jam or preserves. Pro tip – Be creative with your selection – anything from raspberry and apricot to strawberry or even chocolate spread can work beautifully.1 cup Strawberry jam
- Bake – Slide the baking sheet into the preheated oven and let them bake for 10 to 12 minutes until the edges turn lightly golden brown. Pro tip – Keep an eye on them, as the baking time may vary depending on your oven and the thickness of the cookies.
- Cool – Once the cookies are baked to perfection, remove them from the oven and let them cool on the baking sheet for a few minutes. Then, transfer them to a wire rack to cool completely.
Notes
- Chill the dough: After mixing all the ingredients together, it’s crucial to refrigerate the dough for at least 30 minutes. Chilling the dough not only helps it firm up, but it also allows the flavors to meld together, resulting in a more delicious cookie.
- Use the right thumbprint size: When creating the indentations for the filling, make sure to use your thumb or a small spoon to create a well that is just the right size. Too small, and the filling won’t hold its shape; too large, and the cookies might spread too much, losing their distinct thumbprint appearance.
- Don’t overfill the thumbprints: While it may be tempting to go crazy with the filling, be mindful not to overfill the thumbprints. A small spoonful of jam, chocolate, or any other filling of your choice is sufficient. Overfilling can cause the cookies to spread or the filling to overflow, resulting in a mess.
- Experiment with different fillings: While the classic thumbprint filling is often fruit jam, don’t be afraid to get creative. You can try using Nutella, caramel, lemon curd, peanut butter, or even a combination of different fillings. Just ensure that the fillings you choose have a thick consistency to prevent them from spreading too much during baking.
- Bake in batches: To ensure even baking and consistent results, it’s best to bake the cookie dough in batches. This allows each batch to bake at the right temperature without overcrowding the oven or causing the cookies to bake unevenly.
Equipment you will need


Nutrition
Tried this recipe?
Mention @veenaazmanov_kitchen or tag #veenaazmanovkitchen!


Don’t lose this recipe! Save it for Later!
📌 Save this Recipe for later on Pinterest so you can easily find it again.
⭐ Add Veena Azmanov Kitchen to your Google Preferred Sources.
It helps Google show you more of our recipes.
📧 Subscribe for new recipes delivered to your inbox.
🎥 Follow us for more recipes


how much is the cornflour in gram? please help thanks.
1 cup cornflour is about 125 grams so 1/4 cup should be 31 grams. Thanks
Love the cookies, have you done a video yet?
I made these cookies and they were perfect. Loved the shortbread cookie base for these. Thanks for the recipe
Thank you so much Batya. So happy to hear you enjoyed the cookies.
I love shortbread cookies so I know my kids will love these. I have to try them this weekend. Thank you for sharing your best recipes. They always work!!
Thank you so much ! So happy to hear you like my recipes. All my recipes are tested and tried so they should work. Thanks