Homemade Pie Crust Recipe: (Pâte Brisée)
 Prep Time 20 minutes Cook Time 30 minutes Total Time 1 hour 30 minutes


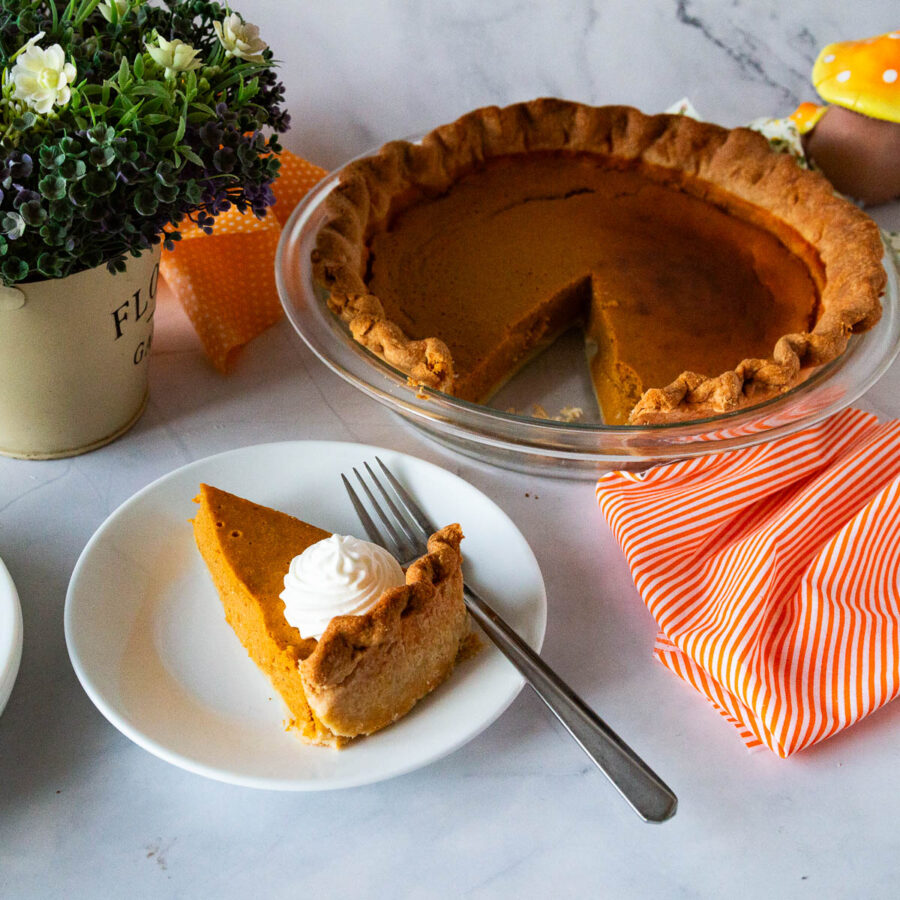
Is there anything better than a flaky, buttery homemade pie crust? This is my no-fail Pâte brisée recipe that always turns out flaky every single time. The recipe is surprisingly simple and easy to make, too.

Pie crust sounds intimidating, and yet it is really not difficult to make. We always have flour, butter, salt, and water at home. Don’t we? Yet, most people will take the trouble to go out and buy store-bought pie crust instead of just making it themselves. And, it’s often just because we perceive it as being difficult to make.
A small word of advice, try making it at least once, and you will be pleasantly surprised how easy and doable this is.
Why make homemade pie crust?
- Homemade pie crust really takes only 5 minutes in a food processor or 10 minutes by hand.
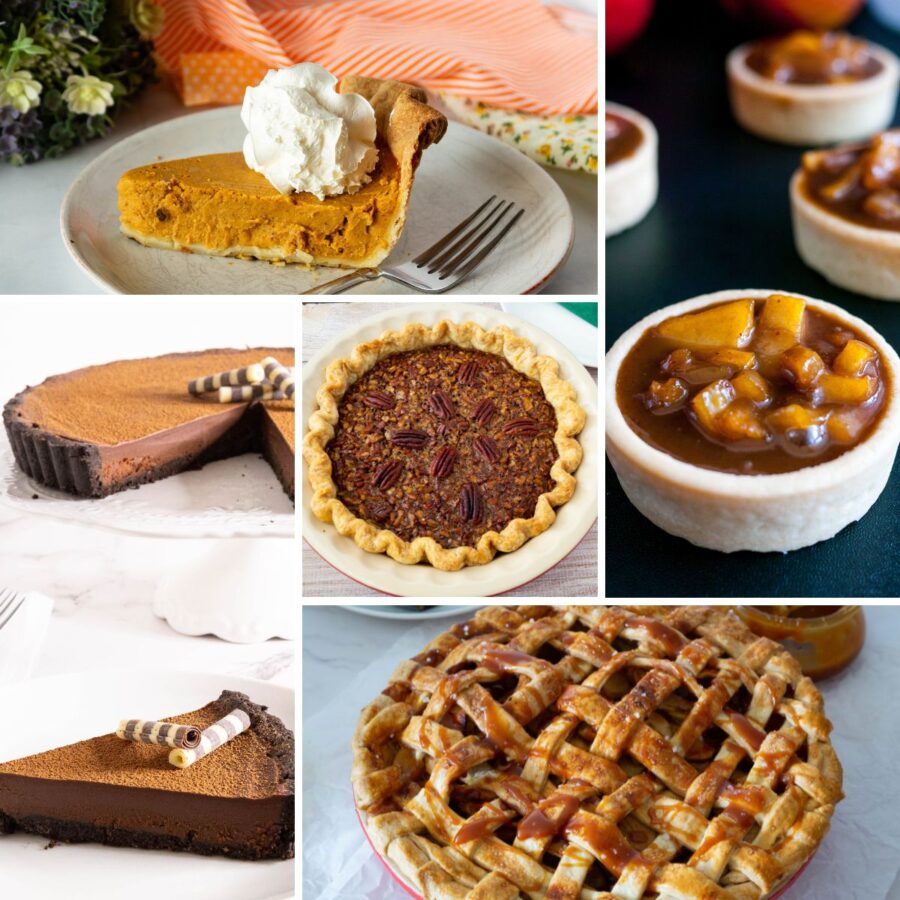
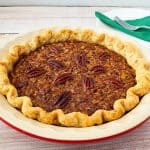
- You can also use this crust to make both sweet and savory pies, like pecan pie or mushroom quiche.
- Also, you need only four ingredients, and they are all pantry staples, so you can make this any time you want.
- You don’t need any special skills to make a pie crust. This is one recipe where you get rewarded for being imperfect. The less you work with the dough, the more flaky it will be.

Ingredients and substitutes
- Butter – I like using all butter for that superior butter flavor, but you can also use half vegetable shortening. My mom used half high-fat vegetable shortening. Make sure to chill the shortening for at least an hour before you use it.
- Flour – Use a good, unbleached all-purpose flour. Do not use self-rising or bread flour. We want a flaky pie crust that does not rise or become chewy.
- Salt – Don’t forget to add salt to your pie crust; it does bring out the flavor. My mom would add a teaspoon of sugar to her pie crust, too. We loved her pies and quiches.
- Water – You want chilled water from the fridge. You can add ice to your water to chill it. Do not add ice directly to the dough since it will make the dough soggy. Also, do not use milk as the milk solids will burn and give a very dark crust.

Step-by-step: Homemade Pie Crusts Recipe
Pie dough
- Food processor – In a food processor, add the flour, salt, chilled cubed butter (and vegetable shortening). Pulse for 30 seconds until it resembles coarse bread crumb consistency.
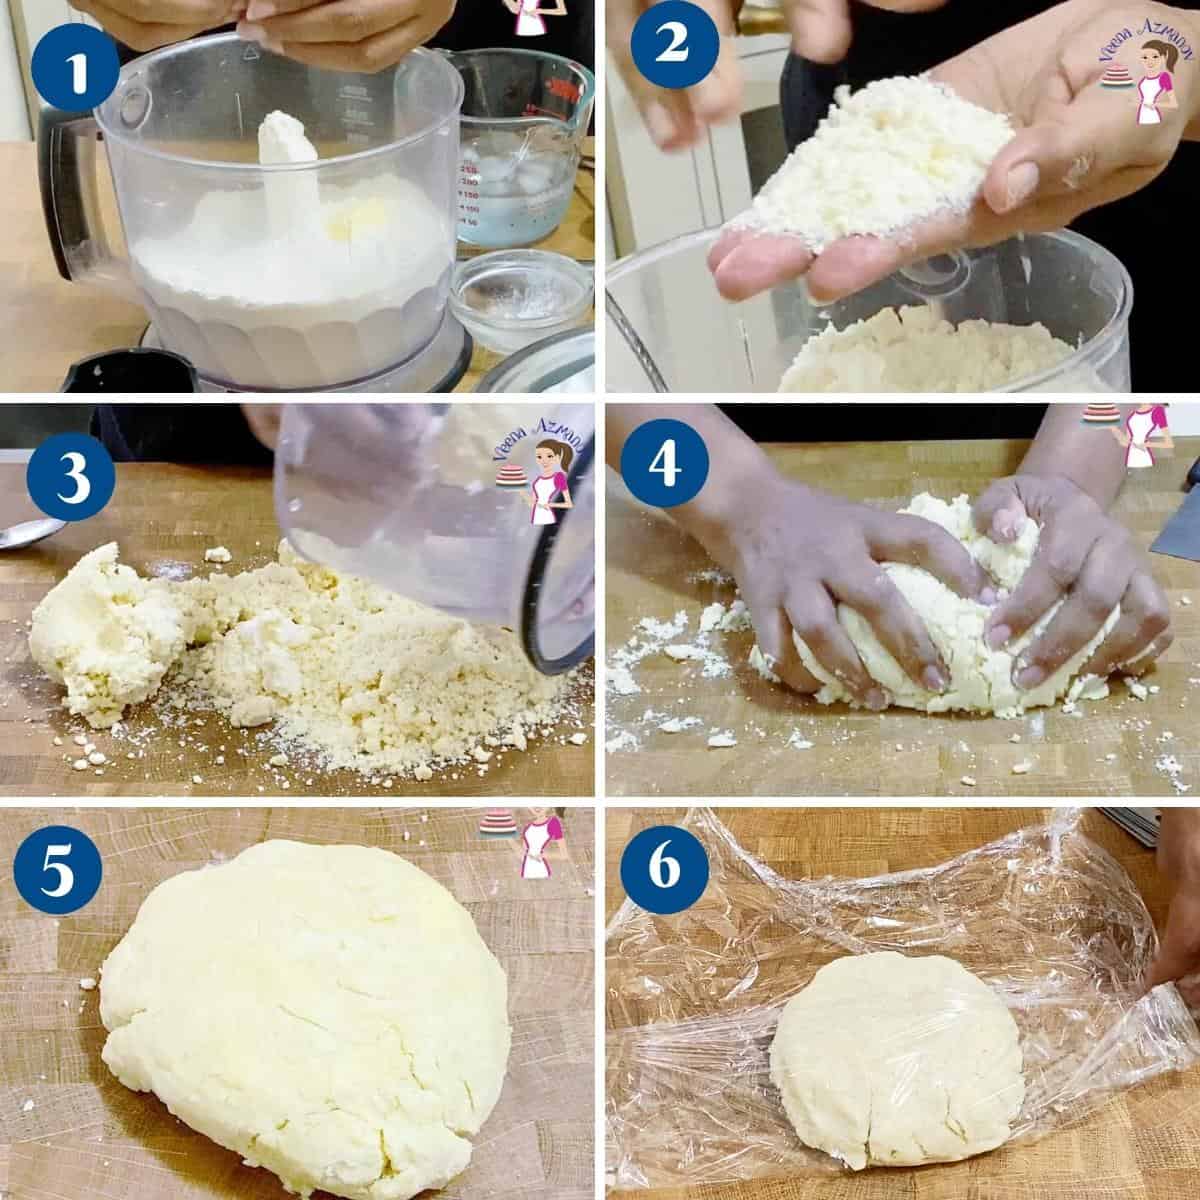
- Pastry blender – You can also do this in a bowl using a pastry blender or fork (I prefer my fingertips) to cut the butter (and vegetable shortening) into the flour. It should look like a crumbly flour-butter mixture.
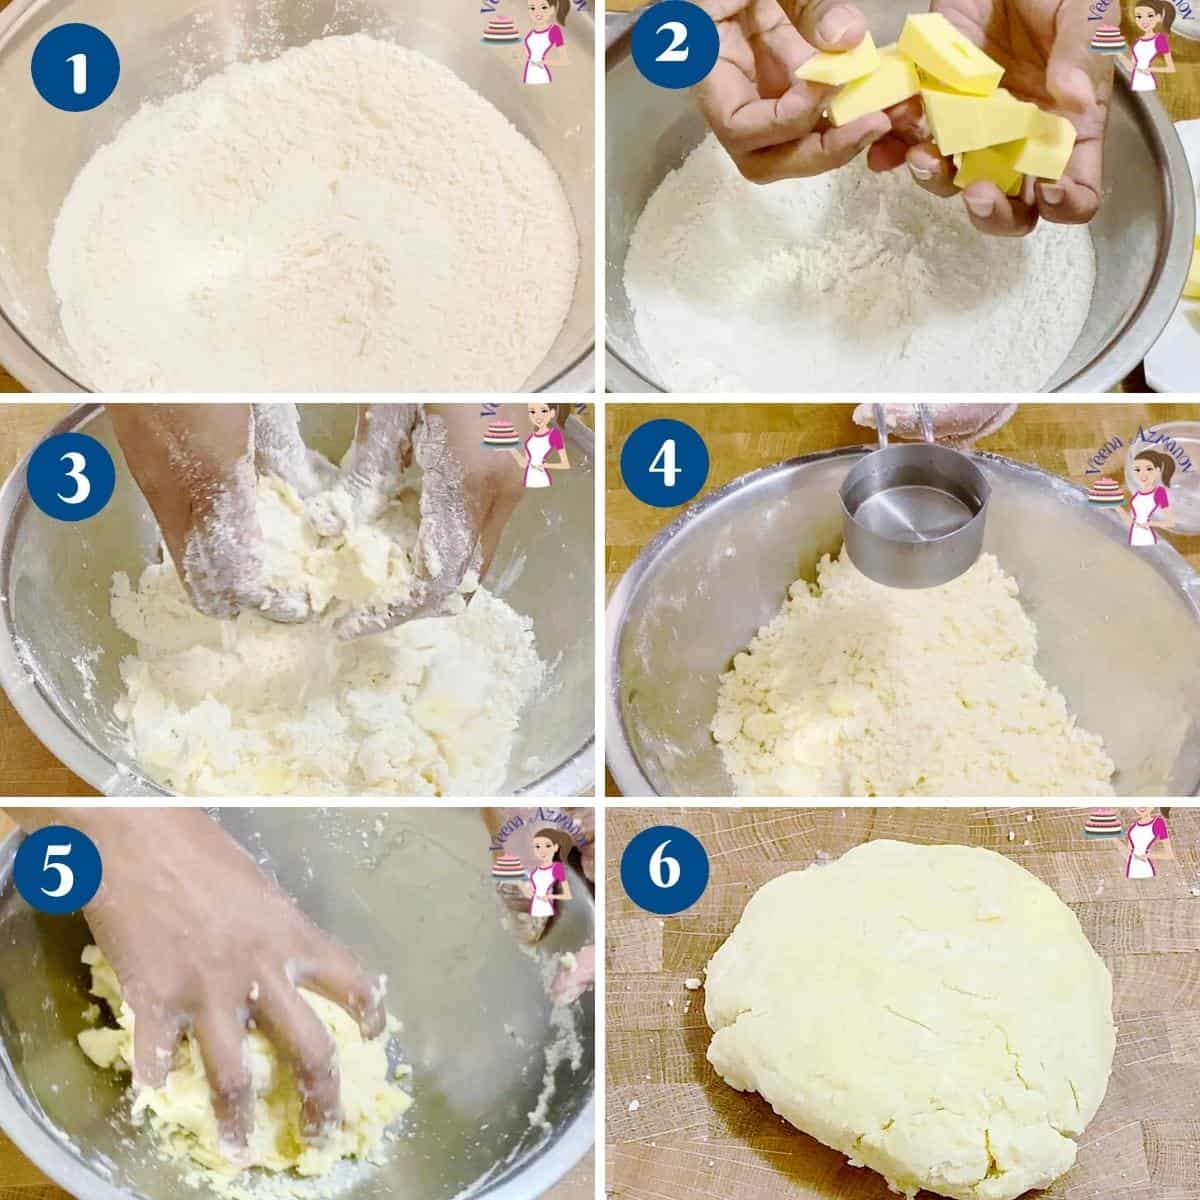
- Add the chilled water, a little at a time, and combine for 30 seconds more.
Pro tip – The mixture will still be crumbly, but when squished with your fingers, it will shape into a dough. So, don’t overmix or pulse too much. - Pour the mixture onto a work surface. Bring all the crumbs together and shape them into a ball. Then, flatten into a disc. Wrap in plastic wrap and chill for 20 to 30 minutes or until firm enough to roll.
Pro tip – If you flatten it into a larger disc, it will chill faster, and you will have to wait for much less time.
Roll crust
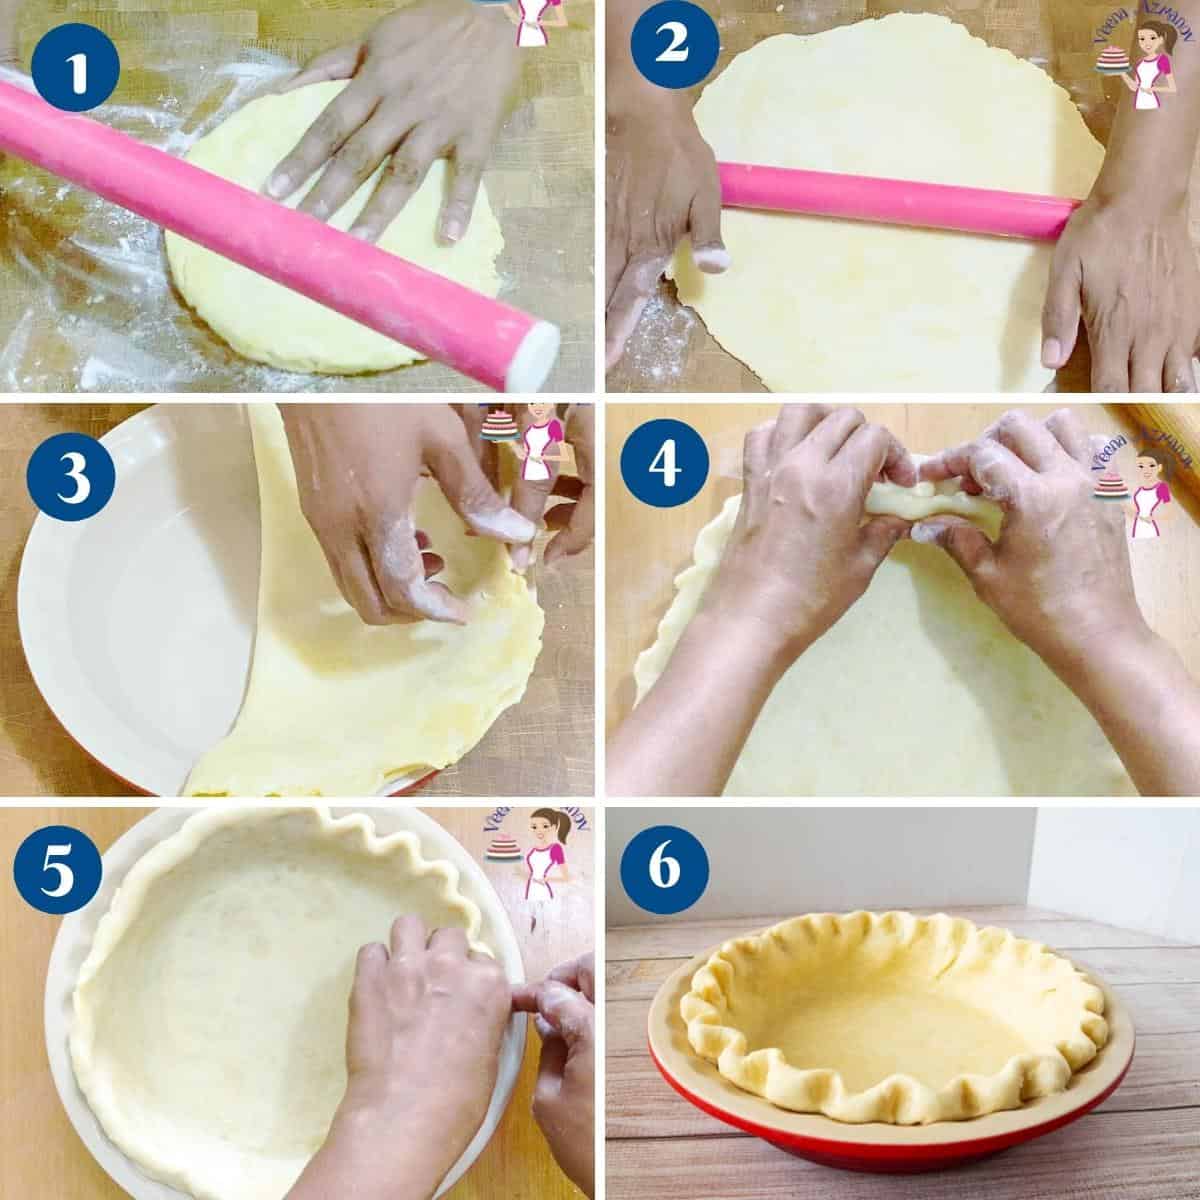
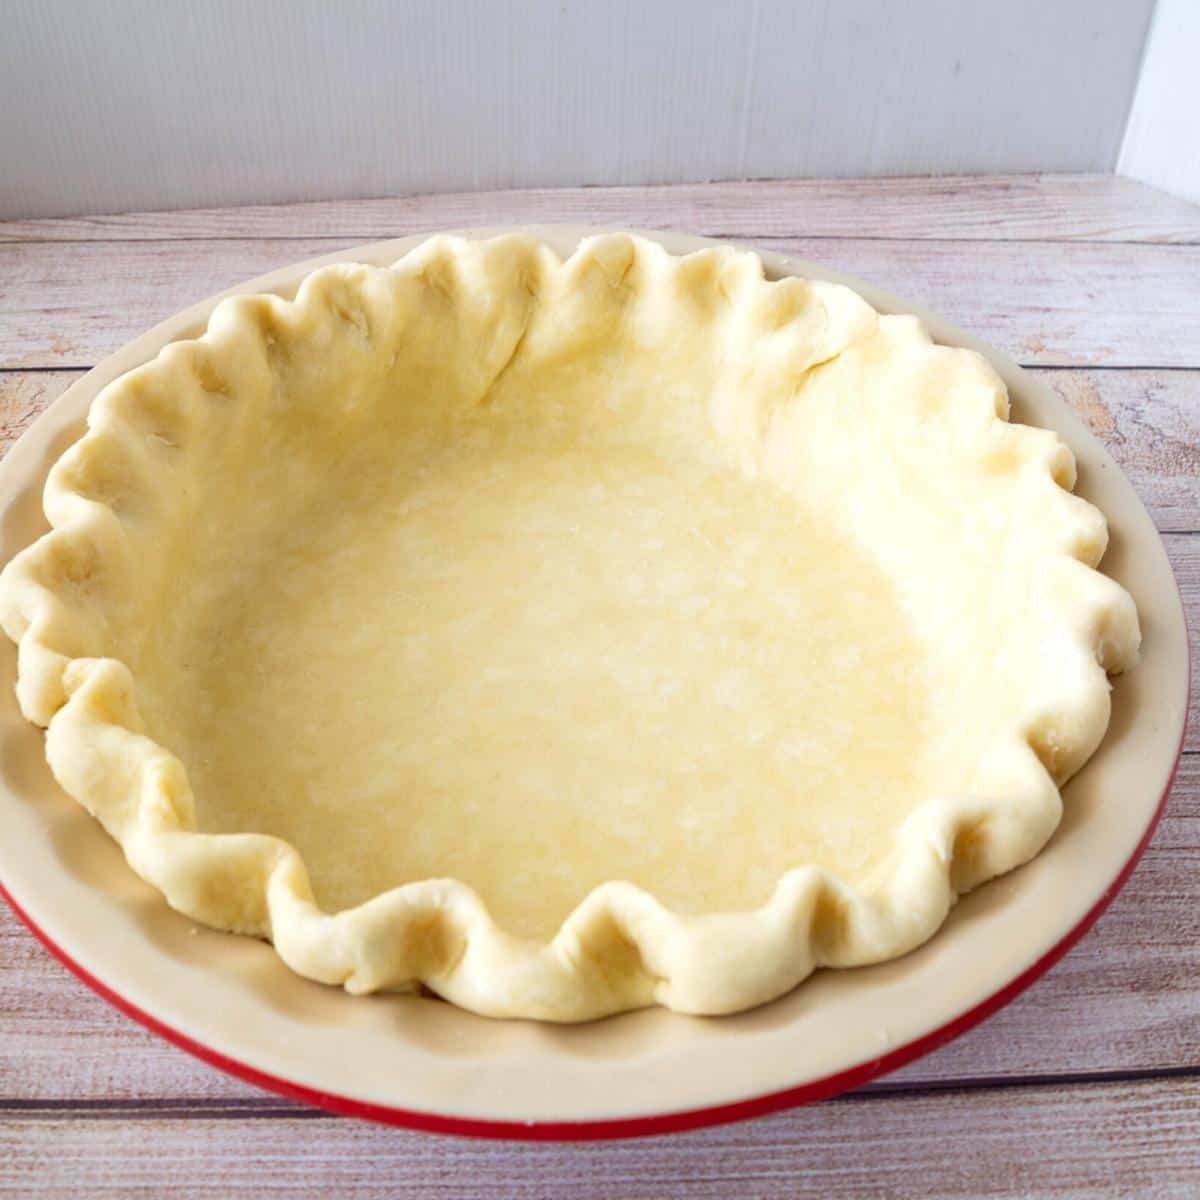
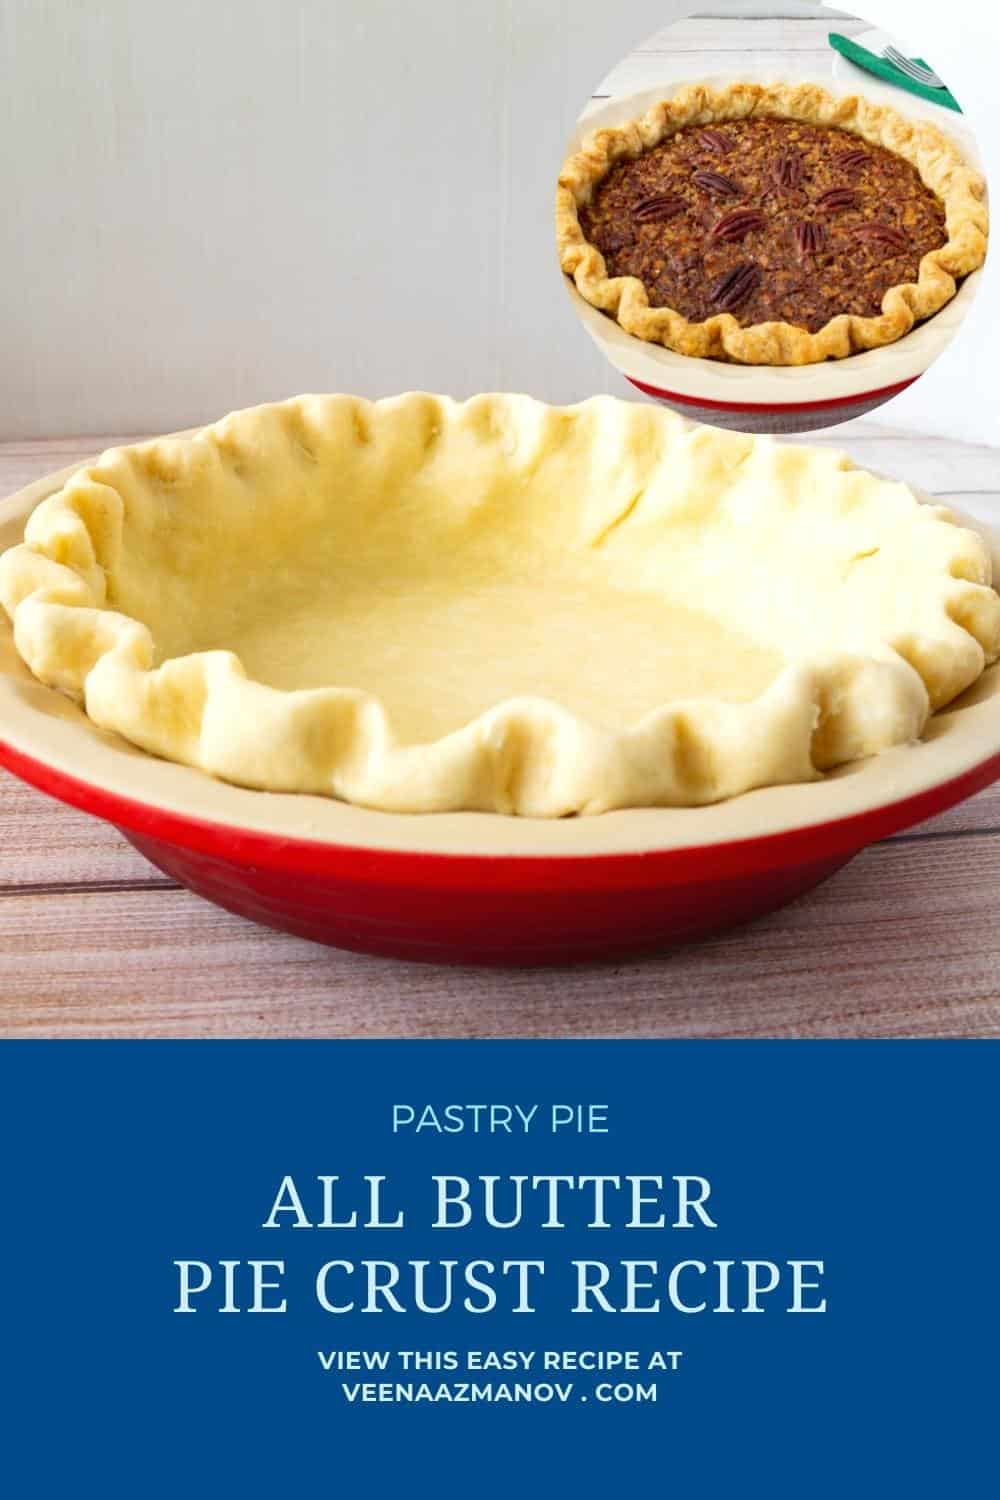
- Dust the work surface with flour. Open the larger disc for the bottom and roll carefully. Use your 9-inch pie pan as a guide to see how big you need it.
Pro tip – If you find the crust is breaking around the edges too much, it means that it is too hard to roll. Leave it to rest on the counter for just 7 to 10 minutes. Then, roll again, pressing the broken edges together with your fingertips. - To transfer the dough to the pan without breaking, fold the pastry in half, then into quarters. Then, place it on the pie pan and unfold.
Pro tip – Alternatively, you can roll the dough onto your rolling pin and unroll it over the pie pan (folding in quarters is easier for newbies). - Gently fit it to the pie pan, especially in the bottom edges, with light hands. Cut the excess from the edges, leaving a 1/2 inch for crimping.
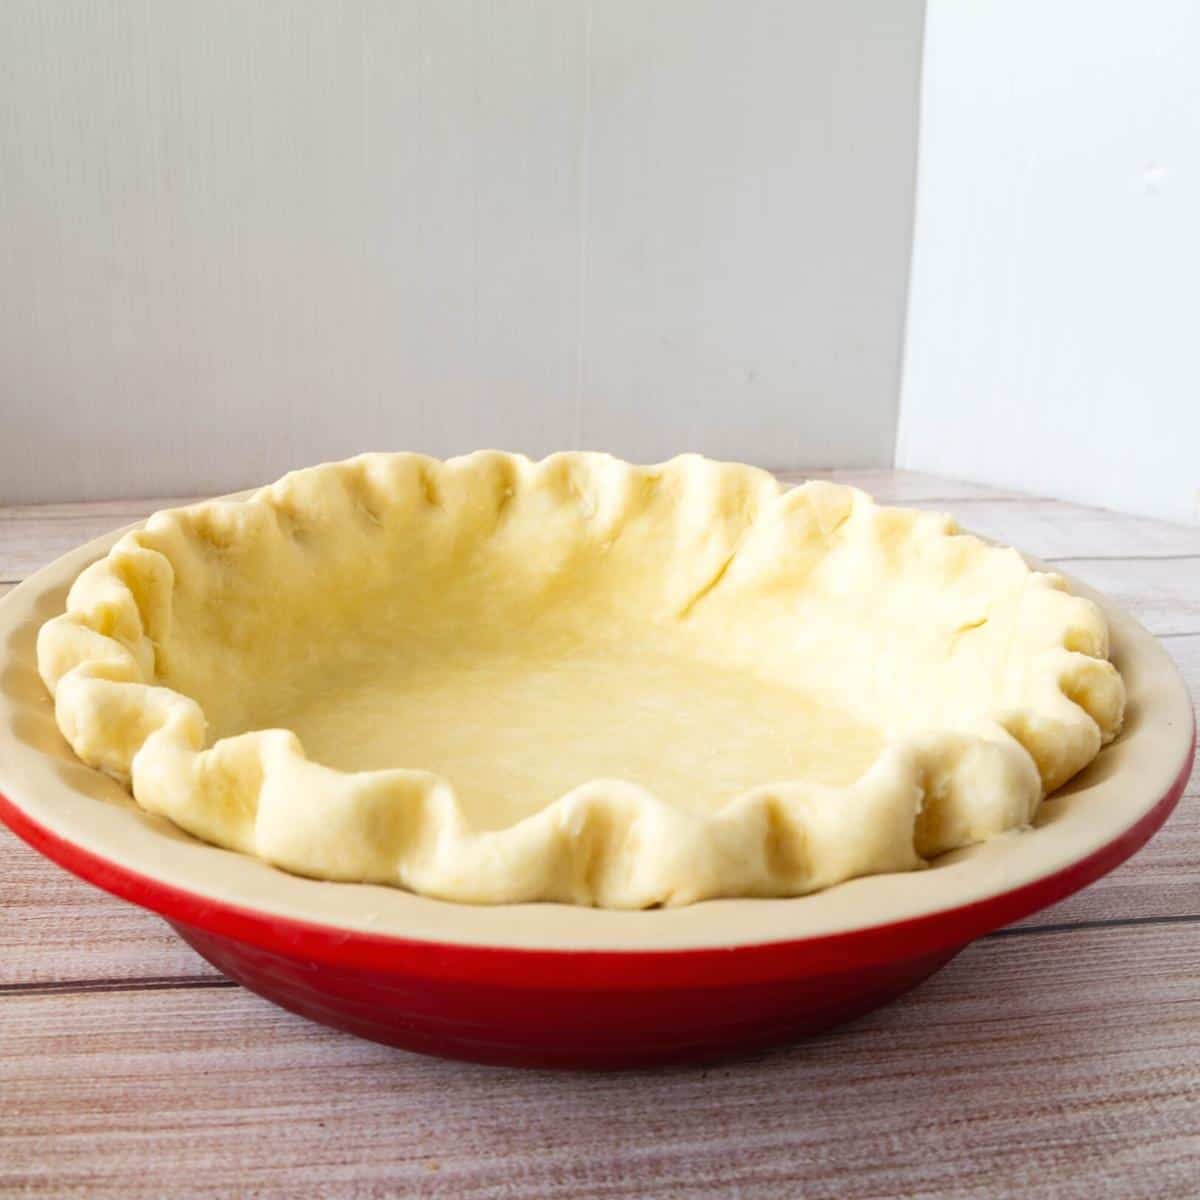
Pro tip – You need about an inch more than the edge of your pie pan so you can trim the excess dough. - Fold the excess under so you have a pretty round edge. Crimp the edge by forming a V shape with your thumb and index finger.
- Chill the crust in the fridge for 15 minutes up to 48 hours. Dock the pastry with a fork to prevent it from puffing during baking.
Pro tip – If you are leaving the dough for a long time, make sure to wrap it in plastic so it does not dry out.

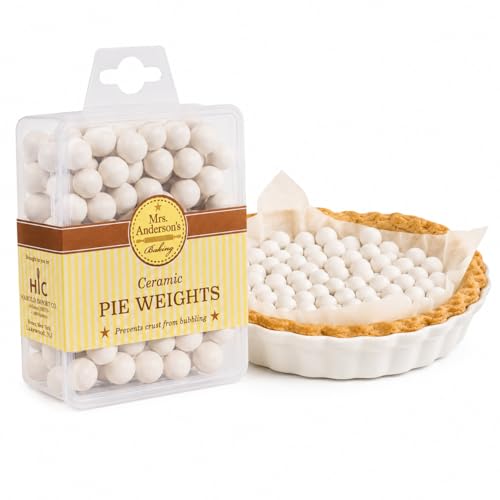
How do you blind bake or partially bake a pie crust?
- Preheat the oven at 400°F / 200°C / Gas Mark 5
- Line the pie with parchment paper, then fill the center with pie weights or baking beans. Bake for 15 minutes – then remove the pie weights and parchment paper.
Pro tip – Baking beans are any uncooked beans that can be used over and over again to blind bake pie and shortcrust pastry. - Add the filling and continue baking until the filling is cooked.
Pro tip – If the pie edges get too dark, tent the edges with foil or a pie shield.

How to fully bake a pie crust?
- Preheat the oven at 400°F / 200°C / Gas Mark 5
- Line the pie with parchment paper, then fill the center with pie weights or baking beans. Bake for 15 minutes. Then, remove the pie weights and parchment paper and continue to bake until the center is cooked and lightly golden.
Pro tip – If the pie edges get too dark, tent the edges with foil or a pie shield.
How to make the perfect crimp for your pie crust?
- Use the edge of your pan to help support the crimp. Cut the excess pastry so that when you fold it, it sits on top of that edge.
- So once you crimp it, it stays on that edge all through baking.
- As a result, when baked, you get a perfect crimp.

7 Tips for success
The secret to making a perfect crust is not only in the recipe but in the method of making it.
- Fat – you will see a big difference in the quality of your crust based on the fat you use. If you ask my mom, it can’t be all butter. It had to be mostly full-fat GHEE (Shortening) and some butter for flavor. The higher the ratio your fat is, the better the crust.
My grandmother would use 100% lard (animal fat). For her, making a crust with butter is a No-No! And yet, she lived healthily until 89.
I, on the other hand, never use lard for making my pie crust. I use butter or sometimes half butter and half veg shortening. I’d be lucky if I live to her age..! - The amount of water in your pie dough plays a very important role in the final texture. Too much water will make your crust very tough. And too little will make it very crumbly. Crumbly is good, and yet you still want to be able to hold a slice of pie.
- Avoid the fat/butter from melting into your flour. I usually place my bowl with the flour and chilled butter into the fridge for at least half an hour before I start to work it into the dough. Those of you living in a hot and humid climate can avoid touching the dough too much with your hands by rolling the pastry between two parchment papers.
- Also, use chilled iced water to maintain the temperature of the dough.
- Cool the pie crust for at least half-hour before you bake. This will prevent the sides from shrinking.
- Let the pre-baked crust cool for 15 minutes before you add in the filling. This will prevent the liquid from being absorbed into the crust. And if your filling is very liquidy, brush the pastry with egg white, before adding the filling. This creates a seal between the filling and crust.
- The secret to the perfect crimp
- Use the edge of your pan to help support the crimp. Cut the excess pastry such that when you fold it sits on top of that edge.
- So, once you crimp it, stays on that edge all through baking.
- As a result, when baked you get a perfect crimp.
Troubleshooting
- Pie dough is too soft – a dough must be chilled for the butter to solidify, so it is easy to roll; otherwise, the soft butter makes a sticky dough, which is not easy to roll.
- Pie dough is too hard – when chilled for too long, the butter in the dough will solidify, making it difficult to roll. Let the dough rest for 7 to 10 minutes on the counter, then try again.
- Soggy pie crust – Sometimes, when the pie filling is too liquid, it can soak into the bottom crust, making it soggy. One way to avoid it is to brush the bottom of the pre-baked pie crust with egg whites. This essentially creates a seal between the crust and the filling.
Frequently asked questions
The pie crust dough will keep in the fridge for up to 3 days and can be frozen for up to 3 months. A fully baked pie crust will keep at room temperature for up to 3 days or in the fridge for up to a week. It can even be frozen for up to a month.
A pre-baked pie crust needs to be baked for 15 to 20 minutes with pie weight (baking beans), then without any weight until cooked through.
You can use coconut oil or ghee for the pie dough instead of butter. These will need to be solidified in the fridge before you cut them into the flour, just like butter. I prefer the combination of half coconut oil and half butter.
A good guide to use is a 3:2:1 part ratio, which means three parts of flour to 2 parts of fat to 1 part of water. With that basic formula, you can make a couple of pies at the same time. It has helped me many times because I sometimes bake six pies all at once.
Flaky Buttery Homemade Pie Crust (Pâte Brisée)
Is there anything better than a flaky, buttery homemade pie crust? This is my no-fail Pâte brisée recipe that turns out flaky every single time. The recipe is surprisingly simple and easy to make, too.
Video
Ingredients
- 1 ½ cup (190 g) All-purpose flour
- 4 oz (113 g) Unsalted butter (1 stick, 1/2 cup) chilled, cubed
- ½ tsp Salt
- 4 tbsp (60 ml) Chilled water
- 1½ cup (190 g) All-purpose flour
- 2 oz (60 g) Unsalted Butter chilled, cubed
- 2 oz (60 g) Vegetable shortening (or ghee) chilled,
- ½ tsp Salt
- 4 tbsp (60 ml) Water
Method
- Food Processor – In a food processor, add the flour, salt, chilled cubed butter (and vegetable shortening). Pulse for 30 seconds until it resembles coarse bread crumb consistency. Pastry blender – You can also do this in a bowl using a pastry blender or fork (I prefer my fingertips) to cut the butter (and vegetable shortening) into the flour. It should look like a crumbly flour-butter mixture.1 ½ cup All-purpose flour, 4 oz Unsalted butter , ½ tsp Salt
- Add the chilled water a little at a time and combine for 30 seconds more.4 tbsp Chilled water
- Pour the mixture onto a work surface. Bring all the crumbs together and shape them into a ball. Then flatten into a disc. Wrap in plastic wrap and chill for 20 to 30 minutes or until firm enough to roll.
- Dust the work surface with flour and roll carefully. Use your 9-inch pie pan as a guide to see how big you need it.
- To transfer the dough to the pan without breaking, fold the pastry in half, then into quarters. Then, place it on the pie pan and unfold.
- Gently fit it to the pie pan with light hands, especially in the bottom edges. Cut the excess from the edges, leaving a 1/2 inch for crimping.
- Fold the excess under so you have a pretty round edge. Crimp the edge by forming a V shape with your thumb and index finger.
- Chill the crust in the fridge for 15 minutes up to 48 hours. Dock the pastry with a fork to prevent it from puffing during baking.
- Preheat the oven at 400°F/200°C/ Gas Mark 5
- Line the pie with parchment paper, then fill the center with pie weights or baking beans. Bake for 15 minutes – then remove the pie weights and parchment paper.
- Add the filling and continue baking until the filling is cooked.
- Preheat the oven at 400°F/200°C/ Gas Mark 5
- Line the pie with parchment paper, then fill the center with pie weights or baking beans. Bake for 15 minutes – then remove the pie weights and parchment paper and continue to bake until the center is cooked and lightly golden.
Notes
- Fat – you will see a big difference in the quality of your crust based on the fat you use. If you ask my mom, it can’t be all butter. It had to be mostly full-fat GHEE (Shortening) and some butter for flavor. The higher the fat content, the better the crust.
My grandmother would use 100% lard (animal fat). For her, making a crust with butter is a No-No! And yet, she lived healthily until 89.
I, on the other hand, never use lard for making my pie crust. I use butter or sometimes half butter and half veg shortening. I’d be lucky if I live to her age..! - The amount of water in your pie dough plays a very important role in the final texture. Too much water will make your crust very tough. And too little will make it very crumbly. Crumbly is good, and yet you still want to be able to hold a slice of pie.
- Avoid the fat/butter from melting into your flour. I usually place my bowl with the flour and chilled butter into the fridge for at least half an hour before I start to work it into the dough. Those of you living in a hot and humid climate can avoid touching the dough too much with your hands by rolling the pastry between two parchment papers.
- Also, use chilled iced water to maintain the temperature of the dough.
- Cool the pie crust for at least half-hour before you bake. This will prevent the sides from shrinking.
- Let the pre-baked crust cool for 15 minutes before you add in the filling. This will prevent the liquid from being absorbed into the crust. And if your filling is very liquidy, brush the pastry with egg white, before adding the filling. This creates a seal between the filling and crust.
- The secret to the perfect crimp
- Use the edge of your pan to help support the crimp. Cut the excess pastry such that when you fold it sits on top of that edge.
- So, once you crimp it, it stays on that edge all through baking.
- As a result, when baked, you get a perfect crimp.
Equipment you will need


Nutrition
Tried this recipe?
Mention @veenaazmanov_kitchen or tag #veenaazmanovkitchen!


Don’t lose this recipe! Save it for Later!
📌 Save this Recipe for later on Pinterest so you can easily find it again.
⭐ Add Veena Azmanov Kitchen to your Google Preferred Sources.
It helps Google show you more of our recipes.
📧 Subscribe for new recipes delivered to your inbox.
🎥 Follow us for more recipes


“Pastry Class Day 8 DONE!”
Pastry Day 7- The Pie Crust- Done
Pastry Day 7 DONE
pastry day 7 done.
Pastry Day 7 DONE
Pastry Day 7 DONE. Thank you.
pastry Day 7 done