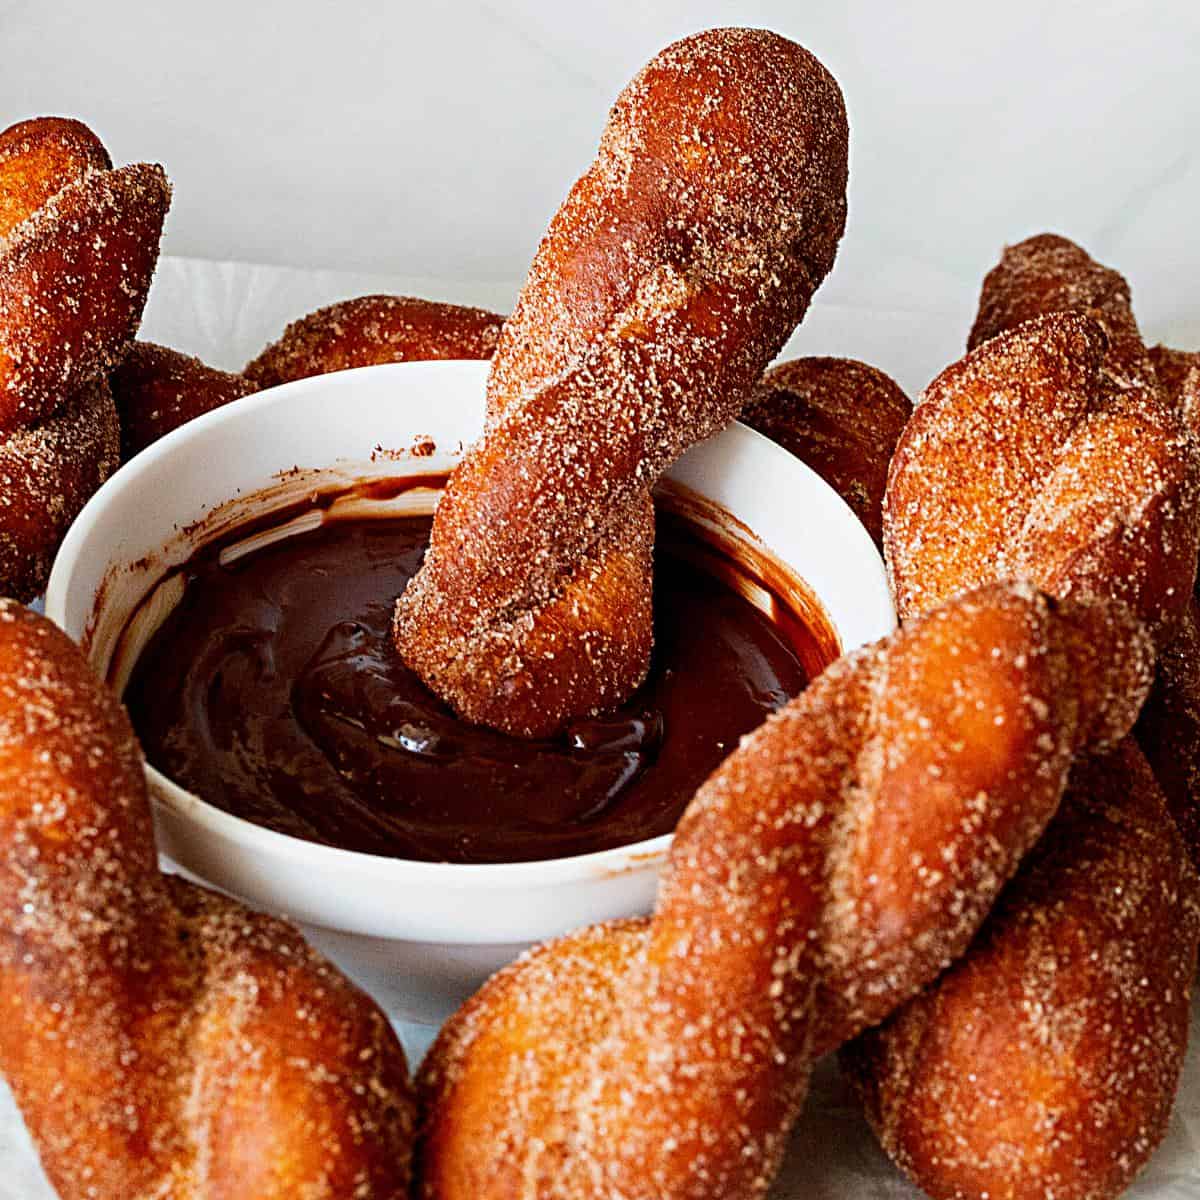
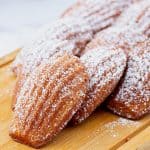
Twisted Doughnuts


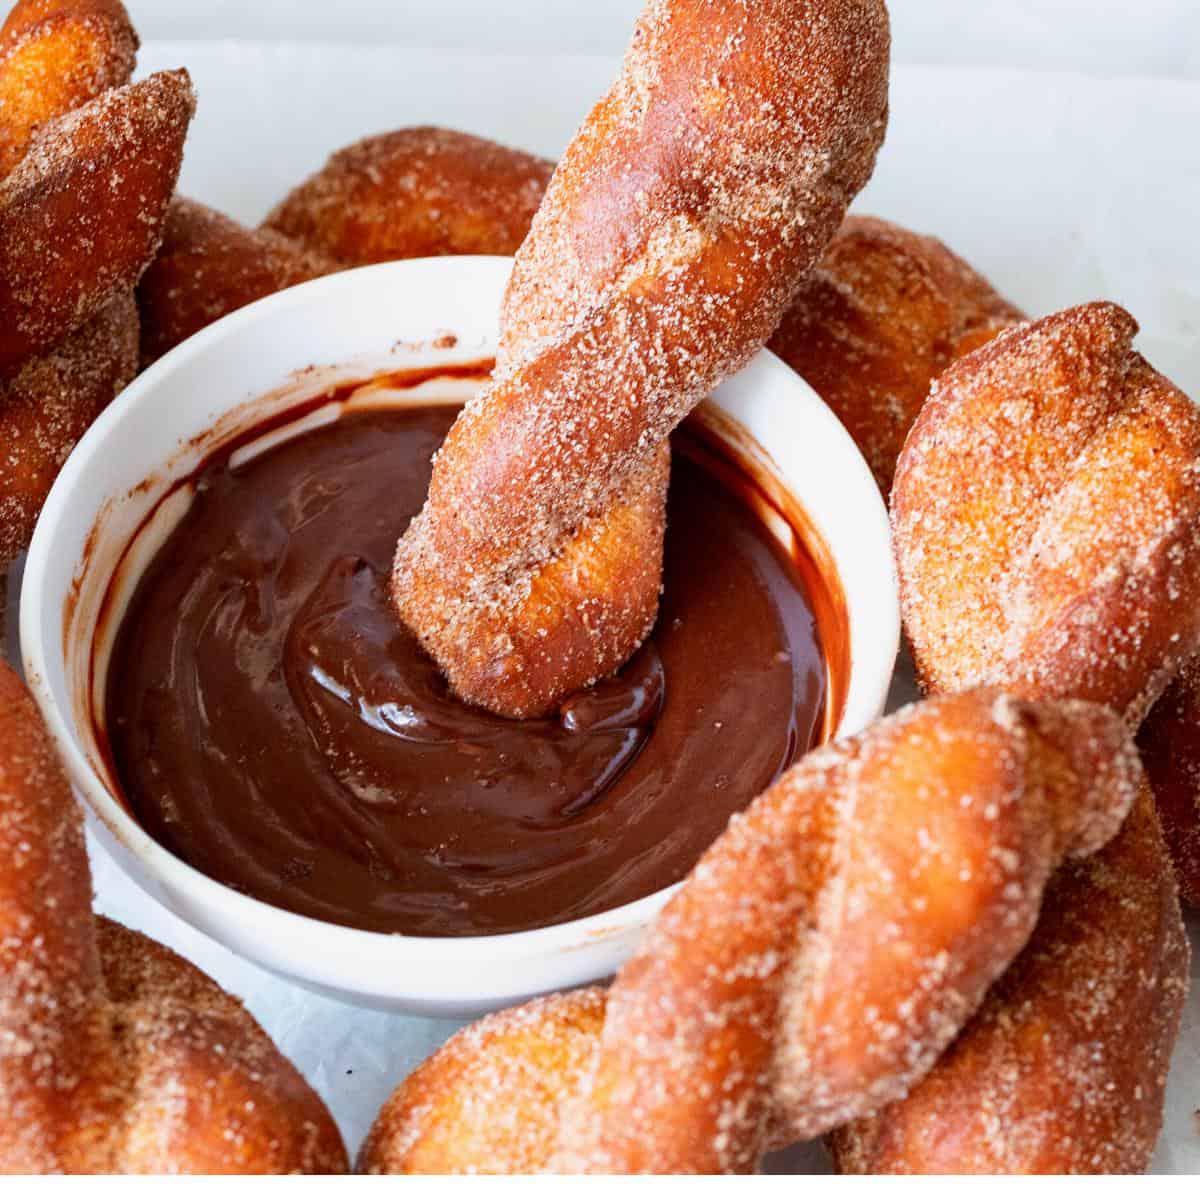
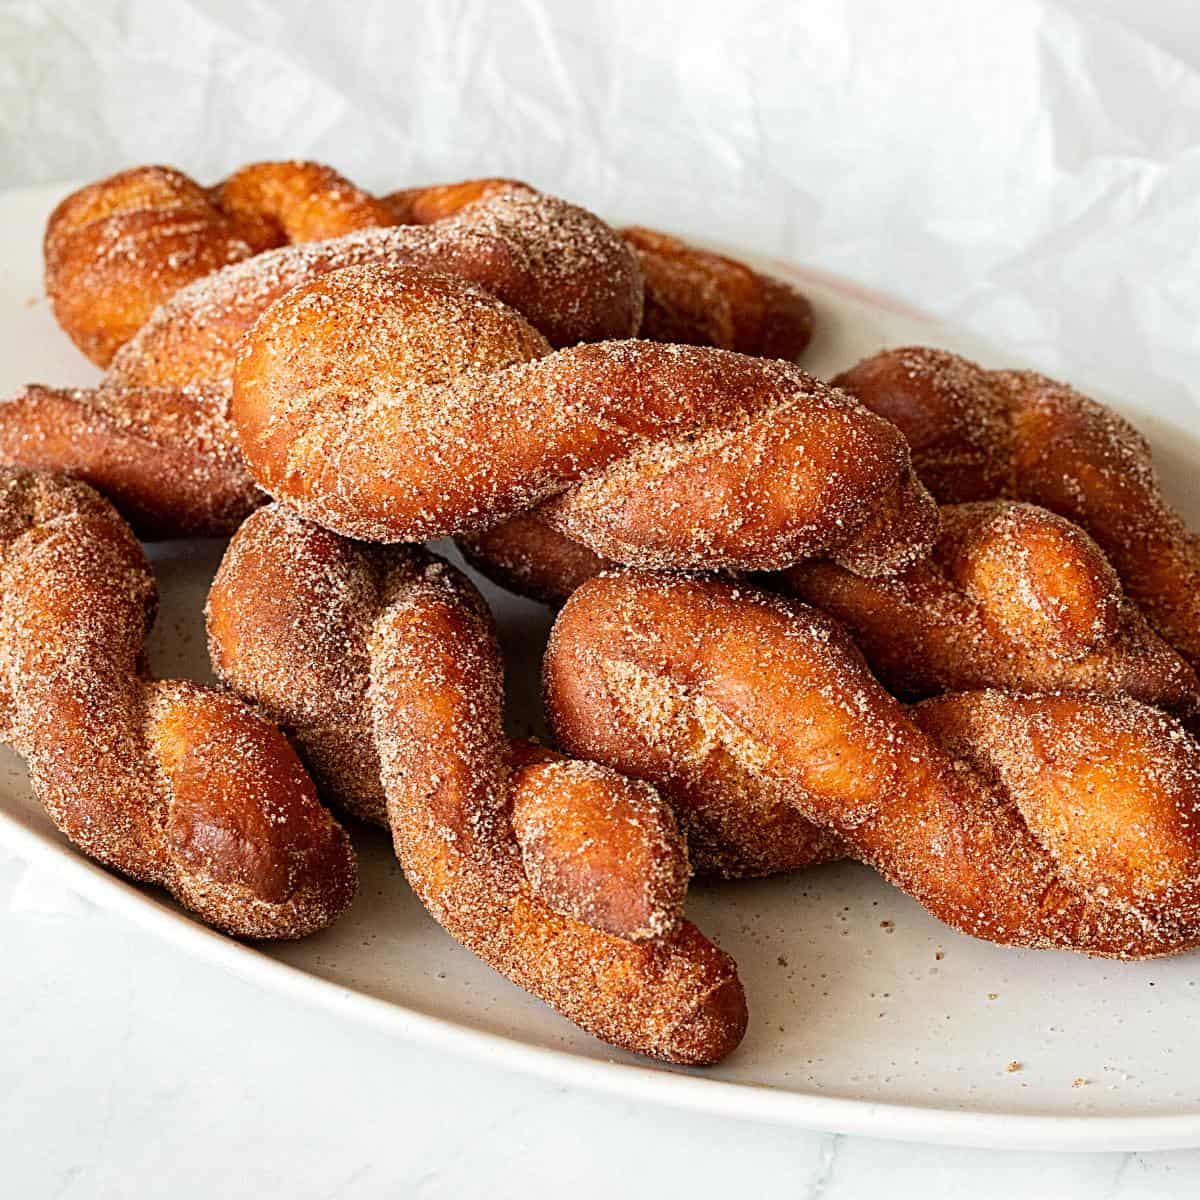
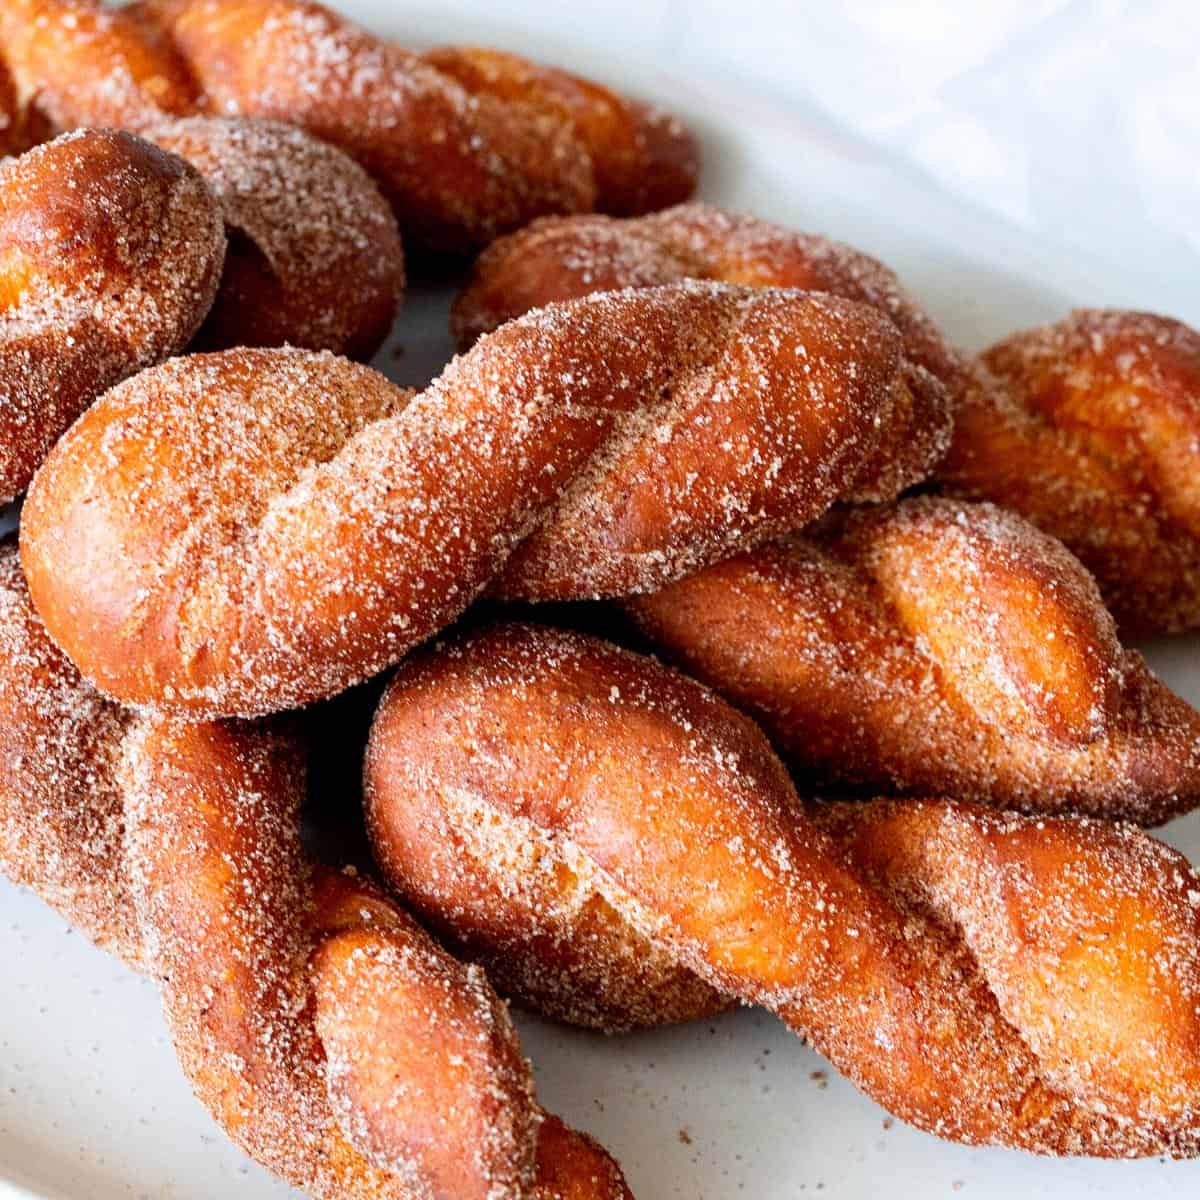
These homemade twisted doughnuts are an upgrade from the ones found in cardboard boxes. They are twisted, yeasty, and raised. Served with chocolate sauce, these are soft, light, and airy.
I vividly remember the first time I tried twisted doughnuts in a Korean restaurant. The moment I took a bite, the combination of the warm, fluffy interior and the crisp, golden exterior coated in sugar and cinnamon was delightful.
Twisted doughnuts, often called “twist doughnuts” or “twisties,” have their origins in various cultures, each adding its own twist to the beloved treat. One of the best-known versions is the Korean “kkwabaegi,” a popular street food snack known for its distinctive twisted shape and sweet, chewy texture. Kkwabaegi is typically coated in sugar and cinnamon, making it a favorite among both children and adults.
The concept of twisted doughnuts is also found in other parts of the world. For example, in Italy, there are “zeppole” or “frittelle,” which are sometimes twisted and served during festivals and holidays. In the United States, twisted doughnuts are often seen in bakeries and doughnut shops, particularly in regions with a strong Eastern European or Mediterranean influence.
Why make these doughnuts?
- Perfect Texture: The dough is kneaded to achieve a smooth and elastic consistency, resulting in a light and fluffy doughnut with a slightly crisp exterior.
- Rich Flavor: The combination of warm milk, butter, and vanilla extract adds a rich and comforting flavor to the dough, making each bite a delightful experience.
- Easy to Follow: The step-by-step instructions are clear and straightforward, ensuring even novice bakers can successfully make delicious twisted doughnuts.
- Customizable Coating: The cinnamon sugar coating is optional, allowing you to customize the doughnuts to your taste. You can also try other coatings like powdered sugar, chocolate glaze, or a simple vanilla glaze.
Ingredients and substitutes
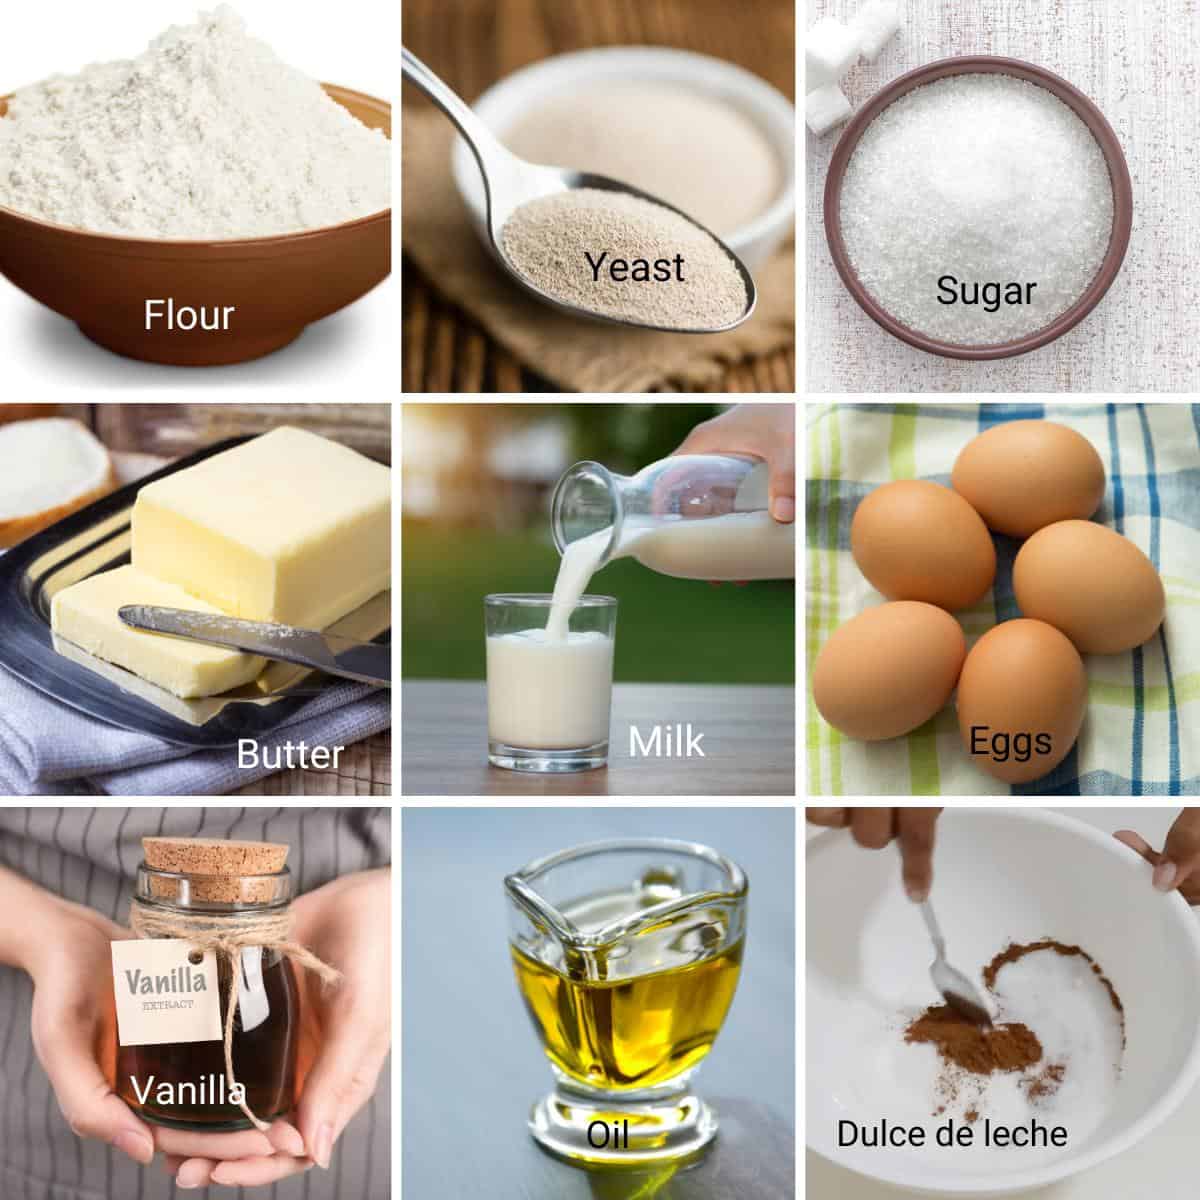
- Flour – Bread flour makes light and airy donuts with a soft and chewy texture. Of course, you can use all-purpose flour, but, if possible, at least use 50% bread and 50% all-purpose. You can experiment with alternative flours, but the texture and flavor will change. Whole wheat flour will make the doughnuts denser, and gluten-free flour may require additional binders like xanthan gum to mimic the elasticity of gluten.
- Yeast – I am using active dry yeast, but you can also use the same amount of instant dry yeast. Alternatively, you can also use 21 grams of fresh baker’s yeast.
- Sugar – This is a sweet dough, so I’ve used sugar, but you can also use honey.
- Milk – Makes a rich dough and gives the donuts a deep golden color when deep-frying. And if you like light-colored, deep-fried donuts, use water instead of milk.
- Eggs – Add stability to the dough and make it easy to work with. And if you want to make these eggless, use ½ cup of milk instead of eggs.
- Oil – I use canola oil. It has a neutral flavor and a high smoke point. Also, it works best when deep-frying bread and sweet treats like churros and doughnuts.
Step-by-step: Twisted donuts recipe
Dough
- Dry ingredients – In a bowl, combine flour, salt, and grated nutmeg.
- Yeast – In a bowl of a stand mixer, with the dough hook attachment, combine warm milk, sugar, yeast, egg, and vanilla.
- Knead – Add the flour mixture to the yeast mixture and combine on medium-high speed until all the flour is well incorporated, making sure to scrape the bottom and sides of the bowl. Then, knead for 8 to 10 minutes on medium speed.
Pro tip – Avoid adding too much flour when kneading. We want a soft, elastic, slightly sticky dough to make soft and fluffy donuts.
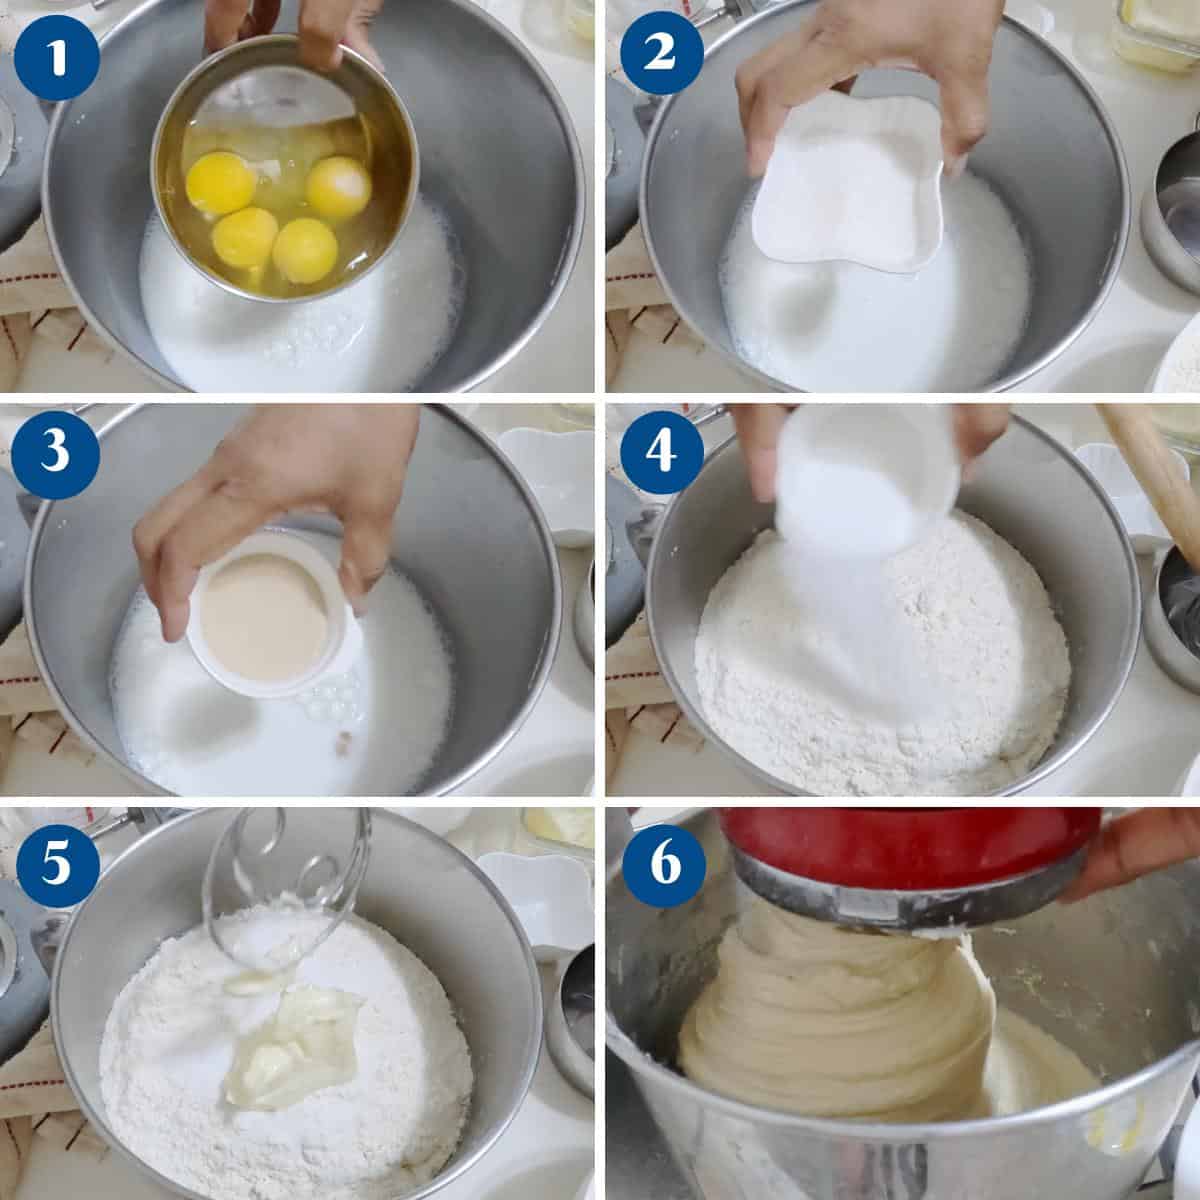
- Butter – Next, add the butter and continue to knead for 8 to 10 minutes more or until you have a smooth, elastic dough.
Pro tip – If kneading by hand, the dough will take about 15 to 20 minutes to become soft, smooth, and elastic. You may need about 1/2 cup of flour for dusting your work surface. - Bowl – Place the dough in a large greased bowl, cover it with plastic wrap, and let it rise for 60 to 90 minutes or until doubled in volume.
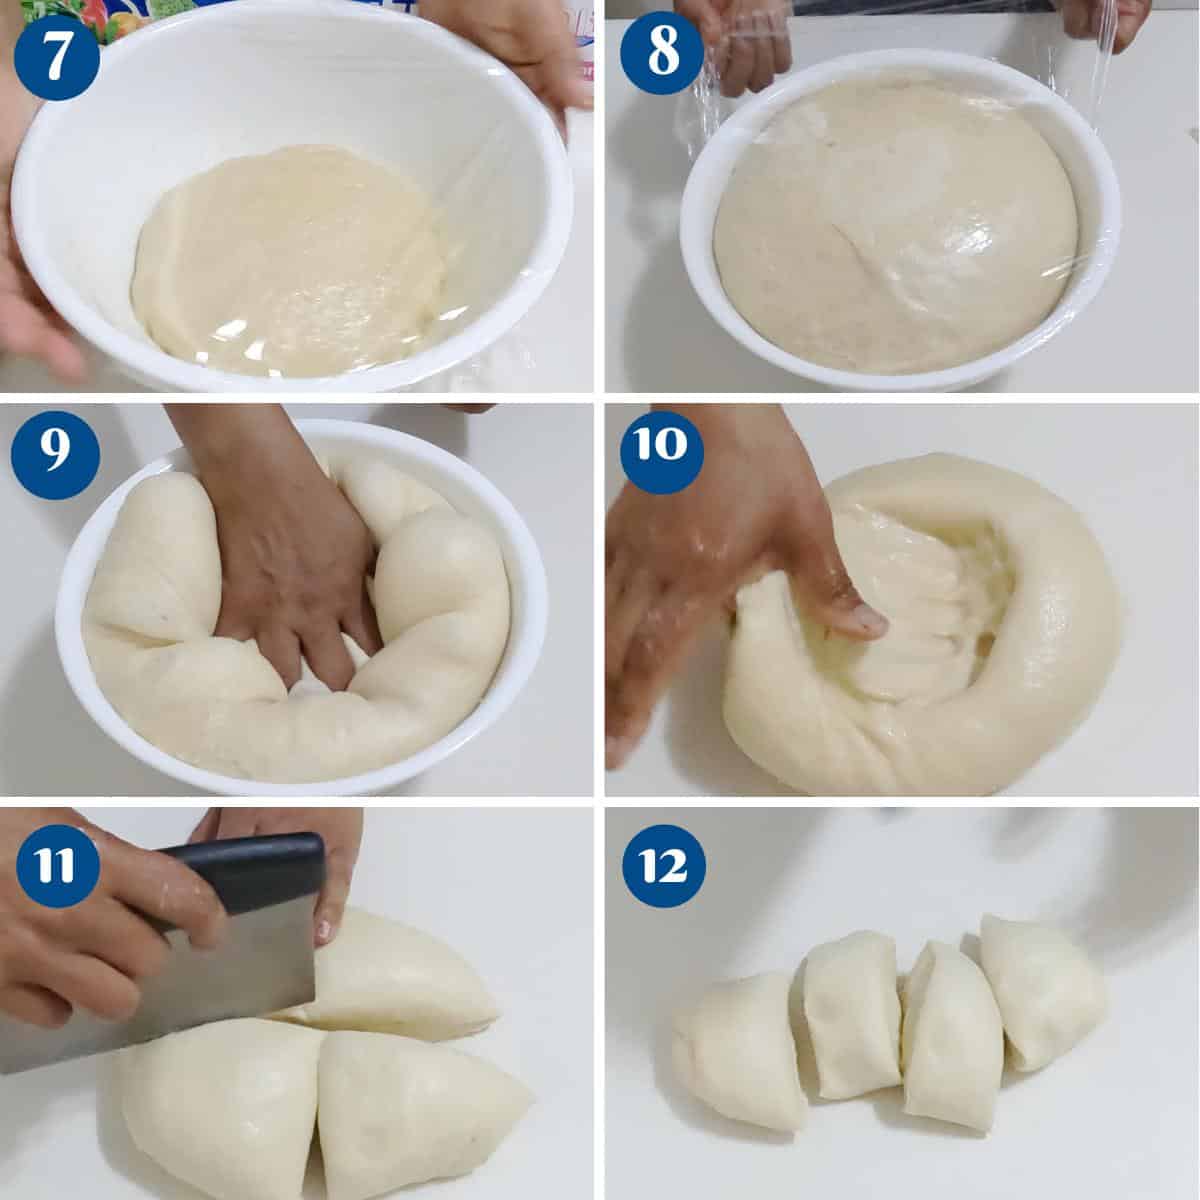
- Divide – Once doubled in volume, invert on a floured surface. Divide the dough into two halves and each half into 4 or 6 portions – making 12 small or 8 medium donuts.
Pro tip – Always make one or two mini doughnuts to test the oil temperature.
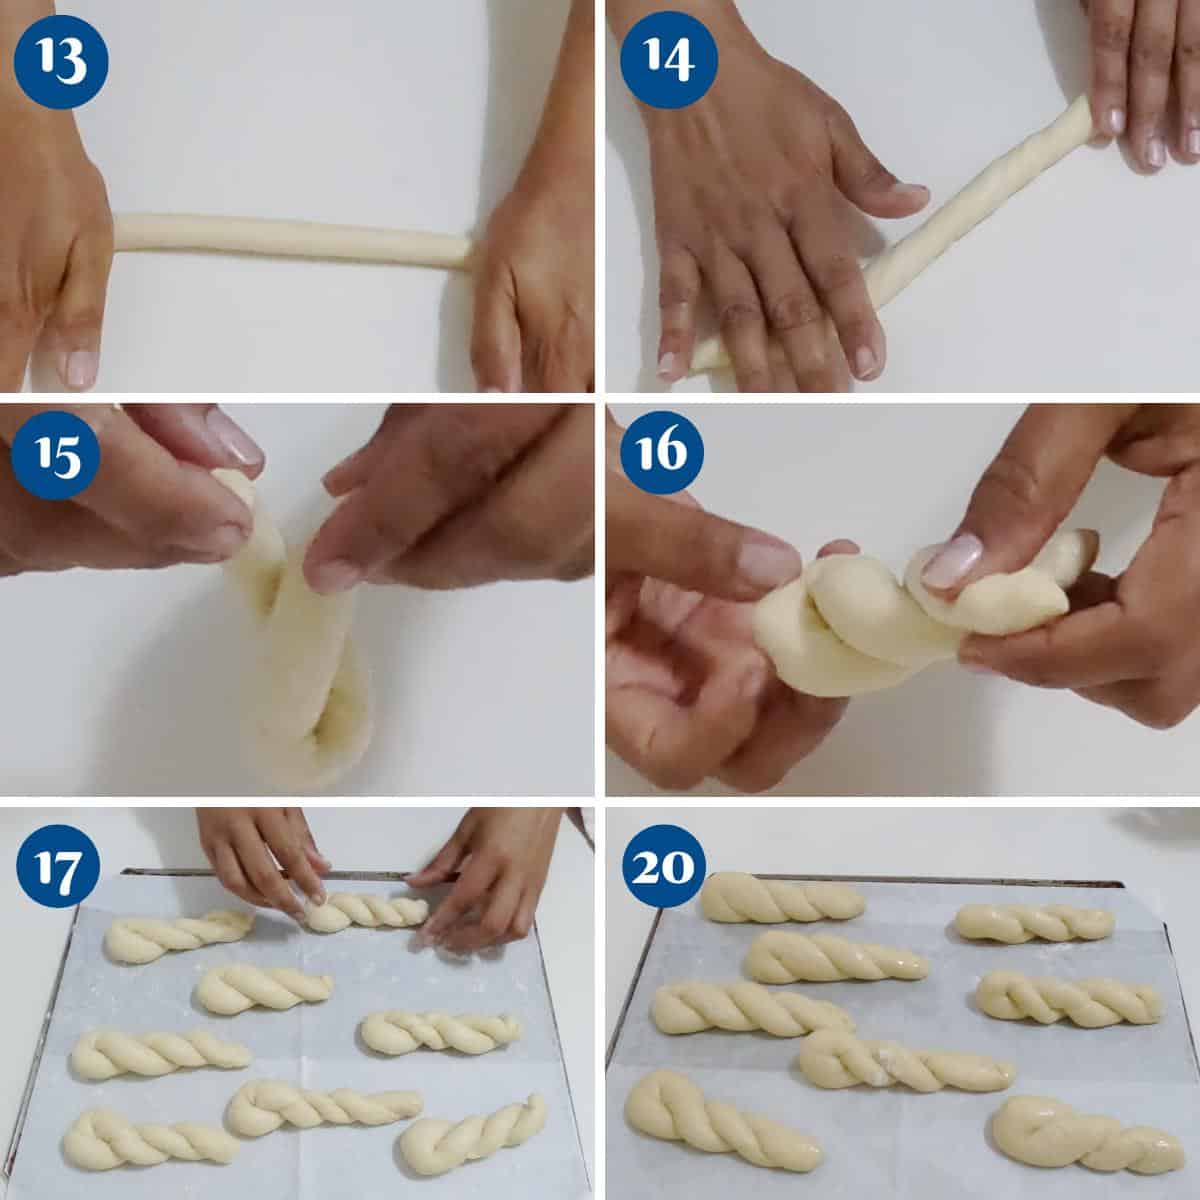
- Shape – Roll each portion into a smooth ball, then into a long rope of about 15 cm long. Twist the rope in opposite directions. Then pick it up and let it twist naturally onto itself, creating a twisted loop.
Pro tip – Twisting the rope in the opposite direction is what is important. Only then, when you pick it up, it will naturally twist onto itself. - Tray – After you roll all the balls, flatten them slightly. Cover the baking tray with a clean kitchen cloth or plastic wrap to prevent the donuts from drying.
Pro tip – Flattening will ensure you have a doughnut shape when it rises and deep-fries (and not a ball shape). - Proof – You can proof the donuts on the counter for 30 to 45 minutes or place them in the fridge for about 60 to 90 minutes until almost double in volume.
Pro tip – The fridge-cold dough is easier to handle but takes longer to proof.
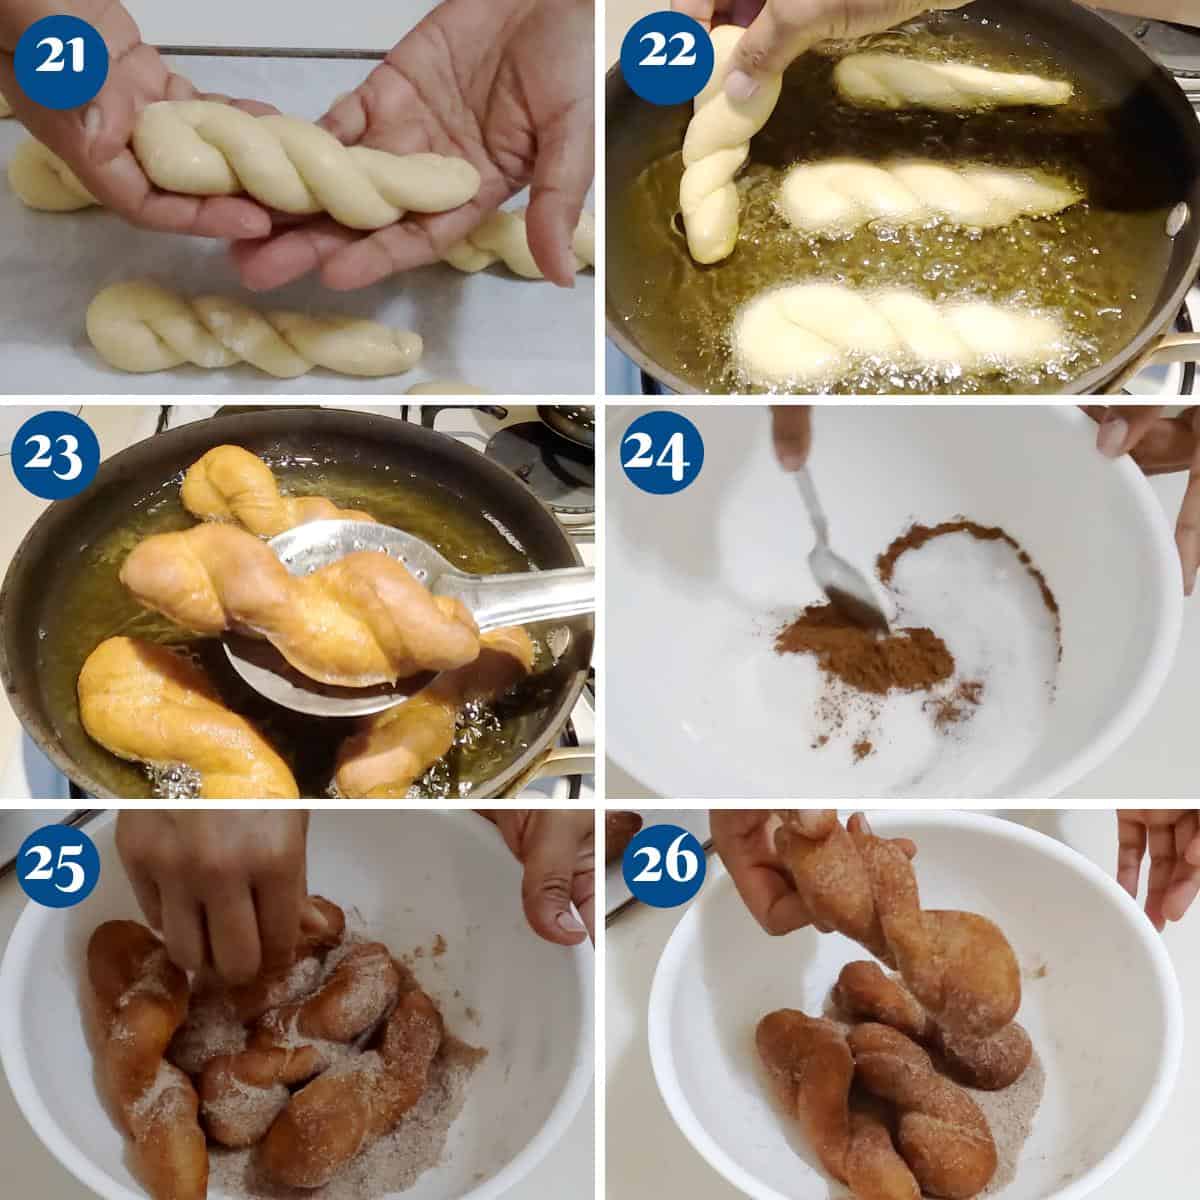
- Oil – Heat vegetable oil in a large pot or deep fryer to about 350 to 360 °F.
Pro tip – You don’t want the oil too hot. I like to use a Dutch oven because it keeps the heat even. They need to be cooked inside before they brown on the outside. If the oil is too hot, the donuts will get too dark or stay uncooked inside. - Test oil – Add a mini doughnut ball to test the oil. They should rise up in 30 seconds. Once the oil is ready, add two or three doughnuts at a time
Pro tip– You need enough oil so the doughnuts will float, and not touch the bottom of the pot. - Deep fry – Cook for 30 seconds on one side, then flip and let cook another 30 seconds on the other side. You will need about 3 to 5 minutes for each donut to cook and be beautifully golden brown.
Pro tip – Do not crowd the pan as the temperature of the oil will drop too fast. The doughnuts should rise in about 30 secs as they puff. - Remove – Use a slotted spoon to remove them onto a paper towel and let them cool for 20 minutes before you fill and serve.
- Sauce – In a micro-safe bowl, add the chocolate, light corn syrup, and butter. Heat until smooth and melted.
- Dust with powdered sugar if desired.
Troubleshooting
- My dough did not rise – This could have two reasons. First, check the yeast expiry date. Second, the liquid ingredients in the dough were too hot.
- Why are my donuts flat? The most common reason for this is when you use the roll and cut method. Keep the dough thick, about ¼ inch thick at least. Otherwise, they will be quite flat.
- My donuts are very dark brown. Often, the oil’s temperature is the main culprit. Keep the heat to medium and adjust it from medium to medium-low as necessary. Remember, the donuts need to be cooked inside as well, which means the oil outside must not be too hot. I use 325F as a guide for my donuts.
- My filling is spilling out of the donut. If you fill the donuts while they are still warm, the heat will melt the filling. This will make the filling ooze out of the filling. It can be quite messy. Also, cooled pastry cream is more delicious. So, wait for the donuts to cool completely.
- Why are my doughnuts greasy? Greasy doughnuts usually result from oil that is too cool. Ensure the oil temperature is maintained at 350°F (175°C) to prevent the dough from absorbing too much oil.


Frequently asked questions
Donuts are best eaten fresh the day they are made. But you can keep them for a day or two. It is best to keep them in a paper bag rather than plastic, as plastic makes them soggy. You can also freeze cooled donuts for months in the freezer.
Chocolate sauce is the most commonly served, but the options are endless, from fruit purees to caramel sauce, dulce de leche, and others.
The dough should double in size during the first rise. This usually takes about 1 to 1.5 hours. If you gently press a finger into the dough and the indentation remains, it’s ready.
Yes, you can prepare the dough a day ahead and let it rise in the refrigerator overnight. This slow rise enhances the flavor. Bring the dough to room temperature before shaping and frying.
Use a neutral oil with a high smoke point, such as vegetable oil, canola oil, or peanut oil. These oils won’t impart any unwanted flavors to the doughnuts.
Place the fried doughnuts on a baking sheet in a warm oven (about 200°F/95°C) to keep them warm until serving. For longer storage, keep them in an airtight container and reheat in the oven at 350°F (175°C) for a few minutes to regain their crispness.
While traditional twisted doughnuts are fried, you can bake them for a healthier alternative. Brush the twists with melted butter and bake at 350°F (175°C) for about 15-20 minutes, or until golden brown.
Yes, you can freeze both the dough and the finished doughnuts. For the dough, freeze after shaping but before the second rise. When ready to use, let them thaw and rise before frying. For finished doughnuts, freeze them in an airtight container and reheat in the oven.
Substitute dairy milk with a plant-based milk (such as almond or soy milk), use a vegan butter or oil instead of regular butter, and replace eggs with flax eggs (1 tbsp ground flaxseed mixed with 3 tbsp water per egg). Ensure your sugar is also vegan.
Twisted Doughnuts
These homemade twisted doughnuts are an upgrade from the ones found in cardboard boxes. They are twisted, yeasty, and raised. Served with chocolate sauce these are soft light and airy.
Video
Ingredients
- 500 g (4 cups) All-purpose flour
- ¼ tsp Nutmeg freshly grated
- 7 g (1 tsp) Salt
- 240 g (1 cups) Warm milk (110 F)
- 100 g (2 large) Egg
- 7 g (2¼ tsp) Instant dry yeast
- 30 g (2 tbsp) Sugar
- 30 g (2 tbsp) Butter
- 1 tsp Vanilla extract
- 4 cups (1 l) Vegetable oil for deep frying 4 cups
- 1 cup (120 ml) Chocolate Dark, semi-sweet, or bitter-sweet
- 2 tbsp Light corn syrup
- 2 tbsp Unsalted butter
Method
- Dry ingredients – In a bowl combine flour, salt, and grated nutmeg.500 g All-purpose flour, ¼ tsp Nutmeg, 7 g Salt
- Yeast – In a bowl of a stand mixer, with the dough hook attachment, combine warm milk, sugar, yeast, egg, and vanilla.240 g Warm milk , 100 g Egg, 7 g Instant dry yeast, 30 g Sugar, 1 tsp Vanilla extract
- Knead – Add the flour mixture to the yeast mixture and combine on medium-high speed until all the flour is well incorporated making sure to scrape the bottom and sides of the bowl. Then knead for 8 to 10 minutes on medium speed.30 g Butter
- Butter – Next, add the butter and continue to knead for 8 to 10 minutes more or until you have a smooth elastic dough.
- Bowl – Place the dough in a large greased bowl, cover it with plastic wrap and let rise for 60 to 90 minutes or until double in volume.
- Divide – Once double in volume, invert on a floured surface. Divide the dough into half and each half into 4 or 6 portions – making 12 small or 8 medium donuts.
- Shape – Roll each portion into a smooth ball then into a long rope of about 15 cm long. Twist the rope in opposite directions. Then, pick it up and let it naturally twist onto itself creating a twisted loop.
- Tray – Once all the balls are rolled, flatten them slightly. Cover the baking tray with a clean kitchen cloth or plastic wrap to prevent the donuts from drying.
- Proof – You can proof the donuts on the counter for 30 to 45 minutes or place them in the fridge for about 60 to 90 minutes until almost double in volume.
- Oil – Heat vegetable oil in a large pot or deep fryer to about 350 °F to 360 ° F.4 cups Vegetable oil for deep frying
- Test oil – Add a mini doughnut ball to test the oil. They should rise up in 30 seconds. Once the oil is ready, add two or three doughnuts at a time.
- Deep fry – Cook for 30 seconds on one side then flip and let cook another 30 seconds on the other side. It will take about 3 to 5 minutes for each donut to cook and be beautifully golden brown.
- Remove – Use a slotted spoon to remove them onto a paper towel and let them cool for 20 minutes before you fill and serve.
- Sauce – In a micro-safe bowl, add the chocolate, light corn syrup, and butter. Heat until melted into a smooth sauce.1 cup Chocolate , 2 tbsp Unsalted butter, 2 tbsp Light corn syrup
- Dust with powdered sugar if desired.
Notes
- The temperature of milk – It is very important to make sure the milk is warm, not hot or cold. You don’t need a thermometer to check – that’s just a guide.
To check if the milk is at the right temperature – just stick your clean little finger in. You should be able to hold it in for a minute if not it’s too hot. Best to wait until just warm. - The temperature of the oil – I know I said the oil has to be around 325 ° F but again, you don’t necessarily need a thermometer. Here’s how to check if the oil is right. Make mini doughnuts – I divide one doughnut into four and make mini doughnuts. This helps me test the hot oil before and in between batches.
- How to test oil – Add a mini doughnut to test the oil. The doughnut should rise in about 30 secs. If it rises too soon means the oil is too hot and if it takes too long means the oil is not yet hot. Adjust accordingly. Keep an eye on oil temperature as it rises and cools between donuts batches. Adding doughnuts to the oil will cool the oil. So find a balance on how many doughnuts per batch works with your settings.
Equipment you will need


Nutrition
Tried this recipe?
Mention @veenaazmanov_kitchen or tag #veenaazmanovkitchen!- Biscoff Doughnuts, Fried Tiramisu Donuts
- Dulce De Leche Donuts, Ferrero Rocher Donuts
- Cinnamon Sugar Donuts, Pumpkin Donuts – Fried
- See all donut recipes
Don’t lose this recipe! Save it for Later!
📌 Save this Recipe for later on Pinterest so you can easily find it again.
⭐ Add Veena Azmanov Kitchen to your Google Preferred Sources.
It helps Google show you more of our recipes.
📧 Subscribe for new recipes delivered to your inbox.
🎥 Follow us for more recipes


These look great and I love that I don’t need one of those doughnut pans to make them! I’ve read all your expert tips and will be ready to whip these up this weekend 😉
These doughnuts look perfect!! I am obsessed with making doughnuts, so these are going to be so good for the holidays 🙂
These donuts are so delicious and easy to make from scratch! I had no idea I could make bakery style donuts at home! Thanks for the detailed instructionsn too!
These kind of remind me of churros with the chocolate dipping sauce! I looove sugar donuts and the idea of dipping them in chocolate sounds incredible. Definitely making these on the weekend. Yum!
Everyone at my house really loved these doughnuts! And I’m so excited to make it again!
Thank you, Toni
These donuts look incredible! Thanks for such detailed step by step instructions.
Perfect! I love this recipe! I haven’t made one in ages. Thanks for the idea!
These were much easier to make than I thought they would be. I will definitely be making them again.
Thse doughnuts look so light and fluffy and easier than biting into a big doughnut. These will ne delicious with all sorts of dips too.
Very good recipe and like all of them on this website, it is explained very well!