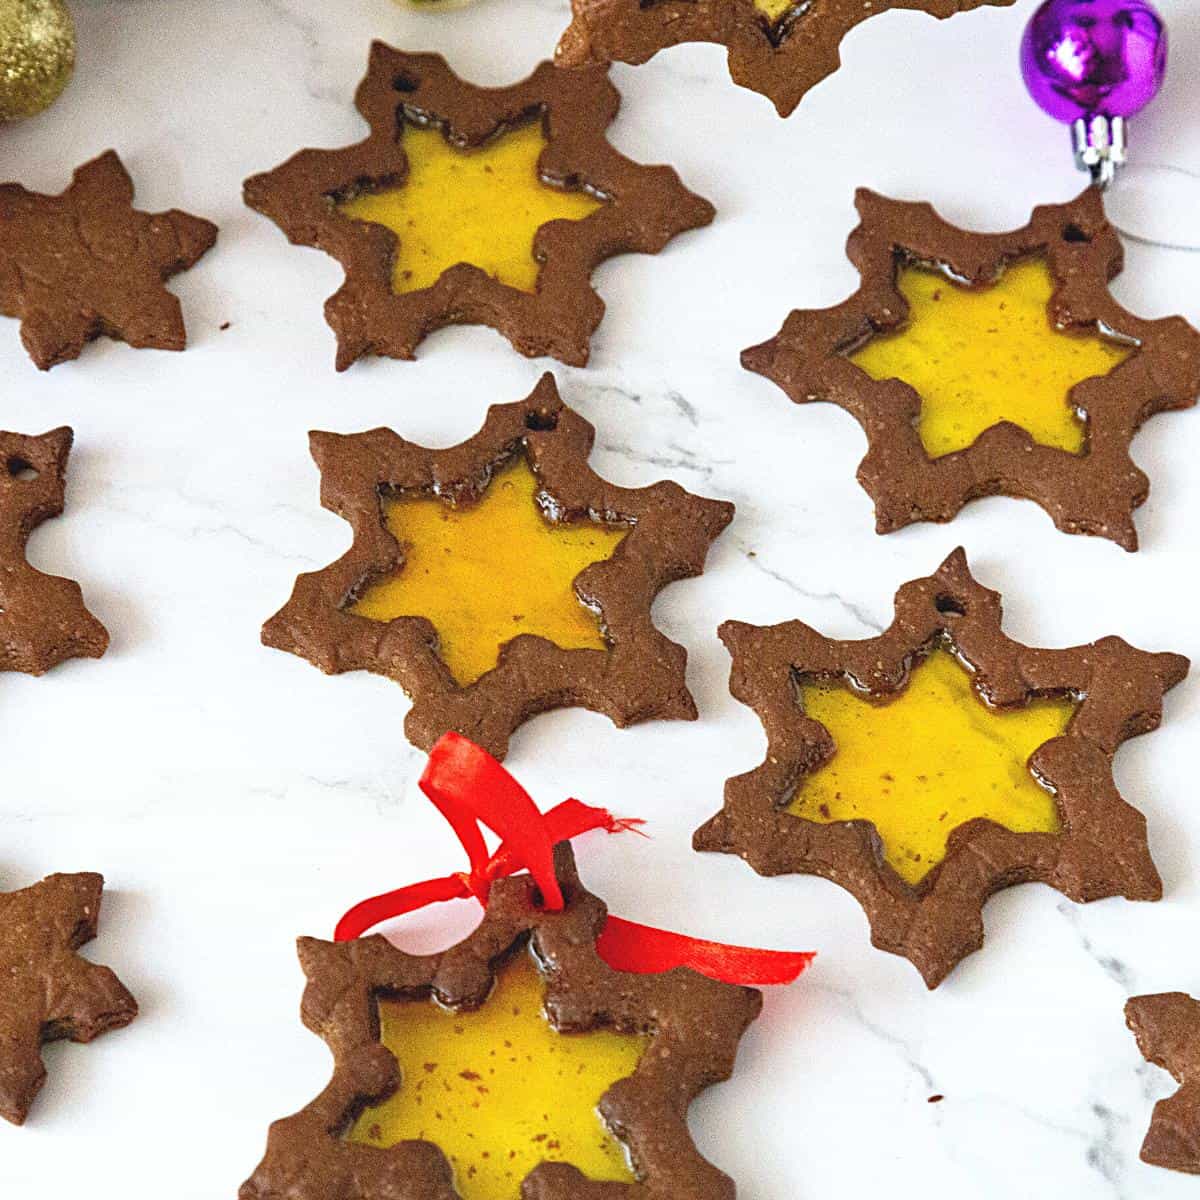
Snowflake Stained Glass Cookies
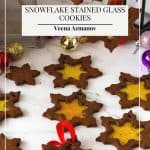
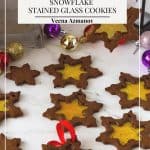
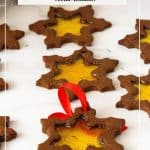
Snowflake stained glass cookies look like they came straight out of Santa’s workshop, but they’re surprisingly simple. A warmly spiced gingerbread cookie, a little crushed candy, and suddenly you’ve got glowing jewel-toned centers that catch the light like tiny edible ornaments. Quick to prepare, fun to make, and absolutely show-stopping on a Christmas cookie platter.

When my kids were little, these cookies were the one project guaranteed to pull them away from their screens. They’d sit for ages crushing candy (a little too enthusiastically), cutting snowflakes, and peeking into the oven to watch the centers melt. Even now, when they’re teenagers, they still ask for “those glowing cookies” every December. So yes — these cookies have become part of our holiday traditions, and I love sharing them with you.
Is there anything more fun than making cookies with the kids during the holidays? In our home, the fun shapes are snowflakes, stars, and Christmas trees.
What Are Snowflake Stained Glass Cookies?
They’re classic stained glass cookies made with a gingerbread dough and filled with melted hard candies that set into glossy, glass-like centers. Instead of the usual round shapes, we turn them into snowflakes, which instantly signals “holidays,” “winter,” and “Christmas baking.”
They’re:
- crisp on the edges
- lightly spiced
- eye-catching
- perfect for ornaments, gifting, and cookie boxes
And yes — they taste as good as they look.
Why You’ll Love This Recipe
- Show-stopping cookies with almost zero effort.
- Uses easy pantry ingredients + hard candy.
- Gingerbread flavor + stained glass effect = double festive.
- Makes perfect ornament cookies for the tree.
- Works with sugar cookie dough, shortbread, or chocolate dough too.
- Kid-friendly (except for the hot candy part — hands off until cooled!).
Ingredients and substitutes
- Butter – Unsalted gives you control. Soft, not melted.
- Brown sugar – Adds moisture and caramel notes.
- Molasses – Essential for gingerbread flavor and color.
- Spices – Ginger, cinnamon, cloves, nutmeg. Use gingerbread spice if you prefer.
- Flour + leaveners – All-purpose flour, baking soda, baking powder.
- Vanilla – Extract, paste, or vanilla sugar.
- Hard candy for centers – Jolly Ranchers, Life Savers, boiled sweets, lollipops. Crush them fine so they melt evenly.

Step-by-Step: Snowflake Stained Glass Cookies
1. Make the Gingerbread Dough
- Dry mix – Whisk flour, spices, baking powder, baking soda, and salt.
- Cream – Beat butter + brown sugar until fluffy.
- Add wet – Mix in molasses, egg, and vanilla.
- Combine – Add dry ingredients; mix until dough forms.
- Chill – Divide, wrap, and refrigerate at least 2 hours.
Pro tip: Warm dough spreads. Cold dough keeps its shape.

2. Cut Out the Snowflakes
- Roll dough to ¼ inch thick.
- Cut large snowflakes, transfer to lined trays.
- Use a smaller snowflake cutter to punch out the centers.
- Fill each center with crushed candy (don’t overfill).
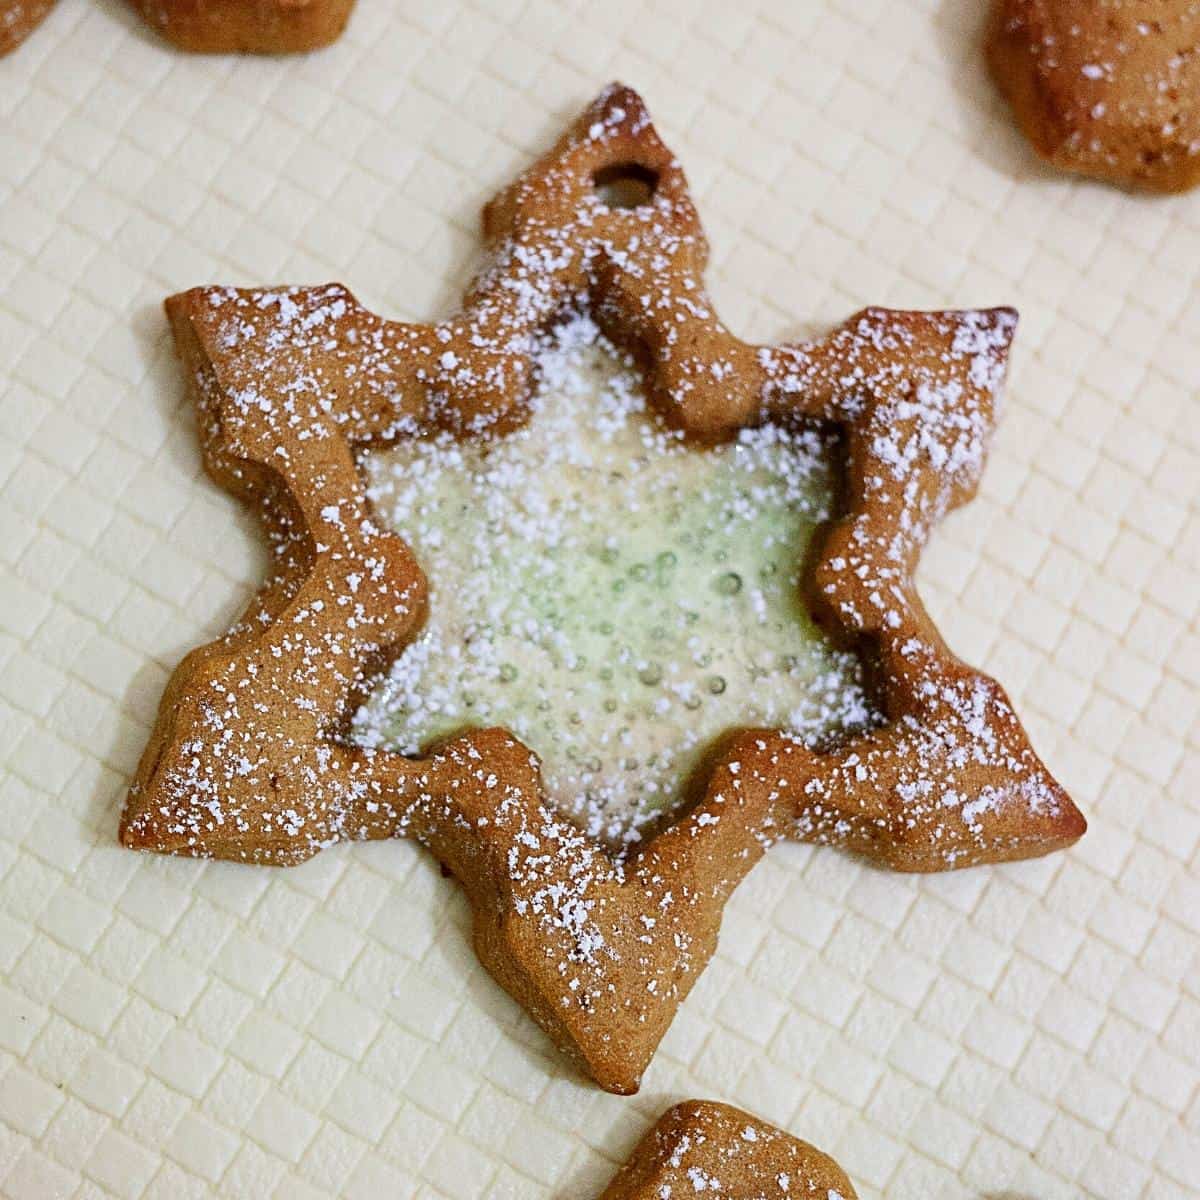
If making ornaments: Punch a hole at the top using a piping tip before baking.

3. Bake
- Bake at 350°F / 177°C for 10–12 minutes until edges are lightly golden.
- Do not touch the candy — it’s molten hot.
- Cool completely on the tray so the “glass” sets.

4. Finish
Dust with powdered sugar if you want a frosty effect, or leave them bright and shiny.

Tips for Success
- Chill the dough well. Warm gingerbread loses its shape.
- Crush candy finely so it melts evenly without bubbling over.
- Don’t overfill the centers. A thin layer gives the cleanest “glass.”
- Let cookies cool fully before moving. Hot sugar = fragile + dangerous.
- Use parchment or silicone mats only. Candy sticks to metal.

Troubleshooting
| Issue | Why It Happens | Fix |
|---|---|---|
| Candy overflowing | Too much candy or pieces too large | Use a thinner, finer crushed layer |
| Center looks cloudy | Candy overheated or mixed colors | Use a single color per cookie; reduce bake time |
| Cookies spread / lose shape | Dough not chilled | Chill dough + trays before baking |
| Candy cracks when lifting | Moved while still warm | Cool fully on the tray until hard |
| Hole for ornaments closed | Dough puffed slightly | Re-poke the hole with a skewer while still warm |


Frequently asked questions
These will stay fresh for four days. Place the cookies in an airtight container to prevent them from becoming soft.
Snowflake cookies refer to any cookie shaped like a snowflake. Stained glass cookies specifically have a hard candy center. Here we combine both: snowflake shapes + stained glass windows.
Absolutely. Sugar dough gives a paler cookie that makes the colors pop. Shortbread works too.
The dough and cut cookies freeze beautifully. Baked cookies keep 5–7 days in a tin.
Yes — gingerbread holds its texture well. Store in an airtight container.
Make a small hole before baking, then thread ribbon through once completely cooled.
While the recipe calls for snowflake-shaped cookie cutters, you can get creative and use other shapes. Heart-shaped, star-shaped, or even tree-shaped cookie cutters can also work beautifully for a winter-themed dessert table.
If you don’t have any hard candy or prefer not to use it, you can explore other options for creating the stained glass effect. Crushed lollipops, colored sugar, or even edible glitter can be alternatives. Experiment with different options to achieve the desired effect and add a touch of sparkle to your snowflake cookies.
Orange – Orange is a good flavor that blends well with ginger and cinnamon.
Ginger, Cinnamon, Cloves – A good blend of spices, but you can go less or more. If you don’t like cinnamon too much, you can reduce it to one teaspoon.
Spice mixes – Try gingerbread spice, pumpkin spice, and chai spice for a different flavor.

Stained Glass Cookies
Snowflake stained glass cookies are festive gingerbread snowflakes with glowing candy centers. Easy to make, fun to decorate, and perfect for Christmas cookie trays or edible ornaments.
Video
Ingredients
- 3 cup (375 g) All-purpose flour
- ½ tsp Baking powder
- 1 tbsp Ground ginger
- 1 tsp Cinnamon powder
- ½ tsp Ground cloves
- ¼ tsp Nutmeg freshly grated
- ¼ tsp Salt
- ½ tsp Baking soda
- ¾ cup (170 g) Butter unsalted, room temperature
- ¾ cup (165 g) Brown sugar light or dark
- ½ cup (120 ml) Molasses unsulphured
- 1 large Egg large
- 1 tsp Vanilla extract
- 1 cup Candies various colors
Method
- Dry ingredients – In a medium bowl, combine the flour, baking soda, baking powder, salt, and spices – cloves, cinnamon, ginger, and nutmeg.3 cup All-purpose flour, ½ tsp Baking powder, 1 tbsp Ground ginger, 1 tsp Cinnamon powder, ½ tsp Ground cloves, ¼ tsp Nutmeg, ¼ tsp Salt, ½ tsp Baking soda
- Dough – In the bowl of a stand mixer, cream the butter with sugar until light and fluffy. Add the molasses and egg. Followed by flour mixture and vanilla extract. Combine well.¾ cup Butter, ¾ cup Brown sugar, ½ cup Molasses, 1 large Egg, 1 tsp Vanilla extract
- Chill dough – Divide the dough into two, wrap in plastic wrap, and let chill until firm enough to roll – about 2 hours or overnight.
- Preheat the oven to 177°C / 350°F / Gas Mark 4. And line 2 x baking trays with parchment paper.
- Roll – Roll dough on a lightly floured surface to about ¼ inch thick. I like to use a patterned rolling pin for my cookies.
- Shape – Use a snowflake cookie cutter, cut the shape, and place it on a parchment-lined baking tray. Use a smaller snowflake cutter (about two sizes smaller) for the center.
- Candy – Fill the center with crushed candy, keeping it within the cavity. If you plan to hang these on the Christmas tree as ornament cookies, make a hole on top using a small round piping tip (about size 3), to tie the string and ensure it's not too close to the edges.1 cup Candies
- Bake the cookies for 10 to 12 minutes or until slightly golden around the edges. When you take the cookies out of the oven, do not touch them. Leave them to cool on the baking tray until completely cooled.
- Garnish – You can dust the cookies with confectioner sugar (powdered sugar) or leave them as is.
Notes
- Chill the dough well. Warm gingerbread loses its shape.
- Crush candy finely so it melts evenly without bubbling over.
- Don’t overfill the centers. A thin layer gives the cleanest “glass.”
- Let cookies cool fully before moving. Hot sugar = fragile + dangerous.
- Use parchment or silicone mats only. Candy sticks to metal.
Equipment you will need


Nutrition
Tried this recipe?
Mention @veenaazmanov_kitchen or tag #veenaazmanovkitchen!
Don’t lose this recipe! Save it for Later!
📌 Save this Recipe for later on Pinterest so you can easily find it again.
⭐ Add Veena Azmanov Kitchen to your Google Preferred Sources.
It helps Google show you more of our recipes.
📧 Subscribe for new recipes delivered to your inbox.
🎥 Follow us for more recipes

im not a baker by any means so seeing these cookies, im tempted to give it a try..looks so pretty!
Oh they are so easy Dixya. Just follow my tips and you will be a pro.
These are so pretty! They would be difficult to eat because I wouldn’t want to ruin how gorgeous they are! I have always wanted to include these in a cookie swap. I might have to do that this year.
Thank you Jenni. Happy to hear that
These cookies are perfect for Christmas. I can see my kids faces light up with these cookies.
Thank you Aish. I bet they will be excited.
I’m going to have to pin this for later when I get into full-fledged Christmas cookie baking mode – so fun!
Thank you Leslie.
These are just so beautiful! I know my granddaughter would love making these! Maybe we’ll try them for Valentine’s Day with heart shaped cookies!
That would be so much fun. I use to use shape cookie cutter when the kids were learning their shapes.
These look like so much fun!! Very pretty too! Thanks for sharing!
Thank you so much Elaine
I used to make a similar cookie with my Mom at Christmas time. We used crushed up Lifesavers candies!
Oh that sounds so much fun Lisa. I bet it was the most fun.
These are so pretty! Love them
Thanks Swayam.
Like little stained glass windows! I just love them! I will definitely try these with my kids!
Yup like little stained glass windows…. Thanks Valentina
These are such a great idea – I love how pretty they are. Once my son is a little older, he will love baking projects like this.
Thanks Julie.. I’m sure he will love it