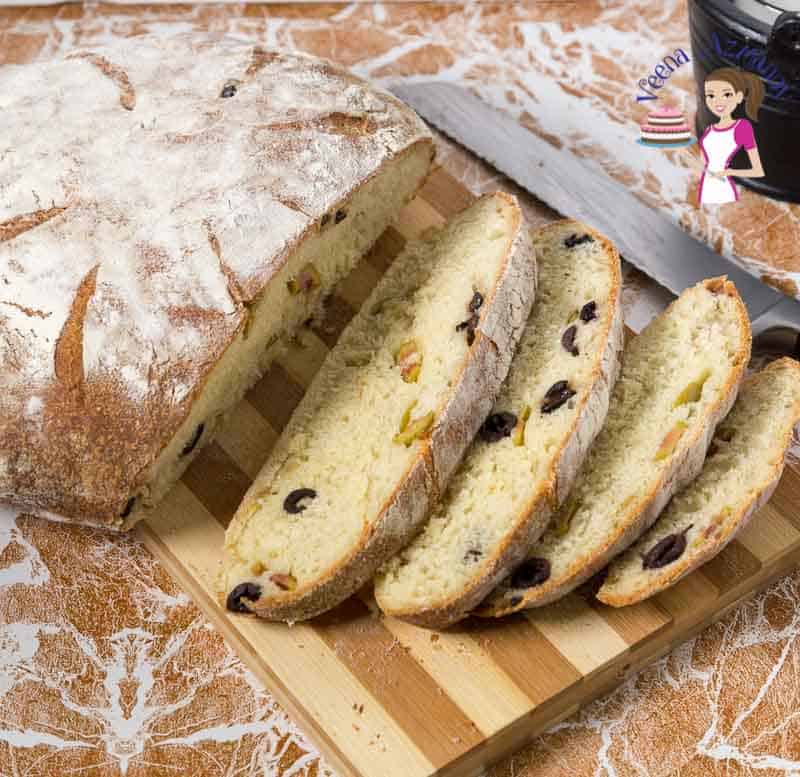
No-Knead Beer Bread
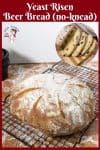
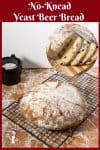

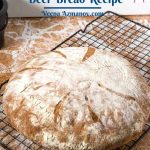

This no-knead beer bread is light and airy because it is made with yeast. Filled with black and green olives, it needs only 10 minutes hands-on and 45 minutes to bake. And, it’s so delicious you won’t be able to stop at one slice.

It had been a very long time since I made my yeast beer bread. Recently, Ziv enjoyed a classic beer bread at a friend’s get-together and raved about it. So, I knew it was time to make some. Of course, this bread is so easy that now we make it often. The kids are also fascinated by beer in their bread.
Have you ever baked with beer? In fact, it is no different from other yeast breads. This is a beginner’s recipe and serves as a base for all the other beer breads I make. And, the best part is that this is a no-knead recipe, so it’s perfect when you are feeling lazy.
Why make this bread?
- This is the basic no-knead bread made with beer! You will never make any other beer bread again.
- It’s made with all-purpose flour and basic ingredients, which you probably already have on hand.
- Also, I’ve made a small recipe, but you can easily double the recipe and freeze any leftovers.
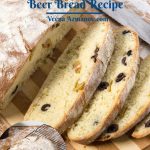
- I’ve used olives, but you can change the fillings, and you’ll make a new beer bread every single time. For example, try sun-dried tomatoes, cheese, goat cheese, artichokes, or Parmesan.
Ingredients and substitutes
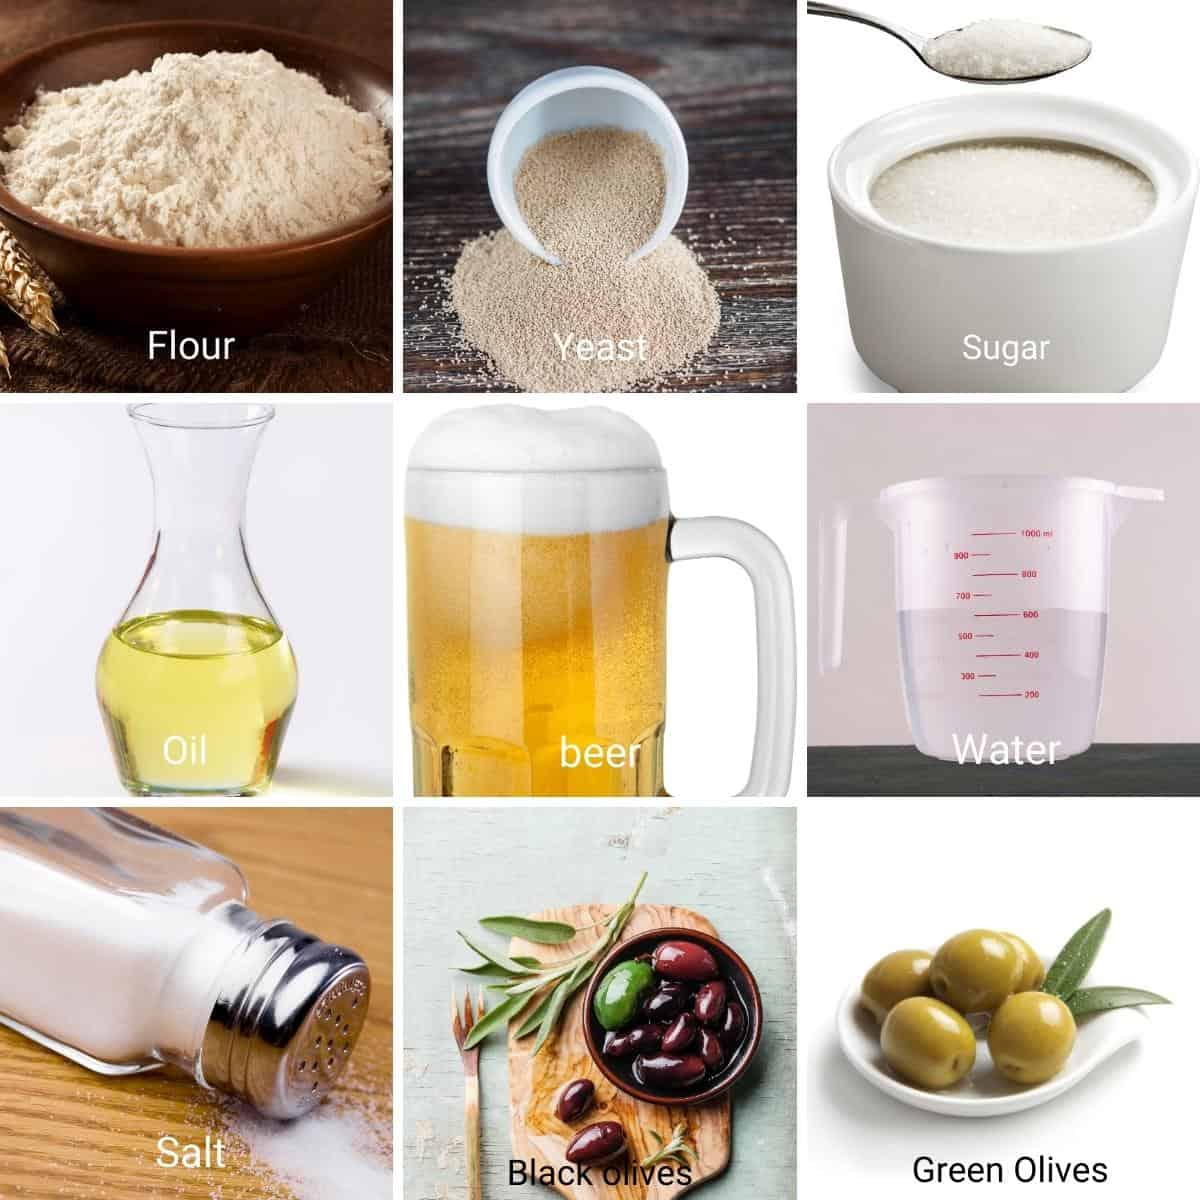
- Flour – In this bread recipe, I use plain white all-purpose flour. I think white flour works better than bread flour.
- Instant dry yeast – I like instant dry because I’ve always had great success. You will need 2 1/4 tsp or one packet if you have to use active dry yeast. If you use fresh yeast, you will need about 21 grams. Also, activating the yeast is unnecessary, but I like to take the guesswork out and make sure my dough will rise.
- Water – The temperature of the water is an important factor in bread making. It has to be warm, not hot. Usually about 110°F.
- Olive oil – Olives are the star of the show in this bread, so use good-quality olive oil. The oil enhances the bread’s flavor.
- Olives – I’ve used both black and green because it adds to the visual appeal. But you can use either one. Use good-quality olive oil that you enjoy eating.
Step-by-step: No-knead beer bread
Dough
- Wet ingredients – In a measuring cup, measure the warm water and add olive oil, sugar, and yeast. Combine well. Set aside for 3 to 5 minutes until foamy.
- Dry ingredients – In a bowl, combine flour and salt. Add the beer and yeast mixture.
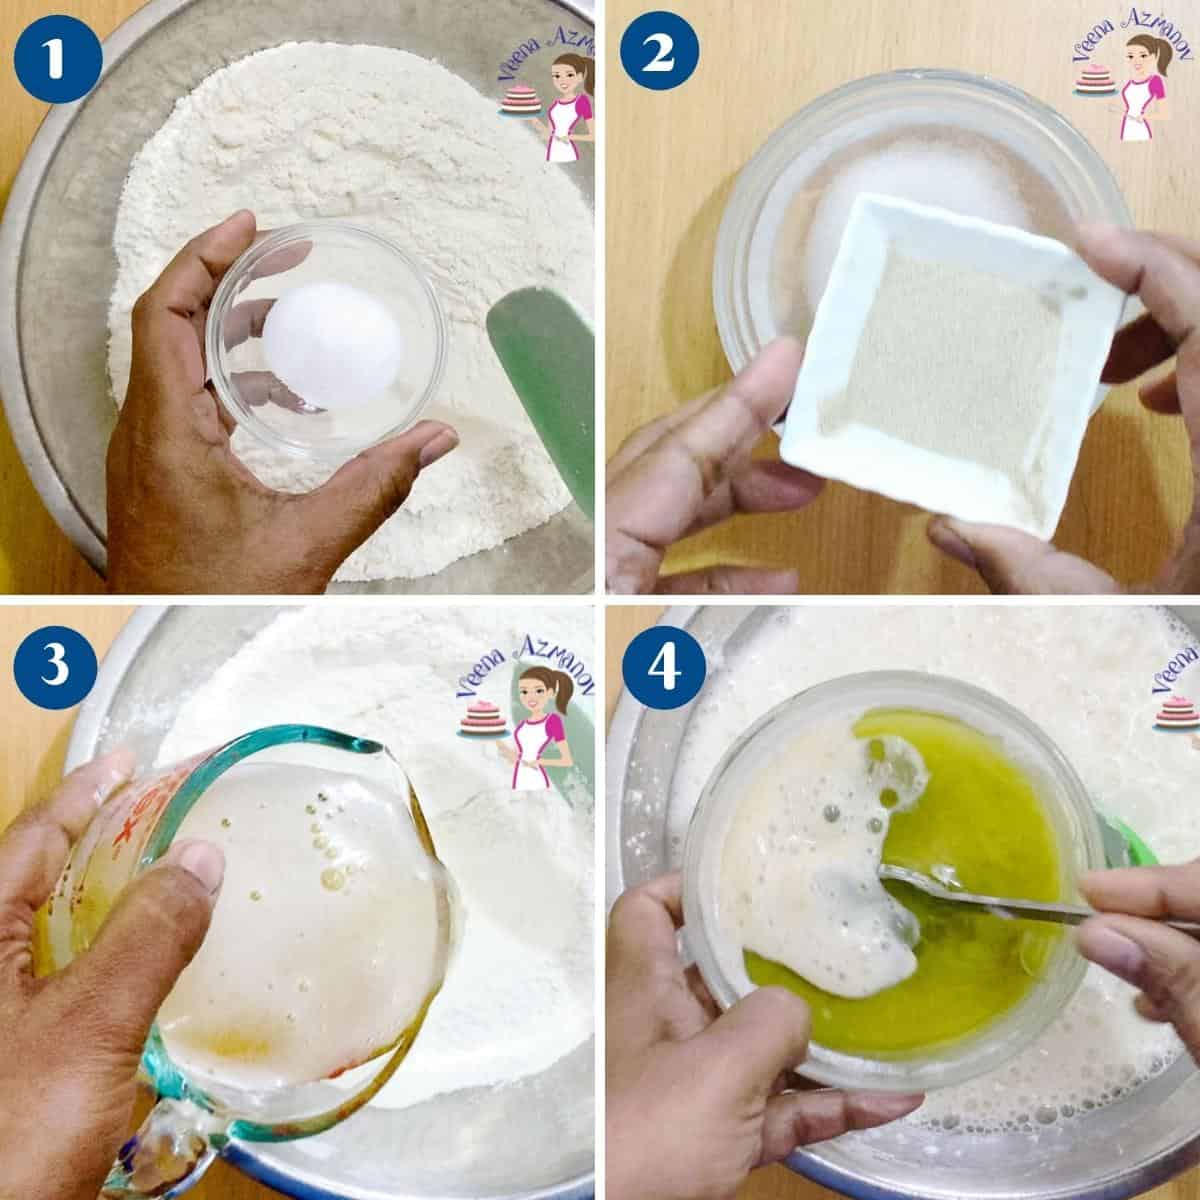
- Use a wooden spoon or spatula to combine it thoroughly, making sure no dry flour remains on the bottom. This is very wet dough, so don’t try to touch it with your hand.
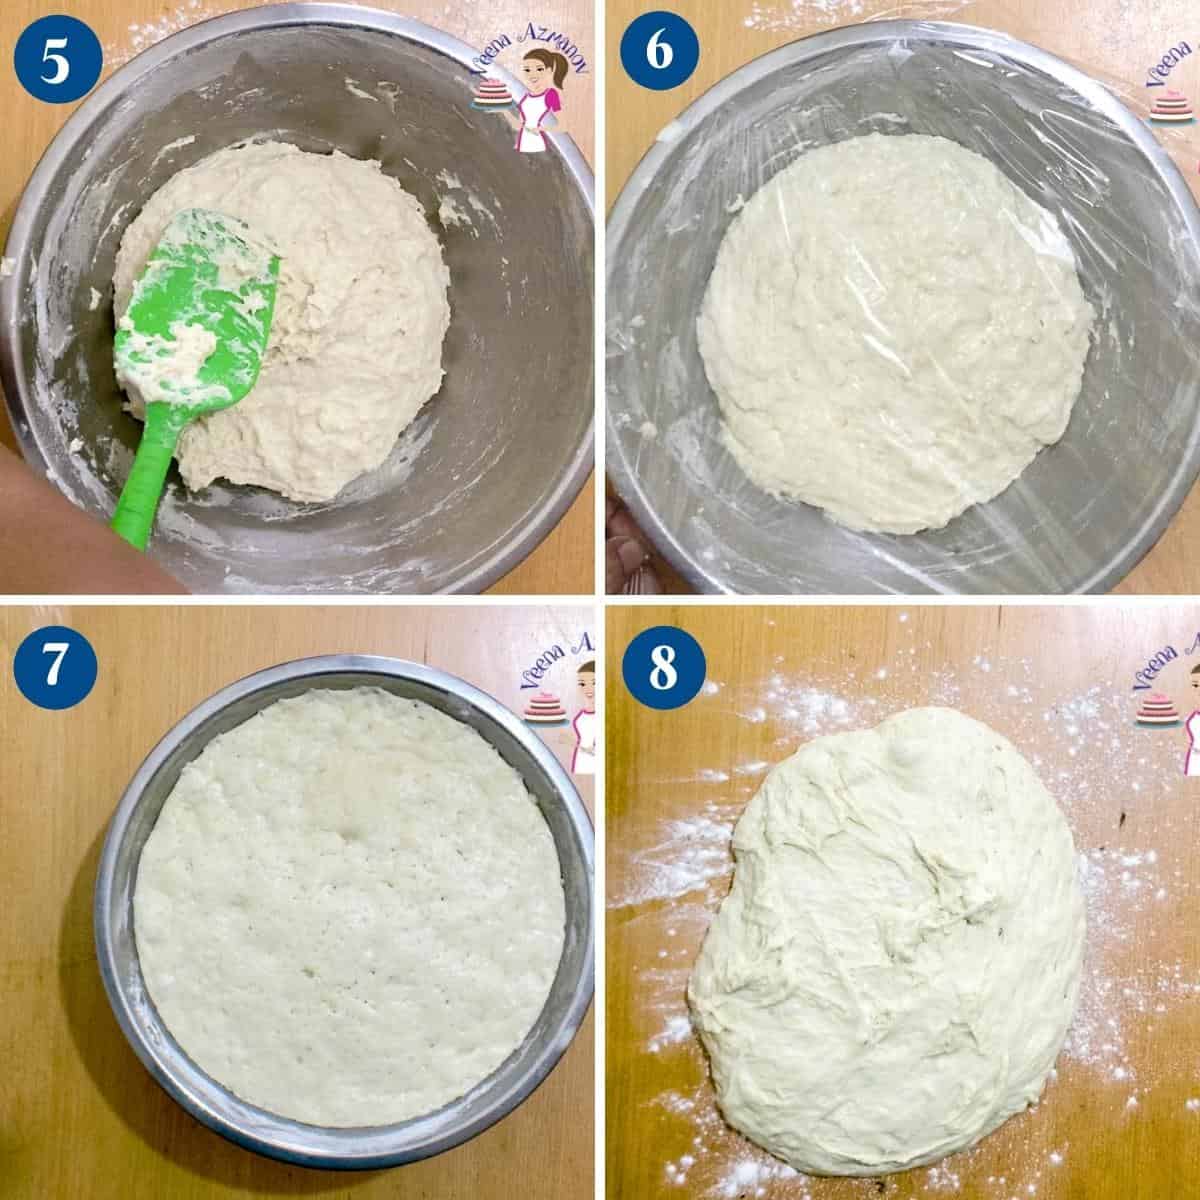
The dough will be soft and slightly sticky—this is normal. Do not add extra flour, as this will make the bread dense.
Pro tip : The high hydration in the dough (water-to-flour ratio) is what gives us that crust on top and a light, airy texture on the inside. - Cover with a clean kitchen cloth or plastic wrap. Leave in a warm place. Let rise for 60 to 90 minutes until doubled in volume.
Pro tip – In winter, you may need 90 minutes or more. But in summer, the dough may double in 45 minutes. If you can’t attend to it at that moment, de-gas, reshape, and let it double in volume again.
Shape
- When the dough is doubled in size, dust your work surface generously with flour. Remove the dough onto the floured work surface. It is best to use a dough scraper or spatula when working with this dough.
Pro tip – Flour is an absolute necessity when handling this dough. Otherwise, it will stick to your hands, and you will lose a lot of volume and quantity of bread. - Spread dough into a rectangle. Sprinkle the chopped olives evenly.
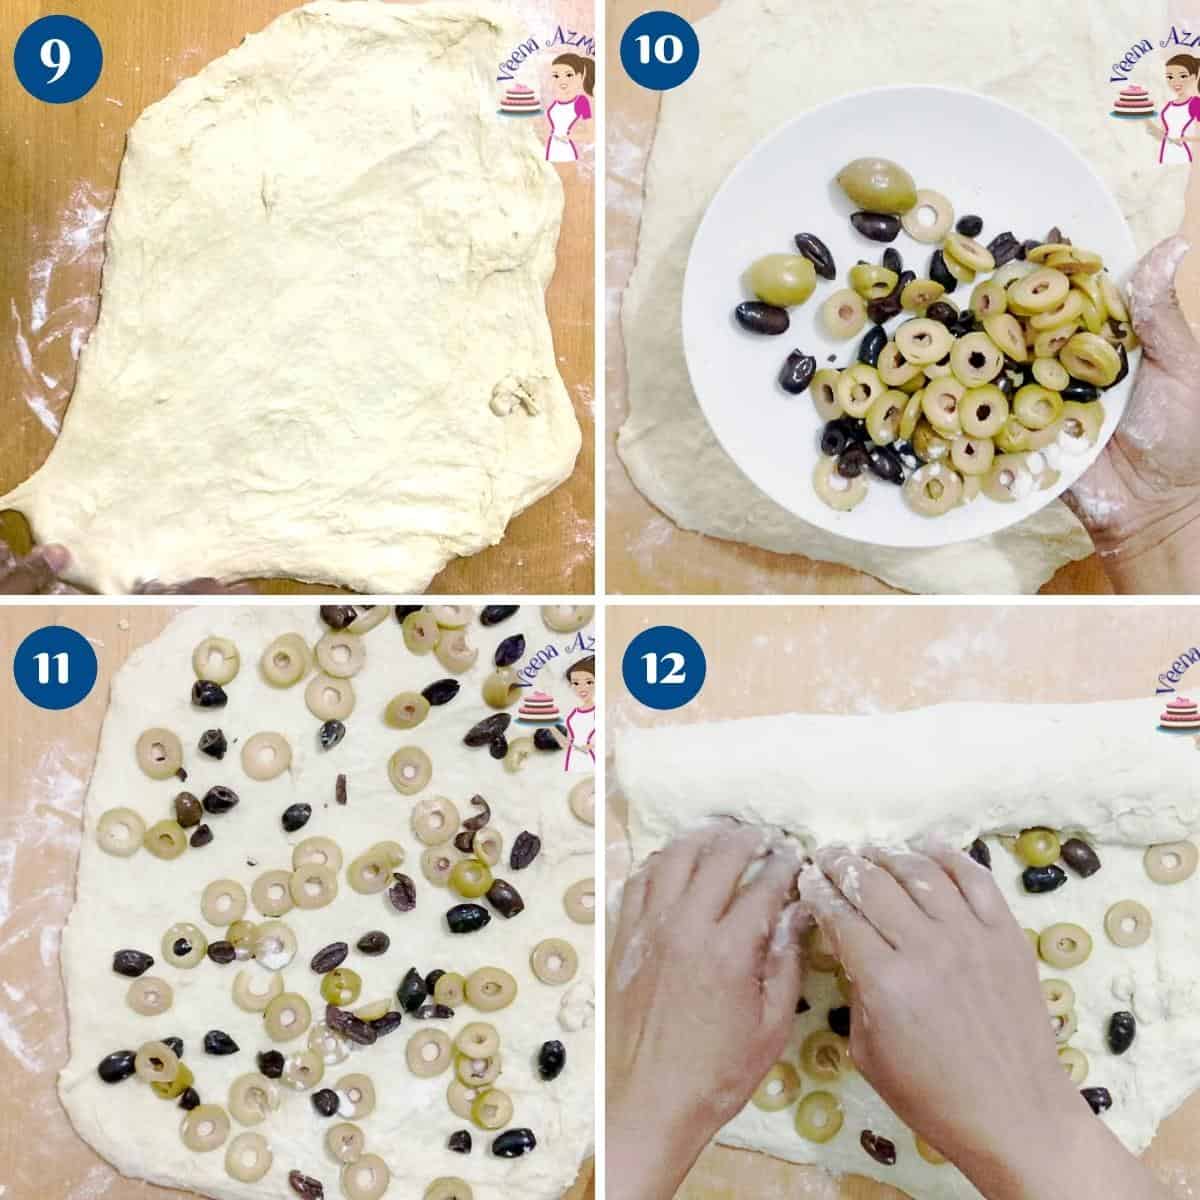
- Then roll the dough into a jelly roll. Pinch each fold to keep the olives in place. Pinch the seams and tuck under. Then, shape it into a ball.
Pro tip – Rolling it this way will ensure the olives are evenly distributed. And, it creates a nicely shaped loaf. - Place the ball into a well-dusted Benetton. Cover with a clean kitchen cloth and let rise for another 45 minutes
Pro tip – You can use a regular bowl lined with a clean kitchen cloth – make sure to flour it well to prevent sticking.

Bake
- Preheat the oven at 200°C / 400°F / Gas Mark 6
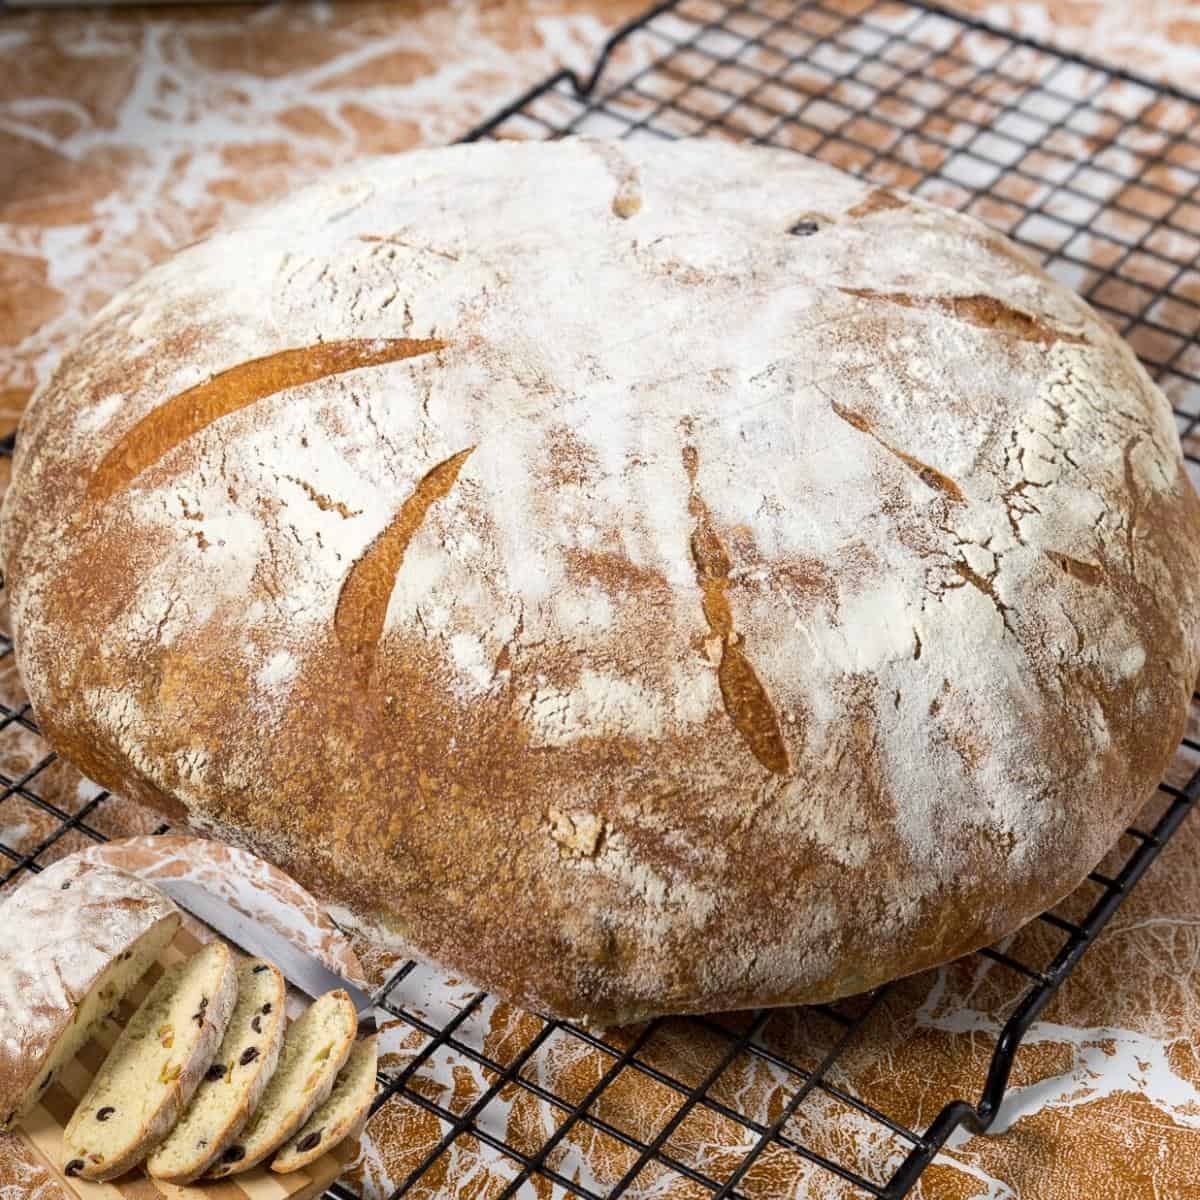
- Carefully invert the proved bread onto a floured baking tray. Sprinkle with some all-purpose flour
- Make slits on the top of each bread with a bread scoring tool, blade, or sharp knife.
Pro tip – The slits/cuts on the top are air vents to let the steam in the bread escape. This will prevent the bread from bursting naturally into a weird shape.

- Place it in the oven on the middle rack and reduce the temperature to 350 F/ 177 C/ Gas mark 4
- Bake for about 45 to 50 minutes – the top will be golden, and the bottom will feel hollow.
Pro tip – I bake mine in a baking trayon the pizza stone. Halfway through baking, I remove the tray so the bread is on the stone. This gives a nice crust. - Remove and let cool on a wire rack for 5 minutes. Dust off excess flour from the top.
Pro tip – Do not leave the loaf on the tray for too long, as the steam will make the bread soggy on the bottom.
Yeast Beer Bread – No-Knead
This no-knead beer bread is an absolute classic. Yeast risen, filled with black and green olives this rustic bread takes only 10 minutes hands-on and 45 minutes to bake. A simple and easy basic yeast beer bread that’s versatile and can be used with many different filling variations.
Video
Ingredients
- 30 ml (2 tbsp) Warm water 110F
- 8 g (2¼ tsp) Instant yeast (1 packet)
- 15 ml (1 tbsp) Olive oil
- 30 g (2 tbsp) Sugar
- 240 ml (1 cup) Beer
- 400 g (3 cups) All-purpose flour
- 9 g Salt
- 75 g (½ cup) Green olives sliced
- 75 g (½ cup) Black olives sliced
Method
- Wet ingredients – In a measuring cup, measure the warm water, add olive oil, sugar, and yeast. Combine well. Set aside for 3 to 5 minutes until foamy.30 ml Warm water, 8 g Instant yeast, 15 ml Olive oil, 30 g Sugar
- Dry ingredients – In a bowl, combine flour and salt. Add the beer and yeast mixture.400 g All-purpose flour, 9 g Salt, 240 ml Beer
- Combine – Use a wooden spoon or spatula to combine it well making sure no dry flour is left on the bottom. This is a very wet dough, so don’t try touching it with your hand.
- Rise – Cover with a clean kitchen cloth or plastic wrap. Leave in a warm place. Let rise for 60 to 90 minutes until doubles in volume.
- When it doubles in size, dust your work surface generously with flour. Remove the dough onto the floured work surface. It is best to use a dough scraper or spatula when working with this dough.
- Spread dough into a rectangle. Sprinkle the chopped olives evenly. Then roll the dough into a jelly roll. Pinch each fold to keep the olives in place. Pinch the seams and tuck under. Then, shape it into a ball.75 g Green olives , 75 g Black olives
- Place the ball into a well-dusted banneton. Cover with a clean kitchen cloth and let rise for another 45 minutes
- Preheat the oven at 200 C / 400 F / Gas Mark 6
- Carefully invert the proved bread onto a floured baking tray. Sprinkle with some all-purpose flour. Make slits on the top of each bread with a bread scoring tool, blade, or sharp knife.
- Place it in the oven on the middle rack and reduce the temperature to 350 F/ 177 C/ Gas mark 4. Bake for about 45 to 50 minutes – the top will be golden and the bottom will feel hollow.
- Remove and let cool on a wire rack for 5 minutes. Dust off excess flour from the top.
Notes
- Storing bread – These loaves do freeze beautifully. Cool the baked loaves then place them in a freezer-safe storage bag. These can be frozen for up to a month. I like to slice my challah so my kids use a few slices at a time.
- Kneading the dough – If possible use an electric mixer because the dough is soft and sticky.
- Bread machine – this dough can be easily made in a bread machine. Pour all ingredients in the pan set to dough or manual. Start and let the dough run its cycle for about 9 to 10 minutes – continue with the recipe as shown above.
Equipment you will need


Nutrition
Tried this recipe?
Mention @veenaazmanov_kitchen or tag #veenaazmanovkitchen!Tips for Success
- This is a soft dough which is why it becomes light and airy despite no-kneading. If you add too much flour the bread will be dense.
- Use lots of extra flour on the work surface to prevent the bread from sticking.
- Use a good quality beer that you like to drink. Open the beer just before you are going to add it to the bread for the best flavor.
- If you do not have a banneton, use a 6-inch bowl. Line the bowl with a clean kitchen cloth and dust it well with flour so the bread won’t stick to it.
- I’ve used a bread scoring tool but you can use a razor blade, Exacto knife, or sharp kitchen knife to score the bread.
- I like to bake such rustic bread on my pizza stone – I start on a baking tray and halfway thru baking I remove the tray and place the bread on the stone. This gives a lovely crust.
- Let the bread cool well before you cut – at least 20 to 30 minutes. This will give you better slices. In our home, we had no patience so we cut the bread while still warm – on a regular day we simply break the bread rather than cut slices. It’s so good.


Frequently asked questions
If stored properly, this beer bread will stay for 4 to 5 days at room temperature. It can be frozen for a month or more, too. Never store bread in the fridge as it dries out.
Yes, you can add raisins and walnuts as well as dried apricots, dates, figs, and cashews, almonds, sunflower seeds, or pecans instead of olives. It’s best to keep the quantity the same or about 1/2 cup more than in the recipe. Any more than that and you risk making the bread too dry.
Yes, it might work very similarly to my soft burger bread or whole wheat burger buns recipes
Perhaps not. But you can try my other no-knead bread that does not use beer, such as No-Knead Bread, Without a Dutch Oven,
as well as no-knead olive bread, knotted rolls, and sandwich bread.
Don’t lose this recipe! Save it for Later!
📌 Save this Recipe for later on Pinterest so you can easily find it again.
⭐ Add Veena Azmanov Kitchen to your Google Preferred Sources.
It helps Google show you more of our recipes.
📧 Subscribe for new recipes delivered to your inbox.
🎥 Follow us for more recipes


Used exactly as described but dough never used all the flour. am anxious to see if bread is good.
Hi Sharon,
That’s actually completely normal 😊 This dough is meant to be soft and a bit sticky, so it won’t use up flour like a firm bread dough. It should come together but still feel slightly tacky.
As long as you followed the measurements, your bread should turn out just fine—let me know how it bakes!
This bread looks so so good and tasty. Love it.
Thank you, Sophie
This bread looks so yummy! I love that it’s no kneed, and those olives in it look delicious!
Thanks, Chelsey. yes, love no-kneading too.