Chocolate Rugelach
 Prep Time 10 minutes Cook Time 15 minutes Total Time 1 day 3 hours 25 minutes


This flaky, buttery, rich pastry with chocolate layers is chocolate rugelach, often called rugalach. This one is layered with chocolate, similar to the ones you pick up at your local bakery. While they look intimidating, these are super simple and easy to make. Let me show you how.

Have you seen this pastry before? Perhaps in a bakery? It’s called rugelach. And pronounced – rug-a-lah. It may look intimidating to make this Jewish chocolate pastry, and yet it is surprisingly easy.
The word “rugelach” actually means “little twists” in Yiddish, which is fitting considering the unique shape of this pastry. However, there is some debate over whether rugelach is a bread, pastry, or cookie. The answer is unclear, as it can vary depending on the recipe and preparation method.
Is rugelach a bread, pastry, or cookie?
- Rugelach dough is typically made with cream cheese, butter, and flour, which gives it a texture that is somewhere between a pastry and a cookie.
- It’s a bread-like dough rolled out thin and cut into triangles. But what sets rugelach apart is the filling – it can be made with various ingredients like cinnamon, nuts, chocolate, apricot, or even savory ingredients like cheese and herbs.
- When baking rugelach, it is usually baked at a high temperature for a short time, resulting in a flaky, crispy texture similar to pastry. However, some recipes call for a lower temperature and longer baking time, resulting in a chewier, cookie-like texture.

Why is this the best rugelach recipe?
- Firstly, its bread-like dough creates the perfect canvas for the flavorful fillings that make rugelach so beloved.
- Secondly, the cookie-like texture of the finished pastry adds a delightful crunch that complements the filling’s sweetness.
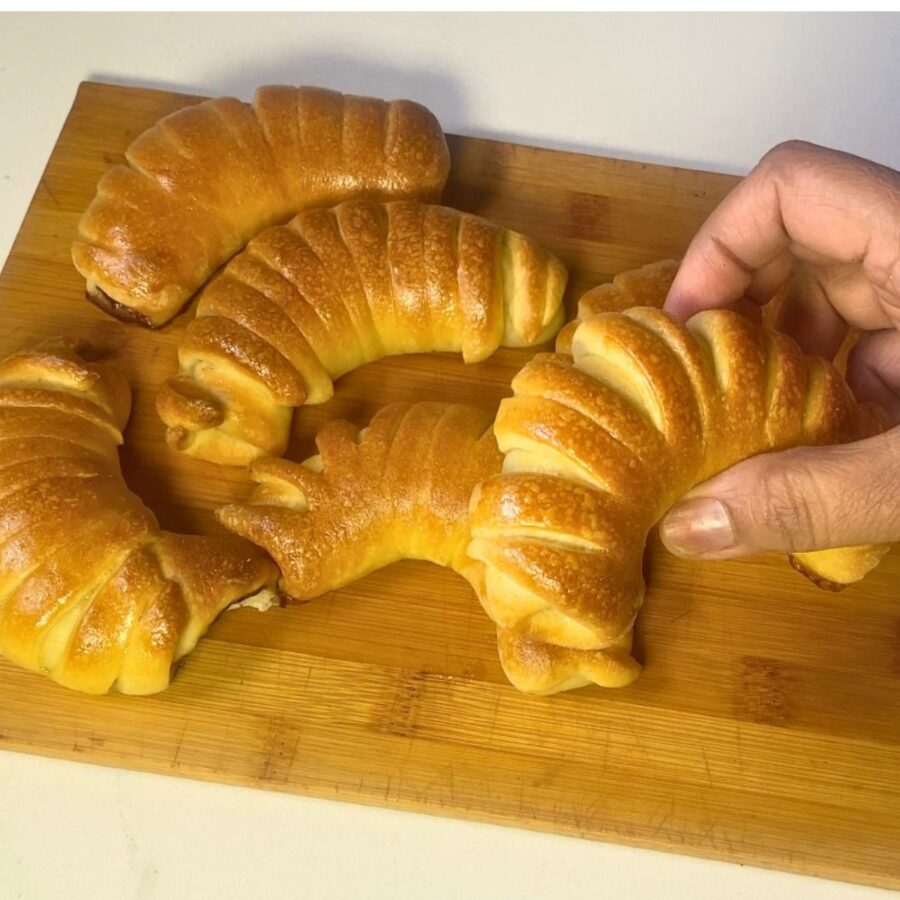
- If you haven’t tasted traditional Jewish rugelach, you are in for a treat with this recipe. They are soft, buttery crescents in shape and layered with chocolate, so the filling does not get lost on the baking tray.
- Also, we brush these with sugar syrup as soon as they are out of the oven. That keeps them soft and moist for a long time.

Ingredients and substitutes
- Flour – I think all-purpose flour works best for this pastry.
- Yeast – There is not much, and that’s because I let the dough rise in the fridge overnight.
- Sugar – I use just a little in the dough; the rest of the sweetness comes from the chocolate.
- Chocolate – Make sure to use good-quality chocolate. If you don’t want to use chocolate, you can use a cocoa powder paste, which I have shared below in the notes.
- Eggs – I use three egg yolks, which add a brioche-like richness to the dough.
- Cream cheese – Rugelach is made with cream cheese, which adds richness and flavor, and tanginess that balances out the sweetness of the filling. You could substitute sour cream for a slightly different tangy flavor or Greek yogurt for a healthier twist.
- Butter – I like to use a good European butter, which is high in fat.
- Almond extract – Another key ingredient in this recipe that adds a subtle nuttiness that complements most fillings. You could swap it out for vanilla extract or even rose water for a floral twist.

Step-by-step: How to make rugelach
Dough
- Yeast dough – Combine milk, yeast, sugar, egg, egg yolks, cream cheese, and vanilla extract in the bowl of a stand mixer with the dough hook attachment.
Pro tip – Use a whisk to combine well, making sure there are no lumps - Knead – Then, add the flour and salt. Combine well on medium-high speed for 2 minutes. Then, lower the speed and knead for 6 minutes more on medium-low speed until smooth, elastic, and shiny.
- Proof – Place in an oiled bowl and cover with plastic or a clean kitchen cloth. Leave the dough to rise on the counter for an hour. Then place it in the fridge for another hour.
Pro tip – The cold dough is easier to work with as the butter chills. You can leave this dough in the fridge for up to 24 hours.

- Chocolate filling – In a microwave-safe bowl, melt the chocolate and butter until smooth. Add the vanilla extract and let the chocolate cool to a spreadable consistency at room temperature.
Pro tip – It is best to make this in advance to give it enough time to thicken. You can also place it in the fridge for a few minutes to chill. - Simple syrup – Combine the sugar and water in a saucepan. Heat on medium-low until all the sugar is melted. Then, cool a minute more until syrup consistency. Set aside until ready to use.

Laminate dough
- Roll – Transfer the dough onto a lightly dusted work surface and roll the dough into a rectangle approximately 10 x 20 cm long.
- Filling – Spread the chocolate over 2/3 of the rectangle. Fold the rectangle like a book, as shown in the pictures above. When laminated, you should have a chocolate layer between each dough layer.
Pro tip – Fold the bottom 1/3 over the center, then the top 1/3 over the center. The chocolate must be a spreadable consistency. Otherwise, it will be messy - Chill dough – Place the dough over a parchment-lined baking tray, and cover with plastic. Chill for an hour or until just firm enough to work with.
Pro tip – You want the chocolate to stay manageable, or it will shatter between the layers. So, approximately an hour is good.

Shape, proof, bake
- Divide – Remove the dough from the fridge and divide it into two so it is easy to work. Work with one portion at a time and keep the second in the fridge to stay chilled.
Pro tip – Dividing the dough will prevent you from making large, thick rugelach. - Shape – Roll the dough into a long, rectangular strip of about 5 mm thickness, which will be about 10 x 25 cm long. Cut the dough into triangles, as shown in the video or pictures above.
Pro tip – First, cut at every 4 inches to get a rectangle shape, then cut the rectangle diagonally. This should give you two triangles - Crescents – Working with one triangle at a time, fold like a croissant into a crescent shape. Start by lightly stretching the triangle lengthwise. Then, roll like a jelly roll from the broader side towards the tail.

- Tray – Place the shaped rugelach on a parchment-lined baking tray, making sure to tuck the tail under. Cover with a clean kitchen cloth and let it proof for an hour.
Pro tip – Tucking the ends under will prevent them from opening during baking. - Oven – Preheat the oven at 325°F / 170°C / Gas Mark 3
Pro tip – Preheating the oven for about 45 minutes is best and ensures it is well preheated. - Bake – Beat the egg and water together. Brush the proofed rugelach with this egg wash. Bake for about 15 to 18 minutes or until lightly golden.
- Syrup – Brush with sugar syrup as soon as you take them out of the oven. Then transfer to a cooling rack to cool completely.
Pro tip – The sugar syrup keeps this rugelach moist, but do not add too much, or they will be soggy. - Enjoy!
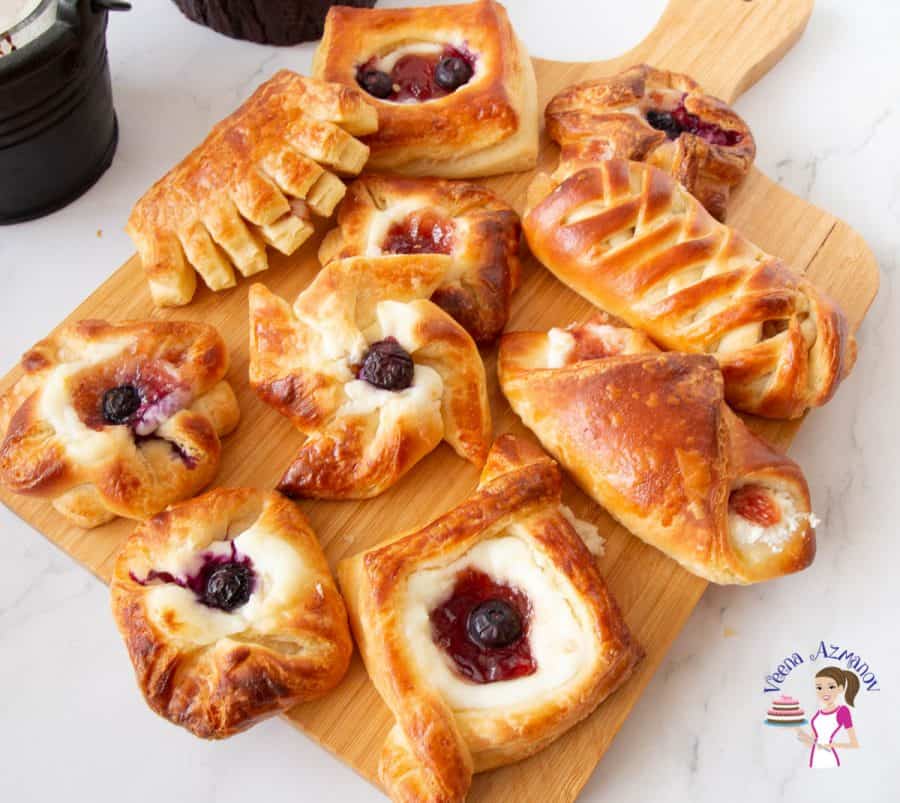
Playing with the rugelach shapes and sizes
For the true baking enthusiasts, experimenting with shapes and sizes can take your rugelach recipe to the next level. While the classic crescent shapes are always a hit, there are plenty of other options to explore.
- You could try making small bite-sized pieces or even making them into larger rolls like cinnamon buns. To get started, try dividing the dough into smaller portions and experimenting with different shapes.
- You could try braiding the dough or making twisted spirals for a unique look.
- Another option is to use cookie cutters to cut the dough into fun shapes like hearts or stars.
- Once you’ve settled on a shape, consider adjusting the size. Miniature rugelach make for a perfect teatime treat, while larger ones are an excellent option for sharing with friends and family.


Troubleshooting rugelach
- Dough is too dry or crumbly:
- Ensure that you’re using the correct measurements for the ingredients. Double-check your recipe to make sure you haven’t missed anything.
- If the dough is too dry, try adding a little more liquid, such as water or milk, a teaspoon at a time, until the dough comes together.
- You can also try incorporating the ingredients more thoroughly. Knead the dough until it becomes smooth and cohesive.
- Dough is too sticky or difficult to work with:
- If the dough is too sticky, it may have too much liquid. You can add a little more flour, a tablespoon at a time, until the dough becomes easier to handle.
- Make sure you’re working with chilled dough. If the dough becomes too warm, it can become stickier. Refrigerate the dough for a little longer before working with it.
- Dust your work surface and rolling pin with flour to prevent sticking.
- Filling is oozing out during baking:
- Be careful not to overfill the rugelach. Leaving a small border around the edges of the dough will help prevent the filling from leaking out.
- Seal the edges of the dough tightly when rolling it up to enclose the filling. Press the edges together to secure the filling inside.
- Rugelach is not evenly baked:
- Ensure that your oven is properly preheated to the correct temperature as specified in the recipe.
- Rotate the baking sheet halfway through the baking time to promote even browning.
- Check the rugelach for doneness by lightly tapping the edges. They should be golden brown when ready.
- Rugelach is too dry or lacks flavor:
- Ensure you’re using quality ingredients, especially when it comes to the chocolate. High-quality chocolate will provide better flavor.
- You can brush the baked rugelach with a thin sugar syrup or honey immediately after they come out of the oven. This will add moisture and enhance the sweetness.
- Chocolate Rugelach Cookies
- Vanilla Crescents Recipe That Will Blow Your Mind!
- Soft Pumpkin Crescent Rolls
- Cinnamon Crescent Rolls
- Soft Crescent Rolls

Frequently asked questions
Rugelach is a pastry, and it’s best on the day it is made. However, it freezes well, so any leftovers are best kept in the freezer. These can be frozen for up to 2 months.
Often people mistake it for a croissant or a schnecken, but it’s not. Croissant is a butter-laminated dough, while the layers in the rugelach are chocolate. And while Schnecken uses sour cream, rugelach uses cream cheese in the dough.
While using real chocolate in the rugelach is the best in terms of taste, the cocoa paste is much easier to work with. To make it easier to work with chocolate, we let the dough chill until the chocolate cools. Below, I have given you both filling options to choose from.
Yes! Rugelach dough can be made up to 3 days in advance and stored in the refrigerator. You can also freeze the dough for up to 3 months.
Absolutely, you can use any chocolate from 54% to 80% cocoa solids.
The key is not to overbake them. If you notice your rugelach turning brown too quickly, reduce the oven temperature by 25 degrees. You can also brush them with a little bit of melted butter or honey before baking to add moisture.
Bakery Style Chocolate Rugelach
This flaky, buttery, rich pastry with chocolate layers is chocolate rugelach, often called rugalach. This one is not just filled with chocolate but layered with chocolate in the traditional way and similar to the ones you pick at your local bakery. And while they look intimidating, these are super simple and easy to make. Let me show you how.
Video
Ingredients
- 500 grams (4 cups) All-purpose flour
- ½ tsp Fine salt
- 7 g (7 g) Instant dry yeast
- 50 g (¼ cup) Sugar
- 1 large Eggs
- 2 large Egg yolks
- 113 g (4 oz) Cream cheese or sour cream
- 80 ml (⅓ cups) Whole milk
- 1 tbsp Vanilla extract
- 113 g (½ cups) Butter unsalted, room temperature
- 7 oz (200 g) Dark chocolate
- 30 g (2 tbsp) Butter unsalted, room temperature
- 1 cup (85 g) Cocoa Powder
- 2 cup (240 g) Powdered Sugar
- ¼ cup (60 ml) Melted Butter
- 1 tbsp Vanilla extract
- 2 tbsp Whole milk or water
- 1 Egg
- 2 tbsp Water
- ½ cup (100 g) Sugar
- ¼ cup (60 ml) Water
Method
- Yeast dough – Combine milk, yeast, sugar, egg, egg yolks, cream cheese, butter, and vanilla extract in the bowl of a stand mixer with the dough hook attachment.7 g Instant dry yeast, 50 g Sugar, 113 g Butter, 1 large Eggs, 2 large Egg yolks, 113 g Cream cheese, 80 ml Whole milk, 1 tbsp Vanilla extract
- Knead – Then, add the flour and salt. Combine well on medium-high speed for 2 minutes. Then, lower the speed and knead for 6 minutes more on medium-low speed until smooth, elastic, and shiny.500 grams All-purpose flour, ½ tsp Fine salt
- Proof – Place in an oiled bowl and cover with plastic or a clean kitchen cloth. Leave the dough to rise on the counter for an hour. Then place it in the fridge for another hour.
- Chocolate filling – In a microwave-safe bowl, melt the chocolate and butter until smooth. Add the vanilla extract and leave at room temperature for the chocolate to cool to a spreadable consistency.7 oz Dark chocolate, 30 g Butter
- Simple syrup – Combine the sugar and water in a saucepan. Heat on medium-low until all the sugar is melted. Then, cool a minute more until syrup consistency. Set aside until ready to use.¼ cup Water, ½ cup Sugar
- Roll – Transfer the dough onto a lightly dusted work surface and roll the dough into a rectangle approximately 10 x 20 cm long.
- Filling – Spread the chocolate over 2/3 of the rectangle. Fold the rectangle like a book, as shown in the pictures above. When laminated, you should have a chocolate layer between each dough layer.
- Chill dough – Place the dough over a parchment-lined baking tray, and cover with plastic. Chill for an hour or until just firm enough to work with.
- Divide – Remove the dough from the fridge and divide it into two pieces so it is easy to work with. Work with one portion at a time and keep the second in the fridge to stay chilled.
- Shape – Roll the dough into a long, rectangular strip of about 5 mm thickness, which will be about 10 x 25 cm long. Cut the dough into triangles, as shown in the video or pictures above.
- Crescents – Working with one triangle at a time, fold like a croissant into a crescent shape. Start by lightly stretching the triangle lengthwise. Then, roll like a jelly roll from the broader side towards the tail.
- Tray – Place the shaped rugelach on a parchment-lined baking tray, making sure to tuck the tail under. Cover with a clean kitchen cloth and let proof for an hour.
- Oven – Preheat the oven at 325°F / 170°C / Gas Mark 3
- Bake – beat the egg and water together. Brush the proofed rugelach with this egg wash. Bake for about 15 to 18 minutes or until lightly golden.
- Syrup – Brush with sugar syrup as soon as you take them out of the oven. Then transfer to a cooling rack to cool completely.
- Enjoy!
Notes
- Use high-quality chocolate: The better the chocolate, the better your rugelach will taste. Look for brands with a high percentage of cocoa solids for a richer, more complex flavor.
- Chilled dough: Ensure your dough is thoroughly chilled before working with it. This helps the dough hold its shape and prevents it from becoming too sticky.
- Rolling out the dough: Roll out the dough into a circle or rectangle, about 1/8 to 1/4 inch thick. Use a lightly floured surface and a lightly floured rolling pin to prevent sticking.
- Even thickness: Aim for an even thickness throughout the dough to ensure even baking. If necessary, gently patch any thin spots with additional dough.
- Filling distribution: Spread the filling evenly over the rolled-out dough, leaving a small border around the edges. This helps prevent the filling from oozing out during baking.
- Filling ingredients: Choose high-quality ingredients for the filling, such as finely chopped chocolate, nuts, or fruit preserves. This will enhance the flavor and texture of your rugelach.
- Rolling up the dough: Roll the dough tightly from one edge to the other, starting with the broader side if you have a rectangular shape. This creates a neat spiral shape and helps keep the filling inside.
- Cutting into pieces: Use a sharp knife or a pizza cutter to cut the rolled dough into individual rugelach pieces. Aim for even-sized pieces to ensure consistent baking.
- Baking temperature and time: Preheat your oven to the specified temperature in the recipe. Bake the rugelach until they are golden brown on the edges. The baking time can vary, so keep an eye on them and adjust as needed.
- Cooling and storing: Allow the rugelach to cool completely on a wire rack before storing them. This helps them firm up and retain their shape. Store them in an airtight container at room temperature for a few days or freeze them for longer storage.
- Experiment and have fun: Rugelach is a versatile pastry, so feel free to experiment with different fillings and flavors. You can try combinations like chocolate, hazelnut, cinnamon, sugar, raspberry jam, and almonds. Get creative and enjoy the process!
Equipment you will need


Nutrition
Tried this recipe?
Mention @veenaazmanov_kitchen or tag #veenaazmanovkitchen!

Don’t lose this recipe! Save it for Later!
📌 Save this Recipe for later on Pinterest so you can easily find it again.
⭐ Add Veena Azmanov Kitchen to your Google Preferred Sources.
It helps Google show you more of our recipes.
📧 Subscribe for new recipes delivered to your inbox.
🎥 Follow us for more recipes


I was excited to try this recipe but I don’t understand how to get rid of all the lumps of butter and cream cheese in step 1. My butter was very softened at room temperature, and I had my cream cheese at room temperature too just in case (though it doesn’t say that in the recipe). I also used a whisk like you suggest in your pro tip, but I still had lumps. What am I supposed to be doing differently? I tried to access your video for this recipe but I couldn’t find the video.
It’s a soft dough; once you knead it, the cream cheese should become smooth.