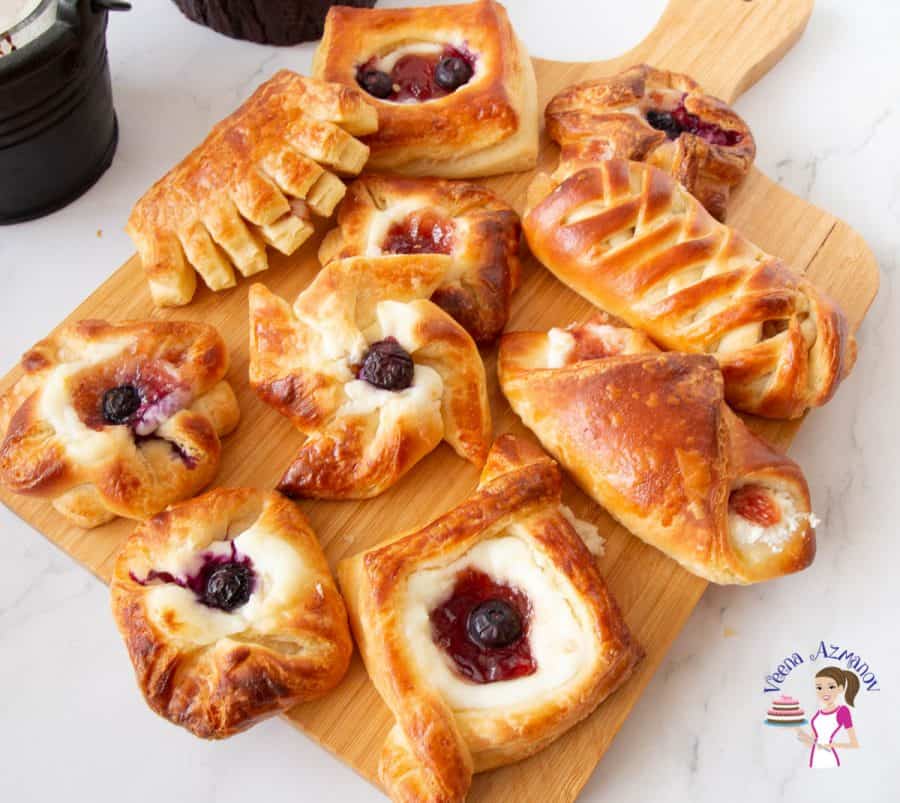
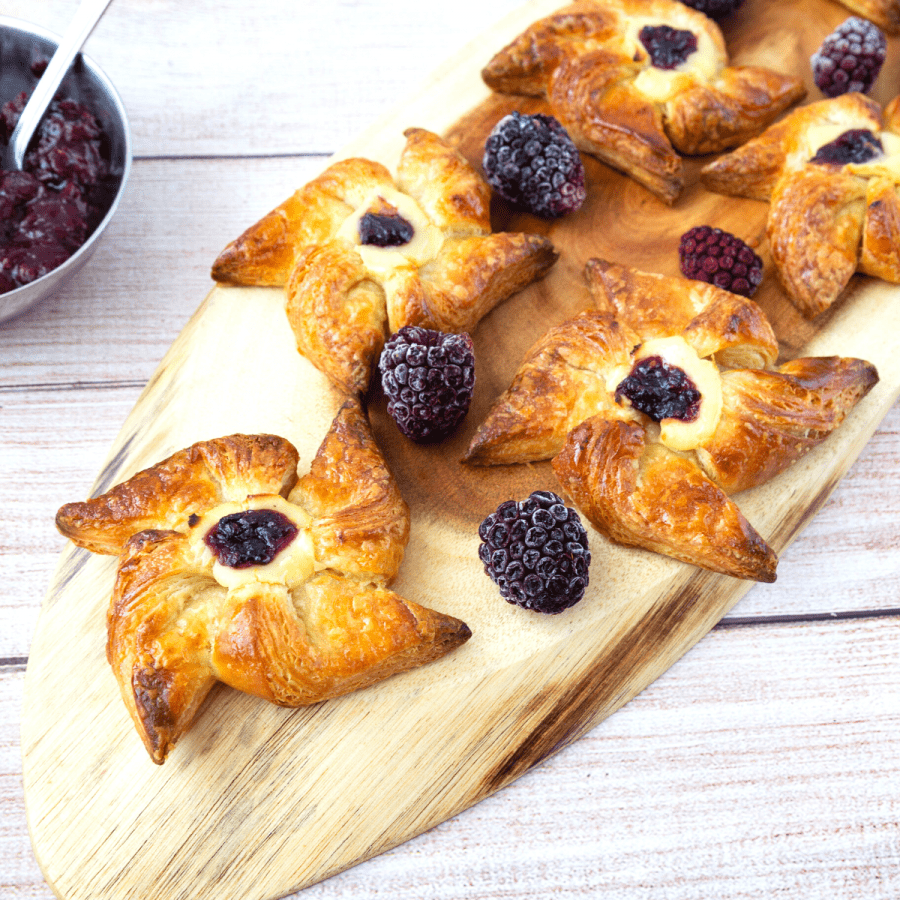
Danish Pastry – Cream Cheese Cylinders


Ever wondered how bakeries get those perfect, flaky Danish pastries with luscious cream cheese and jam inside? You’re about to find out. These Danish pastry cylinders are buttery, tender, and beautifully shaped — and yes, they’re completely homemade.
If laminated dough intimidates you, don’t worry — I’ll walk you through it step by step. This dough is surprisingly forgiving once you understand the method. I’ve been making these since my early baking days, and they were always a hit at brunches and dessert tables. Plus, the best part? You can shape the dough into pinwheels, braids, spirals — or these gorgeous cylinders filled with cream cheese and berry jam. Let’s do this!

Danish pastry is a variety of buttery pastries, primarily from Denmark and Norway, but also in other Nordic countries. They are not necessarily difficult, but a bit time-consuming to make. Actually, any laminated dough, like a croissant or puff pastry, takes time because we need to chill the dough in between steps.
Once you learn to make the basic Danish dough, you can shape it and fill it with anything you like. Cream cheese makes a delicious filling with jam, so that’s what we are going to use in these cylinders.
Quick Overview: Danish Pastry Timeline
| Step | Time Estimate |
|---|---|
| Make the dough | 20 minutes + 15 min chill |
| Make the butter block | 10 minutes + 15 min chill |
| Laminate (3 folds) | 3 x 10 min folds + 2 hrs chill |
| Shape, fill, and proof | 45 minutes |
| Bake | 15–20 minutes |
| Cool and glaze | 10–15 minutes |

Why you’ll love this Danish pastry
- Buttery, flaky layers – Made with real laminated dough, not puff pastry.
- Bakery-style flavor – Tangy cream cheese, sweet jam, and golden brown crust.
- Step-by-step friendly – Easy instructions, visuals, and pro tips.
- Make-ahead & freezer-friendly – Prep in advance and bake when ready.

Ingredients and substitutes
- Danish Dough:
- All-purpose flour – Don’t use bread flour or self-rising flour.
- Milk – Whole milk gives the best flavor and texture.
- Sugar – Can be reduced slightly if you prefer it less sweet.
- Egg – Adds richness and structure.
- Instant dry yeast – Or use active dry yeast (adjust for activation time).
- Butter (softened) – Use European-style unsalted butter for the best lamination.
- Butter Block:
- Butter – Soft but cool; creamed with flour for stability.
- Flour – Just a little to help stabilize the butter during lamination.
- Cream Cheese Filling:
- Cream cheese (full-fat) – Avoid low-fat versions, which can get runny.
- Sugar – Granulated works best.
- Egg yolk – Helps bind the mixture and improve texture.
- Vanilla extract + lemon zest – Adds flavor depth.
- Extras:
- Jam – Any flavor works! Try raspberry, blackberry, or apricot.
- Egg wash – For that golden, glossy finish.
- Apricot glaze – Optional, but makes it bakery-beautiful.

Quick Overview: How to Make Danish Pastry with Cream Cheese
This is a step-by-step summary of the entire process. For detailed instructions and pro tips, scroll down to the full recipe card.
👉 Step 1: Make the Dough
- Mix flour, salt, milk, sugar, egg, yeast, and vanilla in a stand mixer.
- Knead until smooth and slightly sticky.
- Gradually knead in softened butter.
- Chill the dough for 15 minutes.

👉 Step 2: Prepare the Butter Block
- Cream butter and flour together.
- Shape into a 12×6-inch rectangle.
- Divide into two 6×6-inch squares.
- Chill for 15 minutes.

👉 Step 3: Laminate the Dough
- Roll out the dough and sandwich the two butter blocks between layers of dough.
- Fold and roll three times (classic business-letter folds), chilling 30 minutes between each.
- Chill the final dough for at least 2 hours (or up to 48 hours).

👉 Step 4: Prepare the Filling
- Mix cream cheese, egg yolk, sugar, vanilla, and lemon zest.
- Keep chilled until ready to use.
👉 Step 5: Shape the Cylinders
- Roll the dough to 12×12 inches and trim the edges.
- Cut into 3×3-inch squares.
- Pipe cream cheese diagonally, and add a bit of jam.
- Fold opposite corners over each other to form cylinders.
- Proof for 45 minutes.
👉 Step 6: Bake
- Brush with egg wash.
- Bake at 375°F / 190°C for 15–20 minutes until golden.
- Cool 10 minutes, then brush with apricot glaze.
- Cool completely on a wire rack and enjoy!
Pro Tips for Success
- Chill between folds. Cold dough = clean, flaky layers.
- Butter flexibility matters. Cold but pliable — not hard, not melted.
- Don’t overproof. 45 minutes is plenty, or the butter may leak.
- Trim edges. It opens up the lamination and helps with even puff.
- Don’t overfill. Too much cream cheese or jam = messy baking.
Troubleshooting
| Issue | Cause | Fix / Tip |
|---|---|---|
| Pastries were baked too dark | Oven temperature may be too high, especially in fan-assisted ovens | Tent loosely with foil or parchment halfway through baking. Use egg whites only for egg wash instead of whole egg if browning too fast |
| Butter leaked out during baking | The butter block was too soft, or the dough was under-chilled; the oven was not preheated properly | Ensure dough and butter are cold before laminating. Preheat the oven for at least 20 minutes before baking |
| Pastries didn’t puff properly | Dough was over-proofed or under-laminated; layers collapsed | Stick to recommended chilling and folding times; avoid proofing too long. Keep the dough cold during shaping |
| Pastries look bulky or too large | The dough was rolled too thick, or the squares were oversized | Roll to a precise 12×12-inch square, then cut evenly into 3×3-inch portions. Trim edges for a better rise |
| Layers blended together | The dough or butter was too warm during folding | Chill between each fold. If it’s a hot kitchen, chill longer between steps |
| Bottoms soggy or underbaked | Overfilling or too much moisture in the jam | Use thick jam or fruit preserves. Don’t overfill. Let pastries cool on a wire rack |
| Shaped pastries opened during baking | Folds weren’t sealed properly, or the dough was too dry | Press the overlapping corners firmly together. Avoid adding too much flour while shaping |

Frequently asked questions
Both puff pastry and Danish are laminated dough, but they are not the same. Puff pastry does not have yeast, sugar, or milk. The Danish dough is yeast-based with eggs, sugar, and milk.
Both croissant dough and Danish pastry are laminated dough, but they are not the same.
Danish is a sweet dough made with yeast, milk, and eggs. It is Crispy, tender, light, and flaky.
Danish is much heavier than croissants because it contains more butter, along with other ingredients like eggs, which are not in croissants.
Croissant dough can be used for sweet and savory pastries, but Danish is a sweet pastry.
The purpose of the flour in the butter block is to stabilize it. It will take care of any excess moisture in the butter. I highly recommend using it.
The best way to bake laminated pastries is to place them in a hot oven so the layers open up and the butter between the layers is cooked off instantly, leaving no time for it to melt. But you also want them to continue cooking without becoming too dark on the outside. The ideal temperature for homemade Danish, I find, is 190 C/ 375F for 20 to 25 minutes. Tent the pastries if they are browning quickly.
The measurements are guides, so there are no leaks and no waste. After all, this dough does take a lot of effort, so we want to get the maximum out of it. For example, we use a 7 x 18-inch rectangle of dough for our 6 x 6-inch butter blocks. This way, we can be sure the butter will not peek out. You could also use smaller measurements as long as you can calculate them correctly.
Danish Cream Cheese Cylinders
Do you want to learn how to make buttery, flaky, bakery-style Danish pastry yourself? Danish pastry is made with a laminated dough, similar to croissants, but they are sweeter and have more butter and eggs.
Video
Ingredients
- 250 g (2 cups) All-purpose flour
- 250 g (2 cups) Bread flour
- 1 tsp Salt
- 125 ml (½ cups) Whole milk full-fat
- 50 g (¼ cups) Sugar
- 7 g (2 ¼ tsp) Instant dry yeast
- 50 g (1 large) Egg
- 1 tsp Vanilla extract
- 30 g (2 tbsp) Butter unsalted
- 250 g (1 cups) Butter unsalted, room temperature
- 4 tbsp (30 g) All-purpose flour
- 113 g (½ cups) Cream cheese 35% or more
- 30 g (2 tbsp) Sugar
- 1 large Egg yolk
- ½ tsp Vanilla extract
- ½ tsp Lemon zest
- ½ cup (120 g) Apricot jam
- 2 tbsp (60 ml) Water
- 1 Egg beaten
- ½ cup (170 g) Jam I used homemade blackberry
Method
- Combine all ingredients in a bowl. Keep in the fridge until ready to use.113 g Cream cheese, 30 g Sugar, 1 large Egg yolk, ½ tsp Vanilla extract, ½ tsp Lemon zest
- Dry ingredients – In the bowl of a stand mixer with the hook attachment, combine flour and salt. Set aside. You can also use a food processor to make this dough.250 g All-purpose flour, 1 tsp Salt
- Yeast mixture – In a measuring cup or bowl, combine milk, sugar, yeast, egg, and vanilla extract.125 ml Whole milk, 50 g Sugar, 7 g Instant dry yeast, 50 g Egg , 1 tsp Vanilla extract
- Wet to dry – Add the yeast mixture to the flour mixture. Combine on medium-high until all flour is incorporated. Knead a minute more.
- Knead – Then, gradually add the room temperature butter, one tablespoon at a time. Then, knead for 3 minutes on medium. Alternatively, you can knead by hand for 5 to 7 minutes.30 g Butter
- Rest – The dough will be soft and slightly sticky. Remove from the mixer and shape into a ball. Place in an oiled bowl, cover with plastic wrap, and chill for 15 minutes.
- Template – Use a parchment paper to create a template 12 x 6 inches (see video) – set aside.
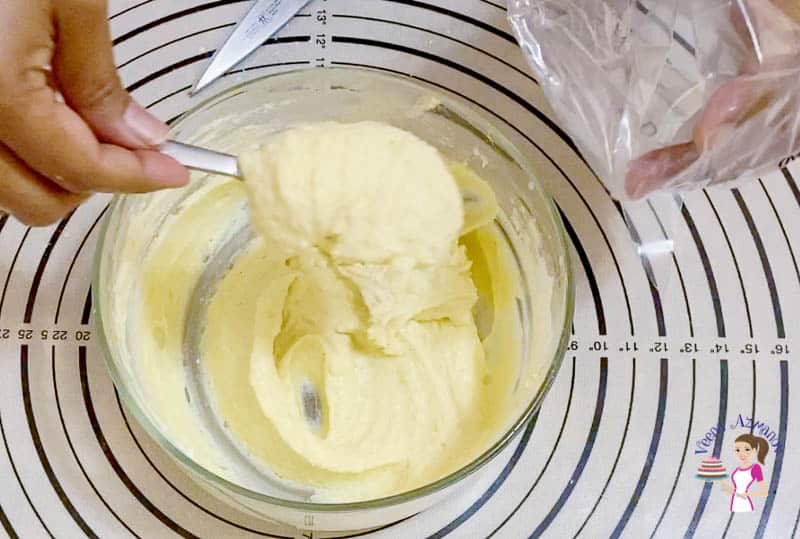
- Cream – In the same electric mixer bowl (no need to wash), cream the butter and flour just until combined. Transfer to the prepared parchment paper template. Spread evenly with a spatula. Use a rolling pin to guide it inside the template towards the corners (see video).250 g Butter, 4 tbsp All-purpose flour
- Divide – Use a ruler to mark them at 6 inches. So, now this will give you two 6 x 6-inch blocks (see video).
- Chill in the fridge for 15 minutes.
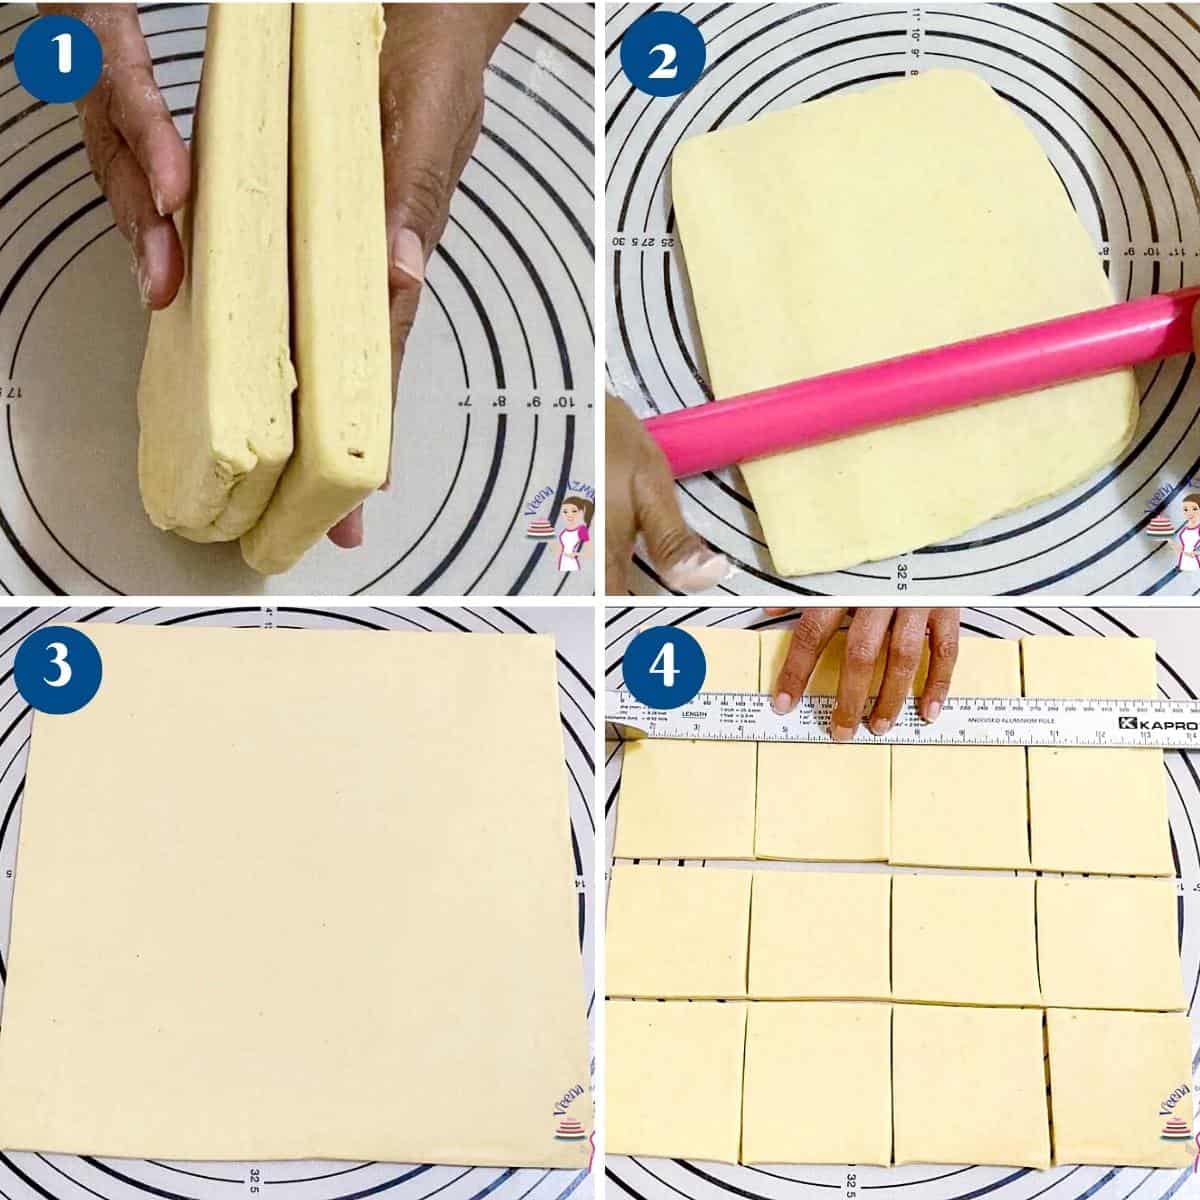
- Roll – Transfer the dough to a lightly floured surface. Roll to a long rectangle of 7 x 18 inches.
- Fold – Open the butter block and divide it into 2 at the mark you created. Now you should have two 6 x 6-inch blocks. Place one block over the center. Fold one side over. Then, place the second block on top and fold the other side over.
- Chill – Wrap the dough, place it on a baking sheet, and put it in the refrigerator – chill for 15 minutes.
- Turn the dough – Roll the chilled pastry dough into a rectangle, with the short side facing you. Roll to a rectangle approximately 6 x 12 inches.
- First fold – Fold the dough lengthways into thirds like a business letter (see video). Wrap in plastic on a baking sheet and place into the fridge to chill for 30 minutes.
- Second fold – Roll the dough lengthways again with the short side facing you (see video) to about 6 x 12 inches long again. Fold the dough into thirds again like a business letter (see video). Place in the fridge for 30 minutes if necessary.
- Third fold – Roll the dough lengthways again with the short side facing you – (see video) to about 6 x 12 inches long again. Fold the dough into thirds again like a business letter (see video).
- Chill – After the third fold, chill in the fridge for at least two hours or until well chilled. This can be chilled for up to 48 hours.
- Divide – Roll the dough into a 6 x 12-inch rectangle. Divide into 2. Place one in the fridge while you work on the second one.
- Roll – Roll the dough to about a 12 x 12-inch square. Trim edges so you have straight, sharp edges.
- Squares – You can use the sheet as a whole or cut it into 3 x 3-inch squares (about 16). Mark at 3 inches from either side as shown in the video.
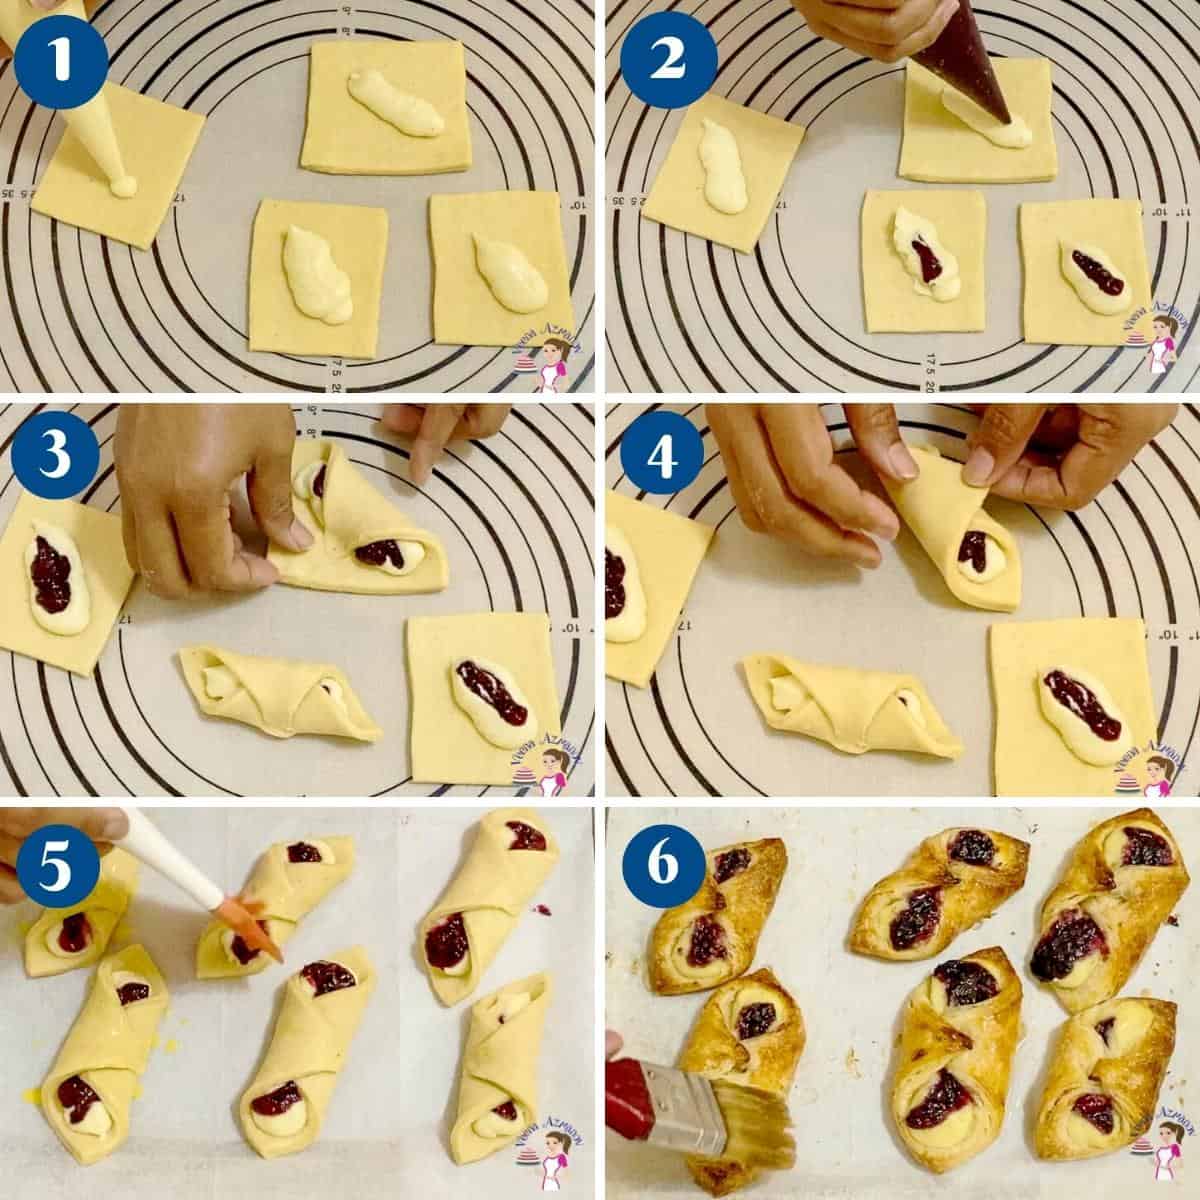
- Fill – Pipe a tablespoon of cream cheese on the square diagonally. Then, pipe some jam in the center of the cream cheese (see video).½ cup Jam
- Fold – Fold two sides over each other diagonally (see video). Make sure to press firmly to prevent opening.
- Proof – Place on a baking tray and cover the pinwheels with a clean kitchen cloth – let poof for 45 minutes.
- Oven – Preheat the oven at 375°F/ 190°C / Gas Mark 5. Brush the pastry with a beaten egg.1 Egg
- Bake – Bake in the hot oven for 15 to 20 minutes until rich, golden brown.
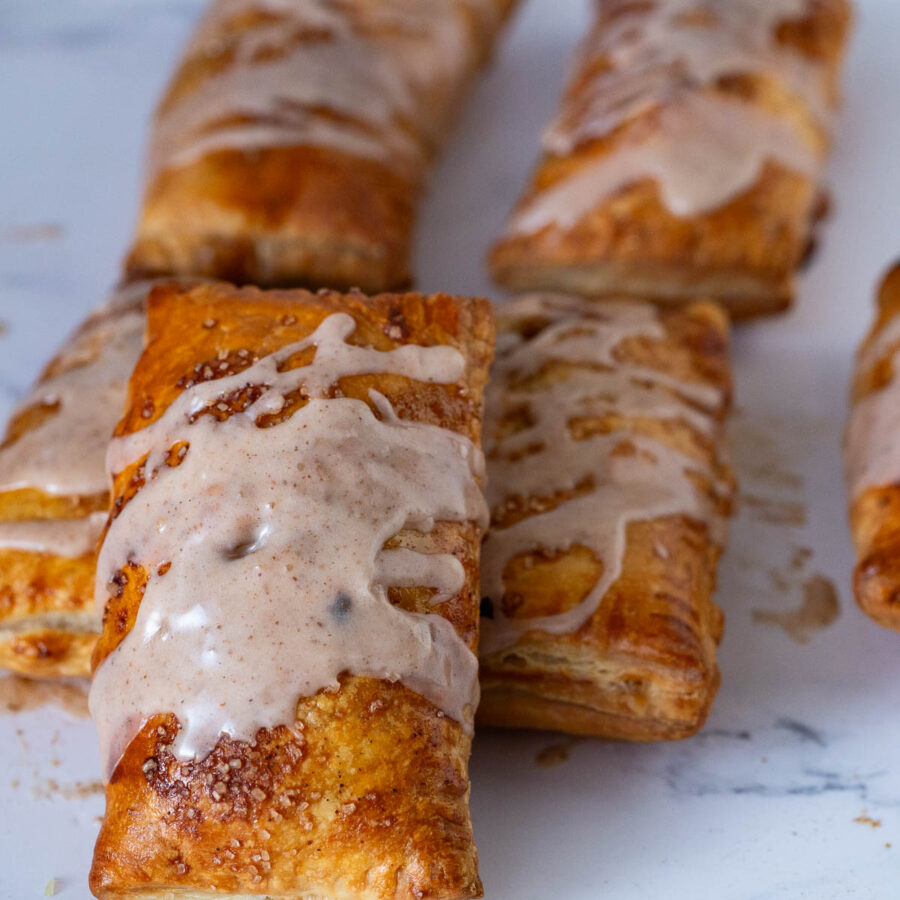
- Glaze – Remove from the oven and let cool on the tray for 10 minutes. Then, using a pastry brush, glaze them with the prepared apricot glaze. (below)
- Cool – Transfer to a cooling rack and cool them completely before storing. These pastries are best enjoyed on the day they are baked. But they also freeze well for months.
Notes
Pro Tips for Success
- Chill between folds. Cold dough = clean flaky layers.
- Butter flexibility matters. Cold but pliable — not hard, not melted.
- Don’t overproof. 45 minutes is plenty or the butter may leak.
- Trim edges. It opens up the lamination and helps with even puff.
- Don’t overfill. Too much cream cheese or jam = messy baking.
Variations & Shaping Ideas
- Shapes: Cylinders, pinwheels, braids, spirals, or envelopes.
- Fillings: Lemon curd, cherry jam, Nutella, pastry cream, or even savory cheese.
- Toppings: Streusel, sliced almonds, or sugar glaze.
Equipment you will need


Nutrition
Tried this recipe?
Mention @veenaazmanov_kitchen or tag #veenaazmanovkitchen!- Cream Puffs – Cheesecake Cream Puffs, Tiramisu Cream Puffs
- Classic Puff Pastry from Scratch – Pate Feuilletée
- Blackberry Braided Puff Pastry, Strawberry Braided Pastry,
- Braided Apple Puff Pastry

Don’t lose this recipe! Save it for Later!
📌 Save this Recipe for later on Pinterest so you can easily find it again.
⭐ Add Veena Azmanov Kitchen to your Google Preferred Sources.
It helps Google show you more of our recipes.
📧 Subscribe for new recipes delivered to your inbox.
🎥 Follow us for more recipes


Hi Veena! I just want clarify how many tablespoons are there in pastry cream recipe? It’s not specified or included in the ingredients but it’s included in the procedure. Please enlighten me. Thanks!
You mean pastry cream instead of cream cheese in the filling. You would use the same amount about a tablespoon or no more than 2 tablespoons. Thanks
Thanks Veena for your quick response. What I mean is how many tablespoons of sugar in the pastry cream recipe? I tried putting 2 1/2. What do you think? What should be the taste of the pastry cream?
My pastry cream has 4 tbsp of sugar thanks
I love Danish pastries on the weekends. These are the perfect sweets for breakfast or brunches.
Than you, Sharon. I hope you try this
Yum- these look so buttery and tasty! A perfect breakfast recipe and way to start the day!
Thank you, Marwin
These were amazing! I used raspberry jam and they came out just perfect, it was such a fun baking project, thank you for all your helpful tips!
You are very welcome, Mikayla. Thank you
These little pastries were so fun to make, and I love how you can customize it with different fruit. And thanks for all the tips! They’re definitely helpful.
Thank you, Amanda. I am so happy to hear you enjoyed this. Thanks for the feedback
I’ve never made a laminated dough because I find it so daunting! Your instructions are so thorough…I think I could actually do it. I have to try someday!
Thank you, Bernice
So buttery and flaky are these pastries. I would love to grab a few. Pinned!
Thanks, Kushi
It’s been over a year since I’ve laminated dough, but every time I see it being done I want to make a batch. I loved perusing this recipe.
Thank you, Marta. It’s so easy you must try
These pastries taste like it came from a bakery- too good and perfect for brunch! Can’t wait to make these again!!
Thank you, Kathryn. I am so happy you enjoyed making these.
These are my favorite pastries! I’ve been making them for years without making my own dough, and this recipe made them so much better! I am never going back to my shortcut ways again. Thanks for the recipe!
Now you can make these yourself every time. Candice
These are perfection!!! I have always been so intimidated to make my own danish pastry before, but with your tips and step by step photos I’m so excited to try!
Thank you, Andrea. let me know how it went.