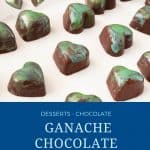
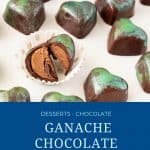
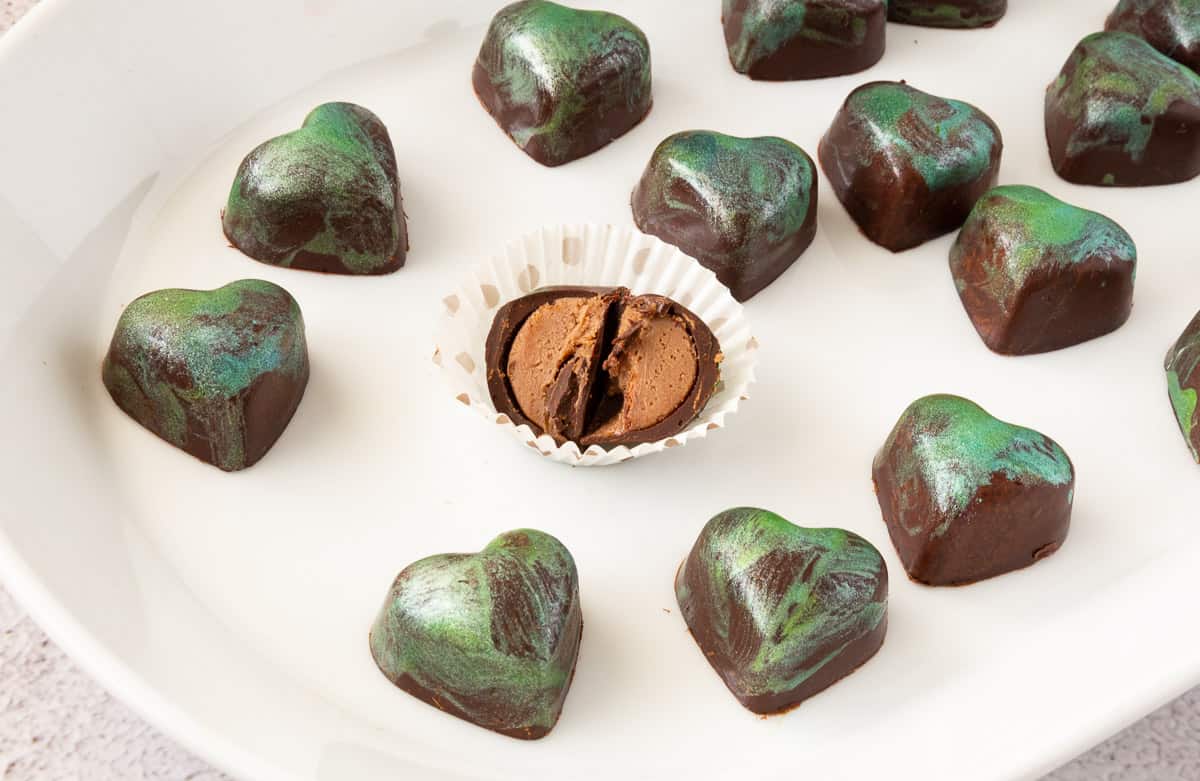
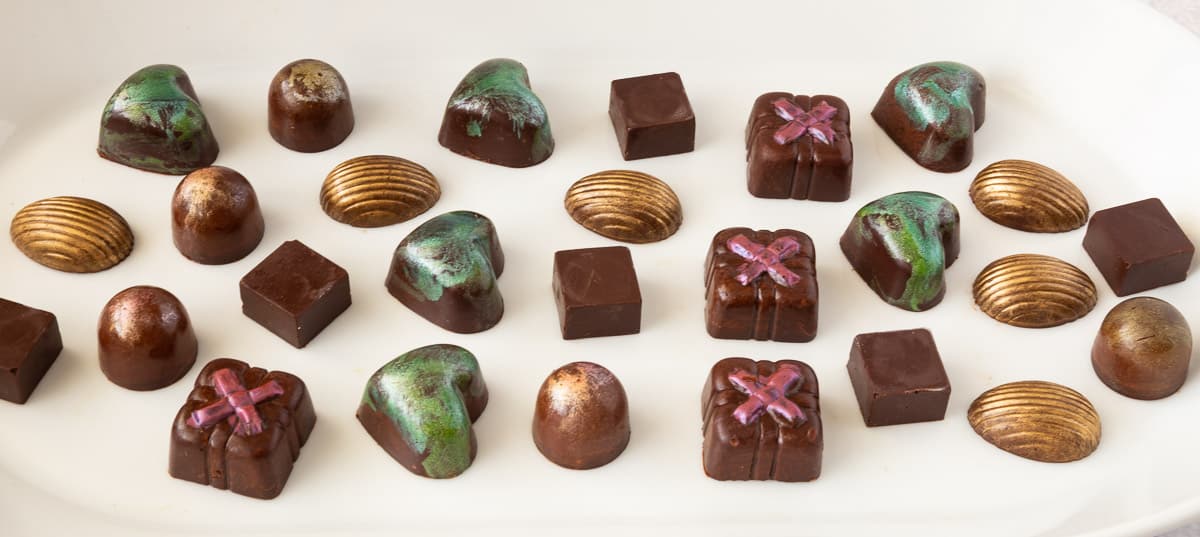
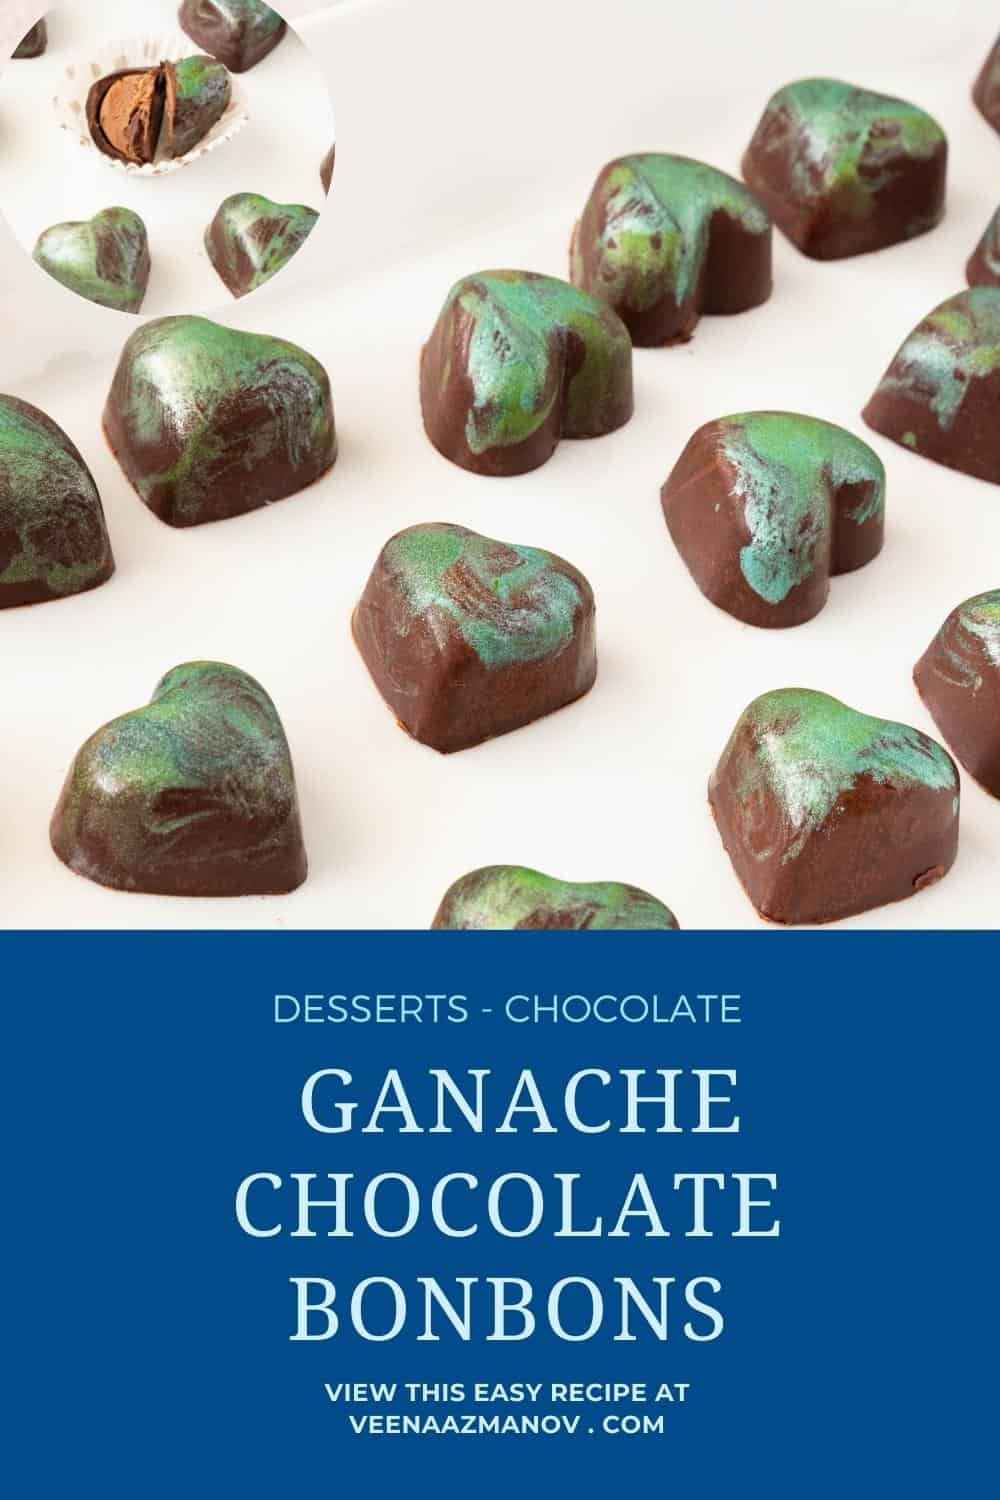
Chocolate Bonbons (Ganache Filling)


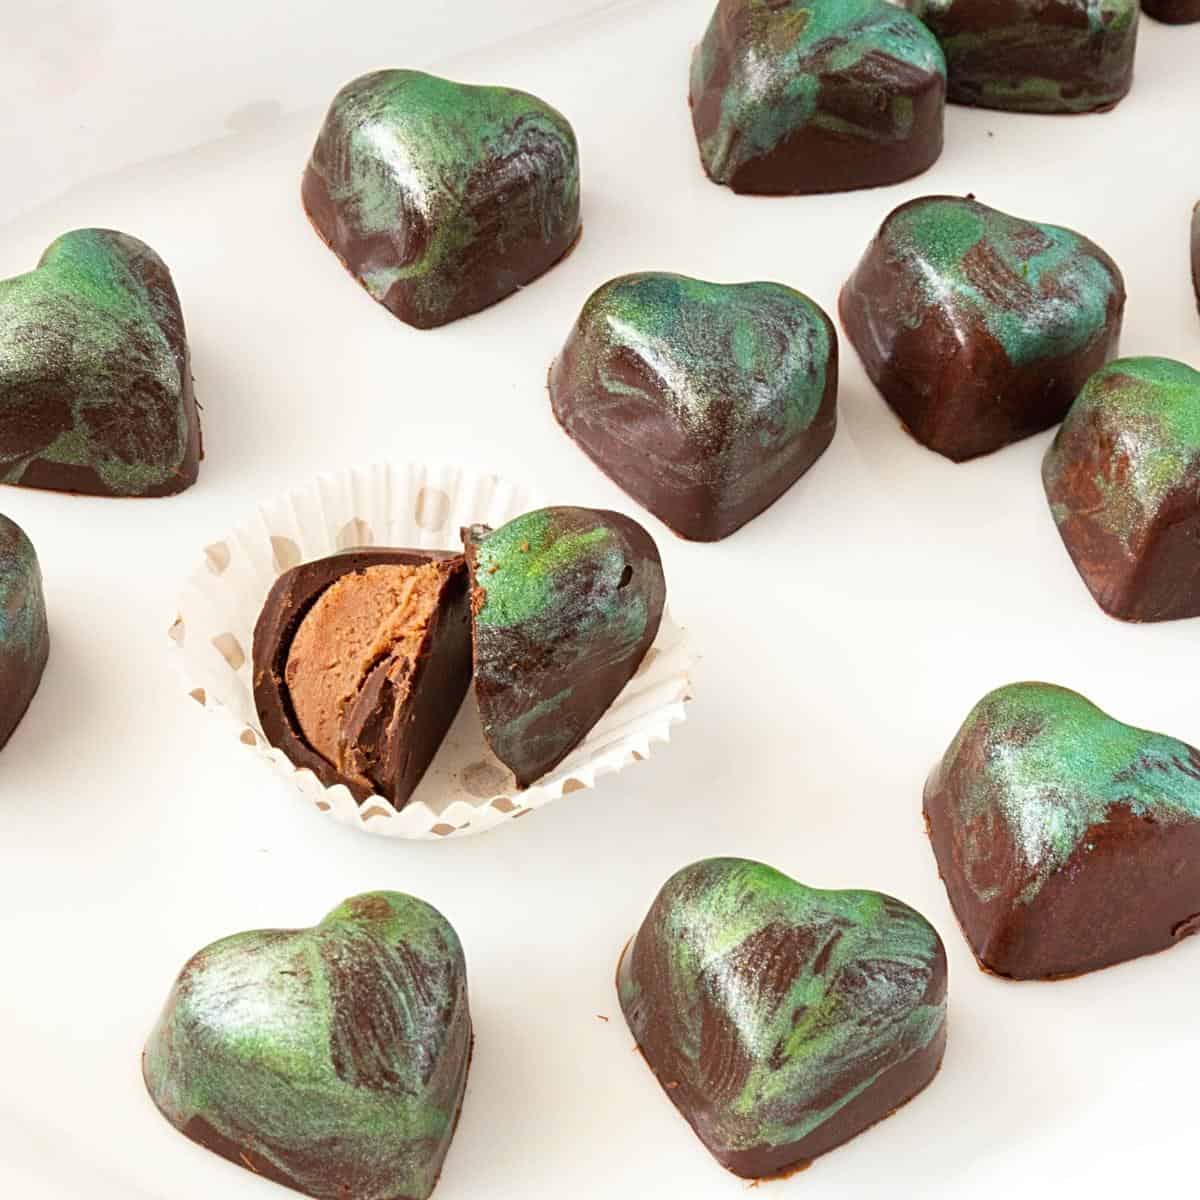
If you love shiny, filled chocolates that look like they came straight out of a luxury chocolate shop, you’re going to love making these bonbons at home. These chocolate bonbons have a crisp tempered chocolate shell and a silky chocolate ganache filling — the classic combination you see in gift boxes everywhere.
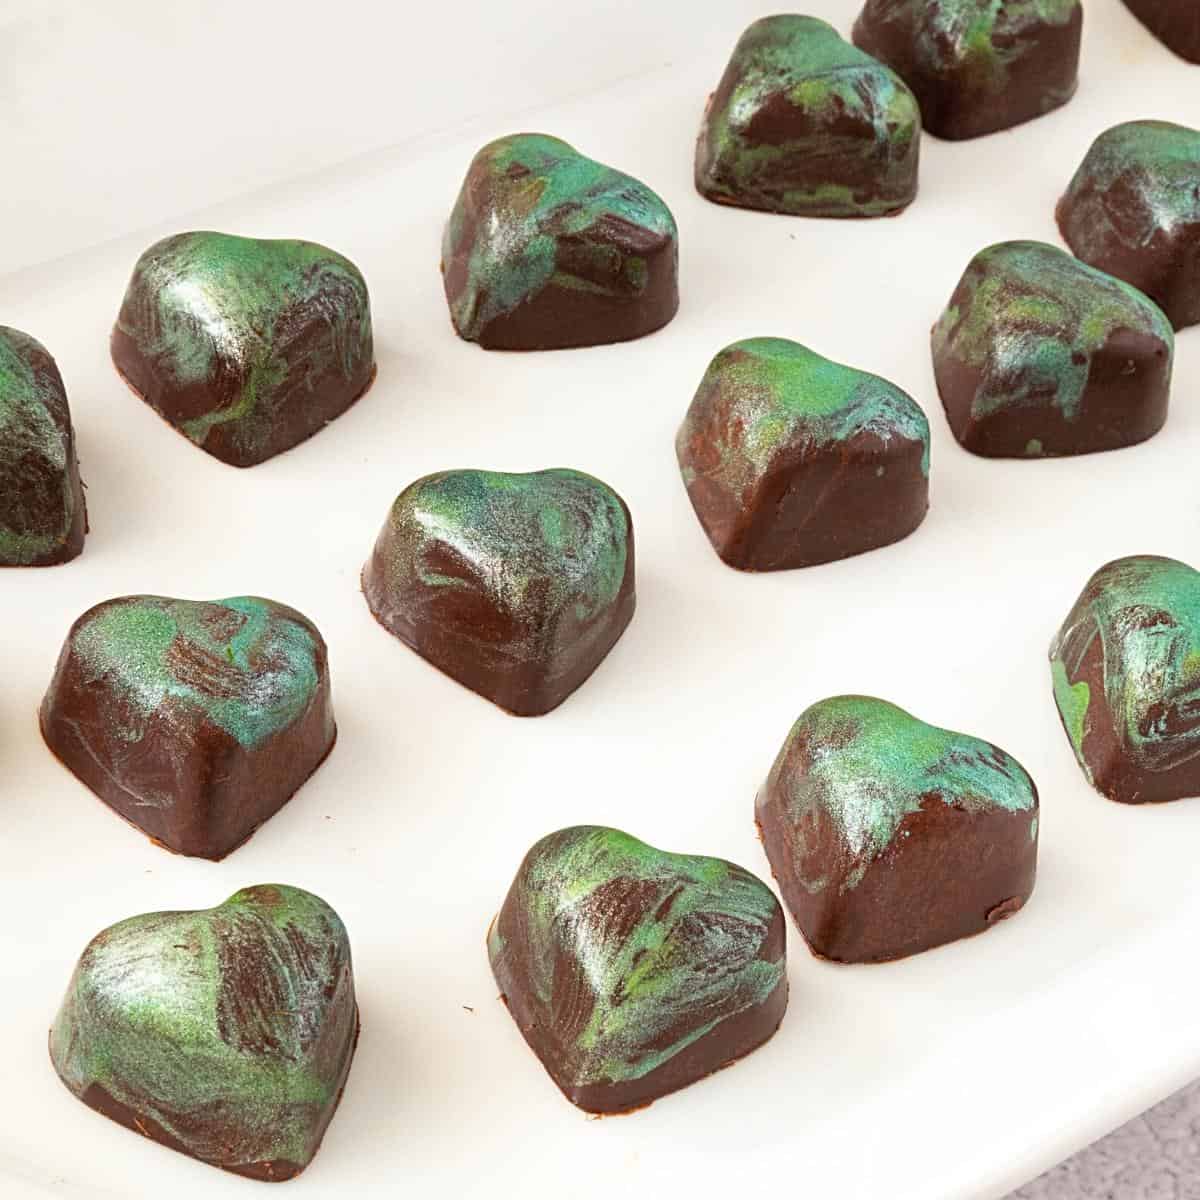
Bonbons used to feel intimidating to me. My husband would bring me boxes from his travels, and I’d study each one like a tiny piece of edible art. Eventually I started making them at home, experimenting with tempering, fillings, and painted cocoa butter designs. And truly — once you learn the process, homemade bonbons look just as stunning as the store-bought kind.
This step-by-step bon bon recipe walks you through everything: tempering chocolate, painting the molds, filling them neatly, and getting that beautiful shine. It’s the perfect little treat for gifting, holidays, or when you just want to show off your chocolate-making skills.
Why You’ll Love This Bon Bon Recipe
- That perfect shine. Tempered chocolate creates a crisp shell with a gorgeous glossy finish.
- Filled with silky ganache. The milk-chocolate filling is rich, smooth, and perfectly balanced against the dark chocolate shell.
- Customizable. Swap fillings, colors, or chocolate types — once you know the technique, the options are endless.
- Great for gifting. These bonbons look like premium chocolates; no one needs to know they came from your kitchen.
- Surprisingly simple. With the seeding method, you temper chocolate only once and use it for the entire process.
Ingredients and substitutes
- Chocolate – Use good quality couverture chocolate for the best shine and clean “snap.” I typically use dark chocolate for the shells and milk chocolate for the ganache. Semi-sweet also works if you prefer something less bitter. You can use white chocolate or milk chocolate shells as long as you temper them correctly.
- Cocoa butter – Used for painting the molds and adding color. You need pure edible cocoa butter — it melts quickly and mixes beautifully with powdered food coloring.
- Whipping cream – A high-fat cream (38% or higher) makes a stable, silky ganache. Lower-fat creams can make the filling too soft or cause it to split.
- Edible powdered colors – These mix with melted cocoa butter to create the colored “paint” for the molds. Use one color, blend two, or experiment with marbling — the technique always looks impressive.

Equipment You’ll Need
- Polycarbonate chocolate molds — the best choice for shine and easy unmolding.
- Microwave-safe plastic or silicone bowls — they don’t retain heat, so tempering is easier.
- Thermometer — essential for accurate tempering.
- Soft-bristled paintbrush — for applying colored cocoa butter.
- Piping bag — for neatly filling and closing the bonbons.
- Spatula & bench scraper — for cleaning the mold edges.

Step-by-Step: Chocolate Ganache Bon Bons
1. Make the Ganache Filling
- Add milk chocolate and whipping cream to a microwave-safe bowl. Heat for 1 minute.
- Let stand for 2 minutes to allow the residual heat to melt the chocolate evenly.
- Stir until smooth; if needed, heat in 10–20 second bursts until fully melted.
- Blend briefly with a hand blender to lighten the ganache.
- Cover and chill for 1–2 hours, or up to 2 days.
- Transfer the set ganache to a piping bag and set aside.

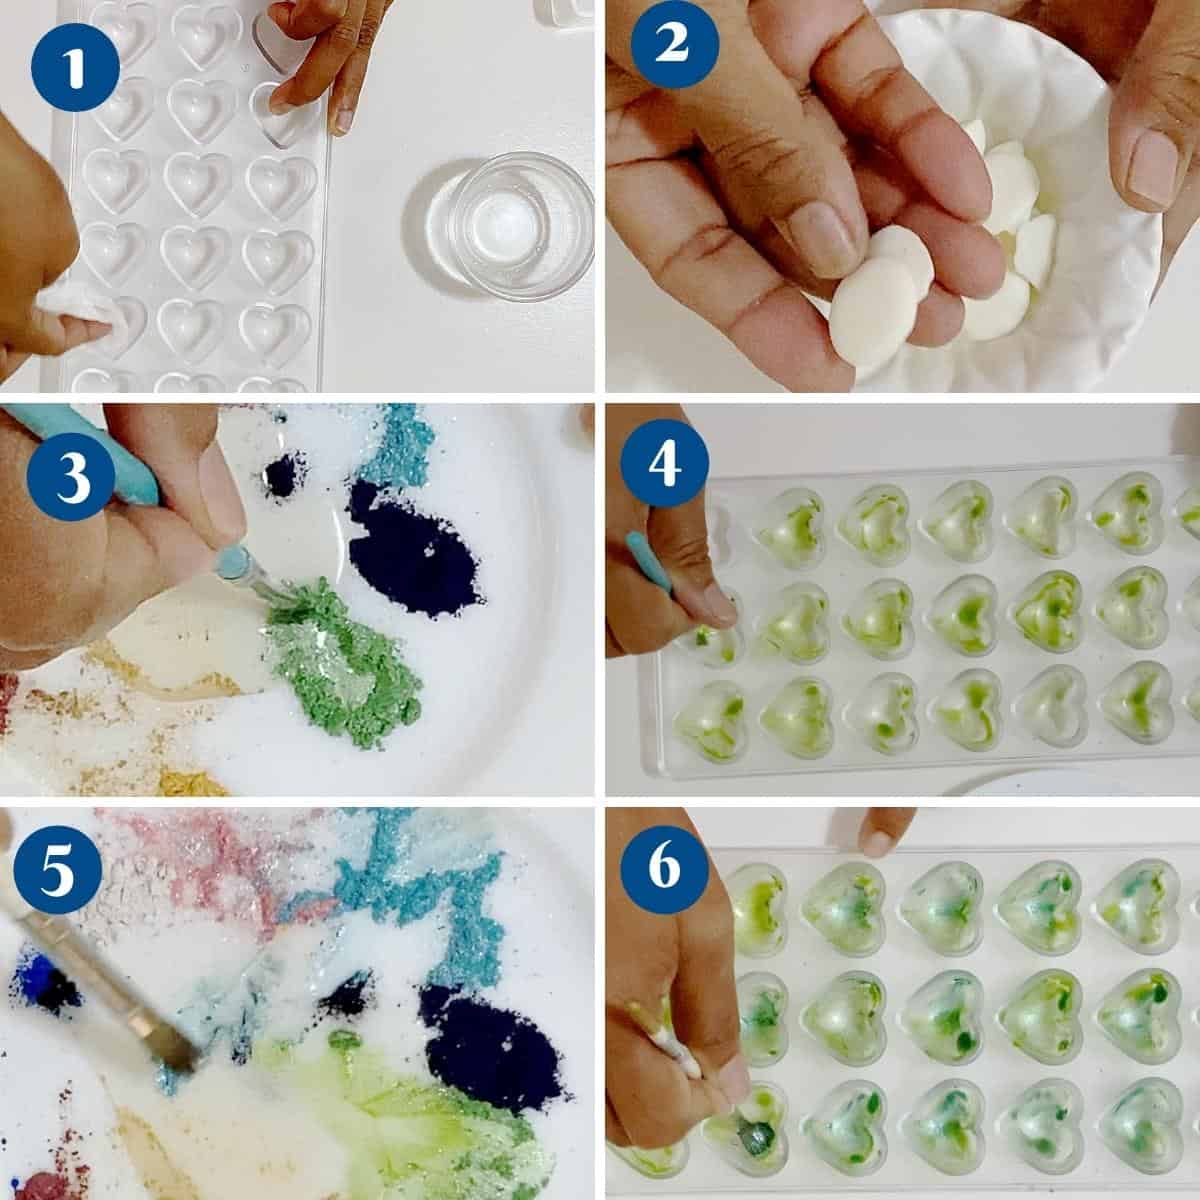
2. Paint the Bonbon Molds
- Melt cocoa butter in the microwave (about 30–40 seconds).
- On a plate, mix edible powdered colors with a little cocoa butter to create a thick paste.
- Using a paintbrush, swipe color inside each cavity of the chocolate mold — use one shade or blend two for a marbled effect.
- Chill the mold for 10 minutes until the cocoa butter sets.
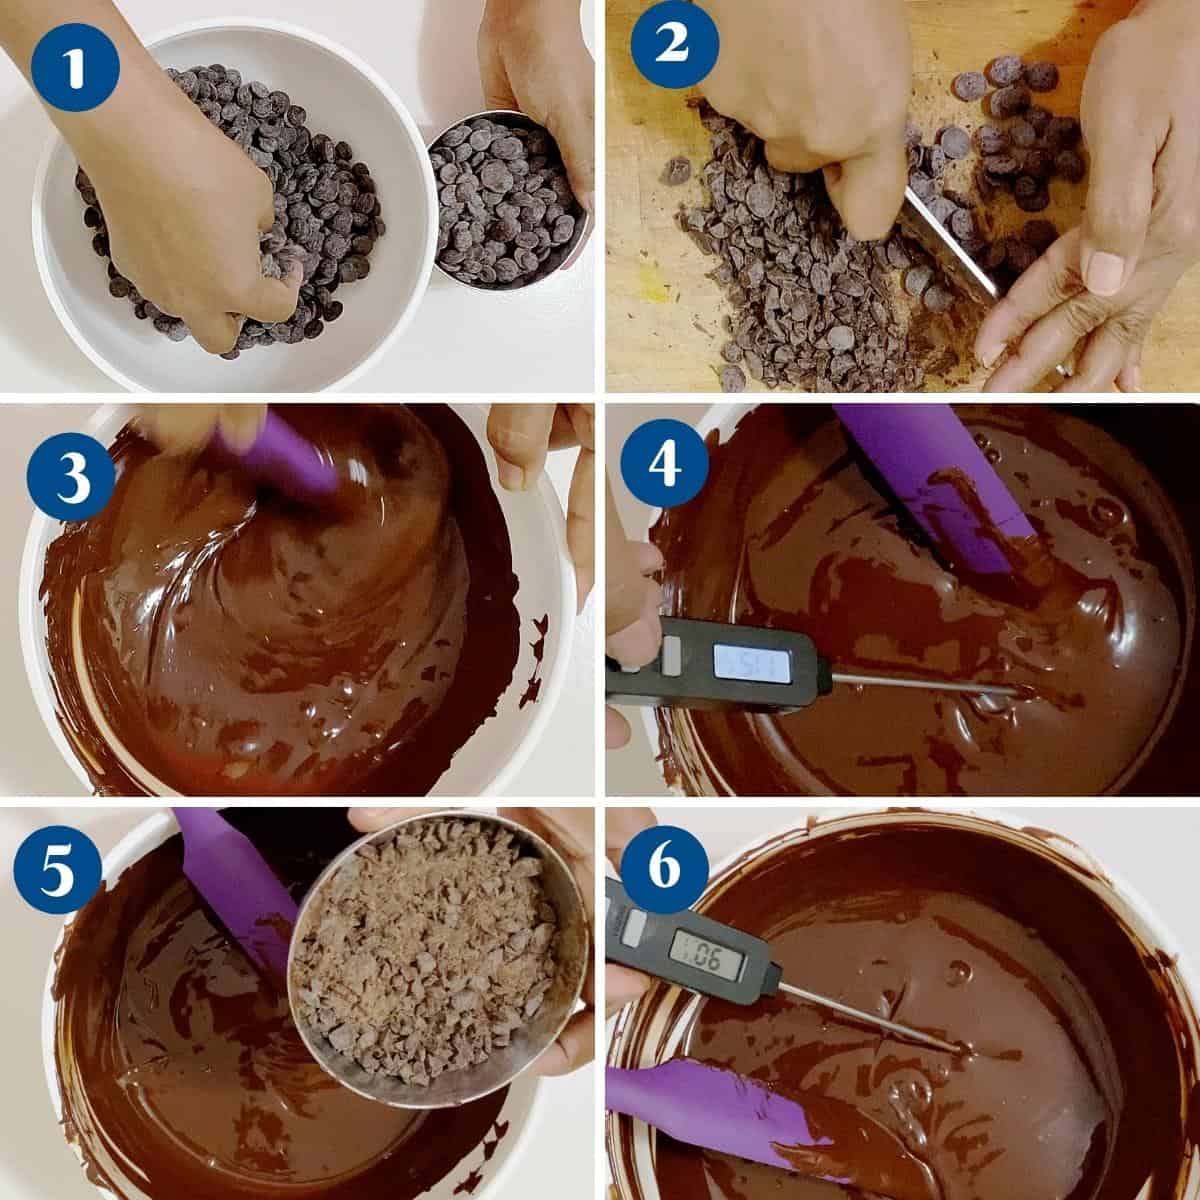
3. Temper the Chocolate (Seeding Method)
- Chop chocolate into even pieces.
- Melt two-thirds of the chocolate in the microwave:
- 30 seconds → stir
- 20 seconds → stir
- 10-second bursts as needed
Don’t exceed 110°F/43°C (115°F/46°C max).
- Add the remaining chopped chocolate and stir until the temperature on the thermometer drops to:
- 90°F/32°C (dark chocolate)
- 86°F/30°C (milk chocolate)
- 84°F/28°C (white chocolate)
- Check temper: spread a little chocolate on parchment. It should set in 3 minutes and look shiny.
4. Create the Bonbon Shells
- Pour tempered chocolate into the painted mold.
- Tap the mold well to remove air bubbles.
- After 30–60 seconds, invert the mold and let excess chocolate drip out.
- Scrape the top clean for smooth edges.
- Chill for 10 minutes — just until set, not rock hard.
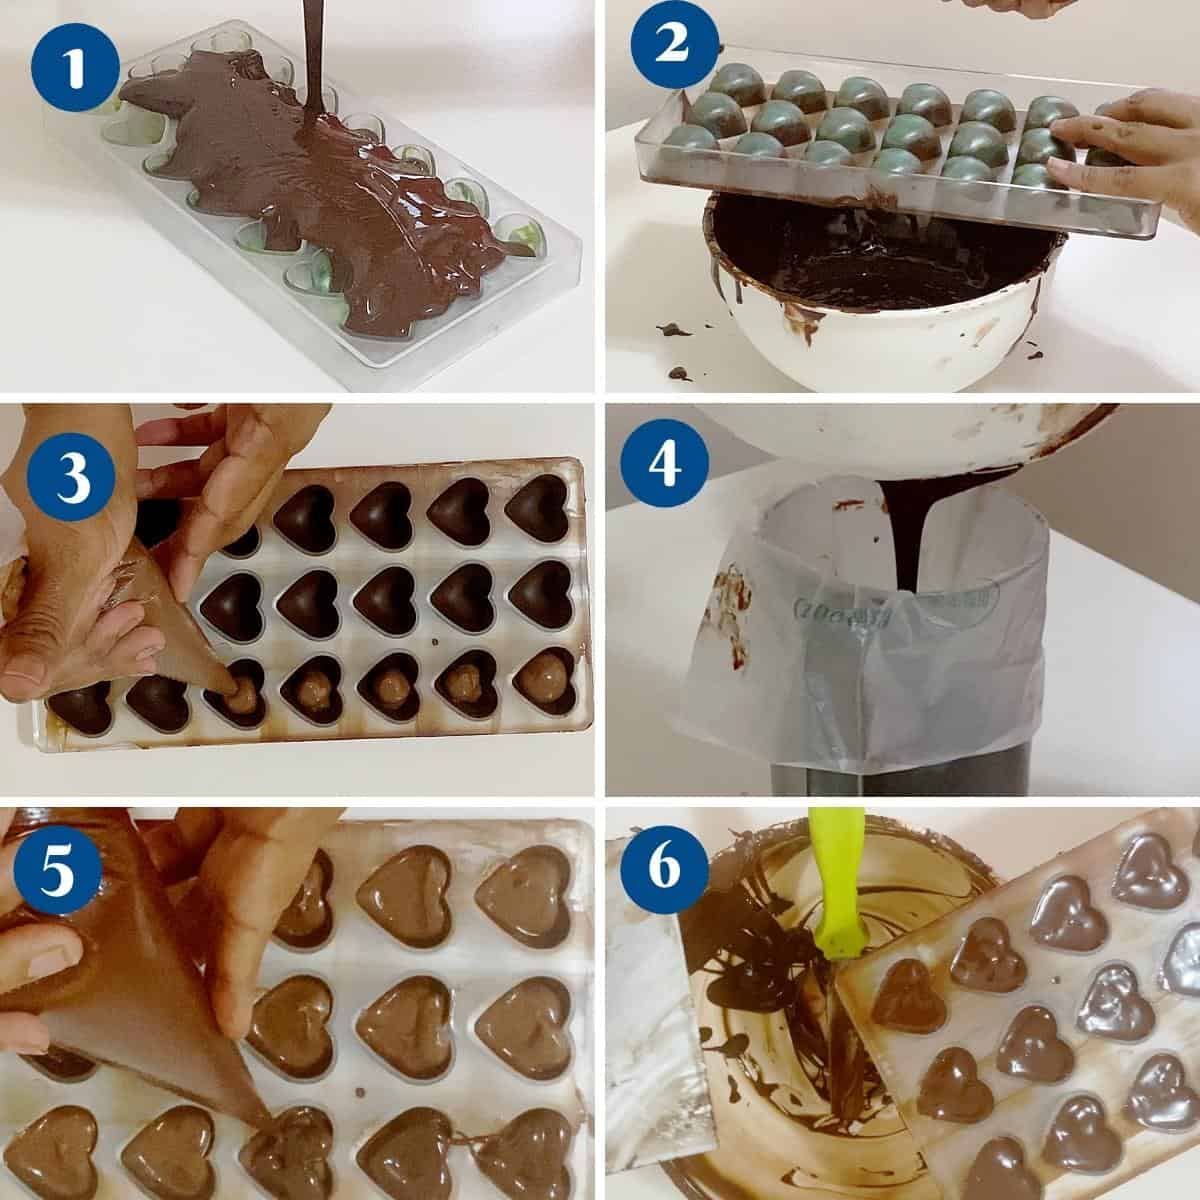
5. Fill the Bonbons
- Pipe ganache into each cavity, leaving space at the top for the closing layer.
- Tap gently to release air pockets.
6. Seal the Bonbons
- Fill a piping bag with the remaining tempered chocolate.
- Pipe a thin layer over each cavity to seal.
- Scrape the mold clean.
- Chill until the chocolate pulls away from the mold.

7. Unmold
- Invert the mold onto a table and tap gently — the bonbons should fall out easily.
- Brush off any edges for a clean finish.

How to Make Chocolate Bonbons Shiny
- Temper chocolate properly (the ONLY way).
- Use polycarbonate molds — they release shine better than silicone.
- Keep molds spotless, dry, and at room temperature.
- Don’t refrigerate too long; condensation ruins shine.
- Avoid touching the bonbons with warm hands.
Variations You Can Try
- White chocolate shells + raspberry ganache
- Dark chocolate with salted caramel filling
- Milk chocolate with coffee ganache
- Pistachio cream filling
- Fruit coulis + chocolate ganache swirl
- Marbled cocoa-butter painted shells
Chocolate Bonbons with Ganache
Learn how to make shiny, filled chocolate bonbons with tempered chocolate shells and a silky ganache center. Perfect for gifting and impressive homemade treats!
Video
Ingredients
- ½ lb (226 g) Chocolate Milk, semi-sweet, or dark
- 1 cup (175 g) Chocolate
- ½ cup (120 ml) Whipping cream
- ¼ cup (20 g) Cocoa butter
- 2 Edible powdered food colors
Method
- Make the Ganache – Heat the chocolate and cream together in the microwave-safe bowl for 1 minute. Let sit 2 minutes, then stir until smooth. Blend briefly with a hand blender for a lighter texture. Chill until thick enough to pipe, then transfer to a piping bag.1 cup Chocolate, ½ cup Whipping cream
- Paint the Molds (Optional) – Melt cocoa butter (30–40 seconds). Mix a little with powdered color to form a smooth paste. Brush inside each cavity and chill 10 minutes until set.¼ cup Cocoa butter, 2 Edible powdered food colors
- Temper the Chocolate – Melt 2/3 of the chocolate to 110°F/43°C (no higher than 115°F/46°C on the thermometer). Add the remaining chocolate and stir until the temperature drops to:Dark: 90°F/32°CMilk: 86°F/30°CWhite: 84°F/28°C The chocolate should look smooth, fluid, and shiny.½ lb Chocolate
- Create the Bonbon Shells – Fill each chocolate mold cavity with tempered chocolate. Tap the mold firmly to release air bubbles. Invert the mold to drain the excess chocolate, then scrape the top clean. Chill for 10 minutes until just set.
- Add the Filling – Pipe ganache into each cavity, leaving a thin rim at the top for sealing. Tap lightly to settle.
- Seal the Bonbons – Pipe a thin layer of tempered chocolate over the filling. Scrape the mold clean so the bottoms are smooth. Chill until fully set and the chocolate pulls away from the mold.
- Unmold – Invert the mold onto a table and tap gently until the bonbons release. Handle minimally to keep the shine.
Notes
- Clean, completely dry molds give the best shine.
- Proper tempering ensures clean release and crisp shells.
- Store at cool room temperature; refrigerate only if the filling requires it.
- Keep your molds spotless. Even a tiny fingerprint or water droplet will cause dull spots on the finished bonbons. Wipe them with a clean microfiber cloth before starting.
- Temperature is everything. If your chocolate isn’t tempered correctly, the bonbons won’t shine or release cleanly. Don’t skip the thermometer.
- Never rush the chilling. Over-chilling causes condensation; under-chilling makes them stick. Ten minutes per stage is usually perfect.
- Tap the mold — firmly but not aggressively. This removes air bubbles, which prevents holes in the shells.
- Don’t overfill the cavities. Leave a little space so the closing layer seals cleanly.
- Work in a cool room. A warm kitchen makes chocolate difficult to temper and can cause streaking.
- Scrape clean each time. A clean top edge helps the bonbons seal perfectly and release without cracking.
- Use fresh cocoa butter for painting. Old cocoa butter can crystallize and give uneven color.
Equipment you will need


Nutrition
Tried this recipe?
Mention @veenaazmanov_kitchen or tag #veenaazmanovkitchen!Troubleshooting
| Issue | Cause | Fix |
|---|---|---|
| Tiny holes | Air bubbles stuck in chocolate | Tap the mold firmly after pouring |
| No space for filling | Shell too thick | Allow more chocolate to drip when inverting |
| Cracked shells | Mold tapped too hard | Tap gently; don’t hit the table |
| Bonbons stick to mold | Not fully set or chocolate not in temper | Chill briefly or check temper |
| White streaks | Chocolate bloom | Re-temper the chocolate |
more truffles and Bonbons


Frequently asked questions
A chocolate bonbon is a filled chocolate candy made with a shiny tempered shell and a soft center, usually ganache, caramel, or fruit.
1–2 weeks at room temperature (if filled with ganache) or longer if refrigerated.
Bonbons have a molded chocolate shell with a filling. Truffles are rolled chocolate balls, usually made of ganache.
Store in a cool, dry place. If filled with dairy, keep in the fridge and bring to room temperature before serving.
Yes — freeze for up to 2 months. Thaw in the fridge to prevent condensation.
more truffles recipes
- White Chocolate Truffles
- Easy Chocolate Fudge Balls –
- White Chocolate Coconut Balls
- Coconut Chocolate Truffles
- Easy Marzipan Truffles


Don’t lose this recipe! Save it for Later!
📌 Save this Recipe for later on Pinterest so you can easily find it again.
⭐ Add Veena Azmanov Kitchen to your Google Preferred Sources.
It helps Google show you more of our recipes.
📧 Subscribe for new recipes delivered to your inbox.
🎥 Follow us for more recipes
This was super helpful! I am trying to get back into making bonbons. I was wondering what kinds of edible powders you use to color the cocoa butter and other things you could use to color cocoa butter as well? Thanks
Look under recipe notes and tips, point 5. It says Tempted instead of Tempered chocolate. Just thought you’d want to know. This was extremely helpful and I can’t wait to make them for my allergic kids & I, who miss out on candy! ☺️
I was thought to temper chocolate for example.milk heat to between 40 and 45 degrees,add seed to cool ut to 29 degree then slowing bring bit back to 31 degrees for working temperature
Hi Veena,
Thank you for your time in preparing and sharing this recipe.
Can you please give an idea of how long would this bonbon be good for ? Would it be safe to say a month considering the ganache (for using cream ) for the filling ?
Many thanks.
Gilberto
Ah!! Honestly, I have never kept bonbons for more than 2 weeks in my fridge, Gilberto. I usually make small batches for the family or to give as gifts and then they are gone instantly.
In truth, chocolate will mostly be affected by climate. So it depends on where you are. If you live in a hot and humid climate the chocolate can go soft. Even in the fridge, it can take ordor from other foods.
It can even have chocolate blooms that do not look nice. I suggest keeping them in the fridge well wrapped but perhaps not for longer than 2 weeks.
This was such a delicious recipe! The entire family enjoyed it! I will definitely make it again! Have a great day!
Happy you enjoyed these Heidy. Thank you for the lovely feedback.
These chocolate bonbons are so easy to make and I love the use of dark chocolate and cocoa butter!!
That coloring is so neat! I’ve never seen that before. This would be so fun to make with kids!
I have everything I need to try this! I just love how easy they are.
Simple to make and the outcome is delicious! I love recipes with dark chocolate, and this makes a perfect snack! 😀