Recipe for Double Pie Crust
 Prep Time 20 minutes Cook Time 20 minutes Total Time 1 hour 40 minutes


This is your basic unsweetened all-butter pie crust recipe or Pâte Brisée dough that’s rich, buttery, flaky, and tender. Today, we make a recipe for double pie crust from scratch for an apple pie.

A good pie crust recipe is a must-have for any baker. One that you can use without trial and error. While there are many versions of pie dough, each claiming to be the best, the basic ingredients are almost always the same.
Some will use a combination of butter and lard for fat, and others will use vodka in place of water. And yet, while they are all very promising, I think this is the absolute winner every single time.
Why make this pie crust?
- This is my all-butter pie dough recipe, which I use almost all the time. It’s the same recipe we use to make a single crust.
- The ingredients are simple pantry staples you always have on hand.
- The secret to a good pie dough is not just in the ingredients, but mostly in the process. You can make it by hand or in the food processor.
- The best part is that the pie dough takes just 5 minutes to prepare and another 10 minutes to roll.
- You can make the dough ahead and keep it in the fridge for 3 days or in the freezer for up to 3 months.

Ingredients and substitutes
- Butter – I like using all butter for that superior butter flavor. But you can also use half vegetable shortening. My mom used half high-fat vegetable shortening. Make sure to chill the shortening for at least an hour before you use it.
- Flour – Use a good unbleached all-purpose flour. Do not use self-rising or bread flour. We want a flaky pie crust that does not rise or become chewy.
- Salt – Don’t forget to add salt to your pie crust. It brings out the flavor. My mom would also add a teaspoon of sugar to her pie crust. We loved her pies and quiches.
- Water – You want chilled water from the fridge. You can add ice to your water to chill it. Do not add ice directly to the dough. It will eventually make the dough soggy. Also, do not use milk since the milk solids will burn and give a very dark crust.

Step-by-step instructions
Pie dough
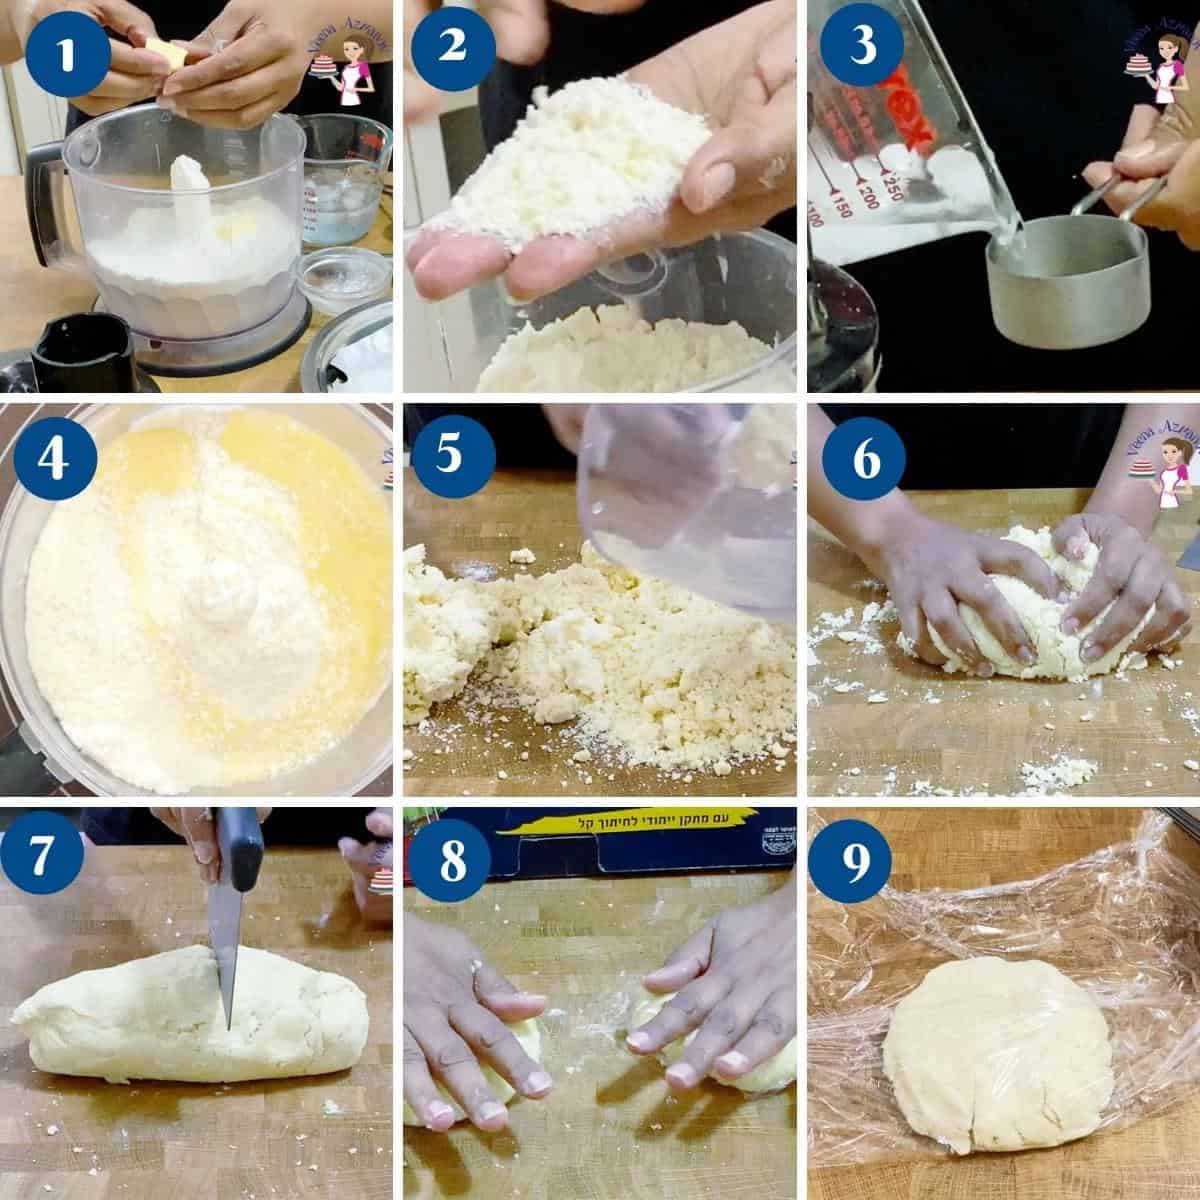
- In the bowl of a food processor, add the flour, salt, and butter. Pulse for 30 seconds until bread crumb consistency. You can also use a bowl and a pastry blender.
Pro tip – A flaky pie crust must have a good combination of small and big pieces of butter. So, don’t pulse too long. - Add the chilled water through the feeder. Pulse another 30 to 40 seconds until almost combined.
Pro tip – The dough should still look crumbly, but when you squish a little with your fingers, it should shape into a ball. - Invert the crumbly mixture on a clean work surface. Gather it all into a ball without kneading.
Pro tip – We do not want to activate the gluten in our dough, so we avoid kneading. - Divide into two – more for the bottom crust, less for the top crust (see video). Wrap each portion in plastic wrap and chill for at least an hour.
Pro tip – You can keep these in the fridge for up to 3 days or freeze them for up to 3 months.
Roll the bottom crust
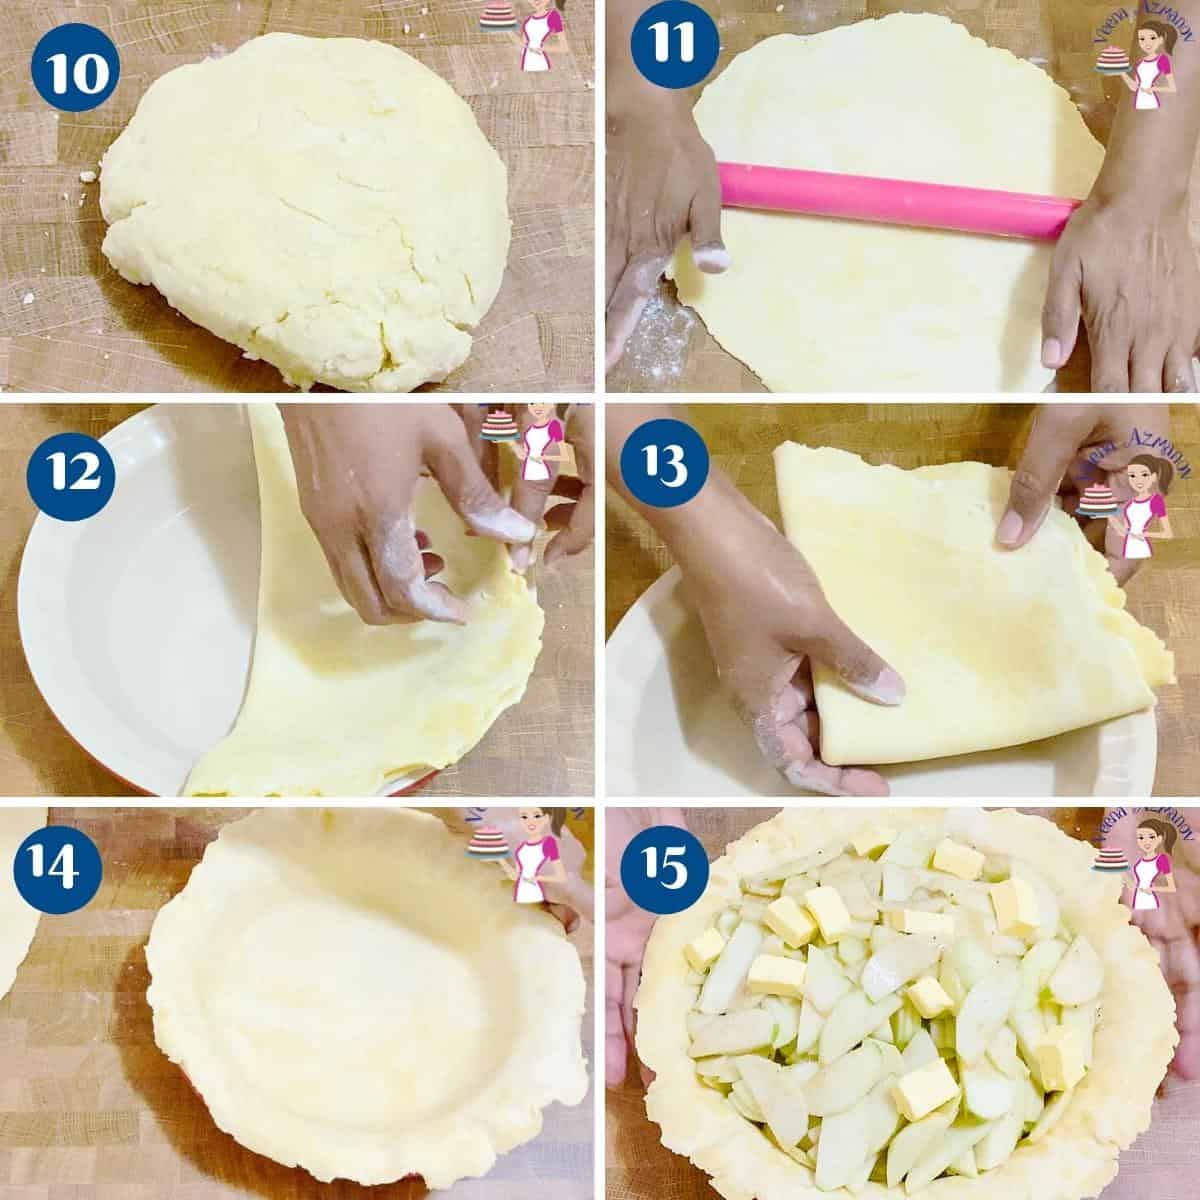
- Dust the work surface with flour. Open the larger disc for the bottom and roll carefully. Use your 9-inch pie pan as a guide to see how big you need it.
Pro tip – If you find the crust is breaking around the edges too much, it means that it is too hard to roll. Leave it to rest on the counter for just 7 to 10 minutes. Then, roll again, press the broken edges together with your fingertips. - To transfer the dough to the pan without breaking, fold the pastry in half, then into quarters. Then, place it on the pie pan and unfold.
Pro tip – Alternatively, you can roll the dough onto your rolling pin and unroll it over the pie pan (folding in quarters is easier for newbies). - Gently fit it to the pie pan, especially in the bottom edges, with light hands. Place the lined pie in the fridge while you prepare the filling.
Pro tip – You need about an inch more than the edge of your pie pan so you can trim the excess dough.
Add the filling
- Preheat the oven to the temperature directed in the recipe. Fill the lined and chilled bottom pie crust with filling (today I am using apple pie filling).
Roll the top crust
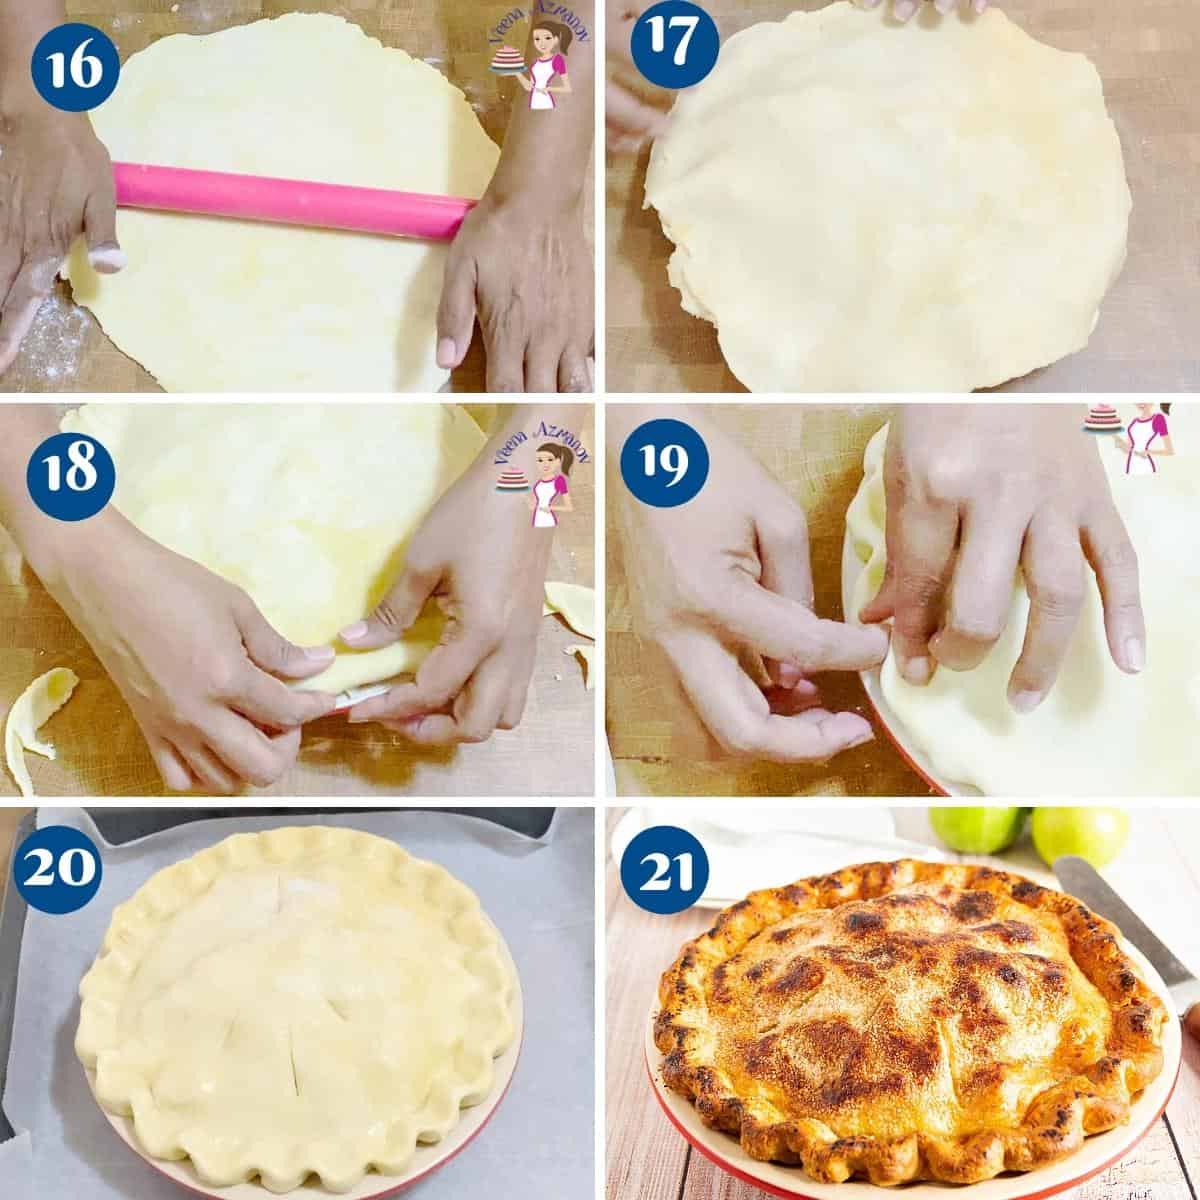
- Roll the top crust – Dust the work surface with flour. Open the larger disc of pie crust for the top of the pie and roll it larger than the pie pan (about 12 inches).
Pro tip – Use your pie pan as a guide to know how big you need it, plus extra for crimping. - Cut excess – Place the second disc on top. Cut off excess at the edges, leaving an inch of overhang.
- Crimp the edges – Fold the top pastry under the bottom pastry (see video). Crimp the edge by forming a V shape with your thumb and index finger (see video).
Pro tip – Alternatively, you can make impressions around the pie using the tines of a fork. - Brush with egg wash. For my apple pie, I also sprinkle it with granulated sugar. Sugar adds a nice crunch, but can be omitted.
Pro tip – For the egg wash, combine the egg and water. Then, use a pastry brush to brush it on the pastry. - Place the pie on a baking tray to catch any juices. Cut a few slits in the top crust with a knife. I like to do about 6 to 8 cuts.
Pro tip – The slits or cuts on the top crust are for steam to escape so the pastry won’t puff up and break.

Bake
- Bake the pie as directed in your recipe. As a guide, here is how I bake my double-crust pies.
- Bake at 400°F / 200°C / Gas Mark 6 for 15 minutes.
- Then, reduce the temperature to 350°F / 177°C / Gas Mark 4 and cook another 35 to 40 minutes.
Pro tip – After 20 to 25 minutes, cover edges loosely with foil or a pie shield to prevent the top crust from becoming too dark.
Troubleshooting
- Soggy pie – Sometimes, when the pie filling is too liquid, it can soak into the bottom pie crust, making it soggy. One way to avoid it is to brush the bottom of the pre-baked pie crust with egg whites. This essentially creates a seal between the crust and the filling.
- Crust is too wet – If you added too much water, just add a tablespoon or two of flour and bring it all together. And if the dough is soft and sticky, which usually appears wet, it means the dough is probably too warm. Shape it into a ball and wrap it in cling wrap. Chill it until it is firm enough to roll.
- Pie shrinking – It’s best to chill the pastry before you bake it. That makes sure the butter stays cold. When baked, the butter melts into the dough, creating a beautiful, flaky crust. And if the crust is not cold, the dough tends to shrink.
More crust recipes
- Single pie crust – Pie crust with shortening
- Sweet shortcrust pastry or Rich shortcrust pastry
- Danish pastry, Croissants, or Puff pastry
- Choux pastry, cream puffs, or profiteroles
- Different types of pastry – explained
Frequently asked questions
A pie crust dough can be kept in the fridge for 3 days or in the freezer for up to 3 months. I always make an extra batch of pie crust and have it in the freezer.
The shortening is 100% fat, while butter is 80% fat. So yes, shortening gives you the flakiest crust. On the other hand, butter has so much more flavor. Therefore, butter is usually my choice of fat when it comes to pastry. You can use all butter, shortening, lard, or try 50% butter and 50% shortening. See which you prefer
If you live in a hot and humid climate, place the flour and salt in a bowl and keep the bowl in the fridge for about an hour. This will keep the ingredients cold. Avoid touching the dough too much with your warm hands. Also, flip the dough over the rolling pin when possible. Work on the back of a chilled baking tray rather than a countertop. And chill the tray in the fridge when you let it rest. That way, the dough and tray will stay cold at all times.
Use the edge of your pan to help support the crimp. Cut the excess pastry such that when you fold it sits on top of that edge.
So, once you crimp it, it stays on that edge all through baking.
As a result, when baked, you get a perfect crimp.
Double Pie Crust Recipe
This is your basic unsweetened all-butter pie crust recipe or Pâte Brisée dough that's rich, buttery, flaky, and tender. Today, we make a double pie crust from scratch for an apple pie.
Video
Ingredients
- 3 cups (375 g) All-purpose flour
- 8 oz (226 g) Unsalted butter (2 sticks, 1 cup) chilled, cubed
- ½ tsp Salt
- ⅓ cup (80 ml) Chilled water up to 6 to 8 tbsp
Method
- In the bowl of a food processor – add the flour, salt, and butter. Pulse for 30 seconds until bread crumb consistency. You can also use a bowl and pastry blender.Pro tip – A flaky pie crust must have a good combination of small and big pieces of butter. So, don't pulse too long.
- Add the chilled water through the feeder. Pulse another 30 to 40 seconds until almost combined. Pro tip – The dough should still look crumbly but when you squish a little with your fingers it should shape into a ball.
- Invert the crumbly mixture on a clean work surface. Gather it all into a ball without kneading. Pro tip – We do not want to activate the gluten in our dough so we avoid kneading.
- Divide into two – more for the bottom crust, less for the top crust (see video). Wrap each portion in plastic wrap and chill for at least an hour.Pro tip – You can keep these in the fridge for up to 3 days or freeze them for up to 3 months.
- Dust the work surface with flour. Open the larger disc for the bottom and roll carefully. Use your 9-inch pie pan as a guide to see how big you need it.Pro tip – If you find the crust is breaking around the edges too much, it means that it is too hard to roll. Leave it to rest on the counter for just 7 to 10 minutes. Then, roll again, press the broken edges together with your fingertips.
- To transfer the dough to the pan without breaking, fold the pastry in half, then into quarters. Then, place it on the pie pan and unfold. Pro tip – Alternatively, you can roll the dough onto your rolling pin and unroll it over the pie pan (folding in quarters is easier for newbies).
- Gently fit it to the pie pan especially in the bottom edges with light hands. Place the lined pie in the fridge while you prepare the filling. Pro tip – You need about an inch more than the edge of your pie pan so you can trim the excess dough.
- Preheat the oven to the temperature directed in the recipe. Fill the lined and chilled bottom pie crust with filling (today I am using apple pie filling).
- Roll the top crust – Dust the work surface with flour. Open the larger disc of shortcrust pastry for the top of the pie and roll it larger than the pie pan (about 12 inches).Pro tip – Use your pie pan as a guide to know how big you need it plus extra for crimping.
- Cut excess – Place the second disc on top. Cut off excess at the edges leaving an inch of overhang.
- Crimp the edges – Fold the top pastry under the bottom pastry (see video). Crimp the edge by forming a V shape with your thumb and index finger (see video).Pro tip – Alternatively, you can make impressions around the pie using the tings of a fork.
- Brush with egg wash. For my apple pie, I also sprinkle it with granulated sugar. Sugar adds a nice crunch but can be omitted. Pro tip – For the egg wash, combine the egg and water. Then, use a pastry brush to brush it on the pastry.
- Place the pie on a baking tray to catch any juices. Cut a few slits on the top crust with a knife. I like to do about 6 to 8 cuts. Pro tip – The slits or cuts on the top crust are for steam to escape so the pastry won't puff up and break.
- Bake the pie as directed in your recipe. As a guide here is how I bake my pies with a double crust.– Bake at 400°F / 200°C / Gas Mark 6 for 15 minutes. -Then, reduce the temperature to 350°F / 177°C / Gas Mark 4 and cook another 35 to 40 minutes.Pro tip – After 20 to 25 minutes, cover edges loosely with foil or pie shield to prevent the top crust from becoming too dark.
Notes
- Fat – you will see a big difference in the quality of your crust based on the fat you use. If you ask my mom, it can’t be all butter. It had to be mostly full-fat GHEE (Shortening) and some butter for flavor. The higher the ratio your fat is, the better the crust.
My grandmother would use 100% lard (animal fat). For her, making a pie crust with butter is a No-No! And yet, she lived healthily until 89.
I, on the other hand, never use lard for making my pie crust. I use butter or sometimes half butter and half veg shortening. I’d be lucky if I live to her age..! - The amount of water in your pie dough plays a very important role in the final texture. Too much water will make your crust very tough. And too little will make it very crumbly. Crumbly is good, and yet you still want to be able to hold a slice of pie.
- Avoid the fat/butter from melting into your flour. I usually place my bowl with the flour and chilled butter into the fridge for at least half an hour before I start to work it into the dough. Those of you living in a hot and humid climate can avoid touching the dough too much with your hands by rolling the pastry between two parchment papers.
- Also, use chilled iced water to maintain the temperature of the dough.
- Cool the pie crust for at least half-hour before you bake. This will prevent the sides from shrinking.
- Let the pre-baked crust cool for 15 minutes before you add in the filling. This will prevent the liquid from being absorbed into the crust. And if your filling is very liquidy, brush the pastry with egg white, before adding the filling. This creates a seal between the filling and crust.
Equipment you will need


Nutrition
Tried this recipe?
Mention @veenaazmanov_kitchen or tag #veenaazmanovkitchen!Don’t lose this recipe! Save it for Later!
📌 Save this Recipe for later on Pinterest so you can easily find it again.
⭐ Add Veena Azmanov Kitchen to your Google Preferred Sources.
It helps Google show you more of our recipes.
📧 Subscribe for new recipes delivered to your inbox.
🎥 Follow us for more recipes


Veena, So enjoyed the detailed recipe and all the pro tips, your the best