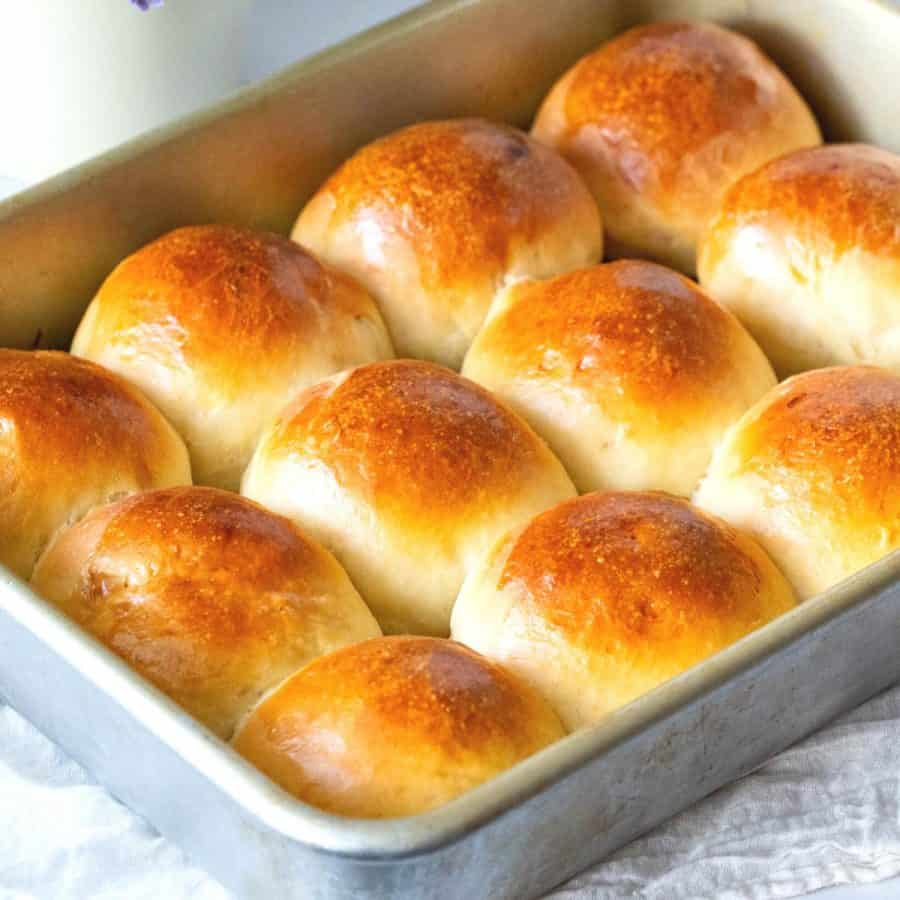
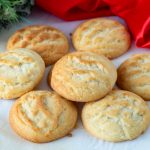
Buttermilk Biscuits Homemade


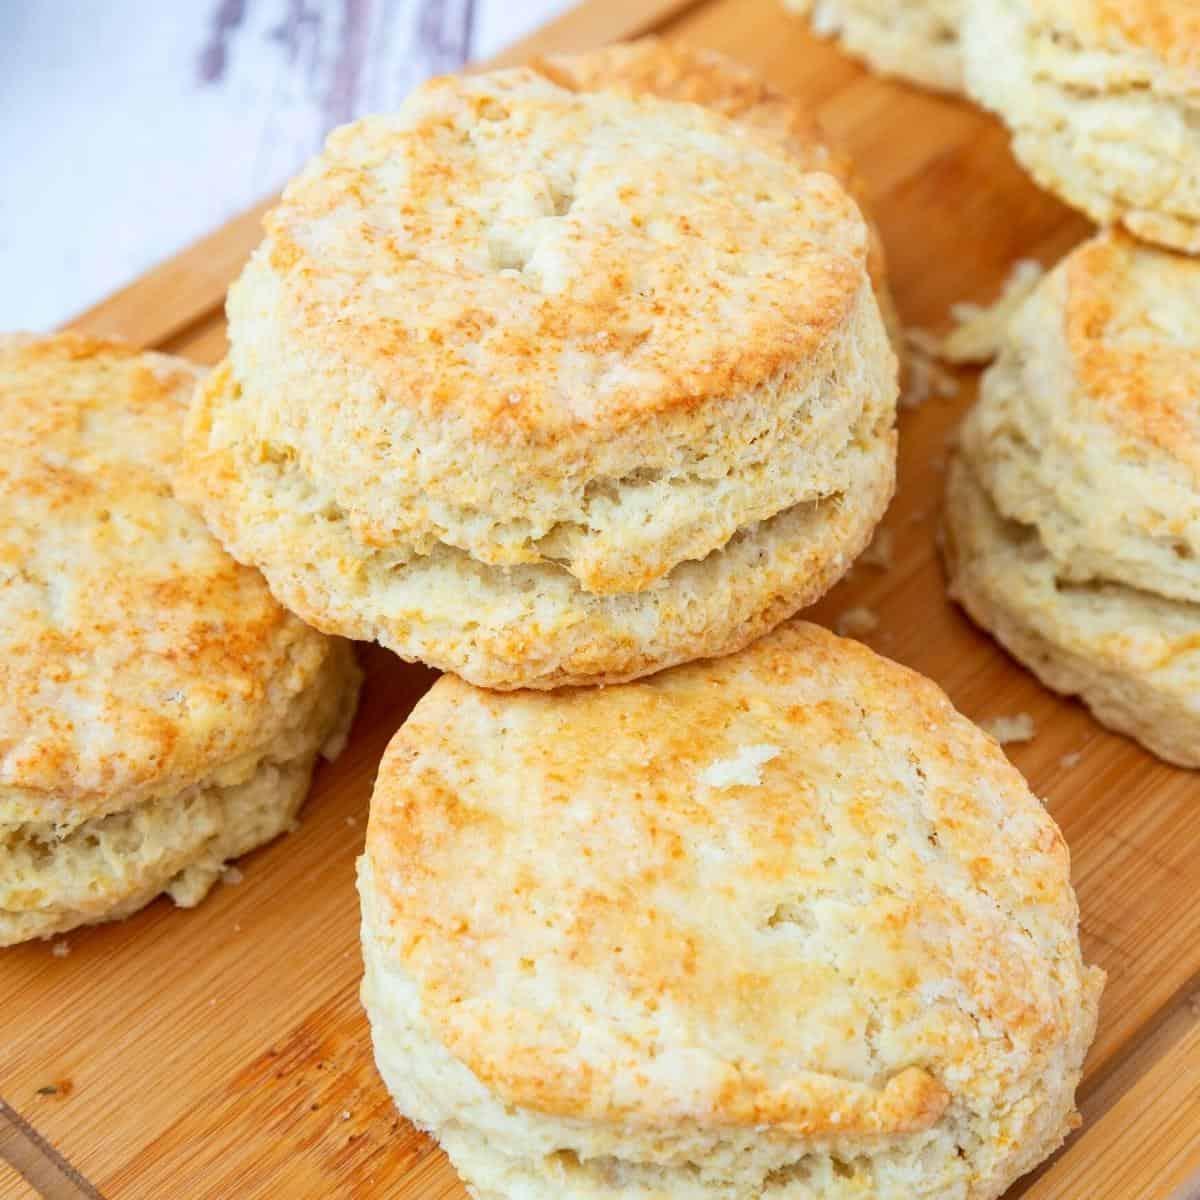
Hungry bellies and happy faces—nothing brings people together like the irresistible aroma of freshly baked buttermilk biscuits. Whether you’re planning a casual get-together or a hearty brunch, these golden brown delights will surely be a hit.
Biscuits embody a sense of nostalgia and heritage. Passed down through generations, biscuit recipes hold memories of cozy family gatherings, cherished traditions, and the love put into every bite. So, when you embark on your biscuit-making journey, remember that you are not just creating a delicious treat but also carrying on a tradition and connecting with the countless biscuit makers who came before you.
Why make buttermilk biscuits?
- First and foremost, buttermilk is the star of the show. Its tangy flavor adds a subtle complexity to the biscuits, elevating them from ordinary to extraordinary. Buttermilk also plays a crucial role in creating the tender, moist texture that melts in every bite.
- Another reason why these biscuits reign supreme is the delicate balance of flavors and textures. The outer crust is golden and crisp, offering a satisfying crunch with that first bite. Yet, as your teeth sink into the biscuit, you’re greeted with a soft, fluffy interior that practically dissolves on your tongue. It’s a contrast that keeps you coming back for more.
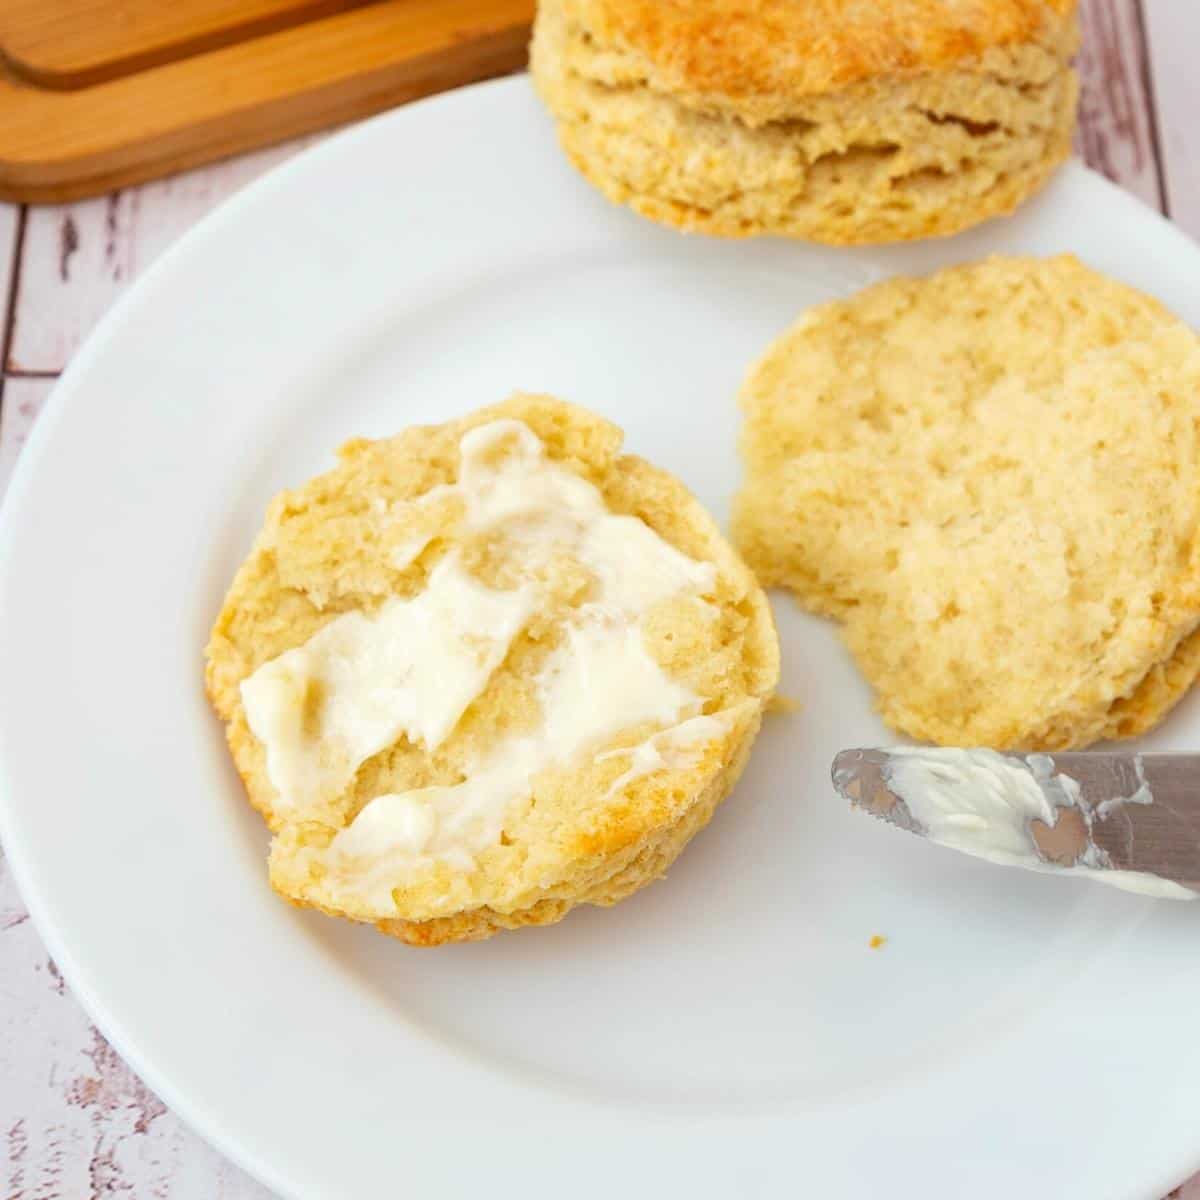
- But what truly sets buttermilk biscuits apart is their versatility. They are the perfect canvas for both sweet and savory toppings. Slather them with butter and jam for a beautiful breakfast treat, or pair them with fried chicken for a delicious Southern feast. With buttermilk biscuits, the possibilities are endless, and you can easily customize them to suit any occasion or craving.
- Finally, the shared experience of enjoying buttermilk biscuits makes them a crowd-pleaser. Whether enjoying them with family and friends or serving them at a gathering, these biscuits unite people. Breaking one open, passing it around, and savoring each bite creates a sense of connection and comfort that is hard to replicate with any other food.
Ingredients and substitutes
- At the heart of any great buttermilk biscuit recipe is, of course, buttermilk. Its tangy flavor and acidity are essential for achieving that light and fluffy texture we crave. However, if you find yourself without buttermilk on hand, fret not. There are a few substitutes you can use to achieve a similar result. One option is to mix a tablespoon of lemon juice or white vinegar with a cup of milk and let it sit for about 10 minutes. This will create a homemade buttermilk substitute that will work just as well in your biscuit recipe.
- Next up, we have flour. The type of flour you use can make a big difference in the final result of your biscuits. It’s best to use all-purpose flour for the lightest and flakiest biscuits. If you prefer a slightly denser biscuit, you can opt for self-rising flour, which already includes baking powder and salt. Whole wheat flour can also be used, but remember that it will yield a heartier, nuttier biscuit.
- Another essential ingredient is fat. Traditional biscuit recipes call for butter, which adds a rich, buttery flavor. However, if you want to switch things up, you can experiment with other fats, such as lard or shortening. Remember that different fats will result in slightly different flavors and textures, so choose based on your preference.
- Regarding leavening agents, baking powder and baking soda are the go-to options. Baking powder helps your biscuits rise by interacting with moisture and heat. If you find yourself out of baking powder, fear not! You can create a substitute by mixing baking soda and cream of tartar. Remember, this homemade substitute is a quick fix and may not yield the same results as store-bought baking powder. Understand baking powder vs baking soda.
- Lastly, we have a pinch of salt. While it may seem like a small detail, salt plays an essential role in enhancing the overall flavor of your biscuits. It balances out the sweetness and brings out the savory notes, making the biscuits even more irresistible.
Step-by-step: How to make biscuits with buttermilk
- Preheat the oven to 450°F / 230°C Gas Mark 8
- First, it’s essential to start with cold ingredients in a large bowl. You’ll need all-purpose flour, baking powder, salt, cold butter, and cold buttermilk.
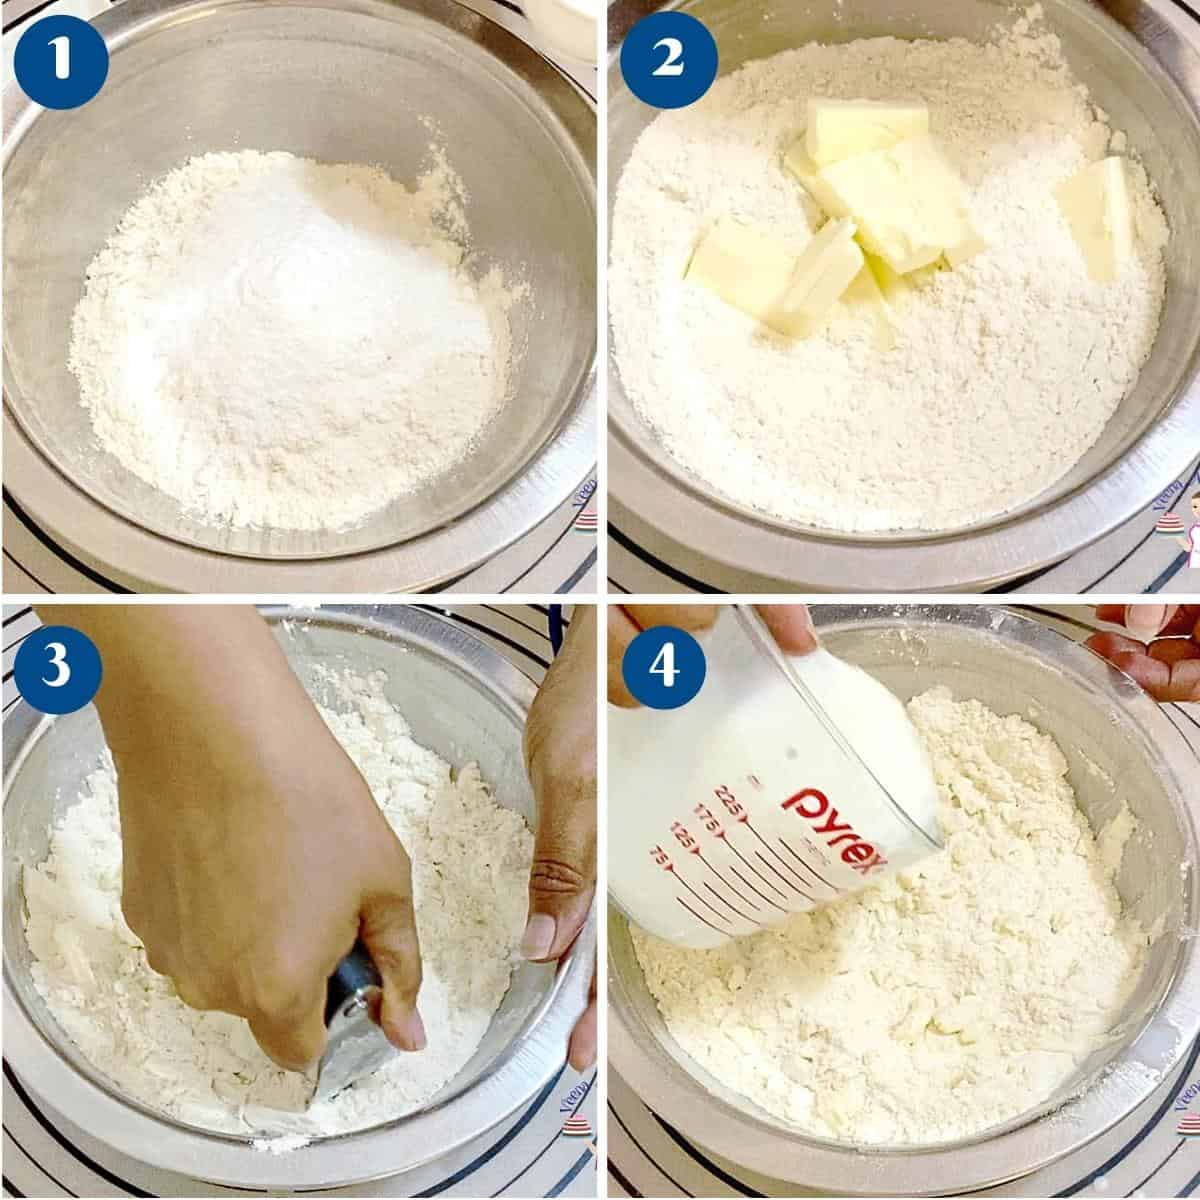
- Next, you’ll want to cut the cold butter into the dry ingredients. This step is where the magic happens. Incorporate the butter into the flour mixture using a pastry cutter or your fingertips until it resembles coarse crumbs.
- After that, it’s time to add the buttermilk. Pour it into the crumbly mixture and gently stir until the dough comes together. Be careful not to overmix, as this can result in tough biscuits. The dough should be slightly sticky but still manageable.

- Once the dough has come together, turn it out onto a lightly floured surface. Gently bring it all together until it forms a ball. Avoid kneading, as this can lead to tougher biscuits. Flatten the dough and fold it in half, then quarter it. Do that once or twice more.
- Now, it’s time to roll out the dough. Using a rolling pin, roll it out to about 3/4-inch thickness. Be sure to work quickly and lightly to avoid overworking the dough. If any cracks appear, gently press the dough back together.

- With the dough rolled out, it’s time to cut out those perfect biscuit rounds. Use a round biscuit cutter or a glass dipped in flour to prevent sticking when cutting out your biscuits. Press straight down without twisting the cutter, which can seal the edges and hinder rising.
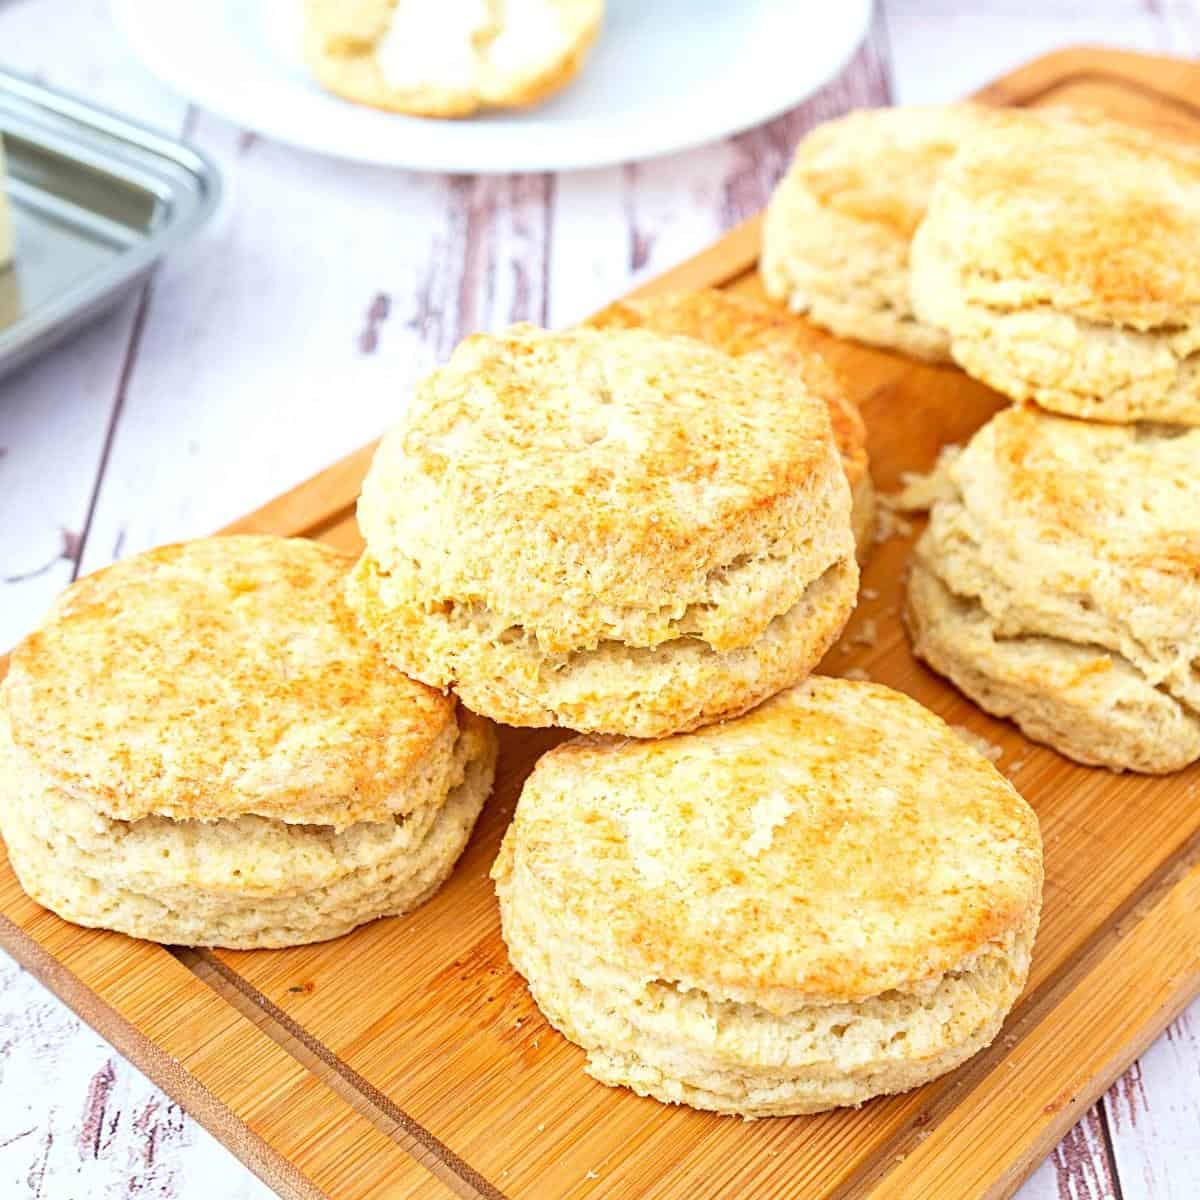
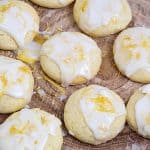
- Finally, place the cut biscuits onto a baking sheet lined with parchment paper, leaving a small gap between each for even baking. Brush them with milk or melted butter. Bake them in a preheated oven for 15 to 17 minutes or until golden brown.

Frequently asked questions
Biscuits are best served as soon as they are made fresh. However, biscuit dough can be kept in the fridge for up to 2 days. The dough can also be frozen for up to 3 months. Baked biscuits can be frozen for up to 3 months, wrapped in freeze-safe bags. Thaw in the fridge (not counter) for best results.
Well, biscuits use more butter, so they are more buttery and flaky, while scones use other ingredients, such as cream and eggs, along with the butter. As a result, scones are still buttery and rich but more like a pastry rather than crumbly biscuits. But they are both delicious and perfect any time of the year. Today, we make these with buttermilk, but you can also make them simple with milk or richer with cheddar cheese.
The secret to achieving a flaky texture lies in handling the dough gently. Overworking the dough can result in tough biscuits. To ensure flakiness, avoid kneading the dough too much, and be sure to use cold ingredients, such as chilled butter and buttermilk.
If your biscuits are turning out dense, it could be due to overmixing or using too much flour. The key is to handle the dough as little as possible and only mix until the ingredients come together. Also, measure your flour accurately using the spoon and level method to avoid packing it.
The butter in the biscuits must be cold; if the dough is too soft, place the biscuits in the fridge before baking. Similarly, if the oven is not hot, the butter will melt instead of creating steam between layers. This causes the biscuits to become flat.
Adding too much sugar can make the biscuits softer rather than crumbly. So do not add extra sugar.
1. Follow the recipe correctly. This recipe uses more baking powder, which helps puff these up in the oven.
2. Use cold butter. This will make the biscuits flakier, lighter, and airier. Because when baking, the butter will create steam between those folds and lift the dough.
3. Use a very hot oven. A hot oven will ensure the butter steams rather than melts between those layers. Keep the biscuits flaky!
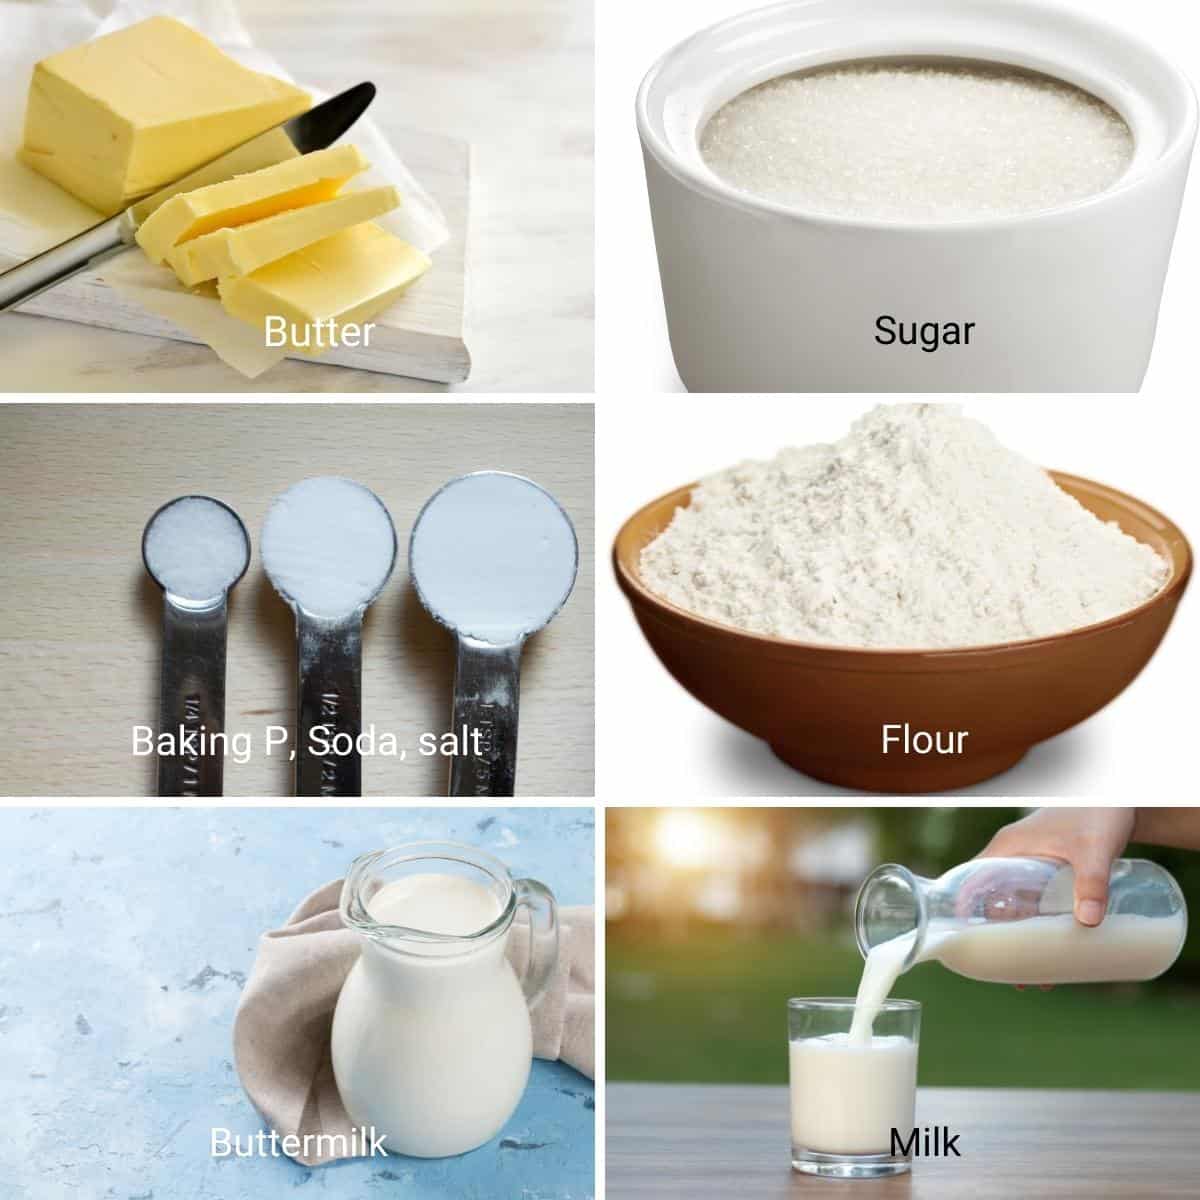
Ingredients
- 2 cups (250 g) All-purpose flour
- 1 tbsp Baking powder
- ¼ tsp Baking soda
- ½ tsp Salt
- 1 tbsp Sugar
- 6 tbsp (85 g) Butter unsalted, chilled, cubed
- ¾ cup (180 ml) Buttermilk chilled
- 2 tbsp Milk for brushing the top
Method
- Oven – Preheat the oven at 450°F / 230°C Gas Mark 8
- Dry ingredients – In a bowl, combine the flour, baking powder, baking soda, salt, and sugar. Then, add the chilled, cubed butter.2 cups All-purpose flour, 1 tbsp Baking powder, ¼ tsp Baking soda, ½ tsp Salt, 1 tbsp Sugar
- Cut – Using a pastry blender or a fork, cut the butter into the flour until it resembles coarse breadcrumbs.6 tbsp Butter
- Liquid – Add the buttermilk and combine well with a spoon or spatula. The mixture will still appear dry and crumbly, and that's ok. Bring the dough into a ball and transfer to a lightly floured surface.¾ cup Buttermilk
- Stack and fold – Using a rolling pin, lightly roll the dough. Fold the dough into thirds, bringing the two sides over the center. Then, the top and bottom sides are in the middle (see video). Just like closing a box!! Repeat this once more or twice more to create more folds.
- Cut – Finally, roll the dough again to about 3/4-inch thickness, and using a 3-inch cookie cutter, cut about 6 to 8 biscuits.
- Finish – Place the biscuits on a parchment or silicone-lined baking tray. Brush the tops of each biscuit with milk or more buttermilk.2 tbsp Milk
- Bake for about 15 to 17 minutes until the top is lightly golden. Remove from the oven and cool on the tray for 5 minutes.
Notes
- First and foremost, when making buttermilk biscuits, it’s essential to use cold ingredients. Cold butter and buttermilk will help create those flaky layers that everyone loves. So, make sure to keep your butter chilled until you’re ready to incorporate it into the dough. Additionally, it’s a good idea to refrigerate your buttermilk until the very last moment. Keeping the ingredients cold will ensure your biscuits rise beautifully and have that melt-in-your-mouth texture.
- Another crucial tip is to handle the dough as little as possible. Overmixing can lead to tough biscuits, so it’s best to mix the ingredients until they just come together. Once you’ve combined the flour, butter, and buttermilk, avoid the temptation to knead the dough extensively. Instead, gently pat it onto a lightly floured surface and use a biscuit cutter to create those perfect rounds.
- Next, let’s talk about the baking process. Properly preheating your oven is key to achieving golden brown and irresistible biscuits. Make sure to preheat your oven according to your recipe instructions. This step ensures that the biscuits bake evenly and develop that desirable color. Additionally, when placing the cut biscuits onto the baking sheet, remember to leave a small gap between each one. This allows for even air circulation and helps prevent them from sticking together.
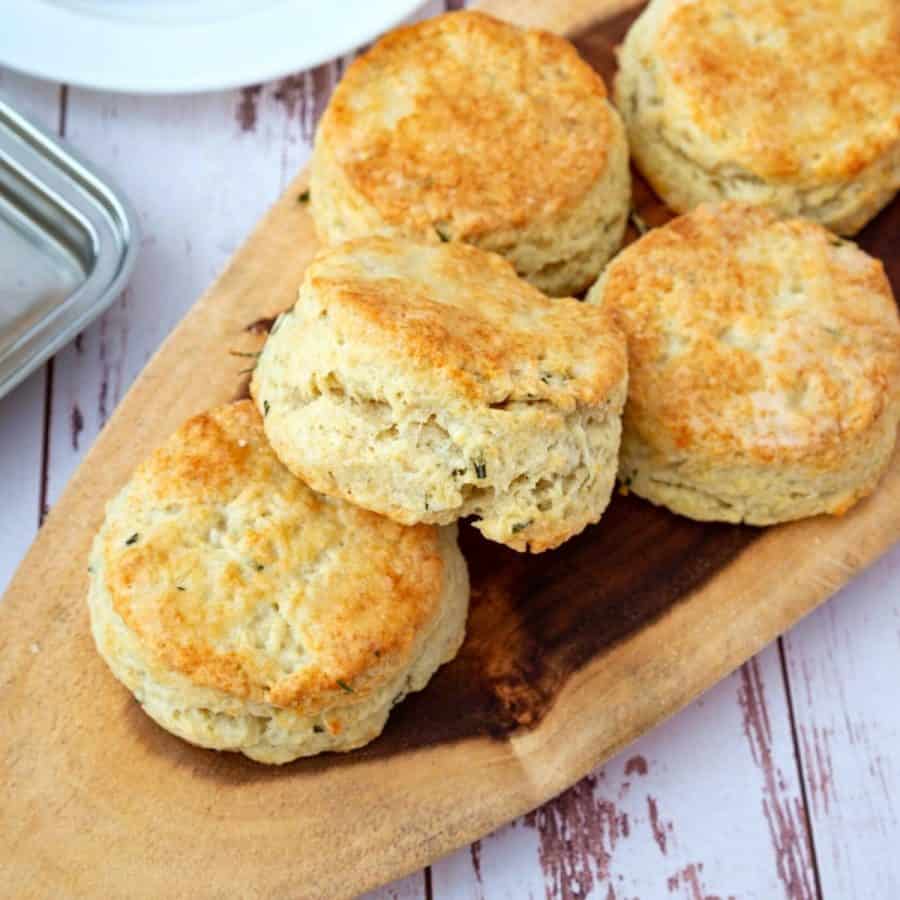
- Lastly, don’t forget to experiment with flavors and add-ins! While classic buttermilk biscuits are undeniably delicious on their own, you can elevate them by incorporating herbs, cheese, or even a hint of spice. Add fresh rosemary, grated cheddar, or a sprinkle of paprika to infuse your biscuits with unique flavors and surprise your guests.
Equipment you will need


Nutrition
Tried this recipe?
Mention @veenaazmanov_kitchen or tag #veenaazmanovkitchen!
Don’t lose this recipe! Save it for Later!
📌 Save this Recipe for later on Pinterest so you can easily find it again.
⭐ Add Veena Azmanov Kitchen to your Google Preferred Sources.
It helps Google show you more of our recipes.
📧 Subscribe for new recipes delivered to your inbox.
🎥 Follow us for more recipes


My daughter and I were so excited to try this recipe but unfortunately it didn’t work for us. We followed the directions exactly The dough never formed into a ball no matter how much we pressed it because it was too dry and crumbly. The only way we could semi save it was by adding a splash of extra buttermilk just to moisten it a bit. The biscuits came out flat and dry but we ate them with our soup anyway because we don’t like waste. We don’t know what happened. The only guess I have is that our buttermilk is very thick so maybe that’s why the dough was overly dry and crumbly?????
Sorry for the delay in replying to you Ms. But, 3/4 cup of buttermilk in 2 cups of flour is more than enough to make these biscuits perfectly. Too much buttermilk will not make these layers and the biscuits will not be crumbly enough.
Can you believe I’ve never made biscuits before? I’ve never even tried them. But these look so fluffy. I can’t wait to give them a try.
These biscuits look amazing! I sure can’t wait to enjoy these for breakfast!
The biscuits look fantastic. Simply perfection. And as always your blog posts are so thorough and helpful to make it successfully the very first time.
They are very like our Scottish scones which we don’t add cream or eggs to. Nice rise.
My Southern Grandmother always made the best buttermilk biscuits as my southern aunts. They used self rising flour, vegetable shortening and fresh full fat buttermilk. The shortening was cut into flour then a well was made, buttermilk poured into middle well then a few sprinkles of baking soda over the buttermilk. Only hands and fingers were used! The first time I tried making these they were like rocks! My southern dad laughed and said if you would make biscuits three times a day since you were 12 you too could make good biscuits! Your grandmother made great biscuits but her mother made better biscuits. Practice makes perfect Sha. The first time I made your recipe they were great! The second time they crumbled all over when cut open. What happened?
These Homemade biscuits look absolutely amazing! Perfectly flakey and buttery. My family is going to love these!