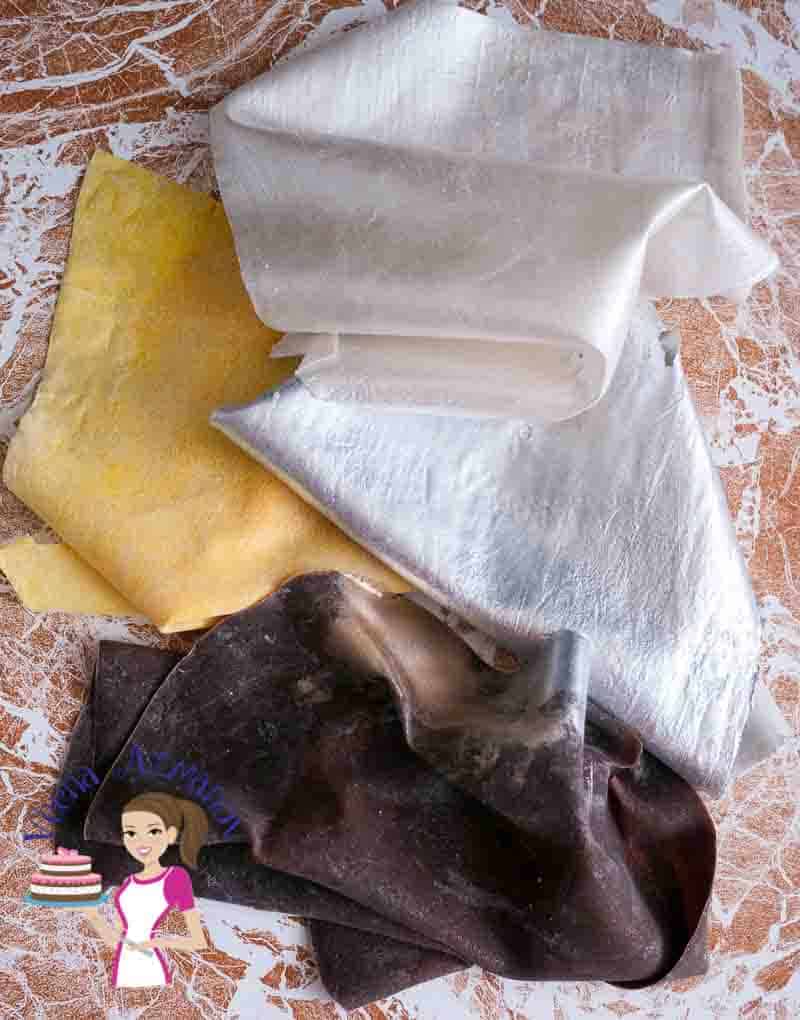
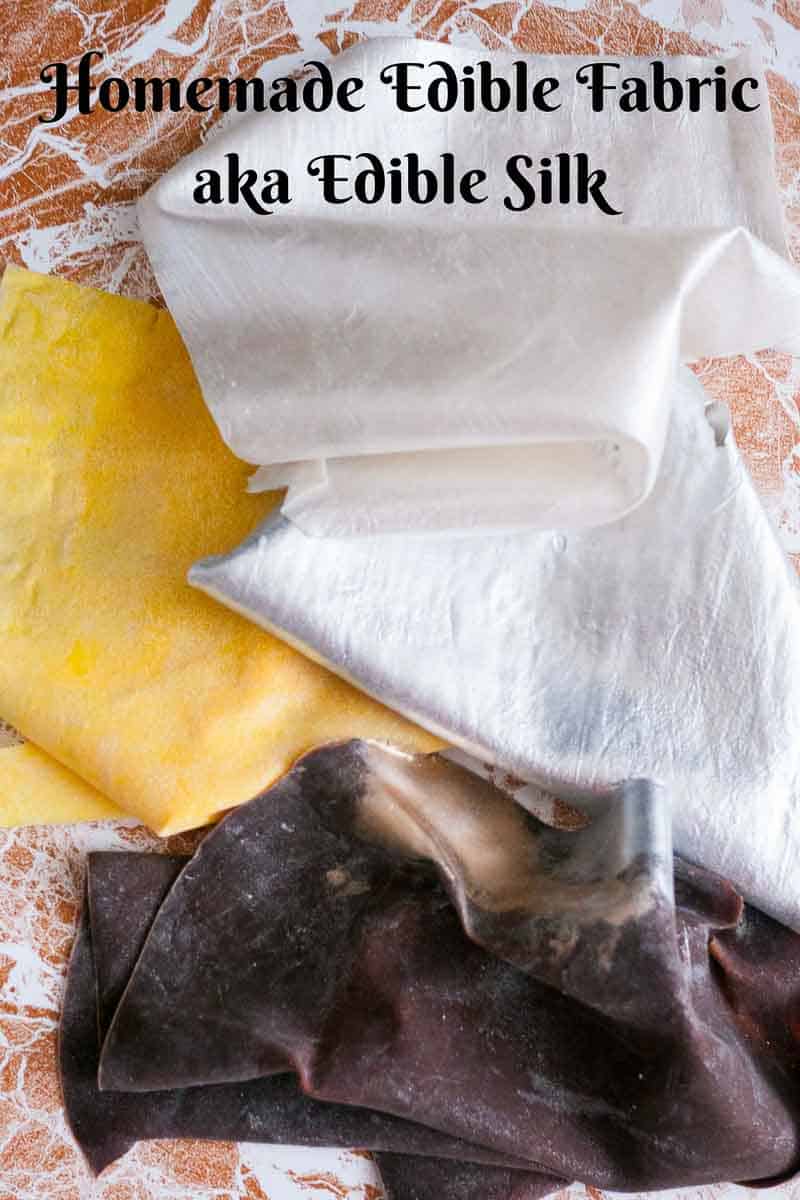
Homemade Edible Fabric – Edible Silk

The latest trend in cake decorating has been these edible fabric sheets also called edible silk and flexique edible fabric. Surprisingly this homemade edible fabric recipe is easier than you can imagine. It takes no more than 10 minutes to make one sheet of homemade edible silk.
A few months ago I had a customer who was very fascinated with having edible drapes for her wedding cake. Unfortunately, after taking into consideration the cost of the cake and shipment, plus the time it would take for shipping, she decided it was not worth it. Of course, I was disappointed.
Recently, I came across this amazing video on YouTube by Elena Wilkinson. She made edible fabric at home. It was very simple, easy, and inexpensive. The video was in Russian so I could not understand a word, yet I loved what I saw and I had to try it. Lucky for me, my friend Gulnaz knows Russian and she was kind enough to help me translate the video and get the recipe.

So, I did my first experiment and was almost jumping. It was so easy! I loved the effect. Of course, you know me, and I wanted to share it with you. And so I decided to do the rest of my testing/experiments on camera so I can share them with you.
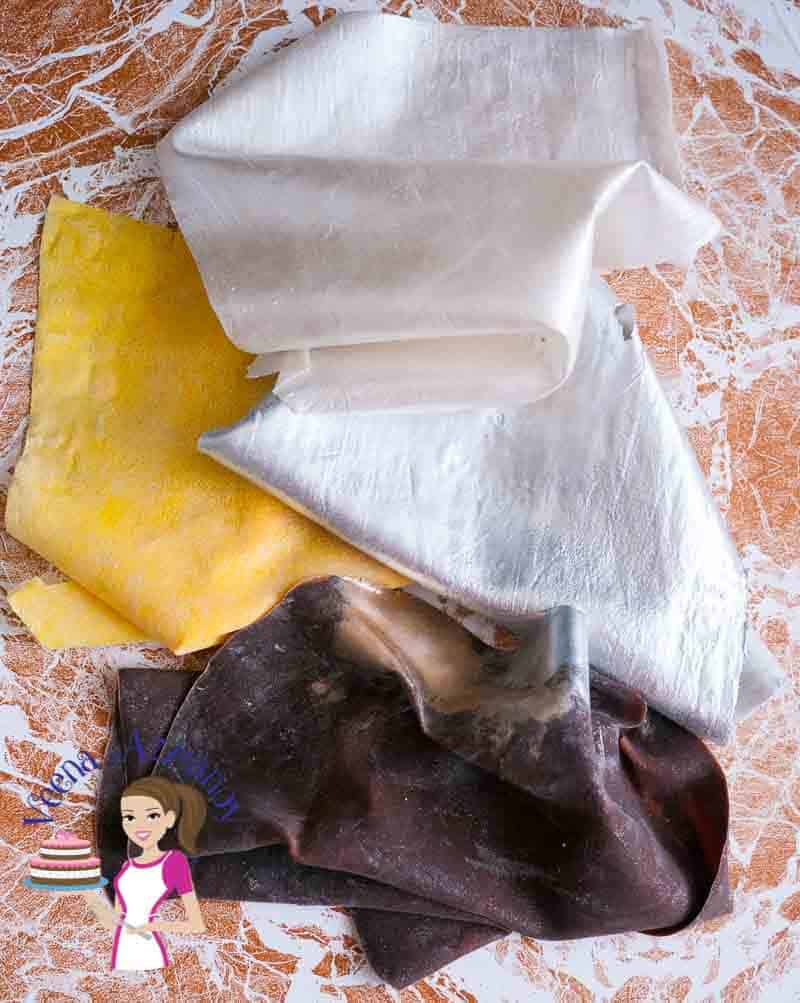
Now I will be honest, I have yet to place it on a cake. But I love how the whole fabric effect looks. It’s so amazing to have something so soft, squishy, and satiny in your hands. Best of all it’s EDIBLE!!
Tools and tips
- Brush– Now it is very important to use a good art brush. It does not have to be expensive but it does need to be able to brush in one stroke. So an old brush works fine. Just make sure the bristles are not falling off and that it gives a smooth brush stroke. Not one that causes lumps. Do not use the kitchen silicon brushes. They make dripping strokes.
- Bowls– Use a microwave-safe bowl. Find two bowls that fit one over the over like a bain-marie. So you can place hot water in the bottom bowl.
- Silicon mat – For the chocolate fabric, you need a clean silicon mat so you can peel the fabric easily.
- Long offset spatula – Use a long offset spatula for the chocolate fabric so it will spread easily and evenly.

How does edible fabric taste?
Well, the recipe is just gelatin, glycerin, and water – no sugar or anything else. So needless to say, it does not taste like much! In fact, at least the homemade edible sugar lace recipe has some sugar. So while it does not take much it’s still OK. And yet, this one is not something you would enjoy eating. It’s mostly for getting the fabric effect on the cake. So don’t expect it to taste good.
My tips & recommendations
If you notice below in the recipe I have given you the option to brush the mixture on one side of the rice paper only. As well as brush the mixture on two sides of the rice paper. Why?
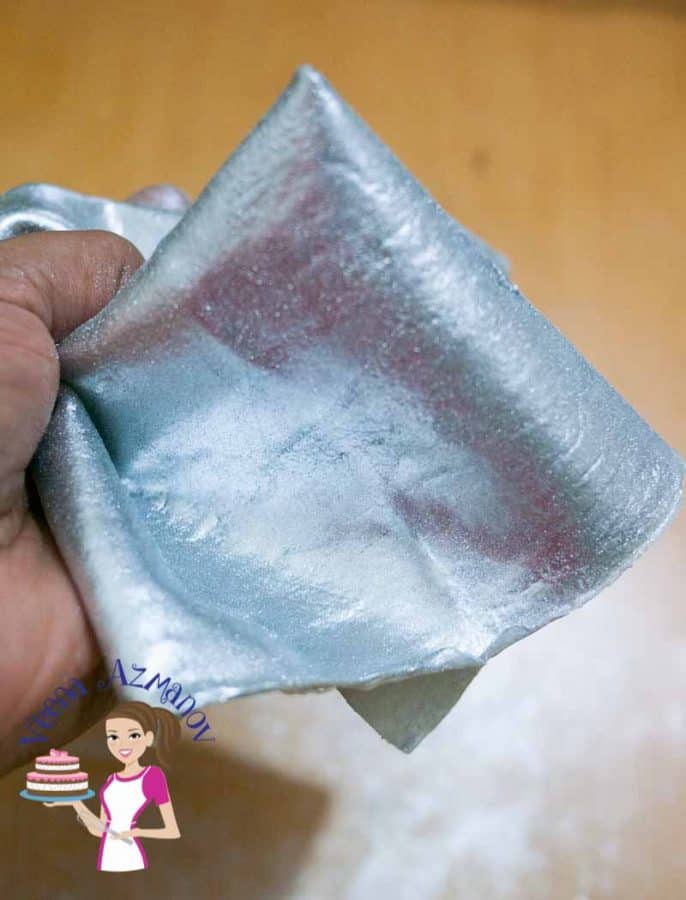
Well, I notice that when brushing only on one side the fabric tends to become stiff after a while. That’s because one side of the rice paper is still exposed to air and you know what happens to rice paper when you keep it out, right? But if you brush on both sides it stays softer for a longer time. In fact, my silver edible fabric has been done a few days ago and it’s still soft.
So, I highly recommend brushing on both sides to get the full fabric effect.
How to make edible fabric
For the transparent mixture
- Soak the gelatin in water for a few seconds.
- Dissolve the gelatin in the microwave for 20 sec or more until completely dissolved.
- Add the glycerin and stir well.
- Place the gelatin bowl over a bowl of hot water so it does not solidify.
Brushed one side (see video)
- Brush the mixture over the rice paper’s shiny side trying to keep single strokes.
- Dry on one side completely for 7 to 10 minutes (it will be dry but tacky).
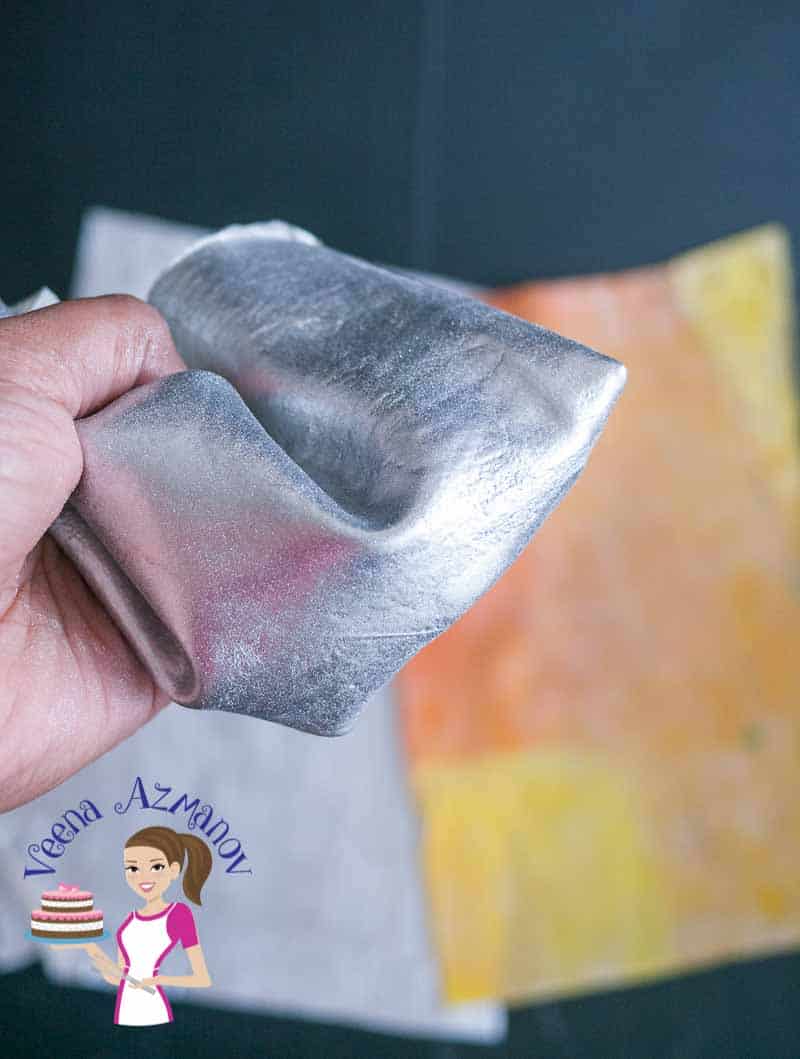
- Brush with pearl luster dust, metallic gold, or silver.
- Dust the second side with cornstarch so it won’t be tacky anymore.
Brushed on two sides (see video)
- Brush the mixture over the rice paper dull side trying to keep single strokes.
- Dry on one side completely for 5 to 7 minutes (it will be dry but tacky).
- Flip the sheet carefully and brush the other (now shiny side) with the mixture.
- Let dry for 5 to 7 minutes until dry but still tacky.
- Brush with pearl luster dust, metallic gold, or silver.
- Dust the second side with cornstarch.
Edible chocolate fabric
- Soak the gelatin in water for a few seconds.
- Dissolve the gelatin in the microwave for 20 sec or more until completely dissolved.
- Add the glycerin and stir well.
- Mix in the chocolate pieces and stir till well dissolved.
- If necessary place in the microwave for 10 seconds.
- Once all the pieces are dissolved pour the mixture over a clean silicon mat.
- Spread out with a long spatula or bench scraper trying to keep to single strokes.
- Let dry for 10 minutes until set (it will be sticky but dry).
- When a dry brush with metallic gold, silver or cornstarch.
- Dust off any excess cornstarch.
Most cake projects need flexible materials like clothes, bows, and swags. You can make a dress for a princess doll cake.
Yes, paint on the plain side first, and let it dry. Then paint on the printed side using single strokes. You want to be gentle and use a single motion to prevent bleeding.
The cornstarch takes away the stickiness from the gelatin. It also gives it that mat finish.
Yes, you can use colored edible dust but note that it will change the color of the edible fabric depending on the color and how much you use.
As shown in the video, you can do one side or you can do both sides. I find doing both sides gives a softer fabric effect.
Doing only one side also means the wafer paper is exposed so it can dry more quickly.
Once dusted with cornstarch the edible fabric needs to be kept wrapped and away from air. Just like fondant or gumpaste the longer it is exposed to air the quicker it will dry.
I find placing the edible fabric between two parchment papers and in a cardboard box works best to keep them soft.
Yes, in this case, you will need about 8 leaves of premium-grade leaf gelatin.
Place the gelatin leaves in water making sure they are completely covered.
Let soak for 5 minutes
Remove them from the water and squeeze out any excess moisture.
Place them in a microwave-safe bowl and melt using 50% power at 30-second intervals.
Alternatively, place them in a bowl over a pan of simmering water (like a double boiler) and stir until melted
Printed edible wafer papers can bleed color when painting so it’s important to do it with one single stroke each time. And if you find the color is bleeding wipe the color off the brush between each stroke so you don’t add color to the mixture or the next stroke.
In most cases, you will not notice the patch or streaky effect when used on the cake like a fabric.
No, keep the mixture warm or the hot gelatin will soak into and warp the wafer paper. Printed wafer paper will bleed colors.
The small gains usually mean that the gelatin was not melted properly before brushing.
The lumps are probably because the gelatin was setting while brushing leaving a lumpy finish. Keep the mixture warm before brushing.
Homemade Edible Fabric Recipe aka Edible Silk Recipe
The latest trend in cake decorating has been these edible fabric sheets also called edible silk. Surprisingly this homemade edible fabric recipe is easier than you can imagine. It takes no more than 10 minutes to make one sheet of homemade edible silk.
Ingredients
- 20 grams (1.50 tbsp) Gelatin or 8 gelatin leaves
- 1 tsp Glycerin
- 40 ml (3 tbsp) Water
- 2 Rice paper sheet
- 20 grams (1.50 tbsp) Gelatin or 8 gelatin leaves
- 1 tsp (tsp) Glycerin
- 40 ml (2.75 tbsp) Water
- 20 grams (0.75 oz) Chocolate
Method
- Soak the gelatin in water for a few seconds.
- Dissolve the gelatin in the microwave for 20 sec or more until completely dissolved.
- Add the glycerin and stir well.
- Place gelatin bowl over a bowl or hot water so it does not solidify.
- Brush mixture over the rice paper shiny side trying to keep single strokes.
- Dry on one side completely for 7 to 10 minutes (it will be dry but tacky).
- Brush with Pearl luster dust, metallic gold or silver.
- Dust the second side with cornstarch so it won’t be tacky anymore.
- Brush mixture over the rice paper dull side trying to keep single strokes.
- Dry on one side completely for 5 to 7 minutes (it will be dry but tacky).
- Flip the sheet carefully and brush the other (now shiny side) with the mixture.
- Let dry for 5 to 7 minutes until dry but still tacky.
- Brush with pearl luster dust, metallic gold or silver.
- Dust the second side with cornstarch.
- Soak the gelatin in water for a few seconds.
- Dissolve the gelatin in the microwave for 20 sec or more until completely dissolved.
- Add the glycerin and stir well.
- Mix in the chocolate pieces and stir till well dissolved.
- If necessary place in the microwave for 10 seconds.
- Once all the pieces are dissolved pour mixture over a clean silicon mat.
- Spread out with a long spatula or bench scraper trying to keep to single strokes.
- Let dry for 10 minutes until set (it will be sticky but dry).
- When a dry brush with metallic gold, silver or cornstarch.
- Dust off any excess cornstarch.
Notes
Tips when working with edible fabric.
- Have all things ready before you start this project.
- Use white color gelatin for a clean finish. Gelatin with a yellow ting will leave a gelatin slightly yellow.
- Gelatin can be a messy job and it sets faster so keep a bowl of warm water handy.
- Use a clean flexible brush with soft bristles so you get a smooth finish with less streaks
- When brushing if the mixture starts to set, stop warm it up or the resulting fabric will be thick with brush strokes.
- If the brush is dragging or pulling on the wafer paper means there is too much mixture set on the brush. Clean the brush in warm water to remove the mixture. Wipe the brush clean and start again.
- You can work with small or large pieces but you want to make sure you have the right amount of mixture for the project.
Equipment you will need


Nutrition
Tried this recipe?
Mention @veenaazmanov_kitchen or tag #veenaazmanovkitchen!Don’t lose this recipe! Save it for Later!
📌 Save this Recipe for later on Pinterest so you can easily find it again.
⭐ Add Veena Azmanov Kitchen to your Google Preferred Sources.
It helps Google show you more of our recipes.
📧 Subscribe for new recipes delivered to your inbox.
🎥 Follow us for more recipes


Veena, this was so fun. I did not have the glycerin and tried it with the other ingredients and worked. I probably would have used two coats for my specific project, as it was sort of translucent. Also, I did not have or use silicon boards, but it worked just fine with brushing on parchment paper. Thanks for the recipe!
You are very welcome CC – thanks for the feedback.
How do you attach it to ganache please x
You can brush corn syrup on ganache and stick the edible fabric to it.
Can you add black food coloring to the chocolate to make a black fabric?
I have not tried it but it should work.
Hello, I was wondering if I could use this technique on rice paper that I will
Print a flannel like image on with my edible
Printer?, then I’d like to drape it over a fondant covered cake.
I have not tried this on printed paper so I am not sure how it will work. I do belive that of you use single strokes in one direction there it will prevent color bleed but again you will have to test it first and see how it goes.
Can I use this just like fondant? I’m planning on using it as a table cloth over buttercream and store it in the fridge. Will that work?
Thank you
Yes, you can use edible lace on fondant, buttercream or gum paste- Thanks. Condensation in humid conditions tends to make it weep.
Can you cut it into shapes?
Yes, once the fabric is ready you can cut it into any shape you want.
Can I use chocolate candy melts ??
It should work. I have not tried.
Rice paper and wafer paper are ver different.
Can you you either?
NO wafer paper is not the same as rice paper.
Hi. Thank you for the recipe! I tried making the chocolate one and the transparent one and put the gelatine on both the sides. The chocolate one was perfect. However the transparent one had a lot of bubbles and when i brushed it with gold it was blotchy and not smooth.
What could have gone wrong?
Thank you
The best is to make sure you spread the gelatin in our stroke. Don’t overbrush as it will cause bubbles and strings
No one mentions the awful body odor smell when cooking the gelatin. There’s a slight smell when the fabric dries too. Is there a way to mask this smell?
Kelley! yes, gelatin does have some smell. You can add 1/4 tsp vanilla or almond extract if you want.
What should be used for fabric, ricepaper or wafer paper? It is confusing since the recipe calls for rice paper and also wafer paper is mentioned.
I used rice paper but you can use printed wafer paper too.
How to stick the fabric to fondant?
Melted gelatin or melted chocolate
This looks incredible. I would love to try it but I was wondering if there is a vegetarian or vegan alternative?
I don’t know Sophia. I have not tried a vegetarian version of this
What should be the thickness of wafer paper?
I used the regular flexible one – nothing special. So, not sure about thickenss. Sorry
Hi, can you use Jello brand flavored gelatin for the edible fabric?
No, Jo, you need plain jello. Gelatin has sugar which we don’t need