Halloween Skull Madeleines with Raspberry Jam
 Prep Time 10 minutes Cook Time 15 minutes Total Time 1 hour 25 minutes
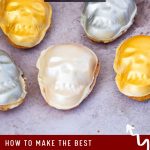
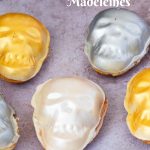
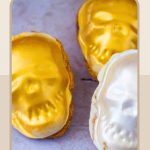
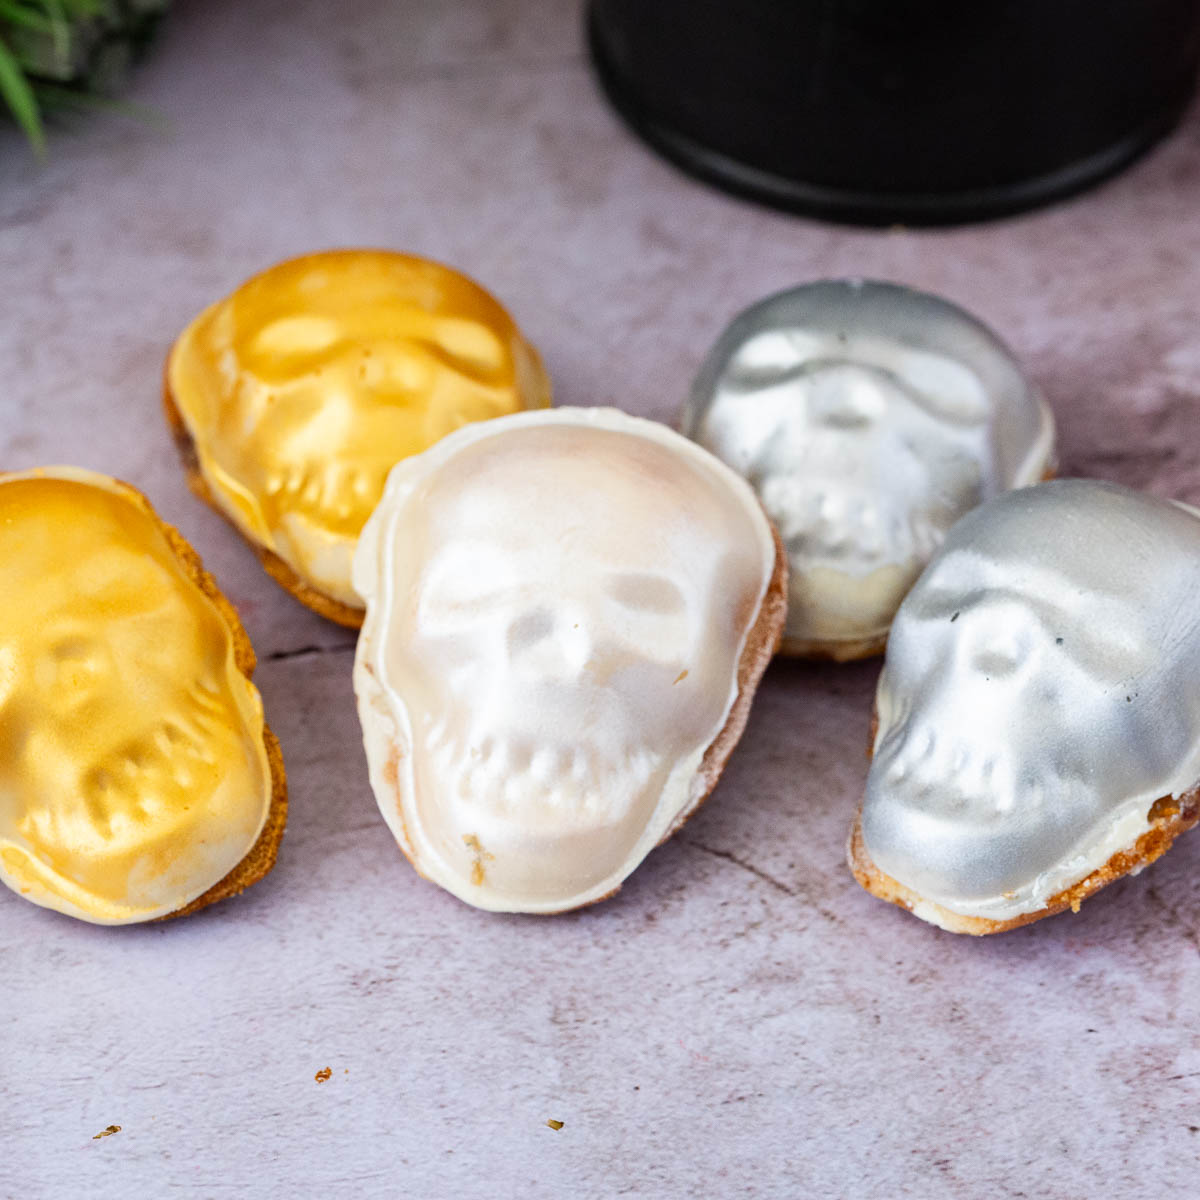
These Halloween Skull Madeleines are a spooky twist on a classic French treat. They feature a buttery, delicate texture with a surprise raspberry jam filling. Covered in white chocolate and dusted with shimmering edible dust, they make an impressive and fun addition to any Halloween party. Let the kids join the fun by helping dust the skulls and bring them to life!

Madeleines were always a special request item in my cake business—delicate, buttery, and perfect with tea. But for Halloween, I couldn’t resist having a little fun and giving them a spooky makeover. Instead of the classic shell shape, I baked them in a skull-shaped pan, transforming these elegant little cakes into something both eerie and delicious.
The first time I made them, I wasn’t sure how they’d turn out, but once I popped them out of the pan, they looked so realistic that I knew they’d be a hit. To make them even more festive, I filled them with raspberry jam for a “bloody” surprise inside, then coated some with white chocolate for an extra eerie effect.
I brought these to a Halloween gathering, and let’s just say, they didn’t last long. Someone even joked, “These are too fancy to be scary—but I’m still eating five of them.” And that’s exactly why I love these—they’re fun, festive, and still just as light and delicious as a classic madeleine.
Now, every Halloween, I can’t resist making a batch, because really—who says spooky can’t be elegant too? ???
Why are these the Halloween treats?
- Unique Presentation: The skull shape adds a spooky and impressive visual element, making these madeleines perfect for Halloween-themed parties and celebrations.
- Delicious Filling: The raspberry jam filling provides a delightful contrast to the light and fluffy Madeline batter, adding a fruity surprise with each bite.
- Luxurious White Chocolate Coating: The white chocolate coating elevates the texture and flavor, giving the madeleines a creamy, rich finish that complements the soft sponge.
- Creative Decoration: Dusting the skulls with edible pearl, silver, or gold dust adds a touch of elegance, making them not only spooky but also visually stunning and eye-catching.

List the key ingredients and substitutes:
- All-Purpose Flour: This provides structure and texture to the madeleine batter. You can substitute cake flour for a lighter texture or gluten-free flour for a gluten-free version.
- Unsalted Butter: Adds richness and moisture to the batter. For a dairy-free option, substitute margarine or coconut oil.
- Granulated Sugar: Sweetens the madeleines and helps create a tender crumb. You can also substitute with brown sugar for a more caramelized flavor or a sugar substitute like stevia for a low-sugar option.
- Eggs: Essential for binding and adding lightness to the batter. You can substitute with flax eggs or applesauce for an egg-free alternative.
- Raspberry Jam: Adds a fruity, tangy filling. You can also substitute with strawberry, apricot, or any jam of your choice.
- White Chocolate: Used for coating and adding a creamy texture. You can substitute with milk or dark chocolate, or use dairy-free white chocolate for a vegan option.
- Edible Pearl, Silver, or Gold Dust: Adds a decorative shimmer. You can also substitute with colored sugar sprinkles or leave the madeleines plain for a more subtle look.

Step-by-step: Halloween Skull Madelines
- Prepare the skull pan: Grease the skull pan with butter or non-stick spray to prevent sticking. Then, lightly dust with flour and tap out the excess. This ensures the Madeleines release easily from the pan.

- Melt the Butter: Melt the butter in a small saucepan over low heat or in the microwave. Allow it to cool to room temperature. This step is crucial for achieving the right texture in the final product. Then, add the lemon juice. Let cool completely.
- Mix Dry Ingredients: In a bowl, whisk together the flour, baking powder, and salt twice. Set aside for later. This will help evenly distribute the baking powder and salt.
- Beat Eggs and Sugar: Beat the eggs and granulated sugar in a separate large bowl using an electric mixer or whisk. Beat on high speed until the mixture is pale, thick, and frothy (about 5 minutes).
- Add Vanilla and Lemon Zest: Gently fold the honey, vanilla extract, and lemon zest using a spatula. Be careful not to deflate the egg mixture while adding these ingredients.
- Fold in Melted Butter: Slowly fold the cooled melted butter into the batter in two additions. Ensure the butter is evenly incorporated without overmixing.
- Chill the Batter: Cover the bowl with plastic wrap and refrigerate for at least 1 hour. Chilling helps thicken the batter and gives Madeleines their signature hump.
- Preheat the Oven: Preheat your oven to 375°F (190°C). Position a rack in the center of the oven for even baking.
- Fill the Skull Cake Pan: After chilling, spoon half of the batter into each skull mold cavity, filling halfway. Then, place a teaspoon of raspberry jam in the center of each. Top with more batter, filling the molds 3/4 full.
- Bake: Bake for 12-15 minutes or until the edges are golden and a toothpick inserted into the center comes out clean. Let the skull madeleines cool in the pan for 5 minutes. Then, transfer them to a wire rack to cool completely.

- Add the White Chocolate Coating: Once cooled, melt the white chocolate in a double boiler or microwave, stirring until smooth. Next, pour a small amount of melted white chocolate into the clean and dry skull cake pan to cover the bottom of each mold. Then, place each madeleine back into the mold on top of the melted chocolate. Freeze for 15-20 minutes or until the chocolate is firm.
- Finish and Decorate: Remove the skull madeleines from the pan carefully. Dust some skulls with edible pearl, silver, or gold dust for a haunting shimmer effect.


Frequently asked questions
Store leftover madeleines in an airtight container in the fridge if they’re coated with chocolate. They can also be stored at room temperature for up to 3 days if they are uncoated.
Chilling the batter helps the butter firm up, which improves the texture and allows the madeleines to rise properly, creating their signature “hump.” It also helps the batter hold its shape in the skull mold for better definition. While you can skip chilling in a pinch, it’s recommended for achieving the best texture and shape. Chilling also prevents the batter from spreading too much in the mold.
The skull-shaped pan makes these madeleines special for Halloween. However, if you don’t have a skull mold, you can use a regular madeleine pan, though the spooky effect will be lost.
Yes, you can make the madeleines a day or two in advance. Store them in an airtight container, and if coated with chocolate, keep them in the refrigerator to prevent melting.
Halloween Skull Madeleines
These Halloween Skull Madeleines are a spooky twist on a classic French treat. They feature a buttery, delicate texture with a surprise raspberry jam filling. Covered in white chocolate and dusted with shimmering edible dust, they make an impressive and fun addition to any Halloween party. Let the kids join the fun by helping dust the skulls and bring them to life!
Video
Ingredients
- ½ cup (113 g) Butter unsalted, melted
- 1¼ cup (160 g) All-purpose flour
- ¼ tsp Baking powder
- ⅛ tsp Salt
- 1 tsp Lemon zest
- 2 large Eggs
- ½ cup (100 g) Sugar
- 2 tbsp Honey
- 1 tsp Vanilla extract
- 1 tsp Lemon juice
- 1 cup White melted chocolate
- Pearl, silver, or gold edible dust optional
Method
- Prepare the skull pan: Grease the skull pan with butter or non-stick spray to prevent sticking. Lightly dust with flour and tap out the excess. This ensures the Madeleines release easily from the pan.
- Melt the Butter: Melt the butter in a small saucepan over low heat or in the microwave. Allow it to cool to room temperature. This step is crucial for achieving the right texture in the final product. Then, add the lemon juice. Let cool completely.½ cup Butter , 1 tsp Lemon juice
- Mix Dry Ingredients: In a bowl, whisk together the flour, baking powder, and salt twice. Set aside for later. This will help evenly distribute the baking powder and salt.1¼ cup All-purpose flour, ¼ tsp Baking powder, ⅛ tsp Salt
- Beat Eggs and Sugar: Beat the eggs and granulated sugar in a separate large bowl using an electric mixer or whisk. Beat on high speed until the mixture is pale, thick, and frothy (about 5 minutes).2 large Eggs, ½ cup Sugar, 2 tbsp Honey
- Add Vanilla and Lemon Zest: Gently fold the honey, vanilla extract, and lemon zest using a spatula. Be careful not to deflate the egg mixture while adding these ingredients.1 tsp Lemon zest, 1 tsp Vanilla extract
- Fold in Melted Butter: Slowly fold the cooled melted butter into the batter. Ensure the butter is evenly incorporated without overmixing.
- Chill the Batter: Cover the bowl with plastic wrap and refrigerate for at least 1 hour. Chilling helps thicken the batter and gives Madeleines their signature hump.
- Preheat the Oven: Preheat your oven to 375°F (190°C). Position a rack in the center of the oven for even baking.
- Fill the Skull Cake Pan: After chilling, spoon half of the batter into each skull mold cavity, filling halfway. Place a teaspoon of raspberry jam in the center of each. Top with more batter, filling the molds 3/4 full.
- Bake: Bake for 12-15 minutes or until the edges are golden and a toothpick inserted into the center comes out clean. Let the skull madeleines cool in the pan for 5 minutes, then transfer them to a wire rack to cool completely.
- Add the White Chocolate Coating: Once cooled, melt the white chocolate in a double boiler or microwave, stirring until smooth. Pour a small amount of melted white chocolate into the skull cake pan to cover the bottom of each mold. Place each madeleine back into the mold on top of the melted chocolate. Freeze for 15-20 minutes or until the chocolate is firm.1 cup White melted chocolate
- Finish and Decorate: Remove the skull madeleines from the pan carefully. Dust some skulls with edible pearl, silver, or gold dust for a haunting shimmer effect.Pearl, silver, or gold edible dust
Notes
- Use Room Temperature Ingredients: Ensure that the eggs are at room temperature to allow for better emulsification and a smoother batter. This helps create a light, airy texture in the Madeleines.
- Chill the Batter: Refrigerate the batter for at least 1 hour or overnight. This helps thicken the batter, develop flavors, and create the signature hump during baking.
- Properly Prepare the Pan: Grease the Madeleine pan thoroughly with butter or non-stick spray and dust it with flour. This ensures the Madeleines release easily and retain their shape.
- Do Not Overmix the Batter: Gently fold the ingredients to prevent overworking the gluten, which can result in tough Madeleines. Aim for a smooth, homogenous batter without overmixing.
- Fill the Molds Correctly: Use a heaping tablespoon of batter for each mold without spreading it. The batter will spread naturally as it bakes, ensuring even cooking and the characteristic shape.
- Monitor Baking Time: Bake until the edges are golden brown and the centers are set. Overbaking can result in dry Madeleines, so keep a close eye on them towards the end of the baking time.
- Tap the Pan to Release: After removing the pan from the oven, tap it on a countertop to loosen the Madeleines. This helps them release cleanly and maintain their shape.
- Serve Fresh: Madeleines are best enjoyed fresh on the day they are made. If storing, keep them in an airtight container for up to 2 days to maintain their texture.
- Experiment with Flavors: Don’t hesitate to add different extracts or zests for new flavors. Almond, orange, or lavender can provide exciting twists on the classic recipe.
- Consider Presentation: Dust the Madeleines with powdered sugar just before serving for an elegant touch. They can also be drizzled with a glaze or dipped in chocolate for added flavor and visual appeal.
Nutrition
Tried this recipe?
Mention @veenaazmanov_kitchen or tag #veenaazmanovkitchen!

Don’t lose this recipe! Save it for Later!
📌 Save this Recipe for later on Pinterest so you can easily find it again.
⭐ Add Veena Azmanov Kitchen to your Google Preferred Sources.
It helps Google show you more of our recipes.
📧 Subscribe for new recipes delivered to your inbox.
🎥 Follow us for more recipes


These looked so dramatic once dusted and filled. Almost too nice for Halloween honestly.
That’s my favorite kind of Halloween dessert — spooky but still elegant 😄 Glad you enjoyed them!