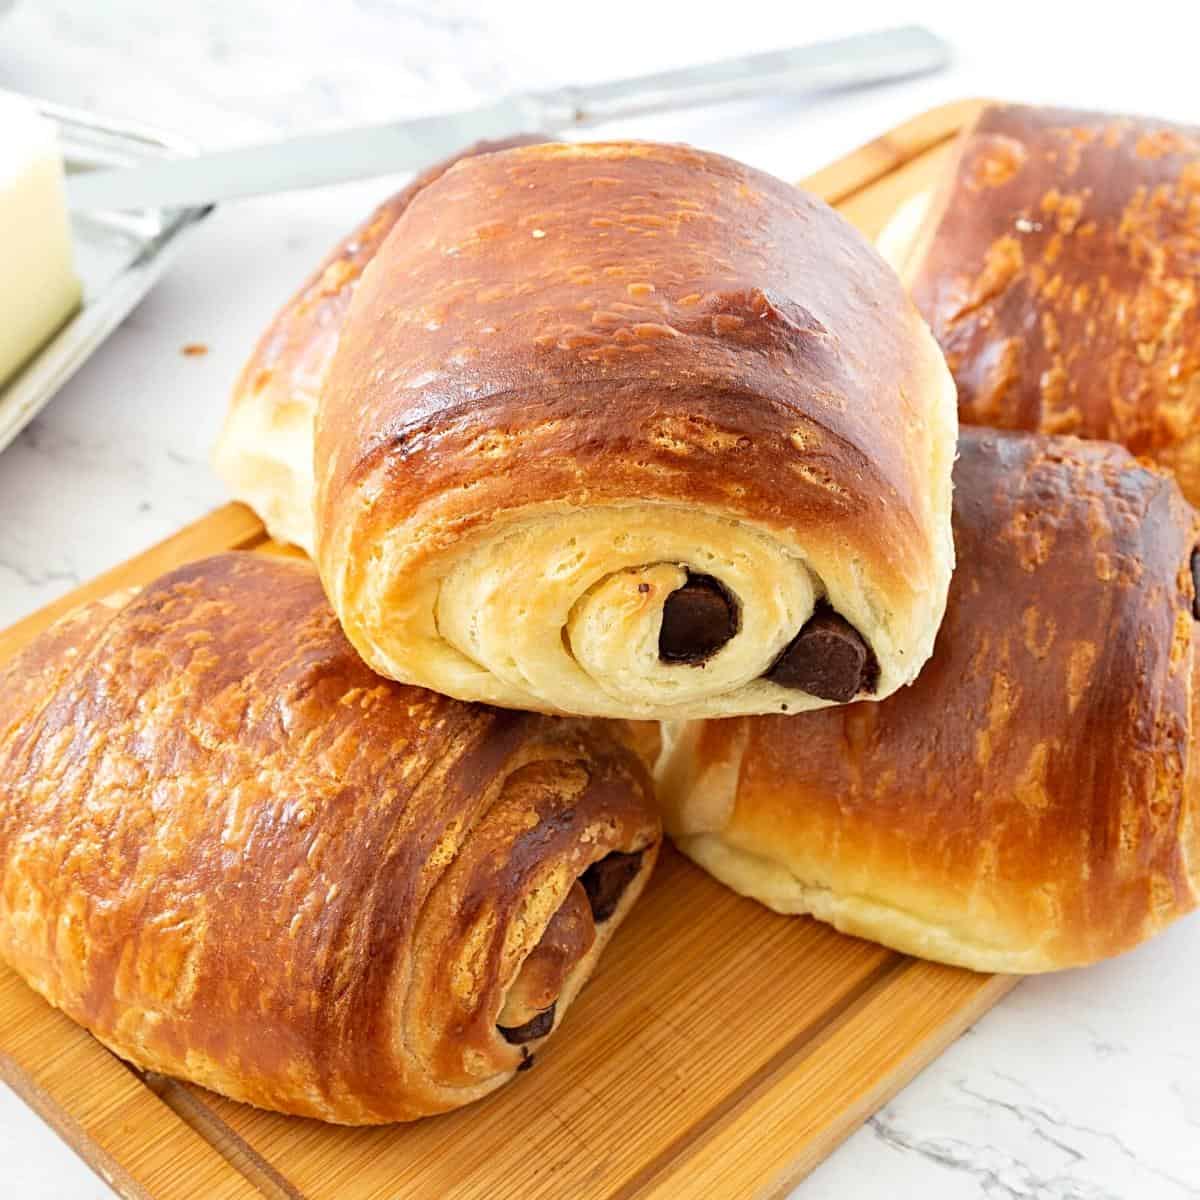
Chocolate Croissants


Chocolate croissants are flaky, buttery French pastries called ‘pain au chocolat.’ A yeast-based dough laminated with layers of butter and then rolled with chocolate batons. Today, I will show you my simple and easy method to make these homemade croissants from scratch.
When I go out for breakfast or brunch, one of my favorite treats to have is a chocolate croissant. It’s also a great dessert pastry to serve at a meeting. Don’t you think?
It’s rich, buttery, flaky, and filled with chocolate. What’s not to like? And, if you’ve never made these yourself, you will be surprised how easy they are to make yourself.
Why make these croissants?
- This is a home baker’s recipe, and if you have never made croissants before, I highly recommend that you start with this dough. It’s a very forgiving dough that’s easy to knead with a stand mixer or by hand.
- There are three main components to this dough:
- The dough – a simple yeast-based dough with a small amount of butter and sugar.
- Butter block – this is lots of butter, which we cream with a little flour and then laminate between the dough. The purpose of the flour in the butter is to help stabilize it. Most professionals often skip the flour, but I recommend you use it.
- Chocolate – pain au chocolate is made with chocolate sticks called batons.
- Of course, we are making chocolate croissants, so I’ve used chocolate, but you can also use Nutella, jam, and dulce de leche.
Timeline and process
The process and timeline for making these homemade croissants are pretty simple as well. Here’s my guide for you to use.
- Make and chill the dough – 10 + 30 mins
- Make and chill the butter block – 10 + 20 minutes
- Laminate the dough – 5 minutes
- First-fold, then chill the dough – 30 minutes
- Second-fold, then chill the dough – 30 minutes
- Third-fold, then chill the dough – 60 minutes up to 48 hours
- Shape the croissants – 10 minutes
- Proof croissant – 60 minutes
- Chill croissants – 30 minutes
- Bake – 25 minutes
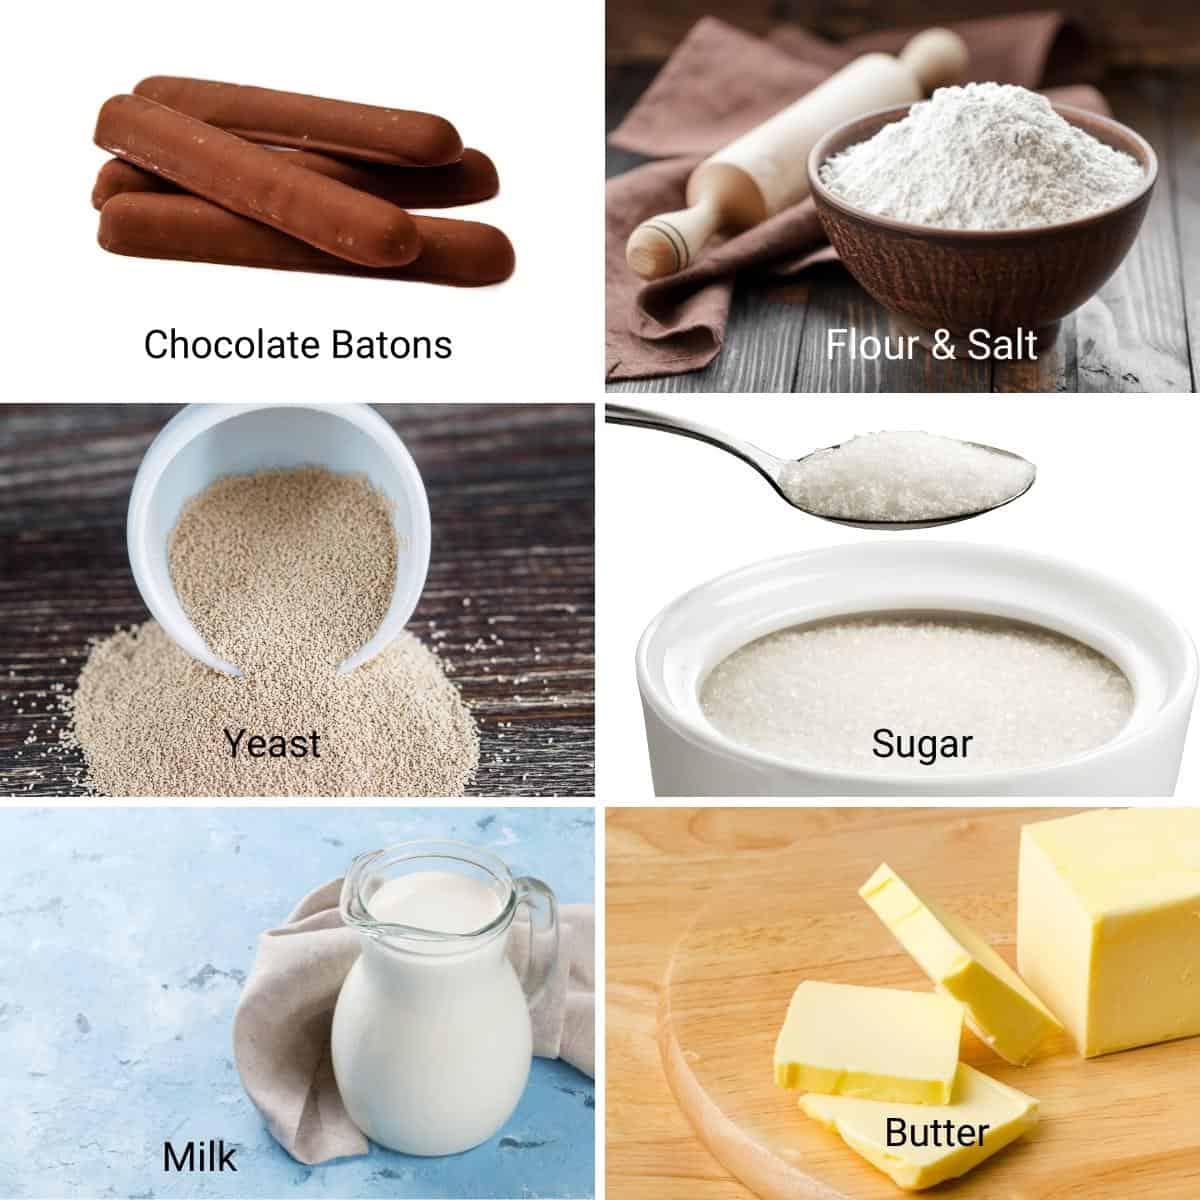
Ingredients and substitutes
- All-purpose flour – Yes, plain all-purpose flour works perfectly with these croissants. Don’t use bread flour, and definitely do not use self-raising flour.
- Sugar – Croissants are not very sweet, but they are considered sweet dough. You can definitely reduce the sugar by half.
- Liquid – I prefer a combination of milk and water. I think this works better for our home-based ovens. I find the sugar in the milk tends to brown too much when I use all the milk. So, I replaced some of the milk with water. You can certainly use all milk as well.
- Yeast – I am using instant dry yeast today, but you can certainly use other varieties of yeast, including fresh yeast. You can read all about yeast and its substitutes here – baking with yeast: a beginner’s guide.
- Butter – The best butter to use is European unsalted butter. The reason for that is that good European butter has a high fat content. High fat means less moisture, which can cause the butter to melt and create steam in the croissants when baking.
- Chocolate – I use chocolate batons that are specially created for chocolate croissants. Of course, you can also use chocolate chips or a chopped chocolate bar.
Step-by-step: Chocolate croissants recipe
Dough
- In the bowl of the stand mixer with the dough hook attachment, combine water, milk, and yeast. Add the sugar and combine well.
Pro tip – You can let the yeast mixture sit for 3 to 5 minutes to foam up. But not all varieties of yeast need to be activated. - Add salt to the flour, then add the flour to the mixer bowl (see video).
Pro tip – It is best to add salt directly to the yeast mixture as it slows the fermentation process. So, we add it to the flour. - Combine on medium-high speed until all flour is incorporated. You may or may not need the extra flour for kneading.
Pro tip – A good indication that you have enough flour is that the dough leaves the sides of the bowl. Avoid adding too much flour as it will make the dough stiff, resulting in dense croissants.

- Knead on medium speed for 2 minutes until you have a smooth, elastic dough.
- Next, add the room-temperature butter, one cube at a time. Once all the butter is in, knead for two minutes more.
Pro tip – The dough should be soft, smooth, and elastic. Don’t over-knead, as we will still be laminating and rolling the dough a few more times. - Remove the dough from the stand mixer and shape it into a ball. Place in a lightly oiled bowl. Cover and chill in the fridge for 30 minutes.
Pro tip – Chilling will help to relax the gluten. The butter in the dough will chill, making it easier to work.
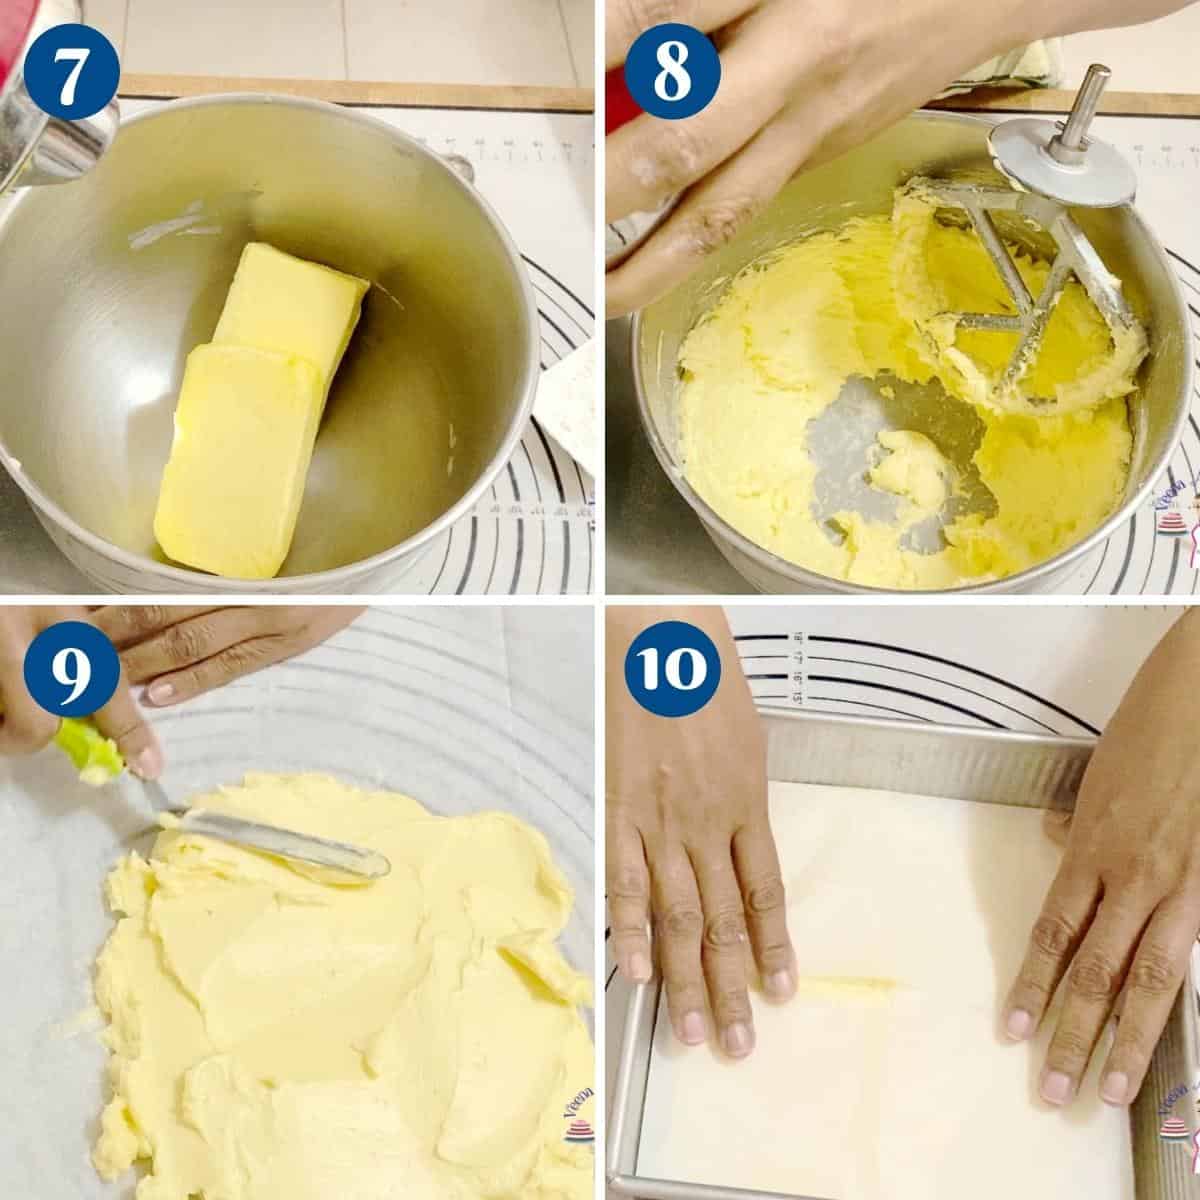
Butter block
- In the same stand mixer with the paddle attachment (no need to clean the mixer), add the butter.
- Cream for 30 seconds. Then, add the flour and cream for 30 seconds more.
Pro tip – Cream the butter to ensure there are no lumps. But, don’t over-mix as we do not want to whip air into the butter. - Butter template – Use an 8-inch square baking pan or a ruler to measure the parchment paper. Fold it so you have an 8-inch square guide (see video).
Pro tip – You can also line the 8-inch square baking pan with plastic wrap and create an 8-inch square block of butter. - Transfer the butter onto the parchment paper. Using the guide you created, use an offset spatula to spread the butter to an 8-inch square.
- Fold the paper over the butter into an 8-inch square. Then, use the rolling pin to spread the butter into the corners. (see video)
Pro tip – If the butter block is not a proper square, you will have gaps in your lamination. - Place in the fridge for 20 to 30 minutes.
Pro tip – The butter must be chilled but still flexible so that it spreads rather than cracks into the dough when we roll.
Laminate the dough
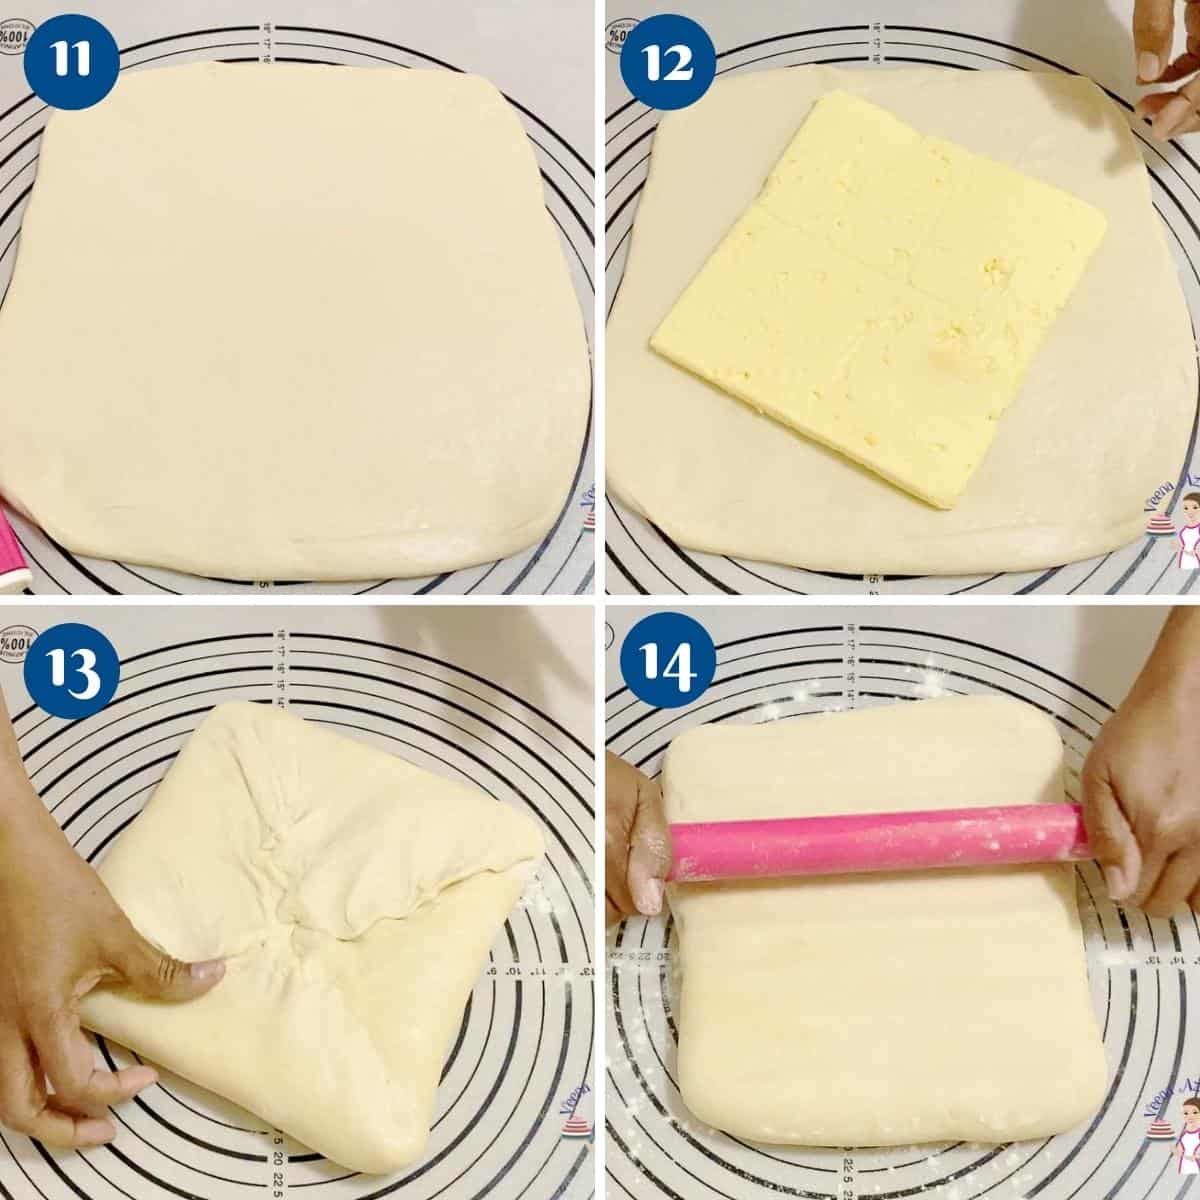
- Remove the dough from the fridge onto a lightly floured surface. Roll to a 12 x 12-inch square.
- Place the chilled butter block diagonally on top of the dough. Then, fold the dough over and seal the edges well (see video).
Pro tip – Try to seal the butter in the dough as much as possible so that it does not come out when rolling.

- Now, roll in one direction, so you have a long 10 x 20-inch rectangle. Dust off excess flour as you go.
- First fold – Fold the dough lengthways into thirds like a business letter (see video). Wrap and place into the fridge to chill for 30 minutes.
Pro tip – Always turn the dough and roll lengthways. This will make it easier to roll and prevent the folds from opening when rolling.

- Second fold – Roll the dough lengthways again with the short side facing you (see video) to about 10 x 20 inches long again. Fold the dough into thirds again like a business letter (see video). Place in the fridge for 30 minutes if necessary.
Pro tip – It is very important that the dough is well chilled before use. Otherwise, the thin layers will blend, ruining all your effort. - Third fold – Roll the dough again lengthways with the short side facing you to about 10 x 20 inches long. Fold the dough one last time into thirds again like a business letter (see video).
- Chill in the fridge for an hour or until well chilled. This can be chilled for up to 24 hours.

Measure the dough
- Roll the dough onto a lightly floured surface to 6 x 12 inches. Divide into 2. Place one in the fridge while you work on the second one.
Pro tip – Do not use too much flour when rolling, and keep a dry brush to dust off excess flour. - Roll the dough into a long rectangle about 8 x 24 inches.
Pro tip – I always roll a bit extra so I can trim off the edges. This will open the edges, and the layers will open during baking. - Cut the edges on all sides. We need to cut 1/4 inch all around the sides of the dough, which will give you 6 x 24 inches.
Pro tip – If you find that the dough is shrinking, it means the gluten needs to relax. Let it rest on the counter for 10 minutes or in the fridge. - Mark every 4 inches so you have 4 x 6-inch rectangles (see video).
Pro tip – A standard croissant is 4 x 6 inches, but you can also make smaller or larger ones.
Shape the croissants
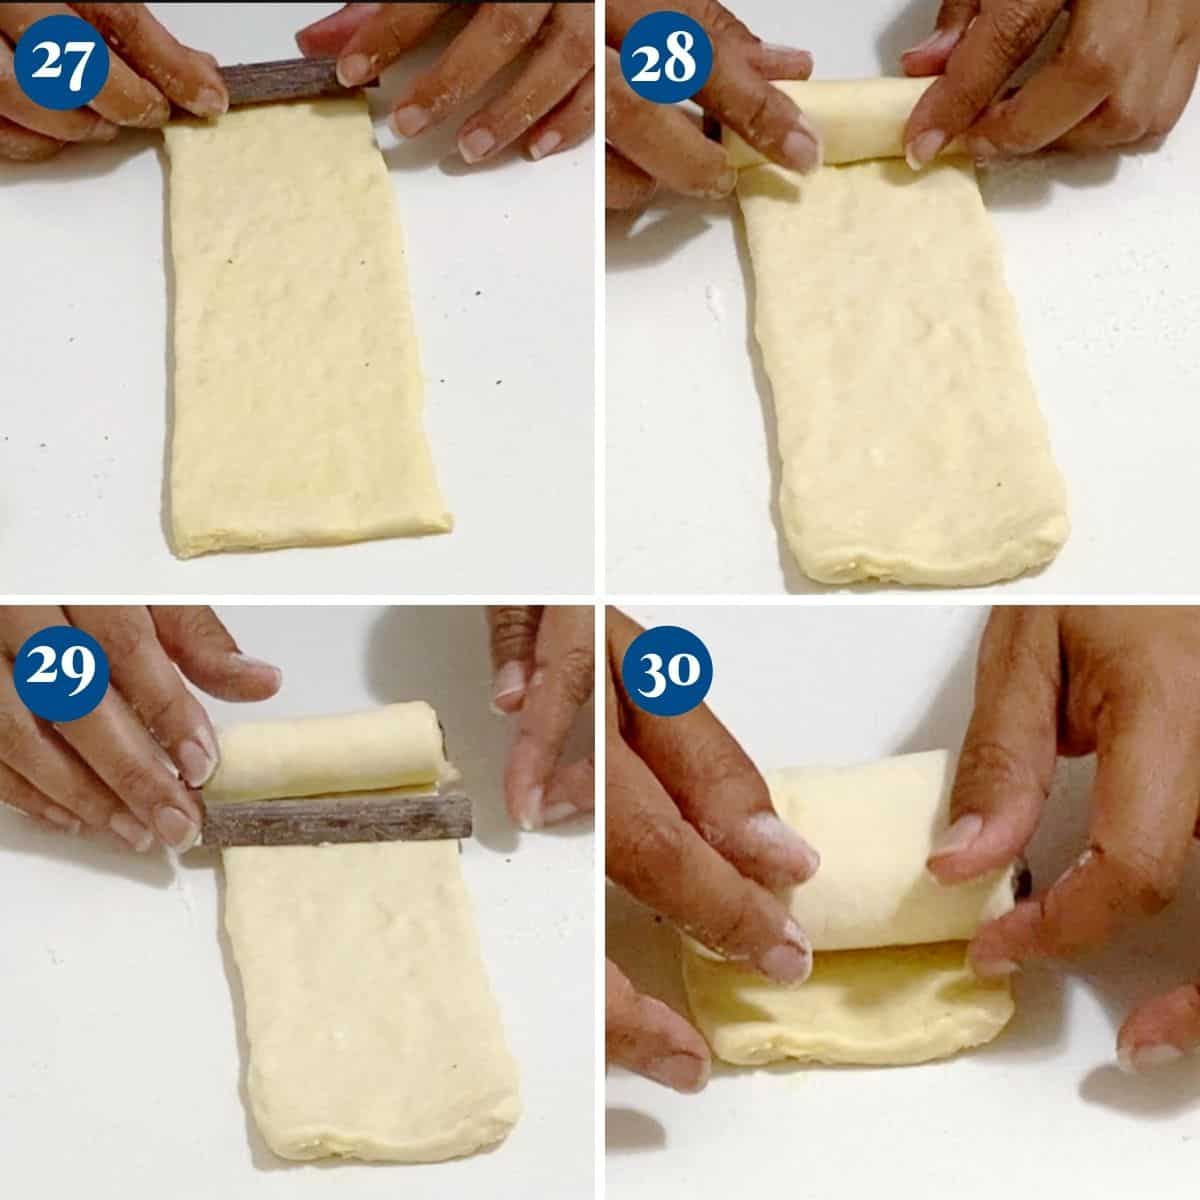
- Take each rectangle. Stretch it lengthways slightly, then roll it with two batons, as shown in the video.
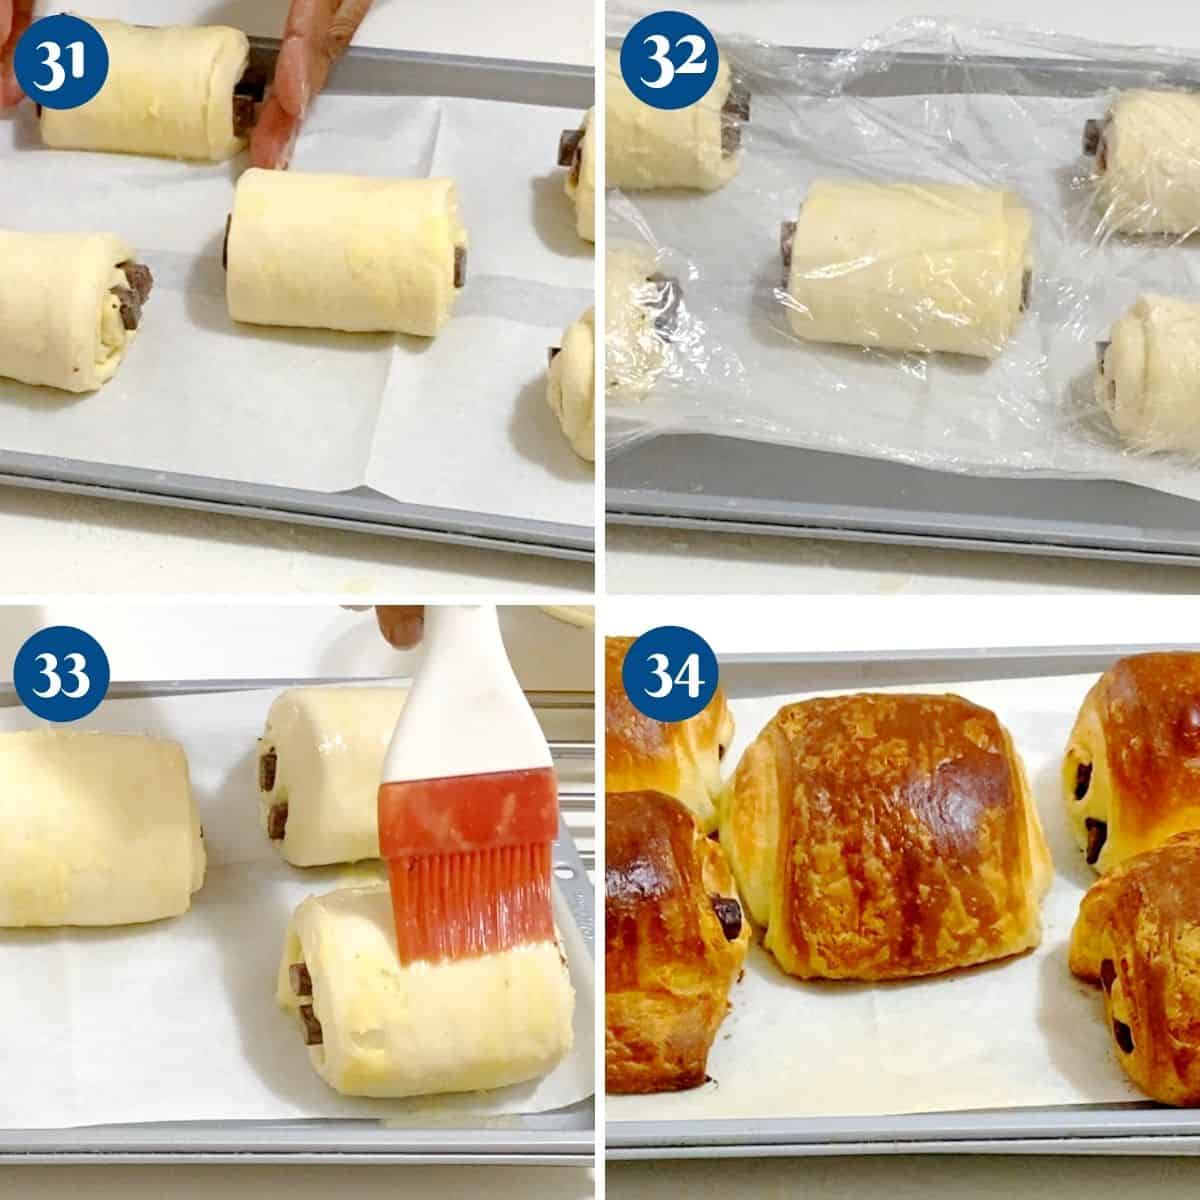
Pro tip – Do not stretch the dough too hard, or you will break/lose those layers. Be gentle. - Place the croissant on a baking sheet or sheet pan, making sure the seams are on the bottom.
Pro tip – If the edges are on top, they will open, so make sure to tuck them under. If you press slightly, they will sit well.
Proof and bake
- Cover and let proof at room temperature for an hour or until almost doubled in size. Then, place it into the fridge for 30 minutes.
Pro tip – I find letting the last 30 minutes chill in the fridge works better for homemade baking. You can also cover and let the croissants prove in the fridge overnight for up to 12 hours. - Preheat the oven to 400°F / 200°C / Gas mark 6. Brush the croissants with egg wash. Bake for 18 to 20 minutes or until golden brown.
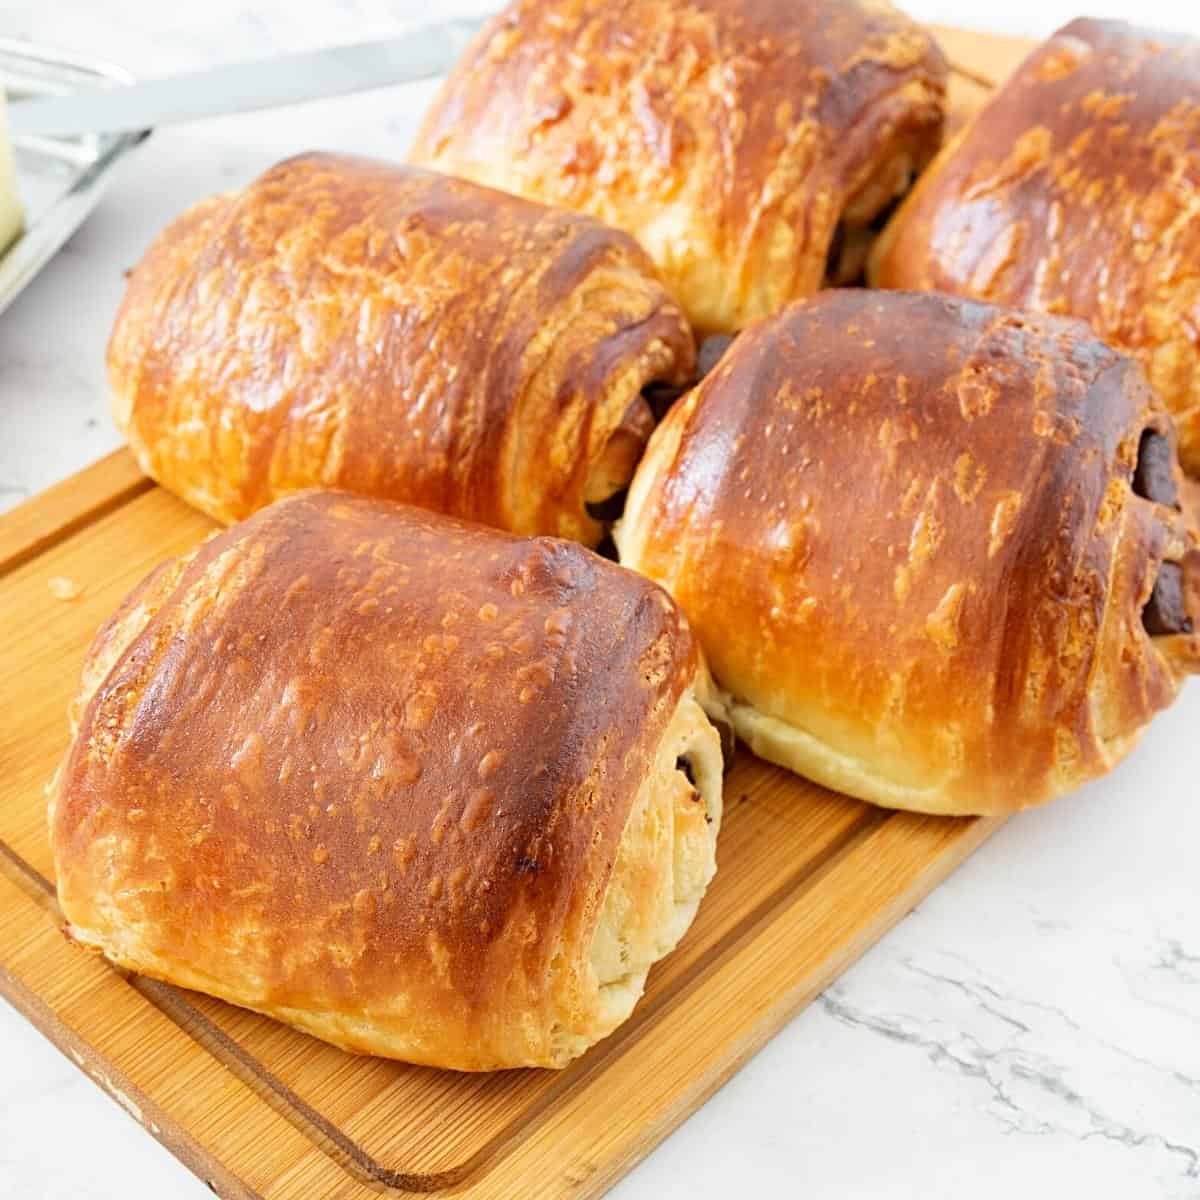
Pro tip – It is very important that the oven is preheated well for at least 10 minutes. Otherwise, the butter will melt, baking a soggy pastry. - Remove from the oven – cool on the pan for at least 10 minutes before serving.
- Enjoy!

Frequently asked questions
Fresh croissants will keep at room temperature for 2 to 3 days. They will keep them in the fridge for 5 to 6 days if properly wrapped. Personally, I like to freeze them in a storage bag and then warm them as I need. Perfect to have on hand for weekend breakfast.
The purpose of the flour in the butter block is to stabilize it. It will take care of any excess moisture in the butter. I highly recommend using it.
The best way to bake croissants is to place them in a hot oven so the layers open up and the butter between the layers is cooked off instantly, leaving no time for it to melt. But you also want them to continue cooking without becoming too dark on the outside. The ideal temperature for homemade croissants, I find, is 200 °C / 392°F for 10 minutes. Then, reduce oven temperature to 190 °C/375°F for 15 minutes. Tent the croissants if they are becoming brown quickly.
No, they are all laminated dough, meaning they are all layers of flour and butter, yet they are all different.
Puff pastry has no yeast and no eggs.
Croissant dough has the addition of yeast and is made with milk, just like bread, but with lamination.
Danish pastry has yeast as well as eggs.
While puff pastry goes through 6 folds, a croissant goes through just 3 or 4 folds, and a Danish pastry also has about three turns.
Lastly, puff pastry has a flaky, crusty quality, while croissant has a more bread-like quality, and Danish pastry has a chewier texture. Read more about the different types of pastry.
Chocolate Croissants
Chocolate Croissants are flaky, buttery French pastries called 'pain au chocolat'. A yeast-based dough is laminated with layers of butter and then rolled with chocolate batons. Today, I will show you my simple and easy method to make these homemade croissants from scratch.
Ingredients
- 4 cups (500 g) All-purpose flour
- ¼ cup (50 g) Sugar
- ¼ cup (60 g) Butter (1/2 stick) unsalted, room temperature
- 1 tsp Salt
- 2 ¼ tsp (7 g) Yeast (1 packet)
- 1 cup (240 ml) Milk warm full-fat
- ½ cup (120 ml) Water warm
- ½ cup (60 g) All-purpose flour for kneading
- 24 Chocolate batons
- 1 ½ cup (340 g) Butter unsalted
- 2 tbsp All-purpose flour
- 1 Egg for egg wash
Method
- In the bowl of the stand mixer with the dough hook attachment, combine water, milk, and yeast. Add the sugar – combine well.
- Add salt to the flour, then add the flour to the mixer bowl (see video).
- Combine on medium-high speed until all flour is incorporated. You may or may not need the extra flour for kneading.
- Knead on medium speed for 2 minutes until you have a fairly smooth, elastic dough.
- Next, add the room temperature butter, one cube at a time. Once all the butter is in, knead for two minutes more.
- Remove the dough from the stand mixer and shape it into a ball. Place in a lightly oiled bowl. Cover and chill in the fridge for 30 minutes.
- In the same stand mixer with the paddle attachment (no need to clean the mixer), add the butter.
- Cream for 30 seconds. Then, add the flour and cream for 30 seconds more.
- Butter template – Use an 8-inch square baking pan or a ruler to measure the parchment paper. Fold it so you have an 8-inch square guide (see video).
- Transfer the butter onto the parchment paper. Use an offset spatula to spread the butter to an 8-inch square using the guide you created.
- Fold the paper over the butter into an 8-inch square. Then, use the rolling pin to spread the butter into the corners (see video).
- Place in the fridge for 20 to 30 minutes.
- Remove the dough from the fridge onto a lightly floured surface. Roll to a 12 x 12-inch square.
- Place the chilled butter block diagonally on the square. Then, fold the dough over and seal the edges well (see video).
- Now, roll in one direction so you have a long 10 x 20-inch rectangle. Dust off excess flour as you go.
- First fold – Fold the dough lengthways into thirds like a business letter (see video). Wrap and place into the fridge to chill for 30 minutes.
- Second fold – Roll the dough lengthways again with the short side facing you (see video) to about 10 x 20 inches long again. Fold the dough into thirds again like a business letter (see video). Place in the fridge for 30 minutes if necessary.
- Third fold – Roll the dough again lengthways with the short side facing you to about 10 x 20 inches long. Fold the dough one last time into thirds again like a business letter (see video).
- Chill in the fridge for an hour or until well chilled. This can be chilled for up to 24 hours.
- Roll the dough onto a lightly floured surface to 6 x 12 inches. Divide into 2. Place one in the fridge while you work on the second one.
- Roll the dough into a long rectangle about 8 x 24 inches.
- Cut the edges on all sides. We need to cut 1/4 inch around the edges, giving you 6 x 24 inches.
- Mark every 4-inch so you have 6 – 4 x 6-inch rectangles (see video).
- Take each rectangle. Stretch it lengthways slightly, then roll it with two batons as shown in the video.
- Place the croissant on a baking tray, making sure the edges are on the bottom.
- Cover and let proof at room temperature for an hour or until almost doubled in size. Then, place it into the fridge for 30 minutes.
- Preheat the oven to 400°F / 200°C / Gas mark 6. Brush the croissants with egg wash. Bake for 18 to 20 minutes or until golden brown.
- Remove from the oven – cool on the pan for at least 10 minutes before serving.
- Enjoy!
Notes
-
- Ensure the dough is soft – this makes it easier to roll. A stiff dough means you have to work hard to roll it later with the butter.
-
- Chill the butter block for only 20 minutes – this means when laminated, it will spread between the layers and not break into pieces.
-
- Chill the dough between folds, but don’t over-chill. It takes longer to thaw the butter between the layers.
-
- After the third fold, I let the dough rest overnight. This is not just because I want to give myself a break, but it also lets the dough rest well. This is when you can over-chill, and it will still be ok.
-
- When rolling the dough for croissants, do not roll it too thin. Croissants are all about those layers.
-
- Commercially made croissants are proofed at room temperature and then baked. I like to chill for 30 minutes while my oven is preheating. This helps keep those layers intact.
-
- Ensure your oven is preheated for at least 20 minutes before you put the croissants in. Otherwise, the butter will melt, and your croissants will swim in a butter pool.
-
- Commercially made croissants are brushed with an egg wash of egg yolks and milk. I find that for my home oven, a beaten whole egg works best and prevents overbrowning. This may be different for different ovens.
Note
- Make-ahead croissants – Croissants are perfect to make a day or a few days ahead of time. You can let the dough rest overnight before lamination, as well as after lamination.
Once laminated, the dough can be cut into two or three portions and frozen for up to three months. This will be perfect to make fewer croissants.
Shaped croissants, once proofed, can be frozen as well. Keep them on a baking tray in the freezer. Once frozen, put them into freezer-safe storage bags for up to a month. Thaw in the refrigerator overnight before baking. - Yeast – Any yeast will work for this dough. You will need 2 1/4 tsp active dry yeast, which is about 7 grams. Alternatively, you can use 21 grams of fresh yeast, also known as baker’s yeast.
Equipment you will need


Nutrition
Tried this recipe?
Mention @veenaazmanov_kitchen or tag #veenaazmanovkitchen!Don’t lose this recipe! Save it for Later!
📌 Save this Recipe for later on Pinterest so you can easily find it again.
⭐ Add Veena Azmanov Kitchen to your Google Preferred Sources.
It helps Google show you more of our recipes.
📧 Subscribe for new recipes delivered to your inbox.
🎥 Follow us for more recipes


Pastry Day 15: Croissants- Done.
Thank you for breaking down the process and timelines. Very helpful! 🙂
Pastry Day 15 DONE.
Pastry day 15 done!
Day 15 DONE. I’m still working on puff pastries, but I’ll get to croissants soon.
It’s an easy well-guided recipe. Thanks, Veena! I can also substitute it with ham and cheese or pepperoni and cheese to make it savory.
This is called a pain au chocolat, not croissant. Croissants are crescent shaped, and though they may be filled usually after baking, ate not the same. The process is the same though, but rolling step different.
Thanks for the recipe, it is one a beginner can use and the pro tips can come in very handy
Thanks Rosa. You are right they are called pain au chocolate in French but in English, we usually refer to them as chocolate croissants. The process here is to make the classic pain au chocolate.
Not a croissant. Call it chocolatine, call it pain au chocolate. But do not call it a croissant.